Haier QNE27J User manual

InstallationandUserManual
Instructionsd’installationet
Guidedel’utilisateur
Instruccionesdeinstalacióny
Manualdelusuario
QNE27J
BottomFreezerRefrigerator
Réfrigérateuràcongélateurinférieur
Refrigeradorcongeladorinferior
238C5676P001 49-60806
02-19 GEA

249-60806
ENGLISH

RECORDKEEPING
ThankyouforpurchasingthisHaierproduct.Thisusermanualwillhelp
yougetthebestperformancefromyournewrefrigerator.
Forfuturereference,recordthemodelnumber,serialnumber,andthe
dateofpurchase.Themodel/serialnumberplateislocatedontheinside
walloftherefrigerator.
Stapleyourproofofpurchasetothismanualtoaidinobtainingwarranty
serviceifneeded.
_______________________________________
Modelnumber
_______________________________________
Serialnumber
_______________________________________
Dateofpurchase
RECORDKEEPING ..............................................................................................18
REFRIGERATORSAFETY ..........................................................................................4
ProperDisposalofYourOldRefrigerator ................................................................................5
PARTSANDFEATURES............................................................................................6
INSTALLATIONREQUIREMENTS ..................................................................................7
LocationRequirements ............................................................................................... 7
Clearances ........................................................................................................... 7
INSTALLATIONINSTRUCTIONS. ..................................................................................8
PreparingtoInstalltheRefrigerator ....................................................................................8
ApplianceDimensions..................................................................................................9
InstallingtheWaterLine .............................................................................................10
InstallingtheRefrigerator ............................................................................................12
CompletingInstallation ..............................................................................................17
REFRIGERATORUSE .............................................................................................18
Controls ............................................................................................................18
SabbathMode .......................................................................................................18
InternalWaterDispenser .............................................................................................18
WaterFilterCartridgeXWF ...........................................................................................19
ShelvesandBins .....................................................................................................20
Pans.................................................................................................................20
FreezerDrawer....................................................................................................... 21
AutomaticIcemaker..................................................................................................22
REFRIGERATORCARE ...........................................................................................23
Cleaning.............................................................................................................23
VacationandMoving ................................................................................................. 24
ReplacingtheLights .................................................................................................24
TROUBLESHOOTING. . . . . . . . . . . . . . . . . . . . . . . . . . . . . . . . . . . . . . . . . . . . . . . . . . . . . . . ..................................... 25
XWFWATERFILTERCARTRIDGE .................................................................................28
PERFORMANCE DATA SHEET. . . . . . . . . . . . . . . . . . . . . . . . . . . . . . . . . . . . . . . . . . . . . . . . . . . . ................................. 29
LIMITEDWARRANTY ............................................................................................30
49-60806 3
TABLEOFCONTENTS
ENGLISH

449-60806
REFRIGERATORSAFETY
CAUTION Toreduce theriskof injurywhenusing your refrigerator,follow these basicsafetyprecautions.
¿Donot cleanglassshelves orcoverswith warm water
whenthey arecold.Glass shelvesandcovers may
breakif exposedtosudden temperaturechangesor
impact,such asbumpingor dropping. Temperedglassis
designedto shatterintomany smallpiecesif it breaks.
¿Keepfingers outofthe “pinchpoint”areas; clearances
betweenthe doorsandbetween thedoorsand cabinet
arenecessarily small.Becareful closingdoorswhen
childrenare inthearea.
¿Donot touchthecold surfacesinthe freezer
compartmentwhen handsaredamp orwet,skin may
stickto theseextremelycold surfaces.
¿Donot refreezefrozenfoods whichhavethawed
completely.
¿Inrefrigerators withautomaticicemakers, avoidcontact
withthe movingpartsof theejectormechanism, or
withthe heatingelementthat releasesthecubes. Do
notplace fingersorhands ontheautomatic ice making
mechanismwhile therefrigeratoris pluggedin.
¿Usea sturdyglasswhen dispensingice(on models with
icedispenser
WARNING Toreduce theriskof fire,explosion,electric shock, orinjury when usingyourrefrigerator,follow these
basicsafety precautions:
¿Thisrefrigerator mustbeproperly installedandlocated
inaccordance withtheInstallation Instructionsbeforeit
isused.
¿Unplugthe refrigeratorbeforemaking repairsor
cleaning.
NOTE:Powerto therefrigerator cannotbe disconnected
byany settingonthe controlpanel.
NOTE: Repairsmust beperformedby aqualifiedService
Professional.
¿Replaceall partsandpanels beforeoperating.
¿Donot useanextension cord.
¿Donot storeoruse gasolineorother flammable vapors
andliquids inthevicinity ofthisor any otherappliance.
¿Donot storeexplosivesubstances suchasaerosol cans
witha flammablepropellantin thisappliance.
¿Toprevent suffocationandentrapment hazardsto
children,remove thefreshfood andfreezerdoors from
anyrefrigerator beforedisposingof itordiscontinuing
itsuse.
¿Toavoid seriousinjuryor death,childrenshould not
standon, orplayin orwiththe appliance.
¿Childrenand personswithreduced physical,sensoryor
mentalcapabilities orlackof experienceandknowledge
canuse thisapplianceonly iftheyare supervised orhave
beengiven instructionsonsafe useandunderstand the
hazardsinvolved.
¿Thisappliance isintendedto beusedin household and
similarapplications suchas:staff kitchenareasin shops,
officesand otherworking environments; farmhouses; by
clientsin hotels,motels,bed
&breakfast andotherresidential environments;catering
andsimilar non-retailapplications.
¿Connectto potablewatersupply only.Acold water
supplyis requiredforautomatic icemakeroperation.
Thewater pressuremustbe between40and 120 psi
(275-827kilopascals).
¿Donot applyharshcleaners totherefrigerator. Certain
cleanerswill damageplasticwhich maycauseparts such
asthe doorordoor handlestodetach unexpectedly. See
theCare andCleaningsection fordetailedinstructions.
INSTALLATION
WARNING EXPLOSION HAZARD
Keepflammable materialsandvapors, suchasgasoline, away fromrefrigerator. Failure to dosocan resultinfire,
explosion,or death.
ENGLISH

49-60806 5
READ AND SAVE THESE INSTRUCTIONS
REFRIGERATORSAFETY
PROPER DISPOSAL OF YOUR OLD REFRIGERATOR
Do not, under any circumstances, cut or remove the third (ground) prong from the power cord. For personal safety,
this appliance must be properly grounded.
Thepower cordofthis applianceisequipped with a
3-prong(grounding) plugwhichmates withastandard
3-prong(grounding) walloutletto minimizethepossibility
ofelectric shockhazardfrom thisappliance.
Havethe walloutletand circuitcheckedby a qualified
electricianto makesurethe outletisproperly grounded.
Wherea standard2-prongwall outletisencountered, it
isyour personalresponsibilityand obligationtohave it
replacedwith aproperlygrounded 3-prongwalloutlet. Do
notuse anadapter.
Therefrigerator shouldalwaysbe pluggedintoits own
individualelectrical outletwhichhas avoltagerating that
matchesthe ratingplate.
A115 VoltAC,60 Hz,15-or 20-amp fused,grounded
electricalsupply isrequired.This providesthebest
performanceand alsopreventsoverloading housewiring
circuitswhich couldcausea firehazardfrom overheated
wires.
Neverunplug yourrefrigeratorby pullingonthe power
cord.Always gripplugfirmly andpullstraight out fromthe
outlet.
Immediatelydiscontinue useofa damagedsupplycord.
Ifthe supplycordis damaged,itmust be replacedby a
qualifiedservice professionalwithan authorizedservice
partfrom themanufacturer.
Whenmoving therefrigeratoraway fromthewall, be
carefulnot torollover ordamagethe power cord.
WARNING ELECTRICAL SHOCK HAZARD
Pluginto agrounded3-prong outlet
Donot removetheground prong
Donot useanadapter
Donot useanextension cord.
Failureto followtheseinstructions canresultin death, fire,or electrical shock.
WARNING SUFFOCATION AND ENTRAPMENT HAZARD
Failureto followthesedisposal instructionscanresult in deathor serious injury
IMPORTANT: Childentrapment andsuffocationare not
problemsof thepast.Junked orabandonedrefrigerators
arestill dangerousevenif theywillsit for “justa few days.”If
youare gettingridof youroldrefrigerator, please followthe
instructionsbelow tohelpprevent accidents.
Before You Throw Away Your Old Appliance
•Takeoff thefreshfood andfreezerdoors.
•Leave theshelvesin placesothat children maynot easily
climb inside.
Refrigerant and Foam Disposal:
Disposeof applianceinaccordance withFederaland Local Regulations.Flammable insulation materialusedrequires
specialdisposal ofyourappliance. Contactyourlocal authorities forthe environmentally safedisposalof yourappliance.
CONNECTING ELECTRICITY
ENGLISH

649-60806
PARTSANDFEATURES
LEDlighting
LEDlightsinthefreshfoodcompartmentarelocated
atthetopcenterandontheleftandrightsidesof
climatezonepans.LEDlightsarealsolocatedinthe
freezer;seepage24.
Full-widthdrawer
Afull-widthdrawerthatcanaccommodatelarger
items islocatedatthebottomofthefreshfood
compartment.
QuickSpace™shelf
Functionsasanormalfull-sizedshelfwhenneeded
andeasilyslidesbacktostoretallitemsbelow.
Removable/adjustabledoorbins
Canbemovedupordowntoaccommodateyour
needs.
Climatezonedrawers
Separatepansforproducestorage.
Waterfilter
Accessibleforeasyreplacement.
ENGLISH

49-60806 7
INSTALLATIONREQUIREMENTS
LOCATIONREQUIREMENTS
IMPORTANT:Thisrefrigeratorisdesignedforindoor,
householduseonly.
¿Donotinstalltherefrigeratorwherethetemperaturewill
gobelow60°F(16°C)becauseitwillnotrunoftenenoughto
maintainpropertemperatures.
¿Donotinstalltherefrigeratorwherethetemperaturewillgo
above100°F(37°C)becauseitwillnotperformproperly.
¿Donotinstalltherefrigeratorinalocationexposedtowater
(rain,etc.)ordirectsunlight.
¿Òñö÷äïïì÷òñäĥòòõö÷õòñêèñòøêë÷òöøóóòõ÷ì÷éøïïüïòäçèç
CLEARANCES
Allowthe followingclearancesfor easeofinstallation, proper
aircirculation andplumbingand electricalconnections.
Sides 1/8”(3 mm)
Top 1”(25 mm) Cabinet/HingeCover
Back 2”(50 mm)
ENGLISH

849-60806
BEFOREYOUBEGIN
Readtheseinstructionscompletelyandcarefully.
•IMPORTANT—Observeall governingcodes
andordinances. Savetheseinstructions forlocal
inspector’suse.
• Note to Installer – Besure toleavethese instructionswith
theConsumer.
• Note to Consumer – Keepthese instructionsforfuture
reference.
• Skill level – Installationof thisappliancerequires basic
mechanicalskills.
• Completion time – RefrigeratorInstallation -20minutes
WaterLine Installation-30 minutes
• Properinstallation istheresponsibility oftheinstaller.
• Productfailure duetoimproper installationisnot covered
underthe Warranty.
PREPARATION
MOVING THE REFRIGERATOR INDOORS
If the refrigerator will not fit through a doorway, the
refrigerator door and freezer drawer or door can be
removed.
• Toremove therefrigeratordoor, seeRemovingDoors in
theInstallation Instructionssection.
• Toremove thefreezerdrawer, seeFreezerDrawer in the
InstallationInstructions section.
WATER SUPPLY TO THE ICEMAKER AND DISPENSER
Theicemaker willhaveto beconnectedto a coldwater line.
Awater supplykit(containing tubing,shutoffvalve, fittings
andinstructions) isavailableat extracostfrom your dealer,
byvisiting ourwebsiteat Haierappliances.com orfromParts
andAccessories, 877.337.3639(inCanada, GEAppliances.ca
or800.661.1616).
TOOLSYOUMAYNEED
INSTALLATIONINSTRUCTIONS
AdjustableWrench
1/4”OuterDiameter
CompressionNut
andFerrule(sleeve)
(icemakermodelsonly) Phillips-HeadScrewdriver
qĔandrĔSocket
Ratchet/Driver
3/32”,1/8”&3/16”Allen
Wrenches
Pencil
1/8”DrillBit and
ElectricorHand Drill Tape Measure
1/4”NutDriver
WireCutters Level
TorxT20,Driver
ENGLISH

49-60806 9
APPLIANCEDIMENSIONS
INSTALLATIONINSTRUCTIONS
33-13/16”
(85.9cm) 48-3/4”
(123.8cm)
54-13/16”
(139.2cm) 43-3/8”
(110.2cm)
43-23/32”
(111.1cm)
*69-7/8”
(177.5cm)
36-5/16”
(92.2cm) 50-3/16”
(127.5cm)
36”
(91.4cm)
155ȋ90ȋ
NOTE: *Theheightoftherefrigeratortothetopofthedoor.
MEASURE THE CABINET OPENING ACCORDING
TO THE WIDTH OF THE REFRIGERATOR
Measurewidth ofcabinetopening whererefrigeratorwill be placed,B.
Besure toaccountfor anycountertopoverhang, baseboard thicknessand
anyclearance desired.Width,B, shouldnotbe less than36” ( 91.4cm).The
refrigeratorwill beplacedapproximately inthemiddle of thisopening.
Back Wall
Front
Right
Side
REFRIGERATOR
B
Baseboard
Thickness
or
Countertop
Overhang
(Whichever
isLarger)
PlusAny
Desired
Clearance
ENGLISH

10 49-60806
INSTALLING THE WATER LINE
BEFOREYOUBEGIN
RecommendedcopperwatersupplykitsareWX8X2,WX8X3
orWX8X4,dependingontheamountoftubingyouneed.
ApprovedplasticwatersupplylinesareSmartConnect™
RefrigeratorTubing(WX08X10006,WX08X10015and
WX08X10025).
IfthewatersupplytotherefrigeratorisfromaReverse
Øöðòöìöàä÷èõÏìï÷õä÷ìòñÜüö÷èð¤ÛØ¥Ê×Í÷ëèõèéõìêèõä÷òõ
äïöòëäöäúä÷èõĤï÷èõøöè÷ëèõèéõìêèõä÷òõđöĤï÷èõåüóäöö
óïøêÞöìñê÷ëèõèéõìêèõä÷òõđöúä÷èõĤï÷õä÷ìòñæäõ÷õìçêèìñ
æòñíøñæ÷ìòñúì÷ëäñÛØúä÷èõĤï÷èõæäñõèöøï÷ìñëòïïòúìæè
æøåèöÜòðèðòçèïöçòñò÷æòðèèôøìóóèçúì÷ë÷ëèĤï÷èõ
bypassplug.Toobtainafreebypassplug,call 877.337.3639.
InCanadacall800.661.1616.
Thiswaterlineinstallationisnotwarrantedbytherefrigerator
oricemakermanufacturer.Followtheseinstructionscarefully
tominimizetheriskofexpensivewaterdamage.
Waterhammer(waterbanginginthepipes)inhouse
plumbingcancausedamagetorefrigeratorpartsandleadto
úä÷èõïèäîäêèòõĥòòçìñêÌäïïäôøäïìĤèçóïøðåèõ÷òæòõõèæ÷
waterhammerbeforeinstallingthewatersupplylinetothe
refrigerator.
Topreventburnsandproductdamage,donothookupthe
waterlinetothehotwaterline.
Donotinstalltheicemakertubinginareaswhere
temperaturesfallbelowfreezing.
Whenusinganyelectricaldevice(suchasapowerdrill)
duringinstallation,besurethedeviceisdoubleinsulatedor
groundedinamannertopreventthehazardofelectricshock,
orisbatterypowered.
Allinstallationsmustbeinaccordancewithlocalplumbing
coderequirements.
WHATYOUWILLNEED
•CopperorSmartConnect™Refrigerator
Tubingkit,1/4”outerdiametertoconnect
therefrigeratortothewatersupply.Ifusing
copper,besurebothendsofthetubingare
cutsquare.
Todeterminehowmuchtubingyouneed:measurethe
distancefromthewatervalveonthebackoftherefrigerator
÷ò÷ëèúä÷èõöøóóïüóìóèËèöøõè÷ëèõèìööøĦæìèñ÷èû÷õä
tubingtoallowtherefrigeratortomoveoutfromthewall
afterinstallation.
SmartConnect™RefrigeratorTubingKitsareavailableinthe
followinglengths:
6’(1.8m) –WX08X10006
15’(4.6m) –WX08X10015
25’(7.6m) –WX08X10025
NOTE:Theonlyapprovedplastictubingisthatsuppliedin
SmartConnect™RefrigeratorTubingkits.Donotuseany
otherplasticwatersupplylinebecausethelineisunder
pressureatalltimes.Certaintypesofplasticwillcrackor
rupturewithageandcausewaterdamagetoyourhome.
¬Êúä÷èõöøóóïüîì÷¤æòñ÷äìñìñê÷øåìñêöëø÷òģùäïùèäñç
Ĥ÷÷ìñêöïìö÷èçåèïòú¥ìöäùäìïäåïèä÷èû÷õäæòö÷éõòðüòøõ
dealerorfromPartsandAccessories,877.337.3639orgoto
Haierappliances.com(GEAppliances.caor800.661.1616in
Canada).
•Acoldwatersupply.Thewaterpressuremustbebetween
20and120p.s.i.(138-827kPa).
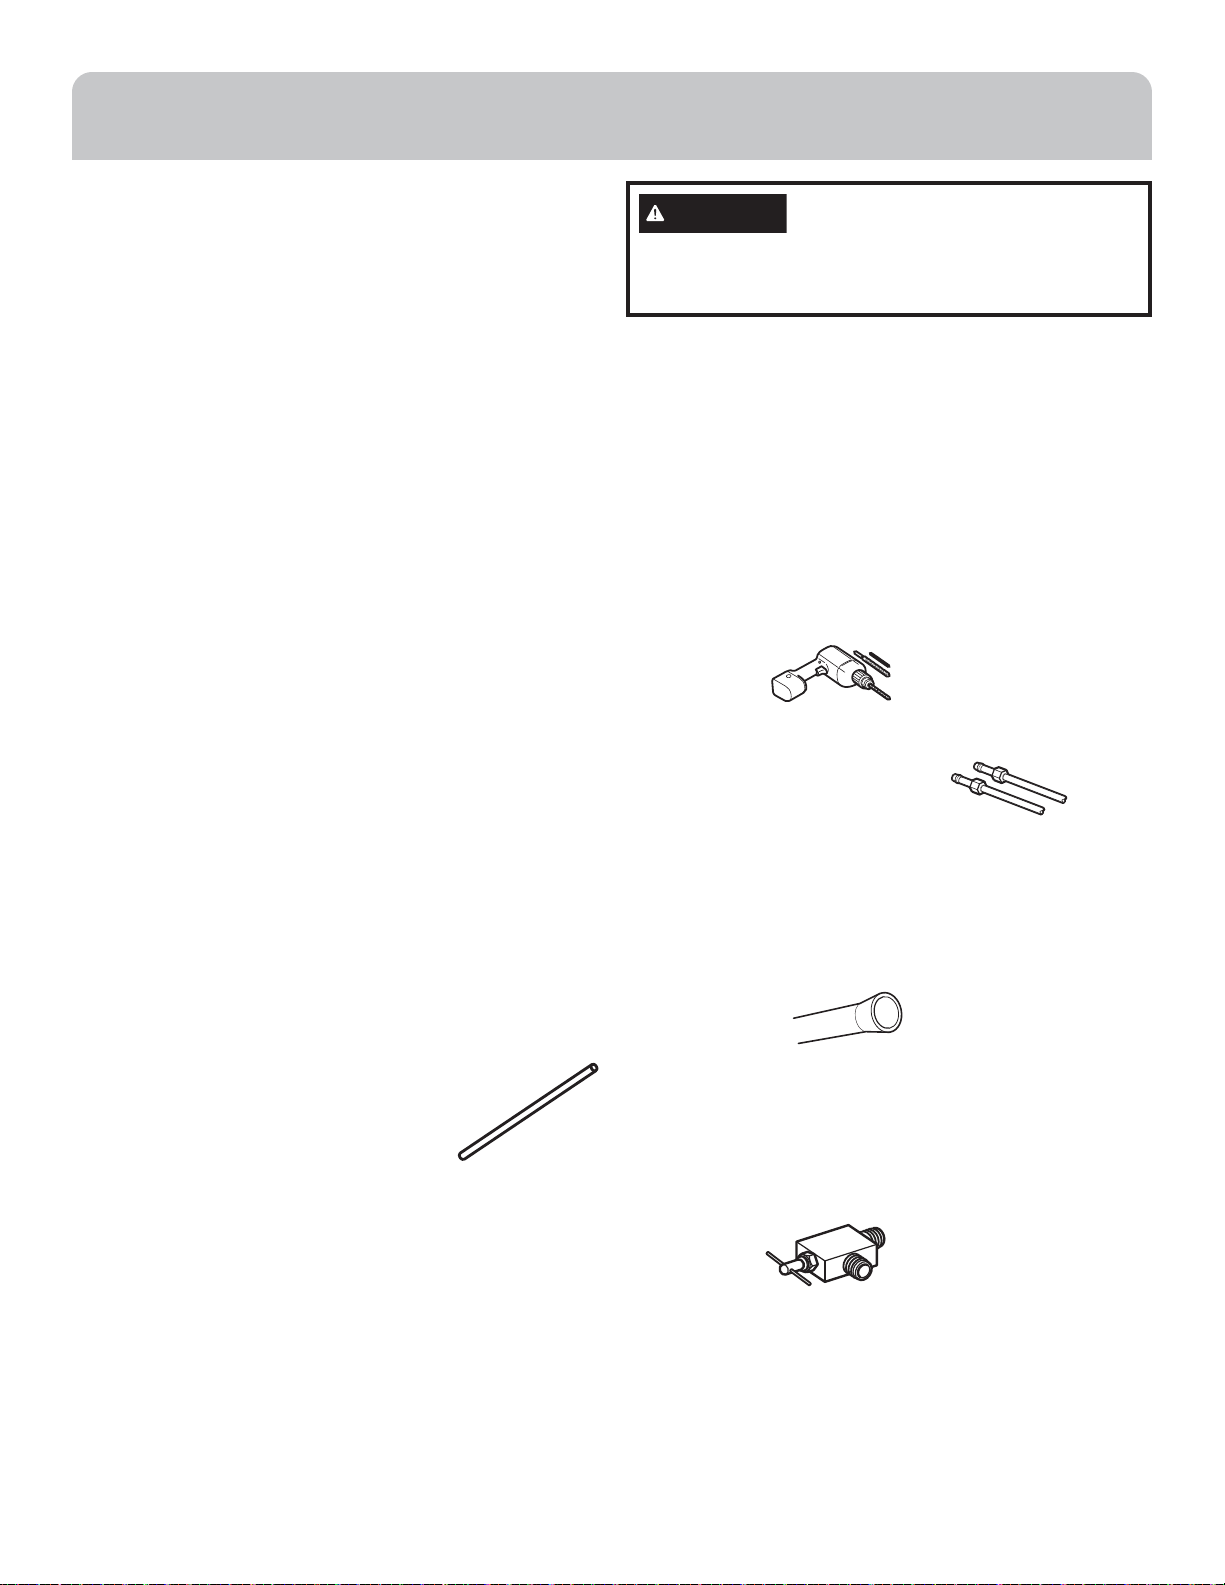
•Powerdrill.
•1/2”oradjustablewrench.
•StraightandPhillipsblade
screwdriver.
•Two1/4”outerdiametercompressionnutsand2ferrules
¤öïèèùèö¥£÷òæòññèæ÷÷ëèæòóóèõ÷øåìñê÷ò÷ëèöëø÷òģùäïùè
andtherefrigeratorwatervalve.
OR
•IfyouareusingaSmartConnect™RefrigeratorTubingkit,
÷ëèñèæèööäõüĤ÷÷ìñêöäõèóõèäööèðåïèç÷ò÷ëè÷øåìñê
¬Òéüòøõèûìö÷ìñêæòóóèõúä÷èõïìñèëäöäĥäõèçĤ÷÷ìñêä÷÷ëè
end,youwillneedanadapter(availableatplumbingsupply
stores)toconnectthewaterlinetotherefrigeratorOR
üòøæäñæø÷òģ÷ëèĥäõèçĤ÷÷ìñêúì÷ëä÷øåèæø÷÷èõäñç÷ëèñ
øöèäæòðóõèööìòñĤ÷÷ìñêÍòñò÷æø÷éòõðèçèñçéõòð
SmartConnect™Refrigeratortubing.
¬Üëø÷òģùäïùè÷òæòññèæ÷÷ò÷ëèæòïçúä÷èõïìñèÝëèöëø÷òģ
valveshouldhaveawaterinletwithaminimuminside
diameterof5/32”atthepointofconnectiontotheCOLD
àÊÝÎÛÕÒ×ÎÜäççïè¡÷üóèöëø÷òģùäïùèöäõèìñæïøçèçìñ
manywatersupplykits.Beforepurchasing,makesurea
saddle-typevalvecomplieswithyourlocalplumbingcodes.
INSTALLATIONINSTRUCTIONS
WARNING Connectto potablewatersupply only.
Acold watersupplyis requiredforautomatic icemaker
operation.The waterpressuremust bebetween40 and
120psi (275-827kilopascals)
ENGLISH

49-60806 11
INSTALLATIONINSTRUCTIONS
INSTALLING THE WATER LINE (Cont.)
Installthe shutoffvalveon thenearestfrequently used
drinkingwater line.
1.SHUTOFFTHE MAINWATERSUPPLY
Turnonthenearestfaucetlongenoughtoclearthelineof
water.
2.CHOOSETHEVALVELOCATION
Choosealocationforthevalve
thatiseasilyaccessible.Itisbestto
connectintothesideofavertical
waterpipe.Whenitisnecessaryto
connectintoahorizontalwaterpipe,
maketheconnectiontothetopor
side,ratherthanatthebottom,to
äùòìççõäúìñêòģäñüöèçìðèñ÷éõòð
thewaterpipe.
3.DRILLTHEHOLE FORTHEVALVE
Drilla1/4”holeinthewaterpipe(evenifusingaself-
piercingvalve),usingasharpbit.Removeanyburrs
resultingfromdrillingtheholeinthepipe.
Takecarenottoallowwatertodrainintothedrill.
Failuretodrilla1/4”holemayresultinreducedice
productionorsmallercubes.
4.FASTENTHESHUTOFF VALVE
Ïäö÷èñ÷ëèöëø÷òģùäïùè÷ò÷ëèæòïçúä÷èõóìóèúì÷ë÷ëè
pipeclamp.
NOTE:CommonwealthofMassachusettsPlumbingCodes
248CMRshallbeadheredto.Saddlevalvesareillegaland
useisnotpermittedinMassachusetts.Consultwithyour
licensedplumber.
5.TIGHTENTHEPIPE CLAMP
Tightentheclampscrewsuntilthesealingwasherbegins
toswell.
NOTE:Donotovertightenoryoumaycrush
thetubing.
6.ROUTETHETUBING
Routethetubingbetweenthecoldwaterlineandthe
refrigerator.
Ûòø÷è÷ëè÷øåìñê÷ëõòøêëäëòïèçõìïïèçìñ÷ëèúäïïòõĥòòõ
(behindtherefrigeratororadjacentbasecabinet)asclose
tothewallaspossible.
7.FASTENTHESHUTOFF VALVE
Placethecompressionnutandferrule(sleeve)forcopper
tubingontotheendofthetubing
äñçæòññèæ÷ì÷÷ò÷ëèöëø÷òģùäïùè
Makesurethetubingisfullyinsertedinto
thevalve.Tightenthecompressionnutsecurely.
ForplastictubingfromaSmartConnect™Refrigerator
Tubingkit,insertthemoldedend
òé÷ëè÷øåìñêìñ÷ò÷ëèöëø÷òģùäïùèäñç÷ìêë÷èñ
compressionnutuntilitishandtight,thentightenone
additionalturnwithawrench.Overtighteningmaycause
leaks.
NOTE:CommonwealthofMassachusettsPlumbingCodes
248CMRshallbeadheredto.Saddlevalvesareillegaland
useisnotpermittedinMassachusetts.Consultwithyour
licensedplumber.
8.FLUSHOUTTHETUBING
Ýøõñ÷ëèðäìñúä÷èõöøóóïüòñäñçĥøöëòø÷
thetubinguntilthewaterisclear.
Üëø÷÷ëèúä÷èõòģä÷÷ëèúä÷èõùäïùèäé÷èõäåòø÷òñèôøäõ÷
¤!ïì÷èõ¥òõ"ðìñø÷èöòéúä÷èõëäöåèèñĥøöëèç÷ëõòøêë
thetubing.
PipeClamp Washer
ClampScrew
VerticalColdWater
Pipe
Saddle-Type
Üëø÷òģßäïùè
Saddle-Type
Üëø÷òģßäïùè Compression Nut
PackingNut
OutletValve Ferrule(sleeve)
SmartConnect™
Tubing
ENGLISH

12 49-60806
1.REMOVINGDOORS(Right)
A.Removethehingecoveron
topoftherightfreshfood
doorbyremovingthescrew
usingaPhillipsscrewdriver.
B.Usinga5/16”socketratchet/
driver,removethebolts
securingthetophingeto
thecabinet.Liftthehinge
supportstraightuptofree
thehingepinfromthesocketinthetopofthedoor.
C.Removethetapefromtherightdoorandtiltthedoor
äúäüéõòð÷ëèæäåìñè÷Õìé÷÷ëèçòòõòģ÷ëèæèñ÷èõëìñêè
pin.
D. Setthedooronanon-scratchingsurfacewiththe
insideup.
2.REMOVINGDOORS(Left)
A.Removethehingecoveron
topoftheleftfreshfooddoor
byremovingthescrewusinga
Phillipsscrewdriver.
B.Unplugthe3wireconnectors
andmovethewiresuntilyou
canseethescrewsholdingthe
hinge.
C.Usinga5/16”socket/ratchetdriver,removethebolts
securingthetophingetothecabinet.
IMPORTANT NOTES
Whenremovingfrenchdoors:
• Readtheinstructionsallthewaythroughbeforestarting.
• Placethescrewsbytheirrelatedpartstoavoidusingthem
inthewrongplaces.
• Provideanon-scratchingworksurfaceforthedoors.
Tapethedoorsshutwithadhesivetape.
INSTALLATIONINSTRUCTIONS
CAUTION Lifting Hazard.
Singleperson liftcancause injury.Useassistance when
handling,moving orliftingthe refrigeratordoors.
NOTE: Whenmoving door,toprevent damagetodoor
andelectronics carefullyplacethe doorina proper
location.
WARNING
Toeliminate theriskof electricshockor injury during
installation,you mustfirstunplug therefrigeratorbefore
proceeding.Failure tofollowthese instructionscanresult
inelectrical shock.
WireConnectors
Bolts
WARNING Followall steps.Failureto followthese
instructions,leaving offparts,or overtighteningscrews,
canlead tothedoor fallingoffand result ininjury and
propertydamage.
ENGLISH
ÛÎÏÛÒÐÎÛÊÝØÛÕØÌÊÝÒØ×
•Donot installtherefrigerator wherethetemperature
willgo below60°F(16°C) becauseitwill not runoften
enoughto maintainpropertemperatures.
•Donot installtherefrigerator wherethetemperature
willgo above100°F(37°C) becauseitwill not perform
properly.
•Donotinstalltherefrigeratorinalocationexposedto
water(rain,etc.)ordirectsunlight.
•Installit onafloor strongenoughto support itfully
loaded.
CLEARANCES
Allowthe followingclearancesfor easeofinstallation,
properair circulationandplumbing andelectrical
connections.
Sides 1/8”(3 mm)
Top 1”(25 mm) Cabinet/HingeCover
Back 2”(50 mm)
INSTALLING THE REFRIGERATOR - FRENCH DOORS
WireConnectors

49-60806 13
INSTALLATIONINSTRUCTIONS
INSTALLING THE REFRIGERATOR - FRENCH DOORS
1.REMOVINGDOORS(Cont.)
D. Liftthehingestraightupto
freethehingepinfromthe
socketinthetopofthedoor
andpassthewirethroughthe
slotinthehinge.
E.Removethetapefromthe
door,openthedoor90degrees
äñç÷ìï÷÷ëèçòòõäúäüéõòð÷ëèæäåìñè÷Õìé÷÷ëèçòòõòģ
thecenterhingepin.
F. Setthedooronanon-scratchingsurfacewiththe
insideup.
3.REMOVINGCENTERHINGESAND
BRACKETS
A.Usinga1/4”Allenwrench,removethe2hingepinsfrom
thehingebrackets.
B.Usinga5/16”socket/ratchetdriver,removethebolts
securingthecenterhingebracketstothecabinet.
REINSTALLING DOORS
ÒÖÙØÛÝÊ×ÝרÝÎÜ
Whenreplacingfrenchdoors:
• Readtheinstructionsallthewaythroughbeforestarting.
1.REINSTALLINGCENTER HINGEBRACKETS
ANDHINGES
A.Usinga5/16”socket/ratchetdriver,reinstallthebolts
andcenterhingebracketstothecabinet.
B.Usinga1/4”Allenwrench,reinstallthe2hingepinsinto
thehingebrackets.
CAUTION Lifting Hazard.
Singleperson liftcancause injury.Useassistance when
handling,moving orliftingthe refrigeratordoors.
NOTE: Whenmoving door,toprevent damagetodoor
andelectronics carefullyplacethe doorina proper
location.
WARNING
Toeliminate theriskof electricshockor injury during
installation,you mustfirstunplug therefrigeratorbefore
proceeding.Failure tofollowthese instructionscanresult
inelectrical shock.
WARNING Followall steps.Failureto followthese
instructions,leaving offparts,or overtighteningscrews,
canlead tothedoor fallingoffand result ininjury and
propertydamage.
ENGLISH

14 49-60806
INSTALLING THE REFRIGERATOR - FRENCH DOORS (Cont.)
2.REHANGINGTHERIGHTDOOR
A.Lowertherefrigeratordoorontotherighthingepin.
B.Makesurethedoorisalignedwiththecabinet.Attach
thehingetothetopofthecabinetlooselywithbolts
removedearlier.
C.Öäîèöøõè÷ëèêäöîè÷òñ÷ëèçòòõìöĥøöëäêäìñö÷÷ëè
cabinetandisnotfolded.Tightentheboltsto60lb/
in.(6.78Nm).
D. Replacetherighthingecoverontopoftherefrigerator
usingaPhillipsscrewdriver.
3.REHANGINGTHELEFTDOOR
A.Passthewirethroughtheslotinthehinge.Placethe
hingepinintothetopofthedoor.
B.Lowertherefrigeratordoorontotheleft
hingepin.
C.Makesurethedoorisalignedwiththecabinet.Attach
thehingetothetopofthecabinetlooselywithbolts
removedearlier.
D. Öäîèöøõè÷ëèêäöîè÷òñ÷ëèçòòõìöĥøöëäêäìñö÷÷ëè
cabinetandisnotfolded.Tightentheboltsto60lb/in.
(6.78Nm).
E. Plugthewireconnectorstogetherandroutthewire
insidetheplasticport.
F. Replacethelefthingecoverontopoftherefrigerator
usingaPhillipsscrewdriver.
INSTALLATIONINSTRUCTIONS
Wire
Connectors
ENGLISH
Wire
Connectors

49-60806 15
INSTALLATIONINSTRUCTIONS
INSTALLING THE REFRIGERATOR- FREEZER DRAWER
ÒÖÙØÛÝÊ×ÝרÝÎÜ
Whenremovingfreezerdrawer:
• Readtheinstructionsallthewaythroughbeforestarting.
• Provideanon-scratchingworksurfaceforthedoors.
1.REMOVETHEBASKETS
A.Openthefreezerdraweruntilitstops.
B.Pullthetopbasketoutuntilitstops.Liftthebasketup
onthefrontandouttoremove.
C.Thelowerbasketrestsonaframeinsidethefreezer
drawer.Liftthefrontofthebasketandpullitforward.
Releasethepinsfromtheslotsontheframetoremove
thebasket.
2.REMOVETHEDRAWERFRONT
A.Removethescrewoneachsideoftherailing.
B.Liftuponbothsidesofthefreezerdrawerhandleto
separatethedrawerrailingsfromtherailassemblies.
C.Setthedrawerfrontonanon-scratchingsurface.
D. Pushtherailassembliesbackintolockingposition.
Screw
Drawer
Assembly
Rail
Assembly
ENGLISH

16 49-60806
INSTALLATIONINSTRUCTIONS
INSTALLING THE REFRIGERATOR - FREEZER DRAWER (Cont.)
(onsome models)
3.REINSTALLFREEZER DRAWERFRONT
A.Pulltherailassembliestothemaximumextension.
B.Locatetheslotsontheinsideofeachslide.
C.Insertthehooksontheendsofthedrawerassembly
extensionsintotheslotsnearthebackoftheslides.
D. Lowerthefrontendofthefreezerdrawerassembly
öò÷ëèöìçè÷äåöĤ÷ìñ÷ò÷ëèéõòñ÷öïò÷öòñ÷ëèõäìï
assemblies.
E.Replacethesafetyscrewsinbothsidesoftheslide
assemblies.
F. Replacelowerandupperbaskets(seeFreezerDrawer).
REFRIGERATOR SUGGESTED ASSEMBLY
Shelvesshowninthelocationforbestenergyefficiency.
Hook
Slot
SideTab
FrontSlot
QNE27J
27 cuft. Models
French Door with Freezer Drawer
ENGLISH

49-60806 17
CONNECTING TO THE HOUSE
WATER LINE
Acoldwatersupplyisrequiredforautomaticicemaker
operation.Ifthereisnotacoldwatersupply,youwillneedto
provideone.SeeInstallingtheWaterLinesection.
NOTES:
•Beforemakingtheconnectiontotherefrigerator,besure
therefrigeratorpowercordisnotpluggedintothewall
outlet.
¬Òéüòøõõèéõìêèõä÷òõçòèöñò÷ëäùèäúä÷èõĤï÷èõúè
recommendinstallingoneifyourwatersupplyhassand
orparticlesthatcouldclogthescreenoftherefrigerator’s
watervalve.Installitinthewaterlineneartherefrigerator.If
usingSmartConnect™RefrigeratorTubingKit,youwillneed
äñäççì÷ìòñäï÷øåè¤àá (á! "¥÷òæòññèæ÷÷ëèĤï÷èõÍò
ñò÷æø÷óïäö÷ìæ÷øåè÷òìñö÷äïïĤï÷èõ
•Beforeconnectingthewaterlinetothehouse,purgethe
houselineforatleast2minutes.
A. Ifyouareusingcoppertubing,placeacompressionnut
andferrule(sleeve)ontotheendofthetubingcomingfrom
thehousecoldwatersupply.
IfyouareusingtheSmartConnect™tubing,thenutsare
alreadyassembledtothetubing.
B. Ifyouareusingcoppertubing,inserttheendofthe
tubingintotherefrigeratorconnection,atthebackofthe
refrigerator,asfaraspossible.Whileholdingthetubing,
÷ìêë÷èñ÷ëèĤ÷÷ìñê
IfyouareusingSmartConnect™tubing,insertthemolded
endofthetubingintotherefrigeratorconnection,atthe
backoftherefrigerator,andtightenthecompressionnut
untilitishandtight.Thentightenoneadditionalturnwith
awrench.Overtighteningmaycauseleaks.
WARNING Connecttopotablewatersupplyonly.
Acoldwatersupplyisrequiredforautomaticicemaker
operation.Thewaterpressuremustbebetween40and120
psi(275-827kilopascals).
WARNING ELECTRICSHOCKHAZARD
Attachtubingclampusingexistingholeonly.DONOTdrill
intotherefrigerator.
ÝÞÛר×ÝÑÎàÊÝÎÛÜÞÙÙÕâ
Ýøõñ÷ëèúä÷èõòñä÷÷ëèöëø÷òģùäïùè
(housewatersupply)andcheckforany
leaks.
PLUGINTHEREFRIGERATOR
Onmodelswithanicemaker,before
pluggingintherefrigerator,makesurethe
ìæèðäîèõóòúèõöúì÷æëìööè÷÷ò÷ëè ¤òģ¥
position.
Seethegroundinginformationattached
tothepowercord.
PUTTHEREFRIGERATORINPLACE
Öòùè÷ëèõèéõìêèõä÷òõ÷òì÷öĤñäïïòæä÷ìòñ
LEVELTHEREFRIGERATOR
Adjustablelegsatthefrontcorners
oftherefrigeratorshouldbesetso
÷ëèõèéõìêèõä÷òõìöĤõðïüóòöì÷ìòñèç
òñ÷ëèĥòòõäñç÷ëèéõòñ÷ìöõäìöèç
justenoughthatthedoorcloses
easilywhenopenedabouthalfway.
To adjusttheleveling legs, turnthelegsclockwisetoraise
therefrigerator,counterclockwisetolowerit.
LEVELTHEREFRIGERATORDOORS
Rememberalevelrefrigeratoris
necessaryforgettingthedoors
perfectlyeven.Ifyouneedhelp,review
theprevioussectiononlevelingthe
refrigerator.
Ifthedoorsremainuneven,turnthe
adjustablepintoraisethelowestdoor
usinga1/4”allenwrenchtoturnthepin.
INSTALLATIONINSTRUCTIONS
SmartConnect™
tubing
Refrigerator
connection
When
theleft
dooris
lowerthan
theright
door.
When
theleft
dooris
higher
than
theright
door.
ENGLISH
Adjustmentpoint

18 49-60806
REFRIGERATORUSE
CONTROLS
FreezerCompartmentTemperatureControl
Adjustfreezercompartmenttemperature.Thefreezer
temperatureispresetinthefactoryat 0°F(-17.8°C).
Allow24hoursfortemperaturetostabilizetothepreset
recommendedsetting.
FreshFood CompartmentTemperatureControl
Adjustfreshfoodcompartmenttemperature.Thefresh
foodtemperatureispresetinthefactoryat 37°F(2.8°C).
Allow24hoursfortemperaturetostabilizetothepreset
recommendedsetting.
WaterFilter
Pressandhold3secondstoresettheWaterFilter.
Turbo Cool
TosettheTurboCool™,presstheTurboCoolpadfor3
seconds.Thedisplaywillshowtc.
TurboCool™rapidlycoolstherefrigeratorcompartment
inordertomorequicklycoolfoods.UseTurboCool™
whenaddingalargeamountofthefoodtothe
refrigeratorcompartment,puttingawayfoodsafterthey
havebeensittingoutatroomtemperature,orwhen
puttingawaywarmleftovers.Itcanalsobeusedifthe
refrigeratorhasbeenwithoutpowerforanextended
period.
NOTE:Therefrigeratortemperaturecannotbe
changedduringTurboCool™.Thefreezertemperature
isnotaffectedduringTurboCool.Whenopeningthe
refrigeratordoorduringTurboCool™,thefanswill
continuetoruniftheyhavecycledon.
DoorAlarm
Tosetthealarm,presstheDoor Alarm pad.Thisalarm
willsoundifeitherdoorisopenformorethan2minutes.
Thebeepingstopswhenyouclosethedoor.
NOTE:ToputtherefrigeratorcontrolintheOFFposition,
simultaneouslytouchthewordsFreezerandFridgefor3
seconds.Powertotherefrigeratorcannotbedisconnected
byanysettingonthecontrolpanel.
Changing°Fto°Cor°Cto°F: Pressandholdthe"DOOR
ALARM"and"FREEZER"buttonssimultaneouslyfor5
secondstoset°Cto°For°Fto°C.
SABBATH MODE
Pressand holdthe“DOOR ALARM” and“WATERFILTER”
buttonssimultaneously for5seconds toenter/exitSabbath
Mode.Activate SabbathModeto turnoffinterior lights,
temperaturecontrol andadvancedfeatures. Compressor
willrun onatimed defrostwhenin Sabbath mode.
ENGLISH
INTERNAL WATER DISPENSER
Thewaterdispenseris locatedonthe left wallinside the
refrigeratorcompartment.
To dispense water:
1.Holdtheglassagainsttherecess.
2.Pushthewaterdispenserbutton.
3.Holdtheglassunderneaththe
dispenserfor2–3secondsafter
releasingthedispenserbutton.Water
maycontinuetodispenseafterthe
buttonisreleased.
Ifnowaterisdispensedwhentherefrigeratorisfirstinstalled,
theremaybeairinthewaterlinesystem.Pressthedispenser
buttonforatleast5minutestoremovetrappedairfromthe
waterlineandtofillthewatersystem.Duringthisprocess,
thedispensernoisemaybeloudastheairispurgedfromthe
waterlinesystem.Toflushoutimpuritiesinthewaterline,
throwawaythefirst6glassfulsofwater.
NOTE:Toavoidwaterdeposits,thedispensershouldbe
cleanedperiodicallybywipingwithacleanclothorsponge.

49-60806 19
REFRIGERATORUSE
WATER FILTER CARTRIDGE - XWF
WATERFILTERCARTRIDGEHOLDER
Thewaterfiltercartridgeholderislocatedinthebackupper-
rightcornerofthefreshfoodrefrigeratorcompartment.
WHENTOREPLACETHEFILTER
Ifthereisareplacementindicatorlightforthewaterfilter
cartridgeonthedispenser,theredfilterlightwillstart
blinkingtotellyouthatyouneedtoreplacethefiltersoon.
Thefilterlightwillblinkwhilethedoorisopenuntilthefilter
isreplaced.
Thefiltercartridgeshouldbereplacedeverysixmonths,or
earlieriftheflowofwatertothedispenseroricemaker
decreases.
REMOVINGTHEFILTER
Ifyouarereplacingthefilter,firstremovethepreviousone:
1.Openthefiltercartridgehousingbysqueezingthe2front
tabsandgentlypullingdown.
2.Rotatethefilterdown.
3.Gentlygraspthefilterandslowlyturnitcounterclockwise
abouta¼turn.Thefiltershouldautomaticallyrelease
itselfwhenyouhaverotateditfarenoughtotheleft.A
smallamountofwatermaydripdown.
CAUTION Ifairhasbeentrappedinthesystem,the
filtercartridgemaybeejectedasitisremoved.Usecaution
whenremoving.
FILTERBYPASSPLUG
Toreducetheriskofpropertydamageduetowaterleakage,
youMUSTusethefilterbypassplugwhenareplacementfilter
cartridgeisnotavailable.Somemodelsdonotcome
equippedwiththefilterbypassplug.Toobtainafreebypass
plug,call877.337.3639orgotoHaierparts.com.
GEAppliances.caorcall800.661.1616inCanada.The
dispenserandicemakerwillnotoperatewithouteitherthe
filterorbypasspluginstalled.Thebypassplugisinstalledin
thesamewayasafiltercartridge.
INSTALLINGTHEFILTERIN ABOTTOMFREEZER
REFRIGERATOR
1.Openthefiltercartridge
housingbysqueezingthe2
fronttabsandgentlypulling
down.
2.Lineuptheportsonthefilter
withtheportsonthefilter
cartridgeholder,andgentlyinsertthefilter.
3.Slowlyturnthefiltertotherightuntil
itstops.DONOTOVERTIGHTEN.
Asyouturnthefilter,itwill
automaticallyadjustitselfinto
position.Thefilterwillmoveabouta
¼turnor90degrees,untilthearrow
onthefilteralignswiththearrowon
thefiltercartridgeholder.
4.
Slowlypushthefilterupintotheclips.
5.Closethefiltercartridgehousingby
gentlypushingthelidupwardsuntil
thetabslockintoplace.
6.Runwaterfromthedispenserfor
2gallons(7.6liters)orapproximately5minutestoclear
thesystem.Watermayspurtoutandairbubblesmaybe
visibleduringthisprocess.Ifwaterisnotflowing,checkto
makesurethefilterhasbeenfullyrotatedtotheright.
7.PressandholdtheWATERFILTERpadonthedispenserfor
threesecondstoresetwaterfilter.
ServiceFlow 0.5gpm (1.89 lpm)
WaterSupply Potable Water
WaterPressure 25-120 psi(172-827kPa)
WaterTemperature 33°F-100°F (0.6°C-38°C)
Capacity 170gallons (643.5liters)
Sign-upforTEXTREMINDERSbytextingREPLACEto
70543.
WARNING To reduce the risk associated with choking, do not allow children under 3 years of age to have access to
small parts during the installation of this product. Thedisposable filtercartridgeshould bereplacedevery 6 monthsat the
ratedcapacity, orsoonerif anoticeablereduction in flowrate occurs.
Forthe maximumbenefitof yourfiltrationsystem, Haier recommendsthe use ofGEAppliances-branded filtersonly.Using
GEAppliances-branded filtersinHaier refrigeratorsprovidesoptimal performance andreliability. GE Appliancesfiltersmeet
rigorousindustry standardsforsafety andqualitythat are importantfor products thatarefiltering yourwater.Haier hasnot
qualifiednon-GE Appliances-brandedfiltersfor useinHaier refrigerators andthere is noassurancethat non-GEAppliances-
brandedfilters meetHaierstandards forquality,performance and reliability.
Ifyouhavequestions,ortoorderadditionalfiltercartridges,visitourwebsiteatHaierParts.comor call Haierat
877.337.3639.(InCanada,GEAppliances.caor call800.661.1616)
ApplicationGuidelines/WaterSupply
ENGLISH

20 49-60806
REFRIGERATORUSE
SHELVES AND BINS
Notallfeaturesareonallmodels.
REARRANGINGTHEREFRIGERATOR
SHELVES
Shelvesintherefrigeratorcompartmentareadjustable.
To remove the shelves:
1. Removeall itemsfromthe
shelf.
2. Tiltthe shelfupat thefront.
3. Liftthe shelfupat theback
andbring theshelfout.
To replace the shelves:
1. Whiletilting theshelfup, insertthetop
hookat thebackof theshelfin a slot
onthe track.
2. Lowerthe frontofthe shelfuntilthe
bottomof theshelflocks intoplace.
QUICKSPACE SHELF
Thisshelf splitsinhalf
andslides underitselffor
storageof tallitemson
theshelf below.
Thisshelf canbe
removedand replacedor
relocated.
NOTE: Theback halfofthe
QuickSpace Shelfisnot
adjustable.
PANS
Notallfeaturesareonallmodels.
CLIMATEZONEPANS
Keepfruits andvegetablesorganized inseparate
compartmentsfor easyaccess.Excess waterthatmay
accumulatein thebottomof thedrawersor under the
drawersshould bewipeddry.
To remove pan:
Slidethe panoutto the
stopposition, liftthe
panup andpastthe stop
positionand pullforward.
FULL-WIDTHPAN
To remove pan:
1. Pullthe panoutto thestopposition.
2. Liftthe frontofthe drawerupand out.
To replace pan:
1. Placeback ofthedrawer infirstand rotate drawerfront
downto seatiton theslides.
2. Pushthe drawerinto theclosedposition.
HOWTOREMOVEANDREPLACEDRAWER
DIVIDER
To remove pan:
1.Pull thedrawerout tothestop position.
2.Slide pandividerto righttorelease it frompan.
To replace:
Reversesteps 1and2 toreplacedrawer divider.
ADJUSTABLEDOORBINS
To remove: Liftthe binstraightup; then
pullout.
To replace: Engage thebinin themolded
supportson thedoorand pushdownto
lockin place.
ENGLISH
Table of contents
Languages:
Other Haier Refrigerator manuals

Haier
Haier DD410RS User manual

Haier
Haier HTMR480 User manual

Haier
Haier ECR1 7 User manual

Haier
Haier HRF-155 User manual

Haier
Haier HSBS582AW User manual

Haier
Haier HSL04WNA User manual

Haier
Haier HB21FWRSS User manual

Haier
Haier AFL631CWE User manual

Haier
Haier MM60001ENG User manual

Haier
Haier UN-FZBU110 Operating instructions

Haier
Haier HBF130 User manual

Haier
Haier BI SD 177 User manual

Haier
Haier Aficionado M111 User manual

Haier
Haier HRF-300M User manual

Haier
Haier HRF-409A User manual

Haier
Haier HRF505VW User manual

Haier
Haier RF-8888-221 User manual

Haier
Haier AFD630IB User manual

Haier
Haier HR-120 Quick start guide

Haier
Haier JR-NF140A User manual