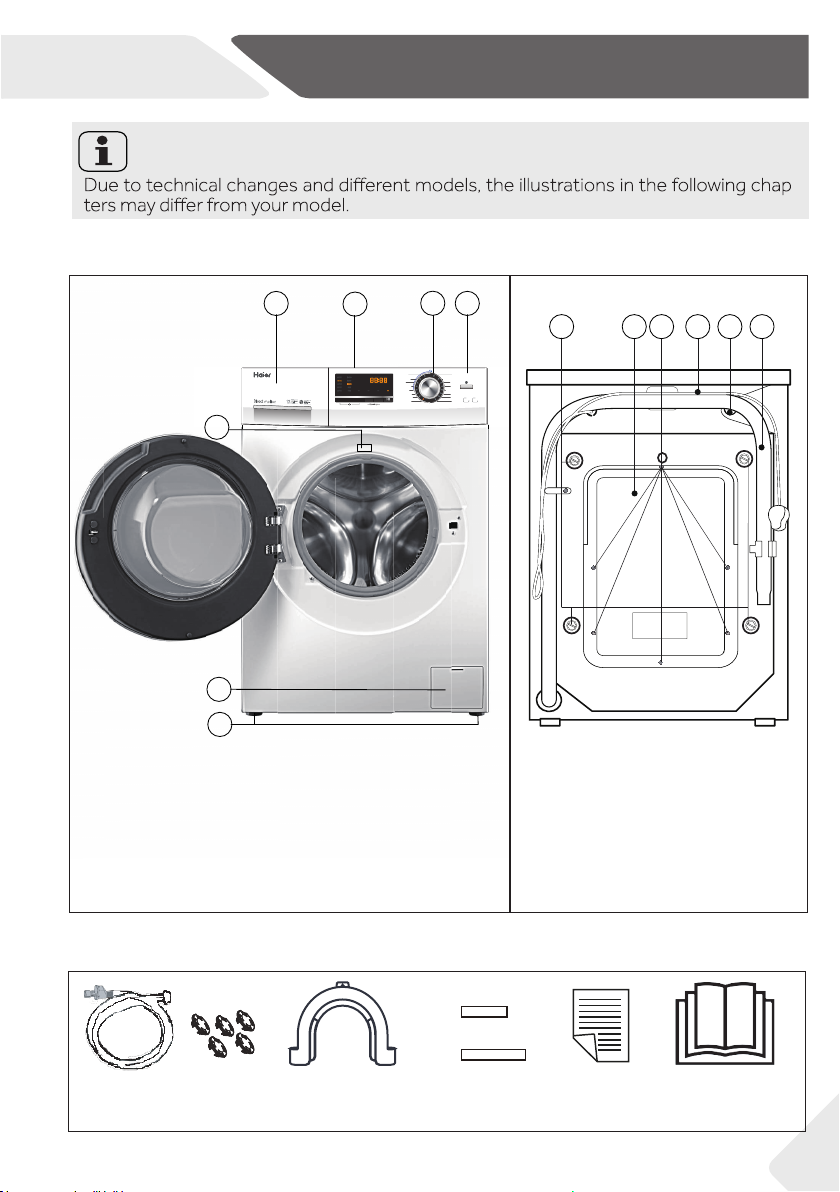
Haier HW70-B14636N User manual

GB
User manual
Washing machine
HW70-B14636N

Thank You GB
2
Legend
Warning – Important Safety information
General information and tips
Environmental information
Disposal
Help protect the environment and human health. Put
the packaging in applicable containers to recycle it.
Help to recycle waste of electrical and electronic ap-
pliances. Do not dispose appliances marked with this
symbol with the household waste. Return the product
to your local recycling facility or contact your municipal
Thank you for purchasing a Haier Product.
Please read these instructions carefully before using this appliance. The instructions con-
tain important information which will help you get the best out of the appliance and ensure
safe and proper installation, use and maintenance.
Keep this manual in a convenient place so you can always refer to it for the safe and proper
use of the appliance.
If you sell the appliance, give it away, or leave it behind when you move house, make sure
you also pass this manual so that the new owner can become familiar with the appliance
and safety warnings.
WARNING!
of it. Remove the door catch to prevent children and pets to get closed in the appliance.

GB Content
3
1-Safety information......................................................................................................................... 4
2-Product description ...................................................................................................................... 7
3-Control panel .................................................................................................................................. 8
4-Programmes.................................................................................................................................11
5-Consumption................................................................................................................................12
6-Daily use.........................................................................................................................................13
7-Eco-friendly washing ..................................................................................................................18
8-Care and cleaning ........................................................................................................................19
9-Troubleshooting ...........................................................................................................................22
10-Installation...................................................................................................................................25
11-Technical data.............................................................................................................................29
12-Customer service......................................................................................................................30

1-Safety information GB
4
-
ing safety hints!
WARNING!
▶Make sure there is no transport damage.
▶Make sure all transport bolts are removed.
▶Remove all packaging and keep out of children´s reach.
▶Handle the appliance always with at least two persons because it
is heavy.
Daily use
▶This appliance can be used by children aged from 8 years and
above and persons with reduced physical, sensory or mental ca-
pabilities or lack of experience and knowledge if they have been
given supervision or instruction concerning use of the appliance
in a safe way and understand the hazards involved.
▶Keep away children under 3 years of age from the appliance un-
less they are constantly supervised.
▶Children shall not play with the appliance.
▶Do not let children or pets come close to the appliance when the
door is open.
▶Store washing agents out of reach of children.
▶-
vent laundry from being entangled. If necessary, use an appropri-
ate bag or net.
▶Do not touch or use the appliance when barefoot or with wet or
damp hands or feet.
▶Do not cover or encase the appliance during operation or after-
wards to allow any moisture or dampness to evaporate.
▶Do not place heavy objects or sources of heat or damp on top of
the appliance.
▶Do not use or store flammable detergent or dry cleaning agent in
close vicinity to the appliance.
▶Do not use any flammable sprays in close vicinity to the appliance.
▶Do not wash any garments treated with solvents in the appliance
without having dried them previously in the air.

GB 1-Safety information
5
WARNING!
Daily use
▶Do not remove or insert the plug in the presence of flammable
gas.
▶Do not hot wash foam rubber or sponge-like materials.
▶Do not wash any laundry which is polluted with flour.
▶Do not open detergent drawer during any wash cycle.
▶Do not touch the door during the washing process, it gets hot.
▶Do not open the door if the water level is visibly over the porthole.
▶Do not force the door to open. The door is tted with a self-lock
device and will open shortly after the washingprocedure is ended.
▶
undertaking any routine maintenance and disconnect the appli-
ance from the electrical supply to save electricity and for safety.
▶Hold the plug, not the cable, when unplugging the appliance.
Maintenance / cleaning
▶Make sure children are supervised if they carry out cleaning and
maintenance.
▶Disconnect the appliance from the electrical supply before un-
dertaking any routine maintenance.
▶Keep the lower part of the porthole clean and open door and de-
tergent drawer if appliance is not in use to prevent odours.
▶Do not use water spray or steam to clean the appliance.
▶Replace a damaged supply cord only by the manufacturer, its ser-
▶Do not try to repair the appliance by yourself. In case of repair
please contact our customer service.
Installation
▶The appliance should be placed in a well-ventilated place. Ensure
a location which allows opening the door fully.
▶Never install the appliance outdoors in a damp place, or in an area
which may be prone to water leaks such as under or near a sink
unit. In the event of a water leak cut power supply and allow the
machine to dry naturally.

1-Safety information GB
6
Intended use
This appliance is intended for washing machine-washable laun-
dry only. Anytime follow the instructions given on the label of each
garment label. It is designed exclusively for domestic use inside the
house. It is not intended for commercial or industrial use.
Changes or modications to the device are not allowed. Unintended
use may cause hazards and loss of of all warranty and liability claims.
WARNING!
Installation
▶Install or use the appliance only where the temperature is above
5 °C.
▶Do not place the appliance directly on a carpet, or close to a wall
or furniture.
▶Do not install the appliance in direct sunlight or in the near of heat
sources(e.g. stoves, heaters).
▶Make sure that the electrical information on the rating plate
agrees with the power supply. If it does not, contact an electri-
cian.
▶Do not use multi-plug adapters and extension cables.
▶Make sure only the delivered electric cable and hose set are used.
▶Make sure not to damage the electric cable and the plug. If dam-
aged have it replaced by an electrician.
▶Use a separate earthed socket for the power supply which is easy
accessible after installation. The appliance must be earthed.
Only for UK: The appliance’s power cable is tted with 3-cord
(grounding) plug that ts a standard 3-cord (grounded) socket.
Never cut o or dismount the third pin (grounding). After the ap-
pliance is installed, the plug should be accessible.
▶Make sure the hose joints and connections are rm and there is
no leakage.

GB 2-Product description
7
2.1 Picture of appliance
Front (Fig. 2-1): Rear side (Fig. 2-2):
2.2 Accessories
Check the accessories and literature in accordance with this list (Fig.2-3):
Inlet hose-
assembly 5 Blanking
plugs Drain hose
bracket User manual
Warranty-card
Note:
-
2-3
134
2
6
7
5
T1 T2
T3 S1
S2 S6
S4
T4
134
265
1 Detergent /Softener drawer
2 Worktop
3 Programme selector
4 Panel
1 Transportation bolts (T1-T4)
2 Back cover
3 Back cover screws (S1-S6)
4 Power cord
5 Water inlet valve
6 Drain hose
2-1 2-2
5 Rating plate
6
Service flap
7
Adjustable feet
S3 S5
2x
2x
Noise
reduction pads
Temp.Speed Steam Delay Start/Pause
Extrarinse
Duvet
Cotton
Synthetic
Mix
Baby Care
Eco 40-60
Cotton 20°C
Hygiene
Underwear
Wool
Sport
Jeans
Spin
Fast
Express 15 min
Delicate/silk
rpm
Capacity
8kg1400
HW80-B14636N

3-Control panel GB
8
1 “
2 Programme selector
3 Display
4 Detergent /Softener drawer
Press this button (Fig. 3-2) gently to switch on, the dis-
playis shining,the indicator ofthe“Start/Pause”button
is flashing. Press it again for about 2 seconds to switch
-
ter a while machine will shut down automatically.
3-2
3.2 Programme selector
By turning the knob (Fig. 3-3) one of 16 programmes
can be selected, related LED will light up, its default
settings will be displayed.
3.3 Display
The display (Fig. 3-4) shows following information:
▶Washing time
▶End time delay
▶Error codes and service information
3-4
5 Function buttons
6 “Delay” button
7 “Start/Pause“ button
Note : Acoustic signal
In following cases, an acoustic signal is no sounds by default:
▶when pressing a button
▶when turning the programme selector
▶at the end of programme
The acoustic signal can be selected if necessary ; see DAILY USE.
Express 15 min
Temp.Speed Steam Delay Start/Pause
Extra rinse
Duvet
Cotton
Synthetic
Mix
Baby Care
Eco 40-60
Cotton 20°C
Hygiene
Underwear
Wool
Sport
Jeans
Spin
Fast
Delicate/silk
HW80-B14636N
rpm Capacity
8kg
1400
3-1
4
1
5 6 7
23
3-3
Express 15 min
Duvet
Cotton
Synthetic
Mix
Baby Care
Eco 40-60
Cotton 20°C
Hygiene
Underwear
Wool
Sport
Jeans
Spin
Fast
Delicate/silk

GB 3-Control panel
9
3.5 Function buttons
The function buttons (Fig. 3-6) enable additional op-
tions in the selected programme before programme
starts. The related indicators are displayed.
-
gramme, all options are disabled.
If a button has multiple options, the desired option can
be selected by pressing the button sequentially.
To delete the setting or to cancel the setting process,
press the function button until the desired LED lights
3-6
3.5.1-Function button “Temp.“
Press this button (Fig. 3-7) to change the washing
temperature of the programme. If no value is illumi-
nated the water will not be heated.
In conjunction with the “Steam” button, the child lock
3.5.2-Function button “Speed”
Press this button (Fig. 3-8) to change or deselect the
spin of the programme. If no value is illuminated the
laundry will not spun.
Note: Factory settings
there is no special requirement default settings are recommended.
3.4 Detergent drawer
Open the drawer, three compartments can be
seen (Fig. 3-5):
Compartment 1 : Water inlet only, no detergent
Compartment 2 : Detergent for programme
Compartment : Softener, Conditioning agent etc.
The recommendation on the type of detergents is
suitable for the various washing temperatures, please
refer to the manual of detergent.
3-5
3.5.3-Function button “Steam“
3-7 3-8
Temp.
Speed
Press this button (Fig. 3-9) to activate the steam function. When this function is activated
the default temperature is the maximum temperature of the programme selected. This
function can be activated only with the following programmes: Cotton, Synthetic, Mix,
Baby Care, Hygiene. When the function is activated the led above the button will light up.
Pushing again this button the function can be deactivated and the led above the button
will turn off. When the function is activated the temperature of the programme cannot
be changed.
( )
3.5.1 3.5.2 3.5.3 3.5.4 3.5.5
Temp.Speed Steam Delay
Extra rinse

3-Control panel GB
10
3.5.4 Function button “Extra rinse“
Press this button (Fig. 3-10) to rinse the laundry more
intense with fresh water. This is recommended for
people with sensitive skin.
By pressing the button several times one to three ad-
ditional cycles can be selected. They appear in the dis-
play with P--1/P--2/P--3. Different programs can ch-
3.5.5 Function “Speed up“
This function saves time and energy. Preferable if laun-
dry is slightly soiled. Press simultaneously button
“Extra
rinse“ and ”Delay” (Fig. 3-11) for about 3 seconds
to activate the “Speed up” function;
SPEEd
uP
is dis-
played. This function is not available in all programmes
(see PROGRAMMES).
3.7 “Start/Pause“ button
Press this button (Fig. 3-13) gently to start or inter
-
rupt the currently displayed programme. During pro-
gramme setting and during programme run the LED
above the button is shining, or if interrupted blinking.
3.6 Function button “Delay”
Press this button (Fig. 3-12) to start the programme
with a delay. End time delay could be increased in steps
6:30 means
end of programme cycle will be in 6 hours and 30 minut-
es. Press “Start/Pause” button to activate delay. It is not
applicable to programme Spin, Eco 40-60.
Note: Liquid detergent
If using liquid detergent, it is not recommended to activate the end time delay.
3.8 Child lock
Press button “Temp.“ and ”Steam” (Fig. 3-14) for 3
seconds simultaneously to block all panel elements
against activation. For unlocking please press again
the two buttons.
The display shows cLo
I-
(Fig. 3-15) if a button will be
pressed, when the child lock is activated. The change
is not running.
3-15
Extra rinse
3-10
Delay
Extra rinse
Speed up
3-11
Delay
3-12
Start/Pause
3-13
3-14
Temp.Speed Steam
Steam
3-9 If “Temp.” button is pushed the “Steam” function will be
deactivated. You can activate “Steam” function only bef-
ore to start any programme. You cannot activate “Steam”
-
function while the appliance is already executing a programme.
(add time to the original
programme time).
oose different rinsing times.

GB 4-Programmes
11
1)
2)
heated(no value is illuminated).
3)
Max. load Temperature Preset
spin speed
in rpm
Function
in kg
in °C
Preset
Steam
Extra rinse
Speed up
Programme seletable
range 2 1
Cotton 10/9/8/7
5/4.5/4/3.5
10/9/8/7
10/9/8/7
10/9/8/7
10/9/8/7
10/9/8/7
5/4.5/4/3.5
HW
100/90/80/70
HW...-B14/16...
40 •º/Cotton • • •
Synthetic 40 •º/• • •
Mix 30 •º/1000 • • •
Hygiene 5/4.5/4/3.5 90 90 •º/Cotton/Synthetic 1000 • •
Underwear 5/4.5/4/3.5
5/4.5/4/3.5
40 •º/1000 /• •
Cotton 20°C 20 •º/Cotton 1400/1600
1400/1600
1200/1400
/• •
Eco 40-60 //•º/Cotton / / / /
Fast 3) 40 •º/1000 /•/
Express
15 min
3)
2.5/2/2/1
2.5/2/2/1
2.5/2/2/1
2.5/2/2/1
2.5/2/2/1.5
* •º/1000 /•/
/
Sport 20 •º/800 •
Delicate/silk
30 •/and silk 800 /•/
Jeans
30 •º/1000 /•
Duvet
40 •/Duvet 800 • •
•
Spin /// / / 1000 / / /
1)
2)
1gent
2
•
Yes,º
Optional,
/ No
/
/
/
Wool *•/
/
/
800 •/
/
40 •º/1000 ••
•
•
Baby Care 2)
Detergent compartment for :
Water inlet only, no deter-
Detergent
Softener or care product
* to 90
* to 40
* to 40
* to 40
* to 40
* to 30
* to 60
* to 40
* to 90
* to 60
* to 60
* to 60
20
Fabrics type
Synthetics or
mixed fabric
Non fragile fabrics
Cotton
Delicate laundry
Lightly soiled
mixed-laundry
of cotton and
synthetics
Cotton/
Synthetics
Cotton/
Synthetics
Cotton/Synthetic
Cotton/Synthetic
Sports wear
Machinewasha-
ble fabric made of
wool or with wool
content
Relating to dry laundry.
Choose 90°C wash temperature only for special hygienic requirements. *:water will not be
Reduce detergent amount because programme duration is short.

5-Consumption GB
12
Note: Auto Weight
The appliance is equipped with a loading recognition. At low loading, energy, water and
Scan QR code on energy label for energy consumption information.
The actual energy consumption may differ from the declared one according to local
conditions.
washing time will be reduced automatically in some programs.The display shows AUtO.

GB 6-Daily use
13
6.3 Preparing laundry
▶Sort out clothes according to fabric (cotton, syn-
thetics, wool or silk,etc.)and to how dirty they are
(Fig. 6-3). Pay attention to the care labelling of
washing labels.
▶Separate white clothes from coloured ones.
they fade or run.
▶Empty pockets (keys, coins, etc.) and remove
harder decorative objects (e.g. brooches).
▶-
a wash bag to care for this delicate laundry (hand
or dry cleaning would be better).
▶Close zippers, velco fastener and hooks, make
sure the buttons are sewn on tightly.
▶
hem, delicate underwearand small items
such
as socks, belts, bras, etc. in a wash bag.
▶Unfold large pieces of fabric such as bed sheets,
bedspreads etc.
▶Turn jeans and printed, decorated or color-inten-
sive textiles inside out; possibly wash separately.
6-3
6.1 Power supply
Connect the washing machine to a power supply
(220V to 240V~/50Hz; Fig. 6-1). Please refer also to
section INSTALLATION.
6.2 Water connection
▶Before connecting check the cleanliness and clar-
ity of the water inlet.
▶Turn on the tap (Fig.6-2).
Note: Tightness
Before use check for leakage in the joints between the tap and the inlet hose by turning
on the tap.
CAUTION!
Non-textile, as well as small, loose or sharp-edged items may cause malfunctions and
damage of clothes and appliance.
6-1 6-2

6-Daily use GB
14
Care chart
Washing
Washable up to 95°C
normal process
Washable up to 60°C
normal process
Washable up to 60°C
mild process
Washable up to 40°C
normal process
Washable up to 40°C
mild process
Washable up to 40°C
very mild process
Washable up to 30°C
normal process
Washable up to 30°C
mild process
Washable up to 30°C
very mild process
Wash by hand
max. 40°C
Do notwash
Bleaching
Any bleaching allowed Only oxygen/
non-chlorine
Do not bleach
Drying
Tumbledryingpossible
normal temperature Tumbledryingpossible
lower temperature Do not tumble dry
Line drying Flat drying
Ironing
Iron at a maximum
temperature
up to 200 °C
Iron at a medial tem-
perature
up to 150°C
Iron at a low temper-
ature up to 110 °C;
without steam (steam
ironing may cause irre-
versible damage)
Do not iron
Professional Textile Care
Dry cleaning in tetra-
chloroethene
Dry cleaning in hy-
drocarbons
Do not dry clean
Professional wet clean Do not professional
wet clean
6.4 Loading the appliance
▶Put in the laundry piece by piece.
▶
thumb for maximum load: Keep six inches between load and drum top.
▶Close the door carefully. Make sure that no pieces of laundry are pinched.

GB 6-Daily use
15
6.5 Selecting detergent
▶W
▶Use only machine wash approved detergent.
▶ergents, e.g. synthetic and woolen fabric.
▶Mind always detergent manufacturer recommendations.
▶Do not use dry cleaning agents such as trichloroethylene and similar products.
Choose the best detergent
Programme
Kind of detergent
Universal Colour Delicate Special Softener
Cotton L/P L/P - - o
Synthetic -L/P - -o
Mix L L/P - - o
Underwear o
Cotton 20°C -o
Hygiene L/P L/P - -o
Fast - - o
Express 15 min L- - o
Sport - - L/P L/P o
Baby Care - - L/P L/P o
Delicate/silk - - L/P L/P o
Jeans L L/P L/P o
Duvet - - L L/P
L = gel-/liquid detergent P = powder detergent O = optional _= no
If using liquid detergent, it is not recommended to activate the time delay.
We recommend by using:
▶Laundry powder: 20°C to 90°C* (best use: 40-60°C)
▶Color detergent: 20°C to 60°C (best use: 30-60°C)
▶Wool/delicate detergent: 20°C to 30°C (best use:20-30°C)
* Choose 90 °C wash temperature only for special hygienic requirements.
Wool - - L/P L/P o
L/P L/P
L/P L
- - o
Eco 40-60
Spin - - --
-
-
15
- - L/P
L/ P L/P -
L/P
L
L

6-Daily use GB
16
6.7 Switch on the appliance
(Fig. 6-5). The LED of the „Start/Pause“ button is flas-
hing.
6.6 Adding detergent
1. Slide out the detergent drawer.
2. Put the required chemicals into corresponding
compartments (Fig. 6-4).
3. Push back the drawer gently.
Note:
▶Remove detergent residues before next wash cycle from the detergent drawer.
▶Do not overuse detergent or softener.
▶Please follow the instruction on the detergent package.
▶
▶Concentrated liquid detergent should be diluted before adding into compartment 2.
▶The best use of liquid detergent is by using a dosing ball, which is given with the laun-
dry into the washing machine.
▶Do not use liquid detergent if “end time delay“ is selected.
▶Carefully choose the programme settings according to the care symbols on all laun-
dry labels and according to the programme table.
6.8 Select a programme
To get the best washing results, select a programme
type.
Turn the programme knob (Fig. 6-6) to select the right
programme. Related programme LED lights up and
the default settings are displayed.
6.9 Add individual selections
Select required options and settings (Fig. 6-7); refer to
CONTROL PANEL.
Temp. Speed Steam Delay
Start/Pause
Extra rinse
Speed up
6-7
6-4
6-5 6-6
Note: Odour removal
amount of detergent in washing agent compartment (2) or special machine cleaner to
remove possibly corruptive residues.

GB 6-Daily use
17
1. At programme cycle end
EnD
is displayed.
2.
3. Remove laundry as soon as possible to go easy on it and to prevent more wrinkling.
4.
5. Unplug the power cord.
6. Open the door to prevent formation of moisture and odours. Let it open while not used.
6.13 Activate or deactivate the buzzer
The acoustic signal can be selected if necessary:
1. Switch on the appliance.
2. Select the SPIN programme.
3. Press the “Delay“ button and “Extra rinse” button at the same time for about 3 sec-
onds. “
bEEP ON
” will be displayed and the buzzer will be activated.
For deactivating the buzzer press these two buttons at the same time again. “
bEEP Off
”
will be displayed.
To interrupt a running programme press gently “Start/Pause“. The LED above the button
is flashing. Press it again to resume operation.
To cancel a running programme and all its individual settings:
1. Press “Start/Pause” button to interrupt the running programme.
2.
3.
4.
After closing the programme to restart the appliance, select a new programme and
start it.
Press “On/Off” button to turn on the appliance, select programme Spin and then se-
lect "no Speed"(speed lights are off) , start the machine to drain the water.
6.12 After washing
Note: Door lock
▶For safety reasons the door is locked partially during the washing cycle. It is only pos-
sible toopen the door at the end of the programme or after the programme was can-
celled correctly (see description above).
▶In case of high water level, high water temperature and during spinning it is not pos-
sible to open the door;
Loc
1-
is displayed.
Note: Standby mode / energy-saving mode
The switched on appliance will go into standby mode if it will not be activated within 2
This saves energy. To interrupt the standby mode push “Start/Pause“ button.
6.10 Start wash programme
Press “Start/Pause“ button (Fig. 6-8) to start. The LED
of the “Start/Pause“ button stops flashing and lights
up continuously.
Appliance operates according to present settings.
Changesareonlypossiblebycancellingtheprogramme.
6.11 Interrupt / cancel wash programme
Start/Pause
6-8

7-Eco-friendly washing GB
18
Environmentally responsible use
▶To achieve best use of energy, water, detergent and time you should use the recom-
mended maximum load size.
▶Do not overload (hand width clearance above laundry).
▶For slightly soiled laundry select the Express 15min programme.
▶Apply exact dosages of each washing agent.
▶Choose the lowest adequate washing temperature - modern detergents are ef-
▶Raise default settings only due to heavy staining.
▶Select max. spinning speed if a domestic dryer is used.

GB 8-Care and cleaning
19
8.1 Cleaning the detergent drawer
Take always care there are no detergent residues.
Clean the drawer regularly (Fig. 8-1):
1. Pull out the drawer until it stops.
2. Press the release button and remove the drawer.
3. Flush the drawer with water until it is clean and
insert the drawer back in the appliance.
8.2 Cleaning the machine
▶Unplug the machine during cleaning and mainte-
nance.
▶Use a soft cloth with soap liquid to clean the ma-
chine case (Fig. 8-2) and rubber components.
▶Do not use organic chemicals or corrosive sol-
vents.
Note: Hygiene
For regular maintenance we recommend to run programme HYGIENE with no load in
order to remove possible corruptive residues quarterly. Add a small amount of deter-
gent in washing agent compartment (2) - or use a special machine cleaner.
To prevent blockage of water supply by solid substanc-
▶
supply.
▶Unscrew the water inlet hose at the back (Fig.
8-3) of the appliance as well as on the tap.
▶
▶
8.4 Cleaning the drum
▶Remove accidentally washed metal parts such as
pins, coins, etc. from the drum (Fig. 8-5) because
they cause rust stains and damage.
▶Use a non-chloride cleaner for removing rust
stains. Observe the warning hints of the cleaning
agent manufacturer.
▶Do not use any hard objects or steel wool for clean-
ing.
8-48-3
8-5
8-1
1
2
8-2

8-Care and cleaning GB
20
1.
2. Open service flap. You can either use a coin or a
screwdriver (Fig. 8-9).
3. Provide a flat container to catch leach water
(Fig. 8-10). There could be bigger amounts!
4. Pull the drainhose out and hold its end above the
container (Fig. 8-10).
5. Take the sealing plug out of the drainhose (Fig.
8-10).
6. After complete drainage close drainhose (Fig.
8-11). and push it back into the machine.
7. Unscrew and remove counter clockwise the pump
8. Remove contaminants and dirt (Fig. 8-13).
8.5 Long periods of disuse
If the appliance is left idle for a longer period:
1. Pull out the electrical plug (Fig. 8-6).
2.
3. Open the door to prevent formation of moisture
and odours. Let door open while not used.
Before next usage check carefully power cord, water
inlet and drain hose. Make sure everything is properly
installed and without leakage.
WARNING!
hot! Before any action please ensure water has
cooled down.
Note: Hygiene
After long periods of disuse we recommended to run programme HYGIENE with no
load and small amount of detergent in washing agent compartment (2) or special ma-
chine cleaner to remove possibly corruptive residues.
for instance if the appliance:
▶doesn´t drain the water.
▶doesn´t spin.
▶cause unusual noise while running.
8-8 8-9
8-10 8-11
8-12 8-13
8-6 8-7
This manual suits for next models
5
Table of contents
Languages:
Other Haier Washer manuals

Haier
Haier HWM96-0623S

Haier
Haier HWM50-0701 User manual

Haier
Haier HWM150-0623S User manual

Haier
Haier HW-D1260TVE User manual

Haier
Haier HW-B1060 User manual

Haier
Haier XPB50-22S User manual

Haier
Haier HWM6802 User manual

Haier
Haier RR36 User manual

Haier
Haier HW-C1270TVE-U User manual

Haier
Haier HWM60-F14N User manual

Haier
Haier HW80-B1239N User manual

Haier
Haier HW80-B14266A User manual

Haier
Haier HW100-1211N User manual

Haier
Haier HTW70-M1217 User manual

Haier
Haier HWM90-L287S User manual

Haier
Haier HWM110-0713S User manual

Haier
Haier HWM70-FD10829 User manual

Haier
Haier HWM130-0713S User manual

Haier
Haier HWM80-9288DD User manual

Haier
Haier HWM70-9288 User manual