Haier HWM95-261NZP User manual

HWM95-261NZP
CONTENTS PAGE
1
2
4
13
15
16
18
7
9
Product overview
Safety precaution
Installation and adjustment
. Please read the manual carefully before using machine.
. The explanation right of the manual is owned by our
company.
. The outward appearance of the product depends on the
actual model.
Preparation
Operational guidance
Washing process
Cleaning and maintenance
Questions and answers
Specification

Product overview
Big lid
Detergent box lid
Big balance ring
Big tub
Lint filter
Major frame
Big lid-lock
Power key
Small lid
Small lid-lock
Small balance ring
Small tub
Control panel
Hinge
Shelf plate
Storage cabinet door
Shelf base
Cabinet
Back cover
Power line
Water inlet valve
Drain hose
Drain hose hook
Adjusting foot

Don’t put the washing machine in the place
where it can not be drained.
Please don’t use the washing machine
near the gas tank and other flammable
or explosive gases and liquids.
Safety Precaution

When the machine is
working, you shouldn’t
unplug the power plug
or switch another power
supply. Please don’t plug
or unplug the power plug
by your wet hands.
Please don’t bend, stretch, rotate,strap the
power line or make heavy objects on it. If
there is some damage on the plug, it must
be replaced by our company’s special
maintenance or after-sale service staff, in
order to avoid danger.
Please put the power plug into the
single phase three pole 220V AC
power socket,and the grounding end
of the socket must be reliable
grounded. If the user’s household
electricity can’t meet the safety
requirement (e.g. There is no
grounding wire), it must be handled
by the professionals.
The washing machine shouldn’t be placed on
the airtight carpet.
Please don’t use hot water above 50
degree Celsius.
The washing machine shouldn’t be installed in
the bathroom or other moist places, and never
flush it with water.
Washing the raincoat, car hood and other
water proof clothing are prohibited.
Do not use the same socket with other electrical appliance,
if the plug and the socket is with loose, please don’t use.
Safety precaution

Check the attachment
It can prevent the rats from entering the
machine to destroy the wires.
Assemble steps:
.Lay the washing machine face up, and ensure its
back is not attrited;
.Place the plate onto the bottom of the machine, and
secure it to the bottom of the machine with screws;
.Once all the screws are tightened and the plate is
secured, return the washing machine to its standing
position.
Please set the drain hose as follows:
.
.
.
.
Please set the height of the drain hose not more than 10cm.
Once exceed the limited height, it will result in poor drainage or no drainage.
Do not trample the drain hose.
If the drain hose is too long, you can cut it as your needs; if it is too short,
please use the drain hose(extended) in the attachment to lengthen the drain
hose.
Installation and adjustment

Connection of water inlet pipe
Smoothly placed the washing machine can reduce the noise
and vibration, please adjust the washing machine to be smooth
before use it.
.Loosen the locked nut with a wrench.
.
.
.
.
Adjust the washing machine to be smooth by adjusting the height of
the foot (Totally 5 feet). ).
Tighten the locked nut by a wrench along the rotating direction after
adjusting the feet to be smooth.
The distance between washing machine and wall is at least 5cm.
The maximum allowable tilted angle of washing machine‘s
supportable surface is 20 degree.
Please use the new water inlet pipe attached to you, the old can not be reused.
a. Choose the right faucet b.Take off the water inlet pipe joint
The front end length of faucet is more than
10mm, and the outlet side is smooth, in order
to avoid leaking.
①Press and hold the lower end of the locking lever.
②Press down the slider and take off the water inlet
pipe joint.
c. Install the water inlet pipe joint
①Uncover the tag.
②Adjust the nut and make it to expose
3-4 threads.
③Loosen the four screws on the water inlet pipe joint
until the joint can be put on the faucet.
④If the water inlet pipe joint can’t be put on the faucet,
remove the bushing.
⑤Tighten the four screws evenly, and then tighten the
nut until the water isn’t penetrated.
Installation and adjustment

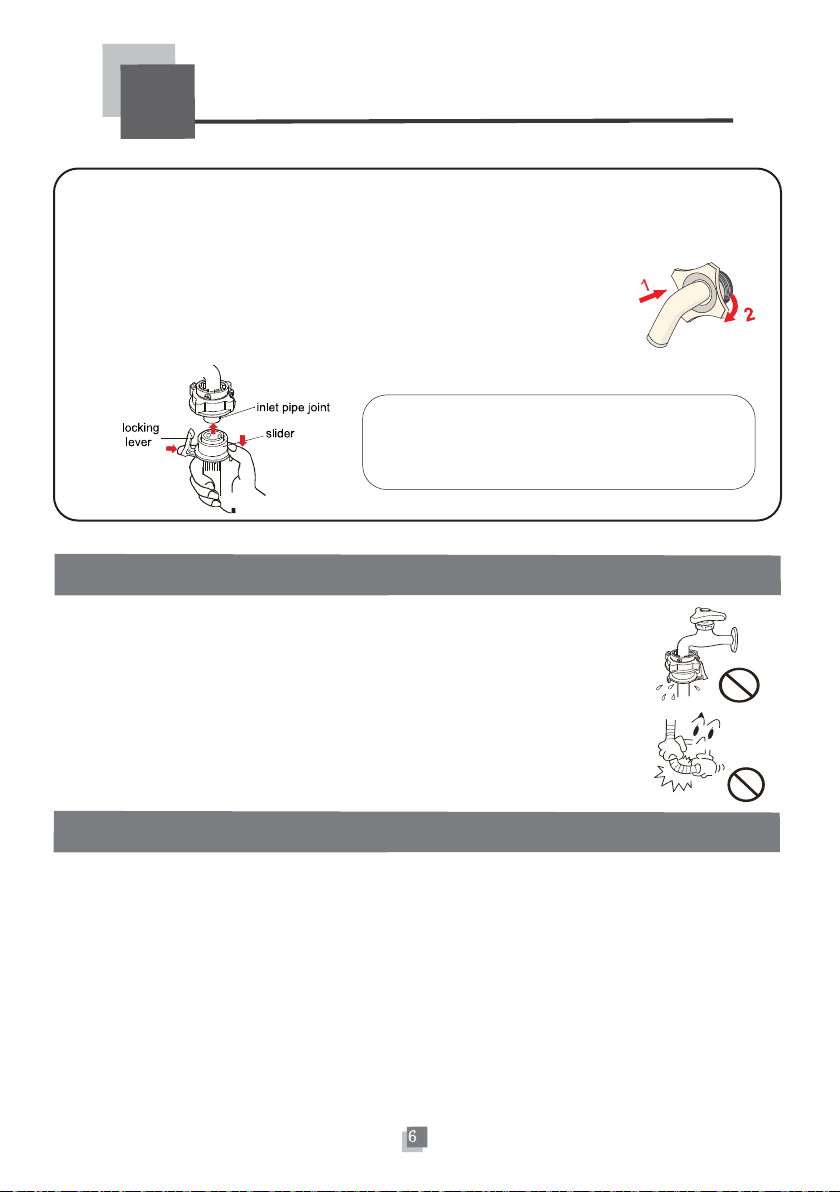
d. The connection of water inlet
pipe and its joints
①Press down the slider and insert
the water inlet pipe to its joints.
②Make the locking lever to hook
the joint of the water inlet pipe
and put down the slider until hear
”bang”.
e. The connection between water inlet pipe
and the washing machine
①Put the nut of the water inlet pipe
joint into the water inlet the upper
part on the washing machine.
②Tighten the nut of the water inlet
pipe joint to the right and confirm
that it is in place.
Note:
If the water-absorbent pad is loose or damaged,
please contact the company’s after-sale service
department.
Check the installation status of the water inlet pipe
Check before switching on the power
1. Check whether the connection of the water inlet pipe is firm.
2. After installing, open the regulator and check whether leaking water.
3. Do not bend the inlet pipe strongly.
4. Before using the washing machine, please check and confirm that
the connection between the regulator and the water inlet pipe is
firm.
1. Check that whether the socket could withstand the washing machine‘s maximum power
load. But for security, the socket’s maximum safe current should not less than the
maximum load current of the power line plug.
2. Check that whether the power supply voltage meets the required values.
3. Check that whether the socket is in conformity with the plug of the washing machine.
If not, replace the socket or the power line to make it consistent. If need to replace the
power line, it should be done by the professional or you need to contact the special
maintenance point of the company.
Installation and adjustment

Preparation

Notes
Washable laundry
The capacity of washing and spinning is the maximum weight of washing and spinning
the laundry.
The weight of soaking, washing,rinsing and spinning for big tub is 7Kg and below (In
Wool program the capacity of washing is 1Kg and below).
The weight of washing, rinsing and spinning for small tub is 2.5Kg and below (In Underwear
program the capacity of washing is 1.5Kg and below).
The big tub is suitable to wash work clothes, shirts, coats, jeans, bed clothes and so on.
The small tub is suitable to wash underwear clothes, briefs, pajamas and so on.
Leather products
water proof clothes
Non washed clothes
Decorated things
Tie, suit and premium coats
Clothes using twisting silk(generally has the shuttled pattern)
Silk clothes
Artificial silk, copper and ammonia fiber and its mixture
Non washable laundry
Preparation

Operational guidance
The control panel module
9
Strong
Quick
Delicate
Standard
Normal
Duvet
Wool
Tub
Clean
Water
Level
Delay
Soak
Wash
Rinse
Spin
Normal
Kids
Underwear
Quick
Delicate
Standard
Wash
Rinse
Spin
Water
Level
Delay
Remain
Remain
Delay
Delay

0
Operational guidance
The programs(for the big tub)
The big tub totally has eight kinds programs, the details as follows .
Quick
Wash the small or not too dirty clothingDuvet
Wash the bed sheets, towels, curtains
and other bulky textile clothing
Gentle washing suitable for washable
wool clothing
Programs Explaination
Normal Common wash
Programs Explaination
Wool Delicate For the delicate clothing;
Standard A default state including soak function,and it is
suitable for washing dirty clothing
P
Heavy
For the bulky or dirty clothing;
Tub Clean
For the tub cleaned itself.The cycle
time is about 12 hours, don’t turn off
the power.
Soak/Wash/Rinse/Spin/Water level/Delay (for the big tub)Q
.Soak
It is a running program to wash the dirty laundry effectively before washing but after water inlet.
.It can set different soaking time in the Normal, f
Duvet, Heavy and Delicate programs by pressing
The Wool and Quick programs don’t have soaking function,so the [Soak] key is not
Wash / Rinse / Spin
.The Normal, Duvet,Heavy and Duvet programs can set different washing time, times of rinsing and
spinning time, and can add or minish the time/times by pressing the ‘ + ’ or ‘ - ’.
.
.
.
Under the Normal and Standard programs, the washing machine can automatically detect the weight
of clothing and set an appropriate water level between 2/4/6/8/10.
Water level
the ‘ + ’ or ‘ - ’;
Delay
The big tub
When select the Delay mode, the Delay light is on and the time display “0”. when press the
‘ + ’ or ‘ - ’ once, the digital will add or monish, and the units is hour.
After delay running, if you want to change the delay time, you need to press the power key to start
machine and set again.
displayed.

Operational guidance
R / U Start/Pause key (for two tubs)
The programs (for the small tub)
The small tub totally has six kinds programs, the details are as follows.
Underwear
Wash the underwear clothing
Quick
Wash the small or not too dirty clothing
Programs Explaination
Normal Common wash
S
Wash/Rinse/Spin/Water level/Delay (for the small tub)
T
Wash / Rinse / Spin
The Normal, Underwear, Kids and Delicate program can set different washing time, times of rinsing
and spinning time.The user the adjust the parameters by press the ‘ + ’ and ‘ - ’.
Touch the [ ] key after power on, the washing machine will run, then touch it again, the washing
machine will stop. It can control the machine to start or pause in any program.
.
.Under the Normal and Standard program, the washing machine can automatically detect the weight
of clothing and set an appropriate water level between 2-3.
Water level
.When the washing water level is 2-3, the rinsing and washing water level is consistent. In addition, you
can freely set the water level.
Delay
Please refer to the Delay for the big tub in page 10.
.
Delicate Wash the delicate clothing
Standard A default state including soak function, and it is suitable for washing dirty clothing
Kids Wash the kids clothing
The small tub
.

V Child lock key (for two tubs)
.Press the [ Child lock ] key, the corresponding lights lit, and the digital will display ‘CL’. After starting
the machine, the buzzer will alarm for 3 times, and the [ ] light keeps lit perpetually, then the
child lock function for the two tubs start.
.The child lock function can be disengaged or increased at any time during operation. Press the
[ Child lock ] key for more than 3 seconds, the buzzer will alarm for 3 times, the display shows
‘CL’, and then the corresponding [ ] light is off or on.
.In the condition of child lock opening, no matter the program is running at the end stage or the
machine is suddenly cut off, once power on again, the default stage is that child lock function is
open.
W The power key
.Press the [ ] key, it indicates the power is on. Press this key again, and then the power is off.
Notice
.You can press “L-tub Cycle” to choose the L-tub Cycle for the big tub (Choose one of the
Normal, Duvet, Wool, Tub clean, Heavy, Quick, Delicate and standard program as your
needs); You can press “R-tub Cycle” to choose the R-tub Cycle for the small tub (Choose
one of the Normal, Kids, Underwear, Quick, Delicate and standard programs as your needs).
.You can press “L-tub Operation” to choose the L-tub parameter for the big tub (Choose one
of the Soak, Wash, Rinse, Spin, Water level and Delay modes as your needs); You can press
“R-tub Operation” to choose the R-tub parameter for the small tub (Choose one of the Wash,
Rinse, Spin, Water level and Delay modes as your needs).
.You can press the ‘ + ’ and ‘ - ’ on the left to adjust the parameter for the big tub; and press
the ‘ + ’ and ‘ - ’ on the left to adjust the parameter for the big tub;

laundry
The big tub and the small tub of the washing machine can be controlled separately,
Please choose the big or the small separately or all of them to be used depending
on your demands.
3

Washing process
4
Close the lids
Power on
Program selection
Washing parameter adjustment
The left blue part of the touch screen is the big tub’s program area, and the other is the small tub’s
Please refer to the “Operational guidance” to choose the appropriate program for the corresponding
washing machine.
Please refer to the “Operational guidance” to adjust the washing parametre for the corresponding
washing parameter.
.
.
.
.
.
Turn off the power.
Remove the laundry.
After washing, please take out the washing clothes in time. If
placed for a long time, clothes are prone to fold, breed bacteria,
or produce odor.
Open the big/ small lid of washing machine .
Please open the washing machine lid for a period of time (about
an hour) in order to keep the inside of the washing machine dry,
after air dried, close the lid.
Close the faucet.
Please turn off the faucet after washing to prevent leaking water.
Unplug the power plug.
Please do not plug the power plug with wet hands to prevent electric
shock.
Note: Washing completed.
.
.
.
.
Press the [ ] key to switch the power on.
If the machine is switched on without operation more than ten minutes, it
will automatically switch off the power.
Press the [ ] key again to switch power off, when the machine has to
be turned off during its operation.
When the power supply is off abruptly, and then provide power normally
again, washing machine will continue to run as before.
power key

15
Cleaning and maintenance
Before cleaning, be sure to unplug the power plug from the outlet.
abc
d e
a. Uncover the inlet pipe;
b. Remove the filter with a sharp-pointed plier;
c. Clean the filter with a soft brush
Water inlet valve
Lint filter
Cabinet
a. Press the upper terminal
of the lint filter and pull
out the lint filter.
c. Close the upper
lid of the lint filter
after cleaning.
d. Install the filter
e.Connected to the water inlet pipe once again
b. Pull up and open the lint
filter’s back cover, and
clear the thread chips
in it.
d. Fit the lint filter.
When the washing is finished, close the faucet and remove the water inlet.
The power plug must be unplugged before maintenance.
Hang the power line and the drain hose.
Wipe the surface of the washing machine and the droplet of the tub with a clean soft cloth.
And open the lid for a period of time (about an hour), then close the lid after air dried.
a. Do not flush the cabinet with water directly.
b. Wipe it with a neuter detergent.
c. Do not wipe it with thinner, gasoline, alcohol
and other volatile items.
Notice
.
.
.
.
once a mounth
after washing
when the cabinet is dirty
The lint filter must be used during washing, and it
must be cleaned timely after each use.

16
Questions and answers

17
Questions and answers

18
261NZP
Specification
Table of contents
Other Haier Washer manuals

Haier
Haier HBS800 User manual

Haier
Haier HW-B1470 User manual

Haier
Haier HWM96-0613S User manual

Haier
Haier PFL510W-u User manual

Haier
Haier HW70-1202D User manual

Haier
Haier HW80-B14876 User manual

Haier
Haier HW80-B1486 User manual

Haier
Haier HWM60-728 User manual

Haier
Haier HWD 105-B14959S8U1 User manual

Haier
Haier HNS1460TVE-FD User manual

Haier
Haier HWM80-0528 User manual

Haier
Haier HN800TX User guide

Haier
Haier HW90-B1439 User manual

Haier
Haier HWM180-M1990DD User manual

Haier
Haier HLT23E - 07-04 User manual

Haier
Haier WNM1000TE User manual

Haier
Haier HMS1460B User manual

Haier
Haier HW70-1001 User manual

Haier
Haier HVS1200ME User manual

Haier
Haier HW-CS850TXVE User manual