Haklift KTHA250 User manual

1
HAKLIFT
Chain block
Wciągnik łańcuchowy
User manual | Instrukcje dla
użytkowników
EN, PL
KTHA08222019EN/PL
!

2
Haklift Chain Block KTHA 0,25 – 20 t
Instruction for use (GB) (Original instructions)
Read through these user instructions carefully before using the chain block. Improper operation may lead to hazardous situations!
General safety provisions
• Only to be used by trained operator.
• Do not use in explosive or corrosive environment.
• Temperature range: -10°C up to +50°C.
• Check the function of the chain block before use. See “Daily checks” on page 3.
• Full function of the brake system can only be secured at a minimum load of 30 kg for capacities (WLL) up to 1 ton,
and for capacities (WLL) above 1 ton, the minimum load to be greater than 3% of the rated capacity (WLL).
• Do not exceed the maximum load.
• Handle the chain block with care. Do not throw the block about or let it fall to the ground.
• Do not use the chain block for welding work where it is exposed to welding spatter or current.
• The chain block must not be used for lifting persons.
Safety factor: 4:1.
Static test coecient: WLL x 1,5.
Generally according to EN 13157.
Data
Model WLL Lifting height Hand force
max. Load chain Number
of falls Hand chain Hand chain
length Weight
Product code (ton) (m) (kg) (mm) (mm) (m) (kg)
KTHA250 0,25 3,0 23,5 4,0 x 12,0 15,0 x 23,7 3,0 6,5
KTHA500 0,5 3,0 24,9 5,0 x 15,0 15,0 x 23,7 3,0 9,8
KTHA1000 1,0 3,0 28,4 6,3 x 19,0 15,0 x 23,7 3,0 13,3
KTHA2000 2,0 3,0 34,3 8,0 x 24,0 15,0 x 23,7 3,0 22,1
KTHA3000 3,0 3,0 34,3 7,1 x 21,0 25,0 x 23,7 3,0 27,3
KTHA5000 5,0 3,0 37,2 9,0 x 27,0 25,0 x 23,7 3,0 42,4
KTHA10000 10,0 6,0 40,0 9,0 x 27,0 4 5,0 x 23,7 6,0 115,4
KTHA20000 20,0 8,0 40,0 9,0 x 27,0 85,0 x 23,7 8,0 200,0
WLL (ton) A B C D H min.
(mm) (mm) (mm) (mm) (mm)
0,25 108 106 20 30 260
0,5 130 128 22 34 280
1,0 150 145 26 39 330
2,0 185 175 35 49 385
3,0 220 158 37 50 510
5,0 255 183 43 60 615
10,0 360 183 47 65 820
20,0 577 183 75 90 1060
Dimensions

23
Function
The load hook is raised or lowered by pulling on the hand chain. The load will remain where it is even when the hand chain is released because of
the eective reaction brake.
Suspension of chain block
Suspend the block from an eye, shackle, girder trolley etc. with sucient load capacity. With the chain tightened, both hooks must be vertically
aligned.
NB! No bending stresses may be applied to block, hooks or load chain.
Raising/lowering
Only use straps and slings of sucient load capacity. Check that the load is not anchored to the oor/ground or is otherwise xed before making
the lift. Ensure that the load chain hangs vertically and has no kinks. The hand chain must also be in good condition and easily accessible. The
load is raised or lowered by pulling the hand chain in either direction.
Warning: Do not overload the brake by prolonged lowering. It may cause brake function to fail.
Warning:
• Only hand power from a single person is permitted on the hand chain. If the chain feels too heavy, use a bigger chain block or reduce the load.
• Make sure no-one stands beneath a hanging load.
• Do not step onto a hanging load.
• Do not raise or lower so far that the load hook hits the block housing.
• The chain block must not be used for pulling loads.
• The block must not be subjected to dynamic stresses, for example where a load connected to the block is launched from a height.
• Do not leave a block with a suspended load unattended.
Attachment of loads
Check the equipment before use. Improper attachment of loads can be highly dangerous (see Figs. 2 a – 2 e).
Fig 2 a
The sling is applying
load to the hook tip
Fig 2 b
Excessive top angle
on sling!
α max. 60°
Fig 2 c
Hook latch
obstructed
Fig 2 d
Hook tip
subject to additional
bending stress
Fig 2 e
Load chain must not
be used as a sling
Multiple lifting
Multiple lifting entails special risks. This is is when two or perhaps more hoists are used simultaneously for the same load. Danger to persons and
material damage can arise due to dynamic stresses and uneven load distribution causing individual hoists to become overloaded. A competent
person with experience in multiple lifting must therefore supervise this type of lifting tasks. The total weight of the target object and its load distri-
bution must be known or calculated.
For a variety of reasons, the centre of gravity can be dicult to determine, and thus so will the distribution of the load each chain hoist must bear.
In cases where heavy, bulky loads must be handled and it is not possible to estimate all factors correctly, the working load limit (WLL) of each
chain hoist must be reduced by at least 25%.
Daily checks
After every working day on which the chain block has been used, the following should be checked:
• Is the chain block deformed or otherwise damaged? Are any parts missing?
• Is any deformation or other damage visible on the suspension device (eye, shackle, bolt, trolley etc.)?
• Are the hooks intact or have any hooks opened? Are the hook latches correct and functional?
• Wipe down the chain block and oil the load chain as required.
• The load chain must be undamaged, i.e. no signs of wear and no deformed or otherwise damaged links.
• The load chain must not be kinked or twisted. With two-fall or multi-fall chain blocks there is a risk of the chain twisting if the bottom hook
assembly ends up looped through the chain sling – usually during retting or moving the chain block between work stations. See Fig 3.
• The hand chain must also be in good condition.
• The brake function must be intact.
In the event of faults or failures, the block must be repaired and carefully checked by a specialist before reuse.
Continuous maintenance - lubrication
Oil the hook latches and bearings. Grease the pawl and ratchet and also the gear. Lubrication must be sparingly and carefully applied so no grea-
se gets on the brake disk. Oil the load chain for longer life.
Periodic checks
Periodic checks are normally carried out yearly to detect and remedy any faults. If required (e.g. high frequency of use), more frequent checks
may be carried out. See “Checklist for periodic checks”. Measure hooks and chain to detect any changes in shape.

4
Checks on load hook (see Fig. 4 and Table 1)
Opening dimension C on the hooks is important. A hook with too
large a maximum dimension has been exposed to overloading
or overheating. It therefore does not have the necessary load
capacity. The hooks may also have been exposed to long-term
wear (dimension K).
Hooks must be discarded and replaced if:
• The maximum C value is exceeded (according to Table 1)
• The minimum K value falls short (according to Table 1)
• The hook shows signs of cracking
• The hook is deformed or otherwise damaged
Defective hooks must be replaced before using the chain block
again.
Table 1 Load hook
WLL (t) 0,25 0,5 1 2 3 5 10 20
Model KTHA250 KTHA500 KTHA1000 KTHA2000 KTHA3000 KTHA5000 KTHA10000 KTHA20000
Dimension C nominal mm 24 25,5 30 38,5 41,5 47 55 84
Dimension C max mm 26,4 28,0 33 42,3 45,5 51,7 60,5 92,4
Dimension K nominal mm 15 19 25 33,5 39 44,5 62 93
Dimension K min mm 13,5 17,1 22,5 30,2 35,1 40,0 55,8 83,7
Checks on load chain (see Fig. 5 and Table 2)
Inspect the load chain over its whole length to detect any deformed or otherwise damaged links. Make a check measurement of suspect links.
Measure the worn areas Also, every 300 mm (normally), make check measurements of the internal length of 5 links (pitch dimension 5xP – ac-
cording to Table 2).
Fig 5 Checking load chain dimensions
Table 2 Load chain
Max. load (t) 0,25 0,5 1 2 3 5-20
Model KTHA250 KTHA500 KTHA1000 KTHA2000 KTHA3000 KTHA5000-20000
Link diameter nominal mm 4,0 5,0 6,3 8,0 7,1 9,0
Link diameter min. mm 3,6 4,5 5,7 7,2 6,4 8,1
Pitch dimension (5xP) nominal mm 60,0 75,0 95,0 120,0 105,0 135,0
Pitch dimension (5xP) max. mm 61,8 77,2 98,0 123,5 108,1 139,0
The load chain must be discarded and replaced if:
• cracks are detected on any link
• any link is deformed or otherwise damaged
• The minimum value of any link’s diameter falls short
• the maximum value of the pitch dimension is exceeded at any point
• the chain is damaged by overheating or has been aected by weld splatter
Load chains must not be repaired – they must be replaced by new chain. If it is desired to lengthen the chain, it must be replaced by a new and
longer chain.
Replacement of the chain shall be performed professionally by an authorized repairer and the chain must meet the requirements stated in the
standard EN 818-7.
Fig. 3 The chain must not be twisted Fig. 4 Load hook
C

4 5
Checklist for periodic checks (normally yearly – more frequently if necessary)
Daily Yearly Inspection items Inspection method Note
Labels
X X Rating plate Visual If the plate is hard to read - replace it
Function
X X Raising and lowering function Test without load A low snapping noise should be audible
-XRaising and lowering function Test with rated weight
for min 300 mm
Load chain sprocket and chain work well together.
Brake works.
Hand pulling on the hand chain feels even and
not too heavy
Hooks
X
-
-
X
Hook opening Visual
Measurements
Looks normal
See Fig. 4 and Table 1
X X Deformation Visual No visible deformation
X X Hook bearing Visual No abnormal play
X
-
-
X
Wear, cracks, deformation and corrosion Visual
Measurements
No visible damage
See Fig. 4 and Table 1
X X Hook latches Visual Works, spring undamaged
Load chain
X
-
-
X
Pitch Visual
Measurement
Looks normal. Measure in case of doubt
See Fig. 5 and Table 2
X
-
-
X
Wear Visual
Measurement
Looks problem-free. Measure in case of doubt
See Fig. 5 and Table 2
X X Deformation Visual No deformation. Measure in case of doubt
X X Cracks etc. Visual No cracks
X X Rust Visual No rust
Housing
X X Frame Visual No deformation and no rust
X X Gearbox Visual No deformation
-XGears Visual after dismantling No serious wear or fractures
-XLoad chain sprocket Visual after dismantling No serious wear or cracks.
No fractures or deformation
-XHand chain sprocket Visual No serious wear or cracks.
No fractures or deformation
-XBearings Visual, testing No damage, smooth running
Screws
X X Screws, nuts, rivets, cotters etc. Visual Must not be missing. Tighten loose items.
Replace as necessary
Brake
-XBrake disk Visual Replace if worn
-XBrake screw Visual No serious wear
-XPawl and ratchet Visual Replace worn parts.
Carefully lubricate with grease
Repairs
The chain block must not be modied. Repairs must be carried out by specialists. Damaged parts must only be replaced with original Haklift spare
parts.

6
Haklift wciągnik łańcuchowy KTHA 0,25 – 20 t
Instrukcje dla użytkowników (PL) (Tłumaczenie z oryginału)
Przed użyciem wciągnika łańcuchowego należy zapoznać się z instrukcją użytkowania. Nieprawidłowe użycie może być przyczyną zagrożenia!
Ogólne zalecenia dotyczące bezpieczeństwa
• Do stosowania wyłącznie przez przeszkolonego pracownika.
• Nie używać w środowisku zagrożenia wybuchem lub powodującym korozję.
• Zakres temperatur: -10°C - +50°C.
• Przed użyciem należy sprawdzić funkcjonowanie wciągnika. Patrz „Inspekcje codzienne” na stronie 7.
• Nie przekraczać maksymalnego obciążenia.
• Należy ostrożnie obchodzić się z wciągnikiem. Nie rzucać wciągnika ani nie dopuszczać do jego upadku na podłoże.
• Nie używać wciągnika do prac związanych ze spawaniem, jeżeli może być narażony na odpryski lub wysokie natężenie prądu.
• Nie używać wciągnika do podnoszenia osób.
Wsp. bezp. 4:1
Wsp. obciążenia testowego DOR x 1,5
Zasadniczo zgodny z EN 13157.
Dane techniczne
Model Maks. ob-
ciążenie
Wysokość
podnoszenia
Maks. siła
uciągu
Łańcuch
nośny
Liczba
punktów Liczba cięgien Liczba cięgien
długość Waga
Nr art. (ton) (m) (kg) (mm) zawiesze-
nia (mm) (m) (kg)
KTHA250 0,25 3,0 23,5 4,0 x 12,0 15,0 x 23,7 3,0 6,5
KTHA500 0,5 3,0 24,9 5,0 x 15,0 15,0 x 23,7 3,0 9,8
KTHA1000 1,0 3,0 28,4 6,3 x 19,0 15,0 x 23,7 3,0 13,3
KTHA2000 2,0 3,0 34,3 8,0 x 24,0 15,0 x 23,7 3,0 22,1
KTHA3000 3,0 3,0 34,3 7,1 x 21,0 25,0 x 23,7 3,0 27,3
KTHA5000 5,0 3,0 37,2 9,0 x 27,0 25,0 x 23,7 3,0 42,4
KTHA10000 10,0 6,0 40,0 9,0 x 27,0 4 5,0 x 23,7 6,0 115,4
KTHA20000 20,0 8,0 40,0 9,0 x 27,0 85,0 x 23,7 8,0 200,0
Maks. obciążenie (ton) A B C D H min.
(mm) (mm) (mm) (mm) (mm)
0,25 108 106 20 30 260
0,5 130 128 22 34 280
1,0 150 145 26 39 330
2,0 185 175 35 49 385
3,0 220 158 37 50 510
5,0 255 183 43 60 615
10,0 360 183 47 65 820
20,0 577 183 75 90 1060
Wymiary

67
Zastosowanie
Hak jest podnoszony lub opuszczany przy użyciu łańcucha ręcznego. Ładunek jest unieruchamiany przez hamulec nawet po zwolnieniu łańcu-
cha.
Zawieszanie wciągnika łańcuchowego
Wciągnik można zawiesić na zaczepie, szakli, wózku z dźwigarem itp. o odpowiedniej nośności. Po naprężeniu łańcucha oba haki należy
wyrównać w płaszczyźnie pionowej.
Uwaga! Należy chronić wielokrążek, haki i łańcuch do podnoszenia ładunku przed naprężeniem zginającym.
Podnoszenie/opuszczanie
Należy używać wyłącznie pasów i zawiesi o odpowiedniej wytrzymałości. Przed rozpoczęciem podnoszenia należy upewnić się, że ładunek nie
jest przymocowany do podłoża lub unieruchomiony w inny sposób. Należy upewnić się, że łańcuch do podnoszenia ładunku zwisa pionowo i nie
jest zapętlony. Łańcuch ręczny powinien być również w odpowiednim stanie technicznych i łatwo dostępny. Aby podnieść lub opuścić ładunek,
należy pociągnąć łańcuch ręczny w odpowiednim kierunku.
Ostrzeżenie: Nie przeciążać hamulca długotrwałym opuszczaniem. Może to spowodować jego uszkodzenie.
Ostrzeżenie!
• Łańcuch ręczny powinien być ciągnięty tylko przez jedną osobę. Jeżeli przesuwanie łańcucha jest utrudnione, należy użyć większego
wciągnika lub zmniejszyć obciążenie.
• Żadne osoby nie powinny znajdować się pod zawieszonym ładunkiem.
• Nie wolno wchodzić na zawieszony ładunek.
• Nie wolno podnosić lub opuszczać hak do położenia, w którym uderza w obudowę wciągnika.
• Nie wolno używać wciągnika do przeciągania ładunków.
• Należy chronić wciągnik przed naprężeniami dynamicznymi, na przykład w przypadku podnoszenia ładunku z wysokiej platformy
Nie pozostawiać wciągnika z zawieszonym ładunkiem bez nadzoru!
Mocowanie ładunków
Przed użyciem należy sprawdzić wyposażenie. Nieprawidłowe mocowanie ładunków może być przyczyną poważnego zagrożenia
(patrz rys 2 a – 2 e).
Równoczesne korzystanie z kilku dźwigników
Równoczesne korzystanie z kilku dźwigników jest związane ze szczególnymi zagrożeniami. W takim wypadku co najmniej dwa wciągniki
łańcuchowe są używane równocześnie do podnoszenia ładunku. Zagrożenie zranienia operatora i uszkodzenia wyposażenia może wynikać z
naprężeń dynamicznych i nierównomiernego obciążenia powodującego przeciążenie poszczególnych wciągników. Równoczesne korzystanie z
kilku wciągników powinno być nadzorowane przez kompetentną osobę z doświadczeniem w zakresie operacji tego typu.
Inspekcje codzienne
Po każdym dniu roboczym, w którym wciągnik był używany, należy sprawdzić następujące elementy:
• Czy wciągnik jest zdeformowany lub uszkodzony w inny sposób? Czy urządzenie jest kompletne?
• Czy widoczna jest deformacja lub inne uszkodzenie wyposażenia używanego do zawieszania (zaczep, szakla, bolec, wózek itp.)?
• Czy haki nie zostały uszkodzone lub otwarte? Czy zapadki haków funkcjonują prawidłowo?
• Należy oczyścić wciągnik i nasmarować łańcuch do podnoszenia ładunku zgodnie z wymaganiami.
• Łańcuch do podnoszenia ładunku nie powinien być uszkodzony (brak oznak zużycia oraz ogniw zdeformowanych lub uszkodzonych w inny
• sposób).
• Łańcuch do podnoszenia ładunku nie powinien być zapętlony lub skręcony. W przypadku wciągników łańcuchowych z wielokrotnym przeplo-
tem występuje zagrożenie skręcenia łańcucha, jeżeli dolny moduł haka zostanie zapętlony przez zawiesie łańcuchowe (zazwyczaj podczas
ponownego instalowania lub przenoszenia wciągnika do innej stacji roboczej). Patrz rys. 3.
• Łańcuch do podnoszenia ładunku powinien być w dobrym stanie technicznym
• Hamulec powinien funkcjonować prawidłowo.
W przypadku usterek lub awarii należy przekazać wciągnik specjaliście w celu dokładnego sprawdzenia i naprawy przed ponownym użyciem.
Bieżąca konserwacja – smarowanie
Należy nasmarować zapadkę haka i łożyska. Nasmarować także mechanizm zapadkowy i przekładnię. Uważnie nakładać niewielką ilość smaru,
aby nie zanieczyścić tarczy hamulca. Należy nasmarować łańcuch do podnoszenia ładunku, aby wydłużyć okres użytkowania.
Inspekcje okresowe
Okresowe inspekcje należy przeprowadzać co roku w celu wykrycia i usunięcia ewentualnych usterek. Jeżeli jest to konieczne (np. w przypadku
intensywnego użytkowania), można przeprowadzać inspekcje częściej. Zobacz „Lista kontrolna inspekcji okresowych”.
Rys. 2 a
Zawiesie przenosi
obciążenie
na końcówkę
haka!
Rys. 2 b
Zbyt duży kąt górny na zawi-
esiu!
α maks. 60°
Rys. 2 c
Zablokowana zapadka haka!
Rys. 2 d
Końcówka haka narażona
na dodatkowe naprężenie
zginające!
Rys. 2 e
Łańcuch do podno-
szenia
ładunku nie
powinien być używany
jako zawiesie!

8
Należy przeprowadzać pomiary haków i łańcucha w celu
wykrycia ewentualnych zmian kształtu.
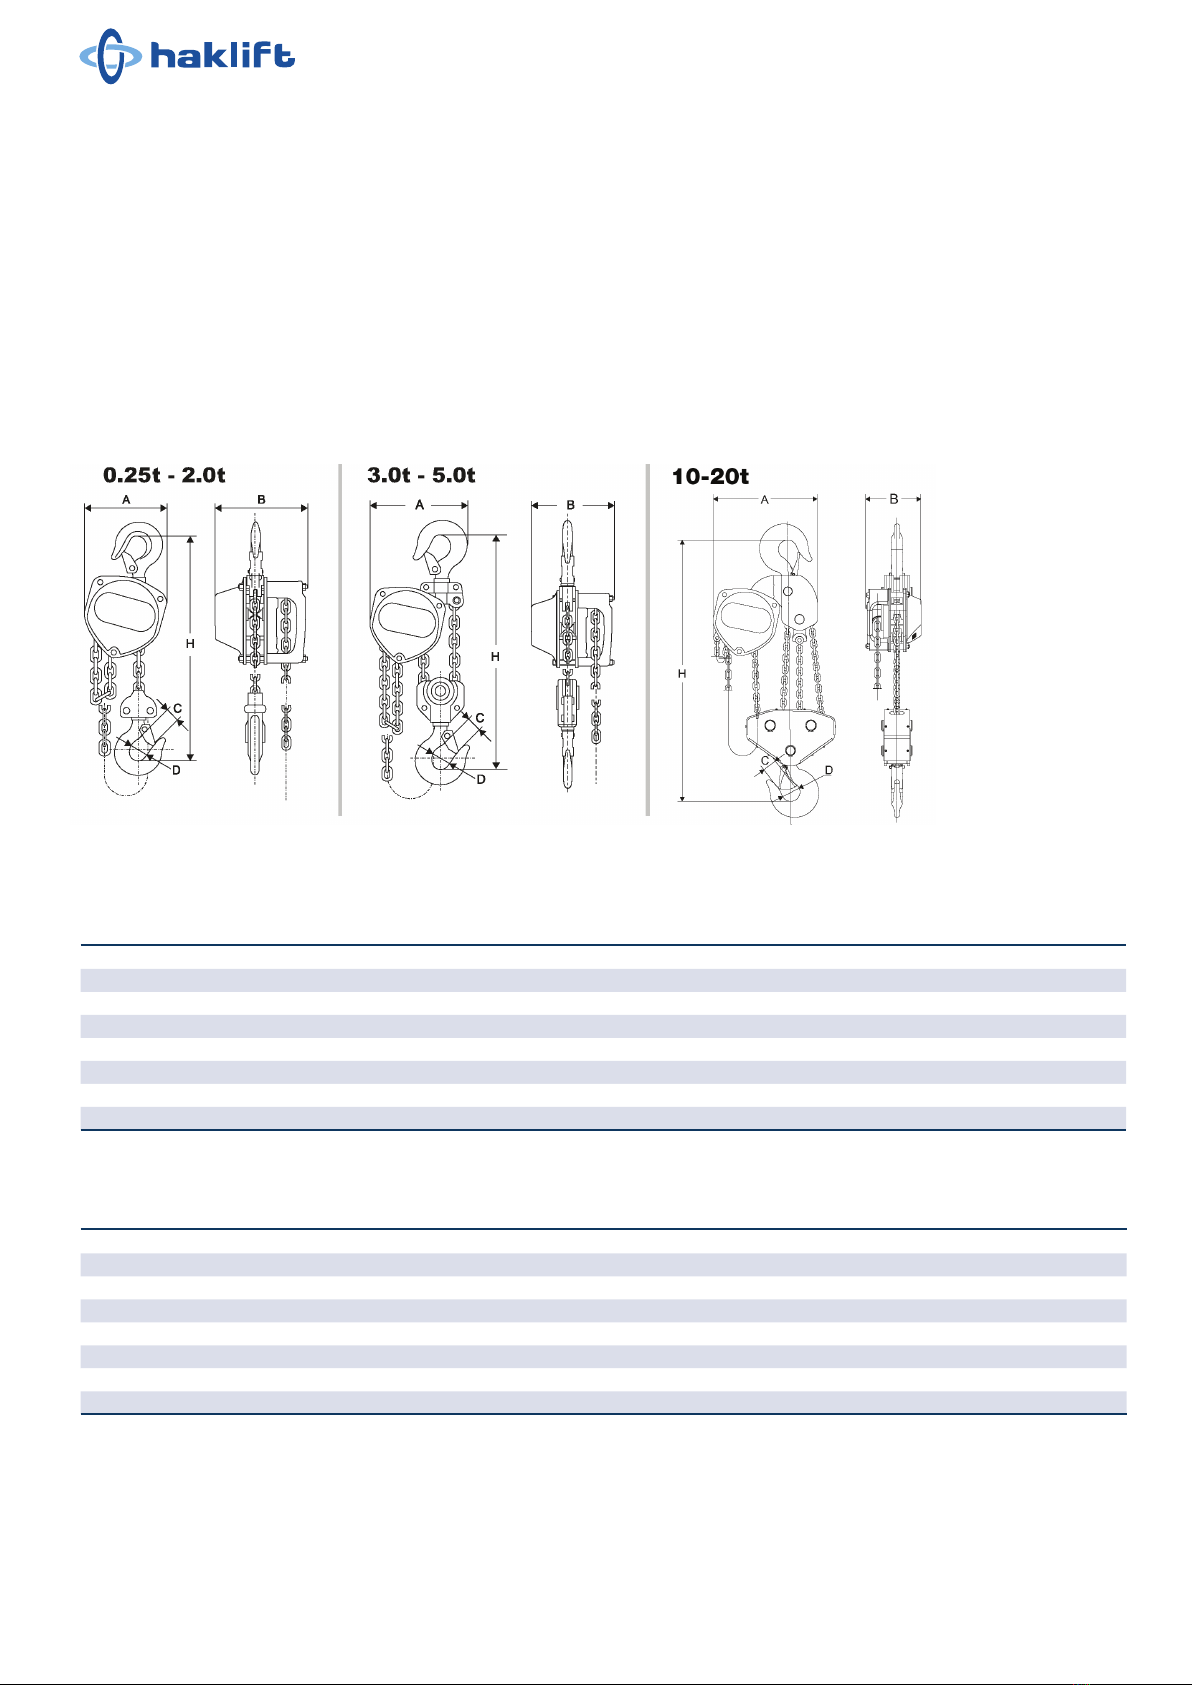
Inspekcje haka do mocowania ładunku (patrz rys. 4 i tabela 1)
Wymiar C otwarcia haka jest ważny. Zbyt duży wymiar oznacza, że
hak był narażony na przeciążenie lub przegrzanie. Nośność haka nie
jest więc dostateczna. Haki mogą być również narażone na długoterminowe
zużycie (wymiar K).
Haki należy złomować i wymieniać w następujących okolicznościach:
• Przekroczenie maksymalnej wartości C (zgodnie z tabelą 1).
• Przekroczenie minimalnej wartości B (zgodnie z tabelą 1).
• Na powierzchni haka widoczne są pęknięcia.
• Hak jest zdeformowany lub uszkodzony w inny sposób.
Uszkodzone haki należy wymienić przed ponownym użyciem wciągnika łańcuchowego!
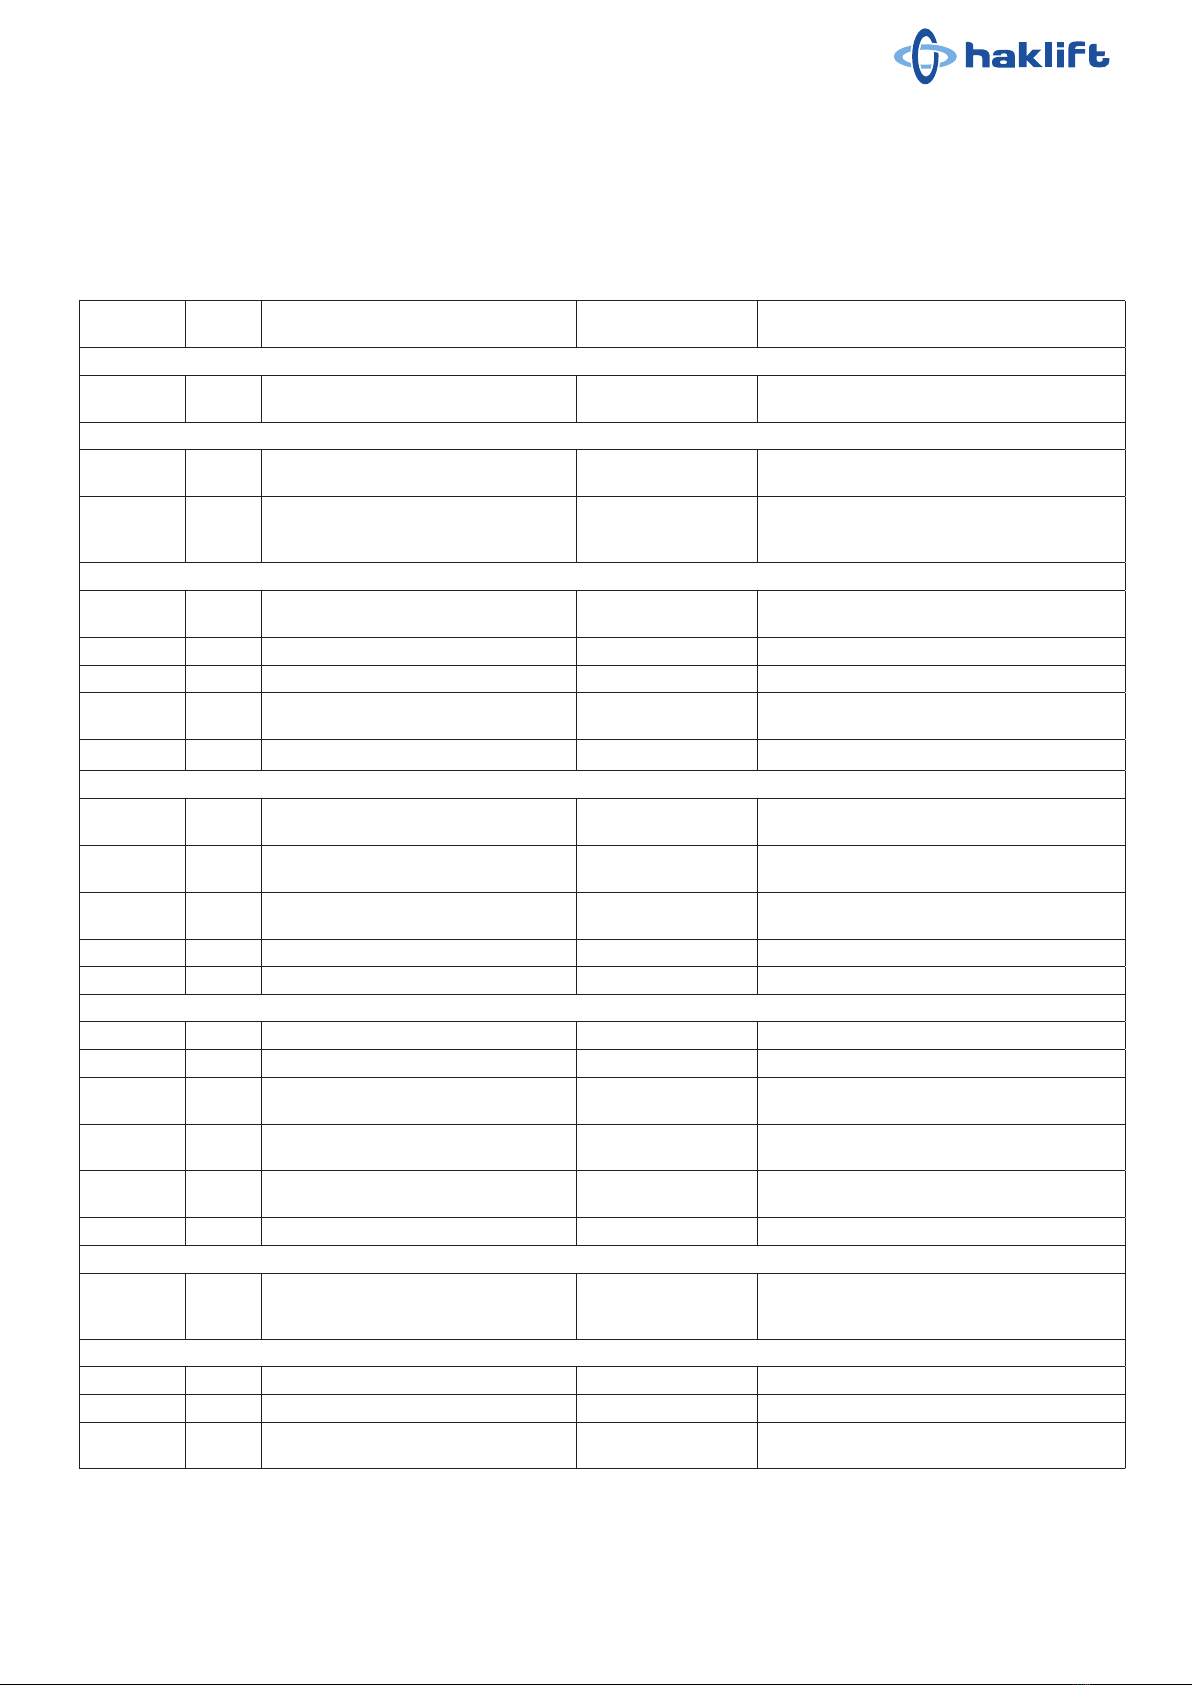
Tabela 1 Hak do mocowania ładunku
Maks. obciążenie ton 0,25 0,5 1 2 3 5 10 20
Model KTHA250 KTHA500 KTHA1000 KTHA2000 KTHA3000 KTHA5000 KTHA10000 KTHA20000
Wymiar C (nominalny)
mm
24 25,5 30 38,5 41,5 47 55 84
Wymiar C (maks.) mm 26,4 28,0 33 42,3 45,5 51,7 60,5 92,4
Wymiar K (nominalny)
mm
15 19 25 33,5 39 44,5 62 93
Wymiar K (min.) mm 13,5 17,1 22,5 30,2 35,1 40,0 55,8 83,7
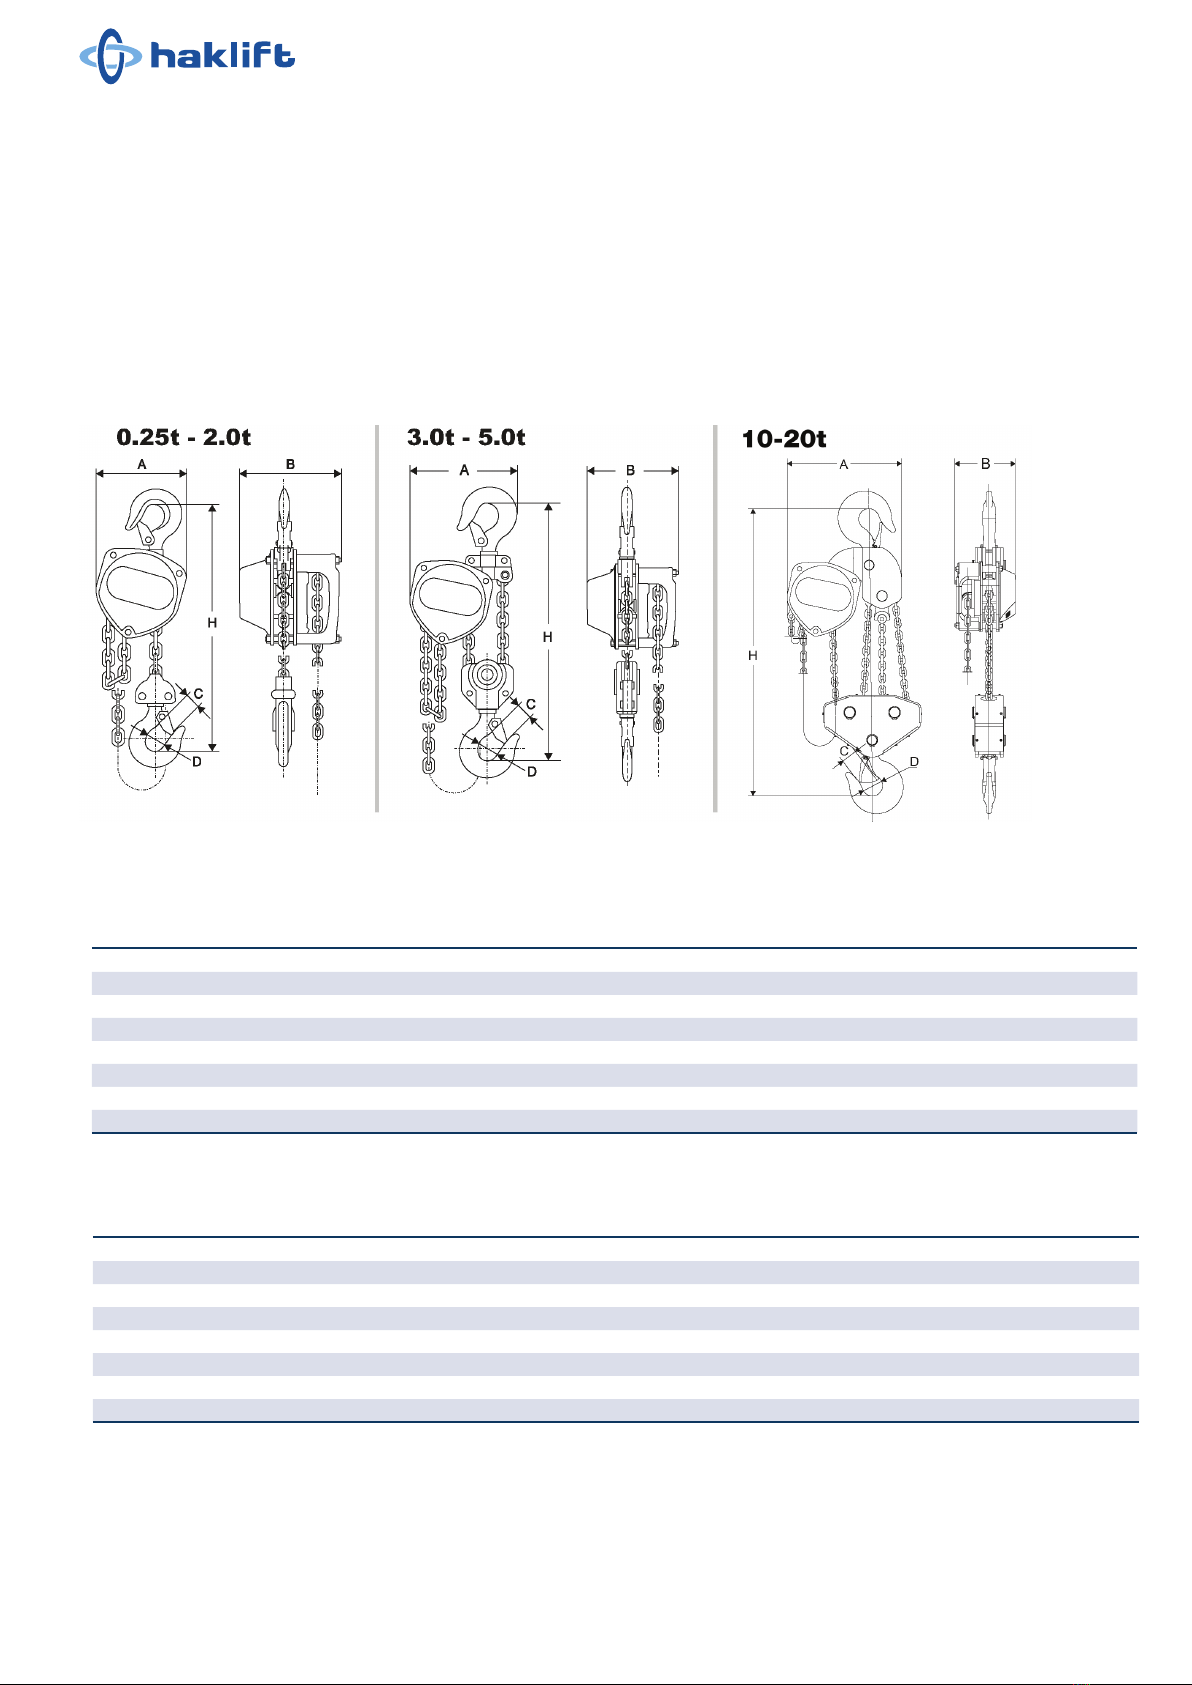
Inspekcje łańcucha do podnoszenia ładunku (patrz rys. 5 i tabela 2)
Należy sprawdzić łańcuch do podnoszenia ładunku na całej długości w celu wykrycia ogniw zdeformowanych lub uszkodzonych w inny sposób.
Przeprowadzić pomiary kontrolne podejrzanych ogniw. Należy przeprowadzić pomiary obszarów ulegających zużyciu (zazwyczaj co 300 mm) i
pomiary kontrolne wewnętrznej długości 5 ogniw (wysokość 5 x P zgodnie z tabelą 2).
Rys. 5 Sprawdzanie wymiarów łańcucha
Tabela 2 Łańcuch do podnoszenia ładunku
Maks. obciążenie (ton) 0,25 0,5 1 2 3 5 10 20
Model KTHA250 KTHA500 KTHA1000 KTHA2000 KTHA3000 KTHA5000 KTHA10000 KTHA20000
Średnica ogniwa nominalna mm 4,0 5,0 6,3 8,0 10,0 9,0 10,0 9,0
Średnica ogniwa min. mm 3,6 4,5 5,7 7,2 9,0 8,1 9,0 8,1
Wysokość (5 x P) nominalna mm 60,0 75,0 95,0 120,0 150,0 135,0 150,0 135,0
Wysokość (5 x P) maks. mm 61,8 77,2 98,0 123,5 154,5 139,0 154,5 139,0
Łańcuch do podnoszenia ładunku należy zezłomować i wymienić w następujących okolicznościach:
• pęknięcie ogniwa,
• deformacja lub inne uszkodzenie ogniwa,
• przekroczenie minimalnej średnicy ogniwa,
• przekroczenie maksymalnej wysokości ogniwa w dowolnym punkcie,
• uszkodzenie łańcucha na skutek przegrzania lub odprysków przy spawaniu.
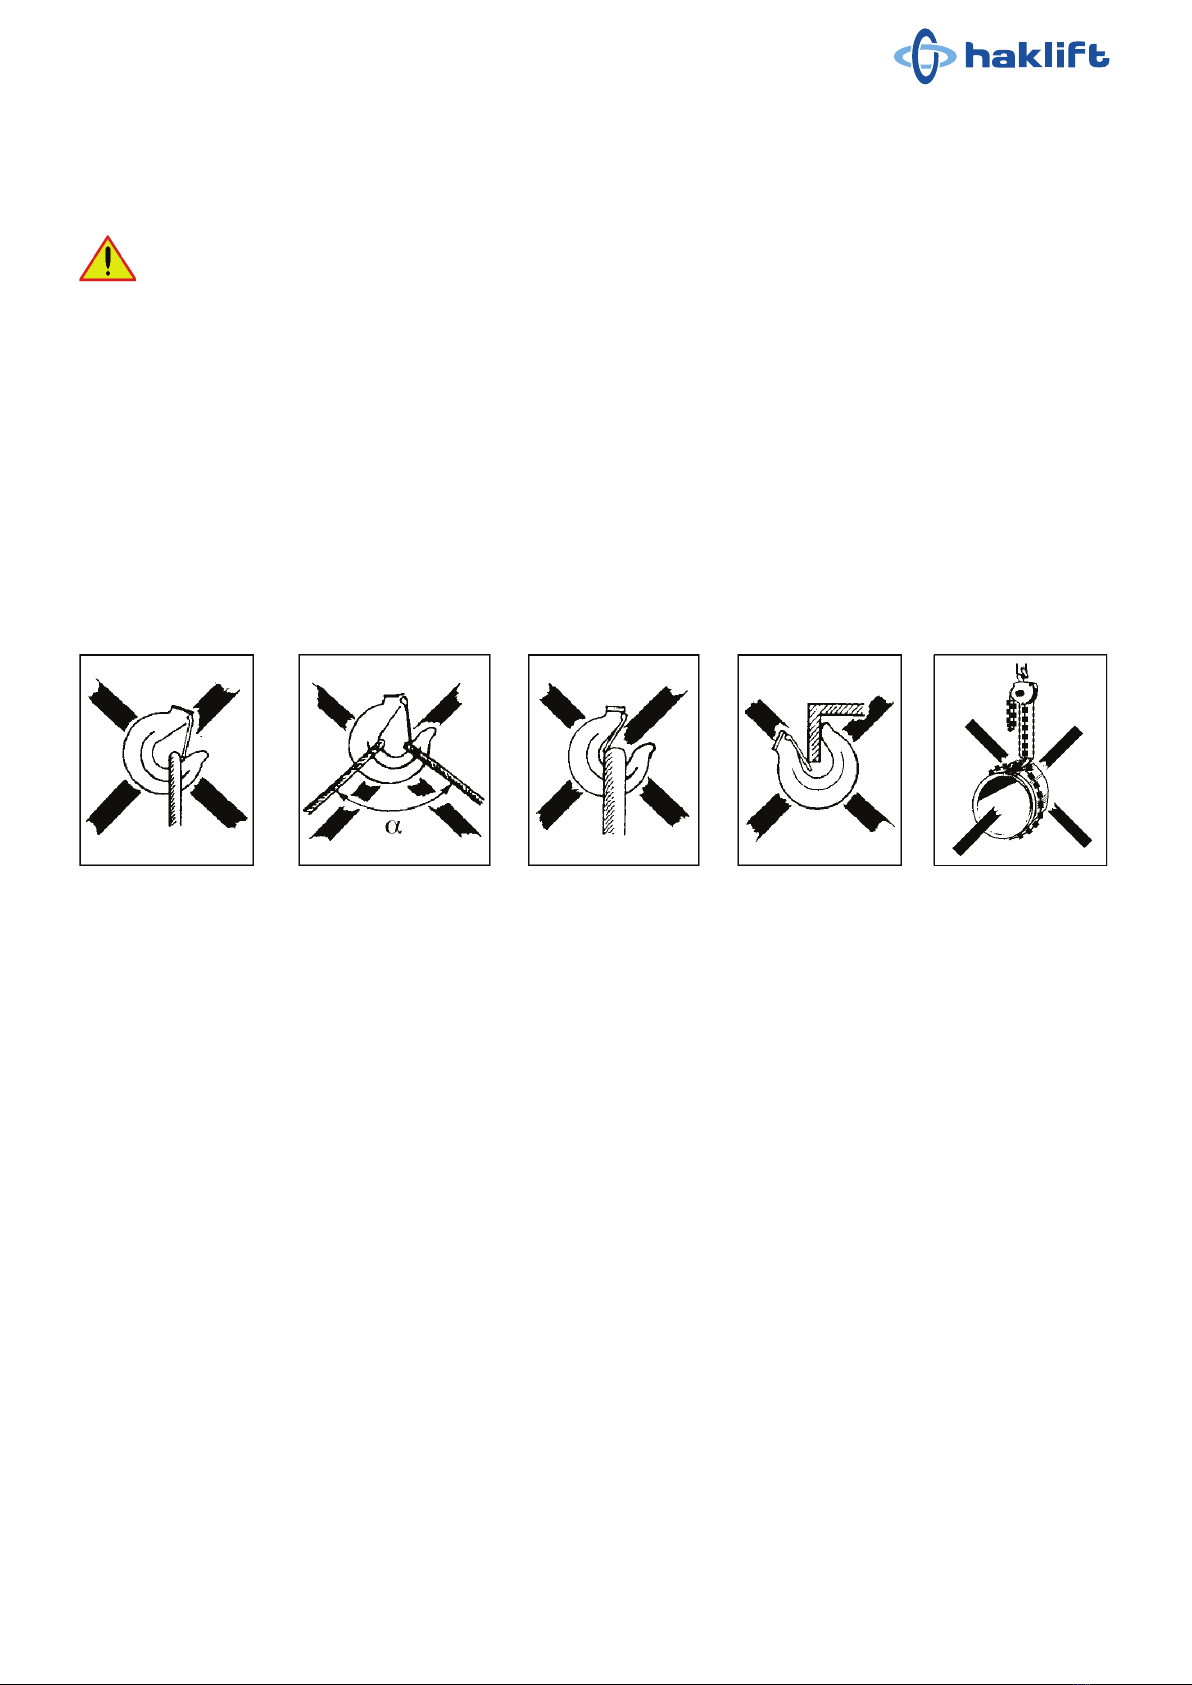
Łańcuchy do podnoszenia ładunku nie powinny być naprawiane – konieczna jest wymiana łańcucha. Jeżeli konieczne jest przedłużenie łańcucha,
należy go wymienić na nowy, dłuższy łańcuch.
Rys. 3 Łańcuch nie powinien być. Rys. 4 Hak do mocowania ładunku.
Skręcony łańcuch!
Prawidłowo Nieprawidłowo

8 9
Wymiany łańcucha należy dokonać w spsób profesjonalny przez autoryzowany warsztat, a sam łańcuch musi spełniać wymagania określone w
normie EN 818-7.
Naprawy
Nie wolno modykować wciągnika. Naprawy powinny być wykonywane przez specjalistów. Uszkodzone części należy zastępować wyłącznie
oryginalnymi produktami rmy Haklift.
Lista kontrolna inspekcji okresowych (zazwyczaj co roku, częściej, jeżeli jest to konieczne)
Codziennie Co
roku
Sprawdzane elementy Metoda inspekcji Uwaga
Etykiety
X X Tabliczka znamionowa Wizualnie Jeżeli tabliczka jest nieczytelna,
należy ją wymienić.
Zastosowanie
X X Podnoszenie i opuszczanie Test bez obciążenia Powinien być słyszalny niski
dźwięk zatrzaskiwania zapadki.
-XPodnoszenie i opuszczanie Test przy obciążeniu
znamionowym (min.
300 mm)
Zęby koła są prawidłowo ustawiane w ogniwach
łańcucha. Hamulec działa. Łańcuch ręczny jest
przesuwany równomiernie i bez oporów.
Haki
X
-
XOtwarcie haka Wizualnie
Pomiar
Wygląd prawidłowy
Patrz rys. 4 i tabela 1.
X X Deformacja Wizualnie Deformacja nie jest widoczna.
XŁożysko haka Wizualnie Brak nadmiernego luzu.
X
-
XZużycie, pęknięcia, deformacja i korozja. Wizualnie
Pomiar
Uszkodzenie nie jest
widoczne. Patrz rys. 4 i tabela 1.
XŁożysko haka Wizualnie, test Brak nadmiernego luzu.
Łańcuch do podnoszenia ładunku
X
-
XWysokość Wizualnie
Pomiar
Wygląd prawidłowy. Wykonać pomiar w przypad-
ku wątpliwości. Patrz rys. 5 i tabela 2.
X
-
XZużycie Wizualnie
Pomiar
Wygląd prawidłowy. Wykonać pomiar w przypad-
ku wątpliwości. Patrz rys. 5 i tabela 2.
X X Deformacja Wizualnie Brak deformacji. Wykonać pomiar
w przypadku wątpliwo ści.
X X Pęknięcia itp. Wizualnie Brak pęknięć
X X Rdza Wizualnie Brak rdzy
Obudowa
X X Rama Wizualnie Brak deformacji i rdzy
X X Przekładnia Wizualnie Brak deformacji
-XPrzekładnia zębata Wizualnie po zdemon-
towaniu
Brak oznak poważnego zużycia lub pęknięć
-XKoło zębate łańcucha do podnoszenia
ładunku
Wizualnie po zdemon-
towaniu
Brak oznak poważnego zużycia lub pęknięć.
Brak pęknięć lub deformacji.
-XKoło zębate łańcucha ręcznego Wizualnie Brak oznak poważnego zużycia lub pęknięć.
Brak pęknięć lub deformacji.
-XŁożyska Wizualnie, test Brak uszkodzeń, działają równomiernie.
Śruby
XŚruby, nakrętki, nity, przetyczki itp. Wizualnie Wszystkie powinny znajdować się w odpowied-
nim położeniu. Dokręcić poluzowane elementy.
Wymienić, jeżeli jest to konieczne.
Hamulec
-XTarcza hamulca Wizualnie Wymienić w przypadku zużycia.
-XŚruba hamulca Wizualnie Brak oznak poważnego zużycia.
-XMechanizm zapadkowy Wizualnie Wymienić zużyte elementy.
Dokładnie nasmarować.

10
Haklift Chain Block KTHA – Spare parts 0,25 t
When ordering spare parts, specify model, WLL, part number and the quantity needed.
When ordering chain, also specify lifting height.
If the load chain has been damaged or worn out the load sheave probably has to be replaced.
Haklift Chain Block 0,25 t

10 11
Pos Description 0,25 t
1Gear cover assy 16.10PCB1411001
2Disc gear assy 16.10PCB1411002
3 Drive shaft 16.10PCB1411003
4 Splined gear 16.10PCB1411004
5 Right side plate assy 16.10PCB1411005
6Load chain sprocket 16.10PCB1411006
9Top hook shaft 16.10PCB1411009
11 Chain stripper 16.10PCB1411011
13 Guide roller 16.10PCB1411013
14 Left side plate assy 16.10PCB1411014
15 Pawl spring 16.10PCB1411015
16 Pawl 16.10PCB1411016
17 Brake seat 16.10PCB1411017
19 Friction plate 16.10PCB1411019
20 Ratchet wheel 16.10PCB1411020
21 Brake cover 16.10PCB1411021
22 Hand chain wheel 16.10PCB1411022
25 Washer 16.10PCB1411025
26 Hand chain cover 16.10PCB1411026
27 Positioned plate 16.10PCB1411027
28 Hand Chain 16.10PCB1411028
32 Name plate 16.10PCB1411032
41 Load Chain 16.10PCB1411041
42 End anchor 16.10PCB1411042
43 End anchor pin 16.10PCB1411043
45 Warning plate assy 16.10PCB1411045
46 Top hook assy KTHA250YKO
47 Safety latch assy KTHA250SAL
61 Bottom hook assy KTHA250AKO
62 Bottom hook pin 16.10PCB1411062
71 Metal lock nut 16.10PCB1411071
72 Metal lock nut 16.10PCB1411072
74 Circlip 16.10PCB1411074
75 Cross head screw 16.10PCB1411075
76 Split retainer 16.10PCB1411076
78 Name plate 16.10PCB1411078
79 Split pin 16.10PCB1411079
80 Hexagon nut 16.10PCB1411080
Spare parts list 0,25 t

12
Haklift Chain Block KTHA – Spare parts 0,5 – 5 t
When ordering spare parts, specify model, WLL, part number and the quantity needed.
When ordering chain, also specify lifting height.
If the load chain has been damaged or worn out the load sheave probably has to be replaced
5 t 0,5 - 3 t 0,5 - 5 t
5 t 0,5 , 1t, - 3t
0,5 , 1t, - 3t 5t

12 13
Pos Description 0,5 t 1 t 2 t 3 t 5 t
1Gear cover assy 16.10PCB1412001 16.10PCB1414001 16.10PCB1416001 16.10PCB1417001 16.10PCB1419001
2Disc gear assy 16.10PCB1412002 16.10PCB1414002 16.10PCB1416002 16.10PCB1417002 16.10PCB1419002
3 Drive shaft 16.10PCB1412003 16.10PCB1414003 16.10PCB1416003 16.10PCB1417003 16.10PCB1419003
4 Splined gear 16.10PCB1412004 16.10PCB1414004 16.10PCB1416004 16.10PCB1417004 16.10PCB1419004
5 Right side plate assy 16.10PCB1412005 16.10PCB1414005 16.10PCB1416005 16.10PCB1417005 16.10PCB1419005
6Load chain sprocket 16.10PCB1412006 16.10PCB1414006 16.10PCB1416006 16.10PCB1417006 16.10PCB1419006
9Top hook shaft 16.10PCB1412009 16.10PCB1414009 16.10PCB1416009 16.10PCB1417009 16.10PCB1419009
11 Chain stripper 16.10PCB1412011 16.10PCB1414011 16.10PCB1416011 16.10PCB1417011 16.10PCB1419011
13 Guide roller 16.10PCB1412013 16.10PCB1414013 16.10PCB1416013 16.10PCB1417013 16.10PCB1419013
14 Left side plate assy 16.10PCB1412014 16.10PCB1414014 16.10PCB1416014 16.10PCB1417014 16.10PCB1419014
15 Pawl spring 16.10PCB1412015 16.10PCB1414015 16.10PCB1416015 16.10PCB1417015 16.10PCB1419015
16 Pawl 16.10PCB1412016 16.10PCB1414016 16.10PCB1416016 16.10PCB1417016 16.10PCB1419016
17 Brake seat 16.10PCB1412017 16.10PCB1414017 16.10PCB1416017 16.10PCB1417017 16.10PCB1419017
19 Friction plate 16.10PCB1412019 16.10PCB1414019 16.10PCB1416019 16.10PCB1417019 16.10PCB1419019
20 Ratchet wheel 16.10PCB1412020 16.10PCB1414020 16.10PCB1416020 16.10PCB1417020 16.10PCB1419020
21 Brake cover 16.10PCB1412021 16.10PCB1414021 16.10PCB1416021 16.10PCB1417021 16.10PCB1419021
22 Hand chain wheel 16.10PCB1412022 16.10PCB1414022 16.10PCB1416022 16.10PCB1417022 16.10PCB1419022
25 Washer 16.10PCB1412025 16.10PCB1414025 16.10PCB1416025 16.10PCB1417025 16.10PCB1419025
26 Hand chain cover 16.10PCB1412026 16.10PCB1414026 16.10PCB1416026 16.10PCB1417026 16.10PCB1419026
27 Positioned plate 16.10PCB1412027 16.10PCB1414027 16.10PCB1416027 16.10PCB1417027 16.10PCB1419027
28 Hand Chain 16.10PCB1412028 16.10PCB1414028 16.10PCB1416028 16.10PCB1417028 16.10PCB1419028
32 Name plate 16.10PCB1412032 16.10PCB1414032 16.10PCB1416032 16.10PCB1417032 16.10PCB1419032
41 Load Chain 16.10PCB1412041 16.10PCB1414041 16.10PCB1416041 16.10PCB1417041 16.10PCB1419041
42 End anchor 16.10PCB1412042 16.10PCB1414042 16.10PCB1416042 16.10PCB1417042 16.10PCB1419042
43 End anchor pin 16.10PCB1412043 16.10PCB1414043 16.10PCB1416043 16.10PCB1417043 16.10PCB1419043
45 Warning plate assy 16.10PCB1412045 16.10PCB1414045 16.10PCB1416045 16.10PCB1417045 16.10PCB1419045
46 Top hook assy KTHA500YKO KTHA1000YKO KTHA2000YKO KTHA3000YKO KTHA5000YKO
47 Safety latch assy KTHA500SAL KTHA1000SAL KTHA2000SAL KTHA3000SAL KTHA5000SAL
48 Top hook pin - - - - -
60 Bottom hook assy 5t - - - - KTHA5000AKO
61 Bottom hook assy KTHA500AKO KTHA1000AKO KTHA2000AKO KTHA3000AKO -
62 Bottom hook pin 16.10PCB1412062 16.10PCB1414062 16.10PCB1416062 16.10PCB1417062 -
63 Bottom hook connector
assy
- - - - 16.10PCB1419063
64 Idler sheave assy - - - - 16.10PCB1419064
71 Metal lock nut 16.10PCB1412071 16.10PCB1414071 16.10PCB1416071 16.10PCB1417071 16.10PCB1419071
72 Metal lock nut 16.10PCB1412072 16.10PCB1414072 16.10PCB1416072 16.10PCB1417072 16.10PCB1419072
73 Circlip 16.10PCB1412073 16.10PCB1414073 16.10PCB1416073 16.10PCB1417073 16.10PCB1419073
74 Circlip 16.10PCB1412074 16.10PCB1414074 16.10PCB1416074 16.10PCB1417074 16.10PCB1419074
75 Cross head screw 16.10PCB1412075 16.10PCB1414075 16.10PCB1416075 16.10PCB1417075 16.10PCB1419075
76 Split retainer 16.10PCB1412076 16.10PCB1414076 16.10PCB1416076 16.10PCB1417076 16.10PCB1419076
78 Name plate 16.10PCB1412078 16.10PCB1414078 16.10PCB1416078 16.10PCB1417078 16.10PCB1419078
79 Split pin 16.10PCB1412079 16.10PCB1414079 16.10PCB1416079 16.10PCB1417079 16.10PCB1419079
80 Hexagon nut 16.10PCB1412080 16.10PCB1414080 16.10PCB1416080 16.10PCB1417080 16.10PCB1419080
86 Metal lock nut 16.10PCB1412086 16.10PCB1414086 16.10PCB1416086 16.10PCB1417086 16.10PCB1419086
87 Metal lock nut 16.10PCB1412087 16.10PCB1414087 16.10PCB1416087 16.10PCB1417087 16.10PCB1419087
88 Bolt M10x25 16.10PCB1412088 16.10PCB1414088 16.10PCB1416088 16.10PCB1417088 16.10PCB1419088
Spare parts list 0,5 – 5 t

14
Haklift Chain Block KTHA – Spare parts 10 t
When ordering spare parts, specify model, WLL, part number and the quantity needed.
When ordering chain, also specify lifting height.
If the load chain has been damaged or worn out the load sheave probably has to be replaced.
Haklift Chain Block 10 t

14 15
Pos Description 10 t Pos Description 10 t
1Gear cover assy 16.10PCB1423001 54 Stay bolt B 16.10PCB1423054
2Disc gear assy 16.10PCB1423002 55 Suspension plate 16.10PCB1423055
3 Drive shaft 16.10PCB1423003 56 Idler sheave assy 16.10PCB1423056
4 Splined gear 16.10PCB1423004 57 Protection cover 16.10PCB1423057
5 Right side plate assy 16.10PCB1423005 58 Top hook assy KTHA10000YKO
6Load chain sprocket 16.10PCB1423006 60 Bottom hook assy KTHA10000AKO
9Top hook shaft 16.10PCB1423009 62 Bottom hook pin 16.10PCB1423062
11 Chain stripper 16.10PCB1423011 63 Hook plate 16.10PCB1423063
13 Guide roller 16.10PCB1423013 64 Bottom idler sheave assy 16.10PCB1423064
14 Left side plate assy 16.10PCB1423014 65 Shaft 16.10PCB1423065
15 Pawl spring 16.10PCB1423015 66 Plate 16.10PCB1423066
16 Pawl 16.10PCB1423016 67 Washer 16.10PCB1423067
17 Brake seat 16.10PCB1423017 68 Protection cover 16.10PCB1423068
19 Friction plate 16.10PCB1423019 69 Cover 16.10PCB1423069
20 Ratchet wheel 16.10PCB1423020 70 Bolt 16.10PCB1423070
21 Brake cover 16.10PCB1423021 71 Metal lock nut 16.10PCB1423071
22 Hand chain wheel 16.10PCB1423022 72 Metal lock nut 16.10PCB1423072
25 Washer 16.10PCB1423025 73 Circlip 16.10PCB1423073
26 Hand chain cover 16.10PCB1423026 74 Circlip 16.10PCB1423074
27 Positioned plate 16.10PCB1423027 75 Cross head screw 16.10PCB1423075
28 Hand chain 16.10PCB1423028 76 Split retainer 16.10PCB1423076
32 Name plate 16.10PCB1423032 78 Name plate 16.10PCB1423078
41 Load chain 16.10PCB1423041 79 Split pin 16.10PCB1423079
42 End anchor 16.10PCB1423042 80 Hexagon nut 16.10PCB1423080
43 End anchor pin 16.10PCB1423043 86 Hexagon recess nut 16.10PCB1423086
45 Warning plate assy 16.10PCB1423045 87 Split pin 16.10PCB1423087
46 Top hook assy 16.10PCB1423046 88 Metal lock nut 16.10PCB1423088
47 Safety latch assy KTHA10000SAL 89 Metal lock nut 16.10PCB1423089
48 Top hook pin 16.10PCB1423048 90 Cross head screw 16.10PCB1423090
49 Plate (right) 16.10PCB1423049 91 Light spring washer 16.10PCB1423091
50 Shaft 16.10PCB1423050 92 Hexagon recess nut 16.10PCB1423092
51 Plate (left) 16.10PCB1423051 93 Split pin 16.10PCB1423093
52 Stay bolt A 16.10PCB1423052
53 Short bolt 16.10PCB1423053
Spare parts list 10 t

16
Pos Description 20 t
47 Safety latch assy KTHA20000SAL
58 Top hook assy KTHA20000YKO
60 Bottom hook assy KTHA20000AKO
Haklift Chain Block KTHA – Spare parts 20 t
When ordering spare parts, specify model, WLL, part number and the quantity needed.
When ordering chain, also specify lifting height.
If the load chain has been damaged or worn out the load sheave probably has to be replaced.
Haklift Chain Block 20 t
Spare parts list 20 t

16 17
Product compliance and conformity
SCM Citra Oy
Juvan Teollisuuskatu 25 C
02920 Espoo
Finland
Haklift Oy
Asessorinkatu 3-7
20780 Kaarina Finland
Tel. +358 2 511 5511
www.haklift.com
This manual suits for next models
6
Table of contents
Languages:
Other Haklift Chain Hoist manuals
Popular Chain Hoist manuals by other brands

RED ROOSTER
RED ROOSTER TCS-500-AT2S-LF user manual

Steinberg
Steinberg SBS-EH-500/3 user manual

Tractel
Tractel supertirfor TU-A Series Operating and maintenance instructions

Ingersoll-Rand
Ingersoll-Rand MLK Series Installation and operation manual

Ingersoll-Rand
Ingersoll-Rand Quantum QCH Series Product information

Comeup
Comeup Easylift EL-300 instruction manual