Warning: Caution required when
using roof bars with a sunroof
OK
OK
Important Safety Notes:
• Please retain the Hex key provided and these instructions safely
with your car owners manual, for future reference.
• The maximum permissible load evenly distributed over the full
width of the bar with a low centre of gravity is 50kg (including
the weight of the bars, 4kg). Check the vehicle handbook for
xing location for the roof bar and the maximum permitted
load. The maximum permitted roof load must be the lowest
quoted gure. And if the vehicle hand book states a maximum
of less than 50kg, then that is the maximum permissible load.
Even if the vehicle handbook states a maximum of 120kg, the
maximum permissible load for these roofbars is 50kg.
• It is your responsibility to ensure that all loads are correctly
and safely secured using suitable xing methods (e.g. strong
webbing straps with buckles). Where specialised accessories
are available, they should be used (e.g. Cycle Carriers, Ski
Holders, etc). If small heavy loads are being carried, load to one
side of the bar, not the middle. Never attach loads to roof bars
using bungee cords or elasticated straps.
• Before driving and at regular intervals during your journey,
check that all securing screws, clamping devices and foot
attachments are fully tightened, in accordance with these
instructions. Additionally ensure the load is fastened correctly.
• After covering a short distance, all securing devices of both the
load and the load carrier must be checked and tightened as
required. This must be done at suitable intervals, depending on
the nature of the road.
• To prevent damage or discolouration to the paint under the foot
pack rubber, we recommend the cleaning of the load bar feet
and the vehicle roof prior to tment. The load bar should be
removed at regular intervals to repeat this process.
• When tted, the roof bars will affect your fuel economy,
therefore please remove when not in use.
• Neither the roof bars nor load must project beyond the
maximum prole of the vehicle.
• Take care not to drive into low places such as garages or multi-
storey carparks when carrying a high load, particularly cycles.
Do not drive through an automatic car wash with the load carrier
mounted on the vehicle
• Using the bars, especially when carrying a load, will affect the
driving and braking characteristics of your car. Larger roof loads
may also affect your car’s sensitivity to cross winds. For safety
reasons, the vehicle must not be driven at maximum speeds.
Speed should be matched to the load being transported, to
prevailing conditions including the state of the road, the quality
of the road surface, the volume of trafc, etc., and of course
any speed restrictions in force. Where there are no restrictions
in force, we recommend a maximum speed of 65 mph, but the
vehicle speed when transporting a load of any kind must be
matched to the prevailing conditions.
• Surfboards, boats and large at objects may produce damaging
aerodynamic forces to the vehicle, out of all proportion to their
dead weight. We therefore recommend travelling at much
reduced speed when carrying these articles. Where two or
more surfboards are carried (or similar items which may
produce lifting forces) they should not be carried side
by side, but should be stacked one upon the other. They
should be secured independently to the front and rear of
the vehicle using strap or methods which are capable of
withstanding the lifting forces.
• When carrying kayaks or canoes ensure that they are
secured to the bars and also the front and rear of the
vehicle in the upright position.
• The roof bars must be kept clean and properly maintained,
particularly during the winter months when dirt and salt must
be removed. Bolts, screws and nuts should be lubricated at
suitable intervals, the periodic use of a spray lubricant will keep
any lock barrels working freely.
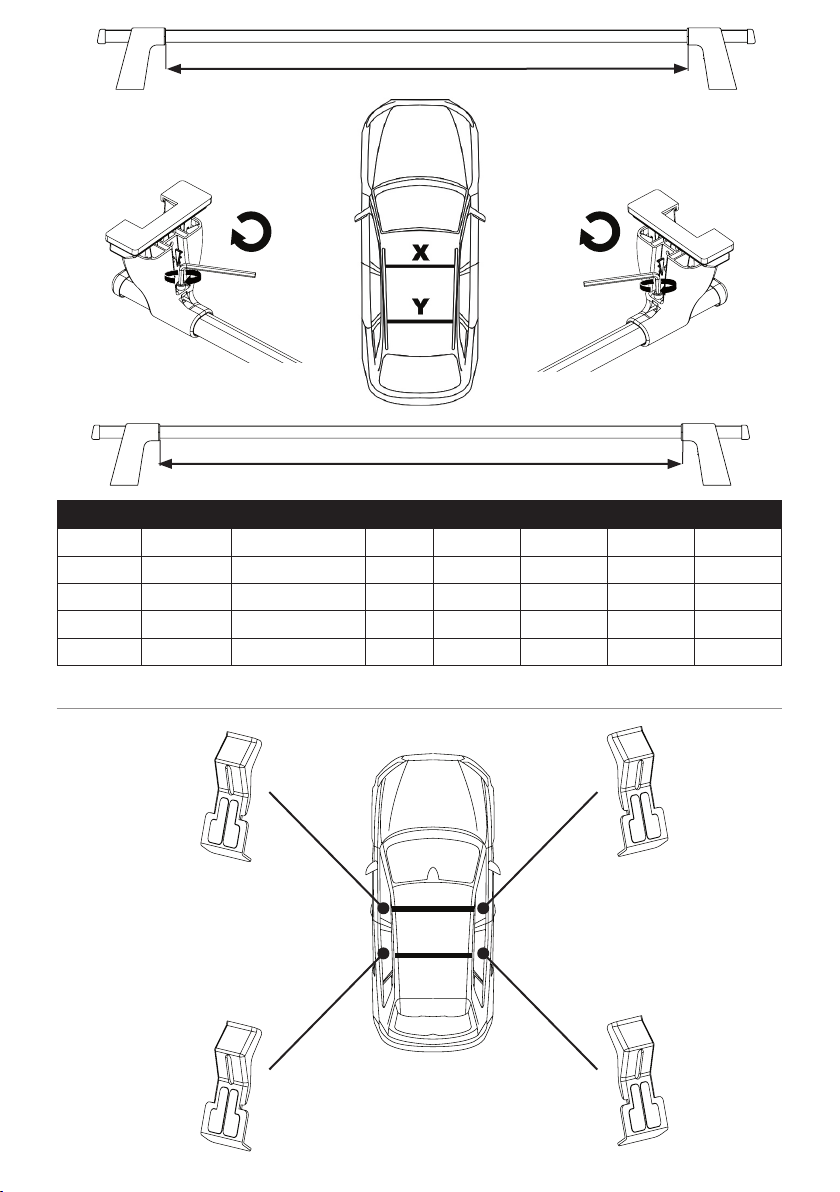
• Always t the roof bars in accordance with these instructions.
The spacing between the front and rear bars must never be less
than 700 mm, except where the vehicle mountings determine
the spacing.
IMPORTANT: This load carrier is especially designed for your
car model. Please therefore check with your retailer which type
of load carrier is needed when changing your car. Do not use
spare parts from other products without checking with your
retailer. Do not put the car through an automatic car wash
when the load carrier is mounted. The manufacturer takes no
responsibility for damage caused by an incorrectly tted load
carrier.
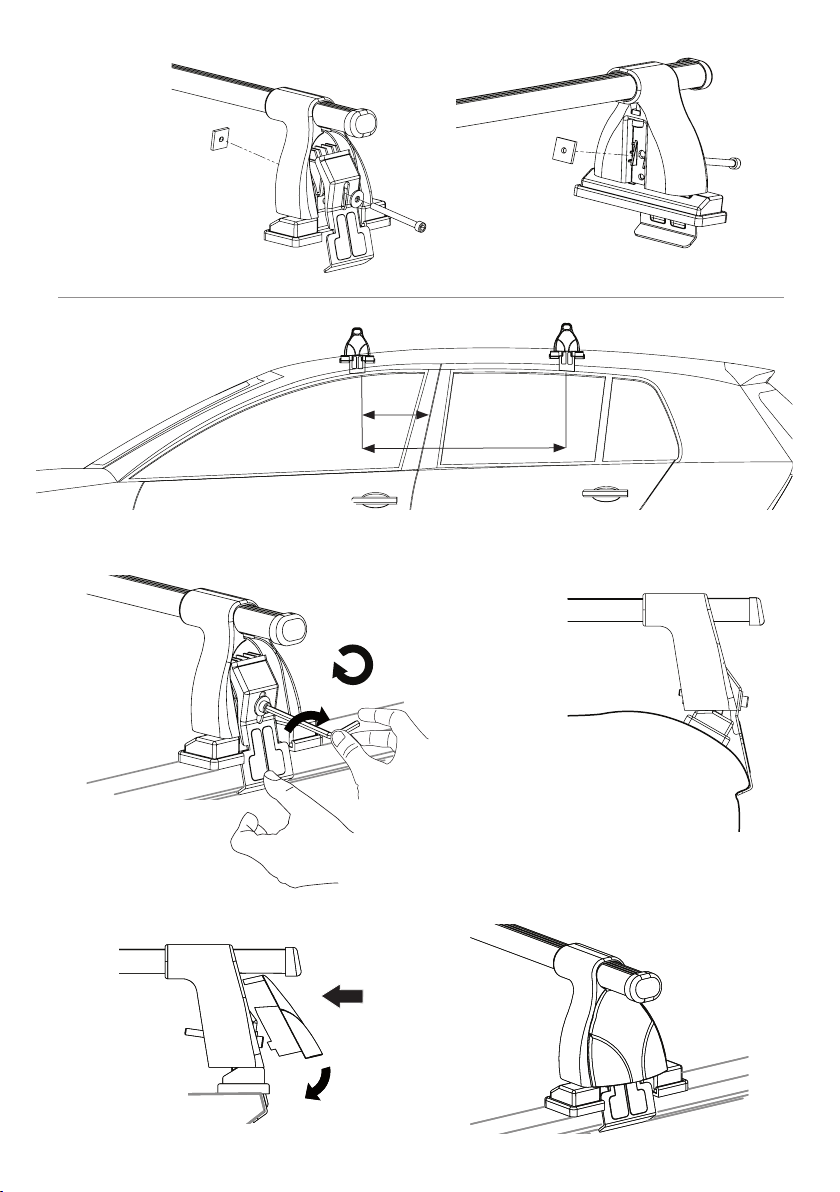
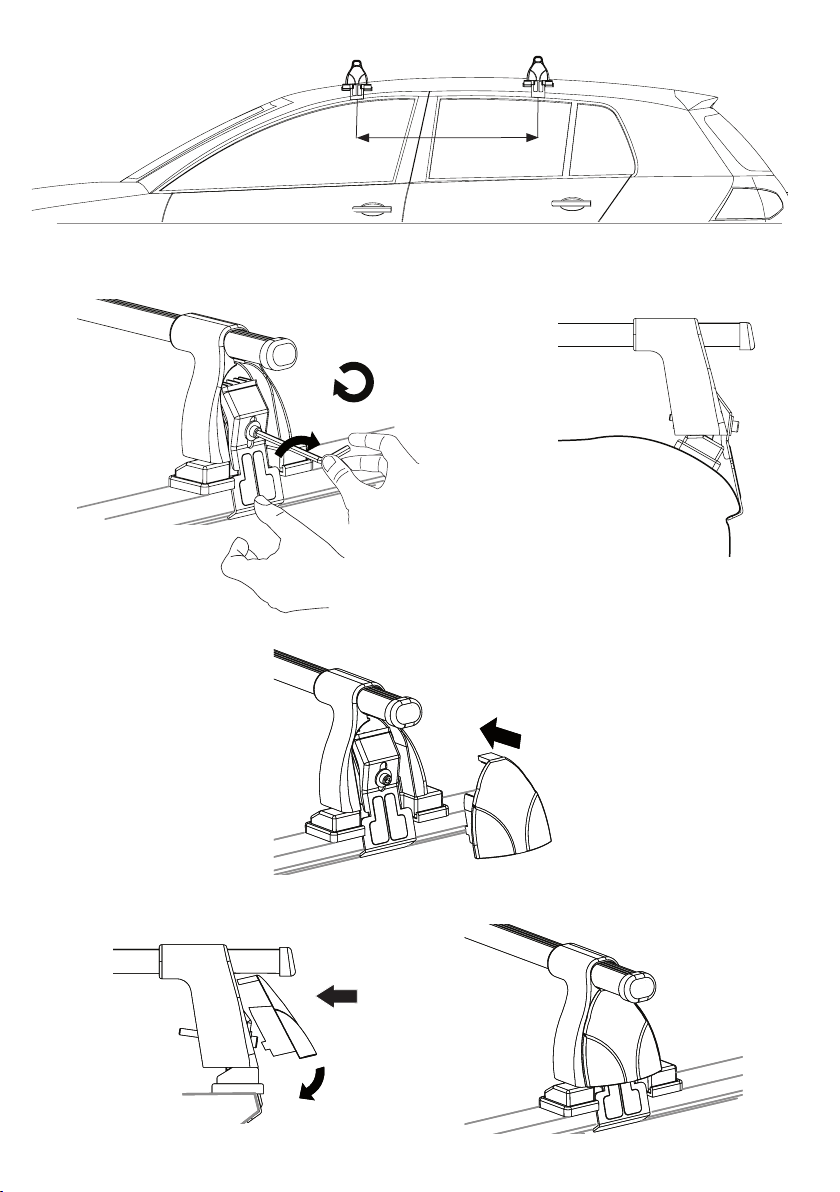
Installation Notes:
• Fit the roof bars according to the instructions only. Do not
assemble or use this product unless you have understood
the tting instructions. If you have any questions, please
contact your local store for further information. Check with the
instruction manual that all the necessary parts are included.
• Check and make sure that all fastening parts are xed securely.
Please check also that the load is fastened properly by pushing
and pulling it. Recheck regularly.
• Please note that some antennas and sunroofs can interfere
with the roof bars or accessory when installed and should not
be used, if so.
• Follow the instructions thoroughly and do not jump ahead in the
sequence (1,2,3, A,B,C… etc).
• Please note there is a measuring guide on the packaging which
can be used to align the roof bars when tting them.
Made in the EU
Halfords Ltd, Icknield Street Drive, Washford West, Redditch, B98 0DE
Visit us at: www.halfords.com