Hall Research Technologies CNT-IP-2 User manual

Quick Start Guide
QSG1212
Rev 1.0
Order toll-free in the U.S. 800-959-6439
For technical support, call 714-641-6607
Hall Research, 1163 Warner Ave. Tustin, CA 92780
www.hallresearch.com info@hallresearch.com
CNT-IP-2
Web Enabled Serial Controller

Web Enabled RS232 Controllers
2
Introduction
Thank you for purchasing the CNT-IP-2 Web Enabled RS232 controller.
This product provides the ability to easily create and add webpage
control of one or more RS232 devices through the local area network. In
addition, the CNT-IP-2 can control an unlimited number of IP enabled
devices by means of Telnet protocol. The CNT-IP-2 features battery
backed real-time clock that can be used to schedule events. For example
a timer can be setup to send power off commands at the end of the day.
Before you install and start using the CNT-IP-2, we highly recommend
that you pre-configure at least one unit on the bench with each possible
type of device you intend to control, and get the system operating as you
wish.
Once you have pre-configured the controller, then you can download and
save the configuration file for safekeeping or for uploading to other CNT-
IP-2 devices in your facility via the LAN.
First and foremost you need to identify the CNT-IP-2 device's IP address
in order to program and configure it. Please read the following sections,
and refer to the full user manual on the our website:
http://www.hallresearch.com/page/Products/CNT-IP-2
Configuring the System
A main features of this unit is that for normal operation
there is no need to install any software on your PC or
app on your tablet or smart phone. You define the
desired serial or telnet commands using the built-in
web pages in the CNT-IP-2.
Furthermore, the elements (buttons) displayed on the
control page are updated bi-directionally in real-time. Multiple users can
access the same device at the same time and any changes made by one
user will be reflected on all other browsers in real-time with in
milliseconds and with no perceptible delay.
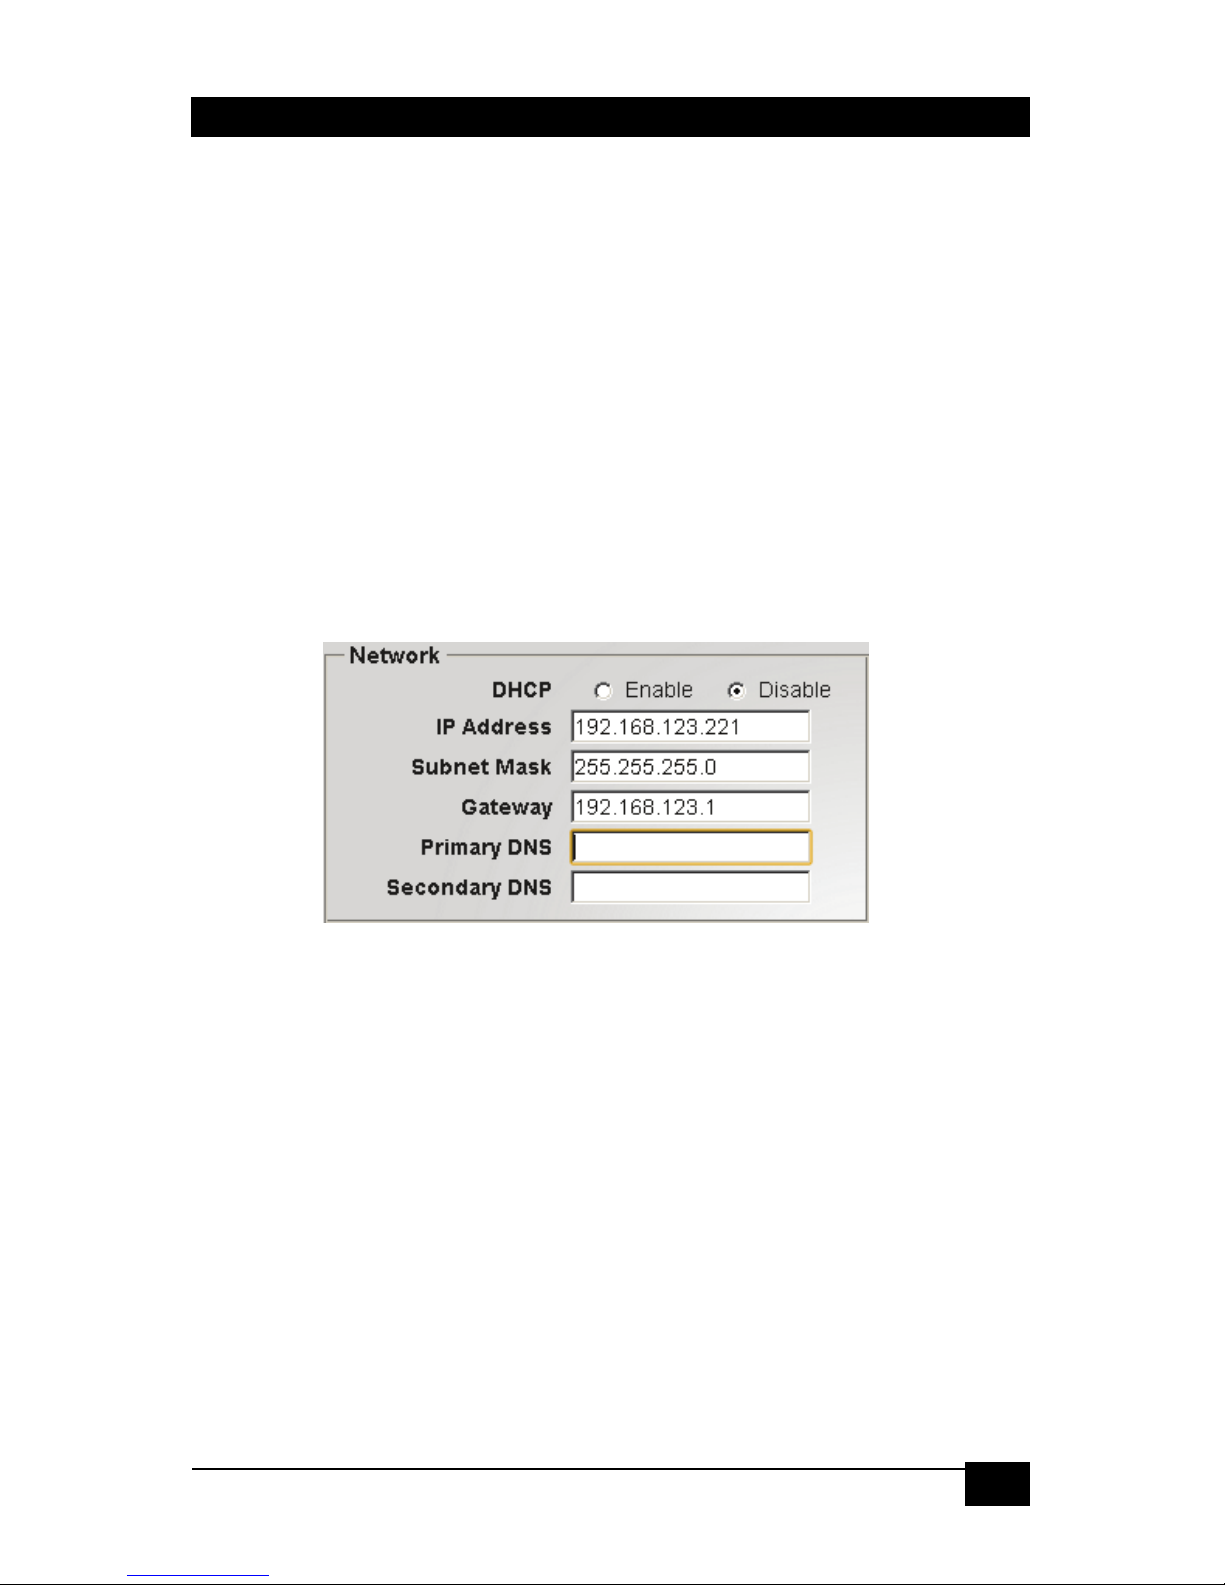
Each device has a unique MAC address shown on the product's label.
The MAC address will be useful for identifying DHCP assigned IP
address of that unit.
As shipped, the product does not have a static IP address (since a fixed
IP address may not be on the same subnet as your LAN) and employs
DHCP which enables unit to get an IP address from your local network.
This makes the unit visible on your LAN. Hall Research provides free
software tool called Device Finder which scans the local network for Hall

Web Enabled RS232 Controllers
3
Research devices. Result of search shows unique MAC addresses,
assigned IP addresses, and model names of found devices. Further
sections will explain more about this process.
Once you have the IP address (which may be temporary due to DHCP),
then you can assign static IP address to each unit using the Device
Finder software or by accessing the built-in web pages in the unit where
you can change IP settings as desired.
Hardware Installation
The CNT-IP-2 has two Serial ports. The two ports can operate
independent from each other or they can be configured to act as
seamless pass-through but with the ability to issue commands via the
network or scheduled event to either port. These modes are referred to
as ‘Dual-Port’ or ‘Pass-Thru’. Both configurations have their own
advantages based on user’s application. Modes differ in way information
is passed to/from both serial ports. The either configuration.
Dual-Port (Default)
In dual port mode, the CNT-IP-2 device can be used to control 2 serial
devices independently. Both serial ports will communicate with only IP
interface on CNT-IP-2 as shown in Figure-1. No information will be
passed between Serial port1 and Serial port 2.
Figure-1 Dual Port Mode
Pass-Thru
In pass thru mode, information can be directly passed between both
serial ports on CNT-IP-2 at the same time the IP interface on CNT-IP-2
CNT-IP-2
IP
Serial
Device
Serial
2
Serial
Device
Another
CNT-IP-2
Serial
1
Local Area Network

Web Enabled RS232 Controllers
4
can be used to monitor serial traffic as well as send data to either serial
device. This allows 3rd party controllers to be used with the CNT-IP-2
device adding the web connectivity or IP control as shown in Figure-2.
Figure-2 Pass Through Mode
Connections
•Connect the RS232 devices to be controlled to the Serial Port 1 and
Serial Port 2 connectors on the CNT-IP-2 device. The appropriate
RS232 cable needed; either straight-thru or null modem will be
determined by the device being controlled. Pin definitions for both
serial ports on CNT-IP-2 are described in tables below.
•Connect the LAN cable from your network router or switch (which is
connected to router) to the CNT-IP-2 device IP connector.
•Connect the power supply to the CNT-IP-2 device. (The power LED
shall illuminate when power is applied).
PORT #1
(FEMALE)
Signal Direction
External Serial
Device (MALE)
External Serial
Device (FEMALE)
PIN
Definition
PIN
Definition
PIN
Definition
2
TxD
2
RxD
3
RxD
3
RxD
3
TxD
2
TxD
5
GND
5
GND
5
GND
PORT #2
(MALE)
Signal Direction
External Serial
Device (FEMALE)
External Serial
Device (MALE)
PIN
Definition
PIN
Definition
PIN
Definition
2
RxD
2
TxD
3
TxD
3
TxD
3
RxD
2
RxD
5
GND
5
GND
5
GND
Serial
1
Serial
Controller
CNT-IP-2
Serial
2
IP
Serial
Device
Another
CNT-IP-2
Local Area Network

Web Enabled RS232 Controllers
5
Embedded Software
Finding the IP Address of CNT-IP-2
Units are shipped with DHCP enabled which means when connected to
LAN network, your network router will assign a dynamic IP address to
CNT-IP-2. Each unit also has unique MAC address printed on the back
of the unit. Please note this address.
To find the IP address, use the Hall Research ‘Device Finder’ Software.
This is a free software and available for Windows™ or Mac™ operating
systems. Device Finder can be downloaded from
http://www.hallresearch.com/page/Products/DeviceFinder
Please follow steps below to find an IP address of the Unit.
•Download and Install Device Finder.
•Run Device Finder and Click on ‘Search’.
•Device Finder will now scan your network for Hall Research products
and will list them as it finds. As shown in the image below.
•In the list of devices displayed by Device Finder, look for MAC
address (printed on the back side) of your unit to get an IP address
of that particular unit.
Device Finder Utility
NOTE CNT-IP-2 uses multiple ports on LAN to offer different services. For unit to
be fully functional LAN should allow network traffic on following network
ports.
•Port 23 [TCP] for ( Telnet Control )
•Port 80 [TCP] ( Web Interface )
•Port 8080 [TCP] ( WebSockets in Web Interface )
•Port 6324 [UDP] ( Device Finder Utility )
CNT-IP-2 Web interface uses WebSockets in protocol in when communicating
through browser. Almost all the latest browsers supports this protocol, however
there are some older version that does not. Below is list of minimum requirement
for different web browsers that works with CNT-IP-2.
1) Google Chrome (12.0 and later) 2) Firefox 5 (with Websockets enabled)
3) Safari 5 4) Mobile Safari (iOS 4.2 and later)
5) Opera (Not recommended, Version 12.0 works but later versions do not)
Apple iPad, iPhone, iPod Touch (basically iOS devices with version 4.2 and above)
are currently supported.

Web Enabled RS232 Controllers
6
This IP address that you found is Dynamic in nature since DHCP is used
to get the address. Which means, It could change between power cycles.
To prevent this, one can change the settings to set STATIC IP address
from Web Manager explained in the next Section.
Once STATIC IP address is assigned unit will remember it and will
always come up at same IP address.
Web Manger and Control
•Access the CNT-IP-2 device from its web interface via a browser
•Type the IP address of the CNT-IP-2 device in the address bar of the
browser. For example, http://192.168.123.221 and press ENTER.
•When presented with a LOGIN dialog box, type in the following
information to gain access to the unit.
USERNAME: admin
PASSWORD: pass
•The webpage will always start out by showing the systems
CONTROL tab
•To navigate in the interface, click on the desired 'TAB' at the top of
the screen (Status, Control or Configuration).
•The CONTROL Tab contains the graphical buttons that the webpage
user will click to send the serial or Telnet commands to the attached
serial devices.
•The STATUS Tab shows general information about the device
Your Device’s IP
MAC Address
Device Finder Utility

Web Enabled RS232 Controllers
7
•The CONFIGURATION Tab contains all the user configurable
controls and settings. From these screens, the user programs the
CNT-IP Serial device.
At this point, if desired, change the IP configuration to a STATIC address
that matches your network settings.
The network settings are available on the following tab:
Configuration -> System -> Communications
Disable the DHCP to set a STATIC address
Supply the desired IP Address, Subnet Mask and Gateway Addresses
that match your network requirements.
SAVE the changes by clicking the small disk icon in the upper right
corner when finished.
Program the serial commands for the device(s) to be controlled into the
appropriate ACTIONS through the web interface.
Create buttons (toggle or momentary) and tie ACTIONS to those buttons
See the users' manual for full details.

© Copyright 2013. Hall Research, Inc.
All rights reserved.
Table of contents
Other Hall Research Technologies Controllers manuals
Popular Controllers manuals by other brands

Emerson
Emerson Dixel XR30CX Series Installing and operating instructions

Emerson
Emerson Dixell XW20LS Installing and operating instructions

Pentair
Pentair Biffi F02 Installation and maintenance instructions

t.a.c.
t.a.c. DuraDrive MS40-717 Series General instructions

MKS
MKS MRK402 user manual

Chicago Pneumatic
Chicago Pneumatic CP90600 Operator's manual