Hallberg-Rassy 34.2 User guide

Offshore Sailing
34.2
SYSTEMS MANUAL

Intentionally Blank

i
CONTENTS
RAFSA(O) HR 34.2 SYSTEMS MANUAL
Chap
Subject
Page
-
Contents
Introduction
i
1
Batteries and Battery Switches
1 - 1
2
240V Electrical System and Immersion Heater Switch
2 - 1
3
Engine and Gearbox Components and Faults
3 - 1
4
Electrical Services Controls
4 - 1
5
Bilge Pumps
5 - 1
6
Hebasto Heater Controls
6 - 1
7
Gas Bottle Connection and Gas Detector Control Panel
7 - 1

ii
Intentionally Blank

iii
INTRODUCTION
1. The purpose of this HR 34.2 Systems Manual is to explain the location, function and
operation of the key systems and equipment on board RAFSA(O) HR 34.2 yachts. It
supplements the Hallberg Rassy Instruction Book – All Models 2016/2017, which is carried
on board. This Manual supplements RAFSA(O)’s Safety Management Policy and our
SOPs; it forms a critical component of the RAFSA(O) Document Set.
2. Both documents also form part of the vital handover information to the skipper and
crew and should be used as a routine reference source. It is not designed to be
exhaustive, rather it covers the key equipment on board that is not better covered by the
manufacturer’s manual e.g. the Raymarine Navigation suite. Further information is
available from the yacht Oi/c or other RAFSA committee members, whose contact details
are in the Boat Folder.
2. Suggested amendments should be forwarded to the Training Principal at
Preparation is key – a few thoughts to ponder
“Failing to prepare is preparing to fail”.
John Wooden
“Success occurs when opportunity meets preparation”.
Zig Ziglar
“I don’t believe in luck, I believe in preparation”.
Bobby Knight

iv
Intentionally Blank

Mar 20
1 - 1
CHAPTER 1 - BATTERIES AND BATTERY SWITCHES
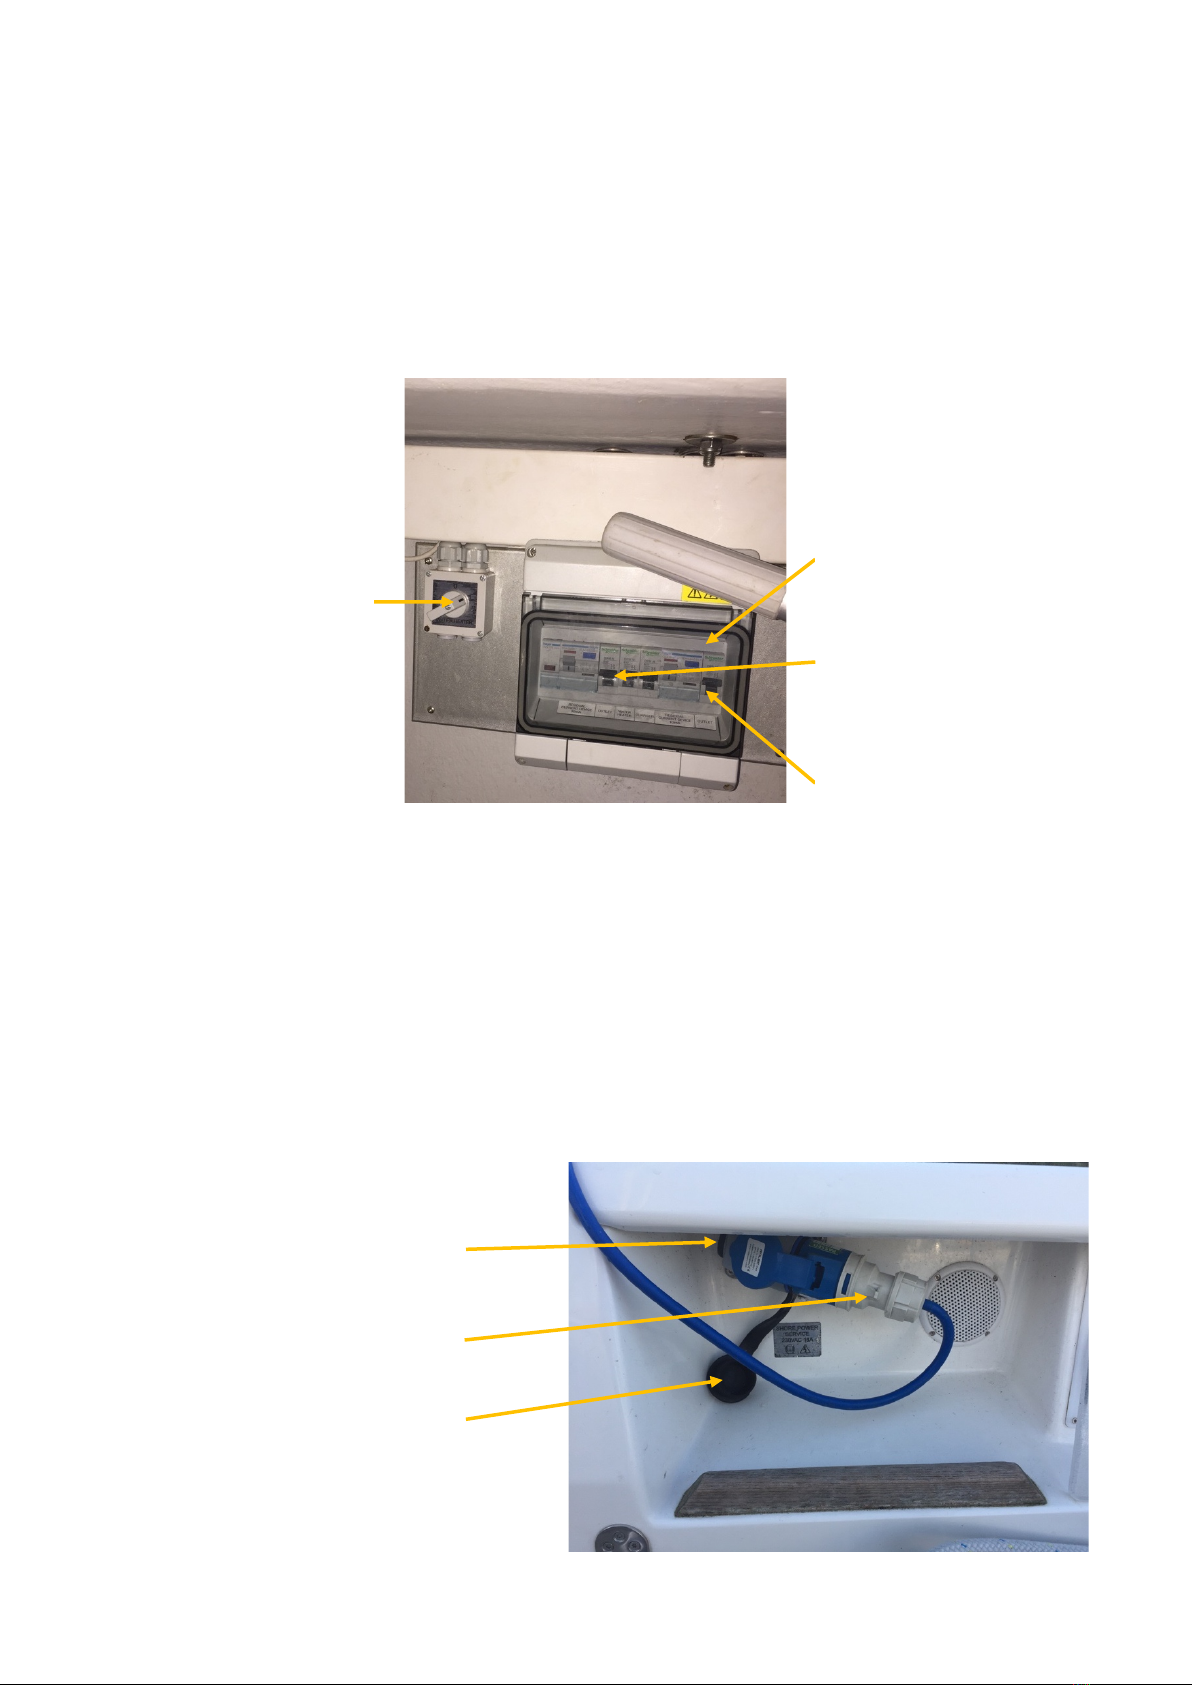
1. The HR yachts are equipped with separate domestic and start batteries located under
the lateral saloon seat amidships, forward of the saloon table. Both can be isolated by the
Battery Isolation Switches accessed from wooden door, under the inboard end of the lateral
saloon seat at the base of the mast post.
Battery switch compartment Battery master switches
2. Charging. Don't underestimate the time required to charge the batteries. Full
charge may take up to 15 hrs using the engine, dependant on electrical load, or overnight if
the yacht is plugged into shore power (charging is automatic. DO NOT adjust the charger
settings – irreparable damage can occur). The alternator on the main engine will give full
charge at 1300 rpm. The only volt metre is on the Furuno cockpit display; you will need to
find the correct page. As a minimum, this should be checked daily before sailing, once
shore power has been disconnected, ideally it should be checked and hourly when
completing the ship’s log. The voltage should not be allowed to exceed 14.2V and should
not be allowed to fall below 11.5V. If this occurs; charge the batteries as soon as possible.

Mar 20
2 - 1
CHAPTER 2 - 240V ELECTRICAL SYSTEM AND IMMERSION HEATER SWITCH
1. Safety with 240 V on board. The 230V system is fitted with an earth leak switch
(residual current circuit breaker) and a number of combined switches and overload circuit
breakers for the different outlets. The Ground Fault Circuit Interrupter (GFCI) switch is a
safety device for preventing electric shock accidents if an electric lead should be touched; if
it is triggered off, all outlets will be isolated. The GFCI is located on the electrical consumer
unit, which is located inside the starboard cockpit locker, outboard. Try to re-engage by
lifting the toggle switch after first breaking each of the circuit breakers.
230 V Electric Consumer Unit – Outboard Sdb Cockpit Locker
2. Danger! To minimise the risk of shock or fire:
• Connect the shore connection cable on board first before connecting it to the
shore outlet.
• Disconnect the shore cable at the shore outlet first before disconnecting on
board. Replace the rubber cap over the yacht’s mains electric socket carefully.
• Use correct adapters to fit different shore outlets.
230 V Consumer
Unit
Circuit Trips
GFCI
Isolates All
230 V
Immersion
Heater Switch
240 V electrical socket behind
starboard cockpit seat back
16 Amp plug and electrical lead
Protective rubber cover

Mar 20
2 - 2
3. Remember: if there is no earth breaker ashore, the cable faults are not protected
against electrical shock between the boat and the shore.
4. Note: The GFCI switch is so sensitive that rain or a damp connection can trigger it.
Do not work on energized AC systems.

Mar 20
3 - 1
CHAPTER 3 - ELECTRICAL SERVICES CONTROLS
12V
1. The battery isolation switches (engine start and domestic) are behind a wooden door,
at the mast foot, in the forward saloon. The emergency engine start (connects the domestic
battery to engine start circuit) is located on the aft side of the quarter berth hanging locker.
Battery Isolation Switches Emergency Engine Start Battery Switch
2. With the battery isolation switches selected on, the 12V electrical services are
controlled from the electrical services control panel outboard of the chart table. Switches
and circuit breakers (push buttons with built in safety trip) are labeled and self-explanatory.
The panel also houses:
• Fuel tank gauge
• Fresh water tank gauge
• Shore power light (illuminated when 230V connected)
• 12V lighter socket (there is also one in the quarter cabin)
electrical services control panel

Mar 20
3 - 2
240V
3. The 230V consumer unit and water heater isolation switch is located in the starboard
cockpit locker, outboard. They have built in residual current protection – see Safety Manual.
Services are:
• 240V Sockets in saloon, galley and quarter berth
• Water heater with separate isolation switch
• Battery charger
• 2 residual current protection devices at 30mA and 10mA
230V Water Heater Isolation Switch and Consumer Unit
4. Hot Water Supply. The hot water tank (calorifier) is located beneath the sole boards
in the starboard cockpit locker and provides all domestic hot water. Water is heated by a
240V immersion heater when plugged into shore power or by the engine when it has been
running. Access to the Calorifier is shown below:
1. Starboard cockpit locker sole boards 2. Location of thermal cut out switch and Calorifier
FWD

Mar 20
3 - 3
5. Failure of Hot Water Supply on Shore power. In the event of a failure of
electrically-heated hot water (not engine-heated), check the following:
a. Check that the hot water is switched on at the rotary switch on the outboard
wall in the starboard cockpit locker. If ON, the first course of action should be to cycle
the switch and wait 20 minutes for a reaction.
b. After cycling the switch and still no warm/hot water, although there is good flow
from the hot water taps, it is possible that the thermostat has failed to control the
temperature, followed by operation of the thermal cut-out protection switch. Proceed
as follows:
• Remove all contents of the starboard cockpit locker, leaving the
floorboards fully exposed (1 above).
• Remove the forward inner floorboard to expose the top of the hot water
tank, (2 above). Check the tank is cold to the touch.
• Press to reset the thermal cut-out on the top of the tank as shown in
Photo C.
• In all cases, please report the fault to the OIC, using the defects log in
the Boat Folder.
Thermal Cut Out Switch for Calorifier

Mar 20
4 - 1
CHAPTER 4 - ENGINE AND GEARBOX COMPONENTS
Overview
1. The pictures below set out the key components in the engine and gearbox
compartments.
2. Access. Access to these areas is gained by:
• Unlatching and lifting the companion way steps. CAUTION: do not hang/store
sail ties on the companion way hand holds – they jam the step. The latch key is on a
lanyard in the lower step storage compartment, port side.
• Removing the access panel at the rear of the engine bay from within the
quarter berth. CAUTION: take care not to damage the inboard reading light.
• Lifting the inboard bunk mattress and base boards from the quarter berth
• Removing the lower step
• Removing the back panel to the lower step storage compartment
3. Volvo Penta D1-30 Diesel Engine with Sail Drive – Main Components

Mar 20
4 - 2
Daily Engine Checks.
4. Water. Check: seawater cock is open; coolant level; and seawater filter clean (do not
cross thread lid, it must seal or water flow fails, and engine overheats);
Seawater cock – 17. Above.
(NB This is from a separate through
hull seacock on Atlas & Sir Arthur)
Open = in line with inlet
Closed
Open
CAUTION: Lid must make airtight
seal: ensure rubber seal in place
and lid not cross threaded
Close seacock before
removing (1). Open
Seacock after replacing (1)
CAUTION: Engine will
overheat if run with
seacock closed

Mar 20
4 - 3
5. Oil. Check engine oil level. Ensure dip stick is correctly seated.
6. Belts. Check no more than 10mm play or 90º twist:

Mar 20
4 - 4
6. Bilge. The engine bilge is separate and isolated in order to contain any fuel, oil and
coolant leaks. Check the engine bilge for fluid leaks. Fuel, oil, coolant or seawater in the
bilge indicate a leak. Clean thoroughly and investigate. Small leaks should be monitored
and cleaned regularly. Top up fluids to the required level. Dispose of waste appropriately.
8. Lines. Check the engine bay pipes, cables and lines to ensure no obvious damage
and that they remain clear of hot and rotating parts.
9. Re-latching the Steps. This is best achieved by:
• Replace the lower step and hanging the latches on the hooks on both sides,
but do not snap closed
• Push the lower step fully aft
• Pull and hold down the steps – they are raised by gas struts
• Using the key, gently tighten the two swivel latches, located above the lower
step
• If necessary, gently slide the lower step fore and aft to aid location of the
letches
• Once step latches are correctly located and locked, tighten the lower step
latches
Engine and Gearbox Bay – layout and Components
Engine compartment from front
Manual fuel pump
Engine Oil Filler
Cap
Drive belt
Coolant header
tank
Air filter
Seawater-coolant
heat Exchanger
Alternator
Sea water pump
(impeller)
Dip stick
Engine bilge
Stop Lever

Mar 20
4 - 5
Aft view of engine and gearbox from quarter berth access
Aft ancillaries compartment view from quarter berth
Seawater
coolant seacock
Through hull
fitting on
RAFSA(O)
Yachts
Exhaust
Gear cable &
gear selector
Exhaust
waterlock
LP fuel
filter
Heads
seawater
seacock
Gearbox
mount
Air filter
Gearbox dipstick
(screw)
Throttle cable
Seawater inlet
filter
Exhaust water
inlet
Seawater-coolant
heat Exchanger
HP Fuel filter
Engine bay
air inlet
Saildrive
& seal
Shower drain
pump
Fresh water
pump
Heads cold
water filter
Air inlet
Engine bay
air inlet
FORWARD

Mar 20
4 - 6
Fault Handling
10. Engine faults are indicated by an audio alarm, an alarm light and symbols displayed
on the tachometer as follows:
11. Symbols
WARNING:
Close down
engine
immediately
WARNING:
Close down
engine
immediately

Mar 20
4 - 7
Starting and stopping the engine.
12. The controls comprise the Electronic Vessel Control (EVC) panel and a tachometer.
a. Starting.
• Morse to neutral
• Press EVC Panel on/off button for 2 secs (Taco screen illuminates,
displays ‘Volvo Penta’ and then engine hours run – difficult to see in sunlight)
• EVC carries out Built in Test and pre-heating of coils automatically –
wait for ‘two beeps’. (In an emergency, no need to wait for BIT check)
• Press and hold ‘Crank’ button until engine starts
• Check: no audio alarms; No warnings, water being expelled from
exhaust outlet.
• Allow engine to warm up
b. Stopping.
• Ensure EVC panel is turned on (Tachometer illuminated)
• Press and hold ‘Stop’ button, until engine stops
• Turn panel off

Mar 20
4 - 8
Engine controls – cockpit panel
13. Manual Engine Stop. Pull stop lever forward & hold (starboard side of engine):
EVC Panel
On/Off button
Stop
Audio alarm
silence
Crank
RPM
needle
Illuminated
display
Tachometer
Other manuals for 34.2
1
Table of contents
Other Hallberg-Rassy Boat manuals
Popular Boat manuals by other brands

SEATTLE Sailing Club
SEATTLE Sailing Club Wildflower J/35c quick guide

Scout Boats
Scout Boats 222 Sport Fish owner's manual

Silver Marine
Silver Marine Phoenix 530 owner's manual

Tiara Yachts
Tiara Yachts 48LS 2024 owner's manual

PATHFINDER
PATHFINDER 2200-V Tournament Edition Owner's/operator's manual

Boston Whaler
Boston Whaler 19 GuardianSeries Operation and maintenance manual