Hama 00095282 User manual

118569
More information
E
CZ
F
D
GB
I
P
RO
NL
H
PL
SK
Operating Instructions
Bedienungsanleitung
Mode d‘emploi
Instrucciones de uso
Istruzioni per l‘uso
Gebruiksaanwijzing
Instrukcja obsługi
Használati útmutató
Návod k použití
Návod na použitie
Manual de instruções
Manual de utilizare
Digital Photo Frame with Weather Station
Digitaler Bilderrahmen mit Wetterstation
00118569
00095282
095282
More information

3
GB
Contents
Introduction........................................ 4
Preface ....................................................4
Copyright.................................................4
Warnings .................................................4
Intended use............................................5
Limitation of liability ................................5
Safety instructions.............................. 6
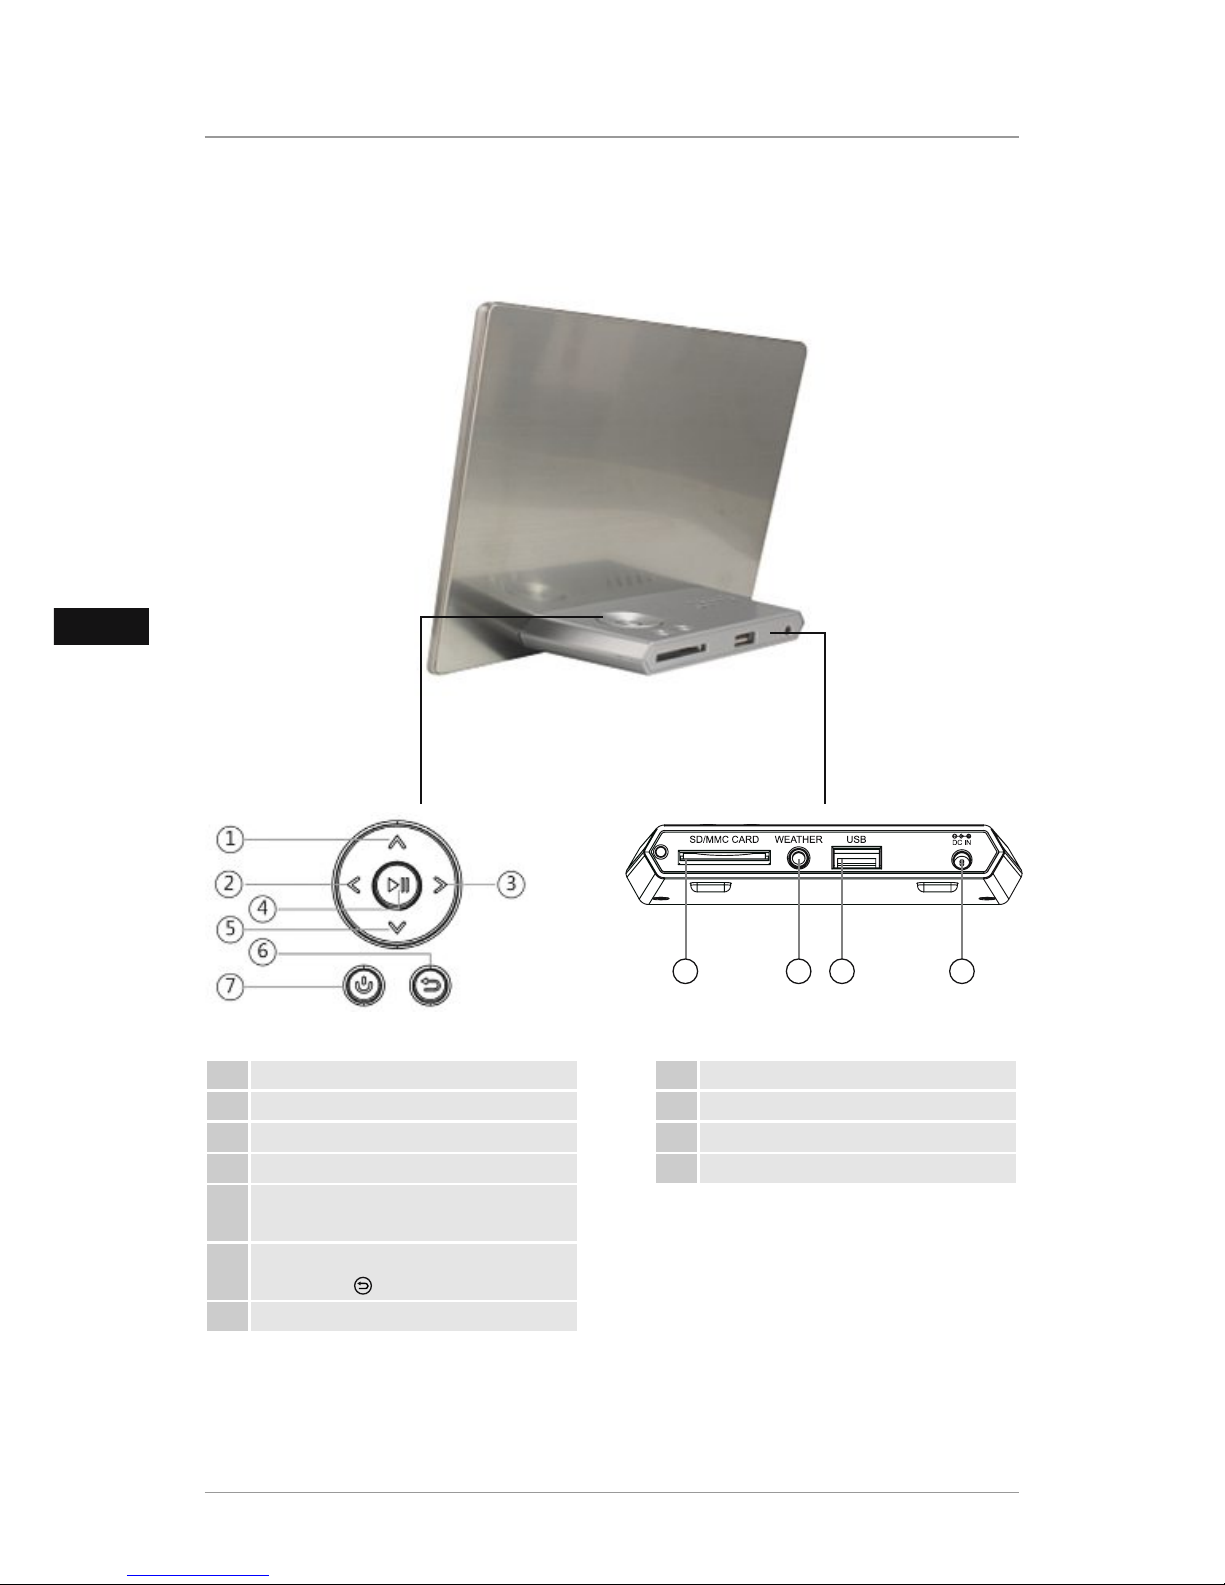
Design and functionality.................... 7
Digital picture frame (rear view)...............7
Remote control ........................................8
Inserting the battery ................................8
Extent of delivery and delivery inspection.9
Operation............................................ 9
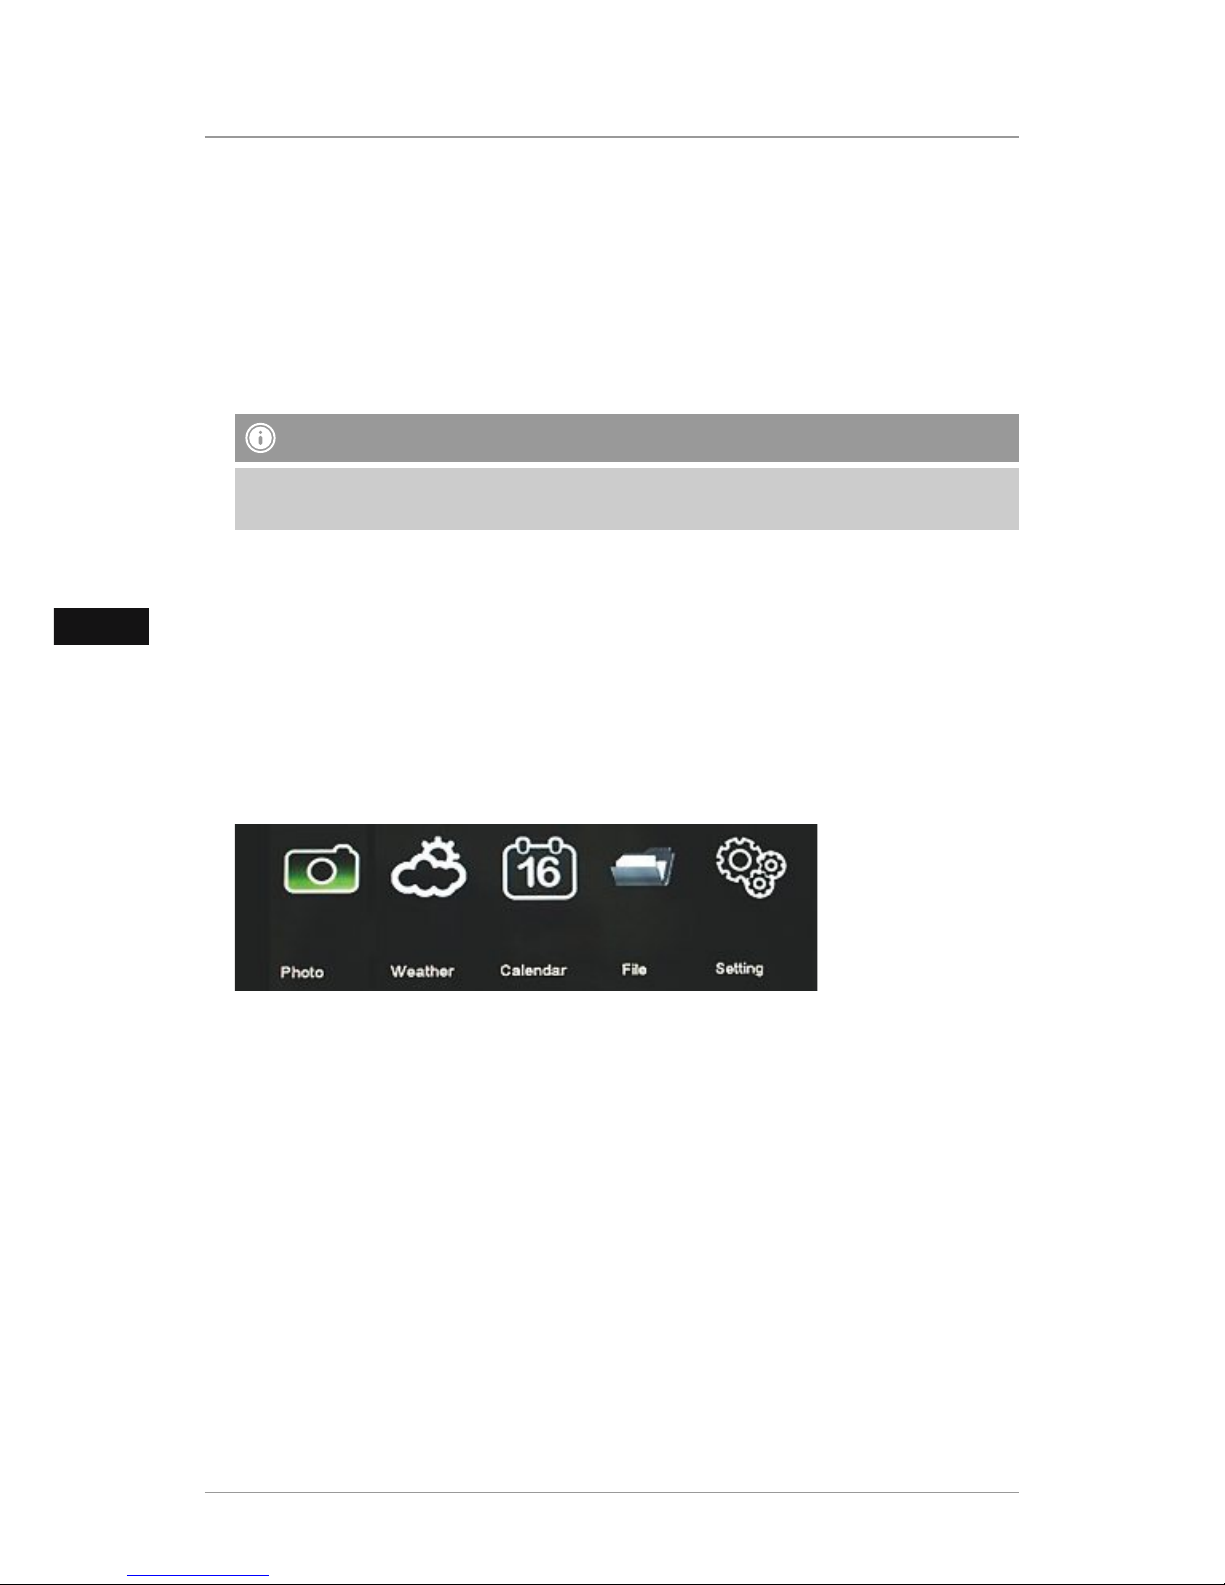
Using the menu .......................................9
System settings ......................................10
Functions .......................................... 12
Photo.....................................................12
Weather.................................................13
Weather forecast and symbols ...............14
Weather indicator ..................................15
Installing the weather station on
the digital picture frame.........................16
Cleaning and care............................. 20
Safety instructions..................................20
Cleaning ................................................20
Troubleshooting................................ 20
Safety instructions..................................20
Causes of errors and error rectication...21
Disposal ............................................ 22
Device disposal......................................22
Battery disposal .....................................22
Disposal of packaging materials.............22
Appendix .......................................... 23
Technical specications..........................23
Menu structure for the DPF.............. 24
Support information......................... 25

4
GB
Introduction
Preface
Thank you for choosing a Hama product.
Take your time and read the following instructions and information completely. Please keep
these instructions in a safe place for future reference. If you sell the device, please pass these
operating instructions on to the new owner.
Copyright
This documentation is protected by copyright.
It may not be reprinted or reproduced (including illustrations) in whole or in part without prior
written consent from the manufacturer. This also applies after changes to the documentation.
Warnings
The following warnings are used in these operating instructions:
Danger
A warning of this type indicates the immediate threat of a dangerous situation.
Death or serious injuries can result if this situation is not avoided.
•Follow the information in this warning to prevent death or serious personal injury.
Warning
A warning of this type indicates the possibility of a dangerous situation.
Injuries and/or material damage can result if this situation is not avoided.
•Follow the information in this warning to prevent personal injury or material damage.
Caution
A warning of this type indicates the possibility of material damage.
Material damage can result if this situation is not avoided.
•Observe the information in this warning to prevent material damage.
Note
A note indicates additional useful information for handling the device.

5
GB
Intended use
This device is only intended for private, indoor use to display photos, along with additional
weather station functionality.
Other uses or uses that go beyond this use are considered unintended.
Warning
Danger caused by unintended use
Danger may result from unintended or other use of the device.
•Only use the device as intended.
•Adhere to the procedures described in these operating instructions.
All claims made as a result of damage caused by unintended use are excluded.
The operator alone bears the risk resulting from unintended use.
Limitation of liability
All technical information, data and instructions contained in these operating instructions were
current at the time of printing and written to the best of our knowledge based on previous
experiences and ndings.
Therefore, no claims can be derived from the specications, illustrations and descriptions
contained in these instructions.
The manufacturer accepts no liability for damages caused by failure to observe these
instructions, improper use or repairs, unauthorised device modications or the use of non-
approved spare parts.
Caution
Pixel defects can occur due to the manufacturing process. These manifest themselves as white
or black pixels that permanently light up during playback. Within the context of production
tolerances, a maximum of 0.01% of these pixel defects measured against the total size of the
screen are permitted as a tolerance and are not considered a product defect.

6
D
Safety instructions
•Visually inspect the device before using it to make sure that there is no external damage. Do
not operate the device if it is damaged.
•Keep the device away from moisture and do not allow liquids or objects to enter the device.
Disconnect the power supply adapter immediately if the device comes into contact with
liquids.
•Place the device on a at, level surface.
•Do not place any objects on top of the device.
•Do not place the device in a hot, wet or very humid environment.
•The device requires adequate air circulation in order to function properly. During operation,
do not place the device on soft surfaces, carpets or other materials that might block air
circulation, and do not make any modications to the device.
•Keep the cable away from hot surfaces and sharp edges.
•Make sure not to bend the cable or pull it too tightly.
•The electrical socket must be easily accessible so that the power supply adapter can be easily
unplugged in case of emergency.
•If you are not going to use the device for an extended period of time, switch off the device,
disconnect it from the power supply and store it in a clean, dry place that is away from direct
sunlight.
•Only use the included power supply adapter; otherwise the device may be damaged.
•Do not operate the device if the power supply adapter, connection cable or plug is damaged.
•Do not open the housing of the device or the power supply adapter under any circumstances.
There is a risk of electric shock if live connections are touched or if the electronic or mechanical
layout of the device is altered.
•Disconnect the power supply adapter from the power supply before cleaning the device,
during thunderstorms or in the event of a malfunction.
•Any repairs to the device should be left to specialists. Improper repair work invalidates any
warranty claims.
•Faulty components may be replaced with original spare parts only.
•Packaging materials may not be used as toys. There is a risk of suffocation.

7
GB
Design and functionality
Digital picture frame (rear view)
1Up/Go to next le control button
2
Left control button
3
Right controlbutton
4Play/Pause/OK/ENTER button
5Down/Go to previous le control
button
6Exit/Back button
MENU = 2x
7ON/OFF button
1234
1SD/SDHC/MMC
2Socket for indoor temperature sensors
3USB type A (host)
4Socket for power supply adapter

8
GB
Remote control
Inserting the battery
To insert/replace the battery, proceed as follows:
•Remove the battery compartment from the remote control by pressing in the locking
mechanism while simultaneously pulling out the battery compartment.
•Remove the used battery and insert a new battery of type CR2025 (button cell) in the battery
compartment. Be sure to install the battery according to the correct polarity.
•Slide the battery compartment back into the remote control.
1POWER ON/OFF
2SETUP EXIT to system settings
3ROTATERotate photo anticlockwise
4Up button
5ZOOM Image zoom function +/-
6Left View previous photo
7OK/
ENTER
Conrm button; play/pause
button in playback mode
8Right View next photo
9SLIDE
SHOW Starts the Photo Slideshow
10 Down
button
11 EXIT Return to the previous menu

9
GB
Extent of delivery and delivery inspection
The device includes the following components as standard:
•Digital picture frame
•Power supply adapter
•Remote control
•Indoor temperature sensor
•Outdoor temperature sensor
•Operating instructions
Note
Check the delivered items for completeness and any visible damage. Immediately inform your
supplier/dealer in the event of incomplete or damaged deliveries.
Operation
Using the menu
The device is equipped with a user-friendly menu. The menu appears on the screen.
•The following types of storage media can be read:
•SD/SDHC cards / MMC cards
•USB storage media
•Turn the device on by pressing the ON/OFF button.
•Once the device is on, the main menu appears. In the menu, use the [◄][►] buttons to move
around, and select the desired function.
•When you conrm your selection by pressing [OK], a corresponding submenu appears. In this
menu, use the [▲] or [▼] buttons to move around, and select the desired line. The selected
line is highlighted in colour.
•Conrm your selection using the [OK] button. Usually, an additional menu will then appear, in
which you move around using the [◄][►][▲][▼] buttons and select the desired setting. Use
button [EXIT] to exit the current menu level.
•For orientation purposes, the menu structure is also included in the Appendix.
•You can control the device using the buttons on the rear or with the included remote control.

10
GB
Note
If you stay in the main menu and do not switch to another function, the device will
automatically open the weather menu after approx. 30 seconds. For this reason, you cannot
view photo slideshows after the device has been switched on.
System settings
To enter the setup menu, press the [SETUP] button on your remote control or use the
[◄][►] buttons on the rear of the device or the remote control to access the menu
item.

11
GB
You can adjust the following settings here:
Photo Setting
Display Mode
Function menu for selecting the display
type (slideshow, thumbnail preview,
search mode)
Display Ratio Function menu for adjusting the photo
to t the screen
Slideshow Duration
Select the time interval at which the
pictures change (3, 5, 15 or 60 seconds,
or 15 or 60 minutes)
Slideshow Repeat Function menu for setting the playback
loop
Slideshow Effect Function menu for setting the transition
effects in the slideshow
Date Setting
Display Mode
Function menu for setting the time and
date
Date
Clock Mode
Clock Time
Display time When this function is activated, the time,
the temperature, or both will be displayed
during the photo slideshow.
Display temperature
System Setting
Language Select the appropriate language menu/
operating language
Brightness
Function menu for adjusting the colour
settings on the display
Contrast
Saturation
Power ON Function menu for setting the automatic
on/off function
Caution:
•The switching on and off has to be extra
activated.
Auto Boot Time
Power Off
Auto Shut Time
Auto Power Frequency
Reset Default Setting Function menu to reset to factory settings
Sytem Upgrade Function menu for updating the rmware
Weather Function menu for correcting a previous
weather forecast
Note
You can use the [EXIT] button on your remote control tor the device 6to exit the current
menu.

12
GB
Functions
Photo
The device starts a photo slide show automatically when a storage medium is inserted.
If no storage medium has been inserted, the device uses the photos stored on the
internal memory.
You can navigate in the photo menu as follows:
•Use the [◄][►][▲][▼] buttons on the device or remote control to select the symbol and
then press [OK].
•In the default setting, the device displays the slide show upon start-up.
•If you press the [EXIT] button on your remote control during the slideshow, you will enter
preview mode, where all the photos on the storage medium are displayed.
•You can use the [▲][▼] buttons to select the photo you want from the menu. Press [OK] to
conrm your selection. The photo is displayed and then the slideshow continues.
•If you press the [ROTATE] button on your remote control during the slideshow, you will enter a
submenu in which you can turn or rotate the photo displayed.
•By pressing the [ZOOM] button on your remote control during the slideshow, you can zoom in
on the photo displayed.
Note
You can use the [EXIT] button on your remote control tor the device 6to exit the current
menu.
Note
If you stay in the main menu and do not switch to another function, the device will
automatically open the weather menu after approx. 30 seconds. For this reason, you cannot
view photo slideshows after the device has been switched on.

13
GB
Weather
Press the [◄][►][▲][▼] buttons on your device or the symbol on the remote control
and press the [OK] button to open the following menu level:
1
9
0
234
6785
1
Date/day of the week
2Weather forecast
3Outdoor temperature display
4Outdoor humidity display
5Indoor temperature display
6Indoor humidity display
7Picture display/photo slideshow
8Comfort display
9Weather indicator
0Time

14
GB
Note
•After the device is turned on, it always starts in the main menu, then automatically switches
to the weather menu after approx. 30 seconds.
•The displays for the time, date and day of the week are not updated via radio. You can set
the current calendar date and time under “Date setting”.
•When the weather station is displayed, press the [OK] button on your remote control to
switch the temperature units between °C and °F.
•If a storage medium is inserted, the pictures saved on it will be displayed in a slideshow.
Weather forecast and symbols
The weather forecast is valid for the next 12 to 24 hours and is displayed using the following
symbols:
Sunny
Sunny to cloudy
Cloudy
Rain
Snowing

15
GB
Weather indicator
The weather indicator uses symbols 8and 9to display the humidity and the comfort level in
the area.
For humidity between 40 and 70%, the display reads “Comfort”
For humidity over 70%, the display reads “Wet”
For humidity less than 40%, the display reads “Dry”
Note
•The weather forecast is based on the general atmospheric pressure, and has an accuracy of
around 70%.
•This means the weather forecasts may not reect the current weather conditions.
•At night, the “Sunny” symbol means clear skies.
•When the device is started up for the rst time or after it has not been used for a long time,
or if the batteries in the outdoor sensor have been changed or the indoor temperature
sensor has been attached or removed, an accurate weather forecast will not be available
until the device has been on for approx. 36 hours.
•For proper operation of the weather station and an accurate weather forecast, the power
adapter must always be connected to a power supply. Only use the ON/OFF button 1 to
switch off the device. Only unplug the power supply adapter in an emergency.
•If the weather forecasts from the local weather station and this device do not match,
the forecast of the local weather station applies. You can make adjustments by selecting
“Weather” in the “System settings” menu.
•Depending on the production process, the measurements may deviate by +/- 1.5°C for
temperature and +/- 10% for humidity. This tolerance may appear in your device and is not
a product defect.

16
GB
Installing the weather station on the digital picture frame
•Connect the indoor sensor to the appropriate socket 8on the back of the device.
•Establishing a connection between the outdoor sensor and the main device.
Once you have inserted the batteries, the main device (the indoor sensor)
automatically receives data from the outdoor sensor about the outdoor
temperature. The battery compartment is on the back of the outdoor sensor.
Unscrew the screws to open the battery compartment.
Note
•After the batteries (2 x 1.5 V AAA; not included) have been inserted properly, the LED
ashes and the outdoor sensor is ready for use. Inserting the batteries with incorrect
polarity will result in damage to the product.
•Make sure you only use AAA alkaline batteries

17
GB
Caution
Do not place the outdoor sensor in or under water. Position the device in a location protected
from rain and direct sunlight. The maximum transmission range between the outdoor sensor
and the indoor weather station is approx. 12 m (approx. 60 m in open spaces).
We recommend installing the outdoor sensor on a northern wall of your building. Also
avoid placing the sensor close to materials that could block the signal (e.g. walls with steel
reinforcement), as this can limit the range of the device.
Note
Please note that it can take up to ve minutes for the indoor and outdoor sensors to correctly
display the temperature and humidity.

18
GB
File
Press [◄][►][▲][▼] on your device or the symbol on the remote control and press the
[OK] button to open the following menu level:
Note
•You can use the [▲][▼] buttons to select the le you want from the menu. Press [OK] to
conrm your selection. The le/photo will be displayed.
•If you hold the [OK] button for longer than 4 seconds, a submenu will appear in which you
can delete the selected le/photo from the storage medium
•You can use the [EXIT] button on your remote control tor the device 6to exit the current
menu.

19
GB
Calendar
Press [◄][►][▲][▼] on your device or the symbol on the remote control and press the
[OK] button.
When set to the defaults, the device will show the following calendar display:
Note
If a storage medium is inserted, the pictures saved on it will be displayed in a slideshow.
By pressing the [OK] button on your remote control, you can also switch to the standard time
display:
Note
The displays for the time, date and day of the week are not updated via radio. You can set the
current calendar date and time for the device under “Date setting”.

20
GB
Cleaning and care
This chapter contains important information for the cleaning and care of the device.
Safety instructions
Caution
Moisture can damage the device.
•To prevent irreparable damage, make sure that no moisture gets into the device when you
clean it.
Cleaning
The display on your device is located behind protective glass.
•Only clean the display with a dry, soft cloth.
•Do not apply pressure to the screen surface when you clean the device.
•To keep from damaging the surface, do not use solvents or alcohol-based cleaners to clean the
device.
Note
For gentle cleaning and care of the display, we recommend that you use a microbre cleaning
cloth.
•Clean the rest of the device with a dry cloth. You can lightly dampen the cloth if the device is
very dirty.
Troubleshooting
This chapter contains important information for localising and rectifying errors. Observe the
information to avoid dangers and material damage.
Safety instructions
Warning
Observe the following safety instructions to avoid safety risks and material damage:
•Repairs to electrical devices may only be carried out by specialists who have been trained
by the manufacturer. Improper repairs can result in signicant danger to the operator and
damage to the device.

21
GB
Causes of errors and error rectification
The following table can be used to localise and rectify minor errors with the device:
Error Possible cause Solution
General information
Display is blank
Device is switched off Switch on the device.
Power supply adapter not
connected correctly
Ensure that the power supply
adapter is plugged in and
connected to the device.
No mains power Check your fuse box.
Device is faulty Inform our customer service
department.
Device turns off
By static electricity, such as
occur during normal daily
use (carpet, wool sweater),
it may happen that the
device will go into Standby
Mode.
In case that the device shouldn´t
react on any commands or show
ablack screen, reset the device by
pressing the POWER button on the
remote control or on the backpanel
of the device.
DPF
No image
appears
No storage medium is
inserted Insert a storage medium.
The storage medium does
not contain data Check your storage medium.
Weather station
The outdoor sensor
displays no data The inserted batteries have
little or no charge
Test or change the batteries
in the outdoor temperature
sensor and reconnect the two
units
Data from the
outdoor sensor is
displayed only occa-
sionally
Your outdoor temperature
sensor is too far away from
the weather station
Position your outdoor sensor
closer to the weather station
and reconnect the two units.
No weather data is
displayed The temperature sensor
and the digital picture
frame are not in contact
with one another
Make sure that the plug
contact of the indoor sensor is
connected rmly and correctly
with the digital picture frame.
If necessary, disconnect the
device from the mains, recon-
nect the indoor sensor to the
picture frame, and switch the
device on again.
This manual suits for next models
1
Table of contents
Languages:
Other Hama Digital Photo Frame manuals

Hama
Hama High-End 00090917 User manual

Hama
Hama 8USLB User manual

Hama
Hama 8SLSWS User manual

Hama
Hama 97SLP User manual

Hama
Hama 9522 User manual

Hama
Hama 95238 User manual

Hama
Hama 95256 User manual

Hama
Hama 00090921-V2.5 User manual

Hama
Hama Slim-Touch Series User manual

Hama
Hama 00095295 121SLB User manual