Hama 55314 User manual

0 0055314/03.07
All listed brands are trademarks of the corresponding companies. Errors and omissions excepted,
and subject to technical changes. Our general terms of delivery and payment are applied.
P O Box 80 · 86651 Monheim/Germany
Phone: +49 9091 502-0
Fax: +49 9091 502-458
http://www.hama.com

Digitaler Bilderrahmen
Digital Picture Frame
Cadre photo numérique
COMPUTER
00055314

2
Merkmale:
• Zeigt digitale Bilder (JPEG) ohne PC an.
• Sie legen eine kompatible Flash-Speicherkarte in den digitalen Bilderrahmen ein und können direkt
die darauf gespeicherten Fotos anzeigen.
• Folgende Speicherkartenformate sind kompatibel:
• Secure Digital Card (SD), miniSD, MicroSD (TransFlash), MultiMedia Card (MMC), MMC PLUS, MMC Mobile,
Memory Stick, Memory Stick Pro, Memory Stick Duo, Memory Stick Duo Pro, Hitachi/IBM Microdrive,
CompactFlash, SmartMedia, xD Picture Card
• Unterstützt JPEG-Bilddateien mit bis zu 268 Millionen Pixel (16384 x 16384).
• Stellt JPEG-Bilder der gängigsten Kameramodelle dar.
• Klares, helles Active Matrix LCD TFT-Display (7 Zoll).
• Automatische Bildwiedergabe als Diashow.
• Bedienerfreundliche Fernbedienung.
• Wandmontage möglich.
Lieferumfang:
• Digitaler Bilderrahmen
• Fernbedienung
• 2 x AAA-Batterien
• AC/DC-Adapter 12 V, 1,5 A
• Benutzerhandbuch
Warnhinweise:
• Die Belüftungslöcher an der Rückseite des digitalen Bilderrahmens dürfen nicht verdeckt werden.
• Vermeiden Sie direkte Sonneneinstrahlung, da diese den digitalen Bilderrahmen beschädigen kann.
• Öffnen Sie nicht das Kunststoffgehäuse des digitalen Bilderrahmens. Das Öffnen des Kunststoffgehäuses
führt zum Erlöschen der Garantie.
• Behandeln Sie das Display des digitalen Bilderrahmens sorgsam; es besteht aus Glas und ist daher
zerbrechlich.
• Um eine Gefährdung durch Feuer oder Stromschlag auszuschließen, darf der digitale Bilderrahmen nicht
Regen oder Feuchtigkeit ausgesetzt werden.
Reinigen des LCD-Displays:
• Verwenden Sie zum Entfernen von Fingerabdrücken und Staub auf dem LCD-Display ein weiches,
fusselfreies Tuch (z. B. ein Objektivreinigungstuch). Falls Sie ein LCD-Reinigungskit benutzen, tragen
Sie die Reinigungsflüssigkeit NICHT direkt auf, sondern tränken das Tuch damit und reinigen das
Display mit dem Tuch.
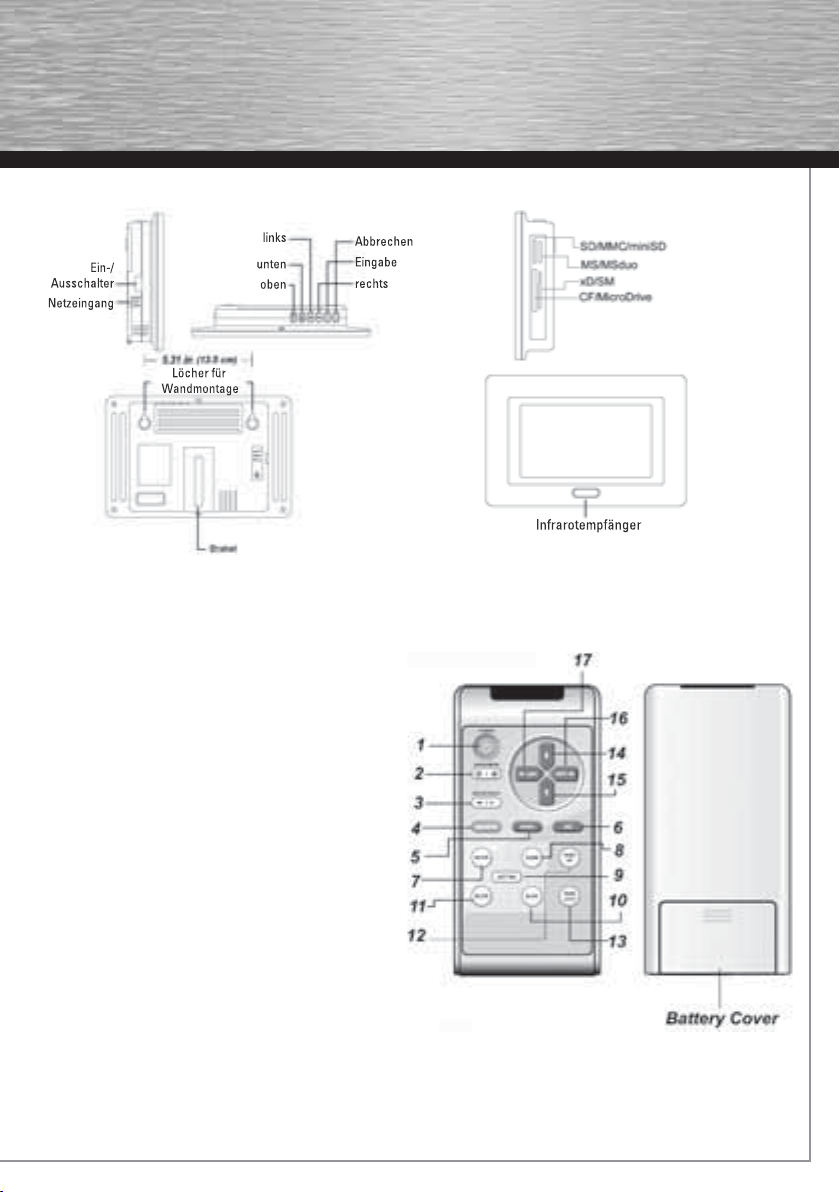
Erste Schritte:
• Ziehen Sie den Ständer des digitalen
Bilderrahmens heraus, und schließen Sie den
Bilderrahmen mit dem beiliegenden
AC/DC-Adapter an die Steckdose an. Schalten Sie
den digitalen Bilderrahmen an. Stellen Sie dafür
den Netzschalter auf die Position ON.
dBedienungsanleitung

3
Nach dem Einschalten des digitalen Bilderrahmens
erscheint der unten abgebildete Bildschirm.
Einlegen der Speicherkarte:
Der digitale Bilderrahmen ist mit folgenden Flash-Speicherkarten kompatibel:
1. Ohne zusätzlichen Adapter: SD, miniSD, MMC, MMC Plus, MS, MS Pro, MS Duo, MS Duo Pro,
SM, xD, CF, MicroDrive
2. Mit zusätzlichem Adapter: RSMMC, MMC Mobile, Micro SD (TransFlash)
Legen Sie die Speicherkarte korrekt in den Speicherkarteneingang ein (siehe Abbildung unten).
Schieben Sie die Speicherkarte nicht gewaltsam ein. Wenn sich die Karte nicht leicht vollständig einschieben
lässt, wurde sie möglicherweise falsch eingelegt.
Hinweis:
Der digitale Bilderrahmen erkennt AUSSCHLIESSLICH Fotos, die im JPEG-Format abgespeichert wurden.
Andere digitale Bildformate werden nicht erkannt.
Ansehen von Bildern:
Legen Sie die Speicherkarte korrekt ein. Wenn auf der Karte Bilder gespeichert sind, wird automatisch eine
Diashow gestartet. Zum Beenden der Diashow drücken Sie die
ESC-Taste auf der Fernbedienung. Um die Diashow fortzusetzen, drücken Sie die SLIDE-Taste.
HINWEIS:
Schieben Sie die xD- und
miniSD-Karte so hinein,
dass das Etikett
auf der Vorderseite von
Ihnen WEG zeigt.

4
Auswählen der Speicherkarte für die Bildwiedergabe:
Wenn Sie mehrere Speicherkarte in den digitalen Bilderrahmen eingelegt haben, gehen Sie wie folgt vor:
1. Wählen Sie das Flash-Kartenauswahlsymbol, und
drücken Sie die ENTER-Taste.
2. Wählen Sie das Symbol für die Speicherkarte,
die wiedergegeben werden soll, und drücken Sie
die ENTER-Taste.
Wenn Sie das Symbol für eine Speicherkarte
auswählen, stellen Sie sicher, dass die
entsprechende Speicherkarte auch eingelegt ist.
Bedienen des digitalen Bilderrahmens:
1. Der digitale Bilderrahmen lässt sich mithilfe der Fernbedienung oder den auf dem Rahmen befindlichen
Tasten bedienen.
2. Legen Sie vor Verwendung zwei Batterien vom
Typ AAA in die Fernbedienung ein. Wenn Sie
den digitalen Bilderrahmen über die Tasten auf
dem Rahmen bedienen, können Sie durch
Drücken der ENTER-Taste die in der folgenden
Abbildung gezeigten Funktionen ausführen.
Drücken Sie während der Anzeige eines Bildes
die ENTER-Taste. Wenn Sie sich im
Diashowmodus befinden, beenden Sie die
Diashow, bevor Sie die ENTER-Taste drücken.

5
Aufbau des digitalen Bilderrahmens
Aufbau der Fernbedienung
1. Ein-/Ausschalter
2. Helligkeit/Dunkelheit: Eine geringere Helligkeit
schont den Bildschirm.
3. 16:9-/4:3-Display: Bildanzeige in den Formaten
16:9 oder 4:3.
4. Hauptmenü: Rückkehr zur ersten Seite im
Miniaturbildindex.
5. Eingabe: Ja/Funktion auswählen
6. Abbrechen: Beenden/Diashow beenden/Video
beenden/Nein
7. Drehen: Bild um 90 ° im Uhrzeigersinn drehen
8. Zoom: Bild vergrößern/verkleinern
9. Einstellung: Einstellungsmenü
10. Dia: Diashow
11. Löschen: Ausgewähltes Bild löschen
12. Seite nach oben: Zurück zur vorigen Seite
13. Seite nach unten: Zur nächsten Seite wechseln
14. Nach oben: Auswahl nach oben verschieben
15. Nach unten: Auswahl nach unten verschieben
16. Nach rechts: Auswahl nach rechts verschieben/
Nächstes Bild/Ja zum Beenden der
OSD-Einstellung
17. Nach links: Auswahl nach links verschieben/
Vorheriges Bild/Ja zum Beenden der
OSD-Einstellung

6
Erweiterte Einstellungen:
1. Wählen Sie das Setup-Symbol, und drücken Sie
ENTER, oder drücken Sie die Taste SETTING auf
der Fernbedienung.
2. Einstellungsmenü
Im Einstellungsmenü navigieren Sie mit den Tasten NACH-OBEN, NACH-UNTEN, NACH-RECHTS und NACH-
LINKS.
• Sprache: Englisch/Vereinfachtes Chinesisch/
Traditionelles Chinesisch
• Diadauer: 03 – 60 Sekunden (Anzeigedauer der
einzelnen Fotos)
• Dateibeschreibung: EIN/AUS (Anzeigen von Datei
informationen auf dem Display)
• Ordnermodus: JA/NEIN (Anzeige der auf der
Speicherkarte gespeicherten Ordner)
• Displayeinstellung: OSD-Einstellungen
Nachdem Sie die gewünschten Einstellungen
vorgenommen haben, drücken Sie die ESC-Taste, um
das Setup zu beenden. Drücken Sie ENTER, um die
Einstellungen zu speichern, oder ESC, um das Menü
zu beenden, ohne die Änderungen zu speichern.

7
3. OSD-Einstellungen
Anbringen des digitalen Bilderrahmens:
An der Rückseite des digitalen Bilderrahmens befinden sich zwei Montagelöcher (siehe Abbildung), mit denen
der Bilderrahmen mithilfe passender Schrauben an der Wand befestigt werden kann.

8
Fehlerbehebung PROBLEM URSACHE und/oder ABHILFE
Digitaler Bilderrahmen lässt sich nicht
einschalten
Der Netzadapter ist nicht ordnungsgemäß mit dem digitalen
Bilderrahmen bzw. der Steckdose verbunden. Überprüfen Sie, ob
der Netzadapter korrekt angeschlossen ist.
Digitaler Bilderrahmen lässt sich nicht
mithilfe der Fernbedienung einschalten
Überprüfen Sie, ob der Ein-/Ausschalter an der linken Seite des
digitalen Bilderrahmens auf ON steht.
Diashow startet bei Einlegen der
Speicherkarte nicht automatisch
Auf der Speicherkarte sind keine Bilddateien enthalten. Das
Format der Bilddateien ist nicht kompatibel. Es sind nur
JPEG-Bilddateien kompatibel.
Um das Bild herum werden schwarze
Ränder angezeigt.
Dies ist normal, da die Bilder von unterschiedlichen Kameras
in verschiedenen Auflösungen bzw. Bildproportionen
aufgenommen werden. Eine bessere Darstellung erreichen
Sie mit dem Bildformat 1024 x 679 (1,5 x 1). Verändern Sie die
Auflösung bzw. die Proportionen Ihrer Fotos mithilfe eines
Bildbearbeitungsprogramms.

9
Operating Instruction
g
Features:
• Displays digital pictures (JPEG) without a computer.
• Simply inserts a compatible flash memory card into the digital photo frame to display photos.
• Compatible memory cards include:
• Secure Digital Card (SD), miniSD, MicroSD (TransFlash), MultiMedia Card (MMC), MMC PLUS, MMC mobile,
Memory Stick, Memory Stick Pro, Memory Stick Duo, Memory Stick Duo Pro, Hitachi/IBM Micro Drive,
CompactFlash, SmartMedia, xD Picture Card
• Supports up to 268 Million pixels (16384 x 16384) Pixels image files (JPEG Format).
• Compatible with most digital cameras‘ JPEG images
• Clear and bright 7” TFT active matrix LCD screen.
• Displays picture slideshow automatically.
• Includes a user-friendly remote control.
• Wall mountable.
Package contents:
• Digital Photo Frame
• Remote Control
• AAA battery x 2
• AC/DC Adapter 12V, 1.5A.
• User‘s Manual
Warnings:
• Do not block the ventilation holes on the back of the digital photo frame.
• Keep your digital photo frame out of direct sunlight. Direct sunlight may cause damage.
• Do not open the plastic case of digital photo frame. Opening the plastic case voids the product warranty.
• The screen of the digital photo frame is made of glass and must be treated with care or may break.
• To reduce the risk of fire or electric shock, do not expose the digital photo frame to rain or moisture.
Cleaning the LCD Screen:
• To clean fingerprints or dust on the LCD screen, use a soft, non-abrasive cloth such as the camera lens
cloth. If you use an LCD cleaning kit, DO NOT apply the cleaning liquid directly on the screen. Instead,
please put the liquid on the cloth and then clean the screen.
Getting Started:
• Pull out the digital photo frame bracket and
connect the AC/DC adapter provided between the
digital photo frame and an electrical outlet. Turn
on the digital photo frame by pressing the power
switch to „ON” position.

10
You will see the screen below if you have powered on
the digital photo frame successfully.
Inserting Memory Card:
The digital photo frame is compatible with the following flash memory cards:
1. without an extra adapter: SD, miniSD, MMC, MMC Plus, MS, MS pro, MS duo, MS duo pro, SM, xD, CF,
MicroDrive
2. with an extra adapter: RSMMC, MMC mobile, Micro SD (TransFlash)
Follow the memory card insertion instruction drawing below to insert the memory card correctly into the
memory card slot. Do not force the memory card into the memory card slot. If you are not able to easily insert
the memory card completely, you may have inserted it incorrectly.
Note:
The digital photo frame will ONLY recognize digital pictures stored in JPEG format in „JPEG Picture” mode.
Digital pictures stored in other formats will be ignored by the digital photo frame.
Viewing Pictures:
Insert the memory card and the picture slideshow plays automatically if you have pictures stored on the
memory card. Make sure you insert the memory card correctly. Press „ESC” button on the remote control to
stop the slideshow To resume the slideshow, press „SLIDE” button.
Note:
Insert xD and
miniSD card with
the front label
facing AWAY from
you.

11
Select memory card to play pictures:
If you have more then one memory card inserted in the digital photo frame.
1. Highlight „Flash Card Selection” icon and press
enter.
2. Highlight the memory card icon you wish to play
and press enter.
Make sure the corresponding memory card is
inserted when you highlight the memory card icon
Control Digital Photo Frame:
1. You can use either the remote control or on-board buttons to control the digital photo frame.
2. Install two AAA batteries into the remote control
before uses If you use on-board buttons to control
the digital photo frame, „ENTER” button can
enable you to operate the following functions
shown in the drawing below. Press „ENTER”
button while a picture is displayed. If you are in
slideshow mode, stop slideshow before pressing
„ENTER” button.

12
Overview of Digital Photo Frame
Overview of Remote Control
1. Power on/off
2. Brightness/Darkness: Lower brightness for
screen saving.
3. 16:9/4:3 display: Display picture in proportion of
16:9 or 4:3.
4. Main Menu: Return to the first page of thumbnail
index.
5. Enter: Yes/Select function
6. ESC: Exit/Stop Slideshow/Stop Video/No
7. Rotate: Turn picture 90 degree clockwise
8. Zoom: Zoom in/out picture
9. Setting: Setup Menu
10. Slide: Picture Slideshow
11. delete: Delete selected picture
12. Page Up: Go to previous page
13. Page Down: Go to next page
14. Up: Move highlight up
15. Down: Move highlight down
16. Right: Move highlight right/Next picture/Yes to
quit OSD setting
17. Left: Move highlight left/Previous picture/Yes to
quit OSD setting

13
Advanced Settings:
1. Highlight „Setup” icon and enter or press
„SETTING” button on the remote control.
2. Setup Menu
Use „Up”, „Down”, „Right”, and „Left” buttons to operate the settings.
• Language: English / Simplified Chinese /
Traditional Chinese
• Slide Duration: 03 ~ 60 Seconds (Slideshow
interval time)
• File Description: ON / OFF (Display picture file
information on screen)
• Folder Mode: YES / NO (Display folders stored in
memory card)
• Monitor Setting: OSD settings
Finish settings and press „ESC” button to exit setup.
Press „ENTER” button to save setting change or
„ESC” button to exit without saving.

14
3. OSD settings
Mounting the Digital Photo Frame:
Two mounting holes on the back of digital photo frame as shown below are used to mount your digital photo
frame. When wall mounted, make sure the mounting holes aim at both of screws then mount the digital photo
frame directly and slightly.

15
SYMPTOM CAUSE and/or CORRECTIVE ACTION
Digital Frame doesn‘t power on The power adapter is not connected to the digital frame or electri-
cal outlet properly. Check the power adapter connection again to
make sure no problem.
Digital Frame doesn‘t power on by the
remote control
Make sure the power switch on the left side of digital frame is
pressed to the „ON” position.
Insert memory card and slideshow
doesn‘t play automatically
No picture files are stored in the memory card. The picture files
are incompatible file format. Compatible picture format: JPEG
Compatible.
Black bands appear around the picture This is normal since different digital cameras take pictures in
varieties of resolutions or width x height proportion. The propor-
tion around 1024 x 679 (1.5 x 1) can fit into the screen better. Use
a Photo Editing software to resample the picture‘s resolution or
width x height proportion.

16
Caractéristiques :
• Vous permet de visionner vos photos numériques (JPEG) sans ordinateur.
• Insérez simplement une carte mémoire flash compatible dans le cadre photo numérique afin de visionner
vos photos.
• Cartes mémoire compatibles :
• Secure Digital Card (SD), miniSD, MicroSD (TransFlash), MultiMedia Card (MMC), MMC PLUS, MMC mobile,
Memory Stick, Memory Stick Pro, Memory Stick Duo, Memory Stick Duo Pro, Hitachi/IBM Micro Drive,
CompactFlash, SmartMedia, xD Picture Card
• Supporte les fichiers image (format JPEG) jusqu’à 268 millions de pixels (16384 x 16384).
• Compatible avec la plupart des appareils photo numériques JPEG
• Ecran matrice active TFT clair et brillant de 7”.
• Visionnement automatique des photos sous forme de diaporama.
• Télécommande conviviale incluse.
• Possibilité d’installation murale
Contenu de l‘emballage :
• Cadre photo numérique
• Télécommande
• Deux piles LR3/AAA
• Adaptateur CA/CC 12V, 1.5 A.
• Manuel d‘utilisation
Avertissements :
• Ne bloquez pas les orifices de ventilation situés sur la face arrière du cadre photo numérique.
• Protégez votre cadre photo numérique des rayons du soleil. Les rayons directs du soleil sont susceptibles
d’endommager l’appareil.
• Ne tentez pas d’ouvrir le boîtier en matière synthétique de votre cadre photo numérique. Toute ouverture du
boîtier en matière synthétique annulerait la validité de la garantie du produit.
• L’écran du cadre photo numérique est en verre et doit être manipulé avec précaution ; il est susceptible de
se casser.
• N‘exposez pas l‘appareil à la pluie ou à l‘humidité afin d‘éviter tout risque d‘incendie ou de décharge
électrique.
Nettoyage de l’écran LCD :
• Utilisez un chiffon doux (du type chiffon de nettoyage de lentilles d’appareils photo) pour éliminer les traces
de doigts ou la poussière de votre écran LCD. Dans le cas où vous utilisez un kit de nettoyage LCD,
n’appliquez PAS le liquide de nettoyage directement sur l’écran. Imprégnez plutôt un chiffon du liquide, puis
nettoyez l’écran au moyen du chiffon humide.
Premiers pas :
• Dépliez le support du cadre photo numérique et
connectez l’adaptateur CA/CC fourni au cadre photo
numérique et à une prise électrique. Mettez votre
cadre photo numérique sous tension en appuyant sur
la touche d’alimentation (position « ON »).
Mode d‘emploi
f

17
Votre cadre photo numérique affichera l’image
ci-dessous dans le cas où il a été mis sous tension
correctement.
Insertion d’une carte mémoire :
Le cadre photo numérique est compatible avec les cartes mémoires flash suivantes :
1. sans adaptateur supplémentaire : SD, miniSD, MMC, MMC Plus, MS, MS pro, MS duo, MS duo pro, SM,
xD, CF, MicroDrive
2. avec un adaptateur supplémentaire : RSMMC, MMC mobile, Micro SD (TransFlash)
Reportez-vous au croquis d’installation de la carte mémoire ci-dessous afin d’insérer correctement la carte
dans l’emplacement. Ne forcez pas la carte dans l’emplacement de carte mémoire. Il est probable que vous
ayez mal inséré la carte dans le cas où vous n’arrivez pas à l’introduire facilement et totalement.
Remarque :
Le cadre photo numérique reconnaîtra EXCLUSIVEMENT les photos numériques stockées au format JPEG
en mode « image JPEG ». Les photos stockées sous d’autres formats seront ignorées par le cadre photo
numérique.
Visionnement des images :
Insérez la carte mémoire et le diaporama démarrera automatiquement dans le cas où des photos sont
stockées sur la carte. Assurez-vous d’avoir inséré la carte correctement. Appuyez sur la touche « EXC » de la
télécommande afin d’arrêter le diaporama ; appuyez sur la touche « SLIDE » afin de relancer le diaporama.
REMARQUE:
Insérez la carte xD et
miniSD de sorte que
l‘étiquette se
trouvant sur le front ne
montre pas dans votre
direction

18
Sélectionnez la carte mémoire afin de visionner des images :
Dans le cas où vous avez inséré plus d’une carte mémoire dans le cadre photo numérique :
1. Sélectionnez l’icône « Flash Card Selection » et
appuyez sur la touche entrée.
2. Sélectionnez l’icône de la carte mémoire sur
laquelle les images que vous désirez visionner
sont stockées et appuyez sur la touche entrée.
Assurez-vous que la carte mémoire
correspondante est bien insérée lorsque vous la
sélectionnez.
Commande du cadre photo numérique :
1. Vous pouvez utiliser soit la télécommande, soit les touches placées sur l’unité afin de commander votre
cadre photo numérique.
2. Installez deux piles LR3/AAA dans la
télécommande avant de l’utiliser ; dans le cas où
vous utilisez les touches placées sur l’unité, la
touche « ENTER » vous permet d’utiliser les
fonctions décrites dans le croquis ci-dessous.
Appuyez sur la touche « ENTER » pendant le
visionnement d’une photo. En mode diaporama,
interrompez le diaporama avant d’appuyer sur la
touche « ENTER ».

19
Vue d’ensemble du cadre photo numérique
Vue d’ensemble de la télécommande
1. Alimentation marche/arrêt
2. Luminosité brillant/obscur : brillance diminuée
pour économiser l’écran.
3. Ecran 16:9/4:3 : affiche les images au format 16:9
ou 4:3.
4. Menu principal : retour à la première page de
l’index des vignettes.
5. Enter : fonction Yes/Sélection
6. ESC : Exit/Stop Diaporama/Stop Vidéo/No
7. Rotate : rotation de l’image de 90° dans le sens
des aiguilles d’une montre
8. Zoom : zoom avant / arrière
9. Setting : menu de configuration
10. Slide : diaporama
11. Delete : effacer l’image sélectionnée
12. Page Up : vers la page précédente
13. Page Down : vers la page suivante
14. Up : déplacement de la sélection vers le haut
15. Down : déplacement de la sélection vers le bas
16. Right : déplacement de la sélection vers la
droite / image suivante / yes pour quitter les
réglages écran
17. Left : déplacement de la sélection vers la
gauche / image précédente / yes pour quitter
les réglages écran
Other manuals for 55314
1
Table of contents
Languages:
Other Hama Digital Photo Frame manuals