Hama SIRIUM1000ABT User manual

Operating Instructions/Bedienungsanleitung/Mode d‘emploi /Instrucciones de uso /
Руководство по эксплуатации/Istruzioni per l‘uso /Gebruiksaanwijzing /Οδηγίες χρήσης/Instrukcja obsługi/
Használati útmutató/Návod kpoužití/Návod na použitie /Manual de instruções /Kullanma kılavuzu/
Manual de utilizare/Bruksanvisning/Käyttöohje/ Работна инструкция/Betjeningsvejledning/Manuelt stasjonssøk
"SIRIUM1000ABT" Smart Speaker
Smart-Speaker "SIRIUM1000ABT"
00054880
00054889
(SIRIUM1000ABT)

1
21 3 4 5 6
A
B
C
1 2 3 4
RESET USB SET UP
DC IN
12V 1.5A

A: Loudspeaker top
1[POWER] button On/Off Switch
2B[BLUETOOTH] button Operating Mode:
Bluetooth
3[MICROPHONE MUTE] button
4[ACTION] button
5[VOLUME -] button Volume control
6[VOLUME +] button Volume control
B: Loudspeaker front
1Status LED
2Status LED update
C: Loudspeaker back
1[RESET] button
2Update port
3[SETUP] button
4Mains power supply

Behaviour of the LED indicator
Indicator LED Behaviour Description
System indicator Flashes orange
The system is starting and searching for anetwork
connection. Wait until the LEDs light up solid and the
network connection has been established.
Network
indicator
Lights up soild green The Loudspeaker is connected to anetwork.
LED 1-3pulses red,
LED 5pulses green
WIFI is disconnected. Initial setup can be carried out via
the Hama Smart Audio App.
LED 1-3quickly ashes red,
LED 5quickly ashes green
WPS mode is active.
LED 1-3slowly ashes red,
LED 5slowly ashes green
WACMode is active.
Amazon Alexa
voice assistant
Alternating quick ashes of
blue and cyan
Alexa is processing and responding to avoice command.
No further voice commands can be given.
Lights up solid red Mute mode is active. All microphones aremuted. Alexa
does not respond to the activation word.
Flashes red Thereisnoconnection with the Amazon server.Alexa is
unable to accept voice commands.
Bluetooth
indicator
Pulses blue The loudspeaker is in Bluetooth mode. Thereisno
connection with amobile device.
Flashes blue The loudspeaker is in Bluetooth pairing mode. The rst
connection can be established with amobile device.
Lights up solid blue The loudspeaker is in Bluetooth mode. Aconnection has
been successfully established with amobile device.
Volume indicator
Lights up white for 3s
Volume 20%
Lights up white for 3s
Volume 40%
Lights up white for 3s
Volume 60%
Lights up white for 3s
Volume 80%
Lights up white for 3s
Volume 100%
Battery charge
level indicator
Flashes red for 3s Battery charge level <10%
Lights up red for 3s Battery charge level 10 -30%
Lights up yellow for 3s Battery charge level 30 -40%
Lights up yellow for 3s Battery charge level 40 -60%
Lights up green for 3s Battery charge level 60 -80%
Lights up green for 3s Battery charge level 80 -100%
Update Flashes white An update is currenty in progress.
Note
•Forreasons of environmental protection and to save valuable rawmaterials, the brightness of the LED is dimmed after
15 minutes of no commands being issued. If acommand is then issued, the brightness of the LED display is restored
to its original setting.

00054880/00054889 SIRIUM1000ABT
Technical Data
Streaming
WiStream (DLNA compatible)
ü
UPNP
ü
Alexa Voice Service
Voice Control
ü
Number of Microphones 3
Microphone Array Far-Field
Connectivity
WiFi (Standard); (Encryption, WPS)
WiFi 2.4GHz (b/g/n) 2x2 MiMo;
WPA, WPA2, WPS
Bluetooth (Standard) 4.0 A2DP (SBC, aptX)
USB Update
Speaker
2x Full Range Driver 1.75" (4.45 cm)
Amplier Class Class D(YDA174)
Technical Data
Input 12 V 1.5 A
Battery type 7.2V Li-Ion
Min. capacity 2500mAh /17,8Wh
Typ. capacity 2600mAh /18,7Wh
Charging time 3-5h
Other Details and Specication
Dimensions (W xHxD) 20 cm x9cm x
11.5 cm
Weight 900 g
Equalizer /DSP
Proles 2(Standard&My
Equalizer)
Standards &Decoders
Max. Audio Resolution (Hi-Res)
WiFi: 48KHz /16bit
BT:44.1 KHz
Supported Hi-Res Audio Codecs FLAC, ALAC(DLNA/
UPnP)
Online Update Forced /Manual
Update

1
GOperating Instructions
Thank you for choosing aHama product. Take your time
and read the following instructions and information
completely.Please keep these instructions in asafe place
for futurereference. If you sell the device, please pass
these operating instructions on to the new owner.
1. Explanation of warning symbols and notes
Risk of electric shock
This symbol indicates product parts energized with a
dangerous voltage of sucient magnitude to constitute
arisk of electric shock.
Warning
This symbol is used to indicate safety instructions
or to draw your attention to specichazards and risks.
Note
This symbol is used to indicate additional information
or important notes.
2. Package Contents
•"SIRIUM1000ABT" Hama Smart speaker
•AC/DC Adapter
•Quick-reference guide
•
3. Safety Notes
•The product is intended only for use inside buildings.
•The product is intended for private, non-commercial
use only.
•Use the product only for the intended purpose.
•Do not use the product in the immediate vicinity of
heaters, other heat sources or in direct sunlight.
•Do not operate the product outside the power limits
specied in the technical data.
•The battery is permanently installed and cannot be removed;
dispose of the product as awhole in accordance with the
statutory regulations.
•Never attempt to open the product using force.
•Protect the product from dirt, moistureand overheating
and use it in dry rooms only.
•As with all electrical products, this device should be kept
out of the reach of children.
•Do not drop the product and do not expose it to any
major shocks.
•Keep the packaging material out of the reach of children
due to the risk of suffocation.
•Dispose of packaging material immediately in
accordance with the locally applicable regulations.
•Do not modify the device in any way.Doing so voids
the warranty.
Risk of electric shock
•Do not open the device or continue to operate it
if it becomes damaged.
•Do not use the product if the AC adapter,adapter
cable or power cable is damaged.
•Do not attempt to service or repairthe product yourself.
Leave any and all service work to qualied experts.
4. Before commissioning
Note
•Youhave the option of powering the product via mains
power or batteries. In order to use mains power,simply
connect the product to apower source. To use battery
power,the battery must be fully charged beforehand.
Note
•Use only original accessories (or accessories approved
by Hama) to avoid damage to the product.
•Only use the product at ambient temperatures between
-10°C and 50°C.
•Only storethe product at ambient temperatures
between -20°C and 60°C.

2
5. Start-up and operation
Warning
•Only operate the product from asocket that has been
approved for the device. The socket must be installed
close to the product and must be easily accessible.
•Disconnect the product from the power supply using the
On/Off switch –ifthis is not available, unplug the power
cordfromthe socket.
•If using amulti-socket power strip,makesurethat the
total power consumption of all connected devices does
not exceed thepower strip's maximum throughput rating.
•If you will not be using the product for aprolonged
period, disconnect it from mains power.
Mains operation
Switching on
•Connect the mains lead on the loudspeaker to aproperly
installed socket.
The loudspeaker switches on automatically.
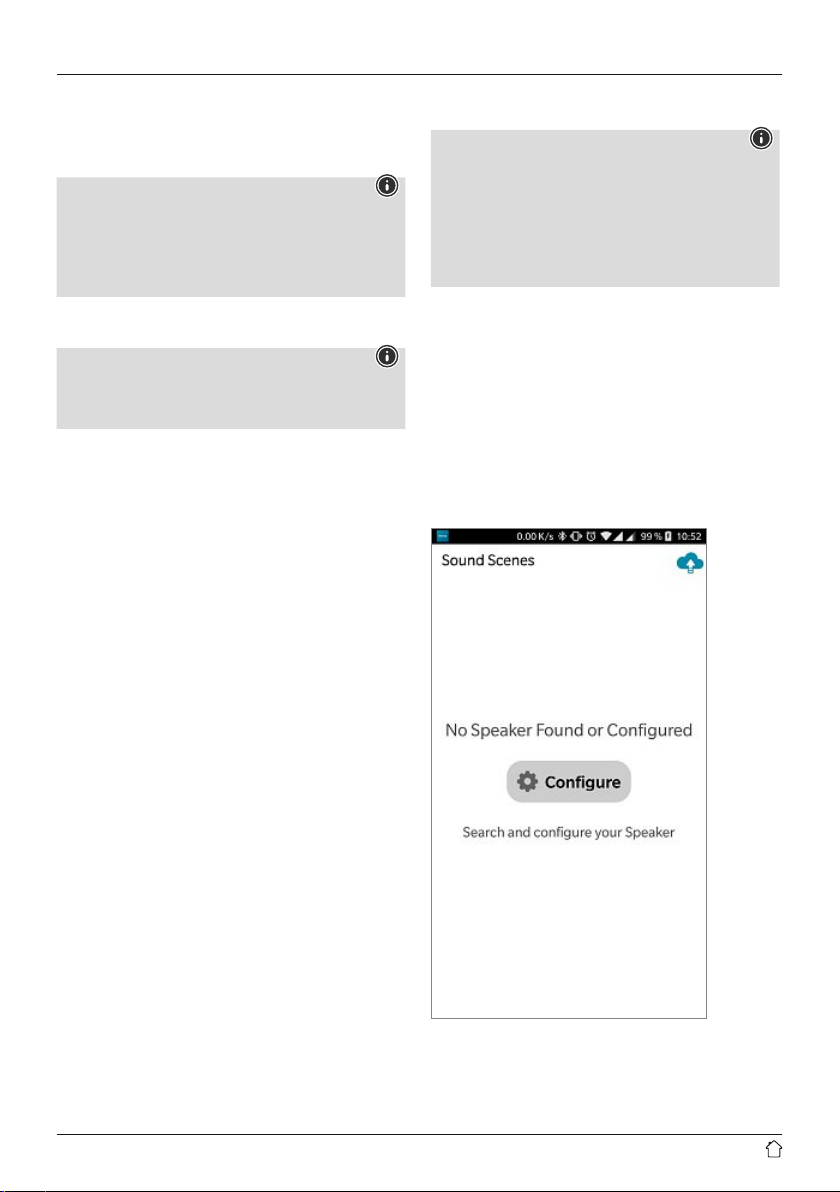
Note –switching on for the rst time
•When rst switched on, the loudspeaker is in "Device
setup"mode and the status LEDs (1–5) pulse.
•If setup mode is not active, brieypress the [SETUP]
button (3) on the back of the device to activate WPS
mode (ashes rapidly). Alternatively,press and hold
the [SETUP]button (3) for around 7seconds to open
an AccessPoint (ashes slowly).
•At the next switch-on, all of the status LEDs (1–5) ash
orange until the connections made so far have been
restored. Depending on the internet signal strength,
this may take up to 20 seconds.
Battery operation
Warning –rechargeable battery
•Useonly suitablechargers to chargethe device's battery.
•Do not use defective chargers or USB ports and do not
attempt to repair them.
•Do not store, charge or use the device in extreme
temperatures.
•Charge regularly (at least quarterly) during periods
of prolonged storage.
•The product contains arechargeable battery.
•Fullycharge the product once beforeusing it for the
rst time.
•Connect the mains lead on the loudspeaker to aproperly
installed socket. The socket must be installed close to the
product and must be easily accessible.
•The loudspeaker switches on automatically.
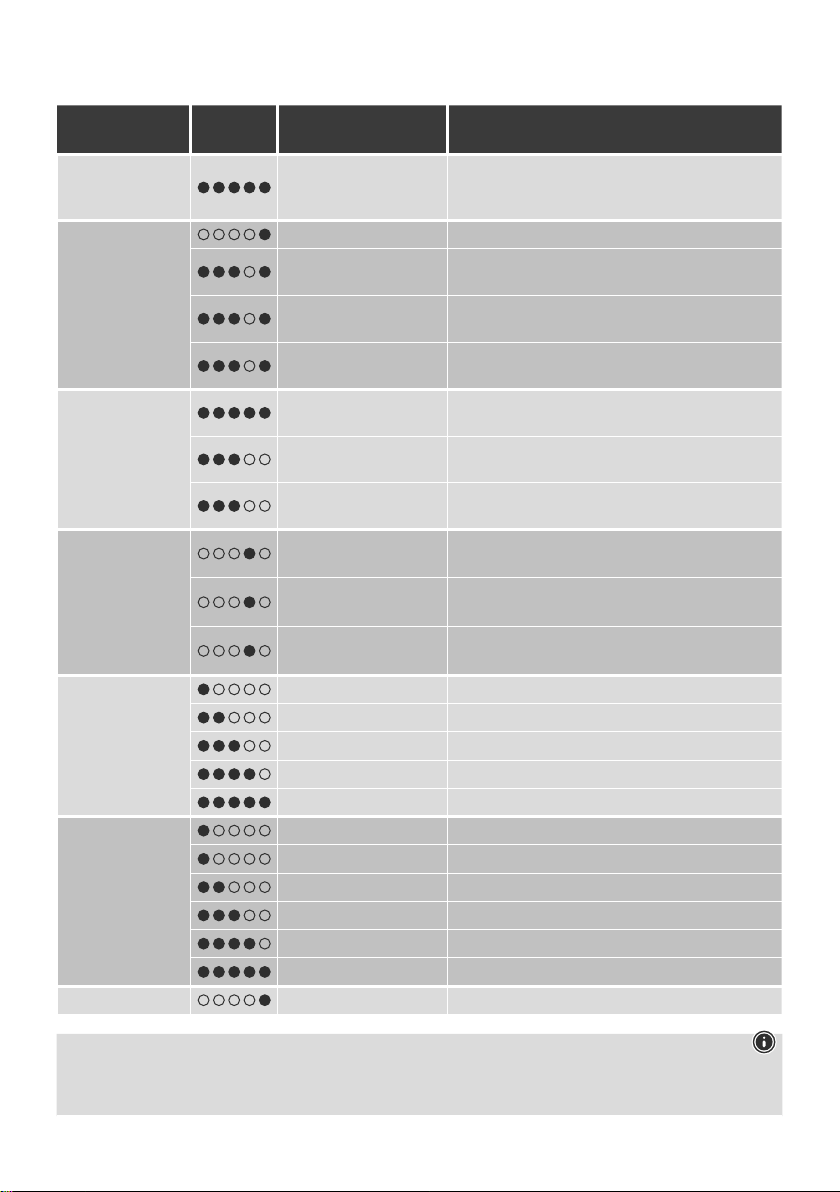
•During the charging process, the current charge level
is indicated by the status LEDs.
Note –charging process
•Acomplete charging cycle takes about 3–5 hours.
•The product's battery can be charged both when it is
switched on and off.
•If the battery capacity is less than 30%, awarning
sound is heardonce. The status LEDs (1–5) on the
loudspeaker ash redonce. This information is only
provided if the product is switched on.
•The actual battery life will vary depending on how you
use the device, the settings and the environmental
conditions (batteries have alimited life).
Battery charge level indicator
•While the power is on, brieypress [POWER](1) to
display the current battery charge level.
•Refer to the LED table for an explanation of the LED display.
•The LEDs go out after 3seconds.
Switching on/off /standby
Note
•Please be awarethat Amazon Alexa only responds
when the device is on and when it is in standby mode.
Mains operation
•Press [POWER] (1) to switch on the speaker.
•After 10 minutes without playback, the speaker
automatically switches to standby mode.
•Press and hold [POWER] (1) for about 3seconds to
switch off the speaker.
Note
•To switch off the speaker completely,disconnect it
from the power supply.
Battery operation
•Press [POWER] (1) to switch on the speaker.
•After 10 minutes without playback, the speaker
automatically switches to standby mode.
•After 10 minutes in standby mode, the speaker switches
off.
•Alternatively,press and hold [POWER] (1) for about 3
seconds to switch off the speaker.

3
Volume adjustment
Press [VOLUME -/+](5/6) to reduce/increase the volume.
6. Setting up the loudspeaker
Note
•To be able to use all of the product's functions,
the Amazon Alexa App must also be downloaded
and an Amazon account set up. To do this, follow
the instructions in the Amazon Alexa App. More
information on this can be found at www.amazon.de.
6.1. Downloading the Hama Smart Audio App
Note
The following operating systems aresupported:
•iOS 8orhigher
•Android 4.4.2 or higher
•Open the iTunes AppStoreorGoogle Play Storeonyour
smartphone.
•Use the search term "Hama Smart Audio".
•Download the App as normal and install it on your
smartphone. To do this, follow the instructions on your
smartphone.
6.2. Setting up the device for the first time with the
Hama Smart Audio App (ALEXA function)
WLAN note (wireless network)
•Ensurethat the router is switched on, is functioning
correctly and that thereisaconnection to the
Internet /network.
•Activate the WLAN function of your router if it is not
already activated.
•Follow your router´s operating instructions as regards
the correct functioning of the WLAN connection.
•Ensurethat the loudspeaker is in WLAN pairing mode.
The status LEDs (1-5) ash.
•If setup mode is not active, brieypress the [SETUP]
button (3) on the back of the device to activate WPS
mode (ashes rapidly). Alternatively,press and hold the
[SETUP] button (3) for around 7seconds to open an
AccessPoint (ashes slowly).
•Ensurethat the Hama Smart Audio App is installed
on your smartphone and that all updates have been
installed.
•Open the Hama Smart Audio App and touch [Setup].

4
•Then touch [Add speaker].
•Open your smartphone's WLAN settings by touching
[WLAN settings].
•In your smartphone's WLAN settings, search for the
Hama SIRIUM1000ABT loudspeaker.
Note
•The loudspeaker generates its own WLAN network
bearing the name SIRIUMSetup and the rst six digits
of the MACaddress (e.g. SIRIUMSetup_E69EBB).
This WLAN does not requireapassword.
•Connect your smartphone with the loudspeaker.
•Now return to the Hama Smart Audio App on your
smartphone.
•Select the required WLAN name (SSID) with which
you wish to connect the loudspeaker.
•Now also enter your network key if necessary
and conrm with [Done].

5
Note
•Often the Pre-Shared Keyisprinted on the back
of the router /AP.
•When entering the key,take notice of capitalisation.
•Conrm the selected settings by touching [Conrm].
•The loudspeaker now connects to the network.
After successful connection, "Loudspeaker congured
successfully" appears on the smartphone.
Note
•With iOS, the App may need to be closed and
restarted. Then follow the two steps below.
•The sound bar that has been set up should now appear
in the main menu. Press on the loudspeaker icon.
•Touch [Sources]atthe bottom edge of the screen
to establish aconnection with your Amazon account.
•Then touch the [Amazon Alexa]button.

6
•Touch [SIGN IN WITH AMAZON] to open the web browser
to enter your access details.
Note
•If the Amazon Shopping App has already been installed
and set up on your smartphone, the following steps
areskipped.
•Using your smartphone's keypad, enter the access
details for your Amazon account and conrm your
entries with Login.
•Alternatively,tap [Create new Amazon account]
to create anew Amazon account.
•Following successful login, you willreturn to the Hama
Smart Audio App.
•Now choose the language to which Alexa
is to respond in future.
Note
•If you change the language, an update may be
required to carry out the language adjustment. This
can take up to 4minutes.
•Open the Amazon Alexa App and if necessary re-enter
your access details. Youshould then nd the loudspeaker
in your active devices.
•Then adjust your personalised settings (time zone, device
name, etc.) in the Amazon Alexa App. Further information
on this can be found at www.amazon.com -> Help and
Customer Service.
Note
•Please note that location information for queries
(e.g. "What is the weather going to be like") will only
work correctly if the correct location information has
been entered into the Alexa App.
•Youcan now use Alexa as described in Section 12.

7
7. Bluetooth®pairing
Youcan pair your devices with the loudspeaker using
Bluetooth and use this as aplayback device for audio signals.
Youcan control playback directly on the terminal device. The
volume can also be controlled directly on the loudspeaker.
Note –Bluetooth®
•Check whether your mobile device (smartphone, tablet
PC. etc.) is Bluetooth-capable.
•Note that the maximum range for Bluetooth®is 10
metres without obstacles such as walls, people, etc.
•The connection may be disrupted by other Bluetooth®
devices/connections in the vicinity.
•The loudspeaker can only ever be paired with one
device at atime.
•Note that compatibility depends on the supported
Bluetooth®proles as well as the Bluetooth®versions
being used. (See: Technical data in the operating
instructions for the respective device)
•Ensureyour Bluetooth-enabled device is switched on
and that Bluetooth is activated.
•Press and hold [Bluetooth](2) for approximately
2seconds to activate pairing mode.
•The status LED starts to ash blue and asignal tone
is heard.
•Open the Bluetooth settings on your device and wait
until the Hama SIRIUM1000ABT is shown in the list
of found Bluetooth devices.
•If necessary,start searching for Bluetooth devices on
your device.
•Select the Hama SIRIUM1000ABT loudspeaker in the
list of available devices and wait until the loudspeaker is
shown as connected in your device's Bluetooth settings.
•The Bluetooth status LED now lights up solid blue.
•Start and control audio playback using the controls on
your device.
Note –Bluetooth®password
Some devices requireapasswordinorder to connect to
another Bluetooth®device.
•If your device requests apasswordtoconnect to the
loudspeaker,enter 0000.
7.1 Automatic
Bluetooth
®connection
(after successful pairing)
•Devices that have already been paired with the loudspeaker
arestored automatically on the loudspeaker.
Note -connection impaired
After the loudspeaker and device have been paired,
aconnection is established automatically.Ifthe
Bluetooth
®connection is not established automatically,
check the following:
•Check the
Bluetooth
®settings of your device to see
whether SIRIUM1000ABT is connected. If not, repeat
the steps listed under
Bluetooth
®pairing.
•Check that your device and the loudspeaker are
less than 10 metres apart. If not, move them closer
together.
•Check whether obstacles areimpairing the range.
If so, move the devices closer together.
7.2 Terminating the
Bluetooth
®connection
•Change to adifferent mode to terminate the
Bluetooth
®
connection between the loudspeaker and the device.
•Alternatively,you can terminate the connection manually
on your device.
8. Network streaming
The loudspeaker allows audio les stored on aPC, tablet
or smartphone to be played.
Note
•Please note that, depending on the source device
you areusing, other softwarethat allows streaming
may be required.
8.1 Playback from acomputer (streaming)
Youcan manage the loudspeaker via your computer
and stream music to it from your computer.
Requirements:
•The loudspeaker and computer must be on the
same network.
•The loudspeaker must have been authorised as
aplayback device on the computer.

8
Proceed as follows: Control Panel -> Network and
Internet -> Show network computers and devices
The loudspeaker should now be listed here.
•Right-click on the icon or designation of the loudspeaker
and choose Allow streaming to this device.
•Right-click again on the icon or designation of the
loudspeaker and choose Show device website
to change the friendly name of the device.
•Anew browser window opens. Youcan make the desired
changes here.
Use:
•The loudspeaker can now access the PC's shared
directories and you can send audio data to the device
for playback (streaming).
•The music directory of your music library is enabled
as standard.
•Create and manage shared folders using Explorer
or Windows Media Player.
•Right-click on the desired music le, choose Play To,
and then select the loudspeaker's friendly name.
•The loudspeaker begins to play the music le.
8.2 Playback via the network
To access one of the existing network shared les directly
from the loudspeaker,proceed as follows:
•Open the Hama Smart Audio App and select the required
loudspeaker.
•This takes you to the playback screen and the associated
source selection in the footer.
•Touch [Sources] and then [Network devices /Playback
sources].
•All of the shared les which the loudspeaker can access
now appear.
•Select the relevant directory and required track. If there
aremultiple les in one directory,these areplayed
in sequence.
9. Alexa function (voice control)
•After saying the activation word("Alexa") or pressing the
[Action]button (4), the status LED lights up blue and
asignal tone sounds. Youcan now talk to Alexa.
•While Alexa is answering, the status LED ashes blue.
Note
•If the Amazon Market App has already been installed
and set up on your smartphone, some smartphones
will take the user data directly from the App.
•To set up anew Amazon account, log out and repeat
the steps described in this section.
Note -Alexa Push to Talk /function key
•Brieypress the [Action] button (4) on the
loudspeaker to activate Alexa during audio mode or
higher volume.
•Press the [Microphone Mute] button (3) to switch the
microphone off.Ifthe microphones aredeactivated,
the status LEDs (1-5) light up solid red.
•The loudspeaker will now no longer respond to the
activation worduntil the microphones arereactivated.
•Press the [Microphone Mute]. The status LEDs (1-5)
go out.

9
10. Wireless network connection (WLAN)
Depending on the network, thereare anumber of ways
to connect to it.
PBC setup
•Press the [SETUP]button (3).
•The status LED ashes quickly green.
•Press the WPS button on your router or current access
point. This can often be done using the web interface,
as well.
•Consult the operating instructions of your router /AP
for details of the exact procedure.
•Once the procedurehas also been initiated on the
router /AP, the loudspeaker should connect with the
access and the network connection should be available.
Note
•Press the [SETUP]button (3) to abort PBC setup.
Open network
Note
•We recommend against establishing unsecured
connections and advise you to always protect your
network against unauthorised access.
•If the network you plan to use does not have any
security features, simply select the network from
the list and conrm it. The radio then connects
immediately to the network.
11. Establishing aconnection with another home
network
•Press and hold the [SETUP]button (3) for around
7seconds. The status LED ashes rapidly.
•The loudspeaker can now be connected to another
network.
12. Factory reset
To reset the loudspeaker to the factory default settings
(delivery condition), proceed as follows:
•Press and hold the [RESET]button (1) on the back of the
unit for about 6seconds with apointed object (such as a
paper clip) to reset the speaker to the factory settings.
•Once the loudspeaker has been reset, it restarts.
Note a
•Resetting to the factory default settings can remedy
some problems and malfunctions.
•However,all settings made previously,such as
equaliser presets, favourites and network proles, will
be permanently deleted.
13. Software update
•We areconstantly developing new softwarefeatures
and improvements for our loudspeaker to xpotential
problems, add functionality,etc.
•We recommend that you always install updates to your
loudspeaker.
•Update notications will be provided in the Hama Smart
Audio App.
Warning
•Make surethat the radio has astable power supply
beforeyou start asoftwareupdate.
•Power supply failureduring asoftwareupdate can
cause irreparable damage to the loudspeaker.
•The device must be connected to apower supply
during the softwareupdate. Asoftwareupdate is
not possible when the device is being operated with
batteries.
14. Care and Maintenance
•Only clean this product with aslightly damp, lint-free
cloth and do not use aggressive cleaning agents.
•If you do not use the product for along time, turn off the
device and disconnect it from the power supply.Storeit
in aclean, dry place out of direct sunlight.
15. Warranty Disclaimer
Hama GmbH &CoKGassumes no liability and provides no
warranty for damage resulting from improper installation/
mounting, improper use of the product or from failureto
observe the operating instructions and /orsafety notes.
16. Declaration of Conformity
Hama GmbH &CoKGhereby declares that the
radio equipment type [00054880, 00054889] is in
compliance with Directive 2014/53/EU.The full
text of the EU declaration of conformity is available at the
following internet address:
www.hama.com -> 00054880, 00054889-> Downloads.
Frequency band(s)
Bluetooth: 2.402 GHz –2.480 GHz
WiFi: 2.402 GHz –2.480 GHz
WiFi: 2.412 GHz –2.483 GHz
Maximum radio-
frequency power
transmitted
Bluetooth: 4dBm (EIRP)
WiFi: 19.5 dBm (EIRP)

00054880_00054889/01.19
www.hama.com/nep
Service &Support
www.hama.com
+49 9091 502-115
DG
Alllistedbrands are trademarks of thecorrespondingcompanies.Errorsand omissionsexcepted,
andsubjecttotechnicalchanges.Our general termsofdeliveryand paymentare applied.
The Bluetooth®wordmark and logos areregisteredtrademarks owned by Bluetooth SIG, Inc. and
any use of such marks by Hama GmbH &CoKGisunder license. Other trademarks and trade names
arethose of their respective owners.
The Spotify softwareissubject to thirdparty licenses found here:
www.spotify.com/connect/third-party-licenses
Other manuals for SIRIUM1000ABT
1
Table of contents
Other Hama Speakers manuals

Hama
Hama USB 2.0 / Fire Wire Combo User manual

Hama
Hama Soundcup-Z User manual

Hama
Hama 52814 User manual

Hama
Hama AB-09 User manual

Hama
Hama AL-200 User manual

Hama
Hama 00173124 User manual

Hama
Hama Tube Series User manual

Hama
Hama E 200 User manual

Hama
Hama Easy Line EL-300 User manual

Hama
Hama SIRIUM4000ABT User manual