HAMPTON BAY PG169T-B User manual

THANK YOU
We appreciate the trust and confidence you have placed in Hampton Bay through the purchase of this patio heater. We strive to
continually create quality products designed to enhance your home. Visit us online to see our full line of products available for your
home improvement needs. Thank you for choosing Hampton Bay!
Item #660533
Model # PG169T-B
USE AND CARE GUIDE
PG169T- B TABLETOP PATIO HEATER
Questions, problems, missing parts? Before returning to the store,
call Hampton Bay Customer Service
8 a.m. - 6 p.m., EST, Monday-Friday
855-HD-HAMPTON
HAMPTONBAY.COM

2
Table of Contents
Table of Contents..........................................................2
Safety Information.........................................................2
Warranty.........................................................................4
Pre-Assembly ................................................................5
Planning Assembly.....................................................5
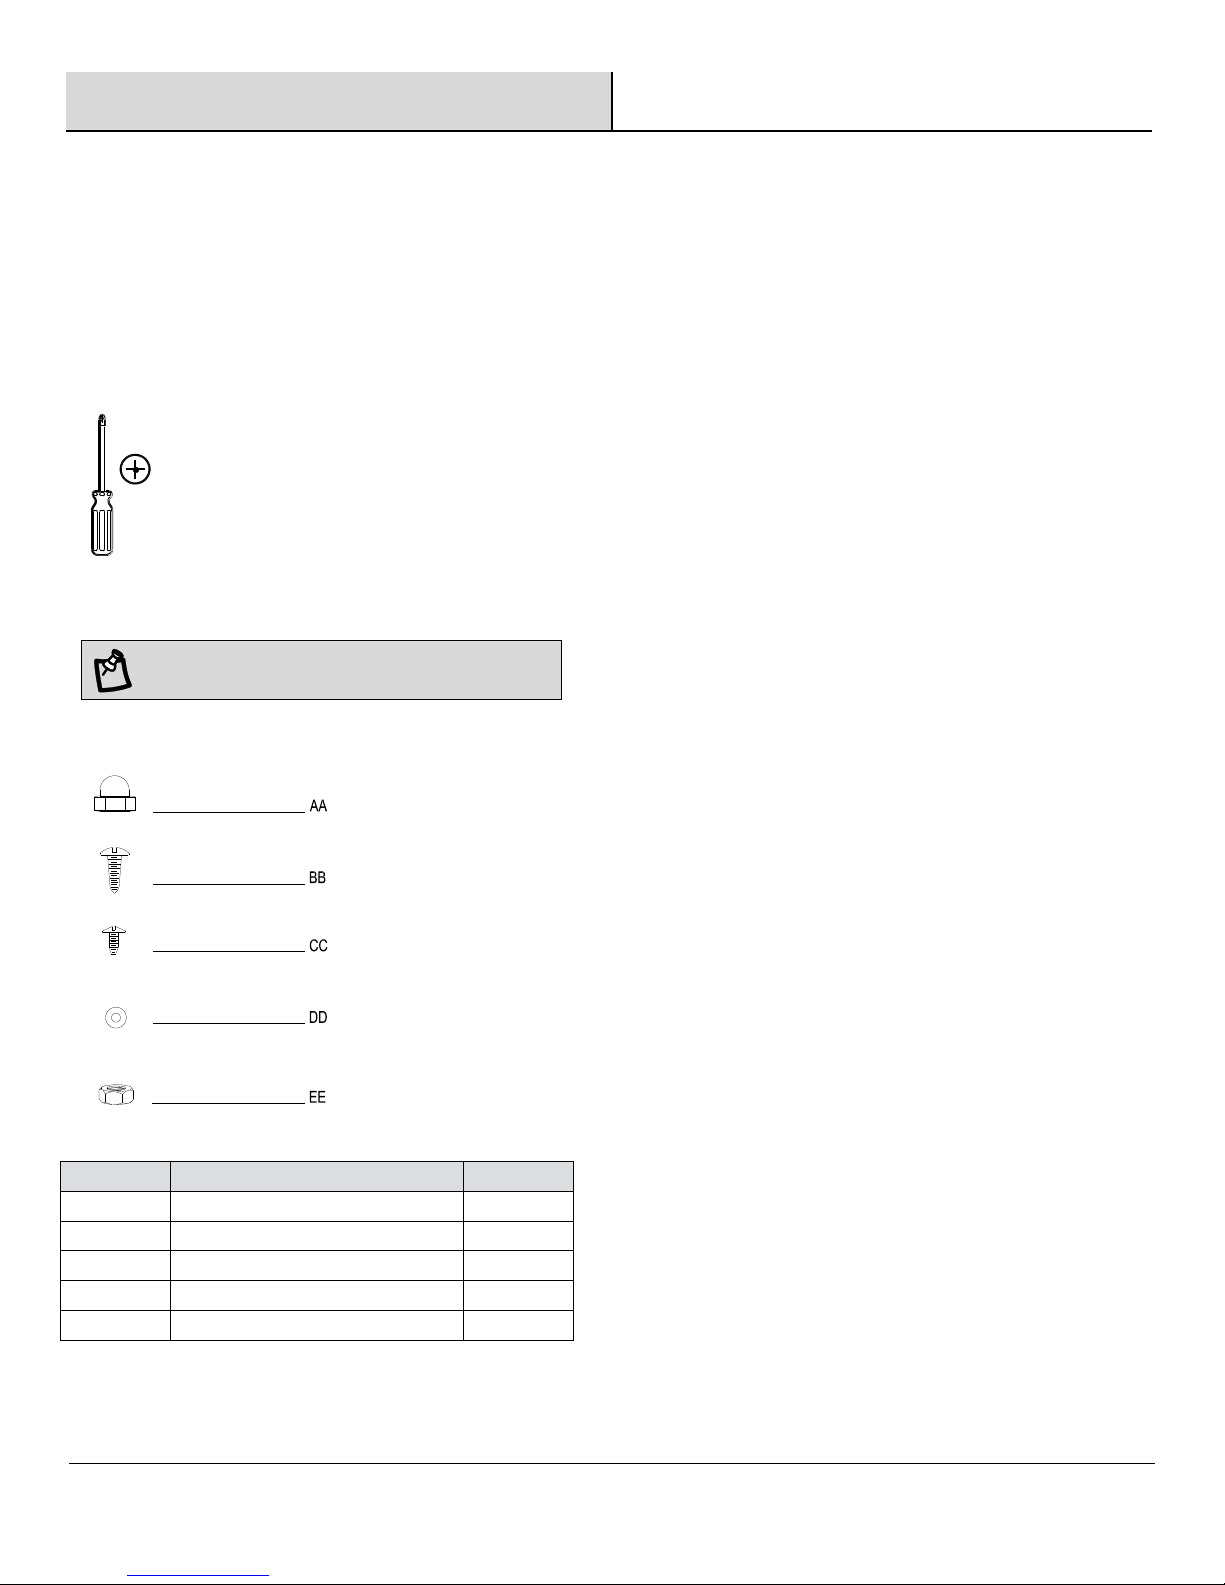
Tools required ............................................................5
Hardware Included .....................................................5
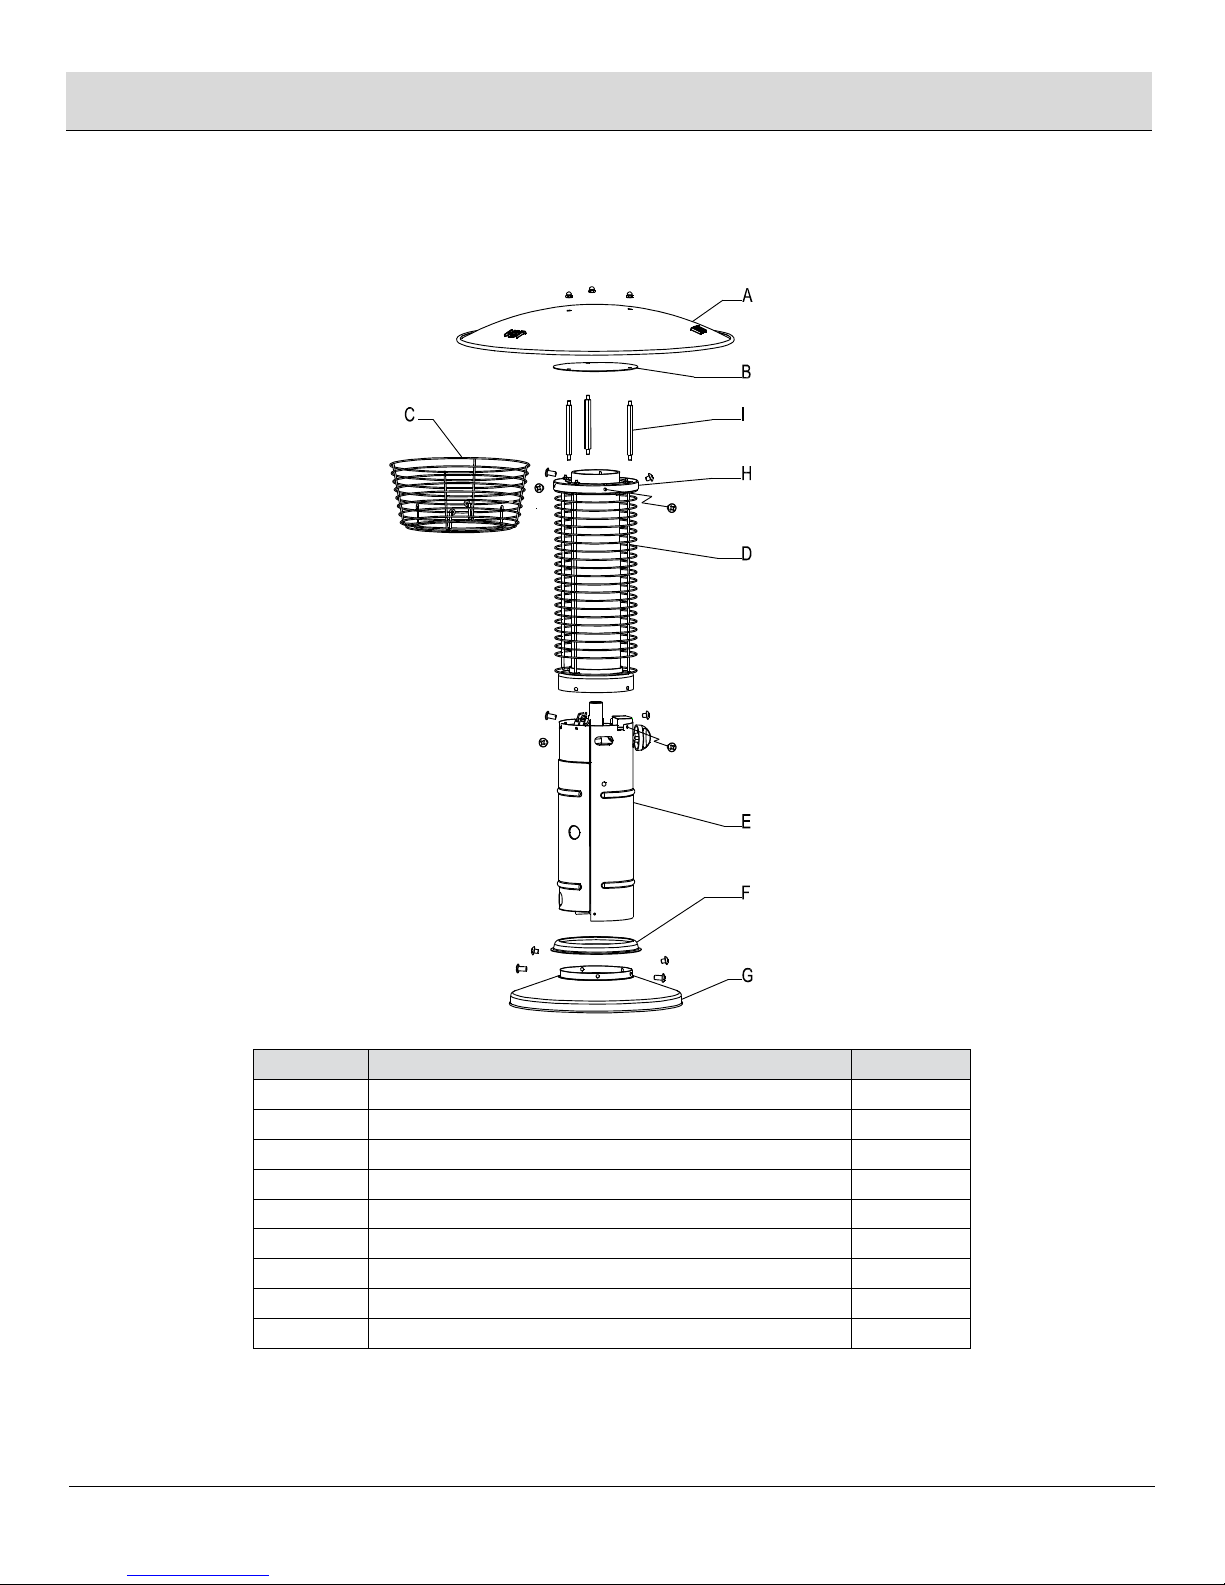
Package Contents...................................................... 6
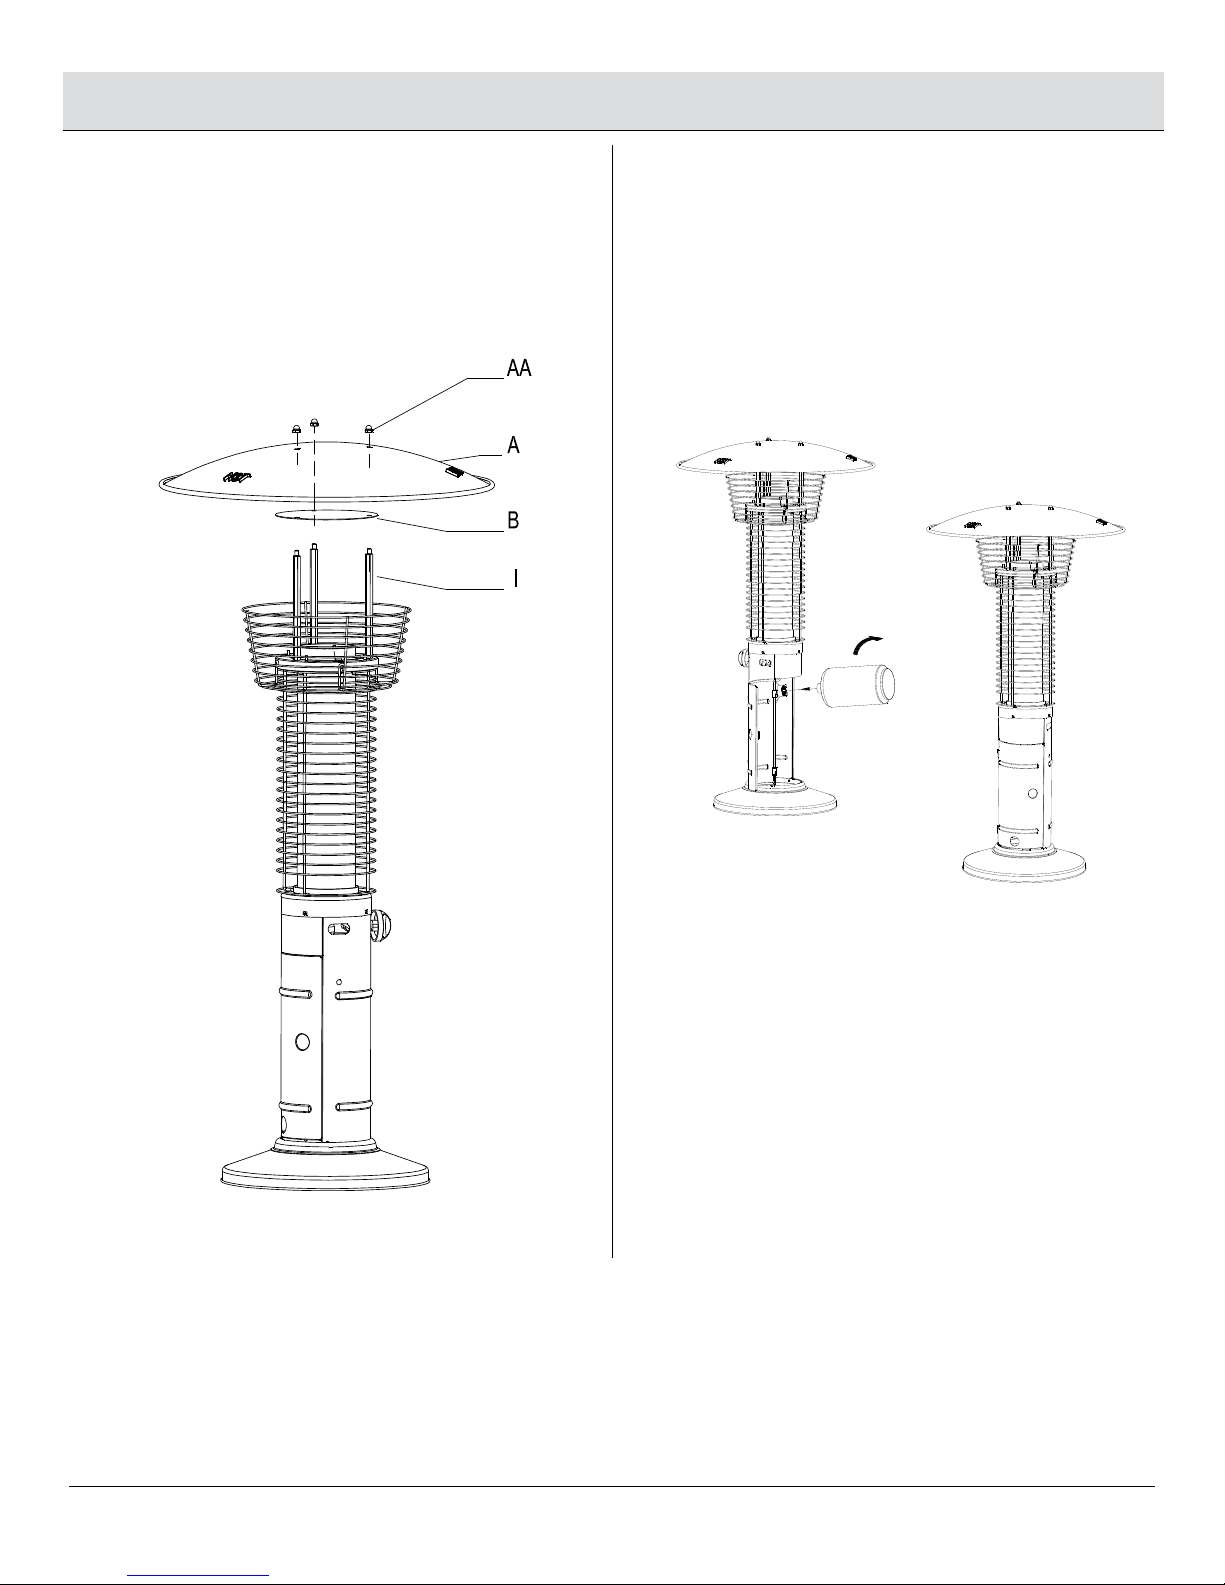
Assembly ....................................................................... 7
Installing LP Gas Tank ................................................. 9
Operation ..................................................................... 10
Care and Maintenance................................................ 11
Troubleshooting.......................................................... 13
Service Parts ............................................................... 14
Safety Information
Please read and understand this entire manual before
attempting to assemble, operate or install the product.
□CALIFORNIA PROPOSITION 65 WARNING:
Chemicals known to the state of California to cause
cancer, birth defects or other reproductive harm are
created by combustion of propane.
□The installation must conform with local codes or, in
the absence of local codes, with the National Fuel
Gas Code, ANSI Z223.1 /NFPA 54, Natural Gas and
Propane Installation Code, CSA B149.1, or Propane
Storage and Handling Code, B149.2.
□Gas Supply Pressure: Max 150 PSI, Min 5 PSI
DANGER:
CARBON MONOXIDE HAZARD
This appliance can produce carbon
monoxide which has no odor.
Using it in an enclosed space can kill
you.
Never use this appliance in an enclosed
space such as a camper, tent, car or
home.
DANGER:
FOR YOUR SAFETY
If you smell gas:
1. Shut off gas to the appliance.
2. Extinguish any open flame.
3. If odor continues, keep away from the appliance
and immediately call your gas supplier or fire
department.
WARNING:
Do not store or use gasoline or other flammable
vapors and liquids in the vicinity of this or any other
appliance.
An LP-cylinder not connected for use shall not be
stored in the vicinity of this or any other appliance.
WARNING:
For Outdoor Use Only
WARNING:
Improper installation, adjustment, alteration, service
or maintenance can cause property damage, injury
or death. Read the installation, operation and
maintenance instructions thoroughly before
installing or servicing this equipment.
DANGER: Young children should be carefully
supervised when they are in the area of the item.
DANGER: Keep the ventilation opening(s) of the
cylinder enclosure free and clear from debris. Use
this appliance in a well-ventilated space only. Do not
use it in a building, garage or any other enclosed
area.
DANGER: Use this appliance in outdoor areas
described below:
(a) With walls on all sides, but at least one
permanent opening at ground level and no
overhead cover.
(b) Within a partial enclosure that includes overhead
cover and no more than two walls. These walls may
be parallel, or at right angles to each other.
(c) Within a partial enclosure that includes overhead
cover and no more than two walls. The following
shall apply:
(i) One wall that is equivalent to at least 25% of the
total wall area is completely open.
(ii) 30% or more in total of the remaining wall area is
open and unrestricted.
DANGER: Store the cylinder outdoors in a well-
ventilated area (not in a building, garage, or other
enclosed area) out of the reach of children.
DANGER: Do not store a spare LP-gas cylinder
under or near this appliance.
DANGER: Never fill the cylinder beyond 80% full.

3 HAMPTONBAY.COM
Please contact 855-HD-HAMPTON for further assistance.
WARNING:
Perform a leak test with a soapy solution:
(a) To check gas connections.
(b) After connecting a new cylinder.
(c) Upon re-assembly after disassembly.
WARNING:
Please refer to the leak test procedure indicated in
this instruction manual on page 10.
WARNING:
The cylinder used must include a collar to protect
the cylinder valve.
WARNING:
Installation and repair should be done by qualified
service person; the heater should be inspected
before use and at least annually by a qualified
service person.
WARNING:
Do not obstruct the flow of combustion and
ventilation air.
WARNING:
The LP-gas supply cylinder to be used must be:
(a) Constructed and marked in accordance with the
Specifications for LP-gas cylinders of the U.S.
Department of Transportation of Dangerous Goods
and Commission, CAN/CSA-B339, as applicable;
(b) Provided with a listed overfilling prevention
device;
(c) Provided with a cylinder connection device
compatible with the connection for the appliance.
WARNING:
Disconnect the cylinder when the appliance is not in
use.
WARNING:
Storage of an appliance indoors is permissible only
if the cylinder is disconnected and removed from the
appliance.
WARNING:
Materials or items when stored under the heater will
be subjected to intense heat and could be seriously
damaged.
WARNING:
Clothing or other flammable materials should not be
hung on the heater, or placed on, under or near the
heater.
WARNING:
Children and adults should be alerted to the hazards
of high surface temperatures and should stay away
from the item to avoid burns or clothing ignition.
WARNING:
Replace the hose assembly prior to the appliance
being put into operation if there is evidence of
excessive abrasion or wear, or if the hose is
damaged. The pressure regulator and hose
assembly supplied with the appliance must be
used .The replacement hose assembly/ regulator
shall be that specified by the manufacturer.
CAUTION:
Minimum clearance to the combustible materials is
24 inches.
CAUTION:
If you don’t feel the heater is on a stable surface,
use a ground screw to fix the base of the heater on
the surface where the heater is installed. Fix the
base on an incline no wider than 15 degrees.
CAUTION:
I Any guard or other protective device removed for
servicing the heater must be replaced prior to
operating the heater.
CAUTION:
More frequent cleaning may be required as
necessary. It is imperative that the control
compartment, burners and circulating air
passageways of the heater to kept clean.
CAUTION:
Keep the appliance area clear and free from
combustible materials, gasoline and other
flammable vapors and liquids.
CAUTION:
Inspect the visible portion of the hose before each
use of the appliance.
CAUTION:
More frequent cleaning may be required as
necessary. It is imperative the control compartment,
Safety Information (continued)

4
Warranty
ONE-YEAR LIMITED WARRANTY
The appliance has been manufactured under the highest standards of quality and workmanship. We warrant to the
original consumer / purchaser that all aspects of this product will be free of defects in material and workmanship for one (1)
year from the date of purchase. A replacement for any defective part will be supplied free of charge for installation by the
consumer. Defects or damage caused by the use of other than genuine parts are not covered by this warranty. This
warranty shall be effective from the date of purchase as shown in the purchaser’s receipt. This warranty is valid for the
original consumer purchaser only and excludes industrial, commercial or business use of the product, product damage
due to shipment or failure which results from alteration, product abuse, or product misuse, where performed by a
container, service company, or consumer. We will not be responsible for labor charges and/or damage incurred in
installation, repair or replacement, nor for incidental or consequential damage. This warranty gives you specific legal
rights, and you may also have the other rights that vary from state to state.

5 HAMPTONBAY.COM
Please contact 855-HD-HAMPTON for further assistance.
Pre-Assembly
PLANNING ASSEMBLY
□To avoid losing any small components or hardware, assemble your product on a hard level surface that does not have
cracks or openings.
□Clear an area large enough to layout all components and hardware.
□When applicable, tighten all hardware connections by hand first. Once the step is completed go back and fully tighten
all hardware.
□Follow all steps in order to properly assemble your product.
TOOLS REQUIRED
Magnetic
Head Phillips
Screwdriver
HARDWARE INCLUDED
NOTE: Hardware not shown to actual size.
Part
Description
Quantity
AA
Acorn Nut
3
BB
ST 4.2 x 10 mm Screw
4
CC
M4 x 10 Bolt
8
DD
Ф4 Washer
4
EE
M4 Nut
4

6
Pre-Assembly
PACKAGE CONTENTS
Part
Description
Quantity
A
Reflector
1
B
Heat Insulation Plate
1
C
Top Wire Guard
1
D
Bottom Wire Guard with Glass Tube Assembly
1
E
Housing Assembly
1
F
Plastic Ring
1
G
Base
1
H
Glass Cap
1
I
Reflector Spacer
3

7 HAMPTONBAY.COM
Please contact 855-HD-HAMPTON for further assistance.
D2
Assembly
1
Assembling the Housing
Assembly
2
Assembling the Bottom Wire
Guard with Glass Tube
Assembly
□Remove the door from the housing assembly (E) by
lifting the door off the hinges. Insert the bottom of
the housing assembly (E) into the top of the plastic
ring (F) and attach to base (G) with M4 x 10 bolts
(CC). Reattach the door to the housing assembly
(E).
□Attach the glass cap (H) to the bottom wire guard
with glass tube assembly (D) using Ф4 washers
(DD) and M4 nuts (EE).
□Attach the bottom wire guard with glass tube
assembly (D) to the housing assembly (E) using M4
x 10 bolts (CC).
3
Assembling the Top Wire
Guard
□Attach the top wire guard (C) to the bottom wire
guard with glass tube assembly (D) using ST 4.2 x
10 mm Screw (BB), then insert the reflector spacers
(I) onto the top of the bottom wire guard with glass
tube assembly (D).
E
Door
F
CC
G

8
Assembly (continued)
4
Assembling the Reflector
5
Assembling the Cylinder
□Place the heat insulation plate (B) onto the reflector
spacers (I), then attach the reflector (A) to the
reflector spacers (I) using acorn nuts (AA).
□Open the door on the housing assembly (E), turning
the connection end of the preassembled regulator
to face outward. Attach a 1 lb. LP-gas tank (sold
separately) to the regulator. Then, turn the regulator
until the tank is in an upright position. Close the
door.

9 HAMPTONBAY.COM
Please contact 855-HD-HAMPTON for further assistance.
Installing LP Gas Tank
1
Inserting and Securing an
LP Gas Cylinder
2
Disconnecting the LP Gas
Cylinder
□This appliance uses a 1 lb (16.4 oz) cylinder only.
□Only a cylinder marked “propane” can be used.
□Align the threads on the canister with those on the
regulator, insert and rotate the canister clockwise
until they fit snugly together.
□HAND TIGHTEN ONLY. Be careful not to cross
threads when screwing in the canister. Keep the
cylinder vertically upright on the base for vapor
withdraw.
NOTE: Some 1-lb cylinders may form frost when
near empty.
□Before disconnecting make sure the heater
control valve is “OFF”.
□Rotate the LP gas cylinder counterclockwise until
it is loose.
□Store the LP gas cylinder in a proper location.
1 lb

10
Operation
1
Before Lighting
2
Checking for Leaks
□The item was designed and approved for
OUTDOOR USE ONLY. DO NOT use it inside a
building, garage or any other enclosed area.
□Make sure surrounding areas are free of
combustible materials, gasoline and other
flammable vapors or liquids.
□Ensure there is no obstruction to air ventilation.
□Be sure all gas connections are tight and there are
no leaks.
□Be sure the access panel is clear of debris.
□Be sure any component removed during assembly
or servicing is replaced and fastened prior to
starting.
□Make 2-3 oz. of leak solution by mixing one-part
liquid dish soap with three-parts water.
1. Make sure control knobs are off.
2. Spoon or brush several drops (or use squirt
bottle) of solution onto the gas regulator and tank
connection.
3. Turn on the gas cylinder valve. Inspect the
connections and look for bubbles.
a. If no bubbles appear, the connection is safe.
b. If bubbles appear, there is leakage. Loosen
and re-tighten this connection. If it still leaks,
please call customer service.
3
Lighting
4
Re-lighting
□Ensure the control knob is in the "OFF" position.
□Push in the control knob and rotate it to the “ON”
position. This will activate the built-in igniter and
light the burner. If necessary, keep pressing and
rotating the knob until the burner lights.
□Once the burner is lit, hold the control knob in for at
least 30 seconds and release.
□If the burner does not stay lit, turn to the “OFF”
position and wait 5 minutes and repeat steps 2 and
3.
□If the igniter does not light the burner, use a lit
match positioned against the bottom of the emitter
screen at the burner location, and repeat steps 2
and 3.
□Once the burner is lit, rotate the control knob to the
desired heating level. If you experience any issues
while attempting to light the item, turn off the
heater and gas supply and refer to the
Troubleshooting section.
CAUTION: Avoid inhaling fumes emitted from the
heater’s first use. Smoke and odor from the
burning of oils used in manufacturing will appear.
Both smoke and odor will dissipate after
approximately 30 minutes. The heater should NOT
produce thick black smoke.
□Turn the gas control knob to the "OFF" position.
□Wait at least 5 minutes to let gas dissipate before
attempting to re-light the burner.
□Repeat steps 2 and 3.
NOTE: For your safety, control knob cannot be
turned on without first depressing control knob
in off position and then rotating to on.

11 HAMPTONBAY.COM
Please contact 855-HD-HAMPTON for further assistance.
Operation (continued)
5
During Heater Operation
6
Turning the Heater Off
□The emitter screen will become bright red due to
intense heat. The color is more visible at night.
□The burner will display a blue flame. These flames
should not be yellow or produce thick black smoke,
indicating an obstruction of airflow through the
burners.
□If yellow flame is detected, turn off the heater and
gas supply and refer to the Troubleshooting
section.
□Visually check burner flames at each use and make
sure the flame height matches illustration.
□Rotate the gas control knob to the “OFF” position.
The burner will likely make a slight popping sound
when extinguished.
□Disconnect the LP-gas tank after use.
□Rotate the LP-gas tank to the horizontal position
and unscrew it counterclockwise until it is loose.
□Store the LP-gas tank in a proper location.
□Close the door on the housing assembly.
NOTE: After use, some discoloration of the
emitter screen is normal.
Care and Maintenance
□Abrasive cleaners will damage this product.
□Never use oven cleaner to clean any part of the heater.
□Do not clean any heater part in a self-cleaning oven. The extreme heat will damage the finish.
□More frequent cleaning may be required as necessary. It is imperative that control compartment, burners and
circulating air passageways of the heater be kept clean.
□Spiders and insects can create a dangerous condition that may damage the heater or make it unsafe. Keep the
burner area clean of all spiders, webs or insects. Clean burner holes by using a heavy-duty pipe cleaner. Compressed
air may help clear away smaller particles.
□Inspect the heater before each use.
□Annually have the heater inspected and repaired by a qualified service person.
□Check the heater immediately if any of the following conditions exist:
a. The smell of gas in conjunction with extreme yellow tipping of burner flames.
b. The heater does not reach proper temperature.
c. The heater’s glow is excessively uneven.
d. The burner makes popping noises during use. This is normal when the burner is extinguished.
□Carbon deposits may create a fire hazard. Keep the dome and emitter clean at all times.
□Do not clean the heater with combustible or corrosive cleaners. Use warm, soapy water.
□Do not paint the engine, engine access panel or dome.
□This heater should be thoroughly cleaned on a regular basis.
□After a period of storage and/or non use, check for leaks, burner obstructions and inspect for any abrasion, wear and
cuts to the hose.
□Some 1-lb cylinders may form frost when near empty.

12
Care and Maintenance (continued)
CLEANING
□Wipe surfaces clean with mild dish detergent or baking soda.
□For stubborn surfaces use a citrus-based degreaser and a nylon scrubbing brush.
□Rinse clean with water.
□Use high-quality automobile wax to help maintain the appearance of the heater. Apply to exterior surfaces from
the pole down. Do not apply to emitter screen or domes。
NOTE: While cleaning your unit, be sure to
keep the area around the burner dry at all times.
Do not submerge the control valve assembly. If
the gas control is submerged in water, do NOT
use it. It must be replaced.
MAINTENANCE
Make sure you perform the following maintenance activities on a regular basis:
□Keep exterior surfaces clean.
□Air flow must be unobstructed. Keep controls, burner and circulating air passageways clean.
Signs of possible blockage include:
□Gas odor with extreme yellow tipping of flame.
□Heater does NOT reach the desired temperature.
□Heater glow is excessively uneven.
□Heater makes popping noises.
NOTE: In a salt-air environment (such as near
an ocean) corrosion occurs more quickly than
normal. Frequently check for corroded areas
and repair them promptly.
STORAGE
Between uses or during periods of extended inactivity:
□Turn the control knob to the "OFF" position.
□Disconnect the LP cylinder and move to a secure, well-ventilated location outdoors.
□Store the heater upright in an area sheltered from direct contact with inclement weather (such as rain, sleet, hail,
snow, dust and debris). Never leave LP-gas tank exposed to direct sunlight or excessive heat.
□If desired, use the cover to protect the heater and help prevent buildup in air passages.
CAUTION: Wait until the heater is cool before
covering.

13 HAMPTONBAY.COM
Please contact 855-HD-HAMPTON for further assistance.
Troubleshooting
Problem
Possible Cause
Prevention/Cure
The burner does not
stay lit.
The thermocouple is not operating correctly.
Replace the thermocouple.
The burner does not
light.
Note: Heater operates
at reduced efficiency
below 40°F.
1. The gas pressure is low.
2. There is blockage in the orifice.
3. There is blockage in the venturi tube.
4. There is air in the gas line.
5. The igniter fails.
6. The control knob is not in the “ON”
position.
1. Turn the control knob to the “OFF” position
and replace the cylinder.
2. Clear the blockage.
3. Clean the venturi tube.
4. Open the gas line and bleed it (pressing
control knob in) for not more than 1-2
minutes or until you smell gas.
5. Use a match to light the burner; obtain new
igniter and replace.
6. Turn the control knob to the "ON" position.
The burner flame is
low.
1. The gas pressure is low.
2. Outdoor temperature is less than 40°F
and the cylinder is less than 1/4 full.
3. The control knob is not fully "ON" or
there is a blockage.
1. Turn the control knob to the “OFF” position
and replace cylinder.
2. Use a full cylinder.
3. Check the control knob setting and check
the burner and orifices for blockage.
The emitter glows
uneven.
The bottom 1 in. of the
emitter normally does
NOT glow.
1. The gas pressure is low.
2. The base is not on a level surface.
3. The burner is dirty.
1. Turn the control knob to the “OFF” position
and replace cylinder.
2. Place the heater on a level surface.
3. Clean the burner.
There is carbon
buildup.
There is dirt or film on the reflector and
emitter.
Clean the reflector and emitter.
There is thick black
smoke.
There is blockage in the burner.
Remove the blockage and clean burner inside
and out side.

14
Part
Description
Quantity
Part
Description
Quantity
AA
Acorn Nut
3
D4
Glass Tube
1
A
Reflector
1
DD
Ф4 Small Flat Washer
4
B
Heat Insulation Plate
1
EE
M4 Nut
4
BB
ST 4.2 x 10 mm Screw
4
E
Housing Assembly
1
C
Top Wire Guard
1
E1
Knob
1
CC
M4*10 Bolt
8
F
Plastic Ring
1
D1
Bottom Wire Guard
1
G
Base
1
D2
Black Silicone Ring
1
H
Glass Cap
1
D3
Barrel lid
1
I
Reflector Spacer
3
Service Parts

Questions, problems, missing parts? Before returning to the store,
call Hampton Bay Customer Service
8 a.m. - 6 p.m., EST, Monday-Friday
855-HD-HAMPTON
HAMPTONBAY.COM
Retain this manual for future use.

16

GRACIAS
Agradecemos la confianza que ha puesto en Hampton Bay a través de la compra de calefactor de patio. Nos esforzamos por
crear continuamente productos de calidad diseñados para mejorar su hogar. Visítenos en internet para ver nuestra línea completa
de productos disponibles para sus necesidades de mejorar su hogar. ¡Gracias por elegir a Hampton Bay!
Núm. de artículo 660533
Núm. de modelo PG169T-B
GUÍA DE USO Y CUIDADO
CALEFACTOR DE PATIO DE MESA PG169T-B
¿Tiene preguntas, problemas, o faltan piezas? Antes de regresar a la tienda,
llame a Servicio al Cliente de Hampton Bay
de lunes a viernes de 8 a.m. y 6 p.m., hora local del Este
855-HD-HAMPTON
HAMPTONBAY.COM

2
Tabla de contenido
Tabla de contenido .......................................................2
Información de seguridad ............................................2
Garantía..........................................................................4
Pre-ensamblado ............................................................5
Planificación del ensamblaje......................................5
Herramientas requeridas............................................5
Herraje incluido ..........................................................5
Contenido del paquete............................................... 6
Ensamblaje .................................................................... 7
Instalación de un tanque de gas PL............................ 9
Operación .................................................................... 10
Cuidado y mantenimiento.......................................... 11
Resolución de fallas ................................................... 13
Piezas de servicio ....................................................... 14
Información de seguridad
Por favor, lea y comprenda este manual completo antes
de intentar ensamblar, operar o instalar el producto.
□ADVERTENCIA DE LA PROPUESTA 65 DE
CALIFORNIA: La combustión del propano genera
productos químicos que el Estado de California
sabe que causan cáncer, defectos de nacimiento u
otros daños reproductivos.
□La instalación debe hacerse conforme a los códigos
locales o, en ausencia de códigos locales, conforme
al Código Nacional de Gas Combustible, ANSI
Z223.1 /NFPA 54, Código de Instalación de Gas
Natural y Propano, CSA B149.1, o Código de
Almacenamiento y Manejo de Propano, B149.2.
□Presión de suministro de gas: Máx. 150 PSI, mín. 5
PSI
PELIGRO:
PELIGRO DE MONÓXIDO DE CARBONO
Este aparato produce monóxido de
carbono que es inodoro.
Usarlo en un área encerrada puede
matarlo.
Nunca use este aparato en un espacio
encerrado como una casa rodante,
carpa, auto o el hogar.
PELIGRO: PARA SU SEGURIDAD
Si percibe olor a gas:
1. Cierre el suministro de gas hacia el
electrodoméstico.
2. Apague cualquier llama directa.
3. Si el olor persiste, manténgase alejado del
electrodoméstico y llame de inmediato a su
proveedor de gas o al departamento de bomberos.
ADVERTENCIA:
No almacene ni utilice gasolina u otros vapores o
líquidos Inflamables cerca de éste u otro
electrodoméstico. No deben almacenarse cilindros
de gas propano que no estén conectados y en uso
cerca de éste ni de ningún otro electrodoméstico.
ADVERTENCIA:
Sólo para uso en exteriores
ADVERTENCIA:
La instalación,el ajuste, la alteración, la reparación
o el mantenimiento inadecuados pueden ocasionar
daños a la propiedad, lesiones o la muerte. Lea con
detención las instrucciones de instalación,
operación y mantenimiento antes de instalar o
reparar este equipo.
PELIGRO: Los niños pequeños deben ser
supervisados cuidadosamente cuando se
encuentren en el área
del calefactor.
PELIGRO: Mantenga las aberturas de ventilacion
del recinto del cilindro libres y limpias de desechos.
Use este aparato en un espacio bien ventilado
únicamente. No lo use en edificios, garajes, o
cualquier otra área encerrada.
PELIGRO: Use este aparato en áreas de exteriores
como se describe a continuación: (a) Con paredes
en todos los lados, pero al menos una abertura
permanente a nivel del suelo y sin cubierta superior.
(b) Dentro de un recinto parcial que incluya cubierta
superior y no más de dos paredes. Estas paredes
deben estar paralelas, o a ángulos rectos entre sí.
(c) Dentro de un recinto parcial que incluya cubierta
superior y no más de dos paredes. Aplicarálo
siguiente: (i) Una pared equivalente a al menos el
25% del área de pared total estácompletamente
abierta. (ii) 30% o más en total del área de pared
restante estáabierta y
sin restricciones.
PELIGRO: Guarde el cilindro en exteriores en un
área bien ventilada (no en edificios, garajes, u otra
área encerrada) lejos del alcance de los niños.
PELIGRO: No guarde un cilindro de gas PL de
repuesto bajo o cerca de este aparato.

3 HAMPTONBAY.COM
Póngase en contacto con el 855-HD-HAMPTON para asistencia adicional.
PELIGRO: Nunca llene el cilindro más alládel 80
por ciento de su capacidad.
ADVERTENCIA:
Realice una prueba de fugas con una solución
jabonosa: (a) Para revisar las conexión de gas. (b)
Después de la conexión de un cilindro nuevo. (c) En
el reensamblaje después del desmontaje.
ADVERTENCIA:
Consulte el procedimiento de prueba de fugas
indicado en este manual de instrucción en la página
10.
ADVERTENCIA:
El cilindro usado debe incluir un collarín para
proteger la válvula del cilindro.
ADVERTENCIA:
La instalación y reparación deben ser hechas por
personas de servicio calificadas, el calefactor debe
ser inspeccionado antes de su uso y al menos una
vez al año por una persona de servicio calificada.
ADVERTENCIA:
No obstruya el flujo de la combustión y el aire
de ventilación.
ADVERTENCIA:
El cilindro de suministro de gas PL que se usará
debe: (a) Estar construido y marcado de acuerdo
con las especificaciones para cilindros de gas PL
del Departamento de Transporte de Mercancías
Peligrosas y Puesta en Servicio de los EE.UU.,
CAN/CSA-B339, según corresponda; (b) Tener
provisto un dispositivo de prevención de desborde
listado; (c) Tener provisto un dispositivo de
conexión de cilindro compatible con la conexión
para el aparato.
ADVERTENCIA:
Desconecte el cilindro cuando el aparato no estéen
uso.
ADVERTENCIA:
El almacenamiento de un aparato en interiores es
permisible solamente si el cilindro está
desconectado y retirado del aparato.
ADVERTENCIA:
Los materiales y artículos almacenados debajo del
calefactor estarán sujetos a intenso calor y podrían
resultar seriamente dañados.
ADVERTENCIA:
No debe colgarse ropa y otros materiales
inflamables en el calefactor, ni colocarse sobre,
debajo o cerca del calefactor.
ADVERTENCIA:
Los niños y adultos deben ser alertados de los
peligros de las altas temperaturas superficiales y
deben permanecer lejos del calefactor para evitar
quemaduras o ignición de
la ropa.
ADVERTENCIA:
Reemplace el conjunto del manguito antes de poner
el aparato en funcionamiento en caso de que haya
indicios de abrasión o desgaste excesivos, o bien si
el manguito estádañado. Se debe usar el regulador
de presión y el conjunto del manguito incluidos con
el aparato. El regulador de presión/conjunto del
manguito de repuesto seráel que haya especificado
el fabricante.
PRECAUCIÓN:
El espacio libre mínimo para los materiales
combustibles es de 24 pulgadas.
PRECAUCIÓN:
Si cree que el calefactor no estáen una superficie
estable, use un tornillo de tierra para fijar la base
del calefactor en la superficie donde estáinstalado
el calefactor. Fije la base en una pendiente no
mayor de 15 grados.
PRECAUCIÓN:
Cualquier protección u otros dispositivos de
protección retirados para darle servicio al calefactor
deben volver a colocarse antes de operar el
calefactor.
PRECAUCIÓN:
Se puede requerir limpieza más frecuente según
sea necesario. Es imperativo que el compartimiento
de control, los quemadores y los pasillos de aire
circulante del calefactor se mantengan limpios.
PRECAUCIÓN:
Mantenga el área del aparato despejada y libre de
materiales combustibles, gasolina y otros vapores y
líquidos inflamables.
PRECAUCIÓN:
Inspeccione la porción visible de la manguera antes
de cada uso del aparato.
PRECAUCIÓN:
Se puede requerir limpieza más frecuente según
sea necesario. Es imperativo que el compartimiento
de control,
Información de seguridad (continuación)

4
Garantía
GARANTÍA LIMITADA DE UN AÑO
El aparato ha sido fabricado bajo los más altos estándares de calidad y mano de obra. Garantizamos al
comprador/consumidor original que todos los aspectos de este producto estarán libres de defectos en materiales y mano
de obra durante un (1) año a partir de la fecha de compra. Se proporcionarán repuestos de cualquier pieza defectuosa
libre de cargos de instalación por el comprador. Los defectos o daños causados por el uso de piezas que no sean
genuinas no están cubiertos por esta garantía. Esta garantía seráefectiva a partir de la fecha de compra como se
muestra en el recibo del comprador. Esta garantía es válida para el comprador consumidor original únicamente y excluye
el uso industrial, comercial o de negocios del producto, daños del producto debido a envío o falla que resulte de
alteración, abuso o mal uso del producto, realizado por un contenedor, empresa de servicio o consumidor. No seremos
responsables de cargos de mano de obra y/o daños incurridos en la instalación, reparación o reemplazo, ni tampoco por
daños incidentales o consecuentes. Esta garantía le otorga derechos legales específicos, y también puede tener otros
derechos que varían de un estado a otro.
Table of contents
Languages:
Other HAMPTON BAY Patio Heater manuals

HAMPTON BAY
HAMPTON BAY HD10 User manual

HAMPTON BAY
HAMPTON BAY SRPH78 User manual

HAMPTON BAY
HAMPTON BAY PG171H-B User manual

HAMPTON BAY
HAMPTON BAY HDMIRAGECO PC User manual

HAMPTON BAY
HAMPTON BAY PH01-SS User manual

HAMPTON BAY
HAMPTON BAY HDMIRAGECO PC User manual

HAMPTON BAY
HAMPTON BAY 68164 User manual

HAMPTON BAY
HAMPTON BAY PG139HDS User manual