HANG 102-00 User manual

Operating Instruction Eyeleter
Model 102 - 00
Part no. 701 - 0060
Eyelet 24 / 25
For future use, take note
and keep on hand with
the Eyeleter.
Maschinen - Produktion GmbH
Jahnstraße 82
D - 73037 Göppingen
Telefon +49 (0) 7161 / 6005-0
Telefax +49 (0) 7161 / 6005-78
https://www.hang.de
https://www.hang-shop.de

Operating manual Eyeleter 102-00
Contents
1Introduction.............................................................................................................................. 1
2Before you use the device....................................................................................................... 1
3Notes and explanation of terms............................................................................................... 1
4Intended use............................................................................................................................ 1
5Warranty .................................................................................................................................. 1
6Scope of delivery..................................................................................................................... 1
7Commissioning........................................................................................................................ 2
8How to operate ........................................................................................................................ 2
9Setting the side stop................................................................................................................ 3
10Setting the rear stop ................................................................................................................ 3
11Refilling with eyelets................................................................................................................ 3
12Pressure setting (eyelet pressure) .......................................................................................... 4
13Replacing the lower stamp...................................................................................................... 4
14Replacing the upper stamp...................................................................................................... 5
15Malfunctions in the eyelet feed................................................................................................ 5
16Replacing the bristle disk......................................................................................................... 6
17Maintenance and servicing...................................................................................................... 7
18Cleaning................................................................................................................................... 7
19Lubrication............................................................................................................................... 8
20Recommended lubricants........................................................................................................ 8
21Servicing.................................................................................................................................. 8
© 2018 Constantin Hang, Maschinen - Produktion GmbH
Jahnstraße 82, D-73037 Göppingen
All rights reserved
Reproduction, in whole or in part, is permissible only with the prior consent of the
manufacturer.

Operating manual Eyeleter 102-00
BA_09/2018en 1
1 Introduction
By purchasing this Eyeleter, you have chosen a robust, reliable, proven model from Hang.
We constantly strive to improve Hang products. This also includes the operating manual.
Please notify us of any deficiencies, errors or ambiguities you notice in our products.
Send us your comments, criticisms and opinions by mail or fax. You will find a form in the
appendix.
2 Before you use the device
Read this operating manual carefully and follow the instructions.
The Eyeleter will thank you by providing a long, trouble-free service life.
3 Notes and explanation of terms:
Indicates a potentially hazardous situation that may lead to minor physical injuries.
This signal word may also be used for warnings related to property damage.
Indicates a potentially damaging situation in which the product or an object near it
may be damaged.
Indicates usage notes and other useful information.
4 Intended use
The Eyeleter is for inserting eyelets.
Any other application is considered unintended use.
The manufacturer assumes no liability for unintended use that causes property
damage or injury. In such cases the user bears the risk.
5 Warranty
12 months from the date of delivery.
The General Business Conditions of
Constantin Hang Maschinen-Produktion GmbH as published at
www.hang.de apply, and are accepted upon conclusion of the contract.
6 Scope of delivery
1 Eyeleter 2 Tool

Operating manual Eyeleter 102-00
BA_09/2018en 2
7 Commissioning
The Eyeleter is delivered in stable packing.
Keep the packing for possible return dispatch for reconditioning purposes.
Put the Eyeleter in a stationary position on a stable
surface according to the purpose of use. Work surface,
desk, etc.
8 How to operate
Do not operate the hand lever without first inserting a stack of paper. The stamp
can be damaged by multiple eyelets!
Figure A
Insert the material to be eyeleted against the end stops [1]
through the lower stamp. Figure A.
Pull the hand lever [2] quickly forward.
The eyelets are inserted.
Let go of the hand lever [2].
Spring force will pull it back to its original position.
The eyeletting process is complete.
Depending on the eyelet size, use more or less force.
The favourable gear ratio allows even heavy eyelets to be
inserted easily.
Operating manual Eyeleter 102-00
BA_09/2018en 3
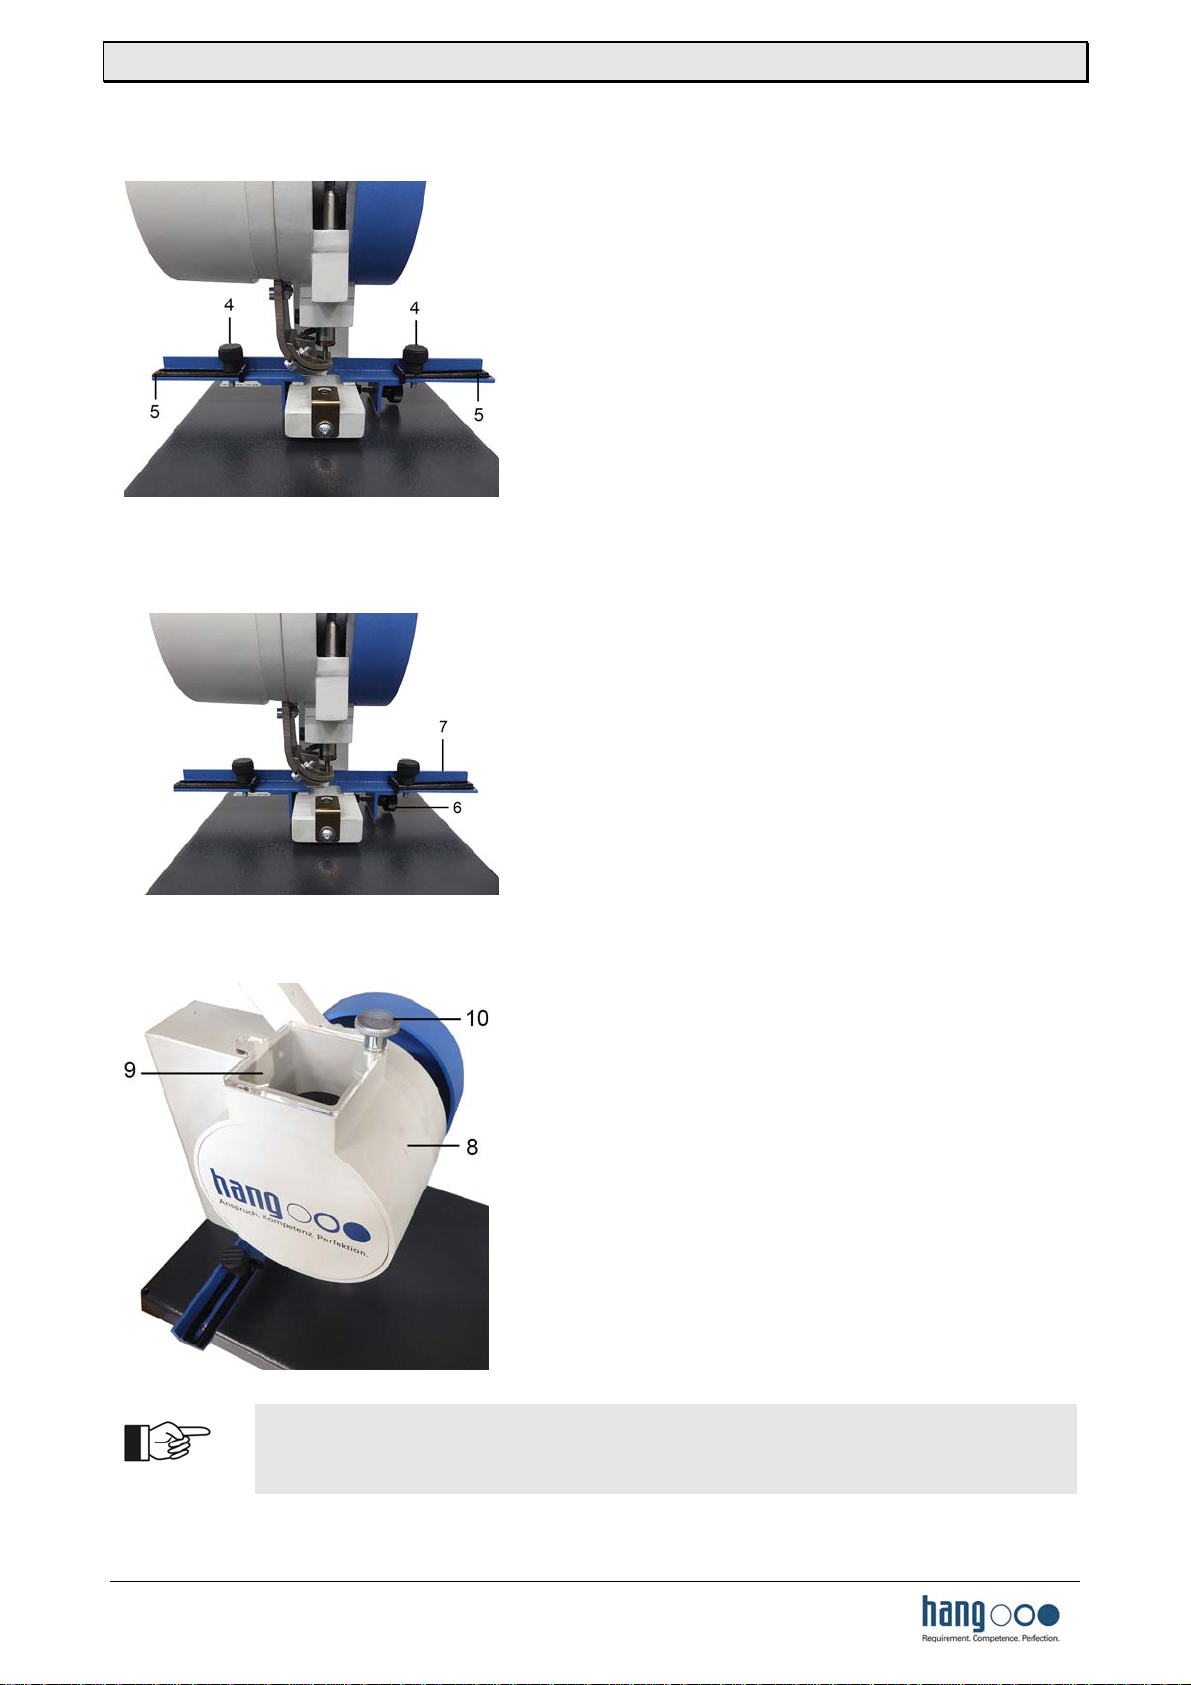
9 Setting the side stop
Figure B
Loosen the knurled screw [4] and set the distance by
sliding the side stop [5].
Then tighten the knurled screw [4].
Figure B.
10 Setting the rear stop
Figure C
Loosen the screw [6] and set the distance by sliding the
rear stop [7].
Then tighten the screw [6].
Figure C.
11 Refilling with eyelets
Figure D
Fill the eyelet holder [8] about 2/3 with eyelets by
loosening the knurled screw [10] and turning the
cover [9] to the side.
Figure D.
The Eyeleter is set up for a single eyelet size.
Always refill it only with the prescribed eyelets.
The wrong eyelets can cause malfunction or damage the device.

Operating manual Eyeleter 102-00
BA_09/2018en 4
12 Pressure setting (eyelet pressure)
Figure E
If you wish the eyelets to be pressed harder or if the
eyelets are being pressed too hard, you must regulate
the pressure by moving the lower stamp [11].
Figure E.
Release the threaded pin [12].
Use the threaded pin [13] to move the lower stamp
[11].
Use the threaded pin [12] to clamp the lower stamp
[11] tight again.
To increase the pressure:Turn the threaded pin clockwise.
To decrease the pressure: Turn the threaded pin anticlockwise.
13 Replacing the lower stamp
Press the eyelet channel to the side to allow easier handling.
Figure F
Loosen the clamping screw [15] on the stripping spring [14]
and swivel it aside. Figure F.
Release the clamping screw [17] on the lower stamp [16].
Pull out the lower stamp [16] upwards.
Install the new lower stamp in the opposite sequence.
Operating manual Eyeleter 102-00
BA_09/2018en 5
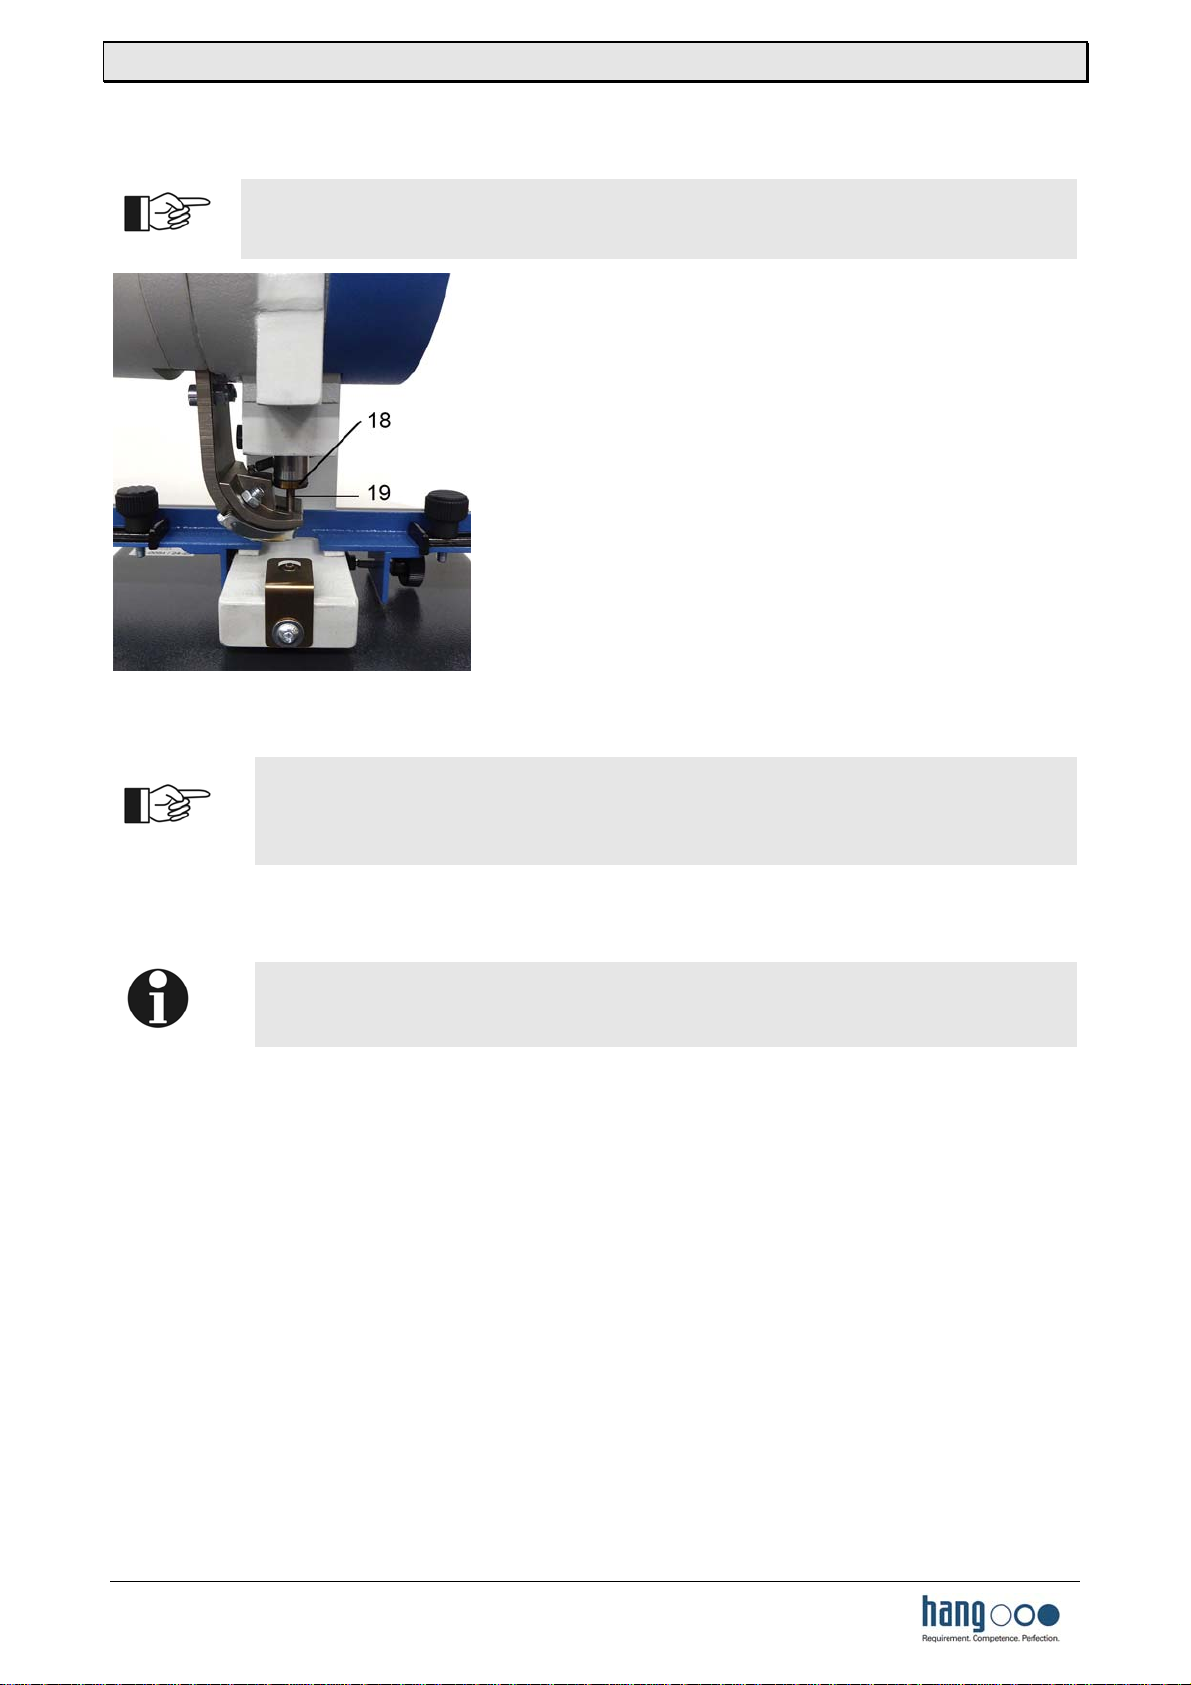
14 Replacing the upper stamp
Press the eyelet channel to the side to allow easier handling.
Figure G
Screw out the upper stamp [18] using the (size 12)
open-ended spanner provided.
If the catch pin [19] also has to be replaced, user
pliers to pull it down and out. Figure G.
Insert the new catch pin through the new upper
stamp and turn both of them together into the tappet.
Do an eyeleting test and, if necessary, readjust the
pressure. (See “Adjusting the pressure”).
15 Malfunctions in the eyelet feed
The eyelet feed is set up for a single eyelet size. If eyelets of a different size,
defective eyelets, dirt or other foreign objects get into the eyelet container or the
feed, malfunctions will occur.
Remove the tension spring that holds the eyelet channel to the body.
Remove the eyelet container (see “Replacing the bristle disk”). (Figures H–K)
First empty the eyelet container, or the eyelets will scatter everywhere.
Repair the cause of the malfunction.
Reinstall the eyelet container.

Operating manual Eyeleter 102-00
BA_09/2018en 6
16 Replacing the bristle disk
Caution: The worm spring is pre-tensioned!
Figure H
There will also be malfunctions if the bristles on the
bristle disk are worn.
Loosen and remove the screw [20].
Remove the cover [21].
Figure H.
Figure I
Loosen and remove the screws [22].
Figures I and J.
Figure J

Operating manual Eyeleter 102-00
BA_09/2018en 7
Figure K
Remove the eyelet container [23] by pulling it off
to the left.
Figure K.
Figure L
Loosen the screw [24].
Pull off the bristle disk [25].
Figure L.
Install in the opposite sequence.
17 Maintenance and servicing
Cleaning and lubrication are the only maintenance the eyeleting machine requires.
18 Cleaning
Clean the Eyelter at regular intervals. Make sure that no dirt deposits in the slide grooves of
the eyelet feed.

Operating manual Eyeleter 102-00
BA_09/2018en 8
19 Lubrication
If the Eyeleter machine is used daily, oil it once a week.
Carefully use an oil can to put one drop of oil at each location [26].
Figure M.
Wipe up excess oil with a rag.
Figure M
20 Recommended lubricants:
ARAL BP ESSO SHELL MOBIL DEA
Machine oil Dural MR 68 Energol EM 68 Coray 68 Carnea 68 Heavy Medium Viscoma,68
21 Servicing
Check the condition of the stamp and bristle disk at regular intervals (every three
months).
If parts are worn, order new ones from the replacement part list.

Form for Operating Personnel
The knowledge of the operating personnel has been checked by a competent person (e.g. supervisor,
safety representative) prior to the start of work.
It is recommended that the test be repeated every six months.
I herewith confirm that I have read and understood Chapters ....... and Chapter 1 „Safety
Precautions“ completely.
Date Chapter Last Name, First Name Signature
................... .................................... ......................................... .................................
................... .................................... ......................................... .................................
................... .................................... ......................................... .................................
................... .................................... ......................................... .................................
................... .................................... ......................................... .................................
................... .................................... ......................................... .................................
................... .................................... ......................................... .................................
................... .................................... ......................................... .................................
................... .................................... ......................................... .................................
................... .................................... ......................................... .................................
................... .................................... ......................................... .................................
................... .................................... ......................................... .................................
................... .................................... ......................................... .................................
................... .................................... ......................................... .................................
................... .................................... ......................................... .................................
................... .................................... ......................................... .................................
................... .................................... ......................................... .................................
................... .................................... ......................................... .................................
................... .................................... ......................................... .................................
................... .................................... ......................................... .................................
................... .................................... ......................................... .................................
................... .................................... ......................................... .................................
................... .................................... ......................................... .................................
Table of contents
Other HANG Industrial Equipment manuals

Popular Industrial Equipment manuals by other brands

 user manual")


Nexen
Nexen AIR CHAMP 625 user manual

SAMCHULLY
SAMCHULLY SD-E instruction manual

Anest Iwata
Anest Iwata PR-B5B instruction manual

HYDAC FILTER SYSTEMS
HYDAC FILTER SYSTEMS LowViscosity Unit CoalescerDiesel LVU-CD-40 Installation and maintenance instructions

Conquip
Conquip Manhole Box user guide

VIBCO
VIBCO BBS-100 manual