Hansen P4 User manual

Standardized gear units
Service manual
Redutores padronizados
Manual de Serviço
Conteúdo ver pagina 25
A
n Invensys compan
y
405 EPT
d
SM2000
Português (Brasil)
SHIPPED
WITHOUT OIL
DESPACHADA
SEM ÓLEO
NEW
INSTUCTIONS
are indicated by a
grey bar in the
margin
NOVAS
INSTRUÇÕES
Marcadas por
barra cinza na
margem

22
-2-
: DANGER
: WARNING
: MAINTENANCE
: NEW INSTRUCTION
contents page
1 GENERAL 3-4
2 SHIPPING 4
3STORAGE 4-5
4 HANDLING 5
5 INSTALLATION 5-13
6 LUBRICATION 13-18
7 COOLING 18-19
8 BACKSTOPS 19-20
9 STARTING-UP 20-21
10 MAINTENANCE 21-22
LUBRICANTS 23
Hansen Transmissions - Leonardo Da Vincilaan 1 B-2650 Edegem (Antwerp) Belgium
Tel: 32(0)3-450 12 11 – Fax: 32(0)3-450 12 20
Worldwide sales & service network: see page 24
Every care has been taken to ensure the accuracy of the information contained in this
publication, but, due to a policy of continuous development and improvement the right is
reserved to supply products which may differ slightly from those illustrated and described in
this publication.
Please contact one of the worldwide sales centres for information on any aspects of storage,
installation, operating, lubrication and maintenance that need clarifying.

33
-3-
SCOPE
This service manual contains the installation, operating, lubrication and maintenance
instructions relative to the Hansen P4 standardized gear units.
Additional information can be obtained by contacting one of the HANSEN sales centres
worldwide (page 24).
All handling, storage, installation, start-up, inspection and maintenance of
the equipment shall be done by personnel qualified in matters of industrial
mechanical and - where applicable - electrical equipment.
1. GENERAL
1.1. GENERAL INSTRUCTIONS
Carefully read this manual before installing the gear unit.
Compliance with the instructions will assure long and troublefree operation of the gear unit.
The equipment should be checked against shipping papers and inspected for apparent damage
sustained during transport. Any shortage, discrepancy or damage must immediately be reported
to HANSEN.
1.1.1. Warranty
The warranty clause of the "General Conditions of Sale" applies to gear units installed and
maintained as per instructions contained in this manual and in any additional instruction leaflets
supplied with the gear unit insofar as the gear unit operates within the service and rating
conditions put forward in the "Order Acknowledgement" and on the certified drawings.
Non compliance with these instructions, injudicious choice of lubricant or a lack of maintenance
will render warranty agreement invalid.
This warranty clause applies to all parts of the gear unit with the exception of these parts which
are subject to wear.
1.1.2. Safety
It is not allowed to use the gear unit for other applications or in other
operating conditions than the one for which it is ordered.
The user shall be responsible for the proper installation of the complete
equipment and the supply of protection guards and other safety equipment in
accordance with local safety regulations.
Heaters, coolers, electrical alarms and other safety or monitoring devices supplied by HANSEN
with the equipment must be installed and connected by the user as indicated on the relative
document.
1.2. GENERAL SPECIFICATIONS
For general specifications such as dimensions, weight, connecting diagrams, refer to certified
drawing of the gear unit and/or to the Hansen P4 standardized gear unit catalogues.

44
-4-
1.3. IDENTIFICATION
Inquiries concerning a gear unit should always specify the unit's complete type code and
manufacturing number, which can be found on the nameplate. The nameplate, which is fitted on
each gear unit, also contains ratings and/or torque, speed and lubrication instructions. This
information is essential to identify positively the unit supplied by HANSEN.
2. SHIPPING
Prior to shipment each unit has been inspected and accepted by the QUALITY CONTROL
DEPARTMENT according to order specifications, and after no load test of several hours in its
normal operating position and at speed indicated on the nameplate.
2.1. SHIPPING CONDITIONS
Unless otherwise specified, gear units are shipped in unpacked condition and depending on
necessity, fixed on wooden pallets with open crating protection. Sometimes parts, such as spare
filter elements, are separately packed. In such events, the end-user must take care of the
assembly (see chapter 5. INSTALLATION p. 5).
The HANSEN P4 gear unit is shipped without oil.
All grease lubrication points are factory filled.
2.2. PAINTING
The standard external paint for HANSEN gear units is an epoxy primer with high solids content,
corresponding to the German Standard RAL 5021, water blue.
This paint system offers a 5 year protection for indoor installation provided the gear unit is not
subjected to humid or chemical aggressive atmospheric conditions.
Overcoating is possible with most paints based on alkyd-, epoxy or polyurethane resins.
2.3. PRESERVATION
The inner parts of the gear units are sprayed with rust preventing mineral oil. The breather plug
(standard, dust-proof, anti-humidity) is neither removed nor sealed.
The shaft extensions are protected with rust preventing grease and waxed paraffin paper. The
hollow shafts and all unpainted machined surfaces are coated with an anti-oxidizing waxy
varnish.
This standard system offers corrosion protection during transport and/or storage for up to one
year indoors.
3. STORAGE
Always store gear units in their originally supplied shipping conditions.
Gear units should not be stored near vibrating machines in order to avoid
damage to bearings.
3.1. SHORT TERM STORAGE
Up to one year indoors. Always store units in their originally supplied shipping conditions.

55
-5-
3.2. LONG TERM STORAGE
Max. 5 years indoors or 6 months outdoors.
•The protection should be kept intact if long term storage was specified at order
placement.
•In all other cases the gear unit must be filled with a small amount of mineral oil
containing a volatile corrosion protection additive. All gear unit openings (dipstick,
breather etc.) should be hermetically sealed.
Some additives may be added to the normal oil. Consult your oil supplier.
4. HANDLING
The Hansen P4 gear units are easy to handle and to install. Make use of integral oval lifting
eyes (horizontal mount) and lifting eye nuts or integral rods (vertical mount).
For equal load sharing make use of all lifting eyes and use adequate tools.
Lifting eye nuts must not be removed and must be fully engaged before
lifting.
Never lift units with slings wrapped around the shafts.
Particular circumstances might dictate the temporary removal of thermostat(s), pressure
gauge(s) and/or part of the oil feed piping. After removal of the latter elements, one should take
special care to avoid ingress of moisture, etc... into the lubrication system of subject gear
unit(s).
5. INSTALLATION
5.1. FITTING OF ACCESSORIES
The metric shaft extensions are equipped with keyways according to ISO/R773-1969 and DIN
6885 "Blatt 1 - Form N1 or N3".
Threaded centre holes in these shafts according to DIN 332 Teil 2 Form D.
Recommended bore tolerance for the couplings or other components to be mounted is K7 (as
per ISO 286).
The inch shaft extensions are equipped with keyways according to USAS B17.1-1967.
Recommended bore tolerance:
- 0.0005" to - 0.001" for diameters £1 1/2"
- 0.001" to - 0.002" for diameters > 1 1/2"
Remove protection from shaft extensions and check keyfit and keyway height in component to
be mounted onto shaft. Heating the component to 80-100°C (175-210°F) will be helpful.
Threaded centre hole in shaft to assist in mounting components onto shaft may be used.
Never mount components by impact as this may cause damage to the
bearings.
Never use rigid couplings except on free end machine shafts (e.g. mixers, aerators) or in
executions with a torque arm.

66
-6-
5.2. EXTERNAL LOADS
If external loads act on the gear unit, thrust blocks must be installed against the unit's feet, to
prevent gear unit from shifting. Components transmitting radial load to the shaft should be
mounted as close as possible to the housing.
Avoid exaggerated tension in transmission belts mounted on input or output shafts. On gear
units with built-on motor and V-belt drive, tension has been factory set. Tension should be
rechecked after 24 hours service. Chain transmissions must be mounted without preliminary
tension.
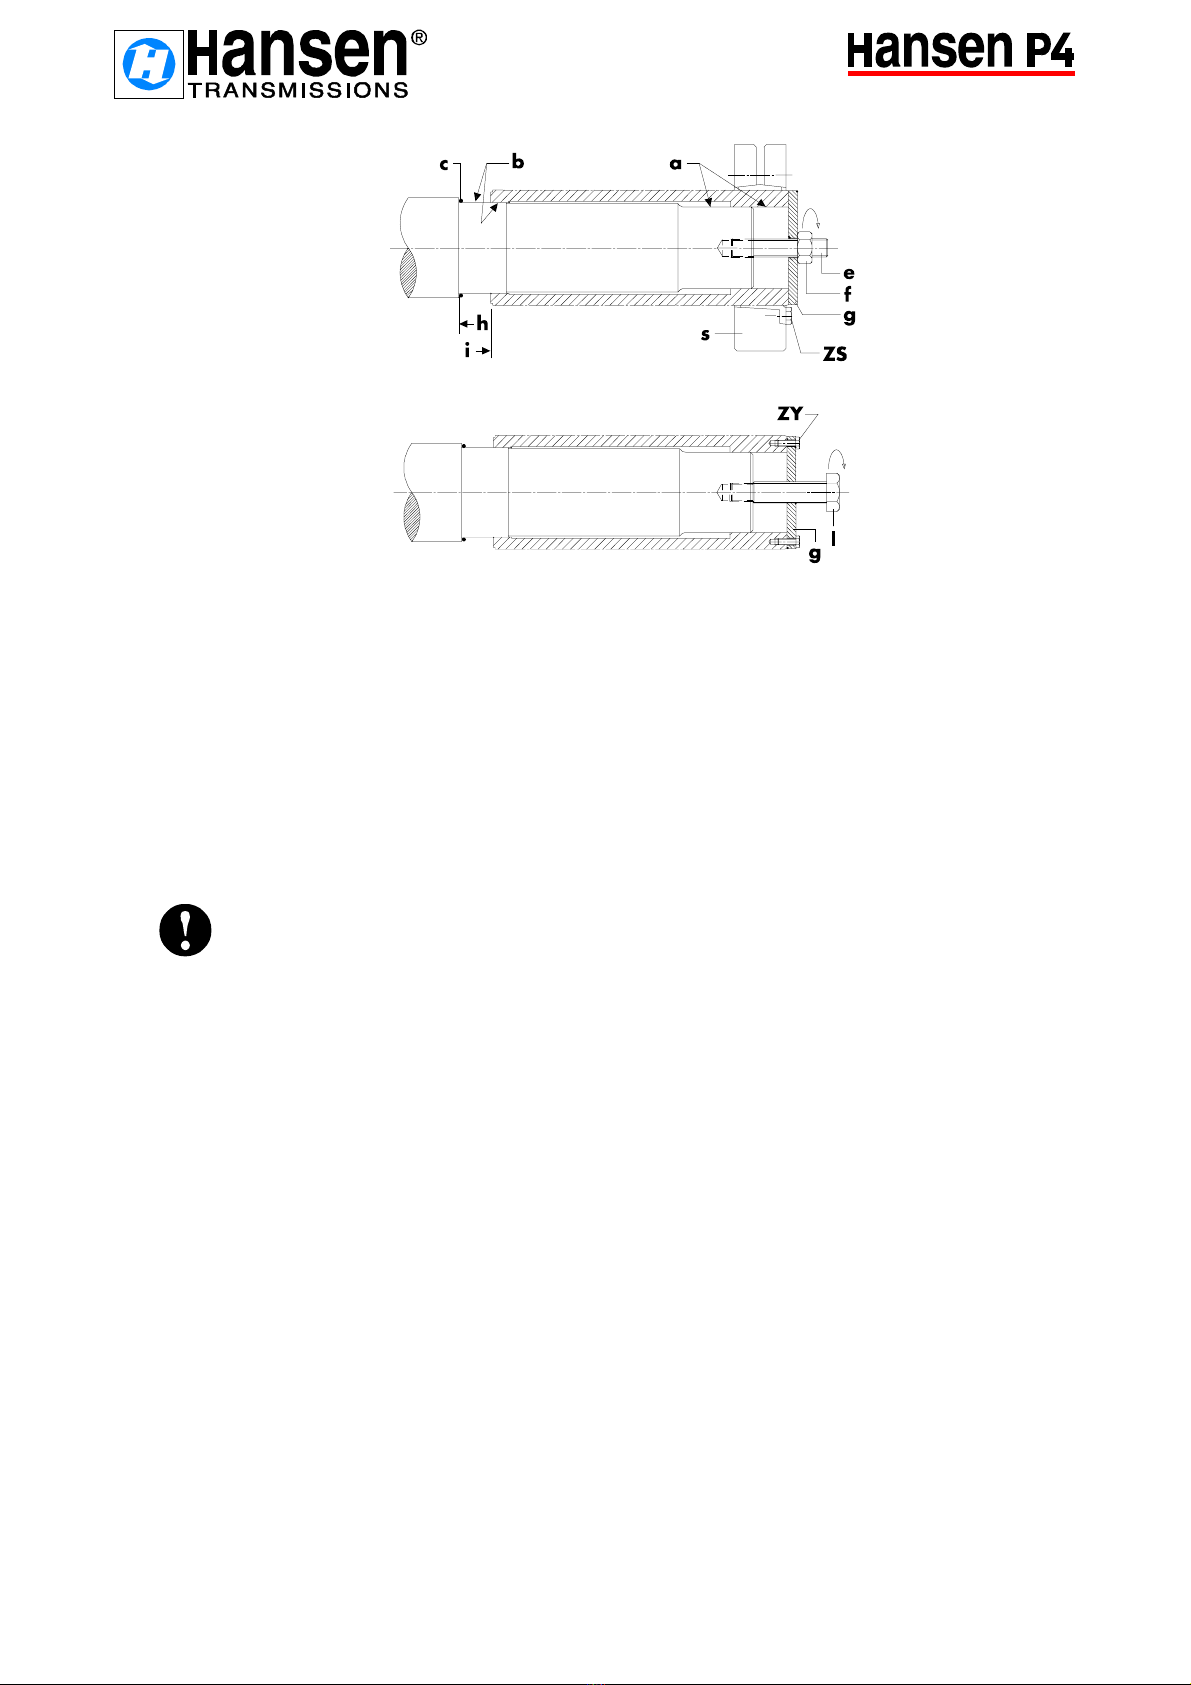
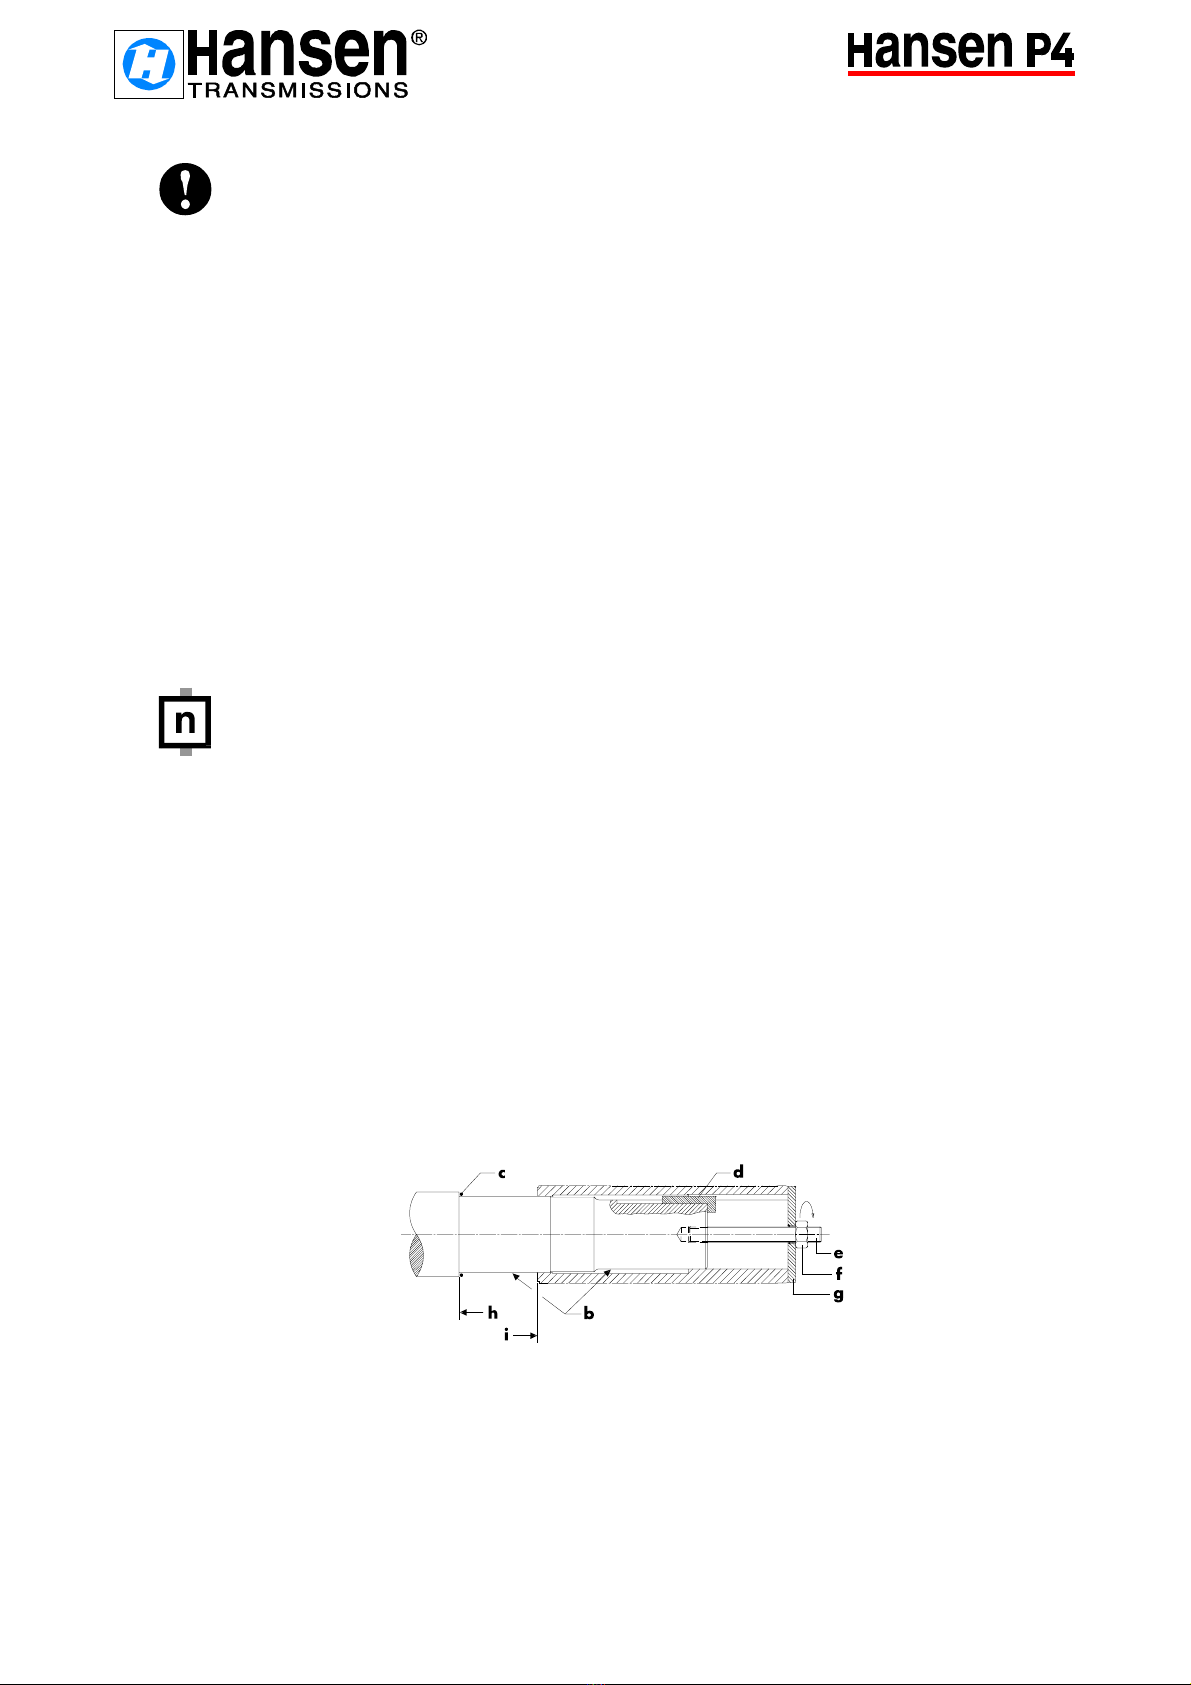
In case a pinion is mounted on the shaft extension of the gear unit, care should be taken to
have normal required backlash between pinion and gear and good contact pattern must be
assured.
5.3. ERECTION
5.3.1. Levelling
Always mount gear unit in position for which it was ordered.
Before altering this position or inverting the unit, please consult HANSEN.
It may be necessary to readapt the lubrication system.
5.3.2. Alignment
Align gear unit as accurately as possible with driving and driven machinery. Install gear unit
level to better than 5 mm per 1 m (5/32 inch per 3 feet or 5mrad or 17 arc minutes) or within the
limits indicated on the outline drawing for positions other than horizontal.
Maximum allowable misalignment depends on the couplings fitted on the shaft extension,
please refer to data provided with coupling.
Use three fixation points of gear unit for alignment. Adjust other fixation points by shimming to
0,1 to 0,2 mm (0.004 to 0.008 inch), depending on the size of the gear unit.
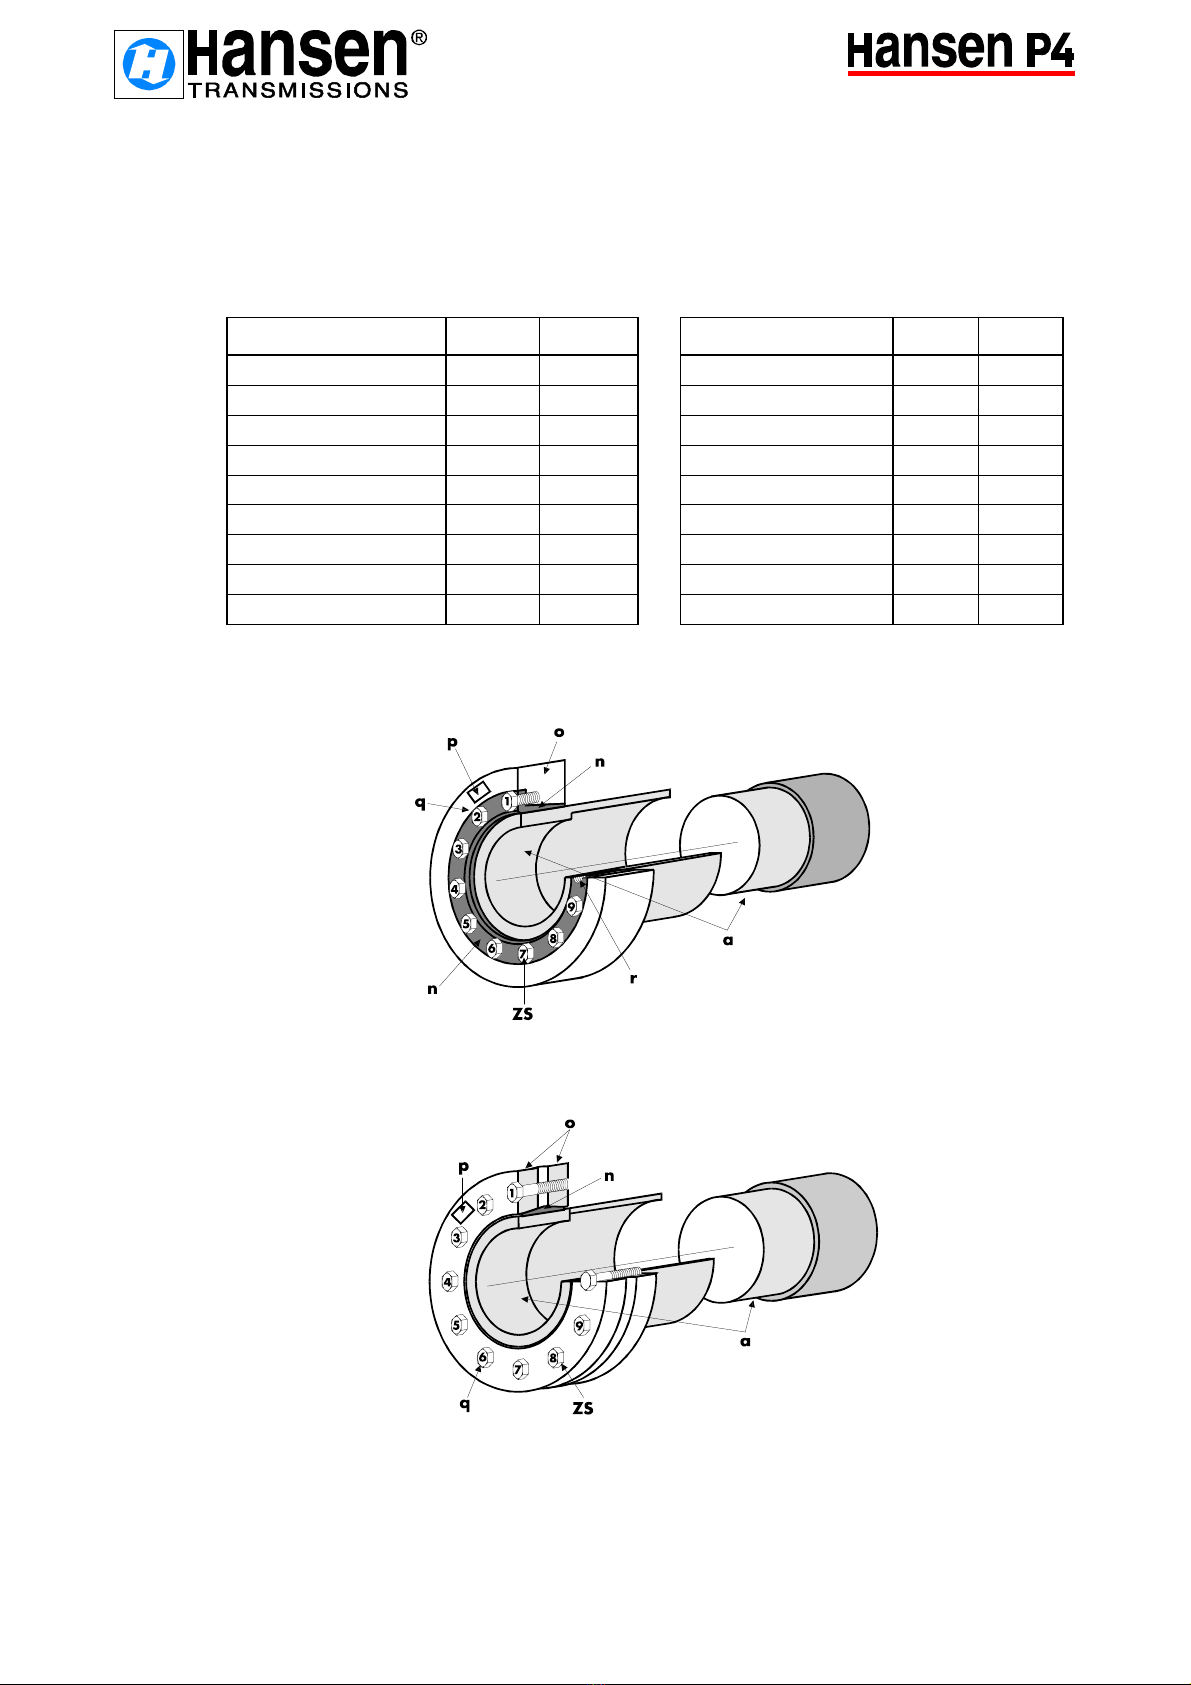
5.4. SECURING OF SOLID SHAFT GEAR UNIT
Gear unit must be mounted onto a rigid and stable bedplate or foundation in order to avoid
vibrations.
Use fixation holes indicated on dimensional drawing.
After correct alignment and shimming of all points, fix gear unit solidly onto its foundation with
appropriate size bolts, grade 8.8 according to DIN 267 or SAE grade 5 for bolts 1 1/2" and
smaller, ASTM.A-354 grade BC for bolts larger than 1 1/2". Dimensions and tightening torques:
see table.
Note: for some horizontal executions with parallel shaft and fans, the protection hood of the fan
must be removed (and remounted afterwards) to enable tightening of the bolts.
Horizontal mount
-Single stage gear units (type QHP.1)
Gear unit size C D E F G
ISO M20 M24 M24 M30 M30
Bolt size UNC 3/4" 7/8" 1" 1 1/8" 1 1/4"
Nm 285 450 660 830 1150
Tightening
torque lbf.in 2500 4000 5800 7300 10000

77
-7-
- Multi stage gear units (type QH...)
Gear unit size A B C D E-F G-H-J-K L-M N-P-Q R-S-T
ISO M16 M20 M24 M24 M30 M36 M42 M48 M56
Bolt size
UNC 5/8" 3/4" 7/8" 1" 1 1/4" 1 1/2" 1 3/4" 2" 2 1/4"
Nm 165 285 450 660 1150 2000 2500 3500 5300
Tightening
torque lbf.in 1450 2500 4000 5800 10000 18000 22000 31000 47000
Vertical mount
- Multi stage gear units (type QV...)
Gear unit size C D E F-G(1) G(2)-H-J-K L-M-N-P-Q R-S-T
ISO M24 M30 M30 M36 M42 M48 M56
Bolt size
UNC 1" 1 1/8" 1 1/4" 1 1/2" 1 3/4" 2" 2 1/4"
Nm 660 830 1150 2000 2500 3500 5300
Tightening
torque lbf.in 5800 7300 10000 18000 22000 31000 47000
(1) size G: 2-stage unit
(2) size G: 3- and 4-stage unit
The alignment of the complete drive packages mounted on a bedplate has been carefully
checked before shipment. It is nevertheless required to check that the bedplate has not been
deformed during transport or erection. Therefore check again alignment of couplings or other
elements after final installation.
5.5 SECURING OF HOLLOW SHAFT GEAR UNITS
5.5.1 Hollow shaft gear unit with shrink disc connection
The HANSEN supplied shrink disc is ready to be installed.
Therefore do not dismantle shrink disc prior to first mounting.
The HSD-type is used as standard.
Upon request the SD-type is possible.
Mounting (see fig. 1a)
- Clean and degrease contact surfaces (a) and (b)
- Smear surface (b) - and not surface (a) - with "Molykote D321R" or similar.
- After the applied coating has hardened, slide the O-ring (c) onto the shaft.
- Draw the gear unit onto the shaft of the machine using threaded rod (e), nut (f) and
distance ring (g) until faces (h) and (i) make contact.
- Fit shrink disc (s). A locating groove on the shaft indicates the position of the shrink disc.
Tighten bolts (ZS) with a torque wrench. The required tightening torque for the HSD-type
is shown in table 1 (page 9).
For the SD-type it can be found on the dimensional drawing.
NOTE: Never tighten bolts when shrink disc is unmounted.

88
-8-
Fig. 1a
Fig. 1b
HSD type (see fig. 1c, page 9)
The tightening torques (TA) are indicated in table 1 (see page 9) and on the name plate (p).
Tightening bolts are prestressed to the right level when outer ring (o) and inner ring (n) are flush
(optical check).
SD type (see fig. 1d, page 9)
The tightening torques are indicated on the name plate (p) and on the dimensional drawing.
Remove spacers, attached for shipping, from between outer rings (o). When mounting and
during tightening make sure that outer faces remain parallel.
HSD + SD type
Tighten bolts (ZS) in indicated sequence (q) one by one, progressively over several rounds, until
required tightening torque (TA) is reached.
Do not tighten bolts crosswise.
Mount protection hood.
Securing in case of axial load
If the axial load is not absorbed by the shoulder of the machine shaft, a distance ring (g) must
be included (see fig. 2b, page 11).
Dismounting (see fig. 1b, page 8)
Loosen all tightening bolts (ZS) uniformly, one by one in a continuous sequence, about a
quarter of a turn per round.
Should outer and inner ring of the HSD-type not release themselves, one can remove some
tightening bolts and install them in tapped holes (r), in the inner ring, to trigger separation of
both rings.
Remove shrink disc from hollow shaft.
Mount the distance ring (g) on the hollow shaft by means of bolts (ZY) (dimensions of ZY:
see dimension drawing).
Place the disassembly bolt (l) into the central hole in the distance ring (g).
Remove the gear unit from the shaft by tightening the disassembly bolt (l).
Note
The parts e,f,g,l and ZY are not included as standard. They can be supplied upon special
request.
For technical data, refer to catalogue or certified drawing.
MOUNTING
DISMOUNTING

99
-9-
Cleaning and greasing
Dismounted shrink discs do not have to be taken apart for cleaning and regreasing prior to
reinstallation, unless they have been used in a very dirty environment.
After cleaning, recoat the tapered surfaces using a solid lubricant with a friction coefficient of
0,04, e.g. Molykote D321R or similar.
Table 1
Shrink discs TA (Nm) TA (lbf.in) Shrink discs TA (Nm) TA (lbf.in)
HSD 110-81x110 121 1070 HSD 320-81x320 980 8600
HSD 125-81x125 121 1070 HSD 340-81x340 980 8600
HSD 140-81x140 193 1700 HSD 360-81x360 980 8600
HSD 165-81x165 295 2600 HSD 390-81x390 1450 12800
HSD 185-81x185 295 2600 HSD 420-81x420 1450 12800
HSD 220-81x220 570 5000 HSD 440-81x440 1450 12800
HSD 240-81x240 570 5000 HSD 480-81x480 1450 12800
HSD 260-81x260 570 5000 HSD 500-81x500 1970 17400
HSD 280-81x280 570 5000 HSD 530-81x530 1970 17400
Fig. 1c HSD TYPE
Fig. 1d SD TYPE

1010
-10-
5.5.2 Hollow shaft gear unit with keyway connection
Mounting (Fig. 2a, page 10)
-Coat mating faces (b) of the machine shaft with sealing compound.
-Slide the O-ring (c) onto the machine shaft.
-Place supplied mounting key (d) into keyway of machine shaft, with the boss against the shaft
face.
-Place the gear unit into position on the machine shaft. Make sure that the keyways are
correctly positioned.
-Press the gear unit on the shaft, using a threaded rod (e), a nut (f), and a distance ring (g) until
the mounting key (d) and the distance ring (g) make contact.
-Remove the nut (f), the distance ring (g) and the mounting key (d).
-Ensure that key (m) has sufficient clearance on top.
-Fit the key (m) into the shaft (¹mounting key).
-Remount the distance ring (g) and the nut (f).
-Draw the gear unit further onto the shaft until the faces (h) and (i) make contact.
-Remove the nut (f), the distance ring (g) and the threaded rod (e).
Securing (Fig. 2b, page 11)
-Mount the distance ring (g) again on the machine shaft using correct fixation bolts (J).
-Install the protection cover (k).
In case of external axial loads on the shaft, please refer to specific instructions on the outline
drawing.
Dismounting (Fig. 2c, page 11)
-Remove the protection cover (k) and the fixation bolts (J).
-Mount the distance ring (g) on the hollow shaft by means of bolts (ZY) (dimensions of ZY:
see dimensional drawing).
-Place the disassembly bolt (l) into the central hole in the distance ring (g).
-Remove the gear unit from the shaft by tightening the disassembly bolt (l).
Note
The parts e,f,l and ZY are not included as standard, but can be supplied upon special request.
For technical data, refer to catalogue or certified drawing.
Fig. 2a
MOUNTING

1111
-11-
Fig. 2b
Fig. 2c
5.5.3 Mounting of the torque arm
After fitting and securing the gear unit to the driven shaft (see par.5.5.1 and 5.5.2), fix unit by
means of the optionally supplied torque arm to a fixed torque reaction point. Refer to the
certified drawing or catalogue for torque arm location on gear unit.
The connection between torque arm and reaction point must remain flexible and resilient. This is
achieved by preloading the disc springs of the torque arm.
The preload of the disc springs (A) will be adjusted as follows:
- Determine the spacing S (fig. 3a), this is the spacing of the disk springs in unloaded and
unmounted condition.
- Screw the nuts until spacing S1 (spacing between gear unit and fixed point) is reached,
where S1 = S - DS (fig. 3b, fig. 3c and fig. 3d)
DS = spacing obtained after compression of the disk springs
(table 2, table 3 and table 4) due to the weight of the gear unit and
tightening of the nuts.
- When the prescribed spacing S1 is obtained, lock the nuts by tightening outer nut
against inner nut.
Fig. 3a
SECURING
DISMOUNTING

1212
-12-
Fig. 3b
Table 2
Fig. 3c
Table 3 Gear unit size D PT PR max DSA
±5 mm inch mm Inch Q* DIN 2093
QH.C3 35 M20 50 1.97 0,7 0.028 2 x 3 A 80
QH.D3 - QH.D4 45 M24 60 2.36 0,9 0.035 2 x 2 A 100
QH.E3 - QH.E4 45 M24 60 2.36 0,9 0.035 2 x 3 A 100
QH.F3 - QH.F4 60 M30 75 2.95 1,0 0.039 2 x 2 A 125
QH.G3 - QH.G4 60 M36 90 3.54 1,0 0.039 2 x 3 A 125
QH.H3 - QH.H4 60 M36 90 3.54 1,0 0.039 2 x 3 A 125
Q*: number of disc springs
Gear unit
size
D PT PR max DSA
±5 mm inch mm inch Q* DIN
2093
QH.A2 35M16401.570,7
0.028 2 x 2 A 80
QH.B2 35 M20 50 1.97 0,7 0.028 2 x 2 A 80
QH.C2 45 M24 60 2.36 0,9 0.035 2 x 2 A 100
QH.D2 45 M24 60 2.36 0,9 0.035 2 x 3 A 100
QH.E2 60 M30 75 2.95 1,0 0.039 2 x 3 A 125
QH.F2 60 M30 75 2.95 1,0 0.039 2 x 3 A 125
QH.G2 60 M36 90 3.54 1,0 0.039 2 x 4 A 125
QH.H2 60 M36 90 3.54 1,0 0.039 2 x 4 A 125
Q*: number of disc springs

1313
-13-
Fig. 3d
Table 4
6. LUBRICATION
Lubrication serves four main functions:
- prevents metal to metal contact in gears and bearings
- reduces friction losses
- dissipates the generated heat from gears and bearings
- prevents corrosion
Different lubrication systems can be used, depending on
- gear velocity
- gear unit mounting position
- operating conditions
HANSEN gear units use one of following systems:
- splash lubrication
- forced feed lubrication: - circulation lubrication
- pressure lubrication
These systems can be completed with auxiliary cooling in different forms (see COOLING
page 18-19).
6.1. SPLASH LUBRICATION
Splash lubrication is standard with horizontal shaft gear units and for speeds between 750 and
1800 min-1 at the high speed shaft. Gears and output shaft bearings are lubricated by
immersion in the oil bath. Oil splash from gears fill oil pockets in the housing, assuring gravity
circulation lubrication of the bearings via channels in housing and covers.
For other speeds at the high speed shaft, refer to HANSEN.
Gear unit size D PT PR max DSA
±5 mm inch mm inch Q* DIN 2093
QH.J3 - QH.J4 80 M42 105 4.1 1,4 0.055 2 x 3 A 160
QH.K3 - QH.K4 80 M42 105 4.1 1,4 0.055 2 x 3 A 160
QH.L3 - QH.L4 80 M48 120 4.7 1,4 0.055 2 x 4 A 160
QH.M3 - QH.M4 80 M48 120 4.7 1,4 0.055 2 x 4 A 160
Q*: number of disc springs

1414
-14-
6.2. FORCED FEED LUBRICATION
All rotating elements above oil bath level are lubricated by a gear pump forcing the oil through
pressure lines.
Pumps can be either of the integral type, driven by one of the gear unit shafts, or a motorpump.
The integral type pumps are always provided with a built-in reversing device for operation in
both directions.
In case of motorpumps the direction of rotation is always indicated.
Built-on pumps reach their normal operating capacity already after a few seconds. However, in
order to avoid unwanted alarm during the start-up period, we recommend to delay the triggering
of the warning signal by 5 to 10 seconds.
Motorpumps should be switched on at least one minute before starting the
gear unit.
6.2.1. Circulation lubrication
- With integral pump (fig. 4).
The circulation lubrication system consists of
- a pump P
- a filter F with bypass (standard from gear unit size G onwards)
- a flow switch Mf (standard from gear unit size G onwards)
Flow switch must be wired in a circuit to automatically stop the main drive
motor when oil flow drops below alarm setting.
- With motorpump
The service manual of the lubrication and cooling system gives detailed information about the
circulation lubrication system with motorpump.
Fig. 4
6.2.2. Pressure lubrication
The service manual of the lubrication and cooling system gives detailed information about the
pressure lubrication system.

1515
-15-
6.2.3. Instrumentation and settings
For detailed information on lubrication system, instrumentation and settings, refer to the certified
drawing, the service manual of the lubrication and cooling system and/or separate leaflets on
instrumentation, supplied with this manual.
Settings stated on the certified drawing have been set during test-run by
HANSEN and should not be altered without written authorisation.
Presettings, if stated, are recommended values set by HANSEN, but may be altered according
to local conditions.
6.3. OIL SELECTION
Mineral oils containing EP additives, which increase oil film load capacity, should be used.
Always use oil of the type and with viscosity characteristics corresponding
to those given on gear unit's nameplate.
The viscosity has been selected according to operating conditions specified in the order.
For conversion from ISO viscosity class VG to other viscosity units see table of corresponding
lubricants page 23. The table is not exhaustive; equivalent brands can be used.
The oil suppliers are responsible for the selection and composition of their products.
Synthetic oils may be used only after written authorisation from the HANSEN
Engineering Department.
Only synthetic oils of the polyalpha-olefine type (SHF-type, Synthetic Hydrocarbon Fluid)
containing EP additives may be used. Due to the good oxidation- durability of synthetic oils their
life expectancy is longer than that of mineral oils of the same viscosity and for the same working
conditions. A longer use is only permitted if an oil analysis is made regularly (every 4000 hours)
by the oil supplier or a qualified laboratory, in order to determine the exact life-time of the oil.
6.4. OIL QUANTITY (see fig. 5, page 16)
The oil level is determined by min. and max. markings on the dipstick.
An oil level glass or an oil level switch is optionally available.
THREADED DIPSTICKS SHOULD BE CHECKED IN PLUGGED POSITION.
The oil level must be checked when the gear unit is out of operation.
On systems with filters and coolers, oil level must be checked with
lubrication and cooling system filled with oil and after short test run.
The lubrication and cooling system, including the cooler, is automatically utilized when the oil
bath temperature rises above 60°C (140°F).
If oil filling is required to take place earlier, manual ventilation of the cooler must be carried out
whilst the pump is in operation.
The oil quantity mentioned on the nameplate of the gear unit is an approximate value given only
for procurement purposes.

1616
-16-
Fig. 5
- Single stage gear units
- Multi stage gear units
QHP.1 QHP.1W
(1) see 6.8

1717
-17-
Type and position of the stickers: refer to certified drawing and gear unit
6.5. THE FIRST OIL FILLING (see fig. 5, page 16)
Fill units only after final installation, especially gear units with vertical downwards shafts, to
prevent oil splashing over drywell during handling.
Fill the gear unit exclusively through the oil filling opening which is provided
in the inspection cover for that purpose. In that way, all bearings are
lubricated with fresh oil.
Note:
- Additional oil filling of the bearing housing.
4-stage horizontal gear units with right angle shafts (QHR.4) and 3- and 4-
stage vertical gear units with right angle shafts (QVR.3 + QVR.4) require on
initial oil filling also an additional oil filling of the bearing housing.
See special sticker on gear unit.
The additional oil quantity is mentioned on the certified drawing and on the
sticker.
- Oil filling of a gear unit with M1 or M3 motor base.
Units with horizontal shafts (QH ..) equipped with a motorbase M1 and M3 must be filled on
initial filling with a small quantity of oil through the inspection cover located in the top face of
the gear unit (see special sticker on gear unit).
If easy access to the oil filler plug is prevented through lack of space between the motor base
and the gear unit upper face, the motor base should be raised following removal of the belt.
For gear units with M1 motor base the normal oil filling plug is located at the side of the output
shaft, opposite the side where the dipstick is located.
For gear units with M3 motor base the normal oil filling plug is located at the side of the
dipstick.
If the gear unit is filled with storage oil, it has to be drained and it may in some instances be
necessary to rince the gear unit with the selected oil before starting up. Check with the oil
supplier.
6.6. GREASE SELECTION (see table, page 23)
Use only high quality greases, with EP-additives and consistency NLGI-Grade 3.
Greases with EP-additives and consistency NLGI-Grade 2 may be used for regreasable
labyrinth type seals and grease lubricated lower bearing of the low speed shaft.
grease lubrication
points
oil draining
ventilation
oil filling
dipstick

1818
-18-
6.7. GREASE LUBRICATION POINTS (see fig. 5, pages 16 - 17)
All greasing points for bearings which are not oil lubricated and for labyrinth seals are equipped
with nipples according to DIN 71412 and have been filled before shipment.
The total number of nipples is indicated on the nameplate.
Some built-on backstops are grease lubricated.
For detailed information refer to appropriate leaflet supplied with this manual.
6.8. OIL DRAINING
Drain the oil while unit is still warm. To facilitate oil draining, remove dipstick. Drain
units having a large oil volume through drain plug. Use portable pump. With some executions a
small quantity of oil remains beneath the high speed bearings. This oil can be drained by means
of a second drain plug (1)(see fig. 5, page 16).
6.9. VENTILATION (see fig. 5, page 16).
To prevent pressure build-up, the gear unit is provided with a breather which is generally
integrated in the dipstick.
Take care and check regularly that this breather does not become clogged.
For some applications, the dipstick with breather hole is replaced by one without breather hole
in combination with an anti-dust or anti-humidity breather.
7. COOLING
Heat generated in the gear unit due to friction and churning of the oil, must be dissipated
through the housing into the environment.
It is important not to decrease the heath dissipation capacity of the housing.
Regularly clean the surface of the housing.
7.1. SEPARATE AIR COOLING
7.1.1. Fans
One or two fans may be mounted on gear unit shafts.
Check regularly that the air inlet and the air outlet are not obstructed.
Fans need no special maintenance, except occasional cleaning.
7.1.2. Air-oil coolers
The service manual of the lubrication and cooling system gives detailed information about the
air-oil cooler.
7.2. SEPARATE WATER COOLING
All water cooling systems must be connected to a non-calcareous water supply. See also
service manual on lubrication and cooling system and/or technical leaflets on specific
instrumentation. The use of seawater must be specified with the order; coolers suited for use of
seawater are available.
When unit is not operating and freezing temperatures may occur, water must be drained from
cooling system. Drain facilities have to be provided by end user.
Unless otherwise stipulated, the water flow indicated on the dimensional drawing is the required
rate for water at 20°C (70°F).
According to load, ambient temperature and the water temperature a lower rate will suffice.
Adjust waterflow to obtain an oil working temperature between 60 and 80°C (140 and 180°F).

1919
-19-
7.2.1. Water-oil coolers
Refer to certified drawing for connection of the water-oil cooler to the coolant.
The service manual of the lubrication and cooling system gives detailed information about the
water-oil coolers.
7.2.2. Cooling coils
Direction of waterflow is optional.
The cooling coils are suited for fresh as well as for seawater.
Maximum allowable water pressure: 0,8 MPa (8 bar, 116 psi).
Connection of cooling coil to water supply.
Warning: In order to avoid torsioning of cooling coil, hold premounted connection with suitable
wrench as shown in fig. 6 below.
8. BACKSTOPS
Backstops are safety devices and have to be inspected at regular time intervals.
The periodical inspection is to be carried out by authorised personnel and according to the
instructions described in the specific service leaflet supplied with the gear unit.
Carefully read these service and inspection instructions before starting any intervention on the
backstop.
The frequency of the inspections depends on the type of application.
The following table lists the maximum interval between 2 inspections for a number of
applications, other applications require at least one inspection every year.
In case of transport of people: the user has to follow local legislation re. inspection of safety
devices.
Application Maximum time interval
Hoist drives Every year
Conveyors Every two years
Elevators Every two years
Cooling towers (QVP.2) Every two years
Cooling towers (QVR.2) Every five years
Screw pump drives Every two years
Cooling coil
FIG. 6

2020
-20-
An inspection of the backstop is also required in the following circumstances:
- In case of disassembly of the gear unit or one of its components
- In the event that abnormal wear or material break-out of gears, bearings or any other
component or pollution of the oil has been detected in the gear unit, since this may have
affected the condition of the sprags and raceways of the backstop.
The outcome of the periodical inspection is to be reported in a logbook.
Never loosen any part of the backstop while the gear unit is loaded:
loosening the backstop may cause reversal of the drive and running back of
the load. Prior to loosening the backstop remove the load and secure the
drive against unwanted movement.
8.1.STANDARD BACKSTOP INTEGRATED IN THE GEAR UNIT
These backstops are lubricated by the oil bath of the gear unit and require, apart from the
regular inspections indicated above, no further maintenance.
8.2. EXTERNALLY FITTED BACKSTOP
In case the gear unit is equipped with an externally fitted backstop, please refer to the
corresponding additional Service Manual for maintenance and inspection. The above
instructions for inspection remain valid.
Alteration of the direction of rotation of a backstop may only be carried out
by authorised personnel and according to the instructions shown in the
relevant instruction leaflet.
9. STARTING-UP
9.1. ALL GEAR UNITS
Before starting-up, check oil level with dipstick and make sure that all points
are lubricated.
Although all greasing points have been greased before delivery, it is advisable to give a few
shots with a grease gun before starting-up.
Check all fixation points between gear unit and foundation.
They may require retightening after some running time.
The alignment of the complete drive packages mounted on a bedplate has been carefully
checked before shipment. It is nevertheless required to check that the bedplate has not been
deformed during transport or erection. Therefore check again alignment of couplings or other
elements after final installation.
Make sure that protection hoods and air guiding plates, if any, in case of fan cooling are
properly fitted.
Gear units may rotate in both directions except when direction of rotation is indicated.
On gear units equipped with backstops, check whether direction of motor
rotation corresponds to backstop freewheeling direction, before coupling
motor to unit.
Other manuals for P4
3
Table of contents
Languages:
Other Hansen Industrial Equipment manuals