ViaAqua Acro-Cal AC-10 User manual

AC - 10
WARNING
Buyer/User assumes all responsability for safety and proper
use not in accordance with the directions and sately labels.
• Built-inwaterpump
• Built-inbleedvalve
• Useinsumporhangingpump
• Bubblecounterincluded
• Easytwistofftop
• For10to75galaquarium

FEATURES
ViaAqua®Acro-CalTMCalciumReactoroffersasimpleandconvenientsolutionfor
maintainingcalciumandalkalinityinyourreeftank.Aftertheinitialsetup,thecalciumreactor
requiresminimalmaintenance.Acalciumreactorisalmostanecessityfortanksheavily
stockedwithstonycoral,wherecalciumandalkalinitydemandsarehighandwillpromote
corallinealgaegrowth.Acro-CalTMCalciumReactorprovidesasteadysupplyofcalciumby
usingCO2todissolvemediainthereactorand,thus,releasingcalciumintoyourwater.The
efuentreleasedalsoactsasabuffertostabilizekH.
WARNING AND SAFEGUARD
WARNING
»This product may contain chemicals known to the State of California to
cause cancer and/or birth defects or other reproductive harm. Wash you
hand after handling the product.
»It is your sole responsability to verify that the plug and receptacle are
clean/free of moisture and salt build up at all times. The receptacle must
be free of water, salt, calcium, and magnesium. Failure to do so may cause
re and/or loss of life.
»Do not plug into an extension cord or power strip.
»A drip loop must be used when plug into any electrical devices. A drip
loop is part of the cord hanging below the receptacle.
»The national code requires all aquarium equipment to be plugged into
a G.F.C.I. (Ground Fault Circuit Interrupter) electrical outlet. If you do
not have a G.F.C.I., have an electrician install one prior to operating any
aquarium components.
• Readandfollowallinstructionsbeforeusingthe
Acro-CalTMReactortoensureproperuseand
application.
• Usethisproductforitsintendeduseonly.
• DonotoperateAcro-CalTMReactorwithoutwater.
Doingsocancausepermanentdamagetothe
pump.
• Youmustverifythatthereceptacleiscleanandfreeofwater,
moisture,andsaltbuildupatalltimes.Failuretodosomaycause
electricalarchingresultinginreorelectricalshock.
• Priortomaintenanceonanyelectricalaquariumapplianceor
aquarium,youmustdisconnectallelectricalaquariumdevices.
• Routinemaintenanceisrequiredtoensurethemaximumperformance
andthelongevityoftheAcro-CalTMReactor.Seemaintenance
guidelines.
• Theuseofasurgesuppressorisstronglyrecommended.
max
min
min
max
min
Drip loop
Drip
Loop
GFCI
ONLY
1

ItemsRequiredforInstallation(notincluded):
• CO2Source
• CO2Regulator
• CO2CheckValve
• SiliconeTubing
• Oceanpure™CalciumReactorMedia
• pHController(recommended)
max
min
min
max
min
4. Hanger
7.Stand pipe
9. Base
8. Suction cup
bracket
5. Support grid
6. Sponge
6” Media
(not included)
10. Bubble
counter
1. Green water
intake valve
3. Blue effluent water
valve
2. White air-vent-bleed
valve
max
min
max
min
max
min
Green water intake valve
Blue effluent water valve
White air-vent-bleed valve
2
PART LIST
1. Greenwaterintakevalve
2. Whiteair-vent-bleedvalve
3. Blueefuentwatervalve
4. Hanger
5. Supportgrid
6. Sponge
7. Standpipe
8. Suctioncupbracket
9. Base
10. Bubblecounter

INSTALLATION:
1. Removethetopofthecalciumreactor.Rinsecalciumreactormedia.Placeaspongeover
thebottomsupportgrid.Addapproximately6”ofmediatothereactor.Whenaddingmedia
verifythatmediadoesnotgodownthestandpipe.Placeanotherspongeoverthetop
supportgripabovethemedia.Screwlidbackontothecalciumreactorandverifythatthe
outputisconnectedtothestandpipe.
2. Chooseoneofthefollowingwatersource(in):
a)Gravity(unitinstalledbelowaquarium):Connectapieceofsiliconetubingtothegreen
waterintakevalve,insertthelineinsidetheaquarium2”belowthewatersurface.
Thetubecanbesecureddirectlytotheoverowboxusingaziptie.
b)Pressure:Chooseanexistingpressureline.Cutthelineandplumbinatee.Thebleedline
willsupplywatertothecalciumreactor.Thebleedlinemusthaveavalveandreducedto
3/16”barb.Withthevalveclosedconnectsthesiliconetubingfromthebleedlinedirectly
tothegreenwaterintakevalve.
c)Supplypump:Useaseparatelowowpump.Reducetheoutputofthepumpto3/16”
barb.Connectsiliconetubingdirectlytothegreenwaterintakevalve.Dependingonthe
sizeofthepump,ableedlineisneededtokeepwaterowingthroughthepumpatall
times.
3. Efuentwater(out):Connectsiliconetubingtotheblueefuentwatervalve.Securetheline
tothebackoftheaquariumorsump.Thesiliconetubingmustbepositionedabovewater
levelsothatyoucanseedropletsofwater
owingfromthetube.
4. Fillbubblecounterthreequartersfullwith
freshwater.
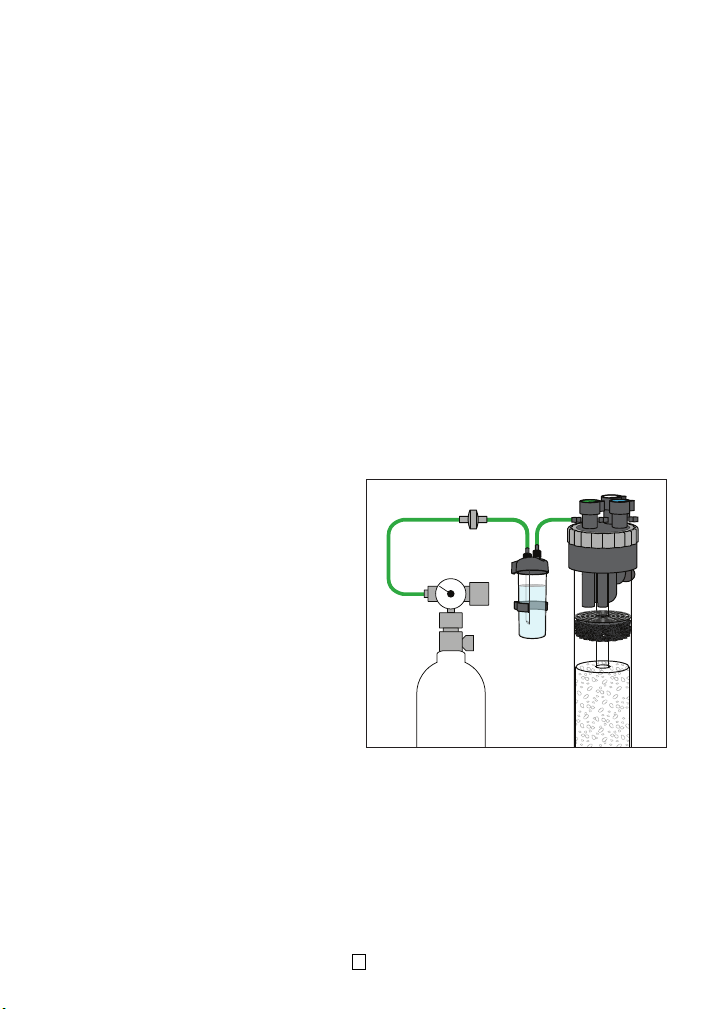
5. CO2/Waterintake(in):Attachthesilicone
tubingfromtheCO2regulatortoacheck
valvetothebubblecounterandtotheCO2
greenwaterintakevalve.Seediagrambelow.
6. Air-vent-bleed:Attachsiliconetubingtothe
whiteair-vent-bleedvalve.Securesilicone
tubingtotheaquariumorsump.Thishelp
preventsairandCO2frombuildingupatthe
topofthecalciumreactor.
7. PrimingCalciumReactor:
a)Gravity:Openthegreenwaterintake
valve.Disconnectthetubingfromthegreenwaterintakevalve,applysuctiontostarta
siphonandreattachitbacktothegreenwaterintakevalve.Keepthewhiteair-vent-bleed
valveopenuntilthecalciumreactorisfullofwater.
b)Pressure:Openthegreenwaterintakevalve,thenthewhiteair-vent-bleedvalve(this
valvemaynothavetobeopenedalltheway).Whenastrongpumpisused,thewhite
air-vent-bleedvalveonlyneedstobeopenaquarterturn.Closethewhiteair-vent-bleed
valvecompletelywhenthecalciumreactorisfullofwater.
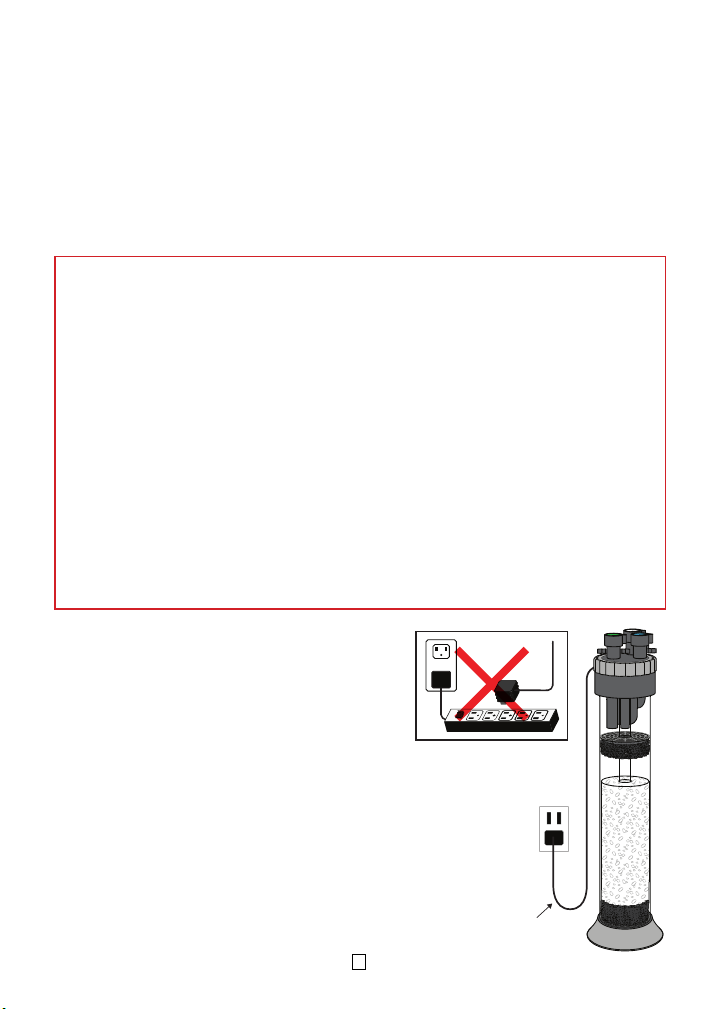
c)Supplypump:Openthegreenwaterintakevalve.PlugthepumpintoaGFCIoutlet.
Openthewhiteair-vent-bleedvalveuntilthecalciumreactorisfullofwater.
max
min
min
max
min
Bubble
Counter
Check Valve CO2 (in)
CO2
Tank
CO2Regulator
3

8. Oncethecalciumreactorisprimed,closewhiteair-vent-bleedvalve.Ifairisaccumulated
inthecalciumreactor,openwhiteair-vent-bleedvalveandleavethegreenwaterintake
valveopen.
9. Turnonthepumpandwaituntilthewaterclears.Opentheblueefuentwatervalve.Adjust
thevalvesothereisabrokenstreamofwaterdischargingfromthetube.Setthevalveas
slowaspossiblewithoutbeingabletocountanydroplets.
10. TurnontheCO2controlvalve.AdjusttheCO2regulatortoproduce60bubblespermin.
inthebubblecounterchamber.TheCO2inputisdirectlyrelatedtowaterowrate:
• ToraisepHinefuentwaterincreasewaterowordecreaseCO2
• TolowerpHinefuentwaterdecreasewateroworincreaseCO2
11. ApHmeter/controllerisrecommendedtomaintainaproperlevelofpHintheaquarium.
CollectasmallamountofefuentwaterandtestitwithapHmeter.InitiallyadjusttheCO2
atpH7.5.MonitorthepHintheaquariumandverifythatit’snotdroppingfast.IfpHdrops
rapidly,decreaseCO2immediately.Atalltimes,thepHoftheaquariumshouldbeover8.0.
TheidealpHoftheefuentwatershouldbe6.5to7.5.Ittakesapproximatelytwoweeks
tostabilizethepHoftheefuentwatertotheideallevel.Continueincreasingordecreasing
theCO2orefuentwateramountasneededtoachieveoptimumpHlevel.
12. After24hours,measurethecarbonatehardnessoftheefuentwater.Thehardnesslevel
shouldbearound12-16dKH.Calciumlevelswillincreasebuttherateitincreasesdepend
onthetypeofmediaused.OceanpureTMCalciumReactorMediaisrecommended.
13. ContinueaddingthecalciummediauntiltheCalciumReactorstartstowork.
max
min
min
max
min
max
min
max
min
max
min
CO2
Tank
2”
Top view of calcium reactor
Bubble
Counter
Drip Loop
Check Valve
CO2Regulator
Aquarium or Sump
Air-vent
H2O (out)
H2O (in)
CO2(in)
CO2(in) H2O(in)
H2O(out)
Air-vent
4
SETUP DIAGRAM
A) GRAVITY
GreenWaterIntakeValve:
CO2/H2OIn
BlueEfuentWaterValve:
H2OOut
Air-Vent-BleedValve

max
min
min
max
min
Bubble
Counter
Drip Loop
Pump
Check Valve
Aquarium or Sump
Air-vent
H2O (out)
H2O (in)
CO2 (in)
CO2
Tank
CO2Regulator
max
min
min
max
min
Valve
Bubble
Counter
Drip Loop
Check Valve
Aquarium or Sump
Main Pump
Line
Air-vent
H2O (out)
H2O (in)
CO2 (in) PVC Pipe
CO2
Tank
CO2Regulator
5
C) SUPPLY PUMP
B) PRESSURE

MAINTENANCE
1. Routinemanteinanceisrequiredtoensurethemaximumperformanceandthelongevityof
theViaAqua®Acro-CalTMCalciumReactor.
2. ForproperoperationoftheCalciumReactor,cleantheimpelleronceamonth.
a)Removethetopofthecalciumreactor.
b)Removetheimpellercover.
c)Removetheimpellerandshaft.Withasmallbrushcleantheinsideoftheimpellerand
impellercover.
d)Iftheimpellerdoesnotspineasilyontheshaft,soaktheunitwith3:1vinegarsolution.
Removeallcalciumresiduebetweentheshaftandrotor.
e)Reassemble.
3. Replacecalciummediaevery3to6monthsdependingontheusage.
4. CleantheViaAqua®Acro-CalTMCalciumReactorevery3to6monthsalongwiththewater
pump.
5. Makesureallpartsarefreeofdebrisandcalciumbuild-up.
PH CONTROLLER (RECOMMENDED)
ThepHControllerisusedtokeeptheefuentwateratapresetlevel.
Itemsneeded:
• pHcontroller
• CO2regulatorwithsolenoid
• Containerfortheefuentwater(musttpHprobe)
Installation:
• SecurethecontainertothepHprobe.
• PlugtheelectronicsolenoidintothepHcontroller.
• FollowpHcontrollermanufactureinstructionsforproperunitsetting.
IfyoustillhavequestionsabouthowtoinstallormaintaintheAcro-CalTMReactor,consult
yourlocalshstore.Continuemonitoringthewaterquality(calcium,alkalinity,efuentpH)to
ensureaproperlyworkingCalciumReactor.
6

Replacement Parts UPC 0069037
Motorhousing 29185
Replacementsponge-2pack 29222
Impeller 29239
Bubblecounter 29345
Oceanpure™CalciumReactorMedia TBA
LIMITED WARRANTY
CommodityAxis,Inc.®warrantsthattheViaAqua®Acro-CalTMCalciumReactorisfreefrom
defectsforaperiodof one year from theinitialdateofpurchase shown on the original cash
register receipt. Commodity Axis, Inc.® disclaim all other warranties, express or implied,
including but not limited to any implied warranties of merchantability and/or tness for a
particular purpose. Although this limited warranty gives you specic rights, you may have
otherrightswhichvaryfromstatetostate.Thiswarrantyisvoidifthefailureisduetomisuse,
tampering,negligence,abuse,accidentand/orsubmersion,afailuretoproperlyinstall,maintain,
clean, prelter, reassemble, and/or use the ViaAqua® Acro-CalTM Calcium Reactor with a
GroundFaultCircuitInterrupter(G.F.C.I.).
CONSUMER REMEDIES
Commodity Axis, Inc.’s entire liability and your sole and exclusive remedy shall be either
repair or replacement of the ViaAqua®Acro-CalTM Calcium Reactor only if you return the
defectiveunitdirectlytoCommodityAxis,Inc.®withtheoriginalreceiptinitsoriginalbox
alongwithfteendollars($15.00)forshippingandhandling.DonotsendtheViaAqua®Acro-
CalTMCalciumReactorbyinsuredmail.YoumaysendyourreturnsorreplacementsbyUPS
if requiring a signature upon arrival.Any replaced unit will be warranted for the remaining
timeoftheoriginalwarrantyperiod.Innoeventshallanyshippingchargesbereimbursed.In
noeventwillCommodityAxis, Inc.® be liable foranyconsequentialor incidental damages,
includingbutnotlimitedtolostsealife,personalinjury,propertydamage,damageequipment,
lostprots,lostwages,lostsavings,lostincome,etc.,arisingoutoftheuseoftheViaAqua®
Acro-CalTMCalciumReactor.Somestatesdonotallowforthelimitationorexclusionofliability
forincidentalorconsequentialdamages,sotheaboveexclusionmaynotapplytoyou.
7

Please ll out this warranty card and mail it with PROOF OF Purchase within 15
days of purchase to: Commodity Axis Inc.,
300 South Lewis Rd. Unit J. Camarillo CA 93012, USA
Name Date
Product Name Mode No
Address
City State Zip Code
Country Home Phone
Cell Phone Email
Date of Purchase Seller (Retail Name)
Seller’s Location Phone
IMPORTANT: Please make a copy of this warranty card and retain it for your records. Warranty
policy is subject to change without notice.
REGISTRATION CARD
ONE (1) YEAR WARRANTY CARD
Bringing Products to Life
300 South Lewis Rd. Unit J. Camarillo CA 93012
Fax: (888) 989 0878
www.ViaAquaOceanpure.com
Table of contents
Other ViaAqua Aquarium manuals