BorMann PRO BBP4015 User manual

Art Nr:
WWW.BORMANNTOOLS.COM
en
el
BBP4015 v2.1
036401

WWW.BORMANNTOOLS.COM
2
A
ΠΡΟΣΟΧΗ: Οι απαιτούμενες μπαταρίες και ο φορτιστής ΔΕΝ ΠΕΡΙΛΑΜΒΑΝΟΝΤΑΙ!
WARNING: Required batteries Li-Ion and charger are NOT INCLUDED!

WWW.BORMANNTOOLS.COM
3

WWW.BORMANNTOOLS.COM
4

WWW.BORMANNTOOLS.COM
5

EN
WWW.BORMANNTOOLS.COM
6
Safety instrucons
Pictograms
The followings show the symbols which may be used for the equipment. Be sure that you understand their meaning before use.
Read the instrucon manual.
Take Parcular Care And Aenon.
Only for EU countries Do not dispose of electric equipment or baery pack together with
household waste material! In observance of the European Direcves, on Waste Electric and
Electronic Equipment and Baeries and Accumulators and Waste Baeries and Accumulators
and their implementaon in accordance with naonal laws, electric equipment and baeries
and baery pack(s) that have reached the end of their life must be collected separately and
returned to an environmentally compable recycling facility.
Do not use in rain.
Wear protecve gloves.
Do not direct the jet at people including yourself, animals, and live
electrical equipments.
Wear protecve mask.
Save all warnings and instrucons for future reference. The term “power tool” in the warnings refers to your mains-operated (corded) power tool or bat-
tery-operated (cordless) power tool.
WARNING – When using this product, basic pre- cauons should always be followed, including the following:
Work area safety
1. Keep work area clean and well lit. Cluered or dark areas invite accidents.
2. Do not operate power tools in explosive atmospheres, such as in the presence of ammable liquids, gases or dust. Power tools create sparks which may
ignite the dust or fumes.
3. Keep children and bystanders away while operang a power tool. Distracons can cause you to lose control.
Personal safety
1. Stay alert, watch what you are doing and use common sense when operang a power tool. Do not use a power tool while you are red or under the inuence
of drugs, alcohol or medicaon. A moment of inaenon while operang power tools may result in serious personal injury.
2. Use personal protecve equipment. Always wear eye protecon. Protecve equipment such as dust mask, non-skid safety shoes, hard hat, or hearing pro-
tecon used for appropriate condions will reduce personal injuries.
3. Prevent unintenonal starng. Ensure the switch is in the o-posion before connecng to power source and/or baery pack, picking up or carrying the tool.
Carrying power tools with your nger on the switch or energising power tools that have the switch on invites accidents.
4. Remove any adjusng key or wrench before turning the power tool on. A wrench or a key le aached to a rotang part of the power tool may result in
personal injury.
WARNING: Read all safety warnings and all instrucons. Failure to follow the warn-
ings and instrucons may result in electric shock, re and/or serious injury.

EN
WWW.BORMANNTOOLS.COM
7
5. Do not overreach. Keep proper foong and balance at all mes. This enables beer control of the power tool in unexpected situaons.
6. Dress properly. Do not wear loose clothing or jewellery. Keep your hair, clothing, and gloves away from moving parts. Loose clothes, jewellery or long hair
can be caught in moving parts.
7. If devices are provided for the connecon of dust extracon and collecon facilies, ensure these are connected and properly used. Use of dust collecon
can reduce dust-related hazards.
Electrical safety
1. Power tool plugs must match the outlet. Never modify the plug in any way. Do not use any adapter plugs with earthed (grounded) power tools. Unmodied
plugs and matching outlets will reduce risk of electric shock.
2. Avoid body contact with earthed or grounded surfaces such as pipes, radiators, ranges and refrigerators. There is an increased risk of electric shock if your
body is earthed or grounded.
3. Do not expose power tools to rain or wet condions. Water entering a power tool will increase the risk of electric shock.
4. Do not abuse the cord. Never use the cord for carrying, pulling or unplugging the power tool. Keep cord away from heat, oil, sharp edges or moving parts.
Damaged or entangled cords increase the risk of electric shock.
5. When operang a power tool outdoors, use an extension cord suitable for outdoor use. Use of a cord suitable for outdoor use reduces the risk of electric
shock.
6. If operang a power tool in a damp locaon is unavoidable, use a ground fault circuit interrupter (GFCI) protected supply. Use of an GFCI reduces the risk of
electric shock.
Power tool use and care
1. Do not force the power tool. Use the correct power tool for your applicaon. The correct power tool will do the job beer and safer at the rate for which it
was designed.
2. Do not use the power tool if the switch does not turn it on and o. Any power tool that cannot be controlled with the switch is dangerous and must be
repaired.
3. Disconnect the plug from the power source and/or the baery pack from the power tool before making any adjustments, changing accessories, or storing
power tools. Such prevenve safety measures reduce the risk of starng the power tool accidentally.
4. Store idle power tools out of the reach of children and do not allow persons unfamiliar with the power tool or these instrucons to operate the power tool.
Power tools are dangerous in the hands of untrained users.
5. Maintain power tools. Check for misalignment or binding of moving parts, breakage of parts and any other condion that may aect the power tool’s oper-
aon. If damaged, have the power tool repaired before use. Many accidents are caused by poorly maintained power tools.
6. Keep cung tools sharp and clean. Properly maintained cung tools with sharp cung edges are less likely to bind and are easier to control.
7. Use the power tool, accessories and tool bits etc. in accordance with these instrucons, taking into account the working condions and the work to be per-
formed. Use of the power tool for operaons dierent from those intended could result in a hazardous situaon.
Baery tool use and care
1. Recharge only with the charger specied by the manufacturer. A charger that is suitable for one type of baery pack may create a risk of re when used with
another baery pack.
2. Use power tools only with specically designated baery packs. Use of any other baery packs may create a risk of injury and re.
3. When baery pack is not in use, keep it away from other metal objects, like paper clips, coins, keys, nails, screws or other small metal objects, that can make
a connecon from one terminal to another. Shorng the baery terminals together may cause burns or a re.
4. Under abusive condions, liquid may be ejected from the baery; avoid contact. If contact accidentally occurs, ush with water. If liquid contacts eyes, addi-
onally seek medical help. Liquid ejected from the baery may cause irritaon or burns.
5. Do not use a baery pack or tool that is dam- aged or modied. Damaged or modied baeries may exhibit unpredictable behaviour resulng in re, explo-
sion or risk of injury.
6. Do not expose a baery pack or tool to re or excessive temperature. Exposure to re or temperature above 130 °C may cause explosion.
7. Follow all charging instrucons and do not charge the baery pack or tool outside the temperature range specied in the instrucons. Charging improperly
or at temperatures outside the specied range may damage the baery and increase the risk of re.
Service
1. Have your power tool serviced by a qualied repair person using only idencal replacement parts. This will ensure that the safety of the power tool is main-
tained.
2. Follow instrucon for lubricang and changing accessories.
3. Keep handles dry, clean and free from oil and grease.
Sprayer safety warnings
Safety Warnings for Spraying Operaon:
1. Do not use the sprayer for any other purpose than spraying agricultural and horcultural chemicals for pest and weed control.
2. Do not use the sprayer for spraying ammable materials.
3. Be aware of any hazards presented by the material being sprayed. Consult the markings on the container or the informaon supplied by the manufacturer
of the material to be sprayed.
4. Do not spray any material where the hazard is not known.
5. Concerning the use of chemical sprays, be sure to thoroughly read the chemical instrucons, in order to become fully acquainted with toxicies and usage
methods.
6. If chemical comes into contact with skin, immediately wash thoroughly with soap.
7. Firmly close chemical tank lid to prevent leaking.
8. Never transfer chemical to another container.
9. Always thoroughly wash empty chemical containers when mixing spray liquid and then follow chemical manufacturer’s instrucons to correctly dispose of
containers at all mes.
10. Before using the sprayer, be sure to check there are no abnormalies, such as displacement of packing from connector, looseness of screws, missing com-
ponents, and/or cracked/worn/damaged hose. Using an incomplete sprayer may cause an accident and/or injury.
11. People not involved in spraying should refrain from approaching the work-site during spraying.
12. When transporng a chemical-loaded sprayer by vehicle, there is a risk of leaking, so always rmly ghten the chemical tank lid, and secure the sprayer in

EN
WWW.BORMANNTOOLS.COM
8
Warning: DO NOT let comfort or familiarity with product (gained from repeated
use) replace strict adherence to safety rules for the subject product. MISUSE or
failure to follow the safety rules stated in this instrucon manual may cause serious
personal injury.
Warning: Only use genuine Bormann Pro baeries. Use of non-genuine Bormann
Pro baeries, or baeries that have been altered, may result in the baery bursng
causing res, personal injury and damage. It will also void the Bormann Pro warran-
ty for the Bormann Pro tool and charger.
an upright posion.
13. Never use items such as strongly acidic chemicals, paints, thinners, gasoline or benzene with the sprayer, as there is a danger of burns or re.
14. Do not clean the sprayer with ammable solvents.
15. Be sure to select the appropriate chemical (taking into consideraon usage method and eecveness) to deal with the pest or weed in queson.
16. An inappropriately mixed chemical may harm humans as well as damage crops/plants. When mixing chemical, thoroughly read chemical instrucons, and
dilute chemical correctly prior to use.
17. Always mix chemical before loading it into tank.
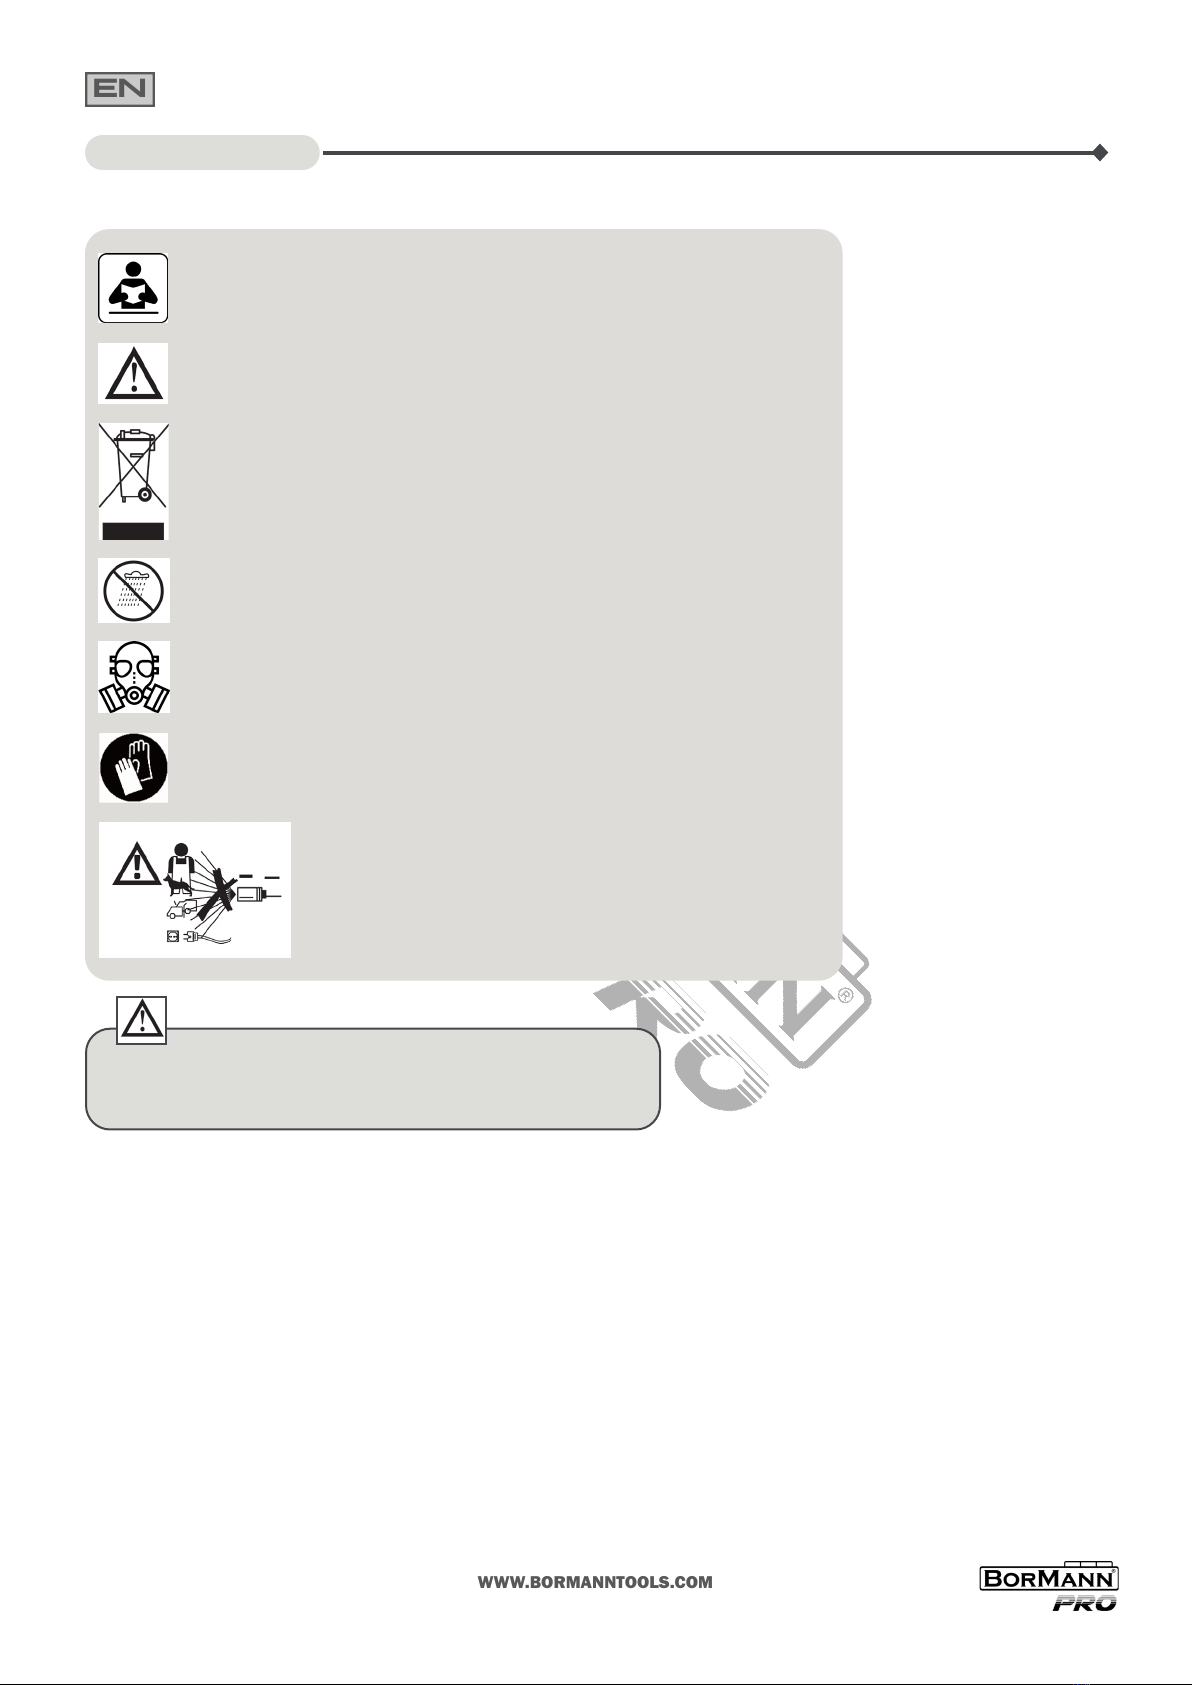
18. To prevent inhalaon and/or contact with chemical, be sure to wear safety clothing(hat, protecve goggles, protecve mask, rubber gloves, long-sleeved
pest-control jacket, long trousers and gumboots), so that skin is not exposed when spraying.
19. Always load the tank with chemical or clean water when operang the sprayer, as operang the sprayer with an empty tank may damage the pump.
20. If the sprayer stops running, or an abnormal sound is emied, immediately switch OFF the sprayer, and disconnue use.
21. Constantly be aware of wind direcon while spraying, to ensure spraying from upwind to downwind, in order to prevent direct chemical contact with body.
Also, be careful to keep chemical from reaching surroundings, and stop using the sprayer when the wind is strong.
22. As there is a risk of chemical poisoning when spraying in a greenhouse, always venlate while spraying.
23. Avoid spraying when atmospheric temperature is high.
24. Avoid prolonged operaon of sprayer. Whenever possible, rotate operators.
25. If even a slight headache or dizziness, etc., occurs, stop spraying work immediately, and consult a doctor. Moreover, be sure to clearly inform the doctor of
the name of the agrochemical being used, and the operang circumstances.
26. In cases where spray status deteriorates and nozzle needs cleaning, there is a risk of the chemical liquid coming into contact with the face, so be sure to
switch OFF the sprayer, and then remove the nozzle to clean.
27. Be sure to dispose of wastewater generated from washing used containers and chemical tank appropriately in a locaon where it will not ow into rivers
and streams and/or contaminate groundwater.
28. Aer spraying, if chemical remains in the chemical tank, spray hose, spray pipe and nozzle, it may cause spray injury. Be sure to fully wash away residual
chemical with clean water - in parcular, aer spraying with herbicide.
29. Keep agrochemicals away from children. Be sure to store residual chemicals in chemical- designated storage containers.
30. Aer compleon of spraying, be sure to wash (spray wash) equipment with clean water, drain o the washing water, and store indoors away from direct
sunlight and freezing temperatures, and out of reach of children.
31. Aer compleon of spraying, be sure to thoroughly wash enre body with soap, rinse eyes, and gargle. During spraying period, change clothes daily.
Important safety instrucons for baery cartridge
1. Before using baery cartridge, read all instrucons and cauonary markings on (1) baery charger, (2) baery, and (3) product using baery.
2. Do not disassemble baery cartridge.
3. If operang me has become excessively shorter, stop operang immediately. It may result in a risk of overheang, possible burns and even an explosion.
4. If electrolyte gets into your eyes, rinse them out with clear water and seek medical aenon right away. It may result in loss of your eyesight.
5. Do not short the baery cartridge:
(1) Do not touch the terminals with any conducve material.
(2) Avoid storing baery cartridge in a container with other metal objects such as nails, coins, etc.
(3) Do not expose baery cartridge to water or rain.
A baery short can cause a large current ow, overheang, possible burns and even a breakdown.
6. Do not store the tool and baery cartridge in locaons where the temperature may reach or exceed 50 °C (122 °F).
7. Do not incinerate the baery cartridge even if it is severely damaged or is completely worn out. The baery cartridge can explode in a re.
8. Be careful not to drop or strike baery.
9. Do not use a damaged baery.
10. The contained lithium-ion baeries are subject to the Dangerous Goods Legislaon requirements. For commercial transports e.g. by third pares, forward-
ing agents, special requirement on pack- aging and labelling must be observed. For preparaon of the item being shipped, consulng an expert for hazardous
material is required. Please also observe possibly more detailed naonal regulaons. Tape or mask o open contacts and pack up the baery in such a manner
that it cannot move around in the packaging.
11. When disposing the baery cartridge, remove it from the tool and dispose of it in a safe place. Follow your local regulaons relang to disposal of baery.
12. Use the baeries only with the products specied by Bormann Pro. Installing the baeries to non-compliant products may result in a re, excessive heat,
explosion, or leak of electrolyte.
13. If the tool is not used for a long period of me, the baery must be removed from the tool.
SAVE THESE INSTRUCTIONS.

EN
WWW.BORMANNTOOLS.COM
9
1. Nozzle
2. Spray Pipe
3. Chemical Tank Lid
4. Spray Pipe Holder
5. Chemical Tank
6. Lever Cock
7. Cover
8. Water Hose
9. Power Switch
10. Buon Of Baery Cartridge
11. Battery Cartridge*
12. Baery Cartridge Cover
13. Plasc buckle
14. Bolt
15. Back Cushion
16. Back Strap
17. Various nozzles
A
Descripon of main parts
Intended use
This tool is intended for spraying agricultural and horcultural chemicals for pest and weed control.
Funconal descripon
Tips for maintaining maximum baery life
1. Charge the baery cartridge before completely discharged. Always stop tool operaon and charge the baery cartridge when you noce less tool power.
2. Never recharge a fully charged baery cartridge. Overcharging shortens the baery service life.
3. Charge the baery cartridge with room temperature at 5 °C - 45 °C. Let a hot baery cartridge cool down before charging it.
4. Charge the baery cartridge if you do not use it for a long period (more than six months).
* The manufacturer reserves the right to make minor changes to product design and technical speci-
caons without prior noce unless these changes signicantly aect the performance and safety of the
products. The parts described / illustrated in the pages of the manual that you hold in your hands may also
concern other models of the manufacturer's product line with similar features and may not be included
in the product you just acquired.
* Please note that our equipment has not been designed for use in commercial, trade or industrial appli-
caons. Our warranty will be voided if the machine is used in commercial, trade or industrial businesses
or for equivalent purposes.
* To ensure the safety and reliability of the product and the warranty validity, all repair, inspecon, repair
or replacement work, including maintenance and special adjustments, must only be carried out by tech-
nicians of the authorized service department of the manufacturer.
Cauon: Always be sure that the tool is switched o and the baery cartridge is
removed before adjusng or checking funcon on the tool.
CAUTION: Always install the baery cartridge ful-
ly. If not, it may accidentally fall out of the tool,
causing injury to you or someone around you.
CAUTION: Do not install the baery cartridge for-
cibly. If the cartridge does not slide in easily, it is
not being inserted correctly.
CAUTION: Be sure to lock the cover before oper-
ang.
CAUTION: Always switch o the tool before in-
stalling or removing of the baery cartridge.
CAUTION: Hold the tool and the baery cartridge
rmly when installing or removing baery car-
tridge. Failure to hold the tool and the baery
cartridge rmly may cause them to slip o your
hands and result in damage to the tool and bat-
tery cartridge and a personal injury.
Installing or removing baery cartridge
1. To install the baery cartridge, open the cover while pushing the plasc buckle. Align the tongue
on the baery cartridge with the groove in the housing and slip it into place. Insert it all the way unl
it locks in place with a lile click. Aer installing or removing the baery cartridges, be sure to close
the cover.
2. To remove the baery cartridges, Slide the baery cartridge while pressing the buon on the
front of the cartridge.
Fig.1
1. Cover
2. Plasc buckle
Fig.2
1. Buon
2. Baery cartridge
Tool/Baery protecon system
The tool is equipped with a baery protecon system. This system automacally cuts o power to the
motor to extend baery life. The tool will automacally stop during operaon if the tool and/or baery
are placed under one of the following condions:
Overload protecon: The tool is operated in a manner that causes it to draw an abnormally high
current. In this situaon, turn the tool o and stop the applicaon that caused the tool to become
overloaded. Then turn the tool on to restart. If the tool does not start, the baery is overheated. In
this situaon, let the baery cool before turning the tool on again.
Overheat protecon: When the tool/baery is overheated, the tool stops automacally. In this situa-
on, let the tool/baery cool before turning the tool on again.
Over-discharge protecon: The remaining baery capacity is too low and the tool will not operate. In
this situaon, remove and recharge the baery.
CAUTION: For more informaon regarding the
operaon of the baery and charger please refer
to the instrucons manual of the baery charger.
Make sure to read all the instrucons before us-
ing this device.
* Not included with all models.

EN
WWW.BORMANNTOOLS.COM
10
CAUTION: Before installing the baery cartridge
into the tool, always check to see that the tool is
switched o.
NOTICE: Do not turn the power switch forcibly.
This may cause the switch to malfuncon.
Cauon: Always be sure that the tool is switched
o and the baery cartridge is removed before
carrying out any work on the tool.
Cauon: Tighten the bolt clockwise rmly.
NOTICE: 1. Firmly aach components to ensure
there is no leaking.
2. All connector units use packing. Before as-
sembly, always check to see that the units have
packing.
3. Check to make sure that the spray hose is not
cracked, worn and/or damaged.
4. If there is a leak from a connector unit, ghten
further using a hand tool (by approximately 45
degrees).
5. Do not use a spray pipe that is longer than the
standard one provided. Doing so may cause leak-
ing from connector units.
Switch acon
Power switch
1. To start the tool, Press down the power switch toward the “I (ON)” posion.
2. To stop the tool, Press down the power switch toward the “O (OFF)” posion.
Fig. 5
1. Power switch
Assembly instrucons
Connecng/disconnecng the Water hose
1. To connect the water hose, Insert the end of the water hose into the hole of the handle grip as far
as it can go.
Fig. 6
1. End of the water hose
2. Handle grip
3. Hole of the handle grip
4. Water hose
5. Nut
2. Pull the nut of the water hose on and then ghten the nut clockwise as far as it can go.
3. To disconnect the water hose, follow the connect procedure in reverse.
Connecng/disconnecng the spray pipe
1. To connect the spray pipe, turn the spray pipe clockwise while screwing it onto the screw thread of the handle grip as far as it can go.
2. To disconnect the spray pipe, follow the connect procedure in reverse.
Fig. 9
1. Spray pipe
2. Handle grip
3. Screw thread of the handle grip
Fig. 12
1. Bolt
2. Back cushion
Fig. 13-15
1. Fixed link 2. Chemical tank 3. Back strap
4. Plasc Buckle 5. Metal buckle
Connecng/disconnecng the nozzle
1. Select nozzle according to type of spraying to be done.
2. To connect the nozzle, turn the nozzle clockwise while screwing it onto the screw thread of the
Spray pipe as far as it can go.
3. To disconnect the nozzle, follow the connect procedure in reverse.
Fig. 11
1. Nozzle
2. Spray pipe
3. Screw thread of the spray pipe
Installing/uninstalling the back cushion
1. To uninstall the back cushion. Loosen total four bolt anclockwise with the T30 star head screw bit.
Remove the bolt and back cushion in order.
Back strap aaching method
To install the back strap, Use the diagram
pointers to aach the back strap at top and
boom, making sure there are no twists in
the strap.
For top aaching

EN
WWW.BORMANNTOOLS.COM
11
For boom aaching
Please refer to Fig.16 - Fig17.
Back strap adjusng method
1. Adjust back strap to a length that brings the sprayer as close to the body as feasibly possible.
2. Lengthening strap
(1) Li up buckle.
(2) Pull the belt on the side connected to the sprayer 3. Shortening strap (1) Pull the belt on the free side.
Fig. 18
1. Adjust buckle
Installing /Uninstalling the spray pipe holder (Fig.19-20)
1. The tank holder post serves as a temporary holder for the chemical tank lid.
2. To install the spray pipe holder, directly insert it into the tank holder post.
3. To uninstall the spray pipe holder, directly remove it from the tank holder post.
When you suspend the operaon, you can temporarily place the Spray pipe on the spray pipe holder as shown in the gure.
CAUTION: Check to make sure that back strap is
securely and rmly aached to chemical tank.
CAUTION: Before inserng the baery cartridge
into the tool, always check to see that the tool is
switched o.
CAUTION: To prevent sudden spraying, be sure
to set the lever cock to STOP, before turning
sprayer switch ON or OFF.
CAUTION: When spray work is interrupted, be
sure to turn switch OFF, to prevent inadvertent
spraying.
CAUTION: Be sure to check the situaon of sur-
roundings before turning sprayer switch ON.
NOTICE:
• Check to make sure the tank is loaded with chemical or clean water when operang the spray-
er as connued operaon of the sprayer with an empty tank may burn out the pump.
• Running the sprayer for prolonged periods with the lever cock closed may have an adverse
eect on the pump as well as drain the baery. Be sure to turn sprayer switch OFF whenever
possible.
• If spray spluers, or pumps suddenly screeches, the chemical tank is empty, so immediately
turn sprayer switch OFF. Do not spray with the baery cover open and/or with the back-support
cushioning removed, as there is a risk of damage to electrical system. Moreover, do not spray
poinng the spray nozzle at the sprayer.
• Do not forcibly handle the lever cock and/or the spray pipe.
CAUTION: Never use Kelthane water dispersible powder (acaricide) because it tends to harden due to heat generated by pump during operaon, which
causes the pump to stop. Use a Kelthane emulsion, Akar emulsion or Osadan water dispersible powder as the acaricide.
CAUTION: When using a water dispersible powder or lime sulfur, be sure to dissolve well prior to use.
CAUTION: Take maximum care when handling chemicals. Wash away thoroughly if chemical comes into contact with body.
CAUTION: Chemicals are harmful. Always adhere to chemical manufacturer instrucons when handling chemicals.
Fig. 21
1. Tank holder post
2. Chemical tank lid
3. Spray pipe holder
4. Spray pipe
Operang instrucons
How to use the lever cock (Fig.22-23)
1. Depress buon of the lever cock to spray, Release it to stop.
2. For connuous operaon, a connuous operaon posion is provided.
Depress buon of the lever cock and then push it forward to lock on and backward to lock o.
Fig.23
1. Lever cock
2. Lock o
3. Lock on
Spraying
While spraying ,always hold the handle grip rmly. Once spraying is complete, immediately set
lever cock to STOP, and then turn the power switch OFF.
Adjusng the intensity of spraying (Fig. 24)
While spraying ,you can adjust the intensity of spraying through ghtening or loosening the adjust
nut. Clockwise to increase and anclockwise to reduce.
Fig.24
1. Adjust nut
Mixing chemicals

EN
WWW.BORMANNTOOLS.COM
12
CAUTION: When changing chemical, be sure to
carefully wash the tank, pump, and nozzle, etc.
with clean water. Residue of the previous chemi-
cal may cause a spray injury. Moreover, if chem-
icals mix, a chemical change may occur, with the
danger of generang a toxic gas.
CAUTION: Be sure to wear protecve gloves.
CAUTION: Do not change chemical in poorly ven-
lated locale. (prevent chemical poisoning).
CAUTION: See the following chart for rao informaon that is useful when dilung chemicals.
CAUTION: Never spray chemicals undiluted.
CAUTION: When using a water dispersible powder, etc., dissolve thoroughly in a container such as a bucket.
Chemical
Diluon rao
500 1,000 2,000
4 L 8 mL 4 mL 2 mL
6 L 12 mL 6 mL 3 mL
8 L 16 mL 8 mL 4 mL
10 L 20 mL 10 mL 5 mL
12 L 24 mL 12 mL 6 mL
15 L 30 mL 15 mL 7.5 mL
Water
Main plant diseases and pests
Always adhere to chemical manufacturer instrucons when handling chemicals. Thoroughly dissolve chemical prior to use.
Chemical replenishment
Check to make sure the sprayer switch is OFF and replenish chemical tank with mixed chemical.
When lling tank with chemical, always strain chemical through equipped tank strainer. The side of
the chemical tank is marked with scale divisions, so be sure to use these as operaon guidelines.
Firmly ghten chemical tank lid to prevent leaking.
CAUTION: Pull out the strainer carefully make
sure not to snap the water hose.
CAUTION: Always be sure that the tool is switched
o and baery cartridge is removed before at-
tempng to perform inspecon or maintenance.
CAUTION: For inspecon and maintenance, al-
ways wear protecve gloves.
NOTICE: Never use gasoline, benzine, thinner, al-
cohol or the like. Discolouraon, deformaon or
cracks may result.
Maintenance
To maintain product SAFETY and RELIABILITY, repairs, any other maintenance or adjustment should
be performed by Bormann Pro Authorized or Factory Service Centers, always using Bormann Pro
replacement parts.
Aer-use maintenance
• Aer use, remove residual liquid from chemical tank, and wash away clinging chemical from inside
of tank using clean water.
• Now ll up chemical tank with clean water and run the sprayer for 2 to 3 minutes to wash out
residual chemical from the pump, hose, and nozzle, etc.
• Remove the residual liquid from inside the chemical tank, restart the pump, and run the sprayer
unl residual liquid ceases to come out of the nozzle, and then turn sprayer switch OFF.
• Wipe away moisture and dirt from equipment, and then check for damage and leaks.
Daily checks
• Before work, check to see whether or not fastened units are loose and components are missing.
• Check to make sure the spray hose is not cracked, worn and/or damaged.
• Aer use, always be sure to wipe dirt o of exterior, and to check for damage and/or leaks.
Cleaning water absorpon strainer
1. Aer removing chemical from tank, remove the water absorpon strainer at the boom of the
tank.
2. Open the cap and remove dirt and debris from the inside of the strainer.

EN
WWW.BORMANNTOOLS.COM
13
NOTICE: This is a lter used to prevent dirt and
dust (that for some reason has got passed the
tank strainer into the tank) from geng into the
pump. If the water absorpon strainer becomes
blocked, spraying will deteriorate, and there is a
risk of the pump being adversely aected.
NOTICE: To maintain the opmal performance,
clean the strainer periodically.
CAUTION: Store the Garden Sprayer out of reach of children, in an indoor locale that does not freeze, is away from direct sunlight, and has good venlaon.
Take full care in storing the sprayer, as, in some cases, the plasc components will deteriorate markedly if le in direct sunlight for a prolonged period;
moreover, product cauon labels will discolour and/or come o.
NOTICE:
• Wash the equipment using the aer-use maintenance procedures.
• In parcular, when storing during the winter season, breakdown or damage may occur due to freezing of residual chemical and/or washing water in the
pump. Run the pump unl all residual liquid has exited from the nozzle, check to make sure there is no more residual liquid, turn the sprayer switch OFF,
and then store the sprayer away.
NOTICE: Spraying deteriorates if the lever cock
strainer becomes blocked.
NOTICE: Firmly aach components to ensure
there is no leaking.
Fig.25-27
1. Water hose
2. Water absorpon strainer
3. Tank
4. Cap
3. To install the strainer, follow the uninstall procedure in reverse.
Cleaning lever cock strainer (Fig.28-29)
1. Loosen the nut on the handle grip anclockwise as far as it can go and remove the lever cock
strainer from hole of the handle grip.
2. Remove dirt and debris from the inside of the strainer.
Fig.28-29
1. Nut on the handle grip
2. Handle grip
3. Lever cock strainer
3. To install the strainer, follow the uninstall procedure in reverse.
Cleaning tank strainer (Fig.30-31 )
1. Turn it anclockwise to open the Chemical tank lid and take out the tank strainer to remove dirt
and debris from the inside of the strainer.
2. To install the strainer, follow the uninstall procedure in reverse.
Fig. 31
1. Chemical tank lid
2. Tank strainer
Storage
Hook the metal buckle (Fig. 32)
You can hook the metal buckle onto the tank aer use or before storing.
Technical data
Baery type: 20V Li-ion
Tank capacity: 15L
Water ow: ≥1.3L/min (with twin spray nozzle)
Max. Pressure: ≥0.3Mpa
Working current: 1.5A
Spray nozzle hole: 1.6mm
Spray pole length: 800mm (two shas)
* The manufacturer reserves the right to make minor changes to product design and technical
specicaons without prior noce unless these changes signicantly aect the performance and
safety of the products. The parts described / illustrated in the pages of the manual that you hold in
your hands may also concern other models of the manufacturer's product line with similar features
and may not be included in the product you just acquired.
* Please note that our equipment has not been designed for use in commercial, trade or industrial
applicaons. Our warranty will be voided if the machine is used in commercial, trade or industrial
businesses or for equivalent purposes.
* To ensure the safety and reliability of the product and the warranty validity, all repair, inspecon,
repair or replacement work, including maintenance and special adjustments, must only be carried
out by technicians of the authorized service department of the manufacturer.

EN
WWW.BORMANNTOOLS.COM
14
Troubleshoong
Before asking for repairs, conduct your own inspecon rst. If you nd a problem that is not explained in the manual, do not aempt to dismantle the tool.
Instead, ask Bormann Pro Authorized Service Centers, always using Bormann Pro replacement parts for repairs.
Malfuncon status Cause Acon
SwitchOFF The switch is OFF Turn switch ON
Motor (pump) will not work Switch ON Baery problem (under voltage) Recharge
If recharging is not eecve, replace
baery.
Wiring connector is disconnected Request an overhaul
Wiring break Request an overhaul
Switch breakdown Request an overhaul
Motor breakdown Request an overhaul
Blown fuse Request an overhaul
Pump is working but spray is not coming out Blocked nozzle Clean or replace
No liquid in chemical tank Replenish
Chemical tank lid’s blowhole is
blocked
Clean
Blocked piping Request an overhaul
Broken or cracked piping Request an overhaul
Disconnected or broken piping Request an overhaul
Blocked water absorpon strainer Remove and clean
Sprayer sprays but is abnormal or spray pressure is weak Chemical tank lid’s blowhole is
blocked
Clean
Blocked piping Request an overhaul
Broken or cracked piping Request an overhaul
Disconnected or broken piping Request an overhaul
Blocked water absorpon strainer Remove and clean
Blocked lever cock strainer Remove and clean
Abnormal pressure regulator Request an overhaul
Worn gear case Request an overhaul
A strange sound is emied when switch is turned ON Coupling that drives pump is broken Request an overhaul
Blocked nozzle Clean or replace
When sprayer is le aer being switched OFF, a large amount of liquid ows
out of the nozzle.
Lever cock is set to connuous spray Set lever cock to STOP

WWW.BORMANNTOOLS.COM
15
EL
Οδηγίες ασφαλείας
Εικονογράμματα κινδύνου
Τα ακόλουθα εικονογράμματα κινδύνου εμφανίζονται εντός του εγχειριδίου αλλά και επικολλημένα σε τμήματα του εξοπλισμού. Βεβαιωθείτε ότι έχετε
κατανοήσει τη σημασία τους πριν από τη χρήση.
Διαβάστε προσεκτικά το εγχειρίδιο χρήσης.
Δώστε ιδιαίτερη προσοχή.
Μόνο για τις χώρες της ΕΕ: Μην απορρίπτετε τον ηλεκτρικό εξοπλισμό ή τη συστοιχία μπα-
ταριών μαζί με οικιακά απορρίμματα! Τηρώντας τις ευρωπαϊκές οδηγίες, για τα απόβλητα
ηλεκτρικού και ηλεκτρονικού εξοπλισμού και μπαταριών και συσσωρευτών και τα απόβλητα
μπαταριών και συσσωρευτών και την εφαρμογή τους σύμφωνα με τους εθνικούς κανονι-
σμούς, ο ηλεκτρικός εξοπλισμός και οι μπαταρίες που έχουν φτάσει στο τέλος της ζωής τους
πρέπει να συλλέγονται χωριστά και να επιστρέφονται σε περιβαλλοντικά συμβατές εγκατα-
στάσεις ανακύκλωσης.
Μην το χρησιμοποιείτε σε βροχή.
Φοράτε ειδικά γάντια προστασίας.
Μην κατευθύνετε τον πίδακα σε ανθρώπους, συμπεριλαμβανομέ-
νου του εαυτού σας, σε ζώα και σε ηλεκτροφόρο εξοπλισμό.
Φοράτε ειδική μάσκα προστασίας.
Αποθηκεύστε όλες τις προειδοποιήσεις και τις οδηγίες για μελλοντική αναφορά. Ο όρος "ηλεκτρικό εργαλείο" στις προειδοποιή-
σεις αναφέρεται στο ηλεκτρικό εργαλείο που λειτουργεί με ηλεκτρικό ρεύμα του δικτύου (ενσύρματο) ή με μπαταρία (ασύρματο).
ΠΡΟΕΙΔΟΠΟΙΗΣΗ - Κατά τη χρήση αυτού του προϊόντος, θα πρέπει πάντα να ακολουθούνται οι βασικοί κανόνες ασφαλείας, συμπεριλαμβανομένων των
ακόλουθων:
Ασφάλεια στο χώρο εργασίας
1. Διατηρείτε το χώρο εργασίας καθαρό και καλά φωτισμένο. Οι ακατάστατοι ή σκοτεινοί χώροι προσκαλούν ατυχήματα.
2. Μην χρησιμοποιείτε ηλεκτρικά εργαλεία σε εκρηκτικές ατμόσφαιρες, όπως παρουσία εύφλεκτων υγρών, αερίων ή σκόνης. Τα ηλεκτρικά εργαλεία δημι-
ουργούν σπινθήρες που μπορεί να αναφλέξουν τη σκόνη ή τις αναθυμιάσεις.
3. Κρατήστε τα παιδιά και τους παρευρισκόμενους μακριά κατά τη λειτουργία ηλεκτρικού εργαλείου. Η απόσπαση της προσοχής μπορεί να προκαλέσει
απώλεια ελέγχου.
Προσωπική ασφάλεια
1. Να είστε σε εγρήγορση, να προσέχετε τι κάνετε και να χρησιμοποιείτε την κοινή λογική όταν χειρίζεστε ένα ηλεκτρικό εργαλείο. Μην χρησιμοποιείτε
ηλεκτρικά εργαλεία όταν είστε κουρασμένοι ή υπό την επήρεια ναρκωτικών, αλκοόλ ή φαρμάκων. Μια στιγμή απροσεξίας κατά το χειρισμό ηλεκτρικών
εργαλείων μπορεί να οδηγήσει σε σοβαρό προσωπικό τραυματισμό.
2. Χρησιμοποιείτε εξοπλισμό ατομικής προστασίας. Φοράτε πάντα γυαλιά ή μάσκα προστασίας για τα μάτια. Η χρήση εξοπλισμού ατομικής προστασίας,
όπως η μάσκα προστασίας από την σκόνη, τα αντιολισθητικά παπούτσια ασφαλείας, το κράνος εργασίας ή τα ακουστικά προστασίας ανάλογα με τις απαι-
ΠΡΟΕΙΔΟΠΟΙΗΣΗ: Διαβάστε όλες τις προειδοποιήσεις ασφαλείας και όλες τις
οδηγίες. Η μη τήρηση των προειδοποιήσεων και των οδηγιών μπορεί να προκαλέσει
ηλεκτροπληξία, πυρκαγιά ή/και σοβαρό τραυματισμό.

WWW.BORMANNTOOLS.COM
16
EL
τήσεις της εκάστοτε εργασίας θα μειώσει τους προσωπικούς τραυματισμούς.
3. Αποτρέψτε την ακούσια εκκίνηση. Βεβαιωθείτε ότι ο διακόπτης βρίσκεται στη θέση απενεργοποίησης πριν από τη σύνδεση με την πηγή ρεύματος ή/και
τη μπαταρία, την συγκράτηση ή τη μεταφορά του εργαλείου. Η μεταφορά ηλεκτρικών εργαλείων με το δάχτυλο στο διακόπτη ή η ενεργοποίηση ηλεκτρικών
εργαλείων που έχουν το διακόπτη ενεργοποιημένο προσκαλεί ατυχήματα.
4. Αφαιρέστε οποιοδήποτε κλειδί ρύθμισης ή κλειδί πριν ενεργοποιήσετε το ηλεκτρικό εργαλείο. Ένα εργαλείο ή ειδικότερα ένα κλειδί που παραμένει
συνδεδεμένο σε ένα περιστρεφόμενο μέρος του ηλεκτρικού εργαλείου μπορεί να προκαλέσει τραυματισμό.
5. Μην τεντώνεστε με σκοπό να χρησιμοποιήσετε το εργαλείο σε δυσπρόσιτα σημεία. Διατηρείτε πάντα σταθερή στάση του σώματος και την ισορροπία
σας. Αυτό επιτρέπει τον καλύτερο έλεγχο του ηλεκτρικού εργαλείου σε απροσδόκητες καταστάσεις.
6. Ντυθείτε με τον κατάλληλο ρουχισμό. Μην φοράτε φαρδιά ρούχα ή κοσμήματα. Κρατήστε τα μαλλιά, τα ρούχα και τα γάντια σας μακριά από τα κινούμε-
να μέρη. Τα χαλαρά ρούχα, τα κοσμήματα ή τα μακριά μαλλιά μπορεί να πιαστούν στα κινούμενα μέρη.
7. Εάν παρέχονται συσκευές για τη σύνδεση συστημάτων αναρρόφησης και συλλογής σκόνης, βεβαιωθείτε ότι αυτές είναι συνδεδεμένες και χρησιμοποιού-
νται σωστά. Η χρήση των συστημάτων συλλογής σκόνης μπορεί να μειώσει τους κινδύνους που σχετίζονται με τη σκόνη.
Ηλεκτρική ασφάλεια
1. Τα βύσματα των ηλεκτρικών εργαλείων πρέπει να ταιριάζουν με την πρίζα. Ποτέ μην τροποποιείτε το βύσμα με οποιονδήποτε τρόπο. Μην χρησιμοποιεί-
τε αντάπτορες με γειωμένα ηλεκτρικά εργαλεία. Τα μη τροποποιημένα βύσματα και οι κατάλληλες πρίζες θα μειώσουν τον κίνδυνο ηλεκτροπληξίας.
2. Αποφύγετε την επαφή του σώματος με γειωμένες επιφάνειες, όπως σωλήνες, θερμαντικά σώματα, εστίες και ψυγεία. Υπάρχει αυξημένος κίνδυνος
ηλεκτροπληξίας εάν το σώμα σας γειώνεται.
3. Μην εκθέτετε τα ηλεκτρικά εργαλεία σε βροχή ή σε συνθήκες με υψηλά ποσοστά υγρασίας. Η είσοδος νερού σε ένα ηλεκτρικό εργαλείο αυξάνει τον
κίνδυνο ηλεκτροπληξίας.
4. Προστατεύστε το καλώδιο και το βύσμα τροφοδοσίας από μηχανικές καταπονήσεις. Ποτέ μη χρησιμοποιείτε το καλώδιο για τη μεταφορά, το τράβηγμα
ή την αποσύνδεση του ηλεκτρικού εργαλείου. Κρατήστε το καλώδιο μακριά από θερμότητα, λάδι, αιχμηρές άκρες ή κινούμενα μέρη. Τα κατεστραμμένα ή
μπλεγμένα καλώδια αυξάνουν τον κίνδυνο ηλεκτροπληξίας.
5. Όταν χρησιμοποιείτε ένα ηλεκτρικό εργαλείο σε εξωτερικό χώρο, χρησιμοποιήστε ένα καλώδιο προέκτασης κατάλληλο για εξωτερική χρήση. Η χρήση
καλωδίου κατάλληλου για εξωτερική χρήση μειώνει τον κίνδυνο ηλεκτροπληξίας.
6. Εάν η λειτουργία ενός ηλεκτρικού εργαλείου σε χώρο με υψηλά ποσοστά υγρασίας είναι αναπόφευκτη, χρησιμοποιήστε παροχή με προστασία από
σφάλμα γείωσης (GFCI). Η χρήση ενός GFCI μειώνει τον κίνδυνο ηλεκτροπληξίας.
Χρήση και φροντίδα ηλεκτρικών εργαλείων
1. Μην αφήνετε το ηλεκτρικό εργαλείο να υπερφορτώνεται. Χρησιμοποιήστε το κατάλληλο ηλεκτρικό εργαλείο για την εκάστοτε εργασία. Το κατάλληλο
ηλεκτρικό εργαλείο θα κάνει τη δουλειά καλύτερα και ασφαλέστερα με τον ρυθμό για τον οποίο έχει σχεδιαστεί.
2. Μην χρησιμοποιείτε το ηλεκτρικό εργαλείο εάν ο διακόπτης δεν το ενεργοποιεί και δεν το απενεργοποιεί. Κάθε ηλεκτρικό εργαλείο που δεν μπορεί να
ελεγχθεί με το διακόπτη είναι επικίνδυνο και πρέπει να επισκευαστεί.
3. Αποσυνδέστε το βύσμα από την πηγή ρεύματος και/ή τη μπαταρία από το ηλεκτρικό εργαλείο προτού προβείτε σε ρυθμίσεις, αλλάξετε εξαρτήματα ή
αποθηκεύσετε τα ηλεκτρικά εργαλεία. Αυτά τα προληπτικά μέτρα ασφαλείας μειώνουν τον κίνδυνο ακούσιας ενεργοποίησης/εκκίνησης του ηλεκτρικού
εργαλείου.
4. Αποθηκεύετε τα αδρανή ηλεκτρικά εργαλεία μακριά από παιδιά και μην επιτρέπετε σε άτομα που δεν είναι εξοικειωμένα με το ηλεκτρικό εργαλείο ή τις
παρούσες οδηγίες να χειρίζονται το ηλεκτρικό εργαλείο. Τα ηλεκτρικά εργαλεία είναι επικίνδυνα στα χέρια μη εκπαιδευμένων χρηστών.
5. Συντηρείτε τα ηλεκτρικά εργαλεία. Ελέγχετε για κακή ευθυγράμμιση ή μπλοκάρισμα των κινούμενων μερών, εξαρτήματα που έχουν υποστεί βλάβη και
κάθε άλλη κατάσταση που μπορεί να επηρεάσει τη λειτουργία του ηλεκτρικού εργαλείου. Εάν έχει υποστεί βλάβη, επισκευάστε το ηλεκτρικό εργαλείο πριν
από τη χρήση. Πολλά ατυχήματα προκαλούνται από κακώς συντηρημένα ηλεκτρικά εργαλεία.
6. Διατηρείτε τα εργαλεία κοπής αιχμηρά και καθαρά. Τα σωστά συντηρημένα κοπτικά εργαλεία με αιχμηρές ακμές κοπής είναι λιγότερο πιθανό να μπλο-
καριστούν και ελέγχονται ευκολότερα.
7. Χρησιμοποιείτε το ηλεκτρικό εργαλείο, τα εξαρτήματα και τα εργαλεία κ.λπ. σύμφωνα με τις παρούσες οδηγίες, λαμβάνοντας υπόψη τις συνθήκες
εργασίας και την εργασία που πρόκειται να εκτελεστεί. Η χρήση του ηλεκτρικού εργαλείου για εργασίες διαφορετικές από τις προβλεπόμενες μπορεί να
οδηγήσει σε τραυματισμό ή πρόκληση βλάβης.
Χρήση και φροντίδα εργαλείων μπαταρίας
1. Επαναφορτίζετε τις μπαταρίες χρησιμοποιώντας μόνο τον φορτιστή που καθορίζεται από τον κατασκευαστή. Ένας φορτιστής που είναι κατάλληλος για
έναν τύπο μπαταρίας μπορεί να δημιουργήσει κίνδυνο πυρκαγιάς όταν χρησιμοποιείται με μη-συμβατές μπαταρίες.
2. Χρησιμοποιείτε ηλεκτρικά εργαλεία μόνο σε συνδυασμό με τις ειδικά σχεδιασμένες μπαταρίες που προορίζονται για αυτά. Η χρήση μη-συμβατών μπα-
ταριών μπορεί να δημιουργήσει κίνδυνο τραυματισμού και πυρκαγιάς.
3. Όταν οι μπαταρίες δεν χρησιμοποιούνται, κρατήστε τες μακριά από άλλα μεταλλικά αντικείμενα, όπως συνδετήρες, κέρματα, κλειδιά, καρφιά, βίδες ή
άλλα μικρά μεταλλικά αντικείμενα, που μπορούν να δημιουργήσουν σύνδεση μεταξύ των ακροδεκτών. Το βραχυκύκλωμα των ακροδεκτών της μπαταρίας,
λόγω της μεταξύ τους σύνδεσης, μπορεί να προκαλέσει εγκαύματα ή πυρκαγιά.
4. Υπό συνθήκες μη-προβλεπόμενης χρήσης, μπορεί να εκτοξευτεί υγρό από την μπαταρία, αποφύγετε την επαφή. Εάν συμβεί κατά λάθος επαφή, ξε-
πλύνετε με νερό. Εάν το υγρό έρθει σε επαφή με τα μάτια, αναζητήστε επιπλέον ιατρική βοήθεια. Το υγρό που εκτοξεύεται από την μπαταρία μπορεί να
προκαλέσει ερεθισμό ή εγκαύματα.
5. Μη χρησιμοποιείτε μπαταρίες ή εργαλεία που έχουν υποστεί βλάβη ή μετατροπές. Οι κατεστραμμένες ή τροποποιημένες μπαταρίες ενδέχεται να πα-
ρουσιάσουν μη προβλεπόμενη λειτουργία με αποτέλεσμα να προκληθεί πυρκαγιά, έκρηξη ή κίνδυνος τραυματισμού.
6. Μην εκθέτετε μια μπαταρία ή ένα εργαλείο σε φωτιά ή σε υπερβολική θερμοκρασία. Η έκθεση σε φωτιά ή σε θερμοκρασία άνω των 130°C μπορεί να
προκαλέσει έκρηξη.
7. Ακολουθήστε όλες τις οδηγίες φόρτισης και μην φορτίζετε τις μπαταρίες ή το εργαλείο εκτός του εύρους θερμοκρασίας που καθορίζεται στις οδηγίες. Η
ακατάλληλη φόρτιση ή η φόρτιση σε θερμοκρασίες εκτός του καθορισμένου εύρους μπορεί να προκαλέσει ζημιά στην μπαταρία και να αυξήσει τον κίνδυνο
πυρκαγιάς.
Επισκευή και συντήρηση
1. Αναθέστε τη συντήρηση του ηλεκτρικού εργαλείου σας σε εξειδικευμένο επισκευαστή, χρησιμοποιώντας μόνο γνήσια ανταλλακτικά. Με τον τρόπο αυτό
θα διασφαλιστεί ότι το ηλεκτρικό εργαλείο διατηρείται σε καλή και ασφαλή λειτουργική κατάσταση.
2. Ακολουθήστε τις οδηγίες σχετικά με τη λίπανση και την αλλαγή των εξαρτημάτων.
3. Διατηρείτε τις λαβές στεγνές, καθαρές και απαλλαγμένες από λάδια και γράσο.

WWW.BORMANNTOOLS.COM
17
EL
Προειδοποίηση: ΜΗΝ αφήνετε την εμπειρία ή την εξοικείωση με το προϊόν (που αποκτήθηκε από την
επανειλημμένη χρήση) να αντικαταστήσει την αυστηρή τήρηση των κανόνων ασφαλείας για το συγκε-
κριμένο προϊόν. Η ΛΑΝΘΑΣΜΕΝΗ ΧΡΗΣΗ ή η μη τήρηση των κανόνων ασφαλείας που αναφέρονται στο
παρόν εγχειρίδιο οδηγιών μπορεί να προκαλέσει σοβαρό προσωπικό τραυματισμό.
Σημαντικές οδηγίες ασφαλείας σχετικά με τις μπαταρίες
1. Πριν από τη χρήση της μπαταρίας, διαβάστε όλες τις οδηγίες και τις προειδοποιητικές σημάνσεις (1) στο φορτιστή μπαταρίας, (2) στην μπαταρία και (3)
στο προϊόν που χρησιμοποιεί την μπαταρία.
2. Μην αποσυναρμολογείτε την μπαταρία.
3. Εάν ο χρόνος λειτουργίας έχει μειωθεί υπερβολικά, διακόψτε αμέσως τη λειτουργία. Αυτό μπορεί να έχει ως αποτέλεσμα τον κίνδυνο υπερθέρμανσης,
πιθανών εγκαυμάτων ή ακόμα και έκρηξης.
4. Εάν ο ηλεκτρολύτης μπει στα μάτια σας, ξεπλύνετε τα με καθαρό νερό και αναζητήστε αμέσως ιατρική βοήθεια. Μπορεί να έχει ως αποτέλεσμα την
Ειδικές οδηγίες ασφαλείας (ψεκαστήρες)
1. Μην χρησιμοποιείτε τον ψεκαστήρα για κανέναν άλλο σκοπό εκτός από τον ψεκασμό γεωργικών και κηπευτικών χημικών ουσιών για την καταπολέμηση
παρασίτων και ζιζανίων.
2. Μην χρησιμοποιείτε τον ψεκαστήρα για τον ψεκασμό εύφλεκτων υλικών.
3. Να γνωρίζετε τυχόν κινδύνους που παρουσιάζονται από το υλικό που ψεκάζεται. Συμβουλευτείτε τις σημάνσεις και τα αυτοκόλλητα που βρίσκονται
επικολλημένα στο δοχείο ή τις πληροφορίες που παρέχονται από τον κατασκευαστή του προς ψεκασμό υλικού.
4. Μην ψεκάζετε υλικά των οποίων τα συστατικά δεν γνωρίζετε ή αν δεν έχετε διαβάσει τις οδηγίες ασφαλείας του κατασκευαστή του.
5. Όσον αφορά στη χρήση χημικών ψεκασμών, φροντίστε να διαβάσετε διεξοδικά τις οδηγίες χρήσης του χημικού, προκειμένου να εξοικειωθείτε πλήρως
με τις τοξικότητες και τις μεθόδους χρήσης.
6. Εάν η χημική ουσία έρθει σε επαφή με το δέρμα, πλύνετε αμέσως σχολαστικά με σαπούνι.
7. Κλείστε καλά το καπάκι της δεξαμενής χημικών για να αποφύγετε τη διαρροή.
8. Ποτέ μην μεταγγίζετε τα χημικά σε άλλα δοχεία με σκοπό την αποθήκευσή τους.
9. Πλένετε πάντα καλά τα άδεια δοχεία χημικών όταν αναμιγνύετε τα χημικά και στη συνέχεια ακολουθείτε τις οδηγίες του κατασκευαστή των χημικών για
τη σωστή απόρριψη των δοχείων.
10. Πριν από τη χρήση του ψεκαστήρα, βεβαιωθείτε ότι δεν υπάρχουν ορατές βλάβες, όπως η μετατόπιση των συνδέσμων, η αποσύσφιξη των βιδών, έλλει-
ψη εξαρτημάτων ή/και ραγισμένος/φθαρμένος/καταστραμμένος εύκαμπτος σωλήνας (λάστιχα). Η χρήση ενός ψεκαστήρα, υπό αυτές τις συνθήκες, μπορεί
να προκαλέσει ατύχημα ή/και τραυματισμό.
11. Άτομα που δεν εμπλέκονται στον ψεκασμό θα πρέπει να αποφεύγουν να πλησιάζουν στο χώρο εργασίας κατά τη διάρκεια του ψεκασμού.
12. Κατά τη μεταφορά με όχημα, ενός ψεκαστήρα φορτωμένου με χημικά, υπάρχει κίνδυνος διαρροής, γι' αυτό σφίγγετε πάντα καλά το καπάκι της δεξαμε-
νής χημικών και βεβαιωθείτε πως ο ψεκαστήρας βρίσκεται σταθεροποιημένος σε όρθια θέση.
13. Μη χρησιμοποιείτε ποτέ αντικείμενα όπως ισχυρά όξινα χημικά, χρώματα, διαλυτικά, βενζίνη ή βενζόλιο με τον ψεκαστήρα, καθώς υπάρχει κίνδυνος
εγκαυμάτων ή πυρκαγιάς.
14. Μην καθαρίζετε τον ψεκαστήρα με εύφλεκτους διαλύτες.
15. Βεβαιωθείτε ότι έχετε επιλέξει το κατάλληλο χημικό (λαμβάνοντας υπόψη τη μέθοδο χρήσης και την αποτελεσματικότητα) για την αντιμετώπιση του
συγκεκριμένου παρασίτου ή ζιζανίου.
16. Μια ακατάλληλα αναμεμειγμένη χημική ουσία μπορεί να προκαλέσει προβλήματα υγείας καθώς και να προκαλέσει ζημιά στις καλλιέργειες/φυτά. Κατά
την ανάμειξη χημικών, διαβάστε προσεκτικά τις οδηγίες χρήσης των χημικών και αραιώστε σωστά τα χημικά πριν από τη χρήση.
17. Να αναμιγνύετε πάντα τη χημική ουσία πριν την μεταγγίσετε στη δεξαμενή.
18. Για να αποφύγετε την εισπνοή ή/και την επαφή με το χημικό, φροντίστε να χρησιμοποιείτε εξοπλισμό ατομικής προστασίας (καπέλο, ειδικά γυαλιά,
γάντια και μάσκα προστασίας, ειδική μακρυμάνικη μπλούζα, μακρύ παντελόνι και γαλότσες), ώστε να μην εκτίθεται το δέρμα κατά τον ψεκασμό.
19. Πάντα να γεμίζετε τη δεξαμενή με χημικό ή καθαρό νερό όταν χρησιμοποιείτε τον ψεκαστήρα, καθώς η λειτουργία του ψεκαστήρα με άδεια δεξαμενή
μπορεί να προκαλέσει βλάβη στην αντλία.
20. Εάν ο ψεκαστήρας σταματήσει να λειτουργεί ή εκπέμπεται ένας μη φυσιολογικός ήχος, απενεργοποιήστε αμέσως τον ψεκαστήρα και διακόψτε την
λειτουργία.
21. Να έχετε συνεχώς επίγνωση της κατεύθυνσης του ανέμου κατά τον ψεκασμό, ώστε να διασφαλίζεται ο ψεκασμός προς την σωστή κατεύθυνση με βάση
την κατεύθυνση του ανέμου, προκειμένου να αποφεύγεται η άμεση επαφή του χημικού με το σώμα. Επίσης, προσέξτε να μην φτάνει η χημική ουσία σε
επιφάνειες που δεν και σταματήστε τη χρήση του ψεκαστήρα όταν ο άνεμος είναι ισχυρός.
22. Καθώς υπάρχει κίνδυνος χημικής δηλητηρίασης κατά τον ψεκασμό σε θερμοκήπιο, αερίζετε πάντα τον χώρο κατά τον ψεκασμό.
23. Αποφύγετε τον ψεκασμό όταν η θερμοκρασία της ατμόσφαιρας είναι υψηλή.
24. Αποφύγετε την παρατεταμένη λειτουργία του ψεκαστήρα. Όποτε είναι δυνατόν, εναλλάσσετε τους χειριστές.
25. Εάν εμφανιστεί έστω και ελαφρύς πονοκέφαλος ή ζάλη κ.λπ. σταματήστε αμέσως τις εργασίες ψεκασμού και συμβουλευτείτε γιατρό. Επιπλέον, φροντί-
στε να ενημερώσετε σαφώς τον γιατρό για την ονομασία του χημικού που χρησιμοποιείται, καθώς και για τις συνθήκες λειτουργίας.
26. Σε περιπτώσεις που η κατάσταση ψεκασμού επιδεινώνεται και το ακροφύσιο χρειάζεται καθαρισμό, υπάρχει κίνδυνος το χημικό υγρό να έρθει σε επα-
φή με το πρόσωπο, γι' αυτό φροντίστε να απενεργοποιήσετε τον ψεκαστήρα και στη συνέχεια να αφαιρέσετε το ακροφύσιο για να το καθαρίσετε.
27. Βεβαιωθείτε ότι τα λύματα που παράγονται από το πλύσιμο των χρησιμοποιημένων δοχείων και της δεξαμενής χημικών διατίθενται κατάλληλα σε
σημείο όπου δεν θα καταλήγουν σε ποτάμια και ρυάκια ή/και δεν θα μολύνουν τα υπόγεια ύδατα.
28. Μετά τον ψεκασμό, εάν το χημικό παραμένει στη δεξαμενή χημικών, στον εύκαμπτο σωλήνα ψεκασμού, στον σωλήνα ψεκασμού και στο ακροφύσιο,
μπορεί να προκαλέσει τραυματισμό από τον ψεκασμό. Φροντίστε να ξεπλένετε πλήρως τα υπολείμματα χημικών ουσιών με καθαρό νερό - ιδίως μετά τον
ψεκασμό με ζιζανιοκτόνο.
29. Κρατήστε τα αγροχημικά μακριά από τα παιδιά. Φροντίστε να αποθηκεύετε τα υπολείμματα των χημικών ουσιών σε δοχεία αποθήκευσης που προορί-
ζονται για χημικά.
30. Μετά την ολοκλήρωση του ψεκασμού, φροντίστε να πλύνετε (έκπλυση μέσω ψεκασμού) τον εξοπλισμό με καθαρό νερό, αποστραγγίστε το νερό έκπλυ-
σης και αποθηκεύστε τον σε εσωτερικό χώρο μακριά από άμεσο ηλιακό φως και θερμοκρασίες ψύχους και μακριά από παιδιά.
31. Μετά την ολοκλήρωση του ψεκασμού, φροντίστε να πλύνετε σχολαστικά ολόκληρο το σώμα σας με σαπούνι, ξεπλύνετε τα μάτια και το στόμα σας.
Κατά τη διάρκεια της περιόδου ψεκασμού, αλλάζετε καθημερινά ρούχα.

WWW.BORMANNTOOLS.COM
18
EL
Προειδοποίηση: Χρησιμοποιείτε μόνο τις γνήσιες μπαταρίες Bormann Pro. Η χρήση μη γνήσιων μπαταριών
Bormann Pro ή μπαταριών που έχουν τροποποιηθεί, μπορεί να οδηγήσει σε έκρηξη της μπαταρίας προκαλώ-
ντας πυρκαγιά, τραυματισμό και ζημιές. Θα οδηγήσει επίσης και στην ακύρωση της εγγύησης της εταιρείας
για το εργαλείο και τον φορτιστή.
Συμβουλές για τη διατήρηση της μέγιστης διάρκειας ζωής της μπαταρίας
1. Φορτίστε την μπαταρία πριν αποφορτιστεί εντελώς. Διακόπτετε πάντα τη λειτουργία του εργαλείου και φορτίζετε την μπαταρία όταν παρατηρείτε μειω-
μένη ισχύ του εργαλείου.
2. Ποτέ μην επαναφορτίζετε μια πλήρως φορτισμένη μπαταρία. Η υπερφόρτιση μειώνει τη διάρκεια ζωής της μπαταρίας.
3. Φορτίζετε την μπαταρία με θερμοκρασία δωματίου στους 5 °C - 45 °C. Αφήστε την ζεσταμένη μπαταρία να κρυώσει πριν τη φορτίσετε.
4. Φορτίστε την μπαταρία εάν δεν τη χρησιμοποιείτε για μεγάλο χρονικό διάστημα (περισσότερο από έξι μήνες).
1. Ακροφύσιο
2. Αυλός ψεκασμού
3. Καπάκι δοχείου
4. Στήριγμα αυλού
5. Δοχείο ψεκαστήρα
6. Λεβιές τροφοδοσίας
7. Κάλυμμα
8. Λάστιχο ψεκασμού
9. Διακόπτης ισχύος*
10. Κουμπί απασφάλισης
11. Μπαταρία*
12. Καπάκι θήκης μπαταριών
13. Μάνδαλο ασφάλισης
14. Βίδα
15. Μαξιλάρι πλάτης
16. Ιμάντες
17. Ακροφύσια
A
Περιγραφή βασικών τμημάτων
*Ο κατασκευαστής διατηρεί το δικαίωμα να πραγματοποιήσει δευτερεύουσες αλλαγές στο σχεδιασμό
του προϊόντος και στα τεχνικά χαρακτηριστικά χωρίς προηγούμενη ειδοποίηση, εκτός εάν οι αλλαγές αυ-
τές επηρεάζουν σημαντικά την απόδοση και λειτουργία ασφάλειας των προϊόντων. Τα εξαρτήματα που
περιγράφονται / απεικονίζονται στις σελίδες του εγχειριδίου που κρατάτε στα χέρια σας ενδέχεται να
αφορούν και σε άλλα μοντέλα της σειράς προϊόντων του κατασκευαστή, με παρόμοια χαρακτηριστικά,
και ενδέχεται να μην περιλαμβάνονται στο προϊόν που μόλις αποκτήσατε.
* Λάβετε υπόψη ότι ο εξοπλισμός μας δεν έχει σχεδιαστεί για χρήση σε εμπορικές, επαγγελματικές
ή βιομηχανικές εφαρμογές. Η εγγύησή μας θα ακυρωθεί αν το προϊόν χρησιμοποιείται σε εμπορικές,
επαγγελματικές ή βιομηχανικές επιχειρήσεις ή για ανάλογους σκοπούς.
* Για να διασφαλιστεί η ασφάλεια και η αξιοπιστία του προϊόντος καθώς και η ισχύς της εγγύησης όλες οι
εργασίες επιδιόρθωσης, ελέγχου, επισκευής ή αντικατάστασης συμπεριλαμβανομένης της συντήρησης
και των ειδικών ρυθμίσεων, πρέπει να εκτελούνται μόνο από τεχνικούς του εξουσιοδοτημένου τμήματος
Service του κατασκευαστή.
απώλεια της όρασής σας.
5. Μην βραχυκυκλώνετε την μπαταρία:
(1) Μην αγγίζετε τους ακροδέκτες με οποιοδήποτε αγώγιμο υλικό.
(2) Αποφύγετε την αποθήκευση της μπαταρίας σε δοχείο με άλλα μεταλλικά αντικείμενα, όπως καρφιά, κέρματα κ.λπ.
(3) Μην εκθέτετε την μπαταρία σε νερό ή βροχή.
Ένα βραχυκύκλωμα της μπαταρίας μπορεί να προκαλέσει μεγάλη ροή ρεύματος, υπερθέρμανση, πιθανά εγκαύματα και ακόμη και βλάβη.
6. Μην αποθηκεύετε το εργαλείο και την μπαταρία σε μέρη όπου η θερμοκρασία μπορεί να φτάσει ή να ξεπεράσει τους 50 °C (122 °F).
7. Μην αποτεφρώνετε την μπαταρία, ακόμη και αν έχει υποστεί σοβαρή ζημιά ή έχει φθαρεί εντελώς. Η μπαταρία μπορεί να εκραγεί σε περίπτωση πυρκα-
γιάς.
8. Προστατεύστε την μπαταρία από κινδύνους πτώσης ή σύνθλιψης.
9. Μην χρησιμοποιείτε μια κατεστραμμένη μπαταρία.
10. Οι μπαταρίες ιόντων λιθίου υπόκεινται στις απαιτήσεις της νομοθεσίας για τα επικίνδυνα εμπορεύματα. Για εμπορικές μεταφορές π.χ. από τρίτους,
μεταφορείς, πρέπει να τηρούνται ειδικές απαιτήσεις σχετικά με τη συσκευασία και την επισήμανση. Για την προετοιμασία του αντικειμένου που μεταφέ-
ρεται, απαιτείται η συμβουλή ενός ειδικού για επικίνδυνα υλικά. Λάβετε επίσης υπόψη σας πιθανώς λεπτομερέστερους εθνικούς κανονισμούς. Κολλήστε
ταινία ή καλύψτε τις ανοιχτές επαφές και συσκευάστε την μπαταρία με τέτοιο τρόπο ώστε να μην μπορεί να μετακινηθεί μέσα στη συσκευασία.
11. Κατά την απόρριψη της μπαταρίας, αφαιρέστε την από το εργαλείο και απορρίψτε την με τον προβλεπόμενο τρόπο. Ακολουθήστε τους τοπικούς κανο-
νισμούς που αφορούν την απόρριψη/ανακύκλωση της μπαταρίας.
12. Χρησιμοποιείτε τις μπαταρίες μόνο με τα προϊόντα που καθορίζονται από την Bormann Pro. Η τοποθέτηση των μπαταριών σε μη συμβατά προϊόντα
μπορεί να οδηγήσει σε πυρκαγιά, υπερβολική θερμότητα, έκρηξη ή διαρροή ηλεκτρολύτη.
13. Εάν το εργαλείο δεν χρησιμοποιείται για μεγάλο χρονικό διάστημα, η μπαταρία πρέπει να αφαιρεθεί από το εργαλείο.
ΦΥΛΑΞΤΕ ΑΥΤΕΣ ΤΙΣ ΟΔΗΓΙΕΣ.
*Δεν περιλαμβάνεται
Σκοπούμενη χρήση
Αυτό το εργαλείο προορίζεται για τον ψεκασμό γεωργικών και κηπευτικών χημικών ουσιών για τον έλεγχο παρασίτων και ζιζανίων.

WWW.BORMANNTOOLS.COM
19
EL
Περιγραφή λειτουργίας
Προσοχή: Βεβαιωθείτε ότι το εργαλείο είναι απενεργοποιημένο και ότι η μπατα-
ρία έχει αφαιρεθεί πριν από τη ρύθμιση ή τον έλεγχο της λειτουργίας του εργα-
λείου.
ΠΡΟΣΟΧΗ: Τοποθετείτε πάντα την μπαταρία
πλήρως. Εάν δεν το κάνετε, μπορεί να απασφα-
λιστεί και να πέσει από το εργαλείο, προκαλώ-
ντας τραυματισμό σε εσάς ή σε τρίτους.
ΠΡΟΣΟΧΗ: Μην πιέζετε την μπαταρία ασκώντας
υπερβολική δύναμη. Εάν η μπαταρία δεν ολι-
σθαίνει εύκολα σημαίνει πως δεν τοποθετείται
σωστά.
ΠΡΟΣΟΧΗ: Βεβαιωθείτε ότι έχετε ασφαλίσει το
κάλυμμα πριν από τη λειτουργία.
ΠΡΟΣΟΧΗ: Πάντα να απενεργοποιείτε το εργα-
λείο πριν από την τοποθέτηση ή την αφαίρεση
της μπαταρίας.
ΠΡΟΣΟΧΗ: Κρατήστε σταθερά το εργαλείο και
την μπαταρία κατά την σύνδεση ή την αφαίρεση
της μπαταρίας. Εάν δεν κρατάτε σταθερά το
εργαλείο και την μπαταρία, μπορεί να γλιστρή-
σουν από τα χέρια σας και να προκληθεί ζημιά
στο εργαλείο και την μπαταρία του καθώς και
τραυματισμός.
Σύνδεση ή αφαίρεση της μπαταρίας
1. Για να τοποθετήσετε την μπαταρία, ανοίξτε το κάλυμμα πιέζοντας το πλαστικό μάνδαλο. Ευθυ-
γραμμίστε τη γλώσσα της μπαταρίας με την εσοχή στο περίβλημα και τοποθετήστε την στη θέση της.
Τοποθετήστε την μέχρι τέρμα μέχρι να ασφαλίσει στη θέση της με ένα μικρό "κλικ". Αφού τοποθετή-
σετε ή αφαιρέσετε τις μπαταρίες, φροντίστε να κλείσετε το κάλυμμα.
2. Για να αφαιρέσετε τις μπαταρίες, τραβήξτε την μπαταρία ενώ πιέζετε το κουμπί στο μπροστινό
μέρος της μπαταρίας.
Εικ.1
1. Κάλυμμα
2. Πλαστικό μάνδαλο
Εικ.2
1. Κουμπί απασφάλισης
2. Μπαταρία
Σύστημα προστασίας μπαταρίας/εργαλείου
Το εργαλείο είναι εξοπλισμένο με σύστημα προστασίας της μπαταρίας. Αυτό το σύστημα διακόπτει
αυτόματα την τροφοδοσία του η/κ για να παρατείνει τη διάρκεια ζωής της μπαταρίας. Το εργαλείο θα
σταματήσει αυτόματα κατά τη διάρκεια της λειτουργίας, εάν το εργαλείο ή/και η μπαταρία βρεθούν
σε μία από τις ακόλουθες συνθήκες:
Προστασία από υπερφόρτωση: Ο τρόπος λειτουργίας του εργαλείου προκαλεί υπερφόρτωση λόγω
του υψηλού φορτίου. Σε αυτή την περίπτωση, απενεργοποιήστε το εργαλείο και σταματήστε την
εργασία που προκάλεσε την υπερφόρτωση του εργαλείου. Στη συνέχεια, ενεργοποιήστε το εργαλείο
και δοκιμάστε εκ νέου. Εάν το εργαλείο δεν ενεργοποιείται, σημαίνει πως η μπαταρία έχει υπερ-
θερμανθεί. Σε αυτή την περίπτωση, αφήστε την μπαταρία να κρυώσει πριν ενεργοποιήσετε ξανά το
εργαλείο.
Προστασία υπερθέρμανσης: Όταν το εργαλείο/η μπαταρία υπερθερμανθεί, το εργαλείο σταματά
αυτόματα. Σε αυτή την περίπτωση, αφήστε το εργαλείο/μπαταρία να κρυώσει πριν ενεργοποιήσετε
ξανά το εργαλείο.
Προστασία από υπερβολική εκφόρτιση: Η υπολειπόμενη χωρητικότητα της μπαταρίας είναι πολύ
χαμηλή και το εργαλείο δεν λειτουργεί. Σε αυτή την περίπτωση, αφαιρέστε και επαναφορτίστε την
μπαταρία.
ΠΡΟΣΟΧΗ: Για περισσότερες πληροφορίες σχε-
τικά με τη λειτουργία της μπαταρίας και του
φορτιστή ανατρέξτε στο εγχειρίδιο οδηγιών
του φορτιστή μπαταρίας. Βεβαιωθείτε ότι έχετε
διαβάσει όλες τις οδηγίες πριν χρησιμοποιήσετε
αυτή τη συσκευή.
ΠΡΟΣΟΧΗ: Πριν από την τοποθέτηση της μπατα-
ρίας στο εργαλείο, ελέγχετε πάντα αν το εργα-
λείο είναι απενεργοποιημένο.
ΣΗΜΕΙΩΣΗ: Μην γυρίζετε τον διακόπτη ασκώ-
ντας υπερβολική δύναμη. Αυτό μπορεί να προ-
καλέσει πρόβλημα λειτουργίας στον διακόπτη.
Λειτουργία διακόπτη
Διακόπτης ισχύος
1. Για να ενεργοποιήσετε το εργαλείο, πιέστε προς τα κάτω το διακόπτη προς τη θέση "I (ON)".
2. Για να απενεργοποιήσετε το εργαλείο, πιέστε προς τα κάτω τον διακόπτη προς τη θέση "O (OFF)".
Εικ. 5
1. Διακόπτης ισχύος
Προσοχή: Βεβαιωθείτε ότι το εργαλείο είναι
απενεργοποιημένο και ότι η μπαταρία έχει
αφαιρεθεί πριν εκτελέσετε οποιαδήποτε εργα-
σία στο εργαλείο.
Οδηγίες συναρμολόγησης
Σύνδεση/αποσύνδεση του σωλήνα νερού
1. Για να συνδέσετε το σωλήνα νερού, εισάγετε πλήρως το άκρο του σωλήνα νερού στην οπή της
χειρολαβής.
Εικ. 6
1. Άκρο του σωλήνα νερού
2. Χειρολαβή
3. Οπή της χειρολαβής
4. Σωλήνας νερού
5. Παξιμάδι

WWW.BORMANNTOOLS.COM
20
EL
2. Τραβήξτε το παξιμάδι του σωλήνα νερού και, στη συνέχεια, σφίξτε το παξιμάδι δεξιόστροφα
μέχρι τέρμα.
3. Για να αποσυνδέσετε το σωλήνα νερού, ακολουθήστε τη διαδικασία σύνδεσης αντίστροφα.
Σύνδεση/αποσύνδεση του σωλήνα (λάστιχο) ψεκασμού
1. Για να συνδέσετε το σωλήνα ψεκασμού, γυρίστε το σωλήνα ψεκασμού δεξιόστροφα, ενώ τον βιδώνετε στο σπείρωμα της χειρολαβής μέχρι τέρμα.
2. Για να αποσυνδέσετε το σωλήνα ψεκασμού, ακολουθήστε τη διαδικασία σύνδεσης αντίστροφα.
ΣΗΜΕΙΩΣΗ: 1. Συνδέστε καλά τα εξαρτήματα
για να διασφαλίσετε ότι δεν υπάρχει διαρροή.
2. Όλα τα σημεία σύνδεσης χρησιμοποιούν
τσιμούχες. Πριν από τη συναρμολόγηση, να
ελέγχετε πάντα αν οι μονάδες διαθέτουν
τσιμούχες.
3. Ελέγξτε για να βεβαιωθείτε ότι ο σωλήνας
ψεκασμού δεν είναι ραγισμένος, φθαρμένος ή/
και κατεστραμμένος.
4. Εάν υπάρχει διαρροή από μια μονάδα σύνδε-
σης, σφίξτε περισσότερο χρησιμοποιώντας ένα
εργαλείο χειρός (κατά περίπου 45 μοίρες).
5. Μην χρησιμοποιείτε σωλήνα ψεκασμού που
είναι μακρύτερος από τον τυποποιημένο που
παρέχεται. Κάτι τέτοιο μπορεί να προκαλέσει
διαρροή από τις μονάδες σύνδεσης.
Εικ. 9
1. Σωλήνας ψεκασμού
2. Χειρολαβή
3. Βιδωτό σπείρωμα της χειρολαβής
Σύνδεση/αποσύνδεση του ακροφυσίου
1. Επιλέξτε το κατάλληλο ακροφύσιο ανάλογα με τον τύπο ψεκασμού που πρόκειται να γίνει.
2. Για να συνδέσετε το ακροφύσιο, γυρίστε το ακροφύσιο δεξιόστροφα, ενώ το βιδώνετε στο σπεί-
ρωμα του σωλήνα ψεκασμού μέχρι τέρμα.
3. Για να αποσυνδέσετε το ακροφύσιο, ακολουθήστε τη διαδικασία σύνδεσης αντίστροφα.
Εικ. 11
1. Ακροφύσιο
2. Σωλήνας ψεκασμού
3. Βιδωτό σπείρωμα του σωλήνα ψεκασμού
Εγκατάσταση/απεγκατάσταση του μαξιλαριού πλάτης
1. Για να αφαιρέσετε το μαξιλάρι πλάτης. Χαλαρώστε όλες τις βίδες αριστερόστροφα με το βιδωτό
εργαλείο T30 με αστεροειδή κεφαλή. Αφαιρέστε την βίδα και το πίσω μαξιλάρι με τη σειρά.
Εικ. 12
1. Βίδα
2. Μαξιλάρι πλάτης
Προσοχή: Σφίξτε καλά την βίδα δεξιόστροφα.
Εικ. 13-15
1. Σταθερός σύνδεσμος 2. Δεξαμενή χημικών 3. Ιμάντας πλάτης
4. Πλαστική πόρπη 5. Μεταλλική πόρπη
Μέθοδος πρόσδεσης ιμάντα πλάτης
Για να τοποθετήσετε τον πίσω ιμάντα, χρησιμοποιήστε τους
δείκτες της εικόνας για να συνδέσετε τον ιμάντα πλάτης στο
πάνω και στο κάτω μέρος, φροντίζοντας να μην υπάρχουν
συστροφές στον ιμάντα.
Για τοποθέτηση στην κορυφή
Για το κάτω μέρος
Ανατρέξτε στις Εικ.16 - Εικ17.
Μέθοδος ρύθμισης του ιμάντα πλάτης
1. Ρυθμίστε τον ιμάντα πλάτης σε μήκος που φέρνει τον ψεκαστήρα όσο το δυνατόν πιο κοντά στον κορμό.
2. Ιμάντας επιμήκυνσης
(1) Σηκώστε την πόρπη προς τα πάνω.
(2) Τραβήξτε τον ιμάντα στην πλευρά που είναι συνδεδεμένη με τον ψεκαστήρα 3. Ιμάντας μείωσης του μήκους (1) Τραβήξτε τον ιμάντα από την ελεύθερη
πλευρά.
Εικ. 18
1. Ρύθμιση της πόρπης
Σύνδεση / αφαίρεση του στηρίγματος του σωλήνα ψεκασμού (Εικ.19-20)
1. Το στήριγμα της δεξαμενής χρησιμεύει ως προσωρινή βάση για το καπάκι της δεξαμενής χημικών.
2. Για να εγκαταστήσετε το στήριγμα του σωλήνα ψεκασμού, τοποθετήστε το απευθείας στο στύλο στήριξης του δοχείου.
3. Για να απεγκαταστήσετε το στήριγμα του σωλήνα ψεκασμού, αφαιρέστε το απευθείας από το στύλο στήριξης δοχείου.
Όταν αναστέλλετε τη λειτουργία, μπορείτε να τοποθετήσετε προσωρινά τον σωλήνα ψεκασμού στον υποδοχέα σωλήνα ψεκασμού, όπως φαίνεται στο
σχήμα.
ΠΡΟΣΟΧΗ: Ελέγξτε για να βεβαιωθείτε ότι ο
ιμάντας πλάτης είναι καλά και σταθερά στερεω-
μένος στη δεξαμενή χημικών.
Εικ. 21
1. Στύλος υποδοχής δεξαμενής
2. Καπάκι δεξαμενής χημικών
3. Στήριγμα σωλήνα ψεκασμού
4. Σωλήνας ψεκασμού
This manual suits for next models
1
Table of contents
Languages:
Other BorMann Paint Sprayer manuals

BorMann
BorMann Pro BPG9200 User manual

BorMann
BorMann BAT6140 User manual

BorMann
BorMann Pro BAP7000 User manual

BorMann
BorMann BAT1300 User manual

BorMann
BorMann Pro BAP7000 User manual

BorMann
BorMann Lite Series User manual

BorMann
BorMann BEA5000 User manual

BorMann
BorMann BPG9000 User manual

BorMann
BorMann BPG7000 User manual

BorMann
BorMann Pro BPG9200 User manual