Harford Attachments Safelock User manual

MECHANICAL QUICK COUPLER
Installation & Operation Manual (English)
Important: This manual must be kept with the excavator at all
times and referred to as required
Harford Attachments Ltd

2 ©2022 Harford Attachments Ltd
SAFELOCK/GEN/MAN/R5
Table of Contents
Item Checklist ..................................................................................................3
Introduction......................................................................................................3
Guide to Safety Symbols .................................................................................4
Safety features.................................................................................................4
Safety labels ....................................................................................................5
Safety Sticker and Data Plate Location Guide.................................................6
Specified Parameters.......................................................................................6
Storage Instructions.........................................................................................6
End of Life Considerations...............................................................................7
Compatible Attachments..................................................................................7
Fitting the Safelock coupler to the Excavator...................................................8
Connecting an Attachment.............................................................................10
Releasing an Attachment...............................................................................11
Lifting a Load .................................................................................................11
Maintenance ..................................................................................................12
Warranty ........................................................................................................13
Example Declaration........................................ Error! Bookmark not defined.
Serial Number Location
Serial Number
Stamped plate on side of hitch
Sticker on rear of control box
Sticker on solenoid manifold
Serial number table (above) for completion by owner
This manual part number SAFELOCK/GEN/MAN/R5
If this Safelock quick hitch to is to be used on a jobsite, the operator shall follow the site rules
where the machine is to be used.
If at any time in the future, you require additional information on the
HARFORD SAFELOCK quick hitch or any aspects of its use, please do not hesitate to
contact:
Harford Attachments Ltd
Spar Road, Norwich. NR6 6BY. England
Tel +44 (0) 1603 403099
email: info@harfordattachments.com website: www.harfordattachments.com

©2022 Harford Attachments Ltd 3
SAFELOCK/GEN/MAN/R5
Item Checklist
The following items are supplied.
Item
Supplied
Safelock Mechanical quick coupler
✓
CE Declaration of Conformity
✓
Installation and operation manual
✓
Lifting eye test certificate
see note
Note: The lifting eye test certificate is only supplied if fitted to the quick coupler at
manufacture.
Introduction
Thank you for choosing to purchase the Harford Safelock quick coupler for excavators. The
information contained in this manual should be thoroughly read and understood by all
operators of the coupler.
The Harford Safelock quick coupler is designed to work with dedicated Safelock buckets and
attachments. The sliding wedge plate provides a locking device which has a spring pressure
acting on it, which means minimal wear over time.
It is important that installation be carried out by a competent person, preferably with quick
coupler installation experience.
It is essential that the operation and maintenance instructions are followed carefully to ensure
safe and reliable operation of the quick coupler at all times. Failure to do so could result in
serious injury and invalidate the product warranty. Several safety features are built into the
design of the coupler, which make it very safe and reliable.
This Manual contains installation and operation instructions for the mechanical Harford
Safelock quick coupler. If the quick hitch you are operate is not a Safelock, please refer to
the appropriate manual.
WARNING: The Safelock coupler is designed to pick up attachments which are dedicated
to a particular Safelock model (SL) and category (T); this information is shown on the
data plate. DO NOT use oversized attachments with this quick coupler as personal injury
could occur and any product warranty will be invalid.
IMPORTANT: This quick coupler has undergone CE certification by Harford Attachments.
Any modification will invalidate this certification and therefore new, independent
certification would be required.

4 ©2022 Harford Attachments Ltd
SAFELOCK/GEN/MAN/R5
Guide to Safety Symbols
SAFETY NOTICE:
These indicate specific precautions and recommended personal protective
equipment (PPE) for use during the given situations.
IMPORTANT:
Specific points to note and situations to be aware of.
IMPORTANT:
Prohibited situations are specified and should be avoided.
WARNING:
Situations of danger in which the operator or installer must pay particular attention
to the information provided to minimise the risk of injury to self or others
Safety features
There are several important safety features that are an integral part of the Harford Safelock
Mechanical quick coupler. Each feature is designed to reduce the eventuality of an
attachment becoming disengaged whilst connected to the coupler.
1. The status of the safety handle is clearly visible by the operator.
2. Attachments can only be released when the safety handle is fully open.
3. The safety handle is retained with a spring-loaded safety lock.
4. The spring pressure acting on the locking wedge ensures there is no movement between
the coupler and dedicated attachment.
IMPORTANT: Due to the weight of the product, handling of the hitch prior to
installation should be done using appropriate lifting aids for the weight, which can be
found on the punched information plate affixed to the side of the hitch.
IMPORTANT: Ensures that the machine to which the Safelock quick hitch is installed
does not exceed its safe working load (SWL), taking into account the additional
weight of the hitch, which is stated on the punched information plate affixed to the
side of the hitch.
IMPORTANT: Be aware that the addition of the Safelock quick hitch will increase the
reach distance of the excavator arm, which may cause it to impact nearby objects and
people or to impact the operators cab, leading potentially to property damage, injury,
loss of limb or fatal injury.
IMPORTANT: It is recommended for safety reasons that the machine to which this
Safelock quick hitch is installed is operated by an experienced, competent person,
trained to ISO 7130:2013 or later.
IMPORTANT: If hammers are to be used for long periods of time the quick hitch
should be removed to prevent unnecessary wear.
©2022 Harford Attachments Ltd 5
SAFELOCK/GEN/MAN/R5
IMPORTANT: During installation, no alterations must be undertaken to any protective
structure (e.g., rollover protective structures (ROPS), tip-over protective structures
(TOPS), or falling object protective structures (FOPS) are permitted except where
authorised by the manufacturer, or according to the manufacturer’s
specifications.
IMPORTANT: It is not permitted to transport or lift persons using the Safelock quick
hitch.
Safety labels
All safety labels are to be kept clean and legible and should be replaced if missing or
unreadable by contacting the manufacturer, Harford Attachments, on +44 (0)1603 403099.
The following safety label is supplied in the required quantities with the Safelock fitting kit.
Their locations are given in the description, and shown graphically in the following diagram.
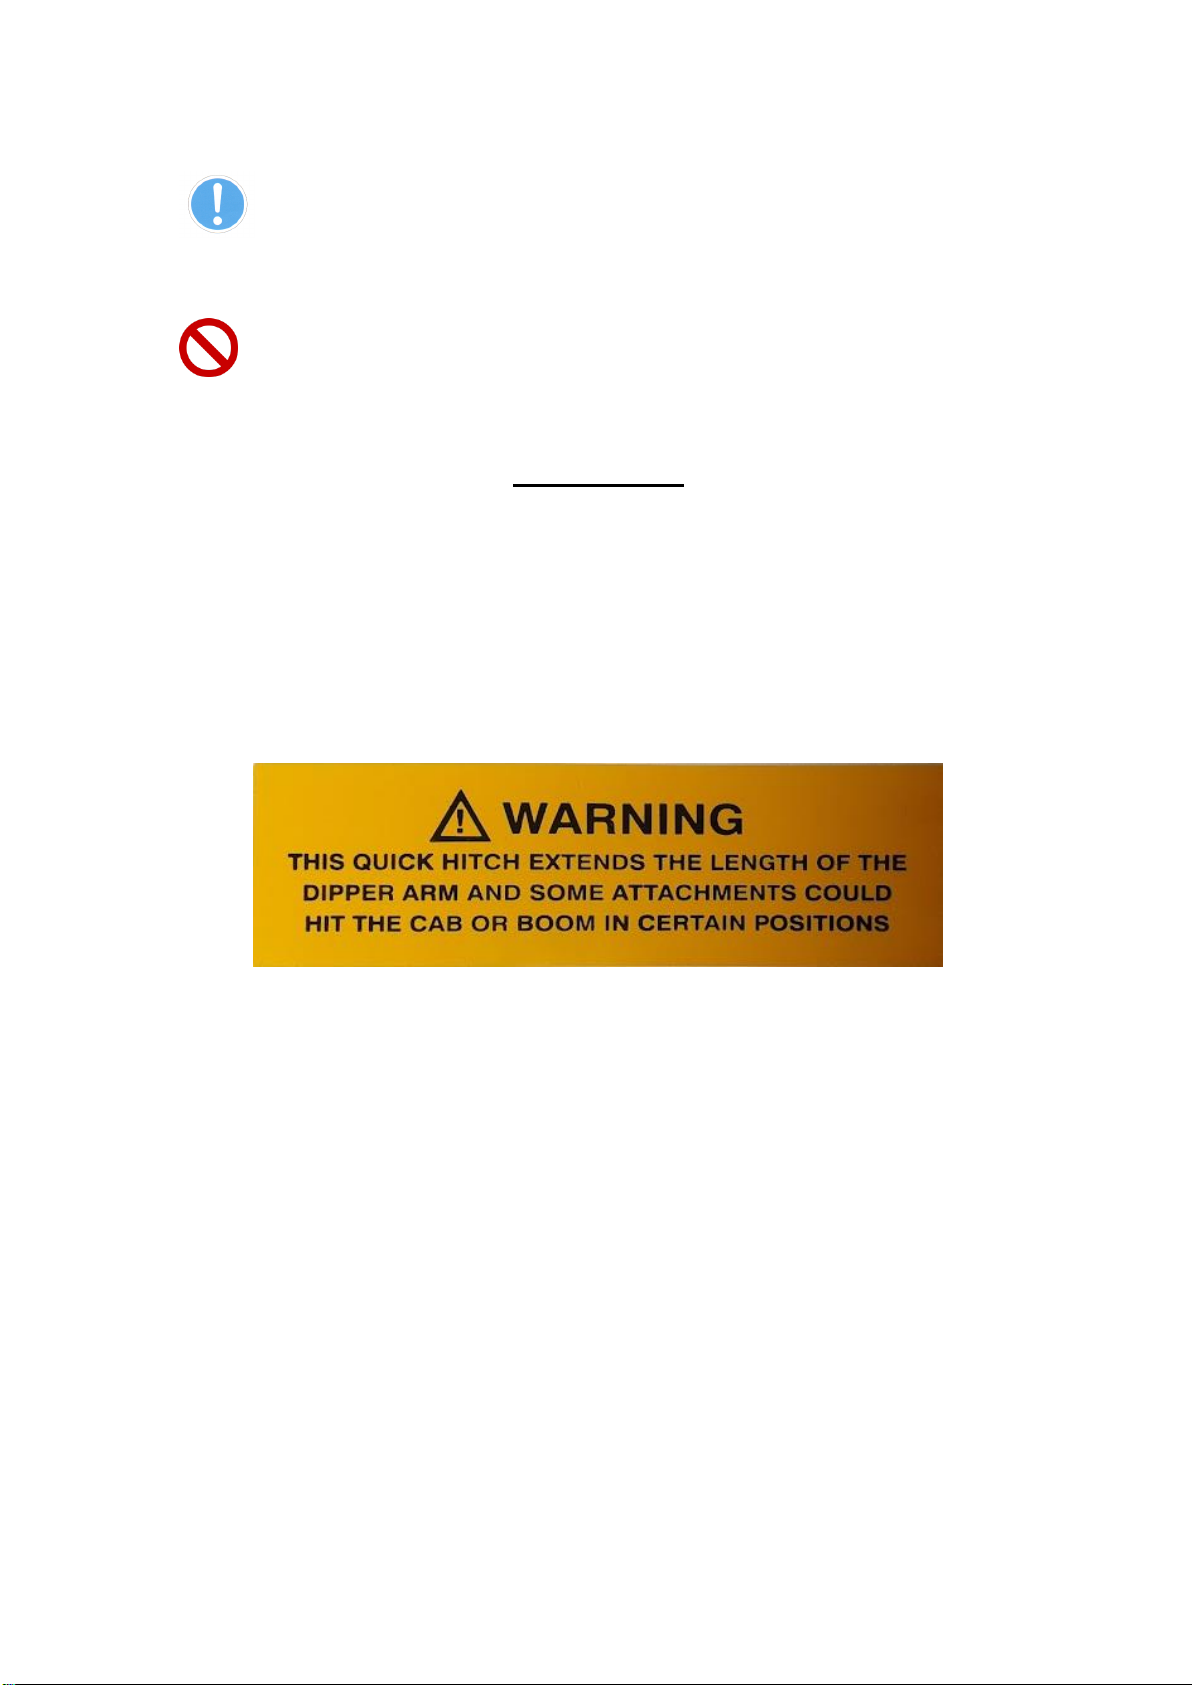
A) One yellow warning sticker to be affixed prominently in the cab warning that the
attachment increases the overall length of the dipper arm and could therefore
impact the cab or boom if care is not taken:

6 ©2022 Harford Attachments Ltd
SAFELOCK/GEN/MAN/R5
Safety Sticker and Data Plate Location Guide
Specified Parameters
Your Harford Safelock quick hitch has been designed to the meet the original equipment
manufacturer (OEM) specifications of the excavator for which it was ordered. The excavator
model for which it was designed and the maximum load category of the hitch can be found on
the punched information plate affixed to the side of the quick hitch body.
Storage Instructions
If your Safelock Quick hitch is to be removed for an extended period of time, please observe
the following instructions:
SAFETY NOTICE:
It is strongly recommended that the Safelock quick hitch is lowered to the ground, the
machine switched off, the key removed and the parking brake engaged, blocks applied to
the wheels, the system depressurised and that safety gloves are worn during any
maintenance on the quick hitch. A warning label should be affixed prominently in the cab to
warn others of ongoing maintenance.
•Wearing appropriate PPE, hydraulic fluid should be drained from the quick hitch and
disposed of according to regulations.
•Basic maintenance tasks should be carried out on the hitch, including cleaning and
greasing (see the Daily Checks list for further information).
•The hitch should be covered and stored in a safe, dry location.
1 of A
Safelock quick
hitch
Lifting Eye (if
installed)
Location of data
plate

©2022 Harford Attachments Ltd 7
SAFELOCK/GEN/MAN/R5
End of Life Considerations
Your Safelock quick hitch is predominantly made of recyclable materials. If your quick hitch
should become damaged beyond repair and is to be disposed of, please be aware of the
environmentally unfriendly nature of the lubricants and hydraulic fluids used. Please check the
cleaning and disposal instructions of the supplier of the contaminants before disposing of the
hitch in an environmentally responsible manner.
Compatible Attachments
Attachment
Can be used (up to the
safe working load)
Can be used, with
limitations
Cannot be used
All Harford Safelock
Attachments
Buckets
Hammer or breaker
For limited periods. For
constant or long-term
use, the Pro-Lok hitch
should be removed to
prevent unnecessary
wear
Pallet forks
Under no
circumstances
Lifting Objects with
hitch
Only if a factory fitted
lifting eye was supplied
with the hitch, certified
to the SWL.
Operator cages
Under no
circumstances
Thumb
Ripper Tooth
Rake
IMPORTANT:
Attachments should be within the recommended limits of the carrying machine when
the quick coupler is attached
8 ©2022 Harford Attachments Ltd
SAFELOCK/GEN/MAN/R5
Crowd Cylinder
Idler Link
Crowd Link
Safelock Coupler
Dipper Arm
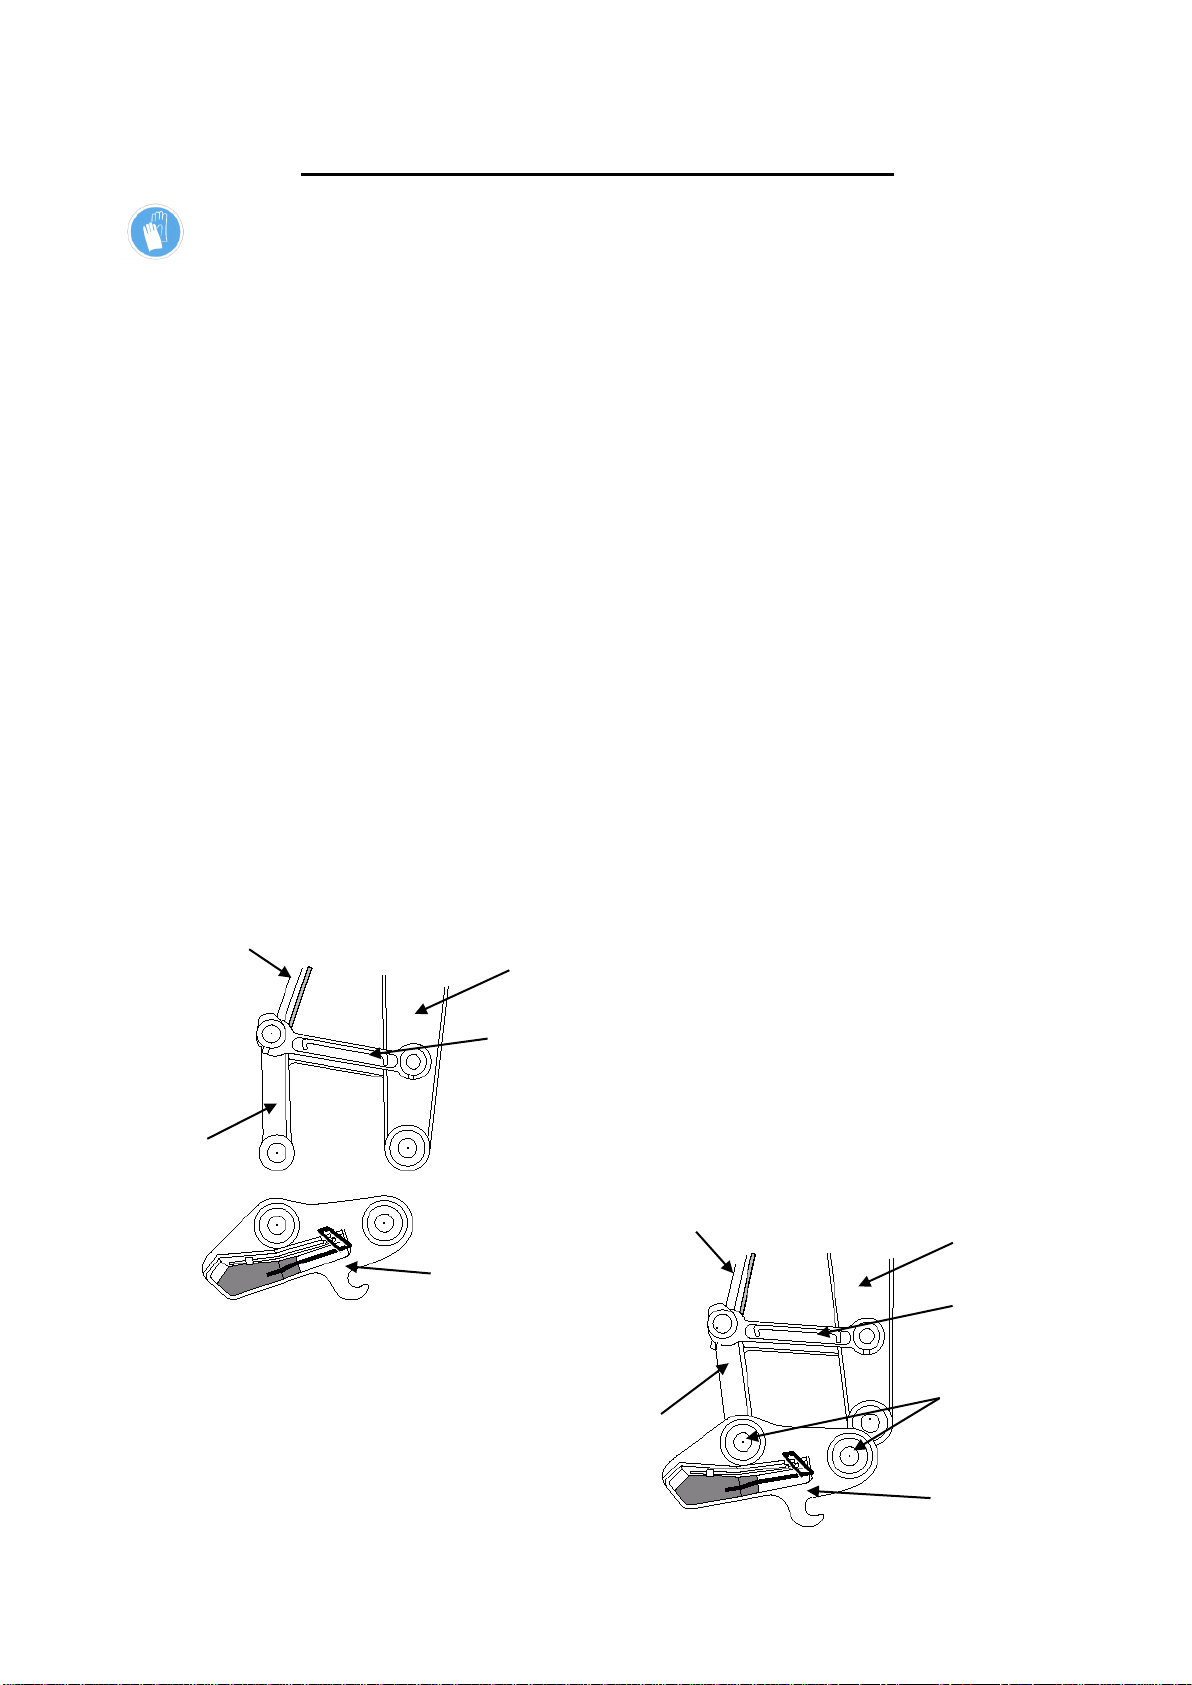
Fitting the Safelock coupler to the Excavator
SAFETY NOTICE: It is recommended that safety gloves are worn during the installation of
the coupler. It should not be necessary to use excessive force, at any stage of the
installation procedure.
1. Remove any existing attachment from the machine dipper arm and crowd link arm.
The two original pins that are removed from these pivot points must be used to attach
the coupler to the excavator (These pins are usually hardened and greaseable).
2. Position the Safelock coupler within easy operating reach of the excavator.
3. With the crowd link positioned above the rear mounting hole, lower the dipper arm to
within 50-75 mm of the top of the Safelock, as shown in Figure 1.
4. Extend the crowd cylinder. Carefully align the crowd link arm between the two rear
mounting holes. Replace any ‘O’ rings that were removed previously and slide one of
the original pins through the coupler and crowd link arm. Securely fix the pin in place
by using the original retention method.
5. Operate crowd and boom cylinders simultaneously, to slowly raise the hitch and align
the front mounting holes as shown in
.Carefully align the dipper arm between the two front mounting holes.
Replace any ‘O’ rings that were removed previously and slide the other original pin
through the coupler and dipper arm. Securely fix the pin in place by using the original
retention method.
6. Use the excavator hydraulics to carefully rotate the coupler to the extremes of the
crowd cylinder (e.g., no stroke and full stroke). Check the clearance of the Safelock
with any part of the dipper arm and linkage.
Figure 1
Figure 2
Crowd Cylinder
Idler Link
Crowd Link
Safelock Coupler
Original Pins
Dipper Arm

©2022 Harford Attachments Ltd 9
SAFELOCK/GEN/MAN/R5
WARNING: During operation there should be no movement between the quick hitch
and attachment. If any movement is detected, stop operation immediately, lower
attachment to the ground and inspect the hitch.
WARNING: The quick hitch extends the length of the dipper arm and some attachments
could hit the cab or boom in certain positions.
WARNING: The quick hitch is designed to accept attachments which are manufactured
to OEM specifications and capacities. Oversized attachments could be hazardous
when used with this quick hitch and could invalidate any warranties.
WARNING:
Ensure the Safe Working Load of the excavator is not exceeded by the combined
weight of the hitch, attachment and load. Refer to the excavator manufacturer’s
information.
IMPORTANT:
If hammers are to be used for long periods of time the quick hitch should be removed to
prevent unnecessary wear.
IMPORTANT:
The use of pallet forks with this quick hitch is not permitted
IMPORTANT
The operator of the machine should be adequately trained in the quick hitch’s safe
operation before use.
10 ©2022 Harford Attachments Ltd
SAFELOCK/GEN/MAN/R5
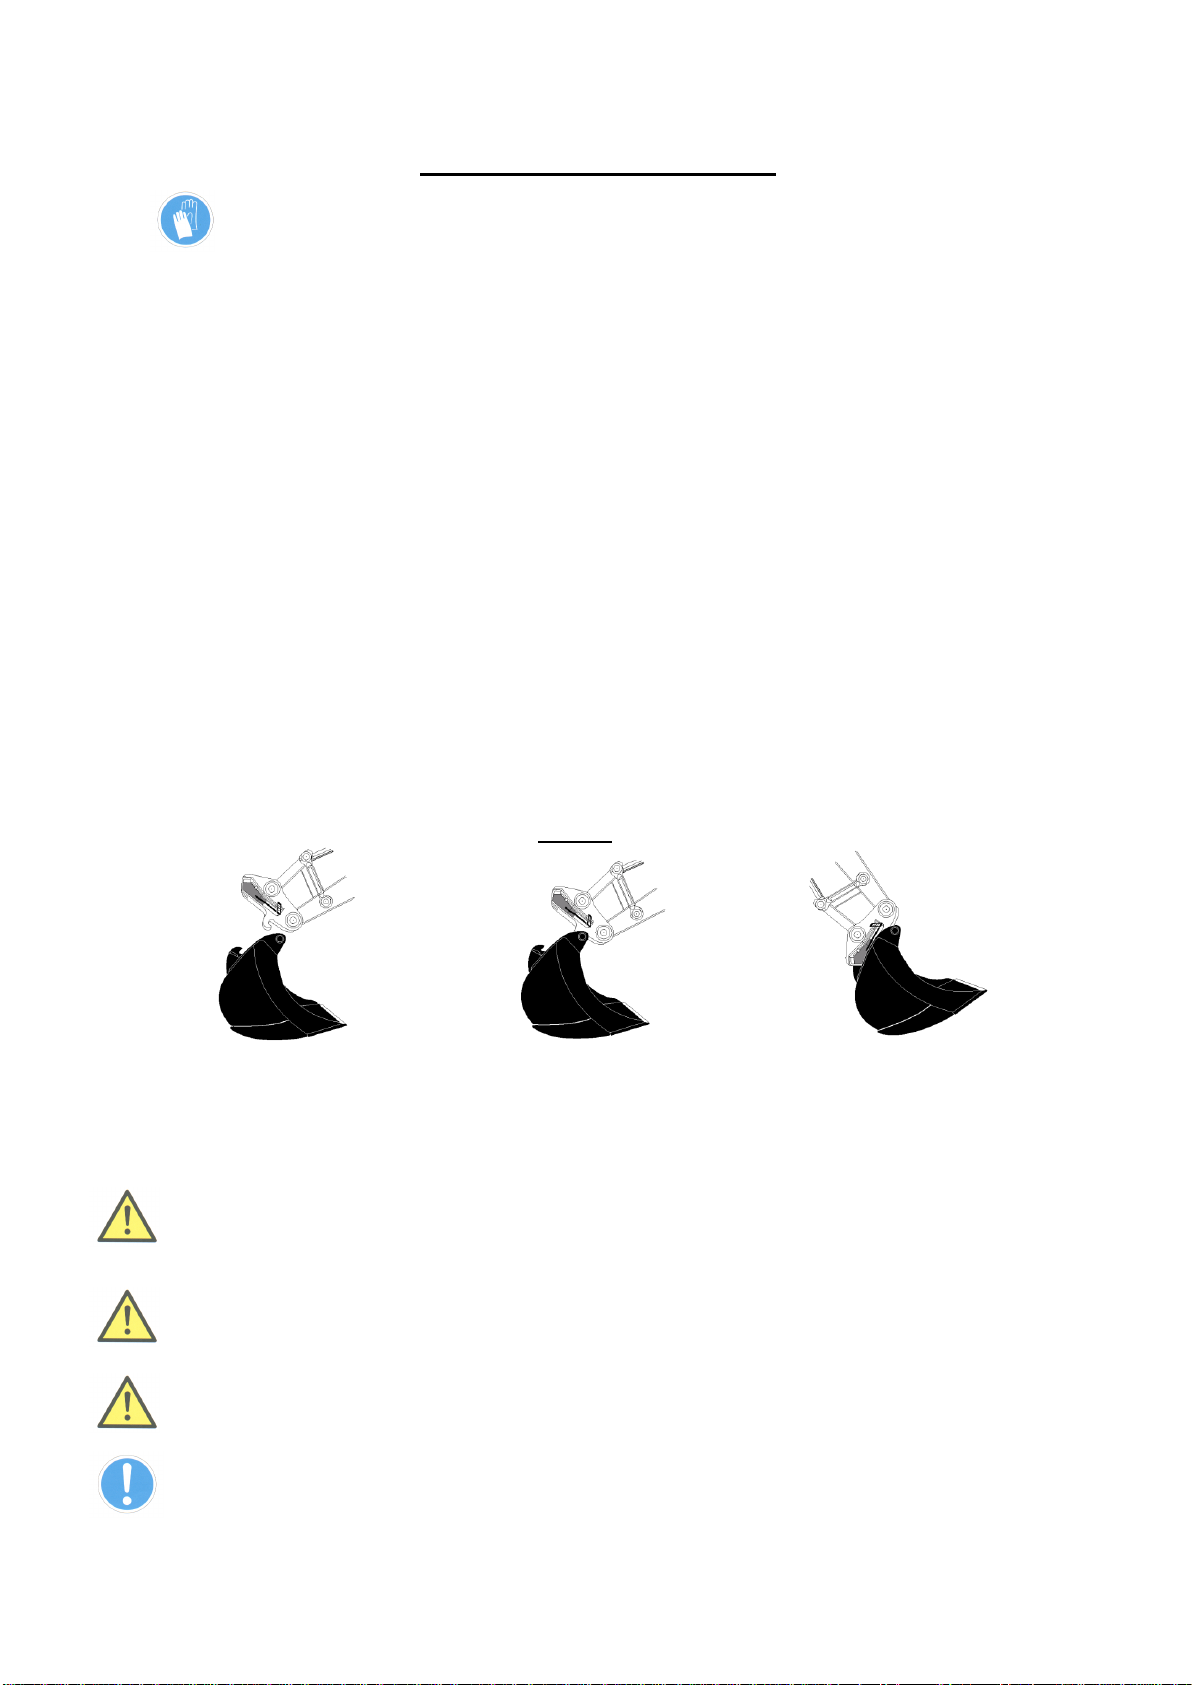
Connecting an Attachment
SAFETY NOTICE: It is recommended that safety gloves are worn during the attachment
changeover operation.
1. Disengage the safety lock and release the safety handle.
2. Fully open the safety handle.
3. Lower the quick hitch front ‘C’ shaped jaw down towards the front attachment pin as
shown in Figure 3, step 1.
4. Engage ‘C’ shaped jaws with the front attachment pin as shown in Figure 3, step 2.
5. Extend the crowd cylinder down towards the rear locking plate and lift the attachment
at the same time as shown in Figure 3, step 3.
6. Keep extending the crowd cylinder so that the front attachment pin is firmly seated in
the ‘C’ shaped jaw and the Safelock coupler is seated onto the rear locking plate.
7. Close the safety handle against the safety lock. Ensure the attachment is clear of the
ground (failure to do so could put undue stress on the front hooks and cause
distortion).
8. Engage the safety lock and lock the safety handle.
9. Visually check that the attachment is connected and locked correctly.
Figure 3
WARNING: During operation there should be no movement between the coupler and
attachment. If any movement is detected, stop operation immediately, lower attachment to the
ground and inspect the coupler.
WARNING: The Safelock coupler is designed to pick up attachments which are dedicated to a
particular Safelock model (SL) and category (T), which is shown on data plate. DO NOT
use oversized attachments with the coupler as personal injury could occur and the product
warranty will be invalidated.
WARNING: Ensure that the Safe Working Load of the excavator is not exceeded. Refer to the
manufacturer’s operation manual for this information.
IMPORTANT: If hammers are to be used on the excavator for long periods of time, remove
the Safelock to prevent unnecessary wear and tear.
Step 1 –Lower hitch towards
front attachment pin
Step 2 –Engage ‘C’ shaped
jaw with front attachment pin.
Step 3 –Crowd and lift attachment
until there is contact with rear
locking surface
©2022 Harford Attachments Ltd 11
SAFELOCK/GEN/MAN/R5
Releasing an Attachment
1. Place the attachment on level ground or in a position so that once released the
attachment cannot roll away from the coupler. Ensure people and property are well
clear of the immediate area.
2. Disengage the safety lock and release the safety handle.
3. Fully open the safety handle.
4. Using the crowd cylinder of the excavator, rotate the Safelock away from the rear
locking plate of the attachment and then lift away from the front attachment pin.
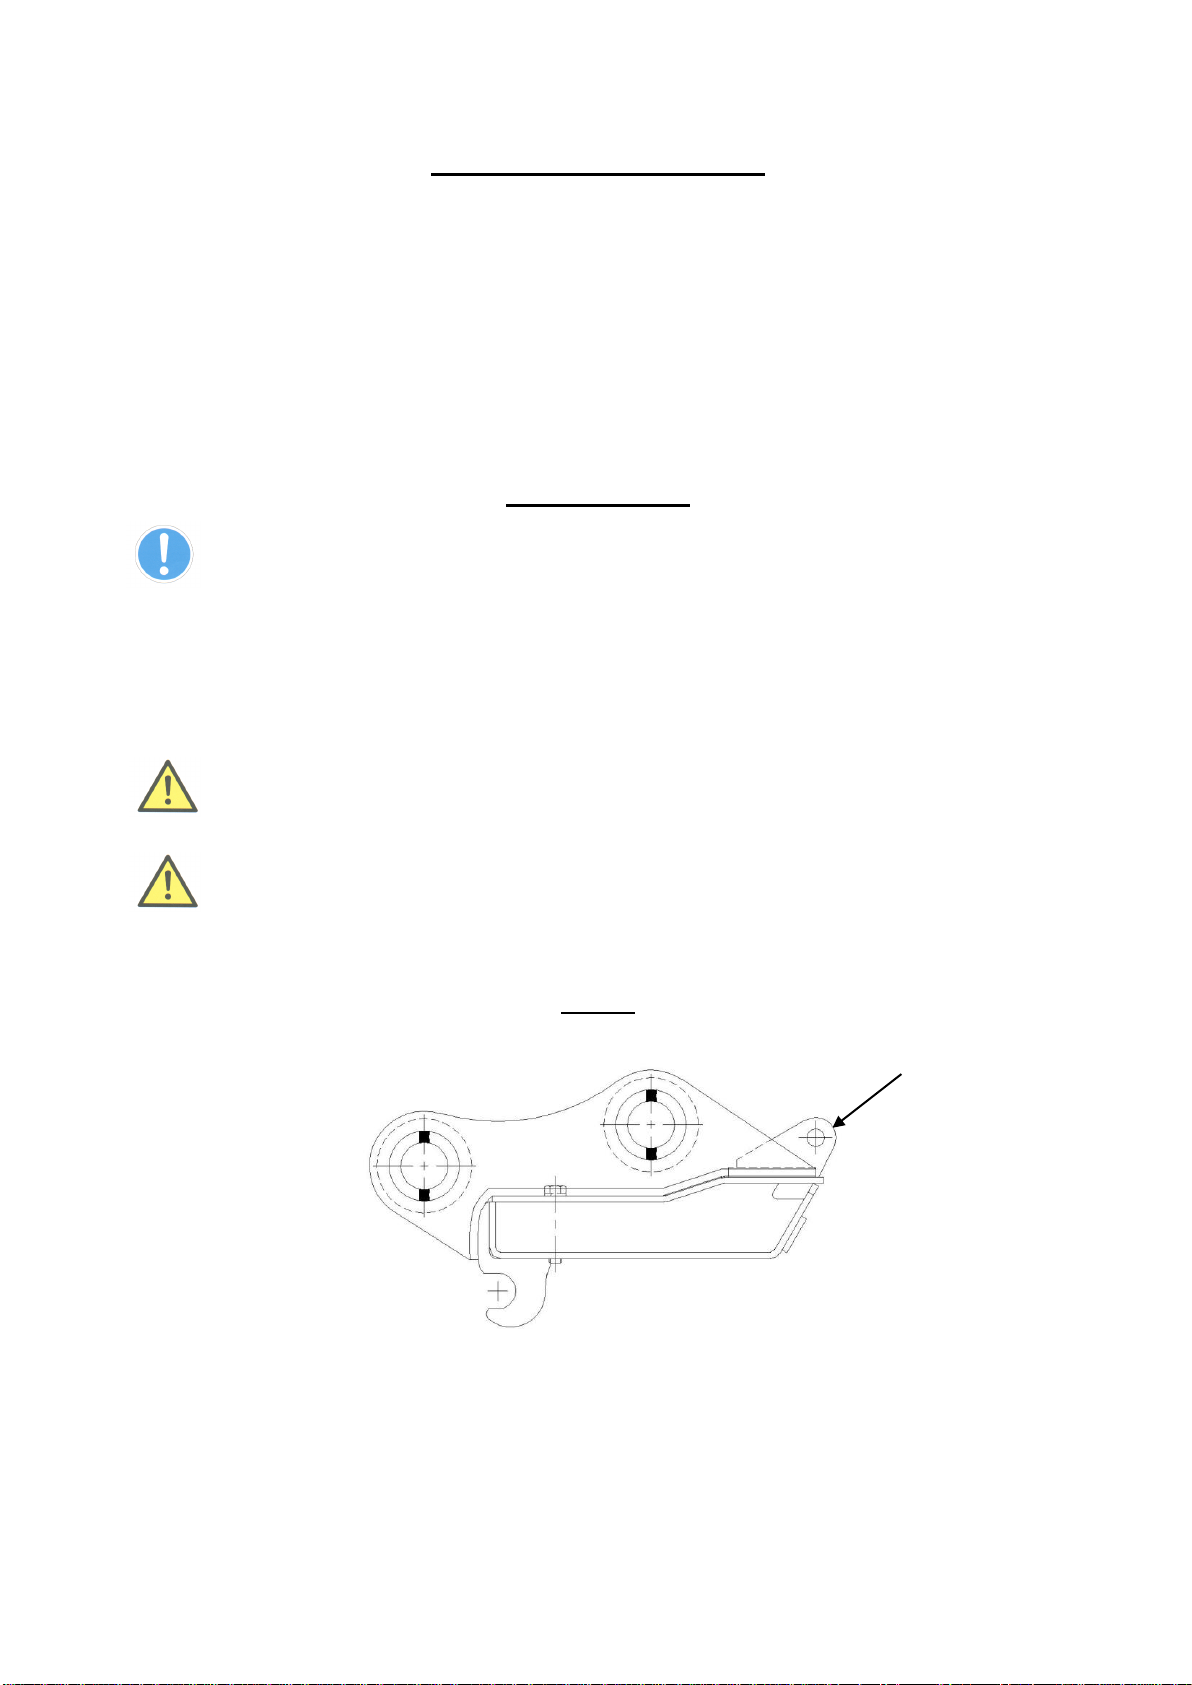
Lifting a Load
IMPORTANT: This section only applies to Safelock couplers which are manufactured with
a lifting eye as shown in Figure 4.
1. Ensure that the load to be lifted does not exceed the safe working load of the lifting eye.
2. The lifting eye is designed to be used with a lifting shackle with the same safe working
load rating.
3. Release any attachment from the Safelock coupler prior to using it to lift a load.
WARNING: Ensure that the safe lifting capacity of the excavator is not exceeded. Refer to
the excavator manufacturer’s operational manual for this information.
WARNING: If your Safelock hitch was not supplied with a factory fitted and certified lifting
eye you must not attempt to lift loads that are not wholly contained within a bucket-type
attachment, it is unsafe, may lead to damage and will invalidate the warranty.
Figure 4
Lifting Eye

12 ©2022 Harford Attachments Ltd
SAFELOCK/GEN/MAN/R5
Maintenance
SAFETY NOTICE:
It is strongly recommended that the Safelock quick hitch is lowered to the ground, the
machine switched off and the ignition key removed, the parking brake engaged and
blocks applied to the wheels, and safety gloves are worn during any maintenance on
the quick hitch. A warning label should be affixed prominently in the cab to warn
others of ongoing maintenance.
Daily:
1. Remove dirt and debris from all moving parts. It is necessary to remove any attachment
to gain access to the underside of the coupler.
2. Check all retaining bolts and nuts for tightness on the coupler.
3. Grease the wedge slide housing.
4. Check Safelock coupler for correct operation by connecting an attachment. Ensure there
is spring resistance acting on the wedge when locating the safety handle.
Weekly
1. Check the Safelock coupler visually for evidence of fatigue, weld failure or stress.
2. Lubricate pivot points and other moving parts.
IMPORTANT: Due to the self-tightening and infinite wear feature accommodated with
the hydraulic cylinder, if any attachment is fitted to the hitch for long periods of time it
should be released daily. If the daily maintenance tasks are adhered to, this will happen
automatically.
WARNING: If the quick hitch is damaged in any way and/or there is any doubt as to the
continued safety, cease operation immediately and contact Harford Attachments Ltd,
Technical Department on Europe: +44 (0)1603 403099, USA: 727 477 3044
WARNING: If the warning buzzer does not sound on machine start-up, please refer to
the troubleshooting guide.
IMPORTANT: Any unauthorised modification of the quick hitch and/or associated
control systems may compromise the safety of the operator and those nearby, and will
invalidate the product warranty.
IMPORTANT: Opening the control box is strongly discouraged as doing so could
make the product unsafe and will pass full liability to the end user and invalidate the
warranty.

©2022 Harford Attachments Ltd 13
SAFELOCK/GEN/MAN/R5
Warranty
Earthmoving Attachment
Harford Attachments Ltd (the seller) warrants their quick hitches as follows:
1. The seller shall repair or replace at the seller’s option any of the goods which are, or which
become, defective within 12 months from delivery due to faulty workmanship, materials or
faulty design, provided that the buyer shall have notified the seller in writing of such defect
and have given the seller a reasonable opportunity to inspect the defective goods.
2. If, in the opinion of the seller, the goods have not been operated or maintained in
accordance with the instructions in this manual, or have been subject to unauthorised
repair or modification, the warranty will be invalidated.
3. The seller’s liability in respect of defects in the goods shall be limited to those stated in this
clause and subject to Clause 2(1) of the Unfair Contract Terms Act 1997, the seller shall
not be liable whether in contract or in tort, including but not limited to negligence, or by
reason of breach of statutory duty or otherwise, for any damage or loss whatsoever
suffered by the buyer arising out of or attributable to such defects.
Table of contents
Other Harford Attachments Construction Equipment manuals


