Harison HR-407 User manual

HR-407
OWNER’S MANUAL
Attention:
Read and follow all instructions in
this owner’s manual.
INVERSION TABLE

Heavy Duty Deluxe Inversion Therapy Table
WARNING:
DO NOT USE this inversion table without the
approval of a licensed physician. Some
medical conditions may not be suitable for
use with this product.
CAREFULLY READ all Warnings and
Instructions before using this inversion
table.
Misuse of this equipment may result in
serious injury.
DO NOT let children under the age of 12 use
the inversion table.
DO NOT allow children, bystanders, or pets
around while using this equipment.
DO NOT put hand or fingers near or
underneath the Protective Cover for the
Angle Selector Pin.
Keep body, clothing, and hair free of all
moving parts.
TIGHTEN ALL nuts, bolts, and screws
BEFORE using equipment.
LEAVE ADEQUATE SPACE to invert.
This equipment is for indoor, household and
non-commercial use only.

BEFORE BEGINNING ASSEMBLY…
Take a few moments to familiarize yourself with the specific parts and hardware included with your
product. Make sure all the parts and hardware are included in the carton and examine them for any
damage that may have occurred in transport. Some parts may be pre-assembled and pre-installed.
CAUTION
WARNING:
Before commencing any exercise program, consult your licensed physician.
Some medical conditions may not be suitable for use with this product.
Read and understand all instructions very carefully before using equipment.
Tighten all nuts, bolts, and screws completely and securely before using the equipment.

ADDITIONAL WARNINGS AND PRECAUTIONS
Innova Products Inc. assumes no responsibility for personal injury or
property damage sustained by or through the use of the Inversion Table.
DO NOT USE THIS INVERSION TABLE WITHOUT A LICENSED PHYSICIAN’S
APPROVAL. THIS PRODUCT MAY NOT BE APPROPRIATE FOR USE WITH
CERTAIN MEDICAL CONDITIONS. IF YOU BELIEVE YOU EXPERIENCE ANY
OF THE FOLLOWING CONDITIONS, CONSULT WITH YOUR PHYSICIAN
BEFORE USING THIS PRODUCT.
YOU ARE STRONGLY RECOMMENDED TO USE THIS PRODUCT ONLY
UNDER THE DIRECTION OF YOUR LICENSED PHYSICAN. HAVE THESE
GUIDELINES APPROVED BY YOUR LICENSED PHYSICIAN BEFORE USE.
PLEASE NOTE: This list is for reference only and it is not a complete listing.
· Acutely swollen joints · Overweight / Extremely Obese
· Bone weakness (osteoporosis) · Pregnancy
· Cerebral sclerosis · Recent or unhealed fractures
· Conjunctivitis · Recent stroke or transient ischemic attack
· Glaucoma · Retinal detachment
· Heart or circulatory disorders
· Spinal injury
· Hiatal hernia · Surgically implanted orthopedic supports
· High blood pressure · Use of anticoagulants
· Hypertension
(including high doses of aspirin)
· Medullary pins · Ventral hernia
· Middle ear infection

IMPORTANT SAFETY NOTICES.................................................1
EXPLODED DIAGRAM...............................................................2
PARTS LIST……………………………………………………….......…..3
ASSEMBLY INSTRUCTIONS......................................................4
ADJUSTABLE GUIDE...............................................................10
HOW TO INVERT......................................................................11
EXERCISE INSTRUCTIONS.....................................................12
TABLE OF CONTENTS

1
IMPORTANT SAFETY NOTICE
PRECAUTIONS
This exercise machine is built for optimum safety.However, certain precautions
apply whenever you operate a piece of exercise equipment. Be sure to read
the entire manual before you assemble or operate your machine.In particular,
note the following safety precautions:
1. Keep children and pets away from the machine at all times. DO NOT leave
children unattended in the same room with the machine.
2. Only one person at a time should use the machine.
3. If the user experiences dizziness, nausea, chest pain, or any other
abnormal symptoms, STOP the workout at once. CONSULT A PHYSICIAN
IMMEDIATELY.
4. Position the machine on a clear, leveled surface. DO NOT use the
machine near water or outdoors.
5. Keep hands away from all moving parts.
6. Always wear appropriate workout clothing when exercising. DO NOT wear
robes or other clothing that could become caught in the machine.
Running or aerobic shoes are also required when using the machine.
7. Use the machine only for its intended use as described in this manual.
DO NOT use attachments not recommended by the manufacturer.
8. Do not place any sharp object around the machine.
9. Disabled person should not use the machine without a qualified person or
physician in attendance.
10. Before using the machine to exercise, always do stretching exercises to
properly warm up.
11. Never operate the machine if the machine is not functioning properly.
12. MAX USER WEIGHT: 100KG/220LBS

EXPLODED DIAGRAM
2

PARTS LIST
Part# Description QTY Part# Description QTY
1 Left Frame 1 31 Square Tube Cap 3
2 Right
Frame 1 32 Round
Tube
Cap
1 4
3 Base
Frame 1 33 Hexagonal
Bolt
M8x16 14
4 Base
Connector 1 34 Spring
Washer
Φ8 10
5 Limit
Bracket 1 35 Curve
Washer
Φ8,
R25 18
6 Back
Support 1 36 Hexagonal
Bolt
M8x70 4
7 Left
Handlebar 1 37 Lock
Nut
M8 12
8 Right
Handlebar 1 38 Cross
Screw
M6x12 6
9 Left
Axis
Frame 1 39 Hexagonal
Bolt
M10x50 4
10 Right
Axis
Frame 1 40 Flat
Washer
Φ10 8
11 Height
Adjustable
Tube 1 41 Lock
Nut
M10 8
12 Foot
Rest 1 42 Hexagonal
Bolt
M8x20 8
13 Adjustable
Base 1 43 Bolt
Axis 4
14 Latch 1 44 Cross
Screw
M4x6 2
15 Foot
Tube 2 45 Hexagonal
Bolt
M8x50 4
16 Foot
Stabilizer 2 46 Flat
Washer
Φ8 18
17 Back
Cushion 1 47 Ring
Latch
Φ8x50 1
18 Foam
Grip 2 48 Cap
Nut
M8 2
19 Foot
Lock 2 49 Ring
Latch
Φ8x20 1
20 Foam
Roller 2 50 Hexagonal
Bolt
M8x25 2
21 Plastic
Axis
Sleeve 4 51 Cross
Screw
M4x20 1
22 Adjustable
Foot
Pad 2 52 Nylon
Nut
M4 1
23 Foot
Pad 6 53 Adjustable
Tube 1
24 Shock
Absorber 1 54 Bush 1
25 Axis
Cover 2 55 Spring 1
26 Oval
Tube
Cap 4 56 Ball
Nut 1
27 Round
Tube
Cap 4 57 Big
Flat
Washer
Φ10 4
28 Limit
Pad 1 58 Hexagonal
Bolt
M10x50 4
29 Adjustable
Latch 1
30 Spring
Latch 1
Tool
Wrench Φ10, 13#, 17# 1 Wrench 6# 1
Wrench 5# 1
3

ASSEMBLY INSTRUCTIONS
STEP 1
Lock the Left Frame (1), Right Frame (2) and Base Frame (3) with
10PCS Hexagonal Bolt M8x16 (33), 10PCS Spring Washer Φ8
(34), 10PCS Curve Washer Φ8, R25 (35) and make sure the main
frame is stable.
4

ASSEMBLY INSTRUCTIONS
STEP 2
Lock the Base Connector (4) to main frame with 4PCS Hexagonal
Bolt M8x70 (36), 4PCS Lock Nut M8 (37), 8PCS Curve Washer Φ8,
R25 (35). Fix the Limit Bracket (5) on left & right frame with 4PCS
Hexagonal Bolt M10x50 (39), 4PCS Flat Washer Φ10 (40), 4PCS
Lock Nut M10 (41), 4PCS Big Flat Washer Φ10 (57).
5

ASSEMBLY INSTRUCTIONS
STEP 3
Lock the Left Axis Frame (9) & Right Axis Frame (10) to Back
Support (6) with 4PCS Hexagonal Bolt M8x20 (42), 8PCS Flat
Washer Φ8 (46) & Lock Nut M8 (37).
6

ASSEMBLY INSTRUCTIONS
STEP 4
Lock the Left Handlebar (7) & Right Handlebar (8) to main frame
with 4PCS Hexagonal Bolt M10x50 (58), 4PCS Flat Washer Φ10
(40), 4PCS Lock Nut M10 (41).
7

ASSEMBLY INSTRUCTIONS
STEP 5
Lock the 2PCS Foot Tube (15) to Height Adjustable Tube (11) &
Adjustable Base (13) with 2PCS Hexagonal Bolt M8x20 (42), and
assemble the 2PCS Foam Roller (20), 2PCS Foot Lock (19), 4PCS
Round Tube Cap 1 (32). Lock the Foot Rest (12) to Height Adjust
-able Tube (11) with 2PCS Hexagonal Bolt M8x50 (45), 4PCS Flat
Washer Φ8 (46) and 2PCS Cap Nut M8 (48)
8
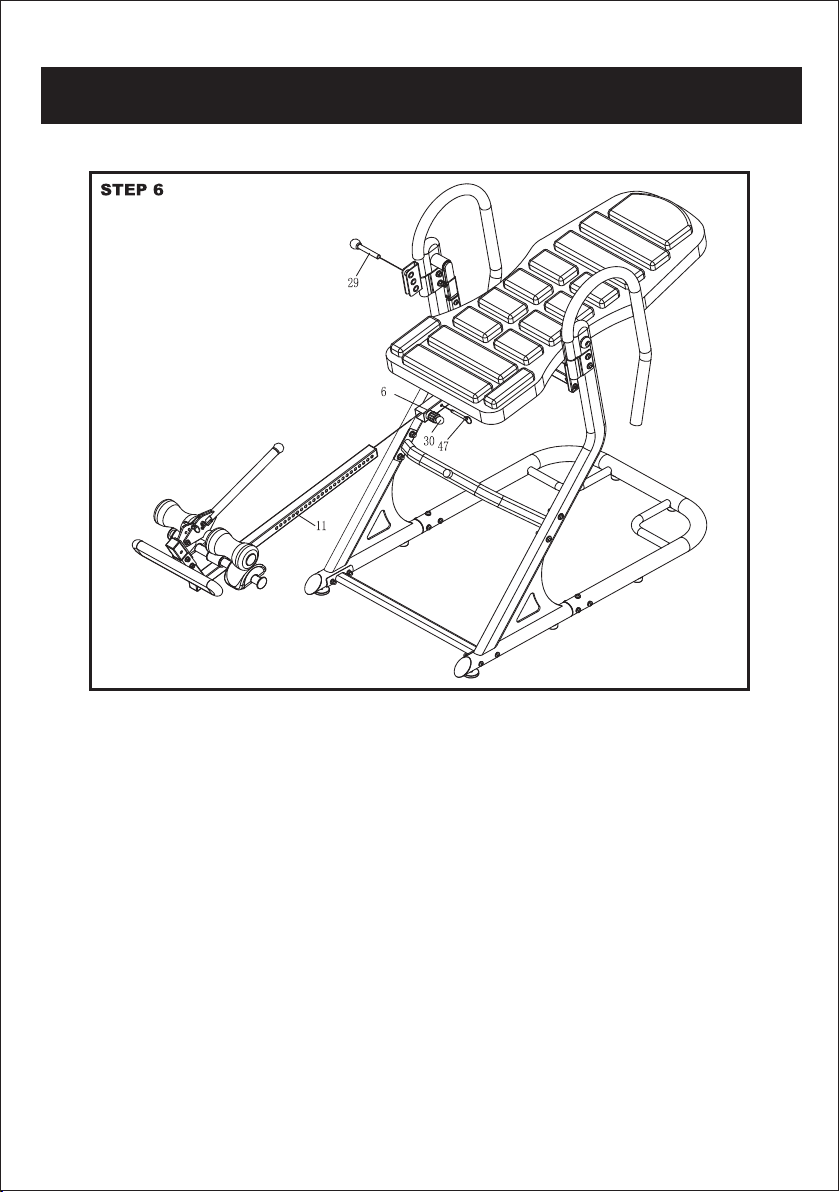
ASSEMBLY INSTRUCTIONS
STEP 6
Unlock the Spring Latch (30), insert Height Adjustable Tube (11)
into Back Support (6), adjust to a appropriate position and lock it
with Ring Latch Φ8 x 5 0 (47), put Adjustable Latch (29) accordingly.
9

ADJUSTABLE GUIDE
How to use the Height Adjustable Tube (11)
There are holes on Height Adjustable Tube (11) to fit different users’ height.
Pull the Spring Latch (30) before using Height Adjustable Tube (11), slip the
tube until it fits your height. And make sure the patch under Back Support (6)
is locked tight in the hole. Unlock the Pull the Spring Latch (30) when it moves
to the correct hole. Lock the Back Support (6) & Height Adjustable Tube (11)
with Ring Latch Φ8x50 (47).
How to use the Left Handlebar (7) & Right Handlebar (8)
The design of (7) & (8) is for your safety. Left Handlebar (7) & Right Handlebar
(8) are on the top of Left Frame (1) & Right Frame (2). They are supposed to help
you get back to the upright positionduring exercise.
30
10

HOW TO INVERT
Before inversion, you should:
1) Adjust the Height Adjustment Tube to your height number,
2) Tighten the Angle Selector Pin,
3) Make sure your feet are secured snugly,
4) Lie flat on the backrest pad.
TO INVERT the inversion table, slowly raise one arm and move it up
and over your head. The inversion table should begin to tilt back
slowly. Then, slowly raise your other arm and move it up over your
head. The inversion table will safely invert to the set degree. Rest
your arms over the head and relax.
If the inversion table does not invert, set the Height Adjustment Tube
upwards one position at a time. If the inversion table inverts too
quickly, set the Height Adjustment Tube downwards one position at a
time until you find the desired height setting.
NOTE: The center of gravity may vary from person to person due to
height and weight distribution. Your height setting may or may not be
your actual height.
TO RETURN to upright position, slowly move your arms back to your
side and bend your knees a little if necessary. To prevent dizziness,
do not return to the upright position too quickly. Be sure to move your
arms slowly and pause for a while at the horizontal level to allow your
body to re-adjust to the upright position.
Try to rely on your center of gravity to return upright. DO NOT lift your
head, try to sit up, or just rely on the handlebars to return upright.
With the proper inversion and height settings, the inversion table
should safely invert.
NOTE: It is recommended that beginners use the setting marked 15
for partial inversion.
CAUTION: By slowly moving your arms back to the starting
position, the inversion table should return to the upright
position. If it does not, use the built-in handlebars to slowly help
pull yourself back upright. Lower the Height Adjustment Tube
downward one position at a time to accommodate your height
and body type.
Photos shown may not represent actual product
To Invert:
To Return:
11

Using your EXERCISECYCLE will provide you with several benefits, it will improve your physical
fitness, tone muscle and in conjunc?on with calorie controlled diet help you lose weight.
1. The Warm Up Phase
This stage helps get the blood flowing around the body and the muscles working properly. It will
also reduce the risk of cramp and muscle injury. It is advisable to do a few stretching exercises
as shown below. Each stretch should be held for approximately 30 seconds, do not force or jerk
your muscles into a stretch - if it hurts, STOP.
2. The Exercise Phase
This is the stage where you put the effort in. A?er regular use , the muscles in your legs will
become more flexible. Work to your own pace but it is very important to maintain a steady
tempo throughout. The rate of work should be sufficient to raise your heart beat into the target
zone shown on the graph below.
SIDE BENDS
FORWARD
BENDS
OUTER THIGH
INNER THIGH
CALF / ACHILLES
HEART RATE
TARGET ZONE
MAXIMU
M
COOL DOWN
AGE
EXERCISE INSTRUCTIONS
12

HARISON FITNESS LTD
113 BARKSDALE PROFESSIONAL CENTER NEWARK,
DE 19711 USA
www.harisonfitness.com
info@harisonfitness.com
Table of contents
Other Harison Fitness Equipment manuals


Popular Fitness Equipment manuals by other brands


Epic
Epic STRENGTH GZFW21310 owner's manual

Merrithew Health & Fitness
Merrithew Health & Fitness Stability Barre™ owner's manual

Lifetime
Lifetime 1533 manual

FOCUS FITNESS
FOCUS FITNESS Fox 5 FFCR005 manual

Cando
Cando Multi-Grip Exerciser Exercises for use

Technogym
Technogym WAVE EXCITE+ Service maintenance manual


