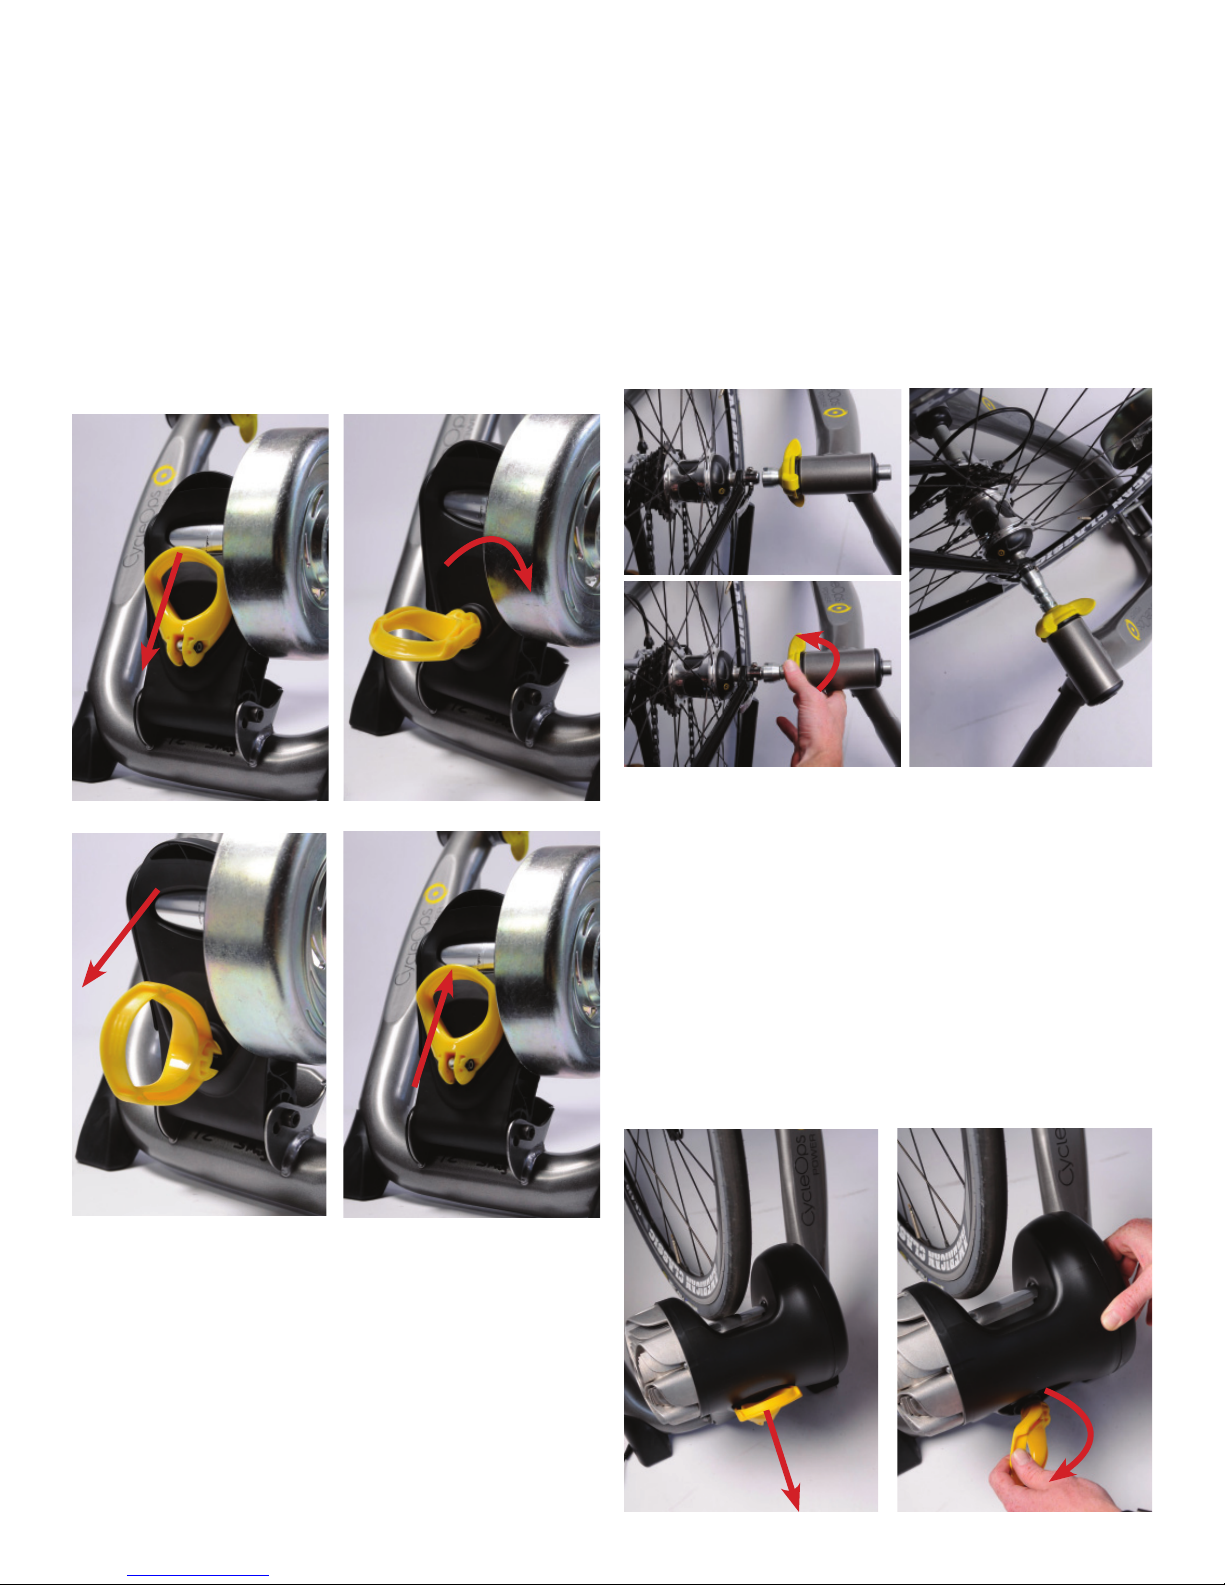
CycleOps JetFluid User manual

JetFluidTM Pro Trainer
User Guide

2
Congratulations! You’ve purchased the best fluid
trainer available, pure and simple. The CycleOps Jet-
FluidTM Pro offers the ultimate in real-world feel for
the widest range of riders possible.
The CycleOps JetFluidTM Pro takes the legendary Cy-
cleOps Fluid technology to the next level by offering
a progressive power curve, increasing resistance as
you increase speed, just like on the road. The power
curve is paired to the CycleOps JetFluidTM Pro fly-
wheel using PowerTuned technology, ensuring the
proper balance between resistance and momentum
to best replicate the feeling of riding outdoors. The
patented Airflow channel maintains operating tem-
perature for a smooth ride and durable operation,
backed up by our lifetime warranty.
This user guide will take you through setting up the
CycleOps JetFluidTM Pro trainer and frame, and thor-
oughly explains how to use the CycleOps JetFluidTM
progressive Power curve to give you an edge over
the competition.
Common Sense Precautions
Before starting any exercise program, consult with
your physician or health professional. He or she can
help establish the exercise frequency, intensity and
time appropriate for your particular age and condi-
tion. If you have any pain or tightness in your chest,
an irregular heartbeat, shortness of breath, feel faint,
or have any discomfort while you exercise, STOP!
Consult your physician before continuing. Failure to
follow any of these safeguards may result in injury or
serious health problems.
· Do not remove feet from pedals while cycling.
· Do not attempt to ride the bike at high RPM’s or in
a standing position until you have practiced at
lower RPM’s.
· Do not place fingers or any other objects into
moving parts of the trainer or bicycle.
· Keep children and pets away from your bike and
the trainer while in use. Do not allow children to
ride on your bike.
· Never turn pedal crank arms by hand.To avoid
entanglement and possible injury, do not expose
hands or arms to the drive mechanism.
· Do not dismount from your bike until both the
pedals and the rear wheel are at a complete STOP.
INTRODUCTION

3
Part 1: Setting Up Your CycleOps JetFluidTM Pro
1.1: Parts Listing
Your CycleOps JetFluidTM Pro trainer should come with all of the following components:
Assembled CycleOps JetFluid• TM Pro Trainer resistance unit and frame (A)
CycleOpsSkewer (B)•
Race Day• training DVD (C)
Warranty registration card (Not Shown) (You may also register your CycleOps trainer at www.cycleops.•
com)
If you do not find all of these items in the box,please contact Saris customer service at 800-783-7257 (op-
tion 3).
(A)
(B)
(C)

4
1.2:Trainer Setup
To your trainer up, extend the legs as shown below,
then set the trainer on a flat surface.
Turn the thumb wheel to adjust the leg and level the
frame as shown below.
1.3: Attaching your Bike to the Trainer
The CycleOps JetFluidTM Pro trainer is designed to be
used with the provided skewer. Replace the skewer
on the rear wheel of your bike with the one provided.
Make sure the quick release handle is on the left side
of the bicycle and faces upward.
Rotate the yellow skewer clamp knob clockwise to
allow sufficient clearance for your skewer.
Press
Extend

5
Pull the yellow cam lever down and rotate 90 de-
grees clockwise to unlatch the resistance unit. Pivot
the resistance unit down to allow clearance for your
rear wheel.
CAUTION: In this position the resistance unit can
move freely, keep fingers clear of moving parts.
Latch the resistance unit in a down position by rotat-
ing the cam lever 90 degrees counter clockwise and
push the cam lever against the resistance unit.
Lift your bike up by the seatpost and insert the right
side (drive side) of the skewer into the fixed cone on
the corresponding side of the frame.
Align the left side of the skewer with the adjustable
cone, lining the notches in the cone up with the
quick release handle/lever. Rotate the yellow skewer
clamp knob as shown below to secure your rear
wheel into the trainer. Securely tighten the knob
until tightly in place.
Note: Your bike does not need to be centered on the
roller for it to function properly
Pull the yellow cam lever down and rotate 90 de-
grees clockwise to unlatch the resistance unit. Push
the resistance unit towards your rear wheel until the
roller contacts the tire. Latch the resistance unit by
rotating the cam lever 90 degrees counter clockwise,
while holding the resistance unit. Compress the
roller against the tire by pulling up on the cam lever
as shown below.

6
The resistance unit should be tight enough to pre-
vent the tire from slipping during accelerations.
A small indentation will be seen in the tire when
tightened properly. If slipping occurs, increase tire
compression by re-latching the resistance unit. Pull
the yellow cam lever further down while performing
the initial unlatching step.
Note: If the cam lever pops open while riding, move
the resistance unit and mount it to the front bolt
hole as shown below. Most tires will fit using either
mounting hole. Larger tires including 29” MTB tires
require mounting to the rear hole.
Note: Be certain your tires are inflated to their proper
pressure. Knobby tires will cause noise and vibration.
For best results, use a slick-tread tire. Note that any
stationary trainer will increase the wear on your tires.
Using harder rubber composed tires will improve
their life.
1.5 Detaching your Bike from the Trainer
Pull the yellow cam lever down and rotate 90 de-
grees clockwise to unlatch the resistance unit. Pivot
the resistance unit down to allow clearance for your
rear wheel. Latch the resistance unit by rotating the
cam lever 90 degrees counter clockwise and pushing
up.
Hold your bike by the seatpost. Rotate the yellow
skewer clamp knob counter clockwise to release
your bike.

7
Part 2: About the CycleOps JetFluidTM Pro Trainer
The CycleOps JetFluidTM Pro Trainer has been carefully constructed using extensive testing and analysis,
including real world data collected by exercise physiologist Allen Lim, PhD. to provide the most road-like feel
possible in a stationary trainer. The resulting power curve illustrated here ensures the widest range of resis-
tance for a fluid trainer at any given speed. Use this chart to benchmark your power to speed relationship.
CycleOps JetFluid
TM
Pro
0
100
200
300
400
500
600
700
800
0 5 10 15 20 25 30 35
Speed (mph)
Power (watts)
JetFluid

8
Warranty
The CycleOps JetFluidTM Pro is designed specifically
for the home use and as such carries the following
warranty:
All Saris Cycling Group CycleOps JetFluidTM Pro prod-
ucts are warranted to the retail purchaser to be free
from defects in materials and workmanship.War-
ranty coverage valid to the original purchaser only
and proof of purchase will be required.
Residential Environment:
Frame: Lifetime
Parts: 3 years
Labor: 1 year
This warranty excludes wear items that need to be
replaced due to normal wear and tear.
This warranty does not cover:
Normal wear and tear.1.
Any damage, failure or loss caused by accident,2.
misuse, neglect, abuse, improper assembly, im-
proper maintenance, or failure to follow instruc-
tions or warnings in Owner’s Manual.
Use of products in a manner or environment for3.
which they were not designed.
Limitations
The foregoing warranties are in lieu of and exclude
all other warranties not expressly set forth herein,
whether expressed or implied by operation of law or
otherwise, including, but not limited to, warranties
of merchantability or fitness for a particular purpose.
Saris Cycling Group shall in no event be liable for
incidental or consequential losses, damages or ex-
penses in connection with its exercise products. Saris
Cycling Group’s liability hereunder is expressly limit-
ed to the replacement of goods not complying with
this warranty or, at Saris Cycling Group election, to
the repayment of an amount of the purchase price of
the exercise product in question. Some states do not
permit the exclusion or limitation of implied warran-
ties or incidental or consequential damages, so the
preceding limitations and exclusions may not apply
to you.
Procedures
Warranty service will be performed by Saris Cycling
Group or an authorized Saris Cycling Group Dealer.
The original purchaser must provide proof of pur-
chase. Service calls and/or transportation to and
from the Authorized Saris Cycling Group Dealer are
the responsibility of the purchaser.
Saris Cycling Group will have the option to repair1.
or replace any product(s) which requires war-
ranty service.
Saris Cycling Group will replace any unit that is2.
structurally defective with a new unit or a unit of
equal value.
In the event a product cannot be repaired, Saris3.
Cycling Group will apply a limited credit reim-
bursement toward another CycleOps JetFluidTM
Pro Trainer product of equal or greater value.
Saris Cycling Group
5253 Verona Rd.
Madison,WI 53711
p. 800-783-7257
f. 608-274-1702
www.saris.com
www.cycleops.com
18456 07/08

JetFluid
TM
ProTrainer
Guíadeusuario

2
¡Enhorabuena!Haadquiridoelmejorsistemade
entrenamientofluido,puroysimple.CycleOps
Jet-Fluid
TM
Proleofrecelasensaciónrealdefinitiva
paralamayorgamadeciclistasposible.
CycleOpsJetFluid
TM
Proaprovechalalegendaria
tecnologíaCycleOpsFluidylasitúaenunnivel
superior,ofreciendounacurvadepotencia
progresivayunaumentodelaresistenciaal
aumentarlavelocidad,igualqueencarretera.
LacurvadepotenciaseequiparaalvolanteCycleOps
JetFluid
TM
ProutilizandolatecnologíaPowerTuned,
garantizandounequilibrioadecuadoentrela
resistenciayelmomentoparasimularmejorla
sensacióndeciclismoalairelibre.Elcanalpatentado
Airflowmantienelatemperaturadefuncionamiento
paraunasesiónsuaveyunfuncionamientoprolon-
gado,respaldadopornuestragarantíadeporvida.
Estaguíadeusuarioleindicacómoconfigurarel
aparatodeentrenamientoCycleOpsJetFluid
TM
Proy
elbastidoryexplicaexhaustivamentecómoutilizar
lacurvadepotenciaprogresivaCycleOpsJetFluid
TM
paracolocarseenposicióndeventajafrentealos
competidores.
Precaucionesrecomendadas
Antesdeiniciarunprogramadeejerciciosconsulte
consumédicooconunprofesionalsanitario.
Dichoprofesionalpodráayudarleaestablecer
unprogramadeejerciciosconunafrecuencia,
intensidadyhorarioacordesasuedadycondición
física.Sitienealgúndoloruopresiónenelpecho,
observaunpulsoirregular,lefaltaelaire,sesiente
débiloincómodomientrasrealizaelejercicio,
¡DETÉNGASE!Consulteasumédicoantesde
continuar.Elincumplimientodeestosconsejos
podríaprovocarheridasoproblemasgravesde
salud.
· Noquitelospiesdelospedalesmientrasutilizala
bicicleta.
· Nointentehacergirarlabicicletaamucha
velocidadodepiehastaquehayapracticadoa
unavelocidadmenor.
· Nocoloquelosdedosniningúnobjetoenlas
partesmóvilesdelaparatodeentrenamiento
olabicicleta.
· Mantengaalejadosalosniñosyanimalesdesu
bicicletaydelaparatodeentrenamientocuando
losestéutilizando.Nopermitaquelosniños
utilicenlabicicleta.
· Nohagagiraramanolamaniveladelpedal.Para
evitarenredosyposiblesdaños,noacerquelas
manosolosbrazosalmecanismodetracción.
· Nosebajedelabicicletahastaquelospedales
ylaruedatraserasehayanDETENIDO
completamente.
INTRODUCCIÓN

3
Parte1:InstalacióndeCycleOpsJetFluid
TM
Pro
1.1:Listadodepiezas
ElaparatodeentrenamientoCycleOpsJetFluid
TM
Prodebeincluirloscomponentessiguientes:
UnidadderesistenciaCycleOpsJetFluid• TM
Promontadaybastidor(A)
CierrerápidoCycleOps(B)•
DVDdeentrenamiento• RaceDay(C)
Tarjetaderegistrodegarantía(nomostrada)(TambiénpuederegistrarsuequipoCycleOpsen•
www.cycleops.com)
Sienlacajanoencuentratodosestoselementos,póngaseencontactoconelserviciodeatenciónalcliente
deSarisenel800-783-7257(opción3).
(A)
(B)
(C)

4
1.2:Montajedelaparatodeentrenamiento
Paramontarelaparatodeentrenamiento,
extiendalaspatastalcomoseindicaacontinuación
ycolóquelosobreunasuperficieplana.
Girelaruedecillaparaajustarlapataynivelarel
bastidorcomosemuestraacontinuación.
1.3:Fijacióndelabicicletaalaparatode
entrenamiento
ElaparatodeentrenamientoCycleOpsJetFluid
TM
Pro
estádiseñadoparasuusoconelcierrerápido
suministrado.Sustituyaelcierrerápidodelarueda
traseradelabicicletaporelsuministrado.Asegúrese
quelamaniveladedesacoplerápidoestéenellado
izquierdodelabicicletayqueapuntehaciaarriba.
Gireelpomoamarillodelamordazadela
abrazaderaenelsentidodelasagujasdelreloj
paradejarespaciosuficientealcierrerápido.
Presionar
Extender

5
Tiredelapalancadelevaamarillahaciaabajoy
gírela90gradosenelsentidodelasagujasdelreloj
paradesacoplarlaunidadderesistencia.Girela
unidadderesistenciahaciaabajoparadejarespacio
paralaruedatrasera.
PRECAUCIÓN:Enestaposiciónlaunidadde
resistenciapuedemoverselibremente,mantenga
losdedosalejadosdelaspartesmóviles.
Acoplelaunidadderesistenciaenlaposición
inferiorgirandolapalancadeleva90gradosen
sentidocontrarioalaagujadelrelojypresionela
palancadelevacontralaunidadderesistencia.
Levantelabicicletaporelsillíneinserteellado
derecho(desdeelpuntodevistadelciclista)del
cierrerápidoenelconofijodelladocorrespondiente
delbastidor.
Alineeelladoizquierdodelcierrerápidoconel
conoajustable,alineandolasmuescasdelconocon
lamanivela/palancadedesacoplerápido. Gireel
pomoamarillodelamordazadelaabrazaderatal
comosemuestraacontinuaciónparaasegurarla
ruedatraseraalaparatodeentrenamiento.Apriete
elpomohastaquesehayafijadoconseguridaden
suposición.
Nota:Noesnecesarioquelabicicletaestécentrada
enelrodilloparaquefuncionecorrectamente
Tiredelapalancadelevaamarillahaciaabajoy
gírela90gradosenelsentidodelasagujasdelreloj
paradesacoplarlaunidadderesistencia.Tiredela
unidadderesistenciahacialaruedatraserahasta
queelrodillohagacontactoconlacubierta.Acople
launidadderesistenciagirandolapalancadeleva
90gradosensentidocontrarioalasagujasdelreloj
mientrassujetalaunidadderesistencia.Presioneel
rodillocontralacubiertatirandohaciaarribadela
palancadelevatalcomosemuestraacontinuación.

6
Launidadderesistenciadebetenerlatensión
suficienteparaevitardeslizamientosdurantelas
aceleraciones.Cuandosehatensadocorrectamente
severáunapequeñahendiduraenlacubierta.
Siseproducendeslizamientos,aumentela
compresióndelacubiertavolviendoaacoplar
launidadderesistencia.Tiremáshaciaabajo
delapalancadelevaamarillaalrealizarel
desacoplamientoinicial.
Nota:Silapalancadelevasesueltaalutilizarla
bicicleta,muevalaunidadderesistenciaymóntela
enelorificiodelpernofrontaltalcomosemuestraa
continuación.Lamayorpartedelasruedas
encajaránencualquierorificiodemontaje.Las
ruedasmayores,incluidaslasde29”MTBrequieren
elmontajeenelorificioposterior.
Nota:Asegúresedequelasruedasesténinfladasa
lapresiónadecuada.Lasruedasflojasprovocarán
ruidosyvibración.Paraconseguirlosmejores
resultadosutiliceunacubiertalisa.Tengaen
cuentaquecualquieraparatodeentrenamiento
estacionarioprovocaráundesgastedelasruedas.
Elusodecubiertasfabricadasconunagomamás
duraprolongarásuvidaútil.
1.5Desmontajedelabicicletadelaparatode
entrenamiento
Tiredelapalancadelevaamarillahaciaabajoy
gírela90gradosenelsentidodelasagujasdelreloj
paradesacoplarlaunidadderesistencia.Girela
unidadderesistenciahaciaabajoparadejarespacio
paralaruedatrasera.Acoplelaunidadderesistencia
girandolapalancadeleva90gradosensentido
contrarioalasagujasdelrelojytirehaciaarriba.
Mantengasujetalabicicletaporelsillín.Gireel
pomoamarillodelamordazadelaabrazaderaen
elsentidoinversoalasagujasdelrelojparasoltarla
bicicleta.

7
Parte2:AcercadelaparatodeentrenamientoCycleOpsJetFluid
TM
Pro
ElaparatodeentrenamientoCycleOpsJetFluid
TM
Prosehaconstruidotrasrealizarampliosensayosy
análisis,incluidalarecopilacióndedatosrealesporelfisiólogoDr.AllenLim,paraofrecerlasensaciónmás
realistaposibleenunaparatodeentrenamientoestático.Lacurvadepotenciaresultantequesemuestra
aquígarantizaqueelrangoderesistenciaseaelmásamplioposibleparaunaparatodeentrenamiento
fluidoacualquiervelocidaddada.Utiliceestediagramaparaponerapruebasurelaciónentrepotenciay
velocidad.

8
Garantía
ElaparatoCycleOpsJetFluid
TM
Proestádiseñado
específicamenteparausodomésticoycomotal
incluyelagarantíasiguiente:
TodoslosproductosCycleOpsJetFluidTMProde
SarisCyclingGroupcuentancongarantíadel
minoristadeestarlibresdedefectostantoenlos
materialescomoenelmontaje.Lacoberturade
garantíasóloesválidaparaelcompradororiginaly
seránecesariouncomprobantedecompra.
Entornoresidencial:
Bastidor:Deporvida
Piezas:3años
Manodeobra:1año
Estagarantíaexcluyeloselementosdesgastados
querequieransustituciónporundesgastenormal
debidoaluso.
Estagarantíanocubre:
Desgastenormaldebidoaluso.1.
Daños,averíasopérdidasprovocadospor2.
accidente,usoincorrecto,negligencia,abuso,
montajeincorrecto,mantenimientoinadecuado
oincumplimientodelasinstruccioneso
advertenciasdeesteManualdeusuario.
Usodelosproductosenunentornoodeuna3.
maneraparalaquenofuerondiseñados.
Limitaciones
Lasgarantíasprecedentessustituyenyexcluyena
cualesquieraotrasgarantíasnoestablecidas
expresamenteenelpresentedocumento,tanto
expresascomoimplícitasprevistasporlaleyuotras,
peronolimitadasagarantíascomercialeso
adecuaciónaunpropósitoparticular. Bajoninguna
circunstanciaSarisCyclingGroupseráresponsable
dedaños,pérdidasogastosimprevistosoderivados
enrelaciónasusproductos.Laresponsabilidadde
SarisCyclingGroupselimitaexpresamenteala
sustitucióndelosproductosquenocumplanesta
garantíaobajocriteriodeSarisCyclingGroupal
pagodeunacantidaddelpreciodecompradel
productoencuestión.Algunosestadosnopermiten
laexclusiónolimitacióndegarantíasimplícitaso
dañosderivadosoimprevistos,portantoesposible
quelaslimitacionesyexclusionesprecedentesnole
afecten.
Procedimientos
Elserviciodegarantíaserállevadoacabopor
SarisCyclingGroupenundistribuidorautorizado
deSarisCyclingGroup.Elcompradororiginaldebe
proporcionaruncomprobantedecompra.Los
gastosdelasllamadasdeservicioyeltransporte
haciaydesdeeldistribuidorautorizadodeSaris
CyclingGroupcorrenporcuentadelcomprador.
SarisCyclingGrouptendrálaopciónderepararo1.
sustituirlosproductosquerequieranelservicio
degarantía.
SarisCyclingGroupsustituirácualquierunidad2.
defectuosaestructuralmenteporunaunidad
nuevaounaunidaddeigualvalor.
Encasodequeunproductonosepuedareparar,3.
SarisCyclingGroupaplicaráunreembolsode
créditolimitadoparaotroproductoCycleOps
JetFluid
TM
Prodeigualvalorosuperior.
SarisCyclingGroup
5253VeronaRd.
Madison,WI53711
p.800-783-7257
f.608-274-1702
www.saris.com
www.cycleops.com
1845607/08

Appareild’entraînement
JetFluid
TM
Pro
Moded’emploi

2
Félicitations!Vousavezachetélemeilleurappareil
d’entraînementàfluidequiexisteaujourd’hui.Le
CycleOpsJetFluid
TM
Prooffreeneffetcequisefaitde
mieuxensensationréellepourlepluslargeéventail
decoureurscyclistesquisoit.
LeCycleOpsJetFluid
TM
Profaitencoreprogresserla
technologielégendaireCycleOpsFluidenoffrant
unecourbedepuissanceprogressivequiaccroît
larésistanceparallèlementàlavitesse,commesur
laroute.Cettecourbedepuissancevadepairavec
levolantCycleOpsJetFluid
TM
Pro,quifaitappelàla
technologiePowerTunedpourunéquilibreparfait
entrerésistanceetcouple,afindereproduireau
mieuxlasensationd’unecourseenextérieur.
Lecanaldeventilationbrevetémaintientune
températuredefonctionnementpourunecourse
agréableetuneutilisationdurable,etestcouvertpar
notregarantieàvie.
Cemoded’emploivavousguideràtraversle
montageetleréglagedel’appareild’entraînement
etducadreCycleOpsJetFluid
TM
Pro,etvousfournir
desexplicationsdétailléessurl’utilisationdela
courbedepuissanceprogressiveCycleOpsJetFluid
TM
pourobtenirdesrésultatsquivousdonnerontun
avantagedécisifsurvosadversaires.
Précautionsélémentaires
Avantdedébuterunprogrammed’exercice,
consultezvotremédecinouunprofessionnelde
lasanté.Ilvouspermettrad’établirlafréquence,
l’intensitéetladuréed’exercicequiconviennentà
votreconditiondesantéetàvotreâge.Sivous
ressentezunedouleurdanslapoitrine,des
battementsdecoeurirréguliers,unsoufflecourt,
unévanouissementouuninconfortquelconque
durantunexercice,ARRÊTEZ!Consultezvotre
médecinavantdecontinuer.Lenon-respectdeces
misesengardepourraitentraînerdesblessuresou
desérieuxproblèmesdesanté.
· Neretirezpaslespiedsdespédalespendant
l’exercice.
· Netentezpasdemonterlevéloàgrandevitesse
oudeboutavantdevousexerceràfaiblevitesse.
· N’introduisezpaslamain,ledoigtouun
quelconqueobjetdanslespiècesmobilesde
l’appareild’entraînementouduvélo.
· Tenezlesenfantsetlesanimauxdecompagnie
àdistancedel’appareild’entraînementouduvélo
pendantl’exercice.Nepermettezpasauxenfants
d’utiliservotreappareilouvotrevélo.
· Nefaitesjamaistournerlepédalieràlamain.Pour
éviterunaccrochageetdesblessureséventuelles,
neposezpaslesmainsoulesbrassurlemécan
ismed’entraînement.
· Nedémontezpaslevéloavantquelespédales
etlarouearrièresoientàl’ARRÊTcomplet.
INTRODUCTION

3
Partie1:MontageetréglagedevotreCycleOpsJetFluid
TM
Pro
1.1:Listedespièces
Votreappareild’entraînementCycleOpsJetFluid
TM
Prodoitêtrefourniaveclesélémentssuivants:
UnitéderésistanceetcadreCycleOpsJetFluid• TM
ProTrainerassemblés(A)
BrocheCycleOps(B)•
DVDd’entraînement• RaceDay(C)
Carted’enregistrementdegarantie(nonillustrée)(vouspouvezégalementenregistrervotreappareil•
CycleOpssurwww.cycleops.com)
Siundesélémentsci-dessusnesetrouvepasdansl’emballage,veuillezcontacterleserviceclientèleSaris
aunuméro800-783-7257(option3).
(A)
(B)
(C)

4
1.2:Montageetréglagedeel’appareil
d’entraînement
Pourmontervotreappareil,étendezsespieds
commeillustréci-dessous,puisposez-lesurune
surfaceplane.
Tournezlamolettepourréglerlepiedetmettrele
cadredeniveau,commeillustréci-dessous.
1.3Fixationduvélosurl’appareild’entraînement
L’appareild’entraînementCycleOpsJetFluid
TM
Pro
estconçupourêtreutiliséaveclabrochefournie.
Remplacezlabrochedelarouearrièredevotre
véloparcellefournie.Veillezàcequelapoignéede
desserragerapidesetrouveducôtégaucheduvélo
etsoitorientéeverslehaut.
Tournezleboutondeserragedelabroche(jaune)
danslesensdesaiguillesd’unemontreafinde
ménagerunécartementsuffisantpourvotrebroche.
Pressez
Étendez
This manual suits for next models
1
Table of contents
Languages:
Other CycleOps Fitness Equipment manuals