Harris 10059-100 User manual

Do not attempt to operate this tool until you have read and thor-
oughly understand all instructions and safety rules contained in
this manual. Failure to comply can result in accidental personal
injury, fire or electric shock.
0II-724605-002
Issue 4, 4/99
pp_005
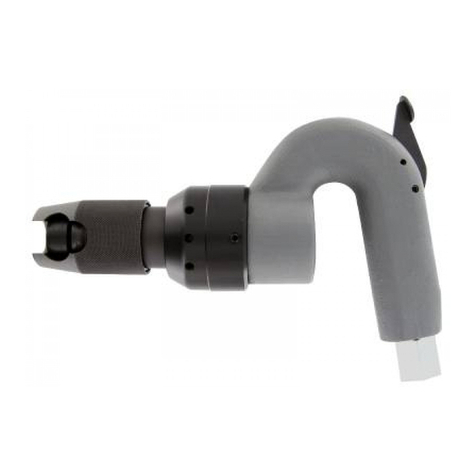
POWER PUNCH MULTI-IMPACTTOOL
The Power Punch Multi-Impact Tool is an auto-impact, combina-
tion wire insertion tool. It can insert up to 10 wires at a time into
the 110 wiring block, without cutting off leads. And, with a change
of heads, it can trim up to 10 wires.It is also used to seat the 110C
connecting block.
The trigger-activated electric solenoid action eliminates the
physical exertion required with other push-down insertion tools. It
also ensures proper and effortless termination of tough waterproof
conductors at low temperatures.
Note:The Power Punch tool-
head rotates 360 (in 90
increments) to accomodate
varying block installations.
USE OF EXTENSION CORD
Use only extension cords that are listed by Underwriter's
Laboratories (U.L.). For outdoor use, the extension cord must be
marked as "outdoor" or have the letters "WA" on the cord. Such a
cord is also suitable for indoor use. Use an extension cord with
adequate size wire. Minimum wire size: up to 25 feet; use 16
gauge, up to 50 feet; 14 gauge, and over 50 feet is not recom-
mended.
90 DAY LIMITED WARRANTY
Harris warrants this product to the original retail purchaser for 90 days from the date
of purchase against any defects that are due to faulty material or workmanship.
Return the complete unit to the participating retailer for free replacement. Proof of
purchase is required. The complete tool may also be returned to Harris Corporation,
809 Calle Plano, Camarillo, CA 93012-8519, transportation prepaid, for free
replacement or repair at Harris' option. This warranty does not apply where repairs
have been made or attempted by others, where the tool has been abused, misused
or improperly maintained, where alterations have been made to the tool, or where
repairs are required because of normal wear. This warranty does not apply to
accessories.
THIS WARRANTY IS IN LIEU OF ALL OTHER EXPRESS WARRANTIES, ANY
WARRANTY OF MERCHANTABILITY OR FITNESS FOR A PARTICULAR
PURPOSE IS LIMITED TO THE DURATION OF THIS WARRANTY. IN NO EVENT
SHALL HARRIS BE LIABLE FOR CONSEQUENTIAL DAMAGES.
Some states do not allow the exclusion or limitation of incidental or consequential
damages, so the above limitation or exclusion may not apply to you. Some states do
not allow limitations on how long an implied warranty lasts, so the above limitation
may not apply to you. This warranty gives you specific legal rights, and you may also
have other rights which vary from state to state.
Should you have any questions, contact Harris in the U.S. at 1-800-437-2266.
WARNING
READ ALL SAFETY INSTRUCTIONS
1. DO NOT POINT Impact Tool toward anyone or anything other than for
its intended use. Body contact with the blade can cause injuries.
2. READ THIS owner's manual carefully. Learn the applications and
limitations, as well as the specific potential hazards associated with this
tool.
3. ALWAYS ensure that the trigger lock is in the "ON" position when the
tool is not in operation.
4. DO NOT ATTEMPT to service this tool if in need of repair. Return to
dealer for repair or replacement.
5. GUARD AGAINST ELECTRICAL SHOCK. Prevent body contact with
grounded surfaces like pipes or other metal surfaces while operating this
tool. USE only in standard 110 cycle power source.
6. USE IN PROPER ENVIRONMENT. Do not use tool in damp or wet
locations or expose it to rain. Keep work area well lighted. Do not use in
the presence of flammable liquids or gases.
7. STORE IDLE TOOLS.When not in use, the tool should be stored in a
dry place.
8. DO NOT FORCE tool. Align tool for insertion and let the force of the
solenoid do the work.
9. WEAR SAFETY GLASSES or a face shield when using the tool.
10. DO NOT ABUSE cord. Never carry the tool by the cord or yank the
cord to disconnect from plug or receptacle. Keep the cord away from heat,
oil and sharp edges.
11. DO NOT OVERREACH. Keep proper footing and balance at all times.
12. Maintain tools with care. Keep them clean and in good working order
for best and safest performance.
13. DISCONNECT TOOLS when not in use, before servicing and when
loading or changing accessories.
14.AVOID ACCIDENTAL FIRING. Do not carry a plugged-in tool with your
finger on the trigger. Always ensure trigger lock is in the "ON" position
when transportingtool, changing insert heads, or when the tool is idle.
15. USE PROPER extension cord for the environment.
16. CHECK FOR DAMAGED PARTS .Before further use of the tool, hous-
ing or any other part of the tool that is damaged should be carefully
checked to determine that it will operate properly and perform its intended
function.
17. STAY ALERT. Watch what you are doing. Do not operate tool when
you are tired or under influence of drugs, alcohol or medication.
18. HIGH LOCATIONS. When using the tool in high locations, always
make sure there is no one below that could be hurt if the tool is dropped.
19. OTHER PEOPLE NEARBY. All people nearby should wear safety
glasses or face shield and be a safe distance from work area.
20. REPLACEMENT PARTS. Use only with replacement parts ordered
from the manufacturer or authorized distributor.
ORDERING PARTS
Replacement parts or additional heads may be ordered from
many Harris Corporation sources. Call Harris in the U.S. at
1-800-437-2266 for more information.
PART PART NUMBER
Power Punch Multi-Impact 10059-100
Tool, P2014
Multi-Blade Head 10059-300
MAINTENANCE
Do not lubricate. The Power Punch Multi-Impact tool is designed
to operate efficiently without oil or grease.
Cleaning: Use a clean cloth to remove external dirt. Do not use
solvents as they can damage plastic parts.

Operation
Using the cutting edge of the Cut Insert, terminate and
trim the conductors into the 110 wiring base (terminal
block).
With wires in place and trimmed in the wiring base,
insert a 110C connecting block into the head of the tool.
Use the No Cut Insert.
Carefully align ImpactTool over the wiring base and
squeeze trigger.
Place cross connect cable into the 110C block and
terminate.
1
2
3
4
CAUTION: When inserting wires or the 110C block, always keep
Impact Tool perpendicular to connector block to avoid damage to
terminals
NEVER insert wires and the 110C block at the same time.
Improper seating will occur.
DO NOT DRY FIRE TOOL - Use tool only for terminating wire
into the 110 block. Activating tool by pulling the trigger while the
tool is not in the 110 block may cause damage to the internal tool
mechanism and void warranty.
DO NOT PUSH ONTOOL. When using the tool, allow the tool to
do the work. Do not force the tool into a block and do not push
on the back of the tool.
Top View
pp_002
Removing
Insert
Ball Plunger
Cutting blades up
for stuff and cut
Locking Bolt
Installing
Insert
pp_003
1
Read important Safety Instructions
on back page,
2
Connect the extension cor to the impact tool cord.
Press the extension cord into the cord retainer to
lock in. Screw locking bolt until cords are fully
sealed.
3
Ball Plunger Locating "V"
Blades
Rotated
PUSHOUT
NOTE: Blade Assembly
is a separate piece.
Sharp Blades
pp_001
To change inserts from Cut Insert to No
Cut Insert, remove head from tool, push
existing insert out of its housing. Rotate
the cutting blade holder so the blades are
up. Push in new insert.
CAUTION: Sharp Blades
PREPARATION FOR USE
This manual suits for next models
1
Popular Tools manuals by other brands

TREND
TREND GRABIT quick start guide

Traditional Tool Repair
Traditional Tool Repair MUL-370 quick start guide
Band-it
Band-it IT1000-C operating manual
Beveltools
Beveltools Bevel Mite ABIS-06 instruction manual
Innovation
Innovation VIEWLIGHT DLR-700 manual
HAMPTON BAY
HAMPTON BAY MDHC150HB Use and care guide

