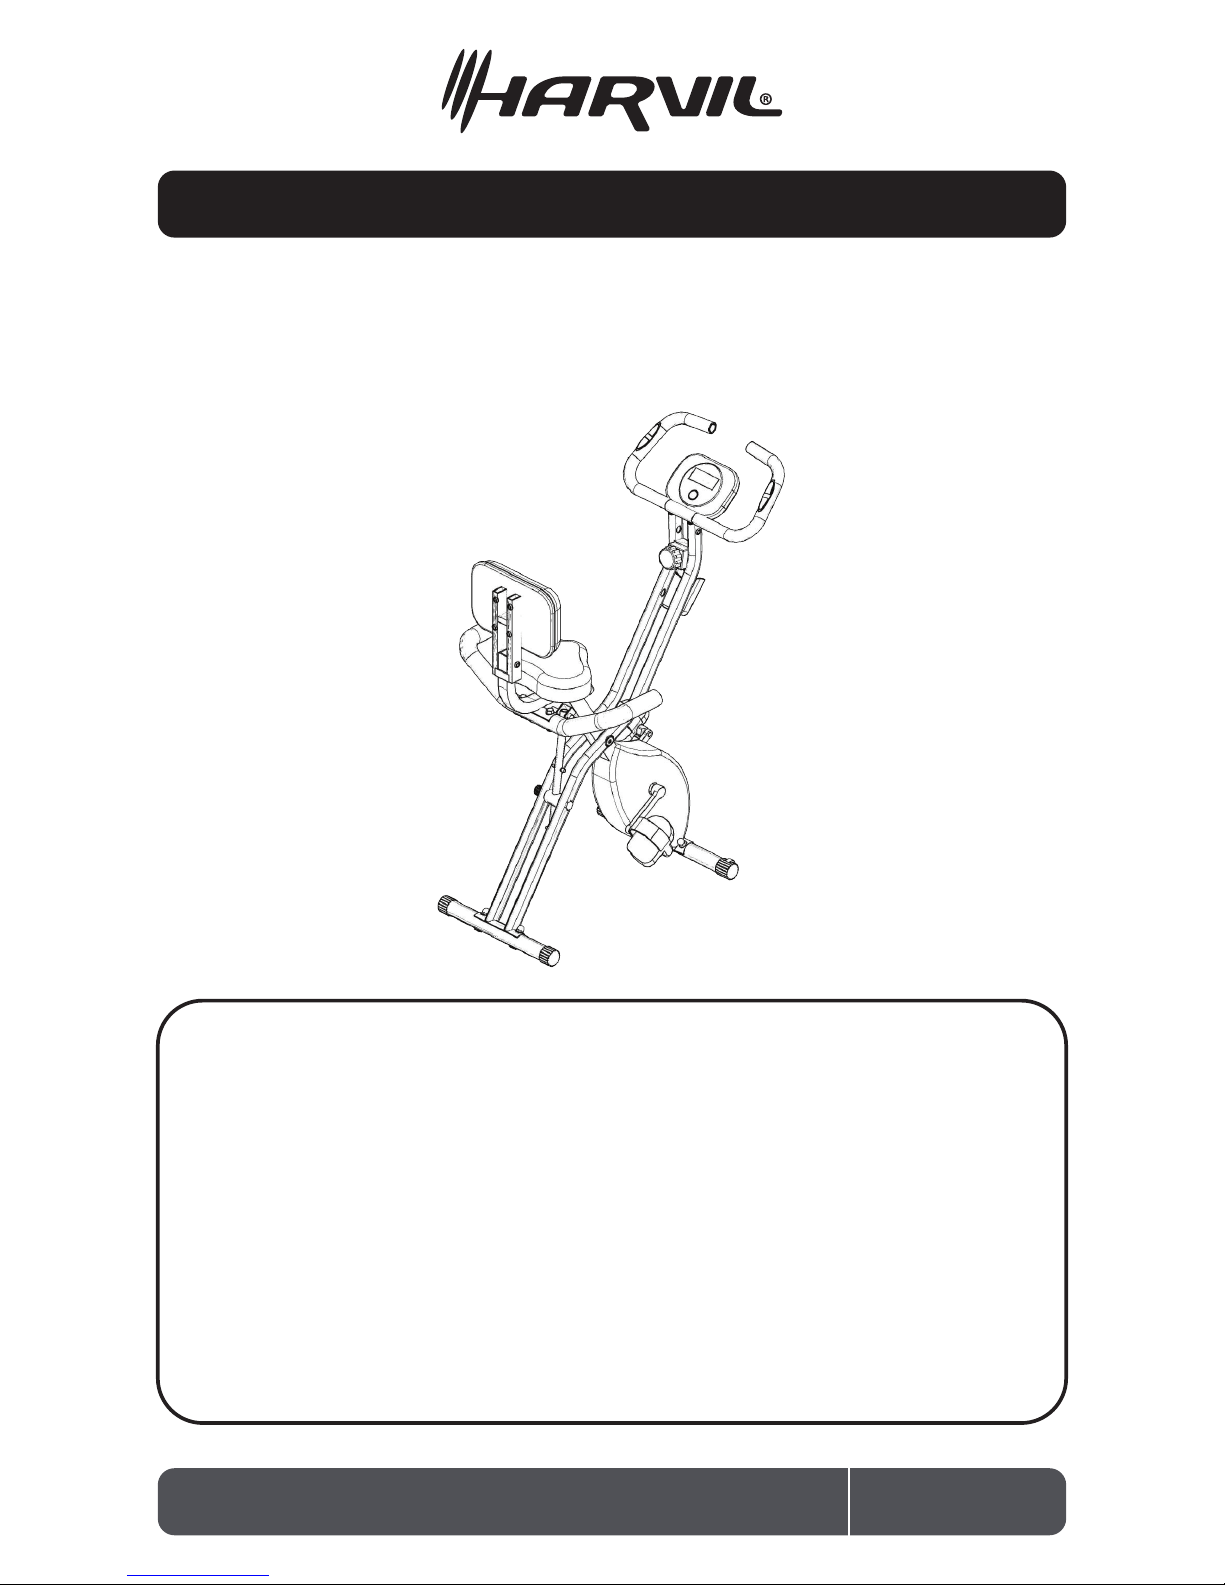
Harvil XB-A User manual
ASSEMBLY INSTRUCTIONS
XB-P / XB-A 1
Foldable Magnec
Exercise Bike
Thank you for your purchase of this Harvil product!
We work around the clock and around the globe to ensure that Harvil products
maintain the highest possible quality. However, in the rare instance that your
product is defective or missing parts, contact your retailer to submit parts
requests or warranty claims. Please read the warranty information at the back
of these assembly instructions for further details.
IMPORTANT! PLEASE READ THESE ASSEMBLY INSTRUCTIONS
IN ENTIRETY BEFORE ASSEMBLING YOUR PRODUCT.
The information contained in this manual is subject to change without notice.

USER GUIDE
XB-P / XB-A 2
1. Please consult a doctor for your health condition before training to prevent injuries or health
issues.
2. If on medication that would aect heart rate, blood pressure or cholesterol index, please comply
with your doctor’s instructions before training.
3. For heart rate measurement, please place both palms on the sensor of the handle bars.
4. Inaccurate or excessive training may cause harm to your body and health. Please stop training
immediately should you experience headache, chest oppression, arrhythmia, abnormally rapid
breathing, dizziness or nausea.
5. This equipment is for adults only, NOT for children.
6. Please place the equipment at a sturdy and level place, with added protection from oor damage.
For your safety, please keep the space clear within a radius of one meter from the equipment.
7. Please make sure all the screws and bolts are tightly screwed before using for the rst time.
8. For equipment repair and maintenance, please use the Harvil-provided spare parts only.
9. Please wear clothes and shoes suitable for tness training and exercise every time you use the
equipment.
10. The maximum weight for the equipment is 330 lbs.
11. This equipment is not for therapeutic or medical use.
12. The equipment is heavy. Please be cautious when moving it around to avoid any accident. It’s
highly recommended that it’s moved by at least 2 people.
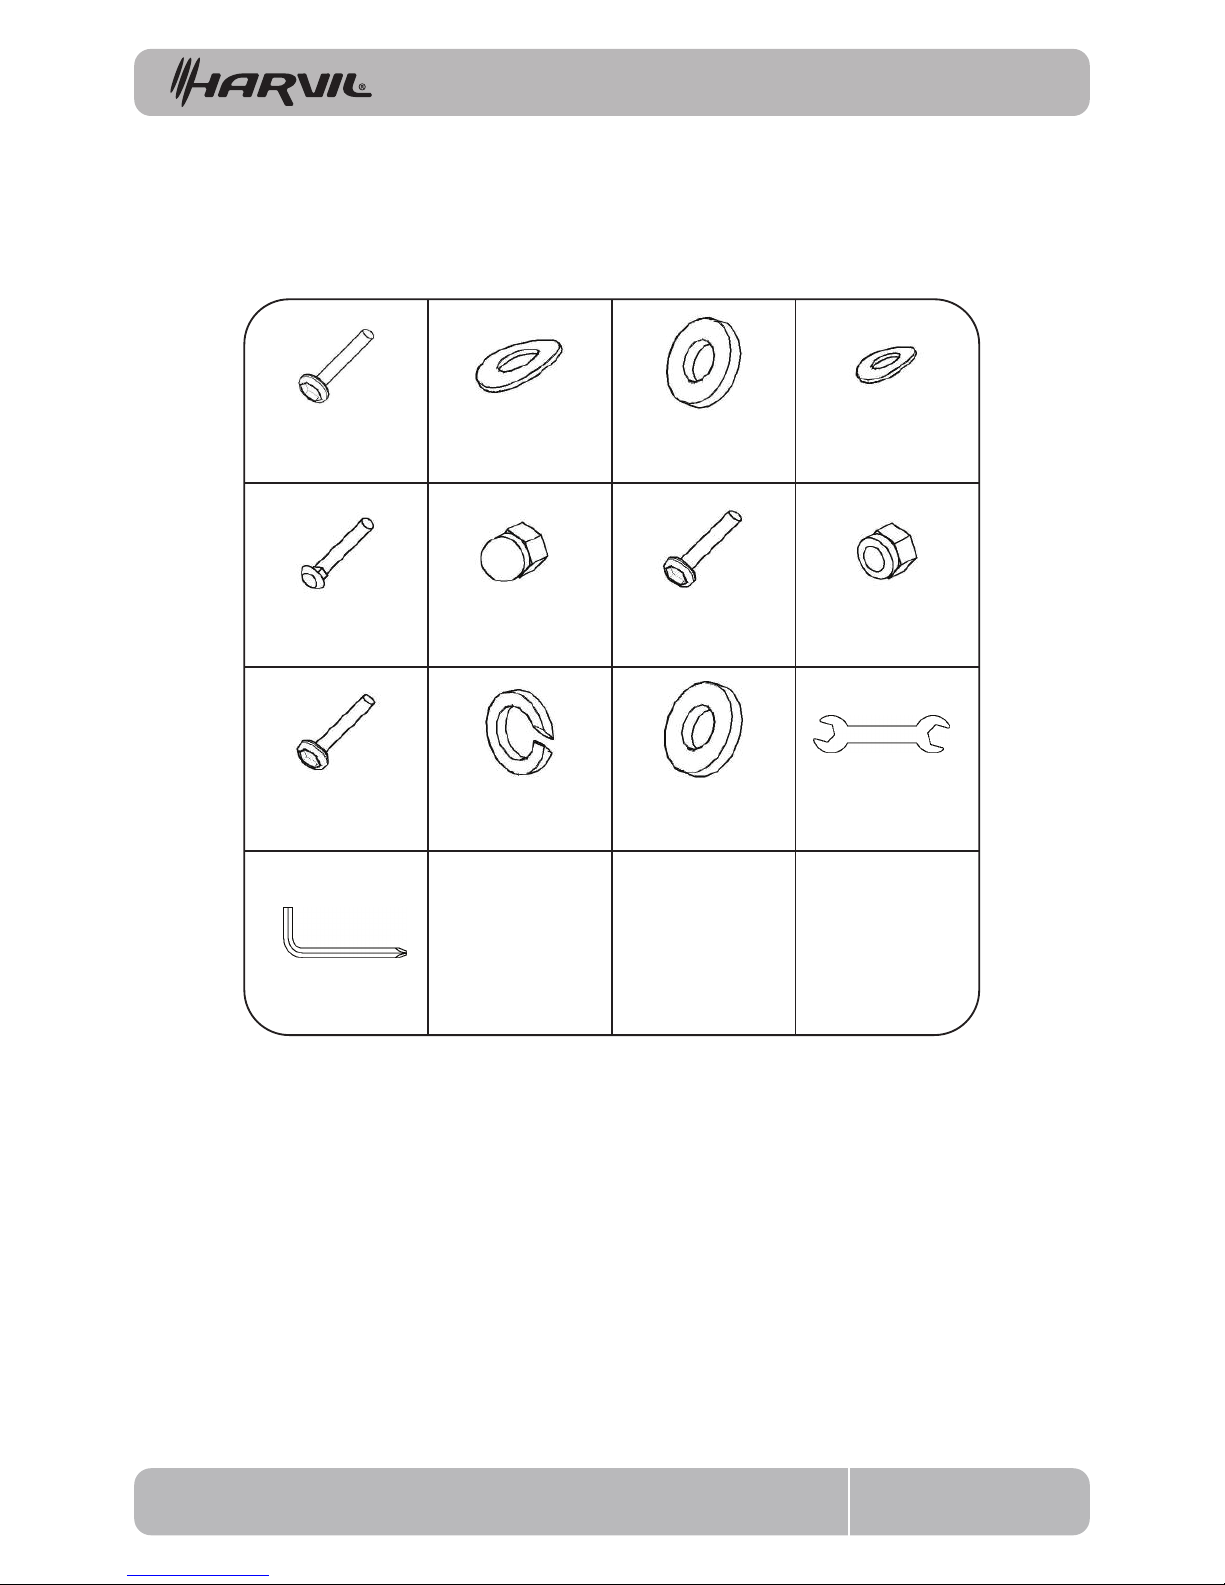
KIT LIST
XB-P / XB-A 3
Semi-Round
Head Screw
(M6 x 12)
Arc Washer
(M6)
Flat Washer
(M6)
Arc Washer
(M8)
Semi-Round
Head Screw
(M8 x 45)
Socket Spanner
(L5)
Spring Washer
(M8)
Flat Washer
(M8)
Outer Hexagonal
Spanner
(13-15)
Carriage Bolts
(M8 x 50)
Cap Nut
(M8)
Semi-Round
Head Screw
(M8 x 35)
Lock Nut
(M8)
ACCESSORIES LIST
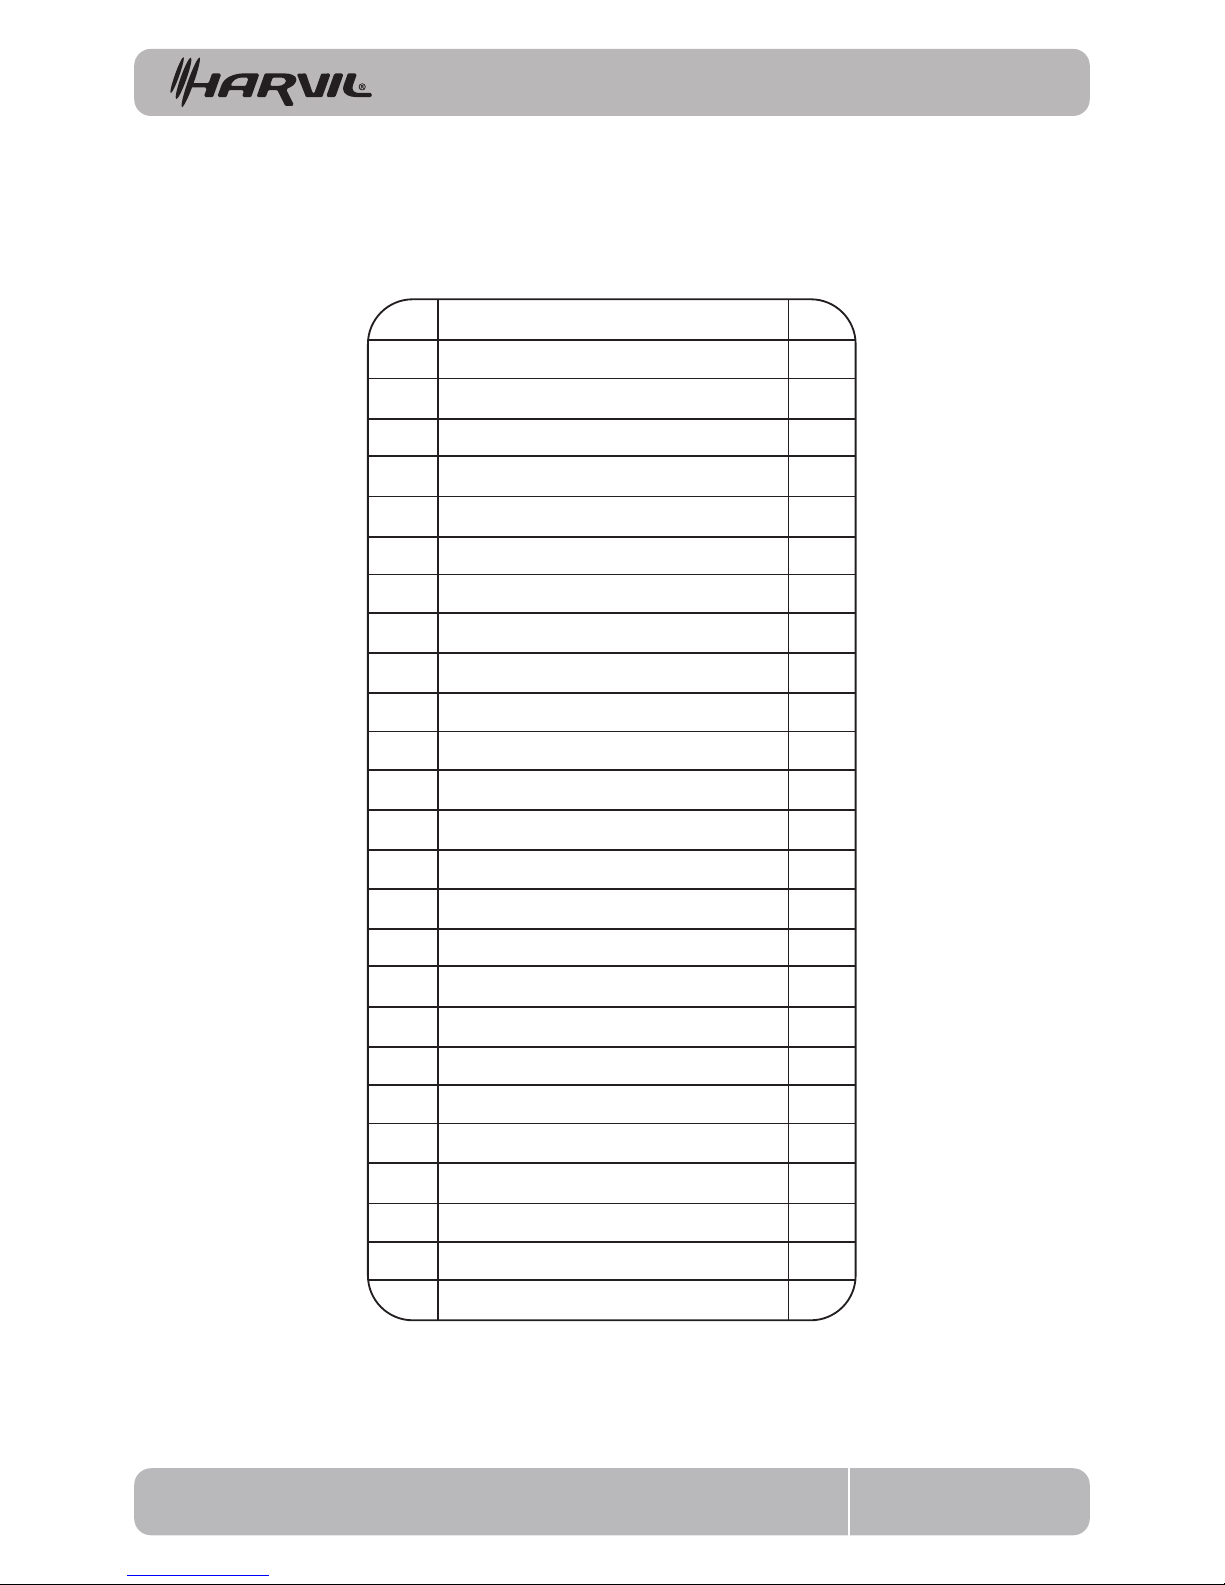
XB-P / XB-A 4
No. Name Q T Y.
1M8*50 Carriage Bolts 2
2Back Stator 1
3M8*40 Semi-Round Head Screw 2
4Back Armrest 1
5Back 1
6Ø 8.5 Flat Washer 5
7M8 Locknut 7
8Ø 8.5 Arc Washer 6
9Seat 1
10 Seat Holder 1
11 Adjustable Knob for Seat 1
12 Pedal (Right) 1
13 M8 Cap Nut 4
14 Foot Tube 2
15 M8*50 Carriage Screw 4
16 Pedal (Left) 1
17 Main Frame 1
18 Ø 6.2 Flat Washer 2
19 M6*12 Semi-Round Head Screw 4
20 Ø 6.2 Arc Washer 2
21 Armrest of Main Frame 1
22 Frame Regulating Lever 1
23 Regulating Rod Fixed Nut 2
24 Spring Gasket 4
25 M8*45 Carriage Bolts 4
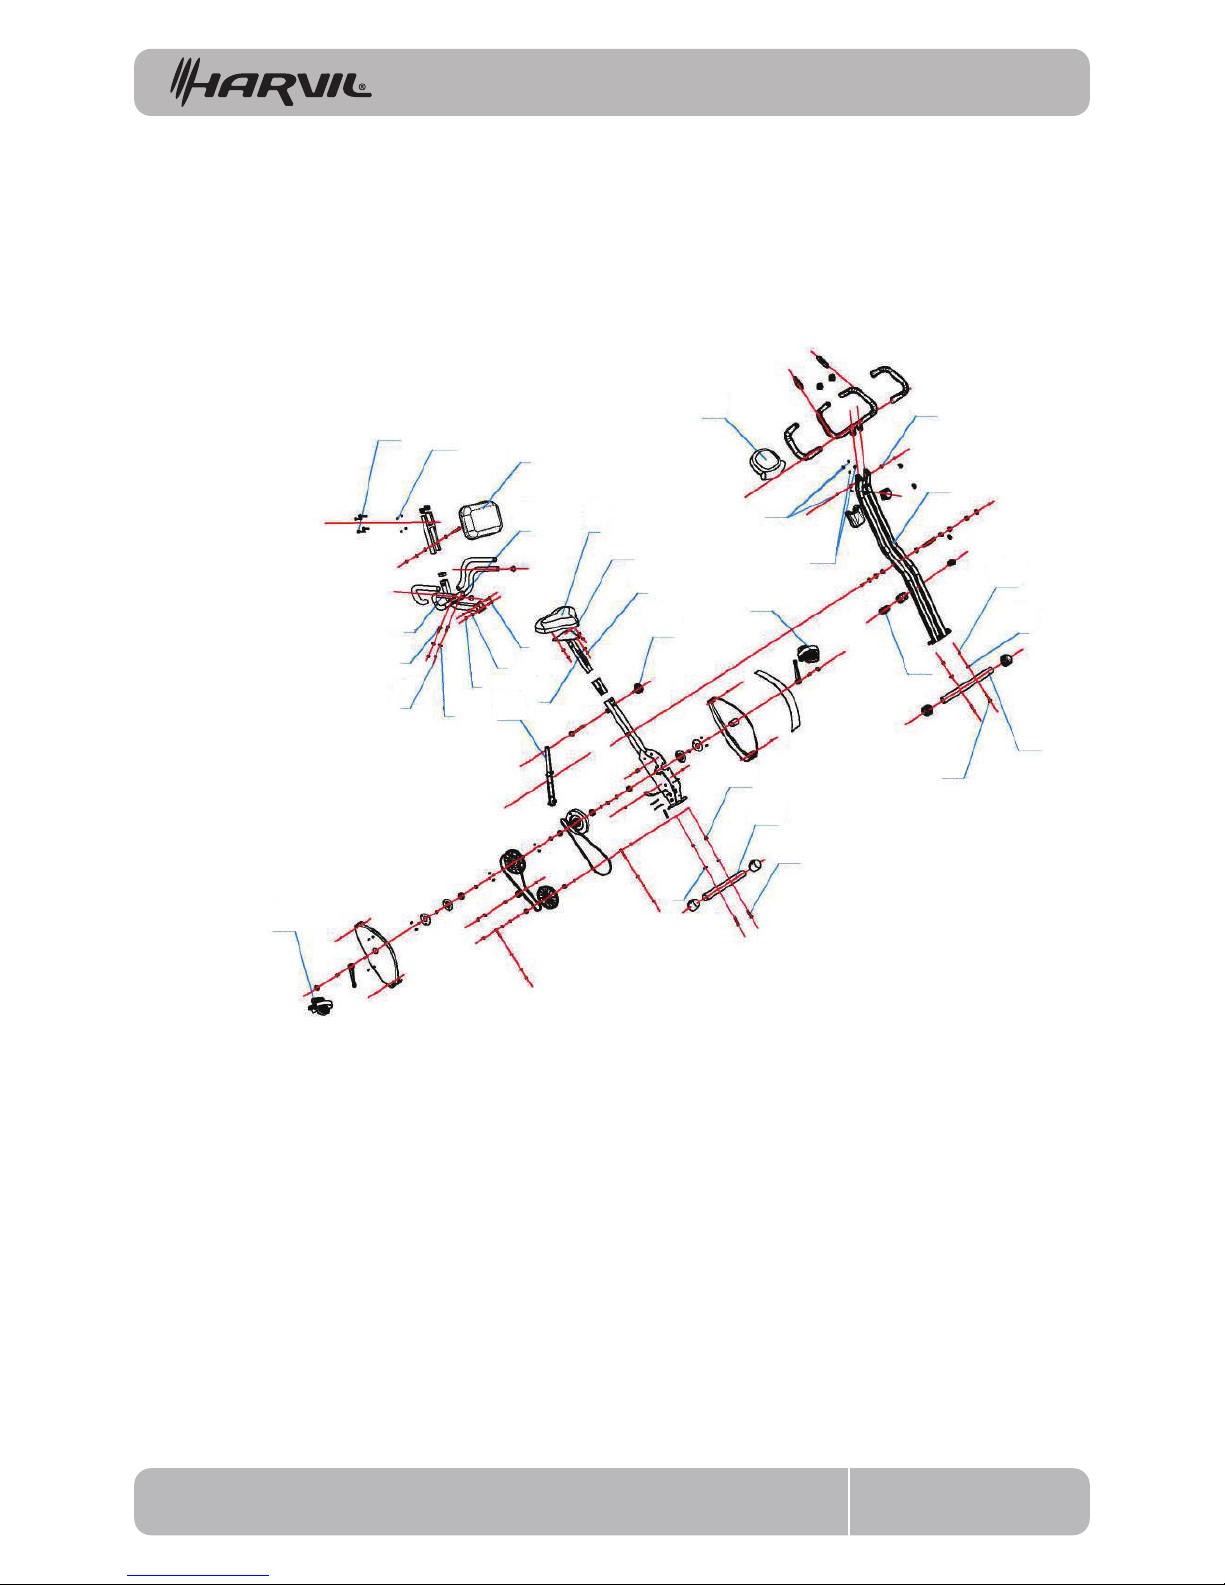
EXPLODED VIEW
XB-P / XB-A 5
21
19
18
17
20
16 13
8
14
15
23
11
7
10
92
5
24
25
4
3
78
761
6
22
15
14
13
8
12

ASSEMBLY INSTRUCTIONS
XB-P / XB-A 6
PART
NAME
Arc Washer
(M8) 4
4
4
8
13
15
Cap Nut
(M8)
Carriage Bolts
(M8 x 50)
PART
DIAGRAM
NO. Q T Y.
17
13
8
14
9
15
To align hole site of Foot tube (14)with Main Frame (17), use Carriage Screw (15), Arc Washer
(8), and Cap Nut (13)then connect and tighten Cap Nut (13).
Step 1
PART
NAME
Flat Washer
(M8) 3
3
8
13 M8 Lock Nut
(M8)
PART
DIAGRAM
NO. Q T Y.
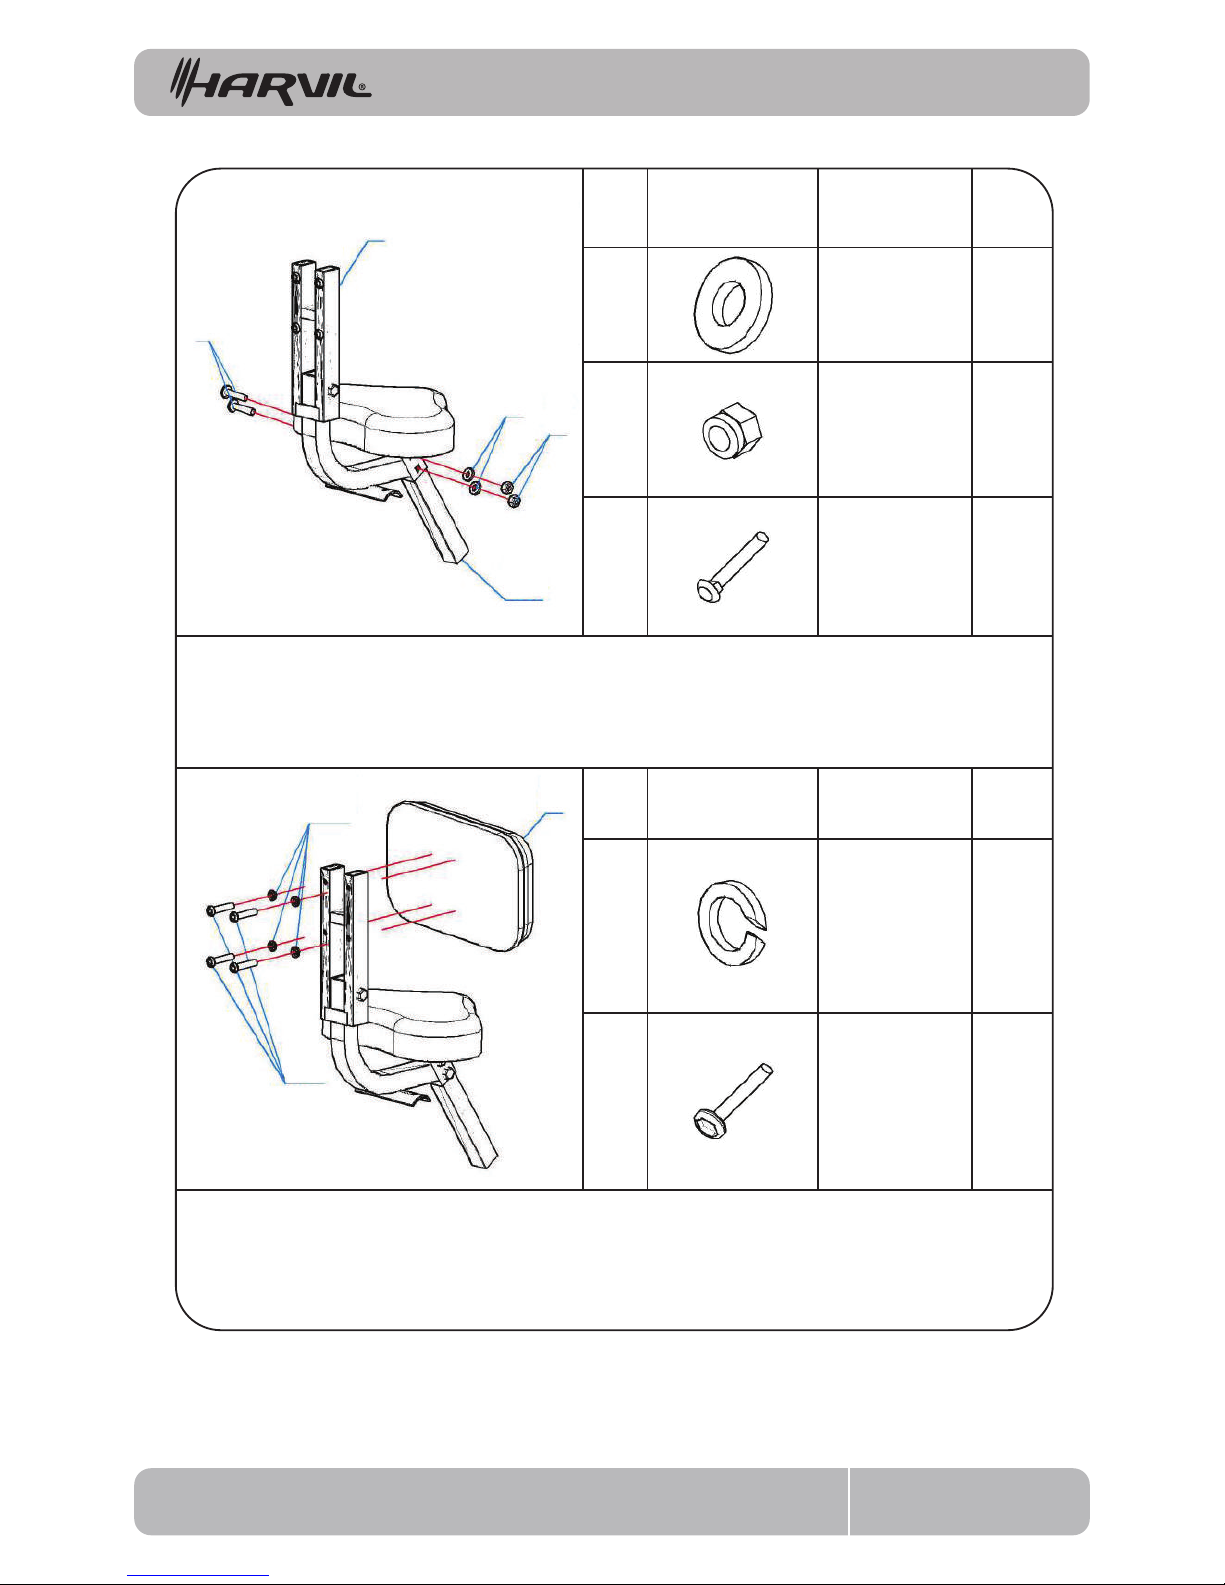
To align hole site of Seat (9)& Seat Holder (10), use Ø 8.5 Flat Washer (7), M8 Lock Nut (6) to
connect, then tighten M8 Lock Nut (12).
Step 2
10
6
7
XB-P / XB-A 7
ASSEMBLY INSTRUCTIONS
PART
NAME
Flat Washer
(M8) 2
2
2
6
7
1
M8 Lock Nut
(M8)
Carriage Bolts
(M8 x 50)
PART
DIAGRAM
NO. Q T Y.
5
1
6
10
7
To align hole site of Back (5) & Seat Holder (10), use M8*45 Carriage Screw (1), Ø 8.5 Flat Washer
(6), M8 Lock Nut (7) to connect, then tighten M8 Lock Nut (7).
Step 3
PART
NAME
Spring Washer
(M8) 4
4
24
25 Semi-Round
Head Screw
(M8 x 45)
PART
DIAGRAM
NO. Q T Y.
Use (25) and align with the back of a chair of 5 holes, Bolt with (24) connect Ø 8.5 Spring
Washer, tighten M8 x 50 Ball Stud (25)
Step 4
24 5
25

XB-P / XB-A 8
PART
NAME
111
Cushion
Adjusng
Knob
PART
DIAGRAM
NO. Q T Y.
11
10
17
Attach seat (10) into Main Frame (17), use Adjustable Knob for Seat (11) to x. The height can
be adjusted after assembly.
Step 5
PART
NAME
Arc Washer
(M8) 2
2
8
Lock Nut
(M8) 27
3
Semi-Round
Head Screw
(M8 x 35)
PART
DIAGRAM
NO. Q T Y.
To align hole site of Back Armrest (4) & Back (5), Use M8*40 Semi-Round Head Screw (3), Back
Stator (2), Ø8.5 Arc Washer (8), M8 Lock Nut (7) to connect and tighten M8 Lock Nut (7).
Step 6
ASSEMBLY INSTRUCTIONS
5
8
3
7
4
2
XB-P / XB-A 9
PART
NAME
220 Arc Washer
(M6)
PART
DIAGRAM
NO. Q T Y.
21
19
17
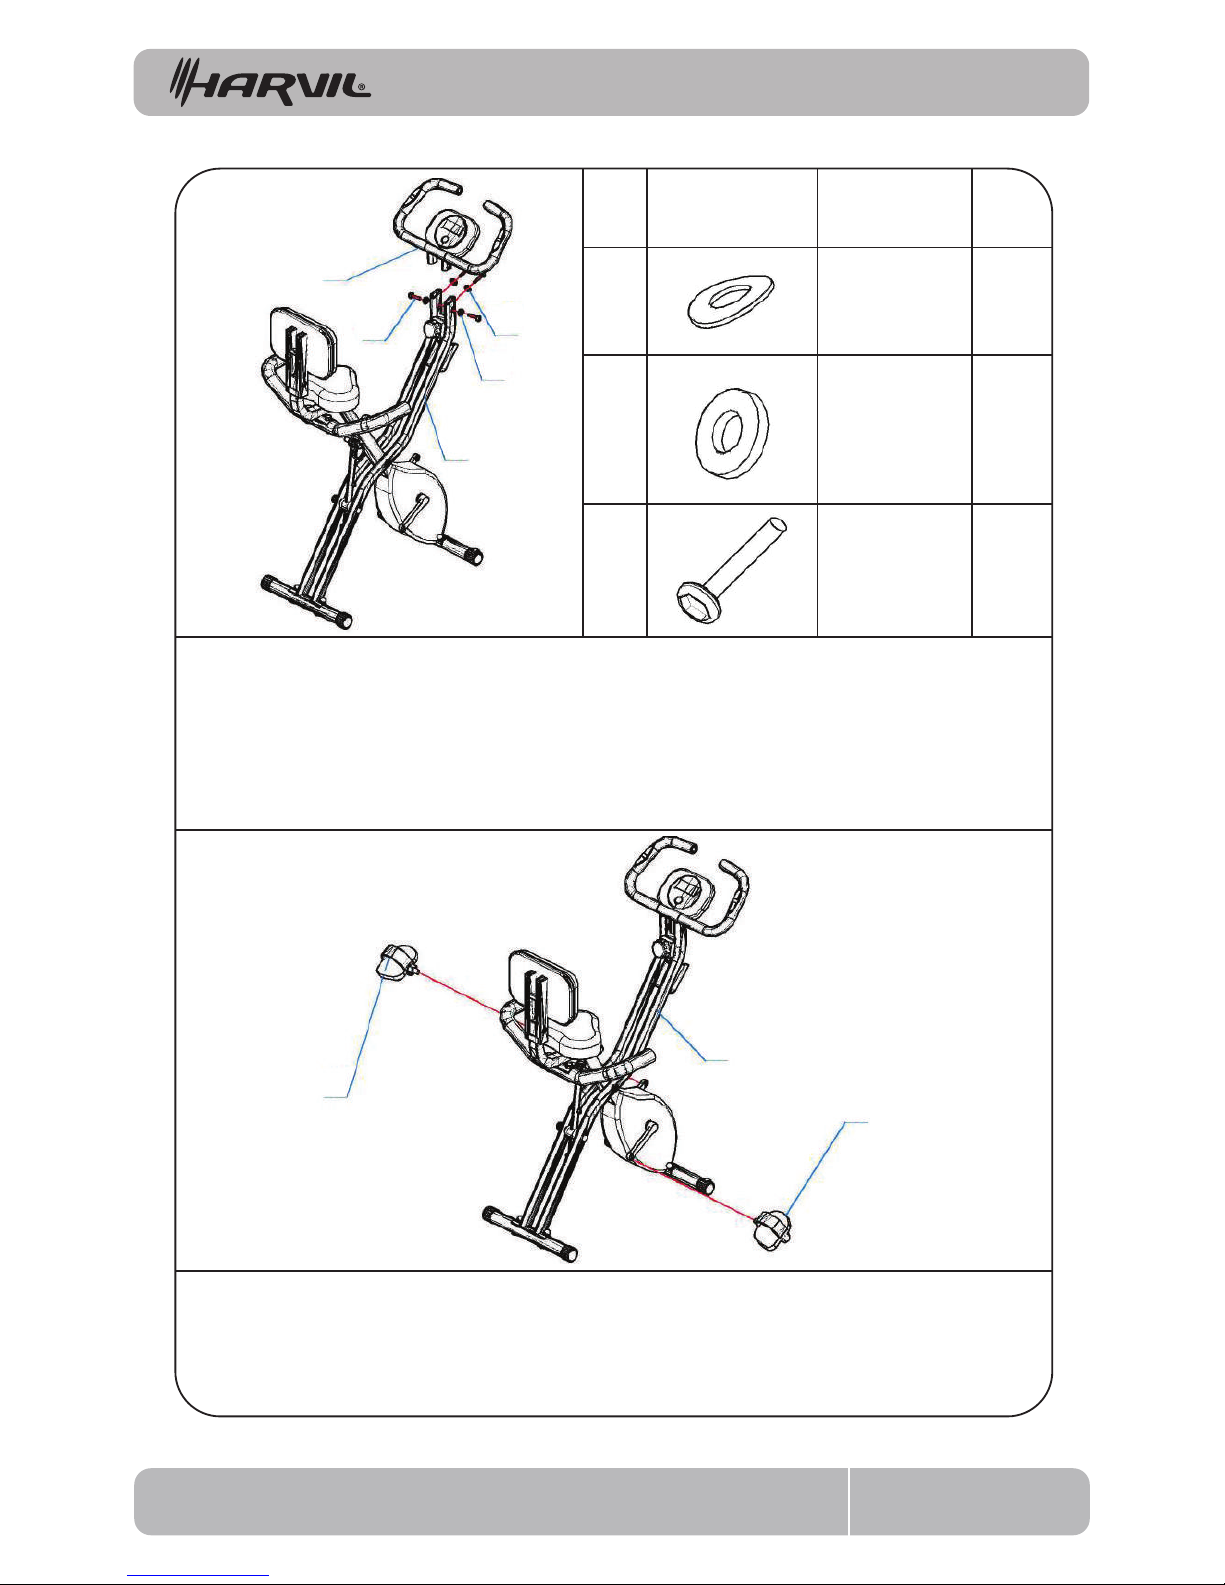
Put Arm rest of Main Frame (21) into Main Frame (17), align hole site beside and back, beside
hole, use M6*12 Semi-Round Head Screw (19), Ø 6.2 Flat Washer (18) to connect. Back side that
use M6*12 Semi-Round Head Screw (19), Ø 6.2 Arc Washer (20) to connect. And tighten all
Semi-Round Head Screw (19). Finally, connect wire between monitor & frame.
Step 7
Position the Pedal (12) and Crank of Main Frame (17) correctly, then tighten.
Note: Distinguish position of right and left. Same method to assemble Right Pedal (16).
Step 8
ASSEMBLY INSTRUCTIONS
218 Flat Washer
(M6)
419
Semi-Round
Head Screw
(M6 x 12)
17
12
16
20
18

TRAINING INSTRUCTION
XB-P / XB-A 10
Training Phase
This is for formal exercise, which can improve leg muscle exibility. Please adjust the training
level according to your body and health condition, and choose a training intensity that is most
suitable for you.
You must stay in the target zone for at least 12 minutes. Some people train for 15-20 minutes.
Training with this equipment can help you strengthen your muscles and get t accompa-
nied by a healthy diet.
Warm up before workout
Stretching before a workout can help with blood circulation, and reduce chances of muscle
spasms. Please follow the instruction below for warm up before you start training. Each move
should last for at least 30 seconds. Do NOT stretch ercely to avoid muscle injury.
Sideways
Movement
Bending
Movement
Thigh Lateral
Practice
Thigh
Practice
Crus
Practice

90-DAY LIMITED WARRANTY
XB-P / XB-A 11
This Harvil product is warranted to the original purchaser to be free from defects in material or
workmanship for a period of 90 days from the date of the original retail purchase.
This warranty does not cover defects or damage due to improper installation, alteration, accident or
any other event beyond the control of the manufacturer. Defects or damage resulting from
misuse , abuse or negligence will void this warranty. This warranty does not cover scratching or
damage that may result from normal usage.
This product is not intended for institutional or commercial use; Harvil does not assume any liability
for such use. Institutional or commercial use will void this warranty.
This warranty is nontransferable and is expressly limited to the repair or replacement of the
defective product. During the warranty period, Harvil shall repair or replace defective parts at no
cost to the purchaser. Shipping charges and insurance are not covered and are the responsibility of
the purchaser. Labor charges and related expenses for removal, installation or replacement of the
product or components are not covered under this warranty.
Harvil reserves the right to make substitutions to warranty claims if parts are unavailable or obsolete.
Harvil shall not be liable for loss of use of the product or other consequential or incidental costs,
expenses or damages incurred by the consumer of any other use. The user assumes all risk of injury
resulting from the use of this product.
This warranty is expressly in lieu of all other warranties, expressed or implied, including warranties of
merchantability or tness for use to the extent permitted by Federal or State law. Neither Harvil nor
any of its representatives assumes any other liability in connection with this product.
All warranty claims must be made through the retailer where the product was originally
purchased. A purchase receipt or other proof of date of purchase will be required to
process all warranty claims. The model number and part numbers found within the
assembly instructions will be required when submitting any parts requests or warranty
claims.
For further warranty information or inquiries, please call 877-800-2299
This manual suits for next models
1
Table of contents
Other Harvil Exercise Bike manuals


