Harwin Z80-255 User manual

IS-46
Hand Crimp Tool Z80-255
2
Issue:
3
Date:
01
/
02
/20
2
3
C/
Order
:
3210
2
Instruction Sheet for Z80-255 Hand Crim Tool
CRIMP CONTACT INFORMATION
This Hand Crim Tool has been designed for use with the following M225 series Crim Contacts:
M225-2830046 ............. Female crim contact for 22-24 AWG wire, su lied loose
M225-2840046 ............. Female crim contact for 26-28 AWG wire, su lied loose
M225-2530046 ............. Female crim contact for 22-24 AWG wire, su lied reeled
M225-2540046 ............. Female crim contact for 26-28 AWG wire, su lied reeled
Harwin recommends the use of BS 3G 210 Ty e A PTFE Equi ment Wire, see Com onent
S ecification C049XX for suggested alternatives.
!"#
$
%
$&''
$
#
''(
)#
$'
''
'"
''
''
"##%%
%
**+
*+,--
**+*.,--
22
19/0.15
0.3358
1.10
0.76–0.82
45
24
7/0.20
0.2199
0.95
29
**+
*+--
**+*.--
26
7/0.15
0.1237
0.80
0.50–0.56
18
28
7/0.12
0.0792
0.71
9.8
GENERAL INFORMATION
The Hand crim tool Z80-255 consists of a Rigidus Hand Crim Tool with a die-set (Z80-244)
designed for M225 series crim contacts. The tool is su lied with a locator (Z80-259), fitted to
the rear of the tool, to ensure correct and consistent location of the crim contacts within the
tool.
The Rigidus Hand Crim Tool includes the following features:
Parallel action stroke for accurate and consistent crim erformance
Unique locator design for full visibility of contact and wire insertion
Symmetric crim dies and locator allow assembly to suit right-handed
or left-handed users
Lightweight and com act design for easy access
Ergonomic handles sha ed for low effort crim ing
Ratchet control to ensure com letion of crim cycles
Die closure adjustment function for tool calibration
Lifetime tests exceeding 50,000 cycles
The contact is correctly crim ed when the tool is free to o en at the fully closed osition, i.e., when
the ratchet releases. The tool cannot be o ened without com leting the cycle – if the handles have
not o ened, squeeze the handles together to com lete the cycle.

3
Issue:
3
Date:
01
/
02
/20
2
3
C/
Order
:
3210
2
Instruction Sheet for Z80-255 Hand Crim Tool
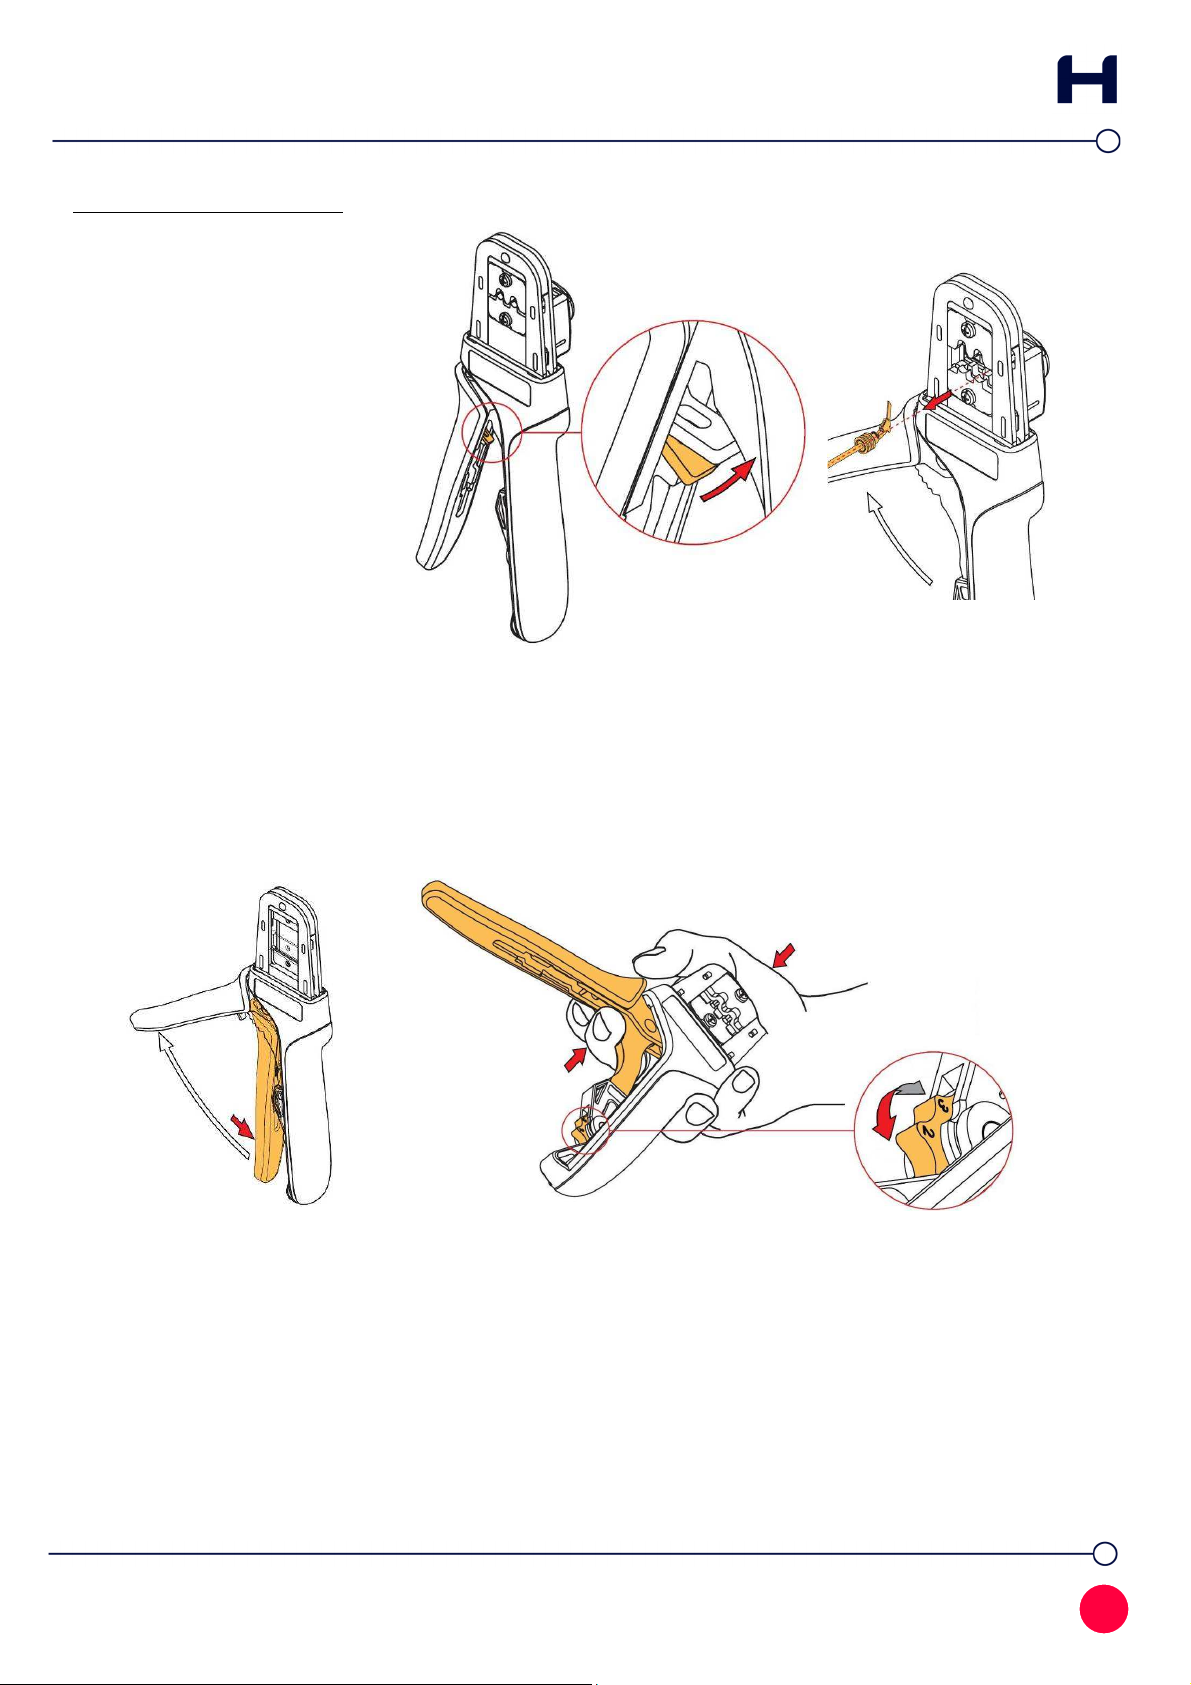
TOOL PREPARATION
%'#%$"
If the locator is fitted, lease see section “Troubleshooting – Re lacing the Dies” on age 6 for
instructions on removing the locator.
Ensure that the crim
tool is at the fully
o en osition.
Remove the TX
-
10 TORX head
screws holding the die sets in
lace.
Reverse the die sets,
ensuring
that the small locating marks
line u and are on the outside
of the tool.
'/#0
Ensure that the crim
tool is at the fully o en
osition.
Push down the centre insert of the
locator, as far as it will go.
Insert the to
hooks of
the locator into to
slots of the tool frame.
Rotate the locator down, sna ing the lower tabs on the locator
into the bottom slots on the tool.
Correct osition for
the locator.
4
Issue:
3
Date:
01
/
02
/20
2
3
C/
Order
:
3210
2
Instruction Sheet for Z80-255 Hand Crim Tool
WIRE PREPARATION
1. Ensure that the wire to be crim ed is within the s ecified range of sizes for the contact and
the crim tool. Failure to use the s ecified wire size will result in oor quality crim s and
ossible tool damage.
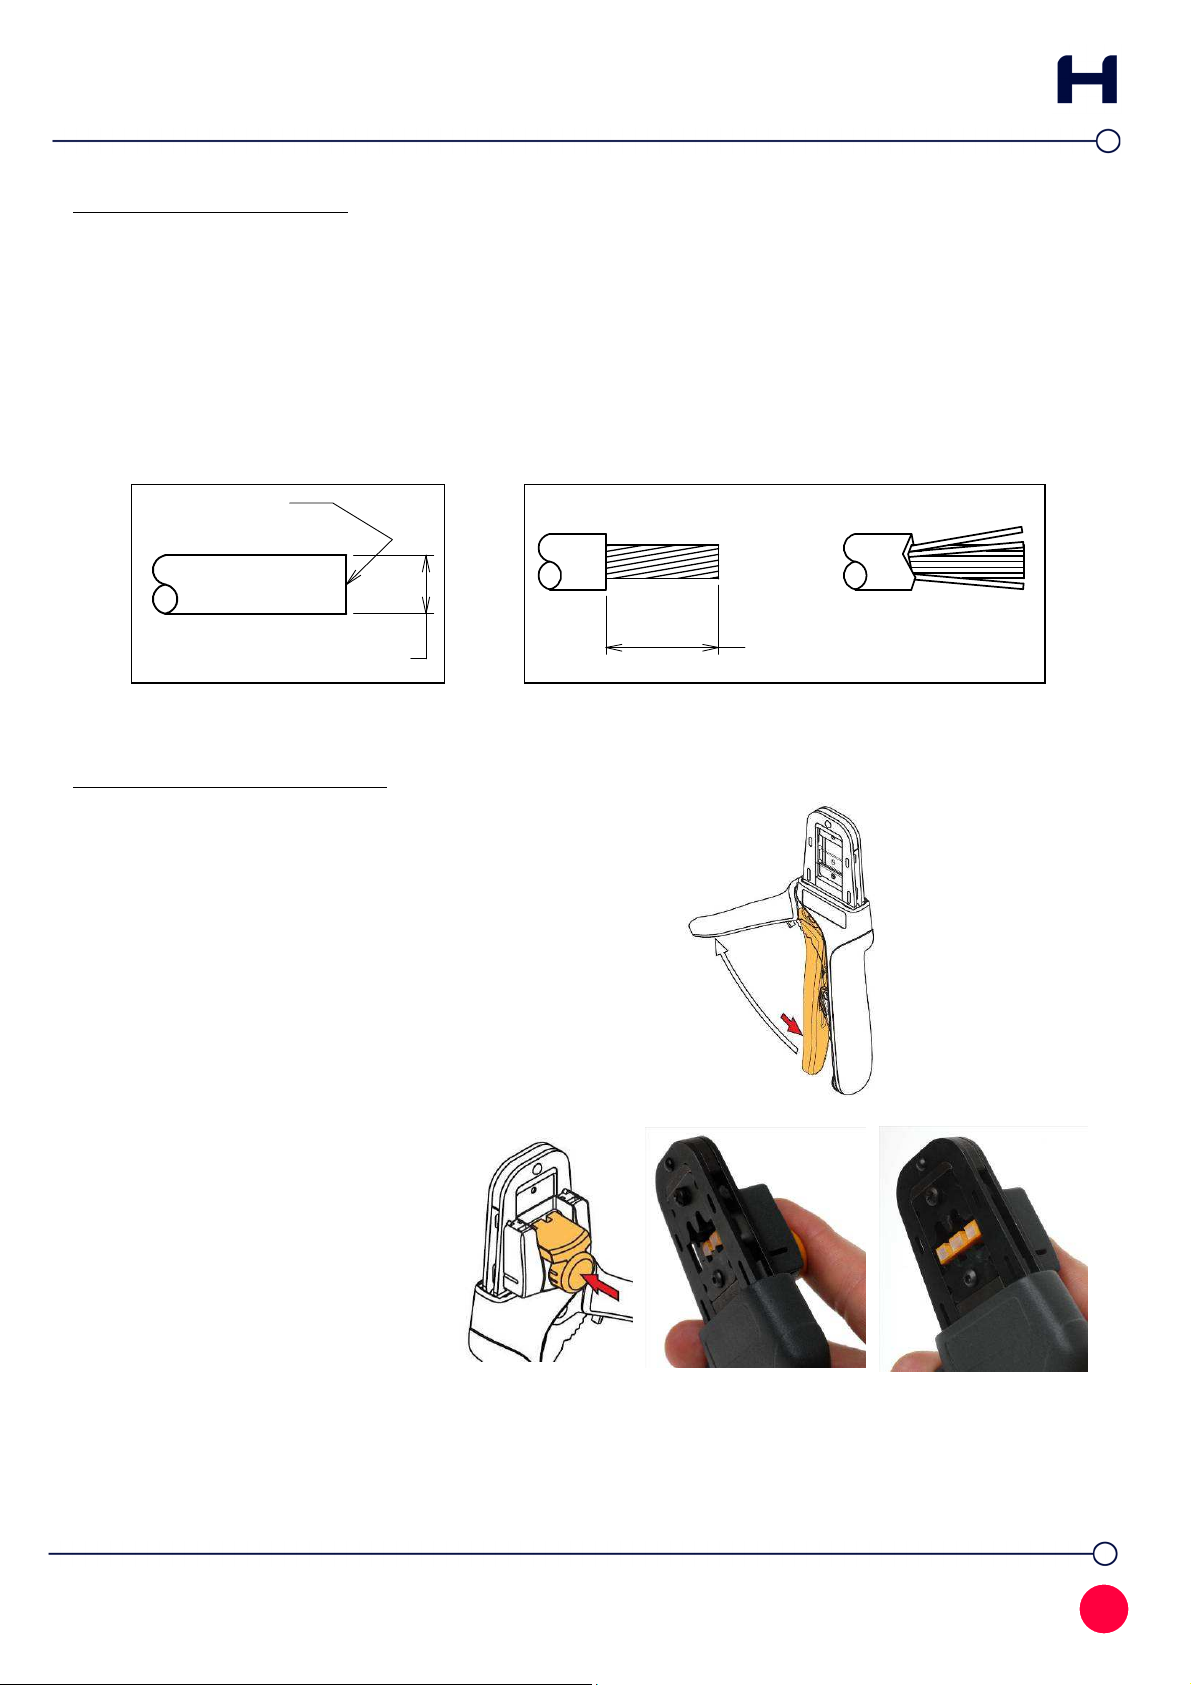
2. Cut the end of the cable to be terminated so that there is a clean cut end (Figure A). Stri the
cable to the correct length (Figure B). We recommend that when the wire is stri ed, it is
clam ed or su orted close to the stri ing area - this will revent insulation sli age.
Suitable wire stri ers (such as a PTFE wire stri er) must be used. This should result in all
the strands laying together neatly. If the lay of the strands is disturbed, it may be re-im osed
with a slight twist.
Clean cut
Ø1.10
mm
max
2.
7
0
–
3.00
mm
1 12
CRIMPING PROCEDURE
1. Ensure that the crim tool is at the fully o en osition.
2. Push the button on the back of
the locator, which will move the
locator forward between the
crim dies.
5
Issue:
3
Date:
01
/
02
/20
2
3
C/
Order
:
3210
2
Instruction Sheet for Z80-255 Hand Crim Tool
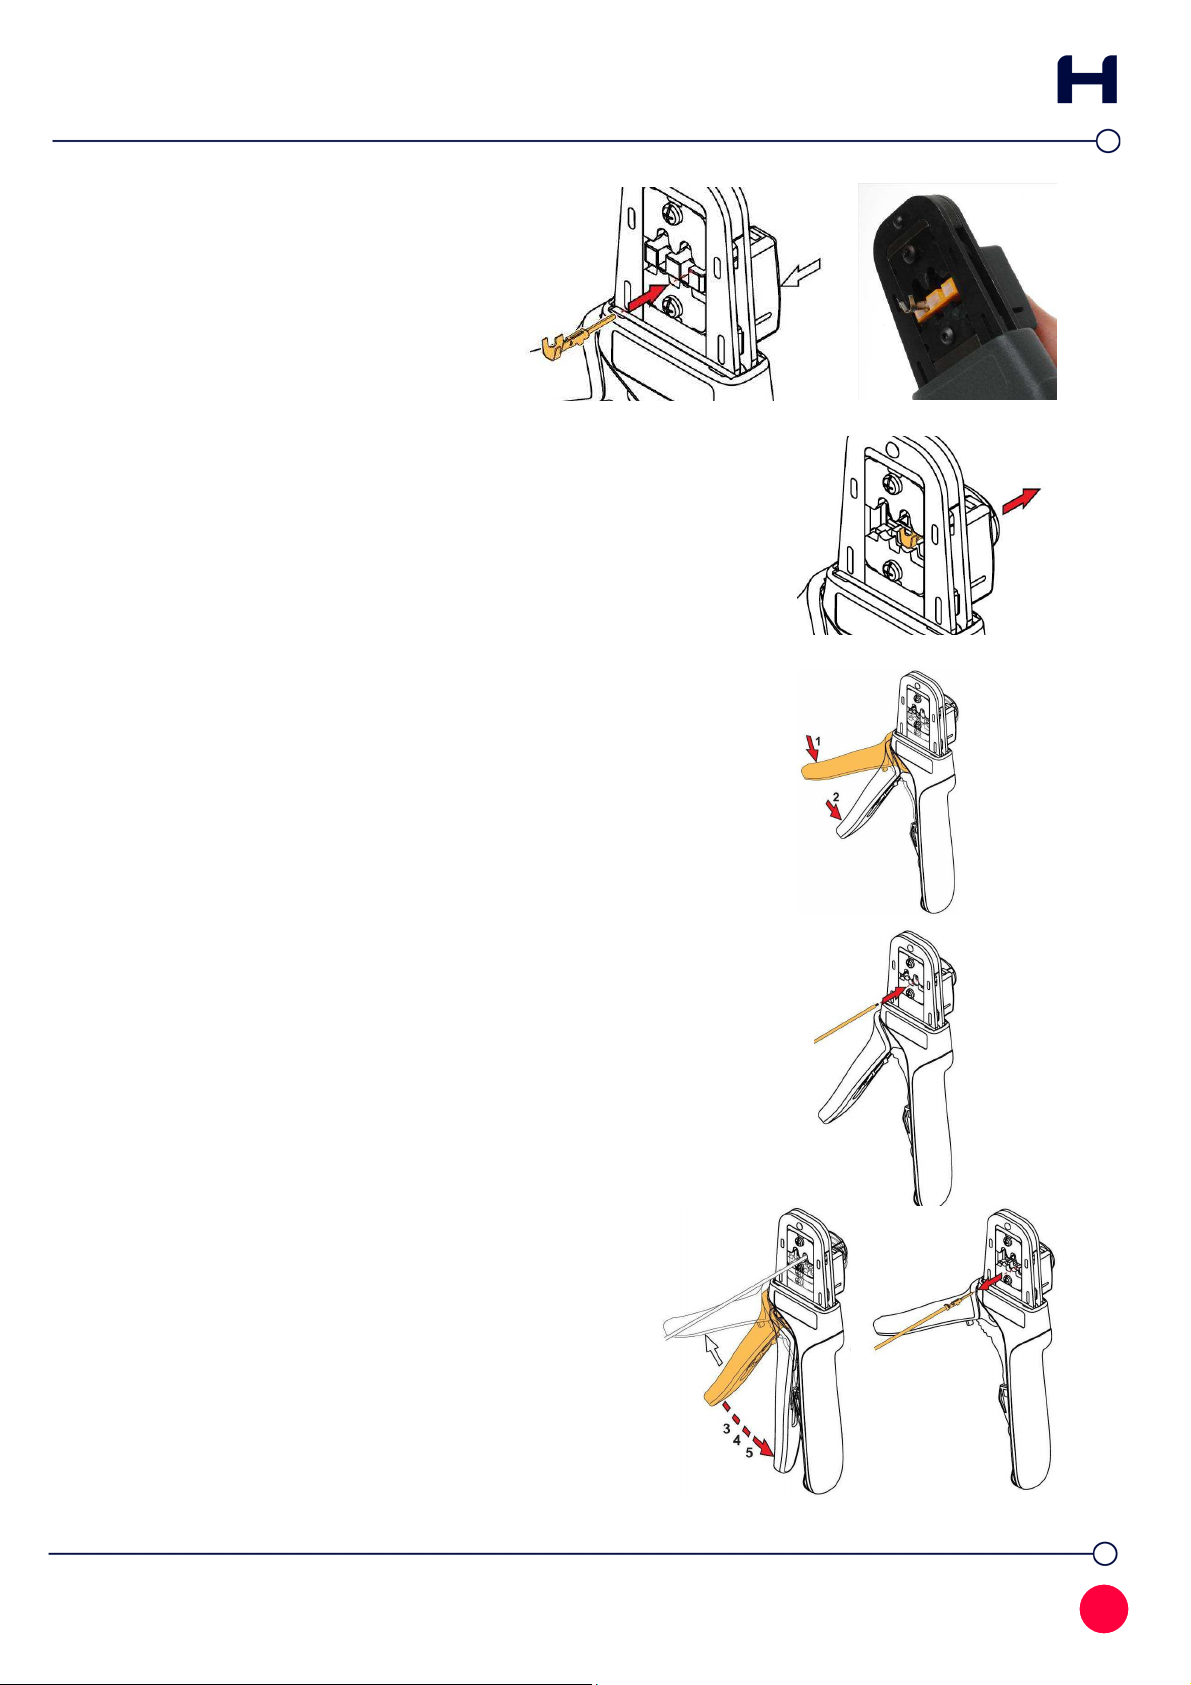
3. Whilst holding the locator in the forward
osition, insert the crim contact into
the correct locator nest. The wire size is
marked on the crim die, above each
location.
4. Release the locator button, allowing the crim contact to move
back between the crim ing jaws.
5. Close the handle, until the second ratchet osition engages.
6. Load the stri ed wire through the terminal, and against the wire
sto inside the tool.
7. Whilst holding the wire against the wire sto ,
com lete the crim by squeezing the tool handles
together through the rest of the ratchet clicks –
another 3, to make 5 in total. The handles should
then be free to o en. Remove the crim ed wire.
6
Issue:
3
Date:
01
/
02
/20
2
3
C/
Order
:
3210
2
Instruction Sheet for Z80-255 Hand Crim Tool
CRIMP INSPECTION
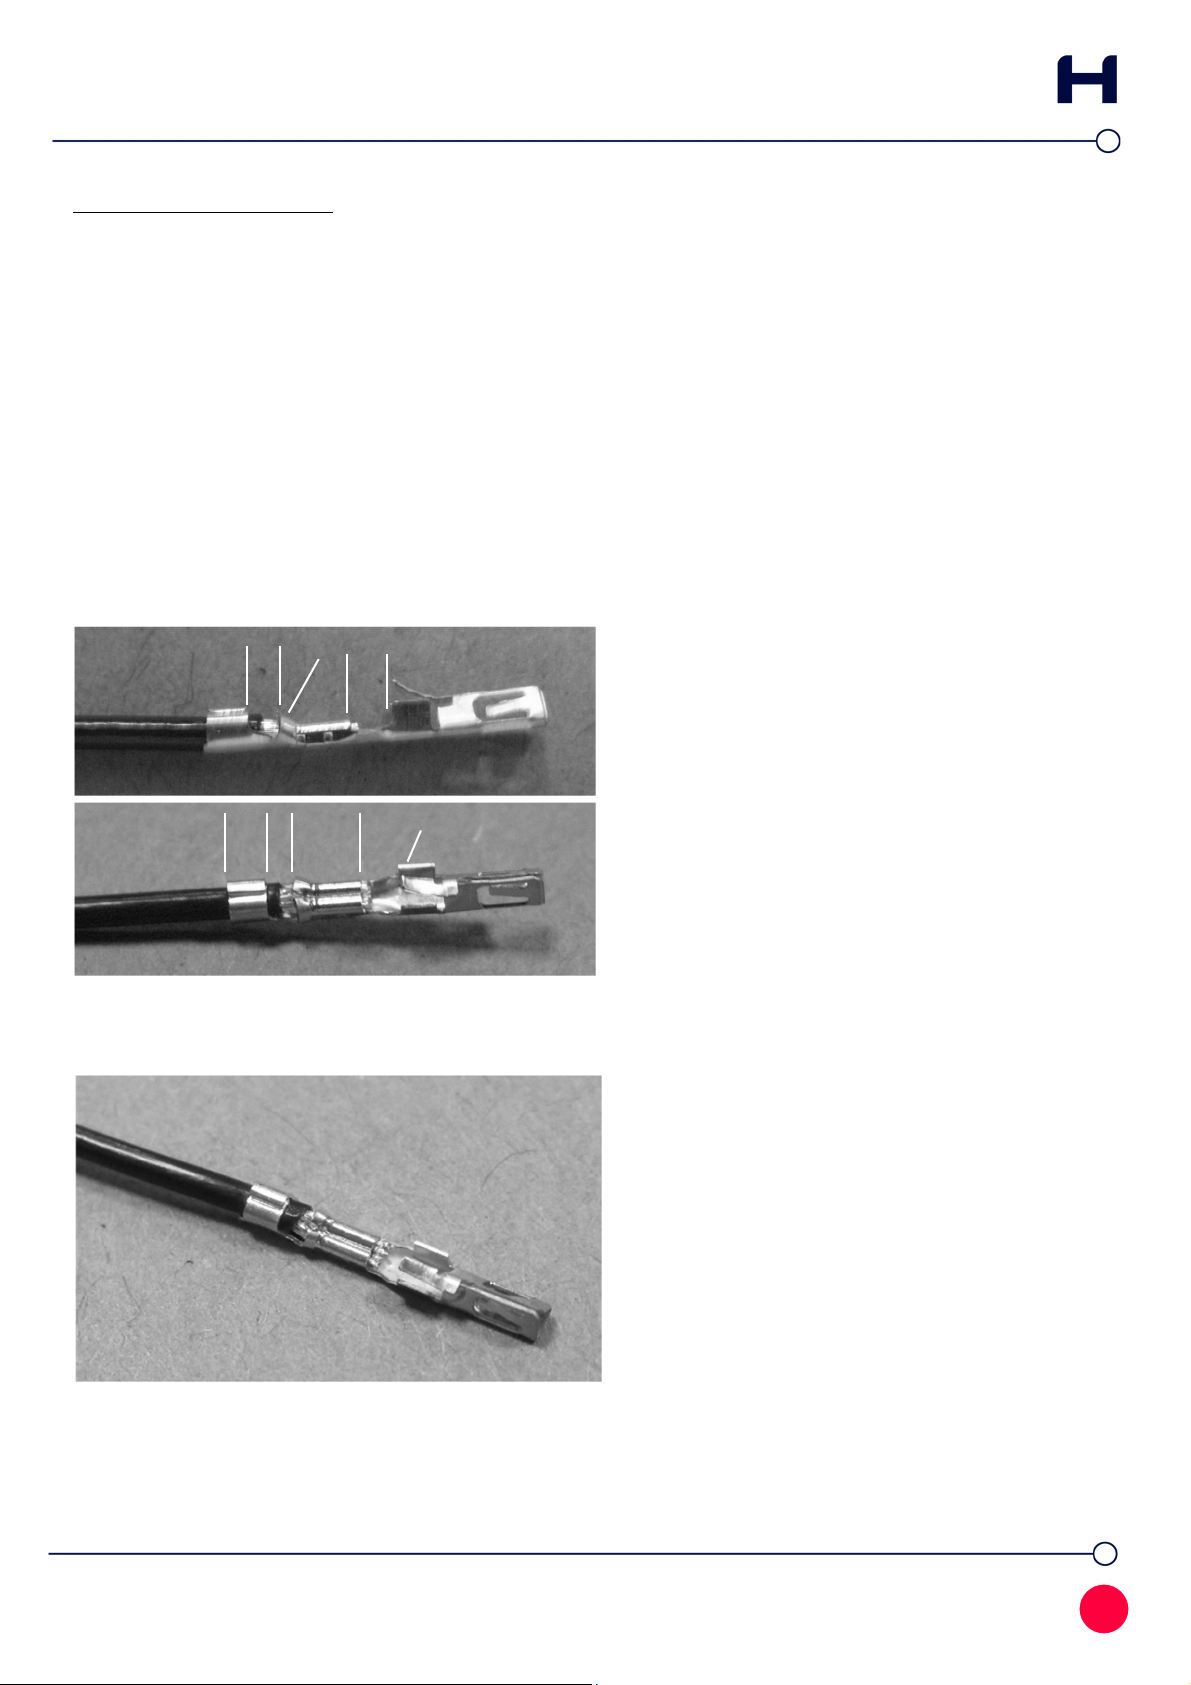
Crim joints should be checked for:
Correctness of form and location of crim .
Freedom of fracture and rough edges.
Adequate insertion of all conductor strands in the crim barrel.
Absence of damage to the conductor or the insulation.
Correct crim height, as er crim height values given on front age.
A destructive ull-off force test should also be erformed occasionally, to confirm the hand
crim tool is still o erating correctly. The correct values for this test are given on the front age
of this instruction sheet. Insulation should be stri ed back beyond insulation crim area before
re aring sam les for ull-off force test.
'""
1. Insulation Ins ection window
2. Bellmouth
3. Conductor Ins ection window
4. Insulation crim area
5. Conductor crim area
6. Contact sto ear
Insulation extends ast insulation crim
area, but does not enter Bellmouth.
Insulation crim does not cut or break
insulation.
Insulation crim is fully wra ed
around and su orting insulation.
Conductors extend ast conductor
crim area, but not ast contact sto
ear.
3
*
,
+

7
Issue:
3
Date:
01
/
02
/20
2
3
C/
Order
:
3210
2
Instruction Sheet for Z80-255 Hand Crim Tool
"/#
Insulation in-line with end of crim area.
Conductor in-line with end of crim area.
Insulation butted u to but not
entering bellmouth.
Conductor in-line with contact sto
ear, but not ast.
4%
Insulation crim incorrectly formed.
Conductor tra ed in Insulation crim .
Conductor outside of crim area.

8
Issue:
3
Date:
01
/
02
/20
2
3
C/
Order
:
3210
2
Instruction Sheet for Z80-255 Hand Crim Tool
Insulation not visible through
ins ection window.
Conductor not visible through
ins ection window.
Insulation enters bellmouth
Conductor extends ast sto ear
ASSEMBLY – CRIMP INTO HOUSING
The com leted crim can now be inserted into the a ro riate M225 series crim housing. For
larger wire sizes, no other tooling should be required for this o eration; the crim s can be
ushed in by hand. Crim s are assembled into the mould with the retaining tang towards the
outer edge of the housing. With thinner wires, it may be hel ful to ush onto the back of the
crim with the Extraction Tool Z80-258.
9
Issue:
3
Date:
01
/
02
/20
2
3
C/
Order
:
3210
2
Instruction Sheet for Z80-255 Hand Crim Tool
TROUBLESHOOTING
'"5'
Should the tool become stuck
or jammed in a artially
closed osition, DO NOT force
he handles open or closed.
There is a ratchet release
lever located inside the
movable handle. Pressing u
on this lever will release the
ratchet, and the handles
should then easily o en. The
jam or miscrim can then be
removed.
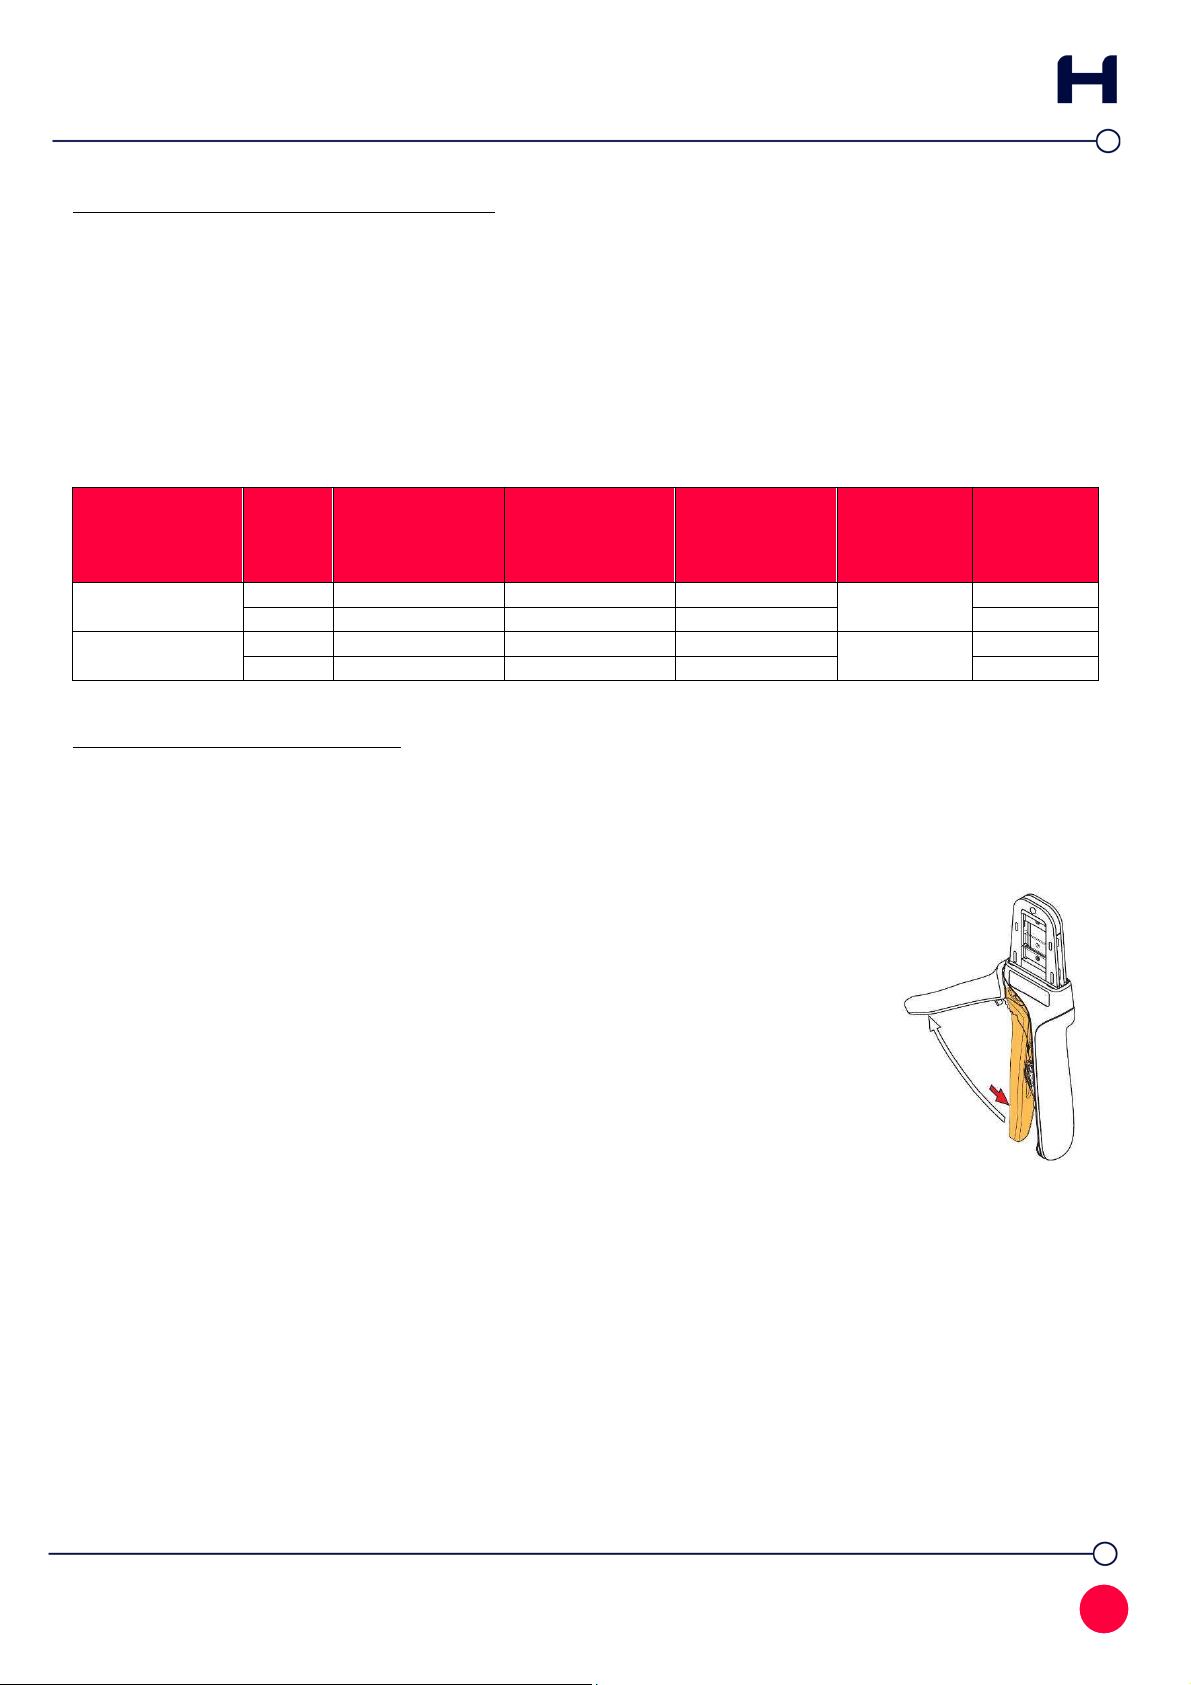
067##%%1
This tool is su lied as new, set to the right reload force necessary to crim the M225 series
contacts. However, over time, this force may fall off slightly. The tool can be adjusted to cater
for this wear and raise the reload force to give correct crim s.
If you need to carry out this rocedure, Harwin recommend that you crim a number of sam les
before and during adjustment, until the ull-off force achieved exceeds the minimum values
shown on the first age of this instruction sheet.
Ensure that the crim
tool is at the fully o en
osition.
Hold the hand tool as shown in the above figure and
squeeze the link bar in towards the to of the tool. This
releases the reload adjustment wheel.
Rotate the setting wheel to a different setting – the higher the number dis layed, the higher the
reload force.
Release the link to lock the wheel in lace.
If the wheel has been set to the maximum setting ossible, then the tool is no longer ca able of
achieving the minimum ull-off force and should be re laced.
10
Issue:
3
Date:
01
/
02
/20
2
3
C/
Order
:
3210
2
Instruction Sheet for Z80-255 Hand Crim Tool
"#4
If you need to remove the dies to clean the tool, or re lace the dies due to damage, then this
section will tell you how to first remove the locator and then the dies.
If you need to re lace the die-set, s are die-sets are available from Harwin. Please request Part
Number Z80-244.
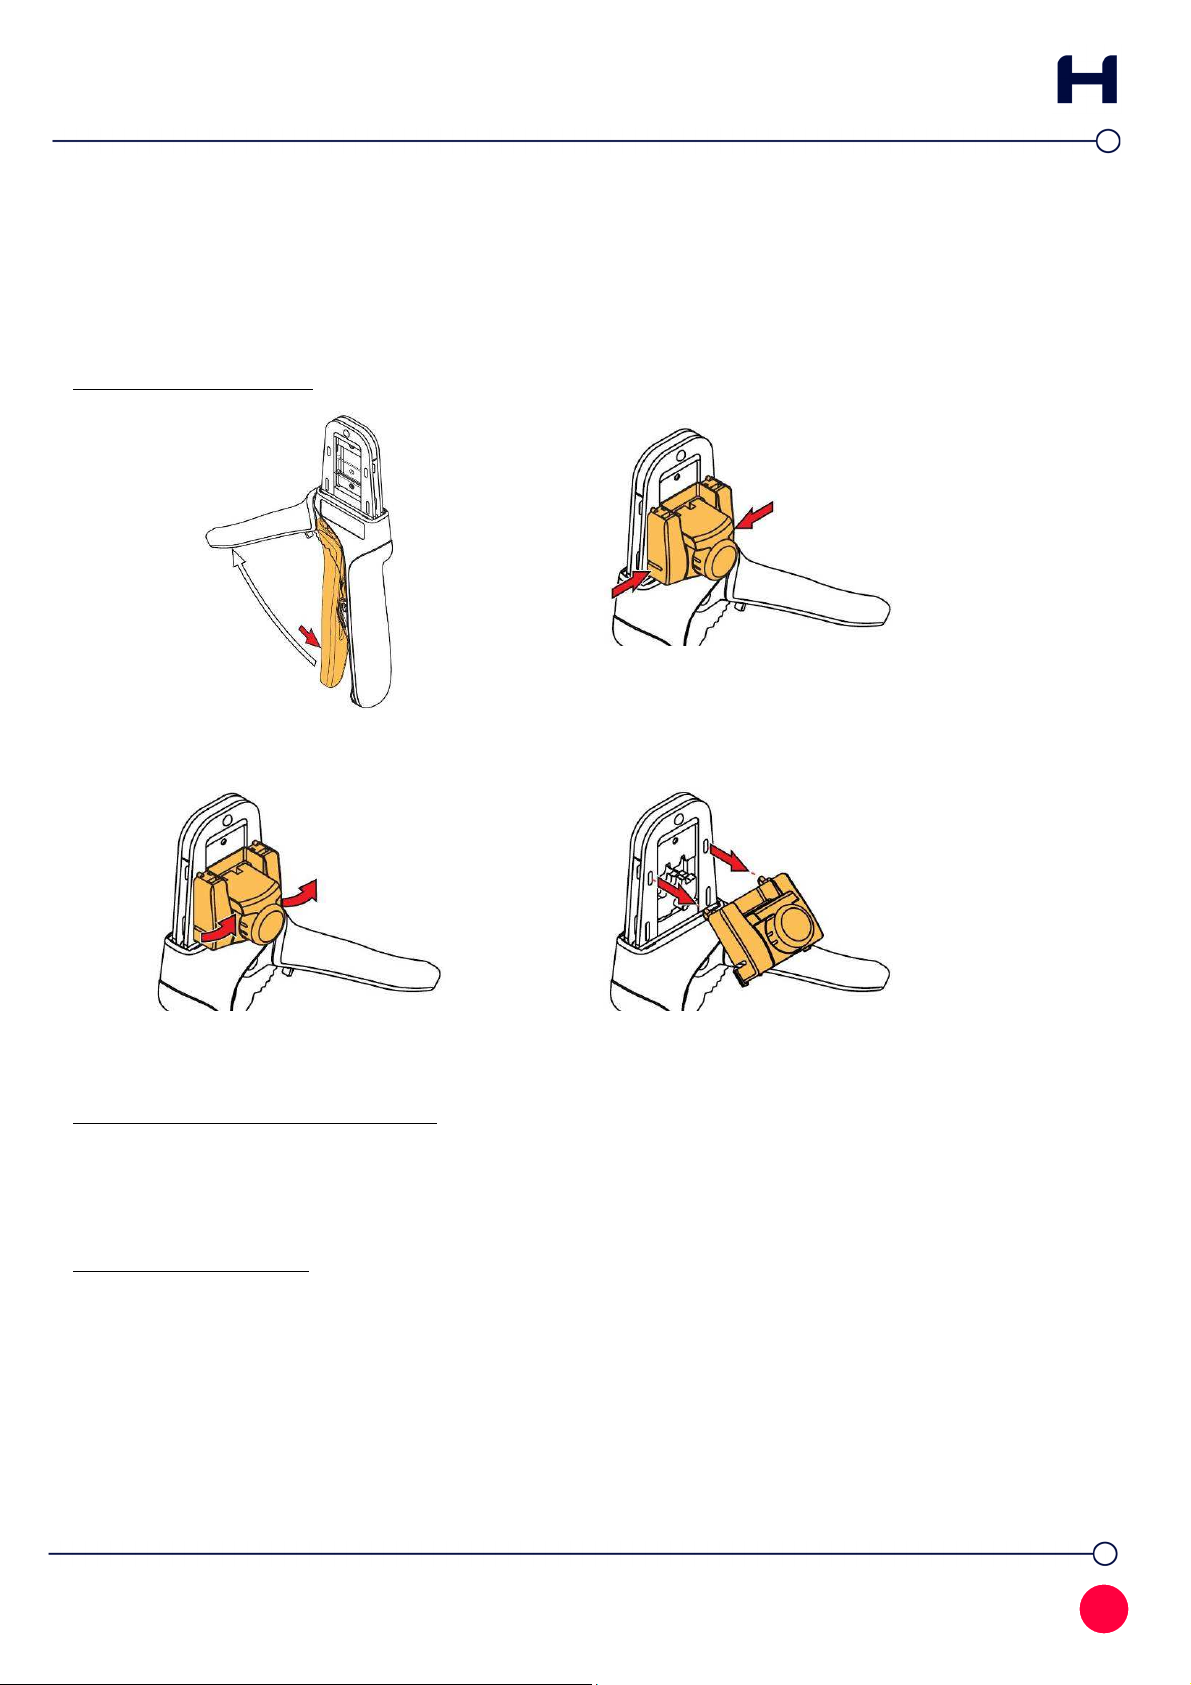
A) Remove the Locator:
1. Ensure that the crim tool is at the
fully o en osition.
2. Squeeze gently on the lower area of
the locator shown in the above
icture, with your thumb and index
finger.
3. Lift the bottom of the locator and
swing it away from the tool.
4. The u er hooks should sli out of the
to slots easily.
B) Remove and Re lace the Die Set:
See the instructions under section “Tool Pre aration – Changing from Right to Left Hand
O eration”, on age 3.
C) Re lace the Locator:
See the instructions under section “Tool Pre aration – Assembling the Locator”, on age 3.

11
Issue:
3
Date:
01
/
02
/20
2
3
C/
Order
:
3210
2
Instruction Sheet for Z80-255 Hand Crim Tool
CARE OF TOOL
Although the Rigidus tool is engineered for durability, it is recommended that the following
maintenance oints are observed, to maximise the life of the tool.
1. Remove dust, moisture, and other contaminants
with a clean brush, or soft, lint-free cloth.
2. Do not use any abrasive materials that could
damage the tool.
3. All ins, ivot oints and bearing surfaces should
be covered with a thin coat of high-quality
machine oil – do not oil excessively. Light oil
(such as 30 weight automotive oil) used at the
oil oints shown in the diagram, is
recommended.
4. Wi e excess oil from hand tool, articularly from
the crim ing area. Oil transferred onto crim
contacts may affect the electrical characteristics
of the connector.
5. When tool is not in use, kee the handles closed to revent objects from becoming lodged in
the crim ing dies, and store the tool in a clean, dry area.
ADVICE ON USE
Wear eye rotection at all times.
Manual tools such as this Rigidus tools are intended for low volume use. Re etitive,
high-volume use is not recommended.
The insulated rubber handles are not designed or certified for rotection against
electrical shock.
Use with the M225 series crim contacts listed on the first age of this instruction sheet.
This tool is designed for hand use only, and must not be used with clam ing, fixturing or use of
handle extensions.
If you have any questions about this instruction sheet, or the M225 series range of connectors,
lease contact techni[email protected].
Other manuals for Z80-255
1
Table of contents
Other Harwin Crimping Tools manuals

Harwin
Harwin Z80-293 User manual

Harwin
Harwin M22520/2-01 User manual

Harwin
Harwin Z22-020 User manual

Harwin
Harwin Gecko-MT Z125-903 User manual

Harwin
Harwin Z80-292 User manual

Harwin
Harwin M22520/2-01 User manual

Harwin
Harwin Z80-255 User manual

Harwin
Harwin Gecko Z125-900 User manual

Harwin
Harwin M22520/2-01 User manual

Harwin
Harwin Z30-020 User manual


Popular Crimping Tools manuals by other brands


TE Connectivity
TE Connectivity SDE-SA instruction sheet

TE Connectivity
TE Connectivity SDE-SA instruction sheet

Staubli
Staubli M-PZ-T2600 operating instructions

TE Connectivity
TE Connectivity 2386892-1 instruction sheet

Textron
Textron EK1240CL Operation manual

CIMCO
CIMCO GENiUS 2.0 operating instructions


