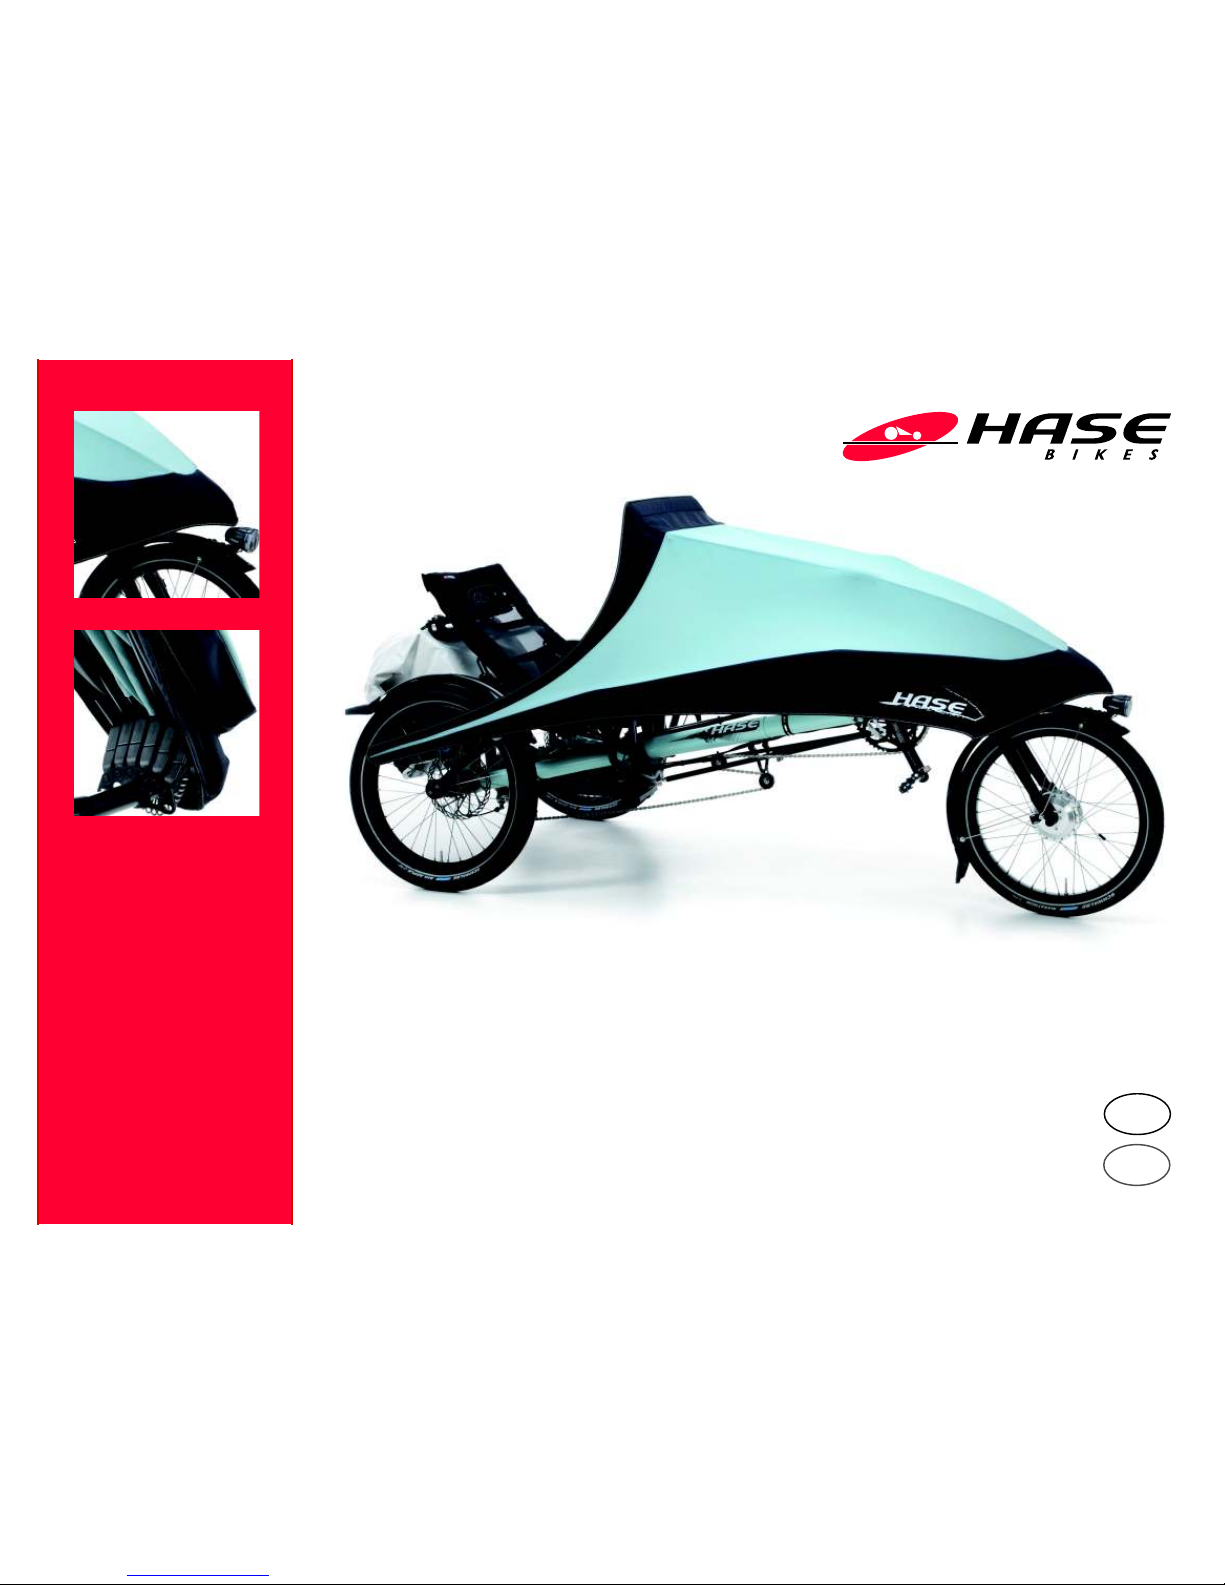
HASE Foldable Fairing User manual

Gebrauchsanleitung
User´s Manual
FV D-ENG 1/12
ENG
D
KETTWIESEL, KLIMAX, TRIX, LEPUS, PINO
Faltverdeck Foldable Fairing

Windabrisskante
Wind deflector
Seitliche Befestigung
Side mount
Vordere Befestigung
Front mount
GefaltetesVerdeck
Folded fairing
AufgespanntesVerdeck
Mounted fairing
Rückspiegel
Rearview mirror
Stangengelenke
Frame joints
Gestänge
Frame
Seitliche Befestigung
Side mount
Regenponcho (Zubehör)
Rain Poncho (optional)

FV-D-ENG 1/12 1
Inhalt Contents
Scope of delivery and optional Accessories ............................2
Safety information .....................................................................3
Read User’s Manual......................................................................................... 3
Symbols used for notes and warnings......................................................... 3
Intended use...................................................................................................... 3
Mounting and adjustment............................................................................... 3
Use of the Rain Poncho.................................................................................. 3
Riding in windy conditions............................................................................. 4
Parking in windy conditions........................................................................... 4
Being visible for others................................................................................... 4
Caution when opening the Foldable Fairing .............................................. 4
Before each ride............................................................................................... 4
Technical condition ......................................................................................... 4
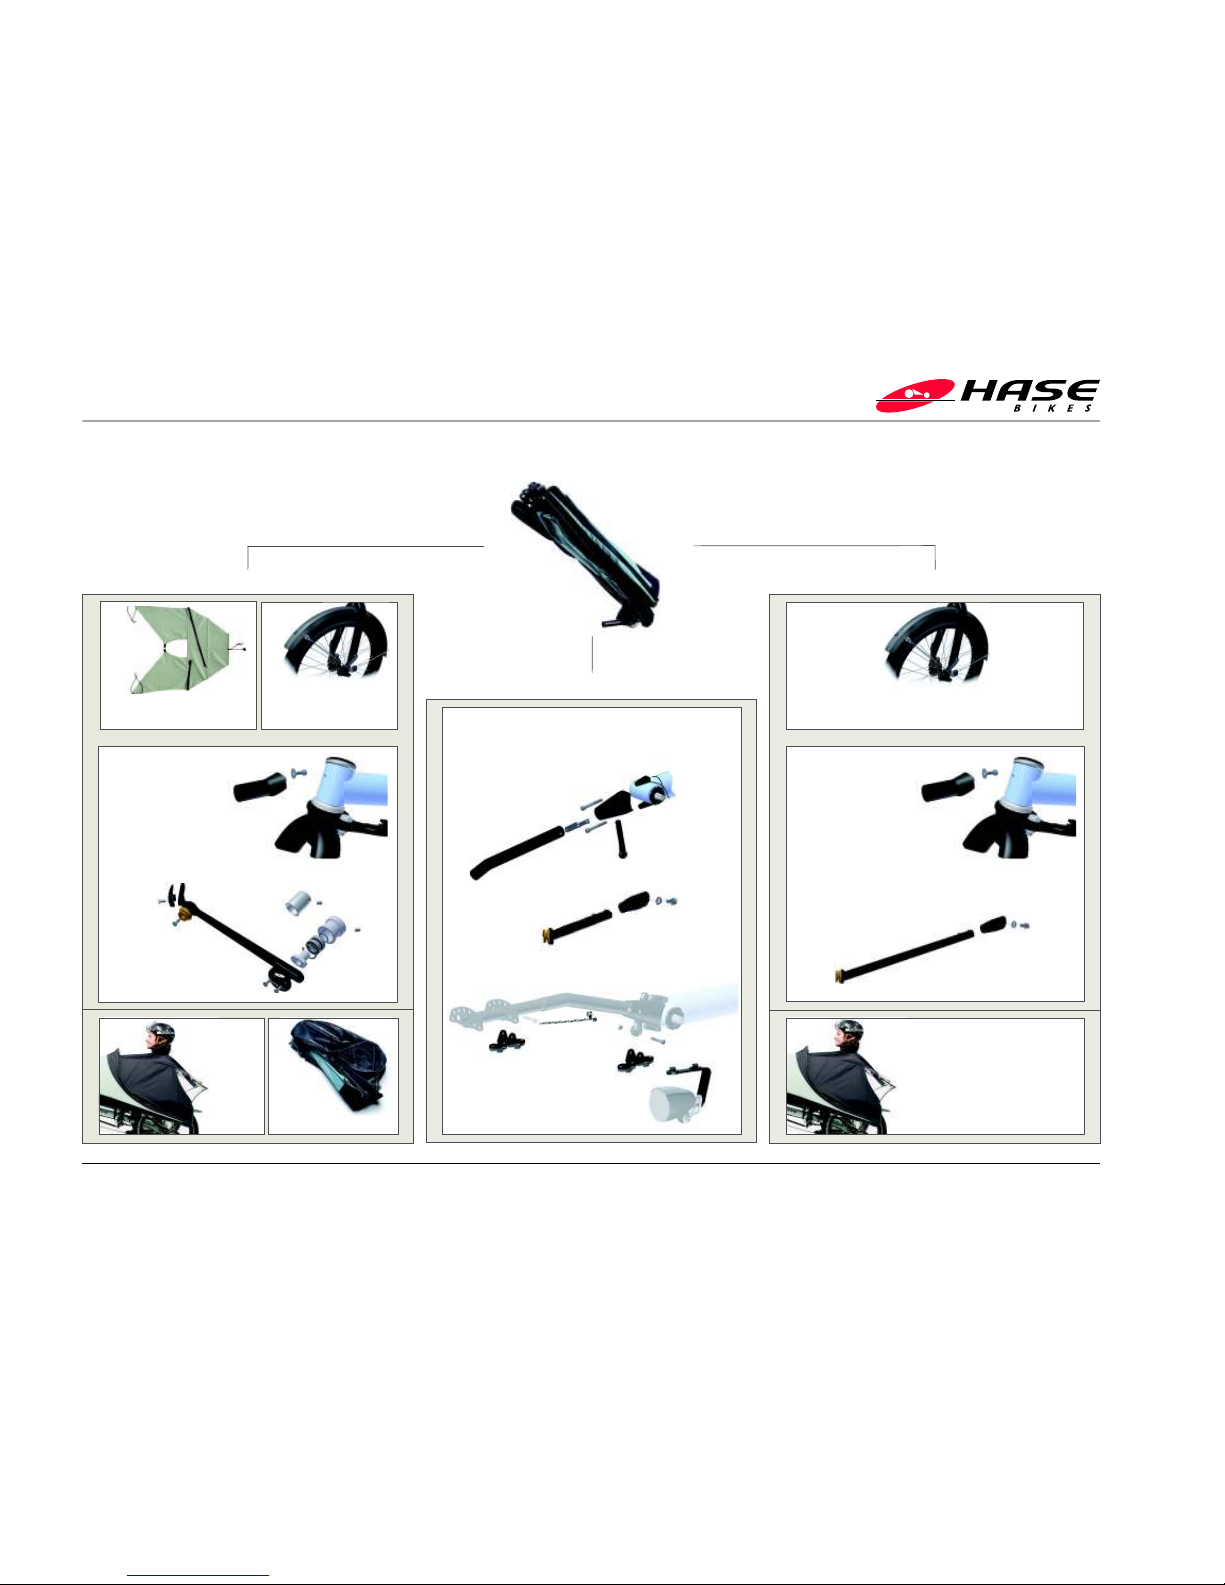
Mounting the fairing mounts ....................................................5
Mounting the fairing mounts: Kettwiesel, Klimax, and Trix .................. 5
Mounting the side mounts ...................................................................................5
Mounting the front mount ..........................................................................................6
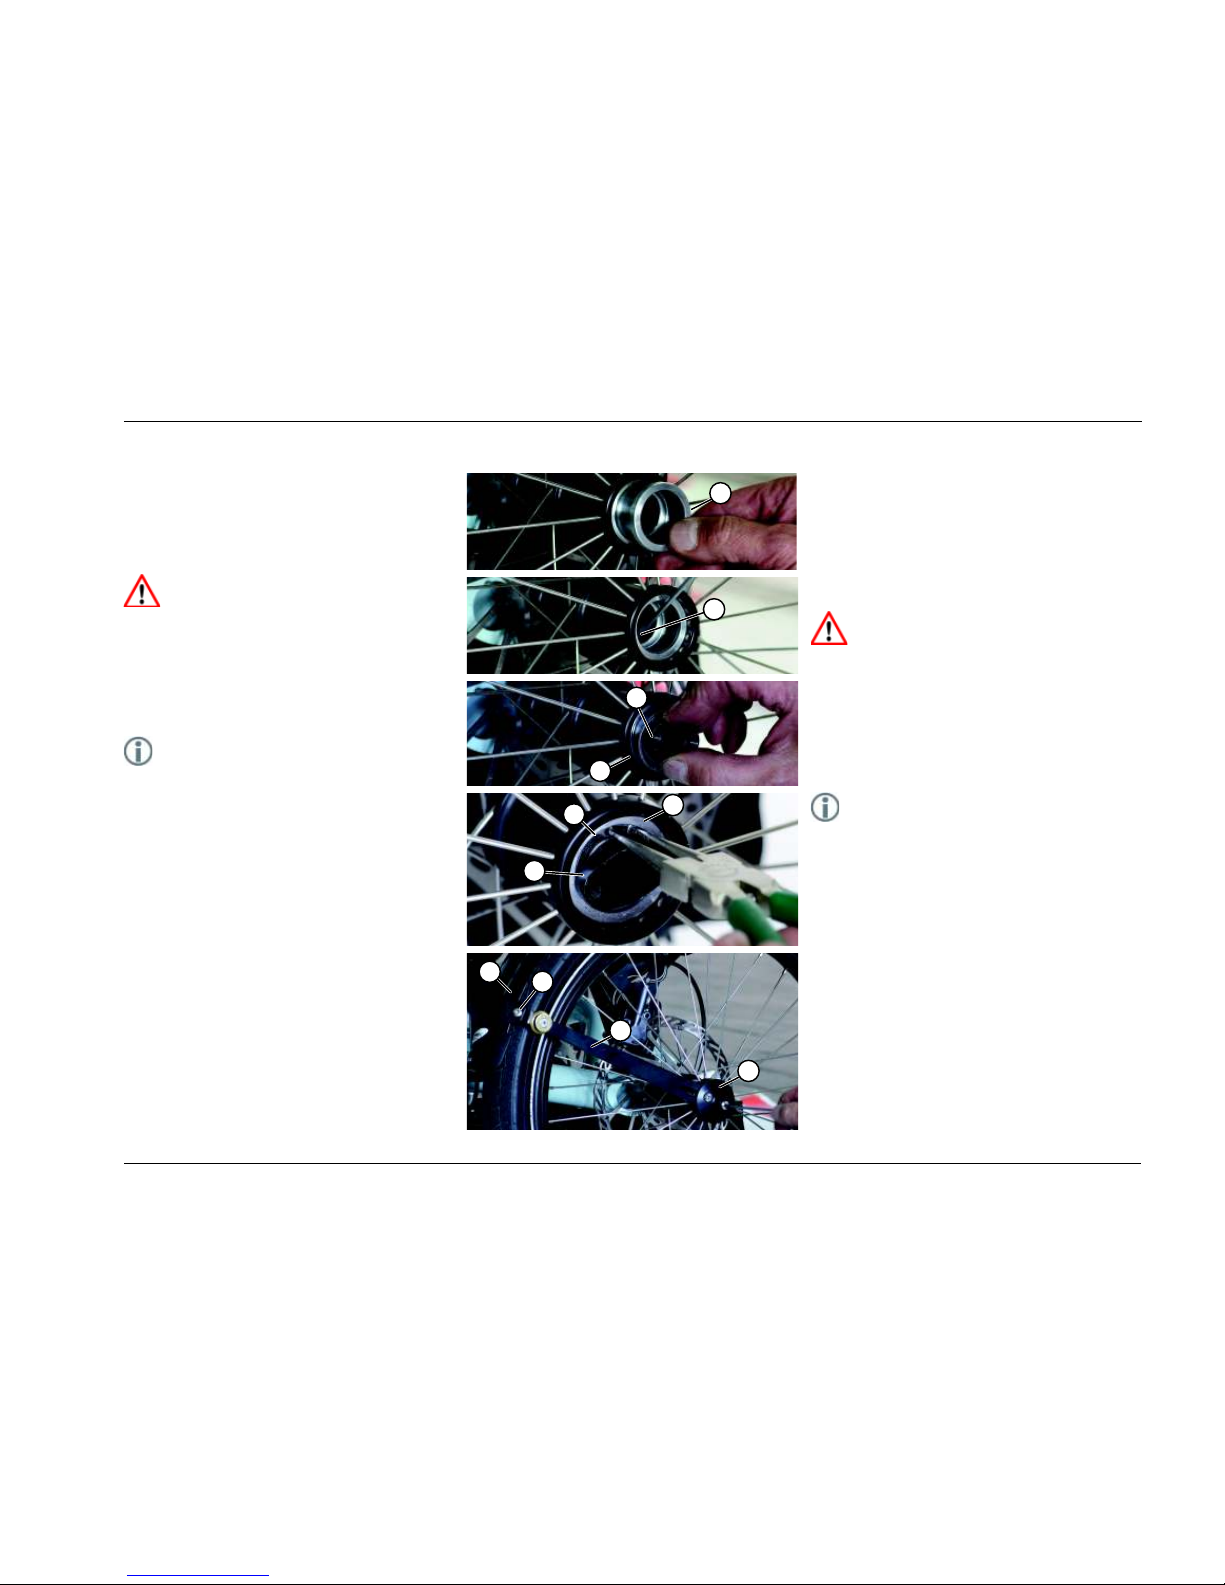
Mounting the long fender to a 20” wheel................................................................7
Mounting a second fender for the 16” wheel (Trix and Lepus Comfort) .......8
Mounting the splash guard ..........................................................................................9
Mounting the Fairing Bag .......................................................................................... 10
Mounting the fairing mount: Lepus............................................................11
Mounting the side mounts........................................................................................ 11
Mounting the front mount ....................................................................................... 11
Mounting the long fender for a 20” wheel........................................................... 11
Mounting a second fender for a 16” wheel ......................................................... 11
Mounting the fairing mount: Pino...............................................................12
Mounting the side mounts........................................................................................ 12
Mounting the front mount ....................................................................................... 12
Mounting the headlight mount to the Pino ......................................................... 14
Riding with the Foldable Fairing.............................................15
Mounting the Foldable Fairing.....................................................................15
Adjusting the Foldable Fairing.....................................................................18
Adjusting wind deflector height..................................................................19
Mounting and dismounting .........................................................................21
Attaching the Rain Poncho ..........................................................................22
Adapting the Rain Poncho for smaller riders..........................................24
Removing the Foldable Fairing....................................................................27
Cleaning and storing the Foldable Fairing ................................................27
Replacement parts...................................................................28
Front mount....................................................................................................28
Side-mount parts for Kettwiesel, Klimax, and Trix...............................29
Side-mount parts for Lepus and Pino........................................................30
Frame joint, locking plate, rearview mirror.............................................31
Headlight Mount.............................................................................................32
Appendix for dealers................................................................34
Drilling hole in head tube ...........................................................................34
Drilling template.............................................................................................35
Lieferumfang und Zubehör .......................................................2
Sicherheitshinweise....................................................................3
Gebrauchsanweisung beachten..................................................................... 3
Verwendete Symbole und Warnungen....................................................... 3
Verwendungszweck......................................................................................... 3
Montage und Einstellung................................................................................. 3
Benutzung des Regenponchos ...................................................................... 3
Fahren bei Wind............................................................................................... 4
Parken bei Wind .............................................................................................. 4
Sichtbar sein für andere.................................................................................. 4
Öffnen des Faltverdecks................................................................................. 4
Bevor Sie losfahren.......................................................................................... 4
Technischer Zustand....................................................................................... 4
Montage ......................................................................................5
Montage am Kettwiesel, Klimax und Trix.................................................. 5
Seitliche Befestigung montieren .........................................................................5
Vordere Befestigung montieren .............................................................................6
Langes Schutzblech für 20“ Rad montieren ............................................................7
Zweites Schutzblech für 16“ Rad montieren (Trix und Lepus Comfort)........8
Spritzschutz montieren................................................................................................9
Tasche anbringen........................................................................................................ 10
Montage am Lepus.........................................................................................11
Seitliche Befestigung montieren.............................................................................. 11
Vordere Befestigung montieren.............................................................................. 11
Langes Schutzblech für 20“ Rad montieren ......................................................... 11
Langes Schutzblech für 16“ Rad montieren ......................................................... 11
Montage am Pino ...........................................................................................12
Seitliche Befestigung montieren.............................................................................. 12
Vordere Befestigung montieren.............................................................................. 12
Lampenhalterung an Pino montieren..................................................................... 14
Rund ums Fahren .....................................................................15
Faltverdeck anbringen...................................................................................15
Ausrichten des Faltverdecks........................................................................18
Höhe der Windabrisskante einstellen.......................................................19
Ein- und Ausstiegen.......................................................................................21
Regenponcho anbringen...............................................................................22
Regenponcho an kleine Personen anpassen ............................................24
Faltverdeck abnehmen..................................................................................27
Reinigung und Lagerung des Faltverdecks................................................27
Ersatzteile.................................................................................28
Vordere Befestigung......................................................................................28
Seitliche Befestigung Kettwiesel, Klimax, Trix........................................29
Seitliche Befestigung Lepus, Pino................................................................30
Stangengelenk, Rastblech, Rückspiegel......................................................31
Lampenhalterung Pino ..................................................................................32
Anhang für Händler .................................................................34
Bohrung im Steuerrohr anbringen ............................................................34
Bohrschablone................................................................................................35

FV-D-ENG 1/12
2
Langes Schutzblech
16 oder 20“
Long fender, 16 or 20”
Lepus
Lieferumfang und Zubehör Scope of delivery and optional
Accessories
Kettwiesel, Klimax, Trix
Pino
Regenponcho
(Zubehör)
Rain Poncho
(optional)
Spritzschutz
Splash guard
2x
Faltverdeck
Foldable Fairing
Seitliche Befestigung
Side mounts
2 x
Tasche
(Zubehör)
Fairing Bag (optional)
2 x
Vordere Befestigung
Front mount
Seitliche Befestigung
Side mounts
Regenponcho (Zubehör)
Rain Poncho (optional)
Langes Schutzblech 16 oder 20“
Long fender, 16 or 20”
Seitliche Befestigung
Side mounts
Vordere Befestigung
Front mount
Lampenhalter
Headlight mount
Vordere Befestigung
Front mount

FV-D-ENG 1/12 3
Sicherheitshinweise
Gebrauchsanweisung beachten
Lesen Sie diese Gebrauchsanleitung sorgfältig und machen
Sie sich mit dem Faltverdeck praktisch vertraut. Beachten Sie
ebenfalls die Gebrauchsanleitung des jeweiligen Fahrzeugs.
Verwendete Symbole undWarnungen
Achtung!
Dieses Symbol weist auf eine mögliche Gefahr für
Leben und Gesundheit hin, falls entsprechende
Handlungsaufforderungen nicht befolgt werden.
Hinweis:
Dieses Symbol gibt Informationen und Tipps zur
Handhabung und Umgang mit dem Fahrzeug.
Verwendungszweck
Das Faltverdeck darf nur an den Hase-Trikes: Klimax, Kett-
wiesel, Trix und Lepus sowie an dem Stufentandem Pino ver-
wendet werden. Die Benutzung in Verbindung mit anderen
Fahrzeugen ist nicht erlaubt. Für eventuelle Schäden überneh-
men wir keine Haftung.
Montage und Einstellung
Ihr Fachhändler hat das Faltverdeck montiert und auf Ihre
Körpergröße eingestellt. Wie das Faltverdeck für einen ande-
ren Fahrer angepasst werden soll, lesen Sie im Kapitel: „Höhe
der Windabrisskante einstellen“, Seite 19.
Sollten Sie das Faltverdeck selbst montieren, beachten Sie die
Montageanleitung. Beim Fahren mit dem Faltverdeck, darf die
Sicht und die Bewegungsfreiheit der Lenkung nicht einge-
schränkt werden. Lenkung und Bremsen müssen frei zugäng-
lich sein.
Benutzung des Regenponchos
Bei Benutzung des als Zubehör erhältlichen Regenponchos
müssen die Bewegungsfreiheit des Oberkörpers und der Ar-
me, vor allem bei Handzeichen für Richtungswechsel und für
den „Schulterblick“ gewährleistet sein. Achten Sie darauf, dass
das Rücklicht durch den Regenponcho nicht verdeckt wird.
Bei einem sehr kurz eingestellten Kettwiesel, Trix oder Kli-
max ist es wahrscheinlich, dass der Regenponcho das Rück-
licht verdeckt. So dürfen Sie auf keinen Fall fahren. Suchen Sie
Ihre Fachwerkstatt auf, um den Regenponcho anzupassen.
Safety information
Read User’s Manual
Read this User’s Manual carefully, and familiarize yourself with
the construction and function of the Foldable Fairing. It’s also
important to read and observe all safety, installation, and op-
erating instructions in the User’s Manual for the bike or trike
with which the fairing is being used.
Symbols used for notes and warnings
Caution!
This symbol indicates that there is a risk to life and
health if the respective instructions are not followed.
Note:
This symbol is used for information and tips on the
handling and use of the vehicle.
Intended use
The Foldable Fairing can only be used with the Hase trikes Kli-
max, Kettwiesel, Trix, and Lepus and semi-recumbent tandem
Pino. The use of the Foldable Fairing with other vehicles is pro-
hibited. Hase assumes no liability for any consequential damage.
Mounting and adjustment
Your authorized Hase retailer has mounted the Foldable Fair-
ing and adjusted it to your height. See section “Adjusting wind
deflector height” on page 19 for instructions on adjusting the
fairing to another rider.
If you are mounting the Foldable Fairing yourself, be sure to
follow the mounting instructions in this manual. When mount-
ed, the Foldable Fairing should in no way restrict the rider’s
vision or the movement of the steering controls. The handle-
bar grips and brake levers must remain freely accessible.
Use of the Rain Poncho
When using the optional Rain Poncho, be sure that it does
not in any way restrict movement of the torso and arms and,
above all, that it is still possible to make the necessary hand
signals and turn your head for looking over your shoulder.
Check that the Rain Poncho is not covering the taillight.
If a Kettwiesel, Trix, or Klimax is adjusted for very short rid-
ers, the Rain Poncho will probably hang in front of the tail-
light. In this case, do not, under any circumstances, ride the
trike with the Rain Poncho. Ask a qualified bicycle mechanic
to adjust the Rain Poncho accordingly.

FV-D-ENG 1/12
4
Fahren bei Wind
Ein Fahrrad mit einem Faltverdeck bietet dem Wind eine grö-
ßere Angriffsfläche an. Deshalb kann sich das Fahrverhalten
bei Wind verändern. Vor allem beim Pino könnte eine Wind-
böe das Fahrrad anheben, versetzen oder sogar umstoßen.
Fahren Sie daher nicht bei Sturm.
Parken bei Wind
Bei starkem Wind empfehlen wir das Faltverdeck zum
Parken abzunehmen, damit das Fahrrad nicht umkippt oder
wegrollt. Wenn Sie das Faltverdeck nicht abnehmen, müssen
Sie sicherstellen, dass das Fahrrad nicht umkippen oder weg-
rollen kann.
Bei einem sehr kurz eingestellten Kettwiesel, Trix oder Kli-
max lässt sich das Trike mit Faltverdeck nicht mehr aufrecht
parken. Das Faltverdeck könnte sonst beschädigt werden.
Sichtbar sein für andere
Bei Regen sind die Sichtverhältnisse in der Regel geringer.
Deshalb können Sie möglicherweise von anderen Verkehrs-
teilnehmern schlechter gesehen werden. Fahren Sie auch am
Tage mit Licht, dieses erhöht die Aufmerksamkeit der anderen
Verkehrsteilnehmer.
Der Frontscheinwerfer darf andere Verkehrsteilnehmer nicht
blenden. Unfallgefahr! Beachten Sie, dass vor allem hochwer-
tige LED-Scheinwerfer sehr helle und weitreichende Lichtke-
gel erzeugen.
Öffnen des Faltverdecks
Lösen Sie die seitliche Befestigung des Faltverdecks nur vor-
sichtig. Das Faltverdeck könnte sich durch die Spannung des
Gestänges plötzlich entfalten und möglicherweise Personen
in der Nähe verletzen. Achten Sie darauf, dass sich keine Per-
sonen in unmittelbarer Nähe befinden.
Bevor Sie losfahren...
Kontrollieren Sie das Faltverdeck auf eine korrekte Befesti-
gung. Ein nicht korrekt befestigtes Faltverdeck könnte sich
während der Fahrt öffnen und Sie oder andere Verkehrsteil-
nehmer verletzen oder Unfälle verursachen.
Technischer Zustand
Fahren Sie stets nur mit einem technisch einwandfreien und
korrekt befestigtem Faltverdeck. Führen Sie vor jeder Fahrt
eine Sichtprüfung auf eventuelle Schäden durch.
Sicherheitshinweise
Safety information
Riding in windy conditions
A bike or trike with a Foldable Fairing has a greater surface
area, making it more susceptible to wind gusts. This can af-
fect vehicle handling. A strong gust of wind could lift up the
vehicle, push it into another lane, or even tip it over. The Pino
with fairing is especially susceptible to high winds. For this
reason, Hase strongly advises never to ride with the Foldable
Fairing in windy conditions.
Parking in windy conditions
In windy conditions, we recommend removing the Foldable
Fairing when parking your bike or trike outdoors. Otherwise,
a gust of wind could tip over the vehicle or cause it to roll
away. If you do not remove the Foldable Fairing, then be sure
to secure the parked vehicle from tipping or rolling.
A Kettwiesel, Trix, or Klimax that has been adjusted for a
very short rider cannot be parked upright (on end) with a
mounted Foldable Fairing, as this would damage the fairing.
Being visible for others
Visibility is generally poor in wet weather. Therefore, it may
be more difficult for other road users to see you. Hase rec-
ommends riding with your lights on in wet weather to make it
easier for other road users to see you.
Be sure to adjust the headlight properly so that it does not
blind other road users. Risk of accident! Keep in mind that
high-quality LED headlights are especially bright and produce
long beams of light.
Caution when opening the Foldable Fairing
Use caution when releasing the catch on the side mount of
the Foldable Fairing. The frame tension could cause the fairing
to spring open, possibly injuring bystanders. Be sure that no
one is standing near the fairing before you release the catch.
Before each ride
Check the Foldable Fairing to make sure it is mounted cor-
rectly. A fairing that has been improperly mounted could
open during the ride and injure you or other road users or
cause accidents.
Technical condition
The Foldable Fairing should only be used if it is in perfect
technical condition and mounted properly. Before each trip,
be sure to check the condition of the fairing and vehicle for
possible faults or damage.

FV-D-ENG 1/12 5
Montage
Das Faltverdeck ist für die Trike-Modelle: Kettwiesel, Klimax,
Trix und Lepus sowie für das Stufentandem Pino geeignet.
Das Verdeck ist für alle Modelle gleich. Unterschiedlich ist die
Befestigung am Fahrzeug. (Vergleiche Seite 2, Lieferumfang
und Zubehör).
Montage am Kettwiesel, Klimax undTrix
Achtung!
Die Montage erfordert je nach Fahrradmodell eventuell
Spezialwerkzeug. Lassen Sie deshalb das Faltverdeck von
einer Fachwerkstatt montieren und auf Ihre Körpergröße
einstellen. Fehlerhafte Montage oder Einstellung können
Unfälle verursachen.
Seitliche Befestigung montieren
1. Stecken Sie die Klemme (1) ca. 6 mm tief in die Nabe, so
dass die Speichenköpfe im Inneren der Nabe sichtbar sind.
Hinweis:
Bei älteren Modellen mit Universalnaben benötigen Sie
die Klemme mit dem Außendurchmesser 33,8 mm. Im
Lieferumfang sind beide Klemmen enthalten (Seite 29).
2. Ziehen Sie die Madenschraube (2) in der Klemme (1) mit
einem Innensechskantschlüssel 3 mm fest.
3. Stecken Sie den Lagerstab (3) mit den beiden Lagern und
dem Sicherungsring (4) in die Klemme (1).
4. Setzen Sie den Sicherungsring (4) mit Hilfe einer Siche-
rungsringzange in die Nut der Klemme (1).
5. Stecken Sie die Kante des Schutzbleches in die Schutz-
blechklemme (5) und ziehen Sie die Schraube (7) leicht an.
6. Setzen Sie die Strebe (6) auf den Lagerstab (3). Drehen
Sie den Lagerstab (3) so, dass die Bohrungen mit dem
Langloch in der Strebe übereinstimmen.
7. Setzen Sie die Kappe (8) auf und schrauben Sie sie mit den
mitgelieferten Senkschrauben mit einem Innensechskant-
schlüssel 4 mm fest.
8. Schrauben Sie die Schraube der Schutzblechklemme (7)
mit einem Innensechskantschlüssel 4 mm fest.
9. Gehen Sie bei der Montage der zweiten Befestigung
genauso vor.
1
2
4
3
41
5
6
3
8
7
Mounting the fairing mounts
The Foldable Fairing is intended for use with the trike models
Kettwiesel, Klimax, Trix, and Lepus and the semi-recumbent
tandem Pino. The fairing itself is identical for all models. The
mounts with which the fairing is attached, however, differ for
the various models. (See page 2, “Scope of delivery and op-
tional accessories”.)
Mounting the fairing mounts: Kettwiesel, Klimax,
andTrix
Caution!
Special tools may be required, depending on the type of
vehicle.Therefore, Hase recommends having a qualified
bicycle mechanic mount the Foldable Fairing and adjust it
to your height.An improperly mounted or adjusted fairing
can cause accidents.
Mounting the side mounts
1. Insert the adapter (1) completely into the hub until the
top edge of the adapter is approx. 6 mm from the surface
of the hub. In this position, the spoke heads should be
visible inside the hub.
Note:
For older models with universal hubs (instead of Quick
Stick Hubs), you must use the adapter with an outer
diameter of 33.8 mm.The Foldable Fairing comes with
both adapters. (See page 29.)
2. Tighten the set screw (2) in the adapter (1) using a 3mm
Allen key.
3. Insert the bearing pin (3) with the two bearings and circlip
(4) into the adapter (1).
4. Insert the circlip (4) into the groove of the adapter (1)
using a pair of circlip pliers.
5. Insert the edge of the fender into the fender clamp (5),
and tighten the bolt (7) using light hand pressure.
6. Position the end of the fender stay (6) over the bearing pin
(3). Rotate the bearing pin (3) until the two holes in the
bearing pin are lined up with the slot in the fender stay.
7. Place the hubcap (8) over the end of the fender stay and
attach it with the countersunk bolts using a 4mm Allen key.
8. Tighten the bolt of the fender clamp (7) using a 4mm Al-
len key.
9. Repeat this procedure for mounting the second side
mount.

FV-D-ENG 1/12
6
Vordere Befestigung montieren
Die vordere Befestigung für des Faltverdeck wird am Steuer-
rohr montiert. Dafür ist im Steuerrohr eine Bohrung (1) ange-
bracht, die mit einem Aufkleber verdeckt ist. Sollten Sie eine
Version des Rahmens ohne eine solche Bohrung besitzen, so
lassen Sie das Faltverdeck von ihrer Fachwerkstatt fachge-
recht anbringen.
Achtung!
Zum Anbringen der vorderen Befestigung (2) ist eine
Bohrung (1) im Steuerrohr notwendig. Diese Bohrung
darf nur von einer Fachwerkstatt durchgeführt werden.
Nicht fachgerecht durchgeführte Bohrung kann zur
Beschädigung des Rahmens und damit zu schwerwie-
genden Unfällen führen.
1. Entfernen Sie die Schraube (3) aus der Ahead-Kappe (4)
mit einem Innensechskanntschlüssel 4 mm.
2. Entfernen Sie die Ahead-Kappe (4), das Lager (5) und
ziehen Sie die Gabel (6) aus dem Steuerrohr nach unten.
Gehen Sie dabei vorsichtig um, damit die Lenkanbindung
(7) nicht beschädigt wird.
3. Entfernen Sie den Aufkleber und setzen Sie die mitgelie-
ferte Schraube (9) mit Unterlegscheibe (10) von Innen
durch die Bohrung im Steuerrohr.
4. Setzen Sie die vordere Befestigung (2) auf die Schraube
und ziehen Sie die Schraube zunächst mit einem In-
nensechskantschlüssel mit Kugelkopf 4 mm handfest an.
5. Richten Sie die vordere Befestigung (2) aus und ziehen Sie
die Schraube (9) mit einem L-förmigen Innensechskant-
schlüssel 4 mm fest.
6. Bauen Sie die Gabel und den Steuersatz in umgekehrten
Reihenfolge wieder ein. Ziehen Sie die Schraube (3) in der
Ahead-Kappe so fest, dass die Lenkung frei beweglich, der
Steuersatz jedoch spielfrei ist.
Montage
Mounting
Mounting the front mount
The front mount (2) for the Foldable Fairing is mounted to
the head tube. For this purpose, the head tube has a special
hole (1), which is covered with a decal. If your head tube does
not have this hole (e.g. earlier models), then the Foldable
Fairing must be professionally mounted by a qualified bicycle
mechanic.
Caution!
A hole (1) in the head tube is required for mounting
the front mount (2).This hole can only be drilled by a
qualified bicycle mechanic.An improperly drilled hole
can damage the frame, which can in turn lead to serious
accidents.
1. Remove the bolt (3) from the Aheadset cap (4) using a
4mm Allen key.
2. Remove the Aheadset cap (4), compression ring, and
cartridge bearing (5), and pull the fork (6) out of the head
tube from below. Take care not to damage the fork-steer-
ing rod connection (7).
3. Remove the decal and insert the bolt (9) with washer (10)
(included with the mounting hardware) through the hole
from the inside of the head tube.
4. Place the front mount (2) over the bolt, and tighten the
bolt lightly using a 4mm ball-end Allen key.
5. Adjust the front mount (2) to the correct position, and
tighten the bolt (9) firmly using a 4mm L-shaped Allen key.
6. Remount the fork and headset, following the instructions
from steps 1 and 2 in the reverse order. Tighten the bolt
(3) in the Aheadset cap until there is no play in the head-
set but the bearing can still move freely.
1
2
4
3
5
6
7
9
10
2

FV-D-ENG 1/12 7
3
4
5
1
2
6
3
4
2
1
9
7
8
10
7
Langes Schutzblech für 20“ Rad montieren
Damit Sie bei Regen trocken bleiben, sollte das vordere
Schutzblech besonders lang und mit einem Spritzschutz ausge-
stattet sein. Außerdem kollidiert die Befestigung der vorderen
Beleuchtung mit dem Regenverdeck. Deshalb sollte das vor-
dere Schutzblech ersetzt werden. Auf dem langen Schutzblech
ist die Lampenbefestigung weiter vorne angebracht, so dass
genügend Platz zum Anbringen des Regenverdecks vorhanden
ist.
1. Lösen Sie die Schraube (1) in der A-Head-Kappe mit
einem Innensechskantschlüssel 5 mm.
2. Schrauben Sie die Schrauben (2) des vorhandenen Schutz-
bleches mit einem Innensechskantschlüssel 4 mm vom
unteren Teil der Gabel ab.
3. Schrauben Sie die Schraube (3) von der Mutter (4) mit
einem Innensechskantschlüssel 5 mm und einem Gabel-
schlüssel 10 mm am oberen Teil der Gabel ab.
4. Nehmen Sie das Schutzblech (5) und auch die eventuell
vorhandene Lampenbefestigung ab.
5. Schrauben Sie das lange Schutzblech (6) mit der Schraube
(3) und der Mutter (4) mit einem Innensechskantschlüssel
5 mm und einem Gabelschlüssel 10 mm an das obere Teil
der Gabel.
6. Schrauben Sie die Schutzblechstreben (7) des langen
Schutzbleches mit einem Innensechskantschlüssel 4 mm an
das untere Teil der Gabel fest.
7. Stecken Sie die mitgelieferten Schutzkappen (10) auf die
Enden der Schutzbstreben (7).
8. Stecken Sie die Schutzblechstreben (7) durch die Schrau-
ben (8) und ziehen Sie die Muttern (9) mit einem Gabel-
schlüssel 8 mm fest.
9. Ziehen Sie die Schraube (1) in der A-Head-Kappe mit
einem Innensechskantschlüssel 5 mm wieder fest.
Mounting the long fender to a 20” wheel
The headlight mount on the standard fender is too high for
use with the front mount of the Foldable Fairing. Therefore,
it must be replaced with the long fender that comes with the
Foldable Fairing. This fender has a lower headlight mount and,
when used in combination with the splash guard, ensures that
the rider will stay dry in wet conditions.
1. To remove the existing fender, unscrew the bolt (1) in
the Ahead cap using a 5mm Allen key.
2. Unscrew the bolts (2) of the fender stays from the fork
ends using a 4mm Allen key.
3. Unscrew the bolt (3) from the nut (4) on the upper fork
using a 5mm Allen key and 10mm open-end wrench.
4. Remove the fender (5) and any headlight mounting hard-
ware.
5. Attach the long fender (6) to the top of the fork with the
bolt (3) and nut (4) using a 5mm Allen key and a 10mm
open-end wrench.
6. Screw the fender stays (7) of the long fender onto to the
fork ends using a 4mm Allen key.
7. Place the protective caps (10) over the top ends of the
fender stays (7).
8. Insert the ends of the fender stays (7) through the bolts
(8), and tighten the nuts (9) using an 8mm open-end
wrench.
9. Tighten the bolt (1) in the Ahead cap using a 5mm Allen
key.
Montage
Mounting

FV-D-ENG 1/12
8
Zweites Schutzblech für 16“ Rad montieren (Trix und
Lepus Comfort)
Damit Sie bei Regen trocken bleiben, sollte das vordere
Schutzblech besonders lang und mit einem Spritzschutz ausge-
stattet sein. Außerdem kollidiert die Befestigung der vorderen
Beleuchtung mit dem Regenverdeck. Deshalb sollte das vor-
dere Schutzblech mit einem zweiten ergänzt werden. Auf dem
zweiten Schutzblech ist die Lampenbefestigung weiter vorne
angebracht, so dass genügend Platz zum Anbringen des Regen-
verdecks vorhanden ist.
1. Schrauben Sie die Schrauben (2) des vorhandenen Schutz-
bleches mit einem Innensechskantschlüssel 4 mm vom
unteren Teil der Gabel ab.
2. Schrauben Sie die Schraube (3) von der Mutter (4) mit
einem Innensechskantschlüssel 5 mm und einem Gabel-
schlüssel 10 mm am oberen Teil der Gabel ab.
3. Nehmen Sie das Schutzblech (5) und auch die eventuell
vorhandene Lampenbefestigung ab.
4. Sägen Sie das vordere Teil des abgenommenen Schutz-
bleches (5) an der vorderen Gabelkante (8) ab.
5. Schrauben Sie das zuvor abgesägte Schutzblech (5) zusam-
men mit dem zweiten Schutzblech (6) mit der Schraube
(3) und der Mutter (4) mit einem Innensechskantschlüssel
5 mm und einem Gabelschlüssel 10 mm an das obere Teil
der Gabel.
6. Schrauben Sie die Schutzblechstreben (7) beider Schutz-
bleche mit einem Innensechskantschlüssel 4 mm an das
untere Teil der Gabel fest.
2
43
5
6
7
7
Mounting a second fender for the 16” wheel (Trix and
Lepus Comfort)
In order to keep the rider dry in rainy conditions, the front
fender should be especially long and include a splashguard.
Furthermore, the headlight mount collides with the fairing.
Therefore, a second front fender should be mounted. The
headlight mount is positioned further forward on the second
fender, leaving sufficient space for the fairing mount.
1. Using a 4mm Allen key, remove the bolts (2) that fasten
the existing fender to the lower part of the fork.
2. Using a 5mm Allen key and a 10mm open-end wrench,
remove the bolt (3) from the nut (4) on the top part of
the fork.
3. Remove the fender (5) and the headlight mount, if ap-
plicable.
4. Saw off the front section of the removed fender (5) at the
front edge of the mount (8).
5. Using a 5mm Allen key and a 10mm open-end wrench,
fasten the rear section of the shortened fender (5), to-
gether with the second fender (6), to the top part of the
fork with the bolt (3) and nut (4).
6. Fasten the fender stays (7) of both fenders to the lower
part of the fork, using a 4mm Allen key.
8
4
3
Montage
Mounting

FV-D-ENG 1/12 9
Montage
Mounting
Spritzschutz montieren
Der Spritzschutz ist für die Trike-Modelle Kettwiesel, Klimax
und Trix geeignet und wird unter dem Sitz an fünf Punkten
befestigt.
Punkt A:
1. Legen Sie den Spritzschutz (1) zwischen den Hauptrahmen
(2) und das Kettenschutzrohr (3). Die Nähte des Spann-
bandes (4) müssen sich auf der Unterseite befinden.
2. Legen Sie das Spannband (4) über das Kettenschutz-
rohr (3) und führen Sie das lose Ende in die Schnalle (5)
ein.
3. Ziehen Sie das Spannband fest, so dass der Spritz-
schutz (1) einen Bogen bildet.
4. Heben Sie die Sitzbespannung (6) ab, legen Sie das Spann-
band (4) an die Sitzkante und klemmen Sie es mit der
Sitzbespannung (6) fest.
Achtung!
Unfallgefahr. Der Spritzschutz muss so gespannt sein,
dass die Bewegungsfreiheit der Lenkung nicht einge-
schränkt wird.
5. Kippen Sie das Trike nach hinten in Parkposition.
Punkt B:
6. Legen Sie das das Gummiband (7) um den Hauptrahmen
(2) vor den Schrauben der Längenverstellung (8) und
führen Sie die Schlaufe (9) über den Tanka (10).
7. Ziehen Sie das lose Ende des Gummibandes, um den
Spritzschutz zu spannen. Durch Drücken auf den Knopf
(12) des Tankas lössen Sie die Spannung.
Hinweis:
Bei einer besonders kurzen Rahmenlänge, können Sie
den Spritzschutz falten und das Gummiband an der
dafür vorgesehenen Stange (13) befestigen.
9
10 12
B
A
C
D
1
2
3
6
4
7
8
5
A
13
Mounting the splash guard
The splash guard can be used with the trike models Kettwi-
esel, Klimax, and Trix. It is mounted beneath the seat at five
mounting points.
Point A:
1. Position the splash guard (1) between the main frame (2)
and the chain tube (3), with the seams for the mounting
strap (4) on the underside of the splash guard.
2. Pull the mounting strap (4) over the chain tube (3), and
thread the loose end through the buckle (5).
3. Now tighten the mounting strap by pulling the loose end
until the splash guard (1) arches downward.
4. Lift the seat cover (6), lay the mounting strap (4) over
the edge of the seat, and secure it by replacing the seat
cover (6).
Caution!
Safety hazard: It is of upmost importance that the splash
guard does not restrict the movement of the steering
assembly.
5. Tip the trike onto its rear wheels in the upright parking
position.
Point B:
6. Stretch the elastic cord (7) around the main frame (2) in
front of the bolts for frame-length adjustment (8), and pull
the cordlock (10) through the loop (9).
7. You can increase tension in the splash guard by pulling on
the loose end of the elastic cord. By pressing the button
(12) of the cordlock, you can reduce tension in the splash
guard.
Note:
For frames that have been adjusted for especially short
riders, you can fold the splash guard and attach the elas-
tic cord to the special rod (13) intended for this purpose.

FV-D-ENG 1/12
10
Punkte C:
8. Ziehen Sie den Spanngummi (14) um das Achsrohr und
hängen Sie die Schlaufe um die Schraube (15) der Sitzstre-
be. Achten Sie darauf, dass das Gummiband nicht an der
Nabe oder der Antriebsschraube schleift.
9. Wiederholen Sie den Vorgang auf der rechten Seite.
Punkt D:
10. Stecken Sie die beiden Teile der Steckschließe (16) unter
dem Hauptrahmen zusammen.
11. Ziehen Sie anschließend am Punkt B das Gummiband
stramm.
12. Vergewissern Sie sich, dass der Spritzschutz nirgendwo
die Bewegungsfreiheit der Lenkung einschränkt. Ziehen
Sie gegebenfalls die Schnalle (5) (Bild vorige Seite) unter
der Sitzbespannung fester an.
Achtung!
Unfallgefahr. Der Spritzschutz muss so gespannt sein,
dass die Bewegungsfreiheit der Lenkung nicht einge-
schränkt wird.
Tasche anbringen
In der als Zubehör erhältlichen Tasche können Sie bei Son-
nenscheinfahrten das Faltverdeck unterbringen. Die Tasche
selbst, wird an der Rückseite des Sitzgestells angebracht.
1. Ziehen Sie die beiden Enden des Spanngurtes (1) durch
das Gestell (2) und stecken Sie die beiden Teile der
Schließe zusammen.
2. Ziehen Sie den Spanngurt (1) stramm. Achten Sie darauf,
dass das Ritzel nicht an der Tasche schleift.
Hinweis:
An der Rückseite des Sitzgestells lässt sich eine weitere
Packtasche befestigen.
14
15
16
1
2
Points C:
8. Pull the elastic band (14) around the axle tube, and hook
the loop onto the screw (15) of the seat stay. Check to
make sure that the elastic band cannot come in contact
with the hub or the drive screw.
9. Repeat Step 8 on the other side.
Point D:
10. Close the plastic buckle (16) beneath the main frame.
11. Then tighten the elastic cord at Point B.
12. Check to make sure that the mounted splash guard does
not restrict steering. If necessary, tighten the strap (4,
page 8) under the seat cover.
Caution!
Safety hazard: It is of upmost importance that the splash
guard does not restrict the movement of the steering
assembly.
Mounting the Fairing Bag
On sunny trips, the Foldable Fairing can be stowed in the op-
tional Fairing Bag. The bag itself is mounted behind the seat to
the seat frame.
1. Pull both ends of the mounting strap (1) through the
frame (2) as shown, and close the buckle.
2. Tighten the mounting strap (1). Check to make sure that
the bag cannot come in contact with the sprocket.
Note:
A pannier can be attached to the seat frame in addition
to the Fairing Bag.
Montage
Mounting

FV-D-ENG 1/12 11
Montage
Mounting
Montage am Lepus
Achtung!
Die Montage erfordert je nach Fahrradmodell eventuell
Spezialwerkzeug. Lassen Sie deshalb das Faltverdeck von
einer Fachwerkstatt montieren und auf Ihre Körpergröße
einstellen. Fehlerhafte Montage oder Einstellung können
zur gefährlichen Situationen führen.
Seitliche Befestigung montieren
Die Steckhülsen für die seitliche Befestigung des Regenver-
decks werden an der Sitzstrebe angeschraubt.
1. Halten Sie die Steckhülse (1) an die Sitzstrebe (2) ober-
halb des Schnellspanners (5) der Sitzverstellung.
2. Stecken Sie die mitgelieferte Unterlegscheibe (3) auf die
Schraube (4) und schrauben Sie die Steckhülse (1) mit der
Schraube (4) mit einem Innensechskantschlüssel 6 mm mit
25 Nm an die Sitzstrebe (2) fest.
Vordere Befestigung montieren
Die Montage der vorderen Befestigung am Lepus gleicht der
Montage der der vorderen Befestigung am Kettwiesel, Klimax
und Trix auf Seite 6.
Langes Schutzblech für 20“ Rad montieren
Die Montage des langen Schutzbleches für das 20“ Vorderrad
gleicht der Montage an Kettwiesel auf Seite 7.
Langes Schutzblech für 16“ Rad montieren
Die Montage des zweiten Schutzbleches für das 16“ Vorder-
rad gleicht der Montage an Trix und Lepus Comfort auf
Seite 8.
5
2
1
3
4
Mounting the fairing mount: Lepus
Caution!
Special tools may be required, depending on the type of
vehicle.Therefore, Hase recommends having a qualified
bicycle mechanic mount the Foldable Fairing and adjust it
to your height.An improperly mounted or adjusted fairing
can cause accidents.
Mounting the side mounts
The mounting sleeves for the attachment of the fairing are
mounted to the seat stays.
1. Hold the mounting sleeve (1) against the seat stay (2)
above the quick-release (5) used for seat adjustment, as
shown.
2. Attach the mounting sleeve (1) to the seat stay (2) by in-
serting the bolt (4) with washer (3) through the seat stay,
into the base of the sleeve and tightening with a 6mm
Allen key using a torque of 25 Nm (18 ft-lbs).
Mounting the front mount
The front mount for the Lepus is mounted in the same way
as the front mount for the Kettwiesel, Klimax, and Trix. See
page 6 for instructions.
Mounting the long fender for a 20” wheel
For mounting the long fender to a 20” front wheel, follow the
instructions on page 7 of the Kettwiesel User Manual.
Mounting a second fender for a 16” wheel
For mounting the second fender to a 16” wheel, follow the
instructions on page 8.

FV-D-ENG 1/12
12
Montage am Pino
Achtung!
Die Montage erfordert je nach Fahrradmodell eventuell
Spezialwerkzeug. Lassen Sie deshalb das Faltverdeck von
einer Fachwerkstatt montieren und auf Ihre Körpergröße
einstellen. Fehlerhafte Montage oder Einstellung können
zur gefährlichen Situationen führen.
Seitliche Befestigung montieren
Die Steckhülsen für die seitliche Befestigung des Regenver-
decks werden an der Sitzstrebe angeschraubt.
1. Halten Sie die Steckhülse (1) an die Sitzstrebe (2).
2. Stecken Sie die mitgelieferte Unterlegscheibe (3) auf die
Schraube (4) und schrauben Sie die Steckhülse (1) mit der
Schraube (4) mit einem Innensechskantschlüssel 6 mm mit
25 Nm an die Sitzstrebe (2) fest.
Vordere Befestigung montieren
Damit Sie die vordere Befestigung des Faltverdecks montieren
können, müssen Sie eine eventuell vorhandene Lampenhalte-
rung und Beleuchtung entfernen. Montieren Sie stattdessen
die dem Faltverdeck beiliegende Lampenhalterung (Seite 14).
1. Führen Sie ein Stahlseil in einen der Seilspanner (7) ein.
2. Positionieren Sie den Seilspanner oben auf dem Vorbau.
Legen Sie das lose Ende des Stahlseils von oben um den
Vorbau (8) und führen Sie es seitlich in den oberen Seil-
spanner (7) ein.
3. Führen Sie das zweite Stahlseil in den zweiten Seil-
spanner (9) ein.
2
3
4
1
8
7
8
Mounting the fairing mount: Pino
Caution!
Special tools may be required, depending on the type of
vehicle.Therefore, Hase recommends having a qualified
bicycle mechanic mount the Foldable Fairing and adjust it
to your height.An improperly mounted or adjusted fairing
can cause accidents.
Mounting the side mounts
The mounting assemblies for the attachment of the fairing are
mounted to the seat stays.
1. Hold the mounting sleeve (1) against the seat stay (2) as
shown.
2. Attach the mounting sleeve (1) to the seat stay (2) by
inserting the bolt (4) with washer (3) through the seat
stay into the base of the sleeve and tightening with a 6mm
Allen key using a torque of 25 Nm (18 ft-lbs).
Mounting the front mount
Before the front fairing mount can be attached, all headlight
mounts and lighting equipment must be removed. Replace the
existing headlight mount with the headlight mounts included
with the fairing. (See page 14).
1. Insert one of the steel cables into one of the cable ten-
sioners (7).
2. Position the cable tensioner on top of the front boom
(8) as shown. Then wrap the long end of the steel cable
around the front boom (8), and insert the end of the
cable into the opposite side of the cable tensioner (7) so
that the ends overlap inside.
3. Insert the other steel cable into the second cable ten-
sioner (9).
7
Montage
Mounting

FV-D-ENG 1/12 13
Montage
Mounting
4. Positionieren Sie den Seilspanner (9) auf der unteren Seite
des Vorbaus. Legen Sie das lose Ende des Stahlseils von
unten um den Vorbau (8) und führen Sie es seitlich in den
unteren Seilspanner (9) ein. Achten Sie darauf, dass keine
Leitungen am Vorbau eingeklemmt werden.
5. Ziehen Sie alle Stahlseile stramm, so dass beide Seilspan-
ner dicht am Vorbau anliegen. Ziehen Sie die Maden-
schrauben (13) an beiden Seilspannern fest.
6. Führen Sie den Spannstab (10) in die Nase (11) ein. Ach-
ten Sie darauf, dass die Senkungen für die Schrauben (13)
im Spannstab (10) in Fahrtrichtung zeigen und die seitliche
Bohrung (12) der Nase (10) in Fahrtrichtung nach links
zeigt.
7. Führen Sie die beiden Schrauben (13) durch den Spann-
stab (10) und schrauben Sie sie abwechselnd in die Seil-
spanner (7 und 9) zunächst handfest ein. Durch Anziehen
der oberen Schraube bewegt sich die Nase (11) nach
oben, durch Anziehen der unteren Schraube nach unten.
Richten Sie die Nase (11) bzw. die gesteckte Verlängerung
horizontal zur Fahrbahn (Bild A) und mittig an den Vorbau
aus. Ziehen Sie anschließend die beiden Schrauben (13)
mit 15 Nm fest.
Achtung!
Um nachträglich denWinkel der Nase zu verstellen,
lösen Sie erst die eine Schraube, bevor Sie die andere an-
ziehen, da sonst das Stahlseil reißen oder die Schrauben
aus dem Gewinde ausreißen könnten.
8
10
11
12
13
9
A
4. Position the cable tensioner underneath the front boom
(8) as shown. Then wrap the long end of the steel cable
around the front boom (8), and insert the end of the
cable into the opposite side of the cable tensioner (9) so
that the ends overlap inside. If there are any other cables
on the front boom, be sure that these are not trapped
between the steel cables and the front boom.
5. Pull both steel cables tight, securing both cable tensioners
firmly to the front boom. Tighten the set screws (13) in
both cable tensioners.
6. Insert the mounting pin (10) into the nose cone (11) as
shown, positioning it so that the counterbored holes for
the screws (13) are facing toward the front end of the
nose cone. Then place the nose cone (11) with pin (10)
against the front of the front boom with the hole (12)
on the side of the nose cone facing left (from the rider’s
perspective).
7. Insert the two bolts (13) through the mounting pin (10),
and screw them into the cable tensioners (7 and 9), alter-
nating between the two bolts and tightening lightly. When
the upper bolt is tightened, the nose cone (11) moves
upward, and when the lower bolt is tightened, the nose
cone moves downward. Position the nose cone (11) and/
or the inserted extension rod horizontal to the ground
(Fig. A) and centered on the front boom. Then tighten the
two bolts (13) with a torque of 15 Nm (11 ft-lbs).
Caution!
When re-adjusting the angle of the nose cone after the
bolts have been tightened, it is important to first loosen
one of the bolts before tightening the other. Otherwise
the steel cable could break, or the bolts could pull out of
the threads.
13

FV-D-ENG 1/12
14
Lampenhalterung an Pino montieren
Ersetzen Sie die Originalhalterung für den vorderen Schein-
werfer durch die beiliegende Lampenhalterung. Diese besteht
aus zwei Haltern (1 und 2) mit Magnetverschlüssen, einem
Bügel (3) und einem Befestigungsbinder (4). Der Bügel mit
dem Scheinwerfer wird bei Fahrten ohne Faltverdeck auf den
Halter an der Nase des Pinos (1), bei montiertem Faltverdeck
an den Halter (2) am Sechsachsengelenk gesteckt.
1. Schrauben Sie den Halter (1) mit der Schraube (5) und der Mut-
ter (6) an die Bohrung im Spannstab (7) so fest, dass der Halter
leicht drehbar bleibt, damit später die Höhe des Lichtkegels
einstellt werden kann. Schrauben Sie den zweiten Halter (2)
entsprechend an die Bohrung im Sechsachsengelenk (8).
2. Spannen Sie den Befestigungsbinder (4) um die Verlängerung.
3. Entfernen Sie den Scheinwerfer von der Originalhalterung
und schrauben Sie ihn auf die gleiche Weise an den Bügel (3).
Je nach Baugröße muss der Scheinwerfer eventuell umge-
kehrt montiert werden (9).
4. Ziehen Sie das Lichtkabel aus dem Pino Vorbau so weit
heraus, dass es nicht unter Spannung steht, und stecken Sie
den Bügel (3) mit dem Scheinwerfer an den Halter (2) am
Sechsachsengelenk (8).
5. Fahrten mit Faltverdeck: stecken Sie den Scheinwerfer an
das Sechsachsengelenk und klippen Sie das Lichtkabel an den
Befestigungsbinder (4). Fahrten ohne Faltverdeck: Stecken
Sie den Scheinwerfer an die Nase des Pinos. Das zu lange
Lichtkabel (10) wickeln Sie um den Bügel des Scheinwerfers.
Scheinwerfer abnehmen: Ziehen Sie den Bügel (3) mit
dem Scheinwerfer ein wenig nach vorne. Der Magnetver-
schluss gibt nach.
Scheinwerfer anbringen:Klippen Sie den Bügel (3) mit dem
Scheinwerfer von unten an den Halter mit Magnetverschluss.
6. Richten Sie den Scheinwerfer so aus, dass der Lichtkegel die
Fahrbahn ca. 5 -20 m vor dem Fahrrad ausleuchtet. Ziehen
Sie alle Schrauben fest, damit sich diese Einstellung nicht
selbsttätig verändern kann.
Achtung!
Hochwertige LED-Scheinwerfer erzeugen sehr helle und
weitreichende Lichtkegel. Der Scheinwerfer darf andere
Verkehrsteilnehmer nicht blenden. Unfallgefahr!
2
3
1
8
3
9
5
6
4
33
10
7
Mounting the headlight mount to the Pino
Replace the original headlight mount with the special mounts in-
cluded with the Foldable Fairing. This mounting system consists of
two mounts, (1) and (2), a bracket (3), and a cable strap (4). The
bracket with the attached headlight is clipped to the mount on the
nose of the Pino (1) when riding without the Foldable Fairing and
to the six-axis joint when the Foldable Fairing is mounted.
1. Attach the mount (1) to the lower hole of the mounting
pin (7) with the bolt (5) and the nut (6), tightening the
bolt just enough so that the mount remains slightly move-
able for adjustment. Fasten the second mount (2) in the
same way to the hole in the six-axis joint (8).
2. Wrap the cable strap (4) around the extension rod as
shown and tighten.
3. Remove the headlight from the original mount and fasten it
in the same way to the bracket (3). Depending on its size,
the headlight may have to be mounted upside down (9).
4. Pull a sufficient length of headlight cable out of the front
boom of the Pino so that the cable is not under tension,
and clip the bracket (3) with the attached headlight to the
mount (2) on the six-axis joint (8).
5. When riding with the fairing: snap the headlight into the
mount on the six-axis joint, and clip the cable to the cable
strap (4). When riding without the Foldable Fairing: snap the
headlight into the mount on the nose of the Pino. Wrap the
excess length of cable (10) around the headlight bracket.
Removing the headlight: Pull the bracket (3) with head-
light slightly forward until magnetic catch disengages.
Attaching the headlight: Snap the bracket (3) with head-
light from below onto the magnetic catch of the mount.
6. Adjust the position of the headlight so that the beam of
light illuminates the ground from approx. 5 to 20 meters
(5-22 yards) in front of the bicycle. Tighten the bolt
securely to ensure that the headlight remains in this posi-
tion. Repeat for second mount.
Caution!
High-quality LED headlights are especially bright and pro-
duce long beams of light.Adjust the headlight properly so
that it does not blind other road users. Risk of accident!
Montage
Mounting

FV-D-ENG 1/12 15
Rund ums Fahren
Faltverdeck anbringen
Das Faltverdeck ist für die Trike-Modelle: Kettwiesel, Klimax,
Trix und Lepus sowie für das Stufentandem Pino geeignet.
Das Verdeck ist für alle Modelle gleich. Unterschiedlich ist die
seitliche Befestigung. Bei dem Stufentandem Pino ist zusätzlich
vorne am Vorbau eine Verlängerung notwendig.
1. Nur Lepus und Pino
Drücken Sie den Knopf (3) am „Snap Button“ (4) und ste-
cken Sie das Seitensteckrohr (1) in die Steckhülse (2) an
der Sitzstrebe. Verdrehen Sie das Seitensteckrohr (1) so,
dass der „Snap Button“ (4) in der Steckhülse (2) einrastet.
2. Nur Pino
Drücken Sie den Knopf (7) am „Snap Button“ (8) der
Verlängerung (5) und stecken Sie die Verlängerung (5) in
die montierte Nase (6) am vorderen Tretlager. Verdrehen
Sie die Verlängerung (5) so, dass der „Snap Button“ (8) in
der Nase (6) einrastet.
Hinweis:
DieseVerlängerung ist notwendig, damit beim Pino der
vordere Mitfahrer genügend Beinfreiheit hat.
2
34
1
5
6
78
Riding with the Foldable Fairing
Mounting the Foldable Fairing
The Foldable Fairing is intended for use with the trike models
Kettwiesel, Klimax, Trix, and Lepus and the semi-recumbent
tandem Pino. The fairing itself is identical for all models. The
side mounts, however, differ for the various models. The
front mount for the Pino requires an extension rod.
1. Lepus and Pino only
Compress the head (3) of the Snap Button (4); then insert
the side-mount extension rod (1) into the mounting
sleeve (2) on the seat stay. Rotate the extension rod (1)
until the lower pin of the Snap Button (4) engages in the
hole of the mounting sleeve (2).
2. Pino only
Compress the head (7) of the Snap Button (8) on the
front-mount extension rod (5), and insert the extension
rod (5) into the mounted nose cone (6) on the front bot-
tom bracket. Rotate the extension rod (5) until the lower
pin of the Snap Button (8) engages in the hole of the nose
cone (6).
Note:
The extension rod is required for ensuring that the front
rider has sufficient leg space.

FV-D-ENG 1/12
16
3. Alle Modelle
Drücken Sie den Knopf am „Snap Button“ (9) des Faltver-
decks (10) und stecken Sie es in die montierte Nase (6)
am Steuerlager des Trikes, bzw. beim Pino in die zuvor
gesteckte Verlängerung (5). Verdrehen Sie die Stange des
Regenverdecks (11) bis der „Snap Button“ (12) in der
Nase (6) bzw. in der Verlängerung arretiert ist.
4. Fächern Sie das Faltverdeck zu beiden Seiten auseinander
(Bild A).
5. Klappen Sie das Faltverdeck auf und setzen Sie sich an-
schließend auf das Fahrrad.
10
6
11 9
12
A
3. All models
Compress the head (9) of the Snap Button (12) in the
mounting rod (11) of the Foldable Fairing (10), and insert
the rod into the mounted nose cone (6) on the head tube
of the trike or, for the Pino, into the end of the extension
rod (5). Rotate the mounting rod (11) until the lower pin
of the Snap Button (12) engages in the hole of the nose
cone (6), or the extension rod (Pino).
4. Hold the outer edges of the fairing frame, and spread the
fairing apart as shown (Fig. A).
5. Unfold the fairing, and sit down on the seat of the trike
(or tandem).
Rund ums Fahren
Riding with the Foldable Fairing

FV-D-ENG 1/12 17
Rund ums Fahren
Riding with the Foldable Fairing
6. Ziehen Sie das Faltverdeck zu sich hin.
7. Schieben Sie auf beiden Seiten des Faltverdecks die Rast-
bleche (13) auf die Befestigungsknöpfe (14) und rasten Sie
sie ein.
Hinweis:
Bei Pino und Lepus befinden sich die Befestigungsknöpfe
anders als im Bild dargestellt auf den Steckrohren unter
dem Sitz. 14
13
6. Pull the fairing down over you.
7. Guide the locking plate (13) on each side of the Foldable
Fairing over the respective mounting button (14) until the
button engages in the locking plate.
Note:
The mounting buttons for the Pino and Lepus are located
at the ends of the side-mount extension rods beneath the
seat (not shown).

FV-D-ENG 1/12
18
Ausrichten des Faltverdecks
Nach dem Anbringen des Faltverdecks werden wahrscheinlich
noch Knitterfalten zu sehen sein. Das Material reagiert auf Um-
welteinflüsse wie Hitze, Kälte und Feuchtigkeit. In feuchtem Zu-
stand wird das Faltverdeck nicht so straff sitzen, wie im trockenen
Zustand. Die Stoffhülle strafft sich jedoch, wenn sie einige Zeit auf-
gespannt ist. Sollte das Faltverdeck jedoch trotzdem nicht richtig
gespannt sein, können Sie folgende Einstellungen vornehmen:
Fehlende Spannung im oberen Stoffbereich lässt sich durch Ver-
drehen der gebogenen Stangen (Windabrisskante) ausgleichen.
1. Lösen Sie mit einem Innensechskantschlüssel 4 mm die
Klemmschrauben (1) an den Stangengelenken.
2. Verdrehen Sie die Stangen (2) bis die Windabrisskante
und das obere Stofffeld gleichmäßig gespannt sind.
3. Ziehen Sie die Klemmschrauben (1) wieder fest.
Sollte das Verdeck schief ausgerichtet sein, kontrollieren Sie,
ob die vordere Befestigung sich in einer Linie mit dem Vorbau
befindet.
4. Lockern Sie gegebenenfalls die vordere Befestigung wie
im Kapitel „Vordere Befestigung montieren“ Seite 6 oder
Seite 10 (je nach Modell) beschrieben und richten Sie sie
neu aus. Spannen Sie wieder das Stahlseil.
Sollte die Windabrisskante nicht horizontal verlaufen, dann
kontrollieren Sie die Lage der seitlichen Befestigungen.
5. Stellen Sie gegebenfalls die seitlichen Befestigungen wie im
Kapitel „Höhe der Windabrisskante einstellen“auf Seite
17 neu ein.
6. Kontrollieren Sie, ob die Rastbleche an beiden Seiten
spannungsfrei einrasten und stellen Sie sie gegebenfalls
neu ein. Siehe Kapitel „Höhe der Windabrisskante einstel-
len“ auf Seite 18.
Pino
Sollte das Verdeck am Pino zu wenig Spannung haben, muss
die vordere Befestigung nach unten gedreht werden.
1. Lösen Sie die obere Schraube (3) mit einem Innensechs-
kantschlüssel 4 mm und merken Sie sich die Anzahl der
Umdrehungen. Ziehen Sie untere Schraube (4) soweit
an, wie Sie die obere gelöst haben. Wiederholen Sie den
Vorgang so lange, bis das Faltverdeck gespannt ist.
3
4
2
1
Adjusting the Foldable Fairing
After you have mounted the Foldable Fairing, the fabric will
probably still have wrinkles. The fabric reacts to environmen-
tal influences like heat, cold, and moisture. When wet, the
fairing will not be stretched as taut as the dry fairing. Howev-
er, the fabric will become more taut over time when mount-
ed. The tension in the fabric can also be adjusted as follows:
Inadequate tension in the upper fabric area can be corrected
by rotating the ends of the bent frame rods (inside the wind
deflector).
1. Using a 4mm Allen key, loosen the clamp bolts (1) on the
frame joints.
2. Rotate the ends of the frame rods (2) outward until the
wind deflector and upper fabric area are uniformly ten-
sioned.
3. Retighten the clamp bolts (1).
If the fairing is not aligned correctly with the trike or tandem,
check the alignment of the front mount.
4. If necessary, loosen the front mount as described in the
section “Mounting the front mount” on page 6 or page
10 (depending on model), and correct the alignment. Re-
tension the steel cable.
If the upper edge of the wind deflector is not horizontal, then
check the positioning of the side mounts.
5. If necessary, reposition the side mounts as described in
section “Adjusting wind deflector height” on page 17.
6. Make sure that the locking plates on both sides of the
fairing click easily onto the mounting buttons without
jamming, and readjust if necessary. See section “Adjusting
wind deflector height” on page 18.
Pino
If there is inadequate tension in a Foldable Fairing mounted to
a Pino, the tip of the front mount must be lowered.
1. Use a 4mm Allen key to loosen the upper bolt (3), keep-
ing count of the number of rotations. Then tighten the
lower bolt (4) by the same number of rotations. Repeat
the process until there is adequate tension in the fairing
fabric.
Rund ums Fahren
Riding with the Foldable Fairing
Table of contents
Other HASE Bicycle Accessories manuals