Hatchlift RV Bedlift Kit User manual

Attach rod endof
spring to lower bracket
Temporarily attach
angle bracket to the
center of the wood
block with two 5/8”
screwsprovided
Pre-drill several holes - temporarily install
Lower Bracket with 5/8”screws at top rail
of bed
Lower Mounting Bracket
Position lowerbracket on top rail
Additional wood blocking may be
required
Bedlift Instructions
Variable speed drill
Measuring Tape & Pencil
#2 Phillips screwdriver
Required for Installation:
1
24”
26”
back
30”
back
22” 24”
36”
22” 24”
3”
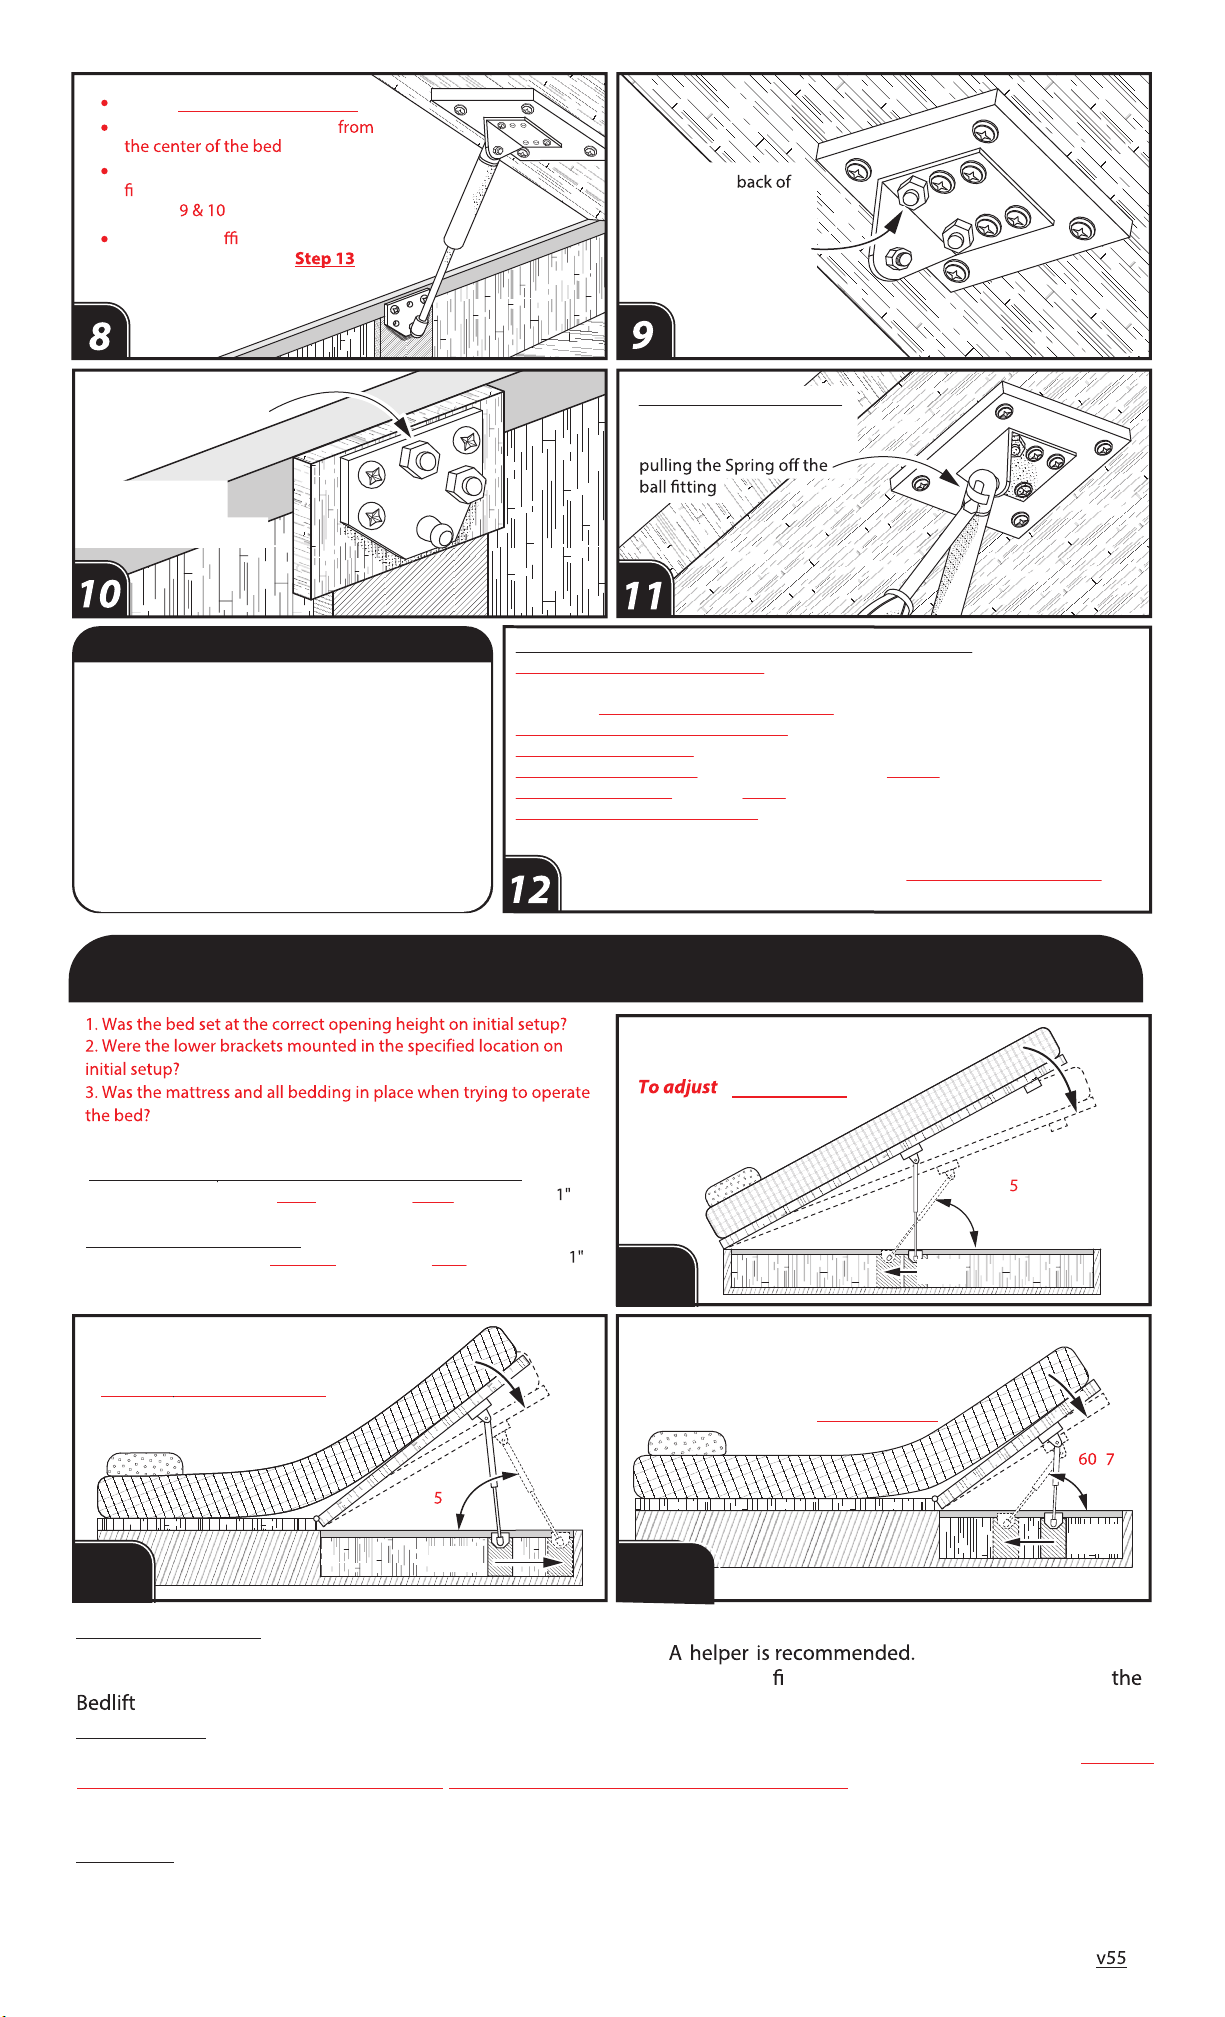
onnect the spring to the
upper bracket assembly on
both sides of the bed
*Pre-drill
holes
Install the wood blocks at the
locations with 1¼” gold
screws provided. Do not glue blocks
Safety Instructions
Installing the Hatchlift Bedlift Kit includes risk of bodily injury. Wear Safety Glasses and
use care when installing the springs and operating the bed. Risk of pinching ngers and hands are possible when
is being operated.
Return Policy
Bedlift Kits may be returned within 30 days of the date of delivery for a refund. Merchandise must be returned unused,
uninstalled, and in the same condition it was received. Return authorization required - email: [email protected]
All return items are subject to a 20% restock fee. Please note that original shipping charges are non-refundable. Return
shipping costs are the purchasers responsibility.
Warranty:
Hatchlift, LLC warrants to buyer for a period of 12 months from the date of purchase that the Hatchlift product will
be free from defects in material and workmanship. If within the warranty period, the product is found to be defective,
Hatchlift’s sole obligation will be to replace the defective part at its option and expense excluding freight charges.
-0°
approx.
1”- 3”
Small Compartment Beds
X-Small Compartment Beds
13C,D
45 - 5 °
approx.
1”- 3”
Partial Platform Beds
13
B
1”- 3”
45 - 5 °
approx.
13
A
TO ADJUST : LOWER THE BED
Full Platform, Small and X-Small Compartment Beds:
Move the lower bracket back towards the head of the bed in
increments.
Partial Compartment Beds:
Move the lower bracket forward towards the foot of the bed in
increments.
Step 13 - Installation Adjustment
Full Platform Beds
- lower the bed
To adjust: - lower the bed
To adjust: Lower the bed
Install mattress and all bedding.
Carefully operate the Bedlift
If the Bedlift operates correctly,
nish installing blocks and brackets
-Step
If the bed is di cult to operate or
won’t close, adjust per in
the instructions.
Apply glue to
block
Pre-drill and install
through-bolts provided
Pre-drill and install
through-bolts provided
*Additional wood
blocking may be
required (not included)
Disconnecting the Spring
Support the Bed. Slowly pry
up on the retainer clip while
After testing and nal adjusting the Bedlift,
remove and glue the upper wood blocks to the
bottom of the deck. Secure brackets with through
bolts provided*
Finish installing the lower mounting blocks and
brackets using the through-bolts provided*
Additional wood blocking may be required (not included)
* Note: Make sure to install through-bolts where
they do not interfere with the springs operation.
Troubleshooting – Bed Will Not Close / Too Dicult To Operate
Lightweight or Lightweight Foam? All kits (except Queen- Lite) are designed for standard
weight mattresses.
Gas Springs Cannot be Compressed or Tested without the kit being fully installed.
Initial Setup Dimensions Must Be Used Do not modify the setup dimensions.
Mattress and All Bedding must be in place to test and operate.
Current RV Bed / Mattress Does the kit size match the current bed and compartment size?
Partial Compartments Does the inside dimension of the bed match the Kit being installed?
Adjusting – #13 in the instructions After adjusting, the opening height should be 1”–2”
less than the opening height specied in the setup dimensions.
For further assistance, please send a side shot picture(s) of the installation to
Do not embed in the email.
Steps 8–10 — FInal Assembly & Operation
Table of contents
Popular Lifting System manuals by other brands


Poweramp
Poweramp CM Series Owner & user manual

ShoreStation
ShoreStation SSV15100EDC Service manual

Nussbaum
Nussbaum JUMBO HF 7000 Owners and installation manual

Ergotron
Ergotron StyleView 888-122 user guide

Lippert Components
Lippert Components ground control 3.0 Service manual

Hi-Force
Hi-Force HPS Series Operating instructions manual