Haushalt International 62810 User manual

3
1
4
2
5
Iglu-Zelt / Igloo Tent / Iglu šator / Iglu šotor
Art.-Nr. / Item no. / Br. artikla / Št. artikla: 62810
AufbAuAnleitung / Assembly instruction / upute zA montAžu /
NAVODILA ZA NAMESTITEV

Iglu-Zelt
Art.-Nr.: 62810
BEDIENUNGS- UND SICHERHEITSHINWEISE
Machen Sie sich vor dem ersten Gebrauch mit
dem Produkt vertraut. Lesen Sie hierzu auf-
merksam die nachfolgende Bedienungsanlei-
tung und die Sicherheitshinweise. Benutzen Sie
das Produkt nur wie beschrieben und für die
angegebenen Einsatzbereiche. Bewahren Sie
diese Anleitung gut auf. Händigen Sie alle Un-
terlagen bei Weitergabe des Produktes an Dritte
ebenfalls mit aus.
BESTIMMUNGSGEMÄSSER GEBRAUCH
Verwenden Sie das Produkt zum Camping im
Außenbereich. Andere Verwendungen oder Ver-
änderungen am Produkt gelten als nicht bestim-
mungsgemäß und können zu Verletzungen und
Beschädigungen führen. Für aus bestimmungs-
widriger Verwendung entstandene Schäden
übernimmt der Hersteller keine Haftung. Das
Produkt ist nicht für den gewerblichen Einsatz
bestimmt.
SICHERHEITSHINWEISE
⚠GEFAHR
Benutzen Sie keine Gas- oder Ben-
zinlampen im Zelt, die Abgase können
tödlich sein. Benutzen Sie keine offene
Flamme jeglicher Art im Zelt. Vermeiden
Sie das Kochen im Zelt.
⚠GEFAHR
Sorgen Sie für ausreichende Belüftung,
indem Sie das Zelt nie komplett schlie-
ßen.
⚠WARNUNG
Lebens- und Unfallgefahr für Kleinkin-
der und Kinder! Lassen Sie Kinder nie-
mals unbeaufsichtigt mit Verpackungs-
material. Es besteht Erstickungsgefahr
durch Verpackungsmaterial. Kleinteile
können verschluckt werden! Kinder un-
terschätzen häug die Gefahren!
i HINWEIS
Bei plötzlichem Sturzregen darauf ach-
ten, dass sich keine Wassersäcke auf
dem Dach bilden.
·Abspannseile und Schnüre von Kindern fern-
halten - Erstickungsgefahr durch Strangulation.
ACHTUNG!
·Wir empfehlen Ihnen vor der Benutzung, das
aufgebaute Zelt ausreichend auszulüften.
·Das Zelt eignet sich nicht bei Wettereinüssen
wie z.B. Starkwind, Schneefall, Hagel, etc. und
es empehlt sich dann ein vorübergehender
Abbau.
·Das Zelt eignet sich nicht für den Ganzjahres-
einsatz und sollte NIE längere Zeit unbeauf-
sichtigt stehen bleiben.
·Auf eine sichere Befestigung mit den mitge-
lieferten Schnüren und Heringen ist zu achten.
·Benutzen Sie das komplette Abspannmateri-
al und die Heringe. Wichtige Punkte sind die
Ecken und die Tür. Setzen Sie hier die Abspan-
ner am besten immer über Kreuz.
STANDORT
Wählen Sie einen geeigneten Standort für Ihr
Zelt. Achten Sie auf folgende Punkte:
·Bevor Sie das Zelt aufbauen, vergewissern Sie
sich, ob das Aufbauen eines Zeltes auf dem
gewünschten Stellplatz erlaubt ist.
·Das Zelt muß auf einer ebenen, rutschfesten
und sicheren Standäche stehen.
·Kein Betonboden und kein Sandboden, da die
mitgelieferten Heringe hier nicht xiert werden
können.
·Wählen Sie einen windgeschützten Standort.
·Achten Sie darauf, dass das Zelt frei steht und
nicht durch herabhängende Äste oder ähnli-
ches beschädigt werden kann.
·Der Boden sollte frei von spitzen Steinen, Äs-
ten, Disteln o. ä. sein.
·Vermeiden Sie Plätze, wie z. B. Bodensenken,
ausgetrocknete Flussbetten oder Bäume mit
totem Astwerk oder starker Harzbildung.
D

·Bauen Sie das Zelt in ausreichendem Abstand
zu Feuerstellen auf und achten Sie dabei auf
die Windrichtung.
·Zelte sollten möglichst wenig direkter Son-
neneinstrahlung ausgesetzt sein, denn mit der
Zeit schwächt die UV-Strahlung den Stoff.
·Lassen Sie Ihr Zelt in aufgestelltem Zustand
gut trocknen, bevor Sie es verpacken.
·ACHTUNG: Zelt NUR im Freien aufbauen!
AUFBAU
Nehmen Sie sich ausreichend Zeit für den Zu-
sammenbau und schaffen Sie zuvor eine ebene
Arbeitsäche. Legen Sie sich die Teile in Griff-
nähe bereit. Kontrollieren Sie alle Teile auf Voll-
ständigkeit bevor Sie mit dem Aufbau beginnen.
Beim Aufbau gehen Sie bitte entsprechend der
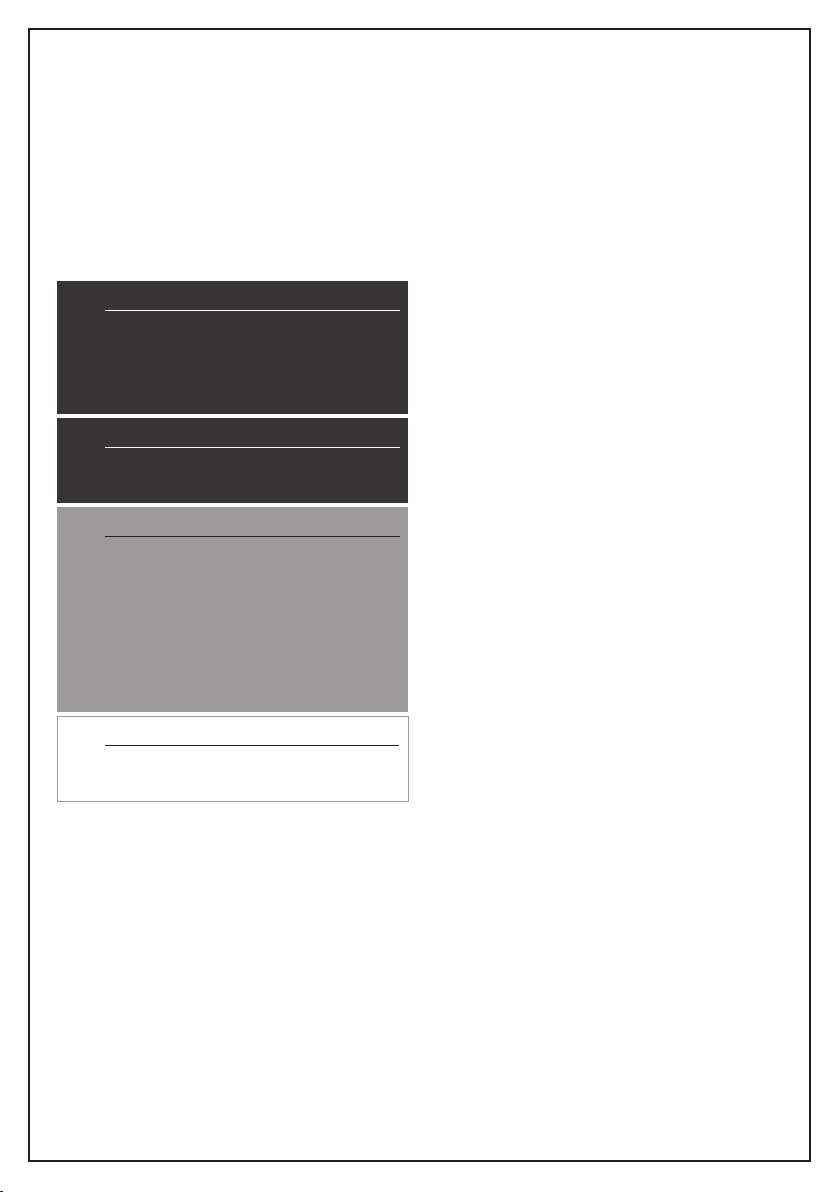
Schritte 1-5 gemäß der Abbildung vor.
1. Legen Sie das Zelt mit dem Eingang nach
oben auf den Boden (Abb. 1).
2. Setzen Sie die beiden Fiberglasgestänge zu-
sammen und schieben Sie diese durch die
beiden diagonal angebrachten Gestängetun-
nel (Abb. 2).
3. Richten Sie nun die Stangen vorsichtig auf
und stecken Sie die Enden in die jeweiligen
Ösen der Bodenplane (Abb. 3).
4. Befestigen Sie das kleine Überdach auf der
Kuppelspitze (Abb. 4).
5. Verankern Sie das Zelt mit den Heringen in
der Erde (Abb. 5).
Zur Beachtung: Reißverschlüsse sind Ver-
schleißteile und fallen nicht unter die Garantie-
bestimmungen.
Die Demontage erfolgt in umgekehrter Reihen-
folge.
REINIGUNG UND PFLEGE
·Flecken mit lauwarmem Wasser oder milder
Seifenlauge vorsichtig abwischen.
·Keine chemischen Reinigungsmittel verwen-
den.
·Waschen Sie das Zelt niemals in der Wasch-
maschine.
·Da das Zelt den Witterungsbedingungen aus-
gesetzt ist, ist es nicht auszuschließen, das
sich trotz sorgfältiger Pege Korrosionsstellen
bilden können. Dieses ist ein materialtypi-
sches Verhalten und kein Reklamationsgrund.
LAGERUNG
Lagern Sie das Zelt an einem trockenen, licht-
geschützten Ort und vergewissern Sie sich,
dass das Zelt trocken und sauber verpackt
wurde (um Schimmel und Geruchsbildung zu
verhindern). Vermeiden Sie eine Komprimierung
des Zeltes.
TECHNISCHE DATEN
·1.000 mm Wassersäule
Lieferumfang:
·1 Zelt
·2 Fiberglasstangen
·kleines Überdach
·1 Satz Heringe
·1 Satz Abspannseile
Maße (Zelt aufgebaut):
·(BxTxH) ca. 210 + 50 x 150 x 110 cm
Material:
·Zelt aus Polyester, PU beschichtet
·Boden aus PE-Folie
·stabiles Fiberglasgestänge
Igloo Tent
Item no.: 62810
DIRECTIONS FOR USE
AND SAFETY INSTRUCTIONS
Make yourself familiar with the product before
rst use. Read the following directions for use
and safety instructions carefully. Use this prod-
uct only for its intended purpose. Keep these in-
structions for future reference and include these
instructions if you pass on the product to third
parties.
GB
INTENDED USE
Use the product only for its intended purpose.
Any other use as well as modications of the
product have to be considered as improper use
and could cause injuries or product damages.
The manufacturer will not be held responsible
for any damages resulting from such improper
use. Not for commercial use.
SAFETY INSTRUCTIONS
⚠DANGER
Do not use any gas or petroleum lamps
in the tent. The fumes could be fatal. Do
not use any open ame of any kind in
the tent.
⚠DANGER
Ensure that there is always good venti-
lation, never closing the tent completely.
⚠WARNING
Life and accident risk for toddlers and
kids! To avoid danger of suffocation,
keep packing materials away from babi-
es and children. Risk of suffocation due
to packing material. Small parts can be
swallowed! Children often underestima-
te the dangers!
i NOTE
In sudden downpours you should ensu-
re that no puddles can form on the tent.
·Keep ropes and cords away from children -
suffocation by strangulation.
ATTENTION!
·We recommend to ventilate the assembled
tent for a while before use.
·The tent is not suitable in some weather con-
ditions eg. severe wind, snowfall, hailstones
etc. It is recommended that you temporarily
take down the tent.
·The tent is not suitable for use all year round,
and should NEVER be left to stand unattended
for a long time.
·Ensure that the tent is safely anchored.
·Use all guy ropes and pegs to anchor the tent.
Important points are the corners and the doors.
It is better to put the anchors crosswise here.
LOCATION
Pay attention to the following criteria when
choosing a location:
·Before setting up the tent, make sure that the
desired place is allowed for camping.
·The tent must stand on a at, non-slip and sta-
ble surface.
·Do not place on concrete or sand as the tent
can not be xed sufcient with the included
pegs.
·Choose a sheltered location.
·Take care that the surrounding of the tent is
free of branches or similar to avoid damages.
·The ground should be free of sharp stones,
branches, thistles etc.
·Avoid locations such as hollows, dried up river
beds or trees with dead branches or a lot of
resin.
·Put up the tent at a safe distance to replaces
and pay attention to the direction of the wind.
·Avoid as much as possible putting up tents in
direct sunlight, as the UV rays will weaken the
tent material by and by.
·Leave your tent to dry in an erected position
before packing it away.
·CAUTION: Only for outdoor use!
ASSEMBLY
Take yourself sufciently time for the assembly.
Arrange an even work surface before you start.
Lay all necessary parts ready to hand beside
you. Check that all the parts are present before
starting to assemble the tent.
When putting up the tent, follow the points 1-5
in the assembly drawing.
1. Spread out the tent with the entrance to the
top on a clean and even surface (g. 1).
2. Fit the pole sections together. Spread the
breglass poles (A) diagonally over the tent
and insert the pole end into the provided pins
/ eyelets (g. 2).
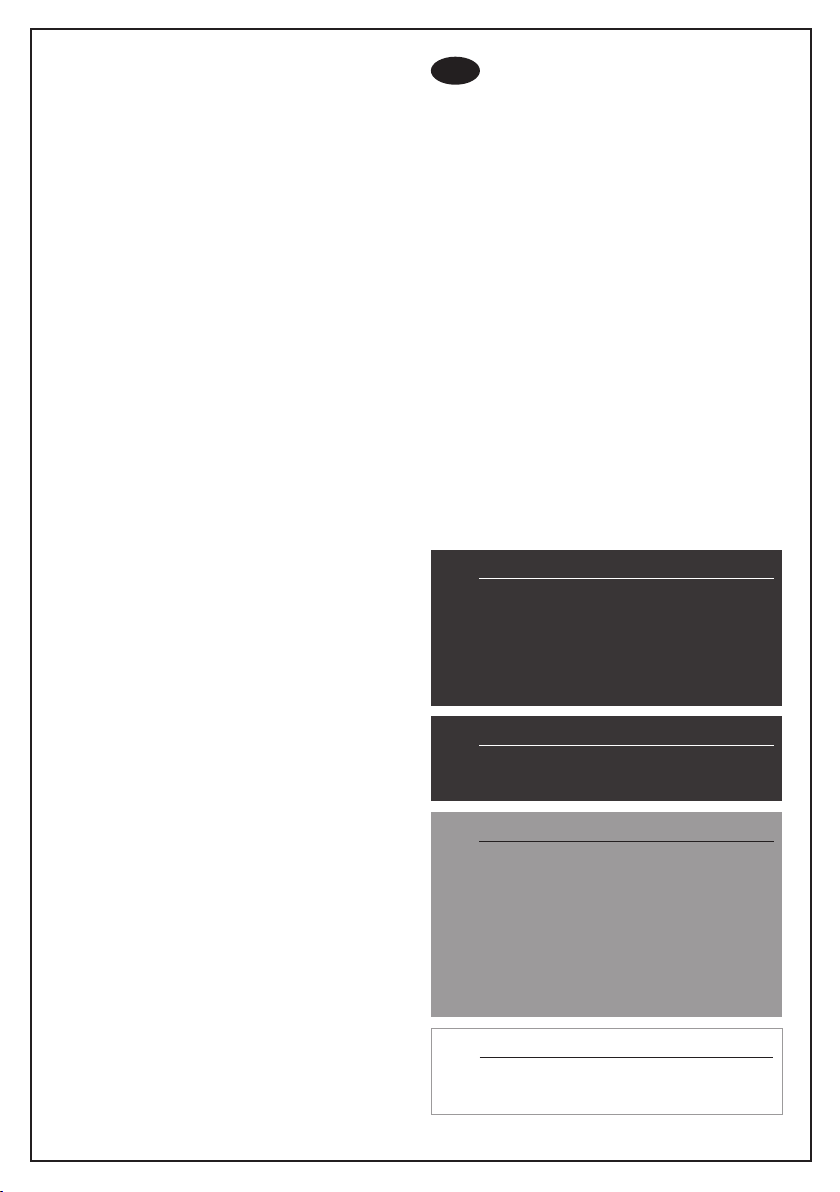
3. Raise the poles carefully and x the pole
ends into the provided pins / eyelets (g. 3).
4. Fix the small y sheet on the tent top (g. 4).
5. Anchor the tent to the ground with the tent
pegs (g. 5).
Note: Zips are parts subject to wear and tear
and do not fall under the guarantee.
Disassembly in reversed order.
CLEANING AND CARE
·Carefully wipe any stains with lukewarm water
or mild soapy water.
·Do not use any chemical cleansers.
·Never wash the tent in the washing machine.
·The tent will be exposed to the weather con-
ditions. Therefore it can not be ruled out that
even when properly cared corrosion could
occur. That is a typical characteristic and no
reason for claims.
STORAGE
Store the tent protected from light in a dry place.
Ensure yourself that the tent is dry and packed
properly before storage (to avoid bad smells and
prevent mildew). Avoid compressig the tent.
TECHNICAL DETAILS
·1.000 mm water column
Items delivered:
·1 tent
·2 breglass poles
·small y sheet
·batch of tent pegs
·batch of guy ropes
Dimensions (assembled tent):
·(WxDxH) approx. 210 + 50 x 150 x 110 cm
Material:
·tent made of Polyester, PU coated
·oor made of PE lm
·sturdy Fibreglass poles
Iglu šator
Br. artikla: 62810
UPUTE ZA UPORABU I SIGURNOST
Prije prvog korištenja proizvoda upoznajte se sa
uputama. Pažljivo pročitajte sljedeće upute za
uporabu i sigurnosne upute. Koristite proizvod
samo kao što je opisano i za navedena područja
primjene. Ove upute držite na sigurnom mjestu.
Prilikom predavanja proizvoda trećoj strani, pre-
dajte i sve dokumente.
UPUTE ZA KORIŠTENJE
Verwenden Sie das Produkt zum Camping im
Außenbereich. Druge upotrebe ili izmjene proi-
zvoda smatraju se neprikladnim i mogu dovesti
do ozljeda i oštećenja. Proizvođač ne preuzima
nikakvu odgovornost za štetu koja proizlazi iz
neovlaštene uporabe. Proizvod nije namijenjen
komercijalnoj uporabi.
SIGURNOSNO UPOZORENJE
⚠OPASNOST
U šatoru ne upotrebljavajte svjetiljke na
plin ili benzin, jer ispušni plinovi mogu
biti smrtonosni. Ne koristite otvoreni
plamen u šatoru i oko njega. Izbjegavaj-
te kuhanje u šatoru.
⚠OPASNOST
Pazite da je šator dobro prozračen, da
nikada nije potpuno zatvoren.
⚠UPOZORENJE
Opasnost po život i zdravlje za novo-
rođenčad i djecu! Nikad ne ostavljajte
djecu bez nadzora s materijalom za
pakiranje. Postoji rizik od gušenja zbog
materijala za pakiranje i dijelova proi-
zvoda. Mali dijelovi se mogu progutati!
Djeca često podcjenjuju opasnosti!
i SAVJET
U slučaju naglog pljuska prvo provjerite
da nije došlo do stvaranja đepova vode.
HR

·Užad i konopce držite podalje od djece – postoji
opasnost od gušenja.
POZOR!
·Prije upotrebe, preporučujemo da sastavljeni
šator dobro prozračite.
·Šator nije pogodan za vremenske uvjete kao
što su, jaki vjetrovi, snijeg, tuča, itd, i prilikom
toga je preporučljivo rastaviti ga.
·Šator nije pogodan za cjelogodišnje korištenje
i nikada ga NE smijete ostaviti dugo vremena
bez nadzora.
·Pazite da šator bude sigurno učvršćen sa pri-
loženim vezicama i klinovima.
·Upotrijebite sav priloženi materijal i klinove za
sastavljanje. Važne točke su kutovi i vrata. Naj-
bolje je konopce postaviti uvijek križno.
LOKACIJA
Odaberite odgovarajuću lokaciju za Vaš šator.
Pritom pazite na slijedeće:
·Prije nego što postavite šator, pobrinite se da
ga postavljate na dopuštenom mjestu.
·Šator mora biti postavljen na ravnoj i čvrstoj
površini, otpornoj na klizanje.
·Šator ne postavljati na beton i pjeskovito tlo jer
se ne može učvrstiti.
·Izaberite mjesto koje je zaštićeno od vjetra.
·Postavite šator na čistinu i pazite da u blizini
nema grana koje bi se mogle nadviti nad njime
i uzrokovati oštećenja.
·Pod bi trebao biti bez oštrog kamenja, granči-
ca, bodlji i sl.
·Izbjegavajte mjesta, poput npr. padina, suhih
riječnih tokova ili drveća sa suhim granama ili
obilnim izlučivanjem smole.
·Ne postavljajte šator u blizini izvora vatre i pa-
zite pritom na smjer vjetra.
·Šatori trebaju biti što manje izloženi izravnoj
sunčevoj svjetlosti, jer zbog UV zračenja tkani-
na s vremenom slabi.
·Pazite da šator prije pakiranja dobro osušen.
·POZOR: Šator postavljajte SAMO na otvore-
nom.
SASTAVLJANJE
Odvojite dovoljno vremena za sastavljanje i pri-
premite ravnu površinu. Pripremite dijelove da
Vam budu na dohvat ruke. Prije početka monta-
že provjerite sve dijelove. Kod postavljanja okvi-
ra pratite korake 1-4 prema slikovnim uputama.
1. Postavite šator na pod sa ulazom prema
gore. (Slika 1)
2. Obje šipke od staklenih vlakana spojite za-
jedno i gurnite ih kroz oba dijagonalno mon-
tirana tunela (Slika 2).
3. Pažljivo poravnajte šipke i postavite krajeve u
za to predviđene ušice podne površine. (slika
3).
4. Pričvrstite mali krov na vrh svoda. (Slika 4).
5. Klinovima pričvrstite šator u zemlju. (slika 5).
Pažnja: Zatvarači su potrošni dijelovi i nisu po-
kriveni garancijom.
Rastavljanje se vrši obrnutim redoslijedom.
ČiŠĆenJe i oDržAVAnJe
·Mrlje očistite mlačnom vodom i blagom otopi-
nom sapuna.
·Ne koristite kemijska sredstva za čišćenje.
·Šator nikada ne perite u perilici rublja.
·Budući da je šator izložen vremenskim uvje-
tima, nije isključeno da, unatoč pažljivoj njezi,
mogu nastati korozijske točke. Ovo je tipična
reakcija materijala, i nije razlog za reklamaciju
SKLADIŠTENJE
Spremite šator na suhom i tamnom mjestu i pa-
zite da je suh i čist prije spremanja (kako bi se
spriječila plijesan i miris). Izbjegavajte kompri-
miranje šatora
teHniČKi poDAci
·1.000 mm Vodeni stupac
Priloženi dijelovi:
·1 šator
·Šipka od staklenih vlakana
·Mali krov
·1 komplet klinova

·1 komplet užadi
Dimenzije (postavljen šator):
·(Š x D x V) oko 210 + 50 x 150 x 110 cm
Materijal:
·Šator od poliestera, PU premaz
·Pod od PE-folije
·Čvrste šipke od staklenih vlakana
Iglu šotor
Št. artikla: 62810
NAVODILA ZA UPORABO IN VARNOST
Pred uporabo izdelka prvič preberite navodila.
Previdno preberite naslednja navodila za upora-
bo in varnostna navodila. Proizvod uporabljajte
le, kot je opisano in samo za navedena področja
uporabe. Navodila hranite na varnem mestu. Pri
predaji izdelka tretji osebi, predložite vse doku-
mente.
BESTIMMUNGSGEMÄSSER GEBRAUCH
Uporabite ta izdelek za kampiranje na prostem.
Druge uporabe ali spremembe izdelka se štejejo
za neprimerne in lahko povzročijo poškodbe ali
škode. Proizvajalec ne prevzema nobene odgo-
vornosti za kakršno koli škodo, ki je posledica
nepooblaščene uporabe. Izdelek ni namenjen
komercialni uporabi.
NAVODILA ZA UPORABO
⚠NEVARNOST
V šotoru ne uporabljajte plinskih ali ben-
cinskih svetilk, ker so izpušni plini lahko
smrtonosni. Ne uporabljajte kakršnega-
koli odprtega ognja v šotoru in v njego-
vem neposrednem okolju. Izogibajte se
kuhanju v šotoru.
⚠NEVARNOST
Zagotovite zadostno prezračevanje. Ni-
koli popolnoma ne zaprite šotora.
SLO
⚠OPOZORILO
Nevarnost za življenje in zdravje novoro-
jenčkov in otrok! Otroke nikoli ne pustite
brez nadzora z embalažnim materialom.
Obstaja nevarnost zadušitve zaradi em-
balaže in delov izdelka. Deli se lahko
pogoltnejo! Otroci pogosto podcenjujejo
nevarnost!
i OBVESTILO
V primeru nenadne plohe najprej pre-
verite, da ni prišlo do ustvarjanja žepi
vode.
·Ohranite vrvi in vrvice od otrok - nevarnost za-
dušitve.
POZOR!
·Pred uporabo preporočamo dobro prezračeva-
nje šotora.
·Šotor ni primeren za vremenske razmere, kot
je močni veter, sneg, toča ipd., in za to vreme
ga je preporočeno razstaviti ga.
·Šotor ni primeren za celo letno uporabo in ga
NE bi smeli zelo dolgo pustiti brez nadzora.
·Poskrbite, da je šotor varno pritrjen s vrvi in
klini.
·Uporabite celoten montažni material in klin.
Pomembne točke so koti in vrata. Najboljše je
vrvi vedno postaviti navkriž.
LOKACIJA
Izberite ustrezno lokacijo za svoj šotor. Bodite
pozorni na naslednje:
·Preden nastavite šotor, se prepričajte, da ga
postavljate na dovoljeno mesto.
·Šotor mora stati na ravni in varni podlagi, od-
porni proti drsenju.
·Šotor ne postavljajte na beton in peščeno
zemljo, ker ga ni mogoče pritrditi.
·Izberite takšno mesto postavitve, ki je zaščite-
no pred vetrom.
·Postavite šotor na čistino, kje ga viseče veje ali
podobno ne morejo poškodovati.

·Tla morajo biti brez ostrih kamnov, vejic, ali
bodelj itd.
·Izogibajte se mestih, kot so npr. pobočja, suhi
rečni tokovi ali drvesa s suhimi vejami ali z
močnim izločanjem smole.
·Šotor ne postavite v bližini vira ognja in pazite
na smer vetra.
·Šotori morajo biti čim manj izpostavljeni nepo-
sredni sončni svetlobi, saj UV-sevanje pogosto
oslabi tkanino.
·Pred pakiranjem poskrbite, da je šotor dobro
posušen.
·Pozor: Postavite šotor SAMO na odprtem.
POSTAVITEV
Vzemite si dovolj časa za montažo in pripravite
ravno površino. Pripravite dele, da so Vam v do-
segu rok. Pred namestitvijo preverite vse dele v
nastavitvi okvira sledite korake 1-4 proti slikov-
nim navodilima.
1. Postavite šator na pod z vhodom navzgor.
(slika 1)
2. Povežite palice iz steklenih vlaken skupaj in
jih potisnite skozi oba diagonalno vgrajena
predora. (slika 2)
3. Previdno poravnajte palice in postavite konce
v priložene lukne na talni površini. (Slika 3)
4. Namestite mali nadstrešek na vrh na kupole.
(slika 4)
5. Klinima pritrdite šotor na tla. (slika 5)
Pozor: Zadrge so potrošni material in niso zajete
v garancij.
Demontaža se opravi v obratnem vrstnem redu.
ČiŠČenJe in oDržeVAnJe
·Madeže previdno pobrišite z mlačno vodo ali z
blago milnico.
·Ne uporabljajte kemičnih čistil.
·Šotor nikoli ne perite v pralnem stroju.
·Ker je paviljon izpostavljen vremenskim raz-
meram, ni izključiteno, da lahko kljub skrbi o
izdelku, nastanejo korzijske mesta. To je tipi-
čen materialni odziv, ne pa razlog za pritožbo.
HRANJENJE
Šotor shranite v suhem in temnem prostoru in
pred shranjevanjem poskrbite, da je suh in čist
(za preprečevanje plesni in vonja). Izogibajte se
stiskanju šotora.
teHniČni poDAtKi
·1.000 mm Vodni stolpec
Priloženi deli:
·1 šotor
·Palice iz staklenih vlaken
·mali nadstrešek
·1 komplet klini
·1 komplet vrvica
Mere (odprti šotor):
·(Š x G x V) pribl. 210 + 50 x 150 x 110 cm
Material:
·Šotor iz poliestra, prevlečen s PU
·Tla iz PE folije
·Stabilne palice iz steklenih vlaken
Hergestellt für / Produced for / Proizvedeno za:
Haushalt International · Im- & Export GmbH
Gerhard-Stalling-Str. 9 -11 · 26135 Oldenburg
Table of contents
Languages:
Other Haushalt International Tent manuals

Popular Tent manuals by other brands


Coleman
Coleman 2000033134 Assembly & instruction manual

Ozark Trail
Ozark Trail W784.1 Assembly instructions and owner's manual

SlingFin
SlingFin CrossBow 2 instructions

Coleman
Coleman 9600-141 instructions

Palram
Palram Arizona 5000 Wave - WINGS manual

COVERPRO
COVERPRO 56184 Owner's manual & safety instructions