Havahart 5267 User manual

Havahart® Spray Away® Hydro-Remote™
Animal Repellent Sprinkler
Owner’s Manual
Model #5267
www.Havahart.com
Version 5/18
10% OFF
Shop all Havahart® solutions and protect your home from all angles!
Your next order at Havahart.com
HHPROMO
Coupon Code:
Caught a critter in the act?
Visit us on Facebook to share your favorite photos of critters you’ve
spotted, for the chance to win gift cards, free product and more!
www.facebook.com/HavahartBrand
Like us to enter:
Owner’s Manual
Thank you for purchasing the Havahart® Spray Away®
Hydro-Remote™ Animal Repellent!
Content Page
Cautions
Woodstream
®
Corporation
69 North Locust Street
Lititz, PA 17543
United States
www.Havahart.com
Intended to operate with typical household water pressure
between 30 and 80 psi.
Malfunctioning units carry an inherent risk of causing water
damage to your property. Mitigate your risk by limiting the
amount of water available to the unit (open hose valve 3/4
turn maximum) and ensuring your water pressure is within
the normal operating range for the unit.
Use a high quality garden hose with a solid brass connector
for a leak-free, durable connection. Any visible wear
(especially on hose thread), such as bends or dings, can
cause the connection to leak.
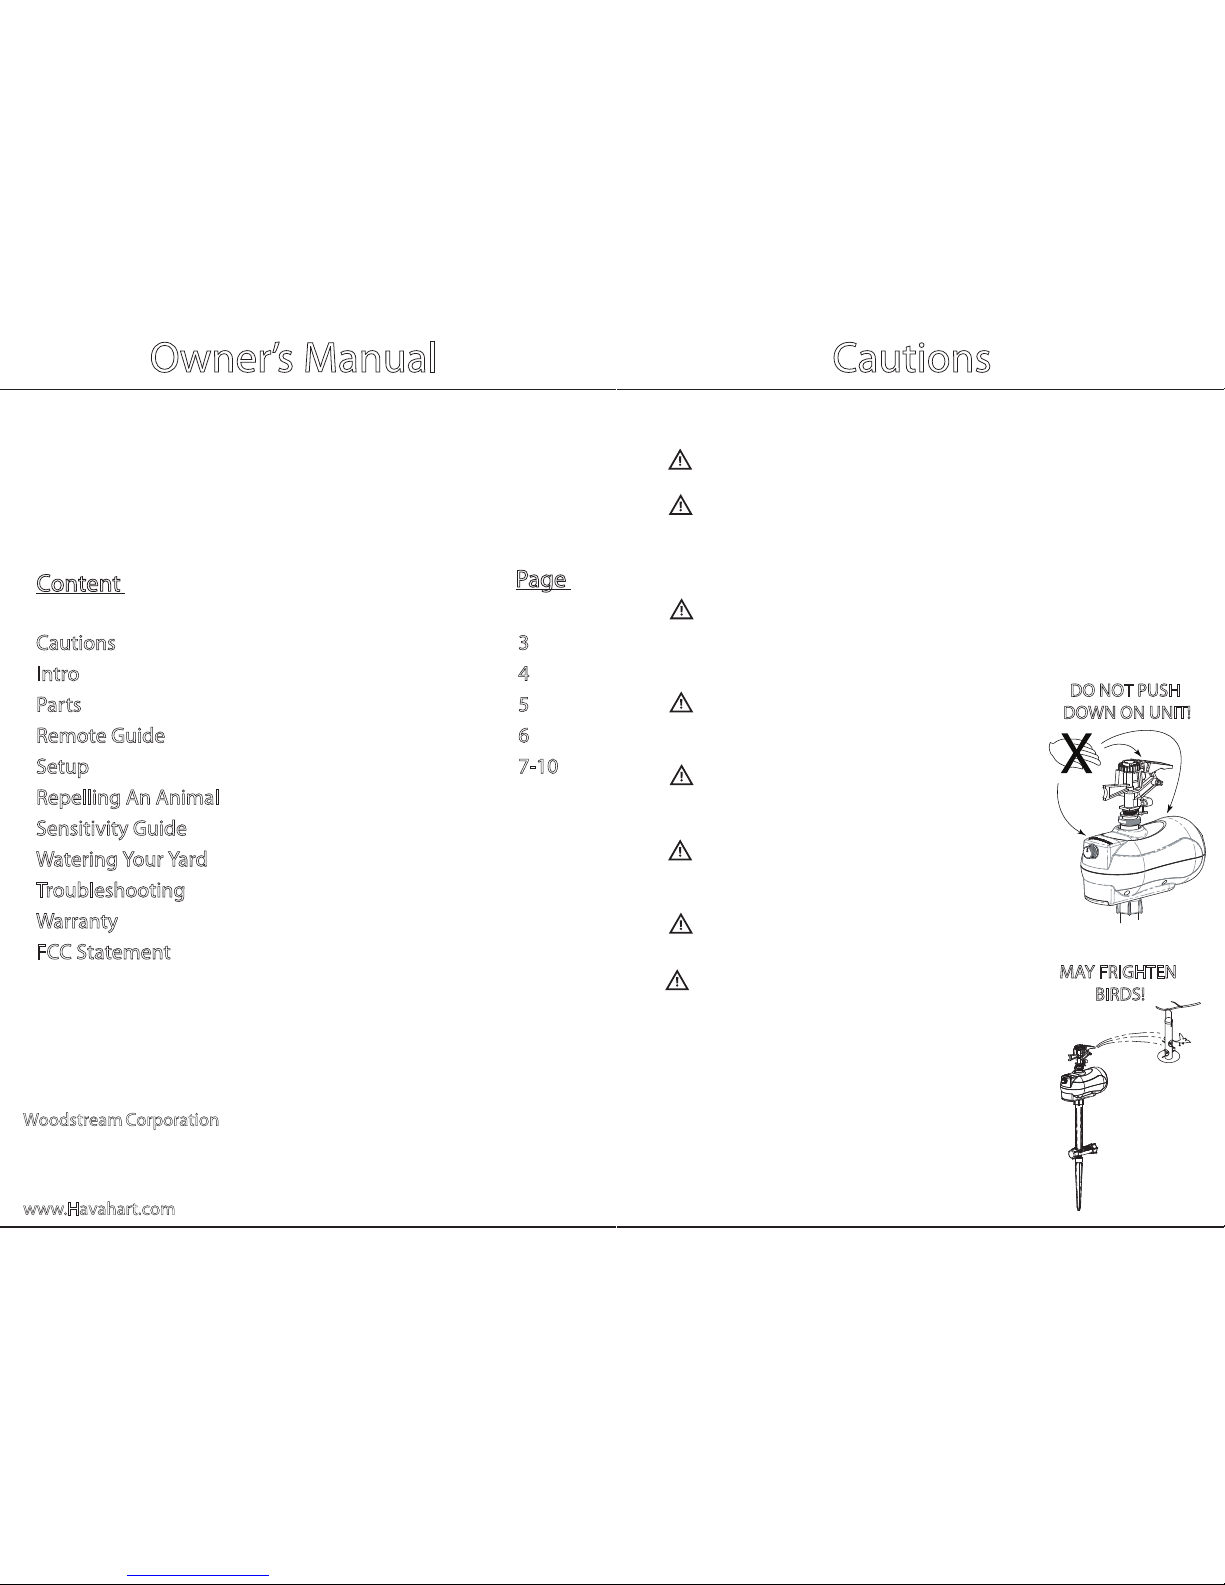
When pushing the stake into the ground,
use the step-in-stake. DO NOT push down or
apply weight on the top of the main unit.
To prevent damage from freezing water,
bring Spray Away® inside when the
temperature drops below 32°F.
Dust, dirt or hard water on Infrared Sensor
can limit sensitivity – keep clean by wiping
it gently with a damp cloth.
Higher sensitivity levels are more prone to
repeated/erroneous sprays.
To minimize false triggers, avoid pointing
Spray Away® at moving water, windy
areas and moving vehicles.
MAY FRIGHTEN
BIRDS!
23
Cautions .......................................................................
Intro ..............................................................................
Parts .............................................................................
Remote Guide ..............................................................
Setup ............................................................................
Repelling An Animal ...................................................
Sensitivity Guide .........................................................
Watering Your Yard .....................................................
Troubleshooting .........................................................
Warranty ......................................................................
FCC Statement .............................................................
3
4
5
6
7-10
11
12-13
14
15
16
17-18
If you encounter any problems while
assembling your Spray Away®, please
refer to the Troubleshooting section of this
manual or call us at 1.855.5.HAVAHART.
DO NOT PUSH
DOWN ON UNIT!
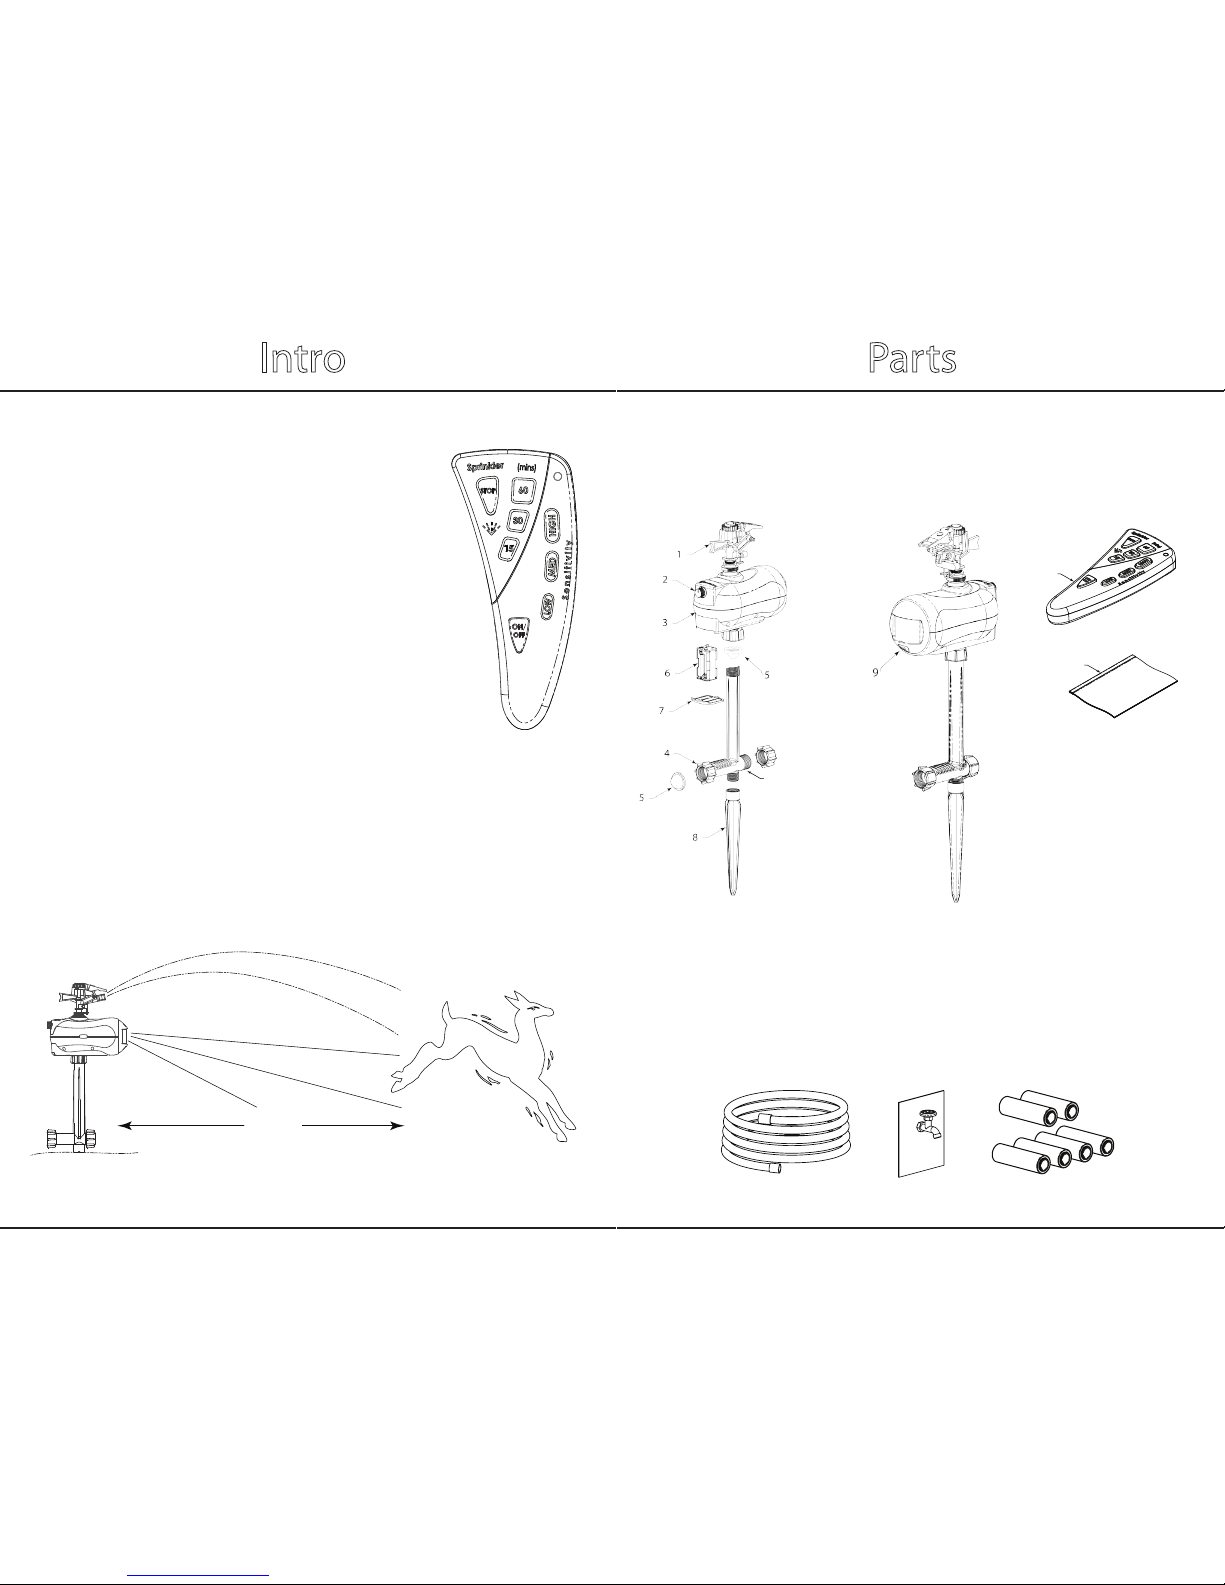
Intro Parts
Havahart® Spray Away® Hydro-Remote™ Animal Repellent is the
next generation of motion-activated sprinklers. Hydro-Remote™
combines an eective and humane animal repellent with a water
sprinkler, giving you the ability to hydrate your yard and garden
while protecting it.
Additionally, this unique dual purpose gardening tool can be
Away® Hydro-Remote’s remote functions from over 100 feet
Before getting the newspaper, use the remote to turn o the unit
from the safety of your kitchen. Or, switch the unit into sprinkler
mode to water your garden while you’re relaxing on the patio!
We’ve designed Spray Away® Hydro-Remote™ to be your secret
gardening tool.
Just turn it on and let it do the work for you!
Missing something? Call Customer Service at
1.855.5.HAVAHART.
Sprinkler Head
Mode Knob
Main Unit
Primary Hose Connection
Screen Gasket
Battery Case
1.
2.
3.
4.
5.
6.
What you will need:
Garden Hose
Access to Faucet / Tap
6 AA Batteries
Garden Hose Access to
Faucet / Tap
6 AA Batteries
45
Battery Cover
Step-in-Stake
Indicator Light
Remote Control
Owner’s Manual
Secondary Hose Connection
7.
8.
9.
10.
11.
35 feet
10
11
controlled with a touch of a button! The rst of its kind, Spray
away. For example:
12.
12
Remote Guide Setup
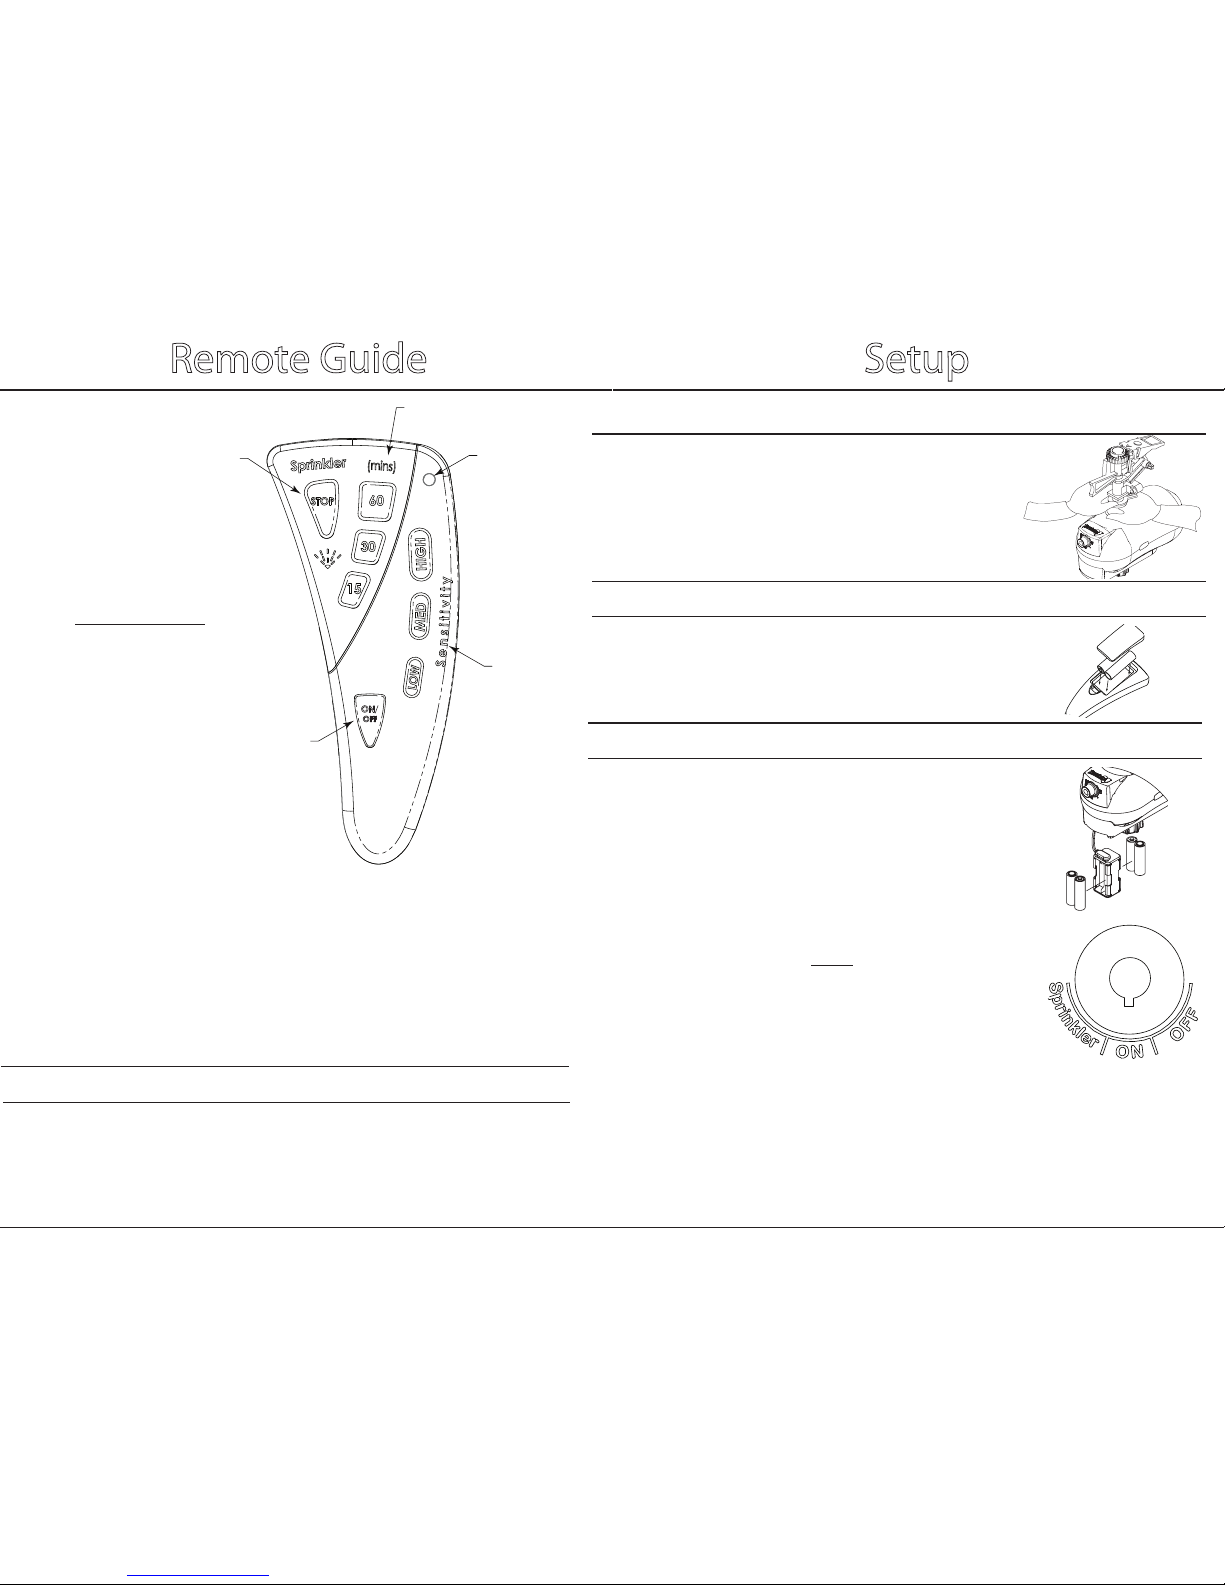
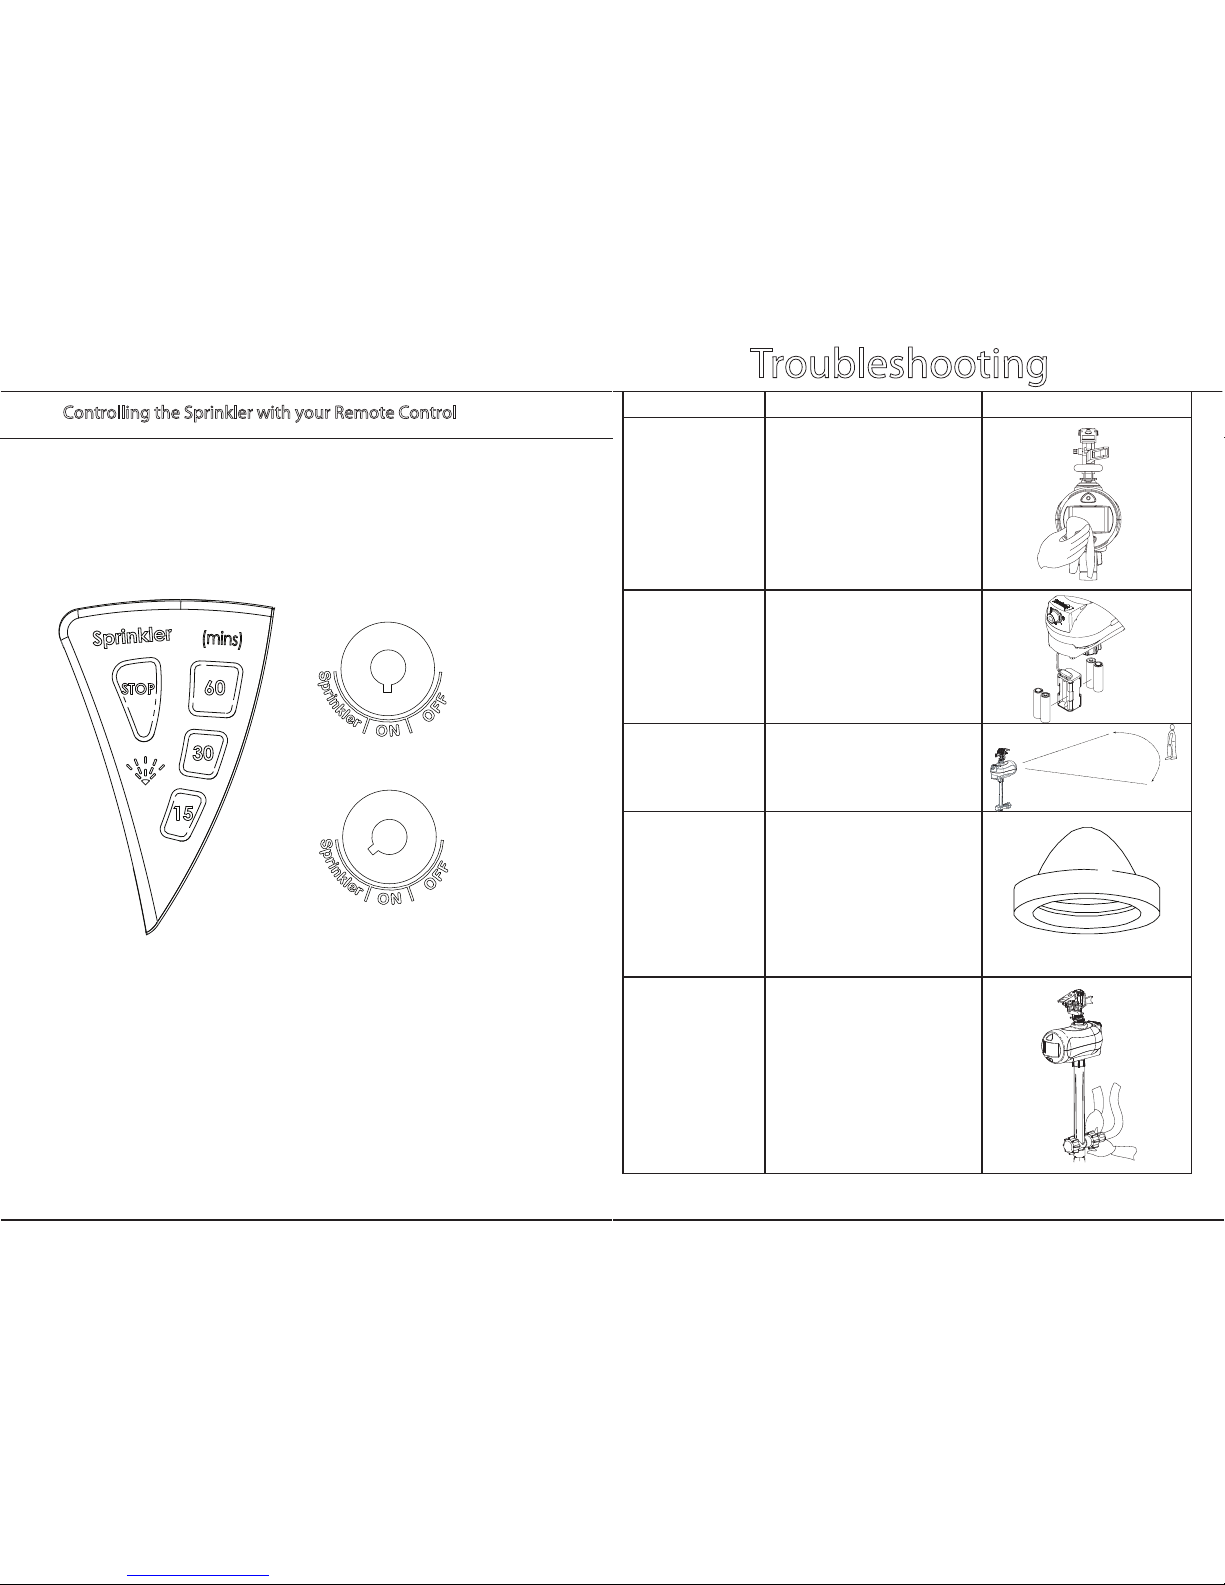
LED Light: Illuminates when a signal is sent to the unit. If this light
does not illuminate when a button is pressed, replace the batteries.
ON/OFF: Turns Spray Away® ON or OFF.
Sensitivity: Select your sensitivity level. See guide on page 12.
Sprinkler Minutes (mins): Commands Spray Away® to
water/continuously spray for 15, 30, or 60 minutes.
STOP: Stops the Sprinkler.
100 ft Range
Unit light will blink and
beep when receiving
remote signal
67
Attach Sprinkler Head
Attach Sprinkler Head and fully tighten by hand.
Note: Using tools (ex: wrench) will damage the unit and
result in leaking and/or unit malfunction.
2. Install Batteries To Remote Control
Install 2 AA batteries into Remote Control
Install 4 AA batteries into Main Unit
3. Sync Remote to Spray Away®
Complete the next 3 steps within 2
minutes of installing batteries into the
remote.
•
1.
2.
3.
4.
5.
1.
•
•
1.
2. With Remote Control and Main Unit in
hand, turn the Mode Knob to ON.
3. Immediately press LOW on the remote
three to four times.
Successful - The Main Unit will rapidly blink and beep.
Unsuccessful - Main Unit will NOT rapid blink or respond to
remote. You will need to resync. Remove batteries from the
Main Unit and repeat steps 2 and 3.
•
•
2
3
51
4
Am I synced?
If you don’t successfully sync the remote with main unit
within 2 minutes of installing your main unit batteries,
remove the batteries and attempt syncing again.
To override the remote features manually, turn the dial on the main
unit to "OFF" for three seconds. This will allow you to select "ON" or
"SPRINKLER" directly from the back of the unit. You can regain control
using the remote by pressing the "ON/OFF" button on the remote and
listening for the beep/blink.
IF YOU DO NOT HAVE YOUR REMOTE
Setup Cont.
89
Setup Cont.
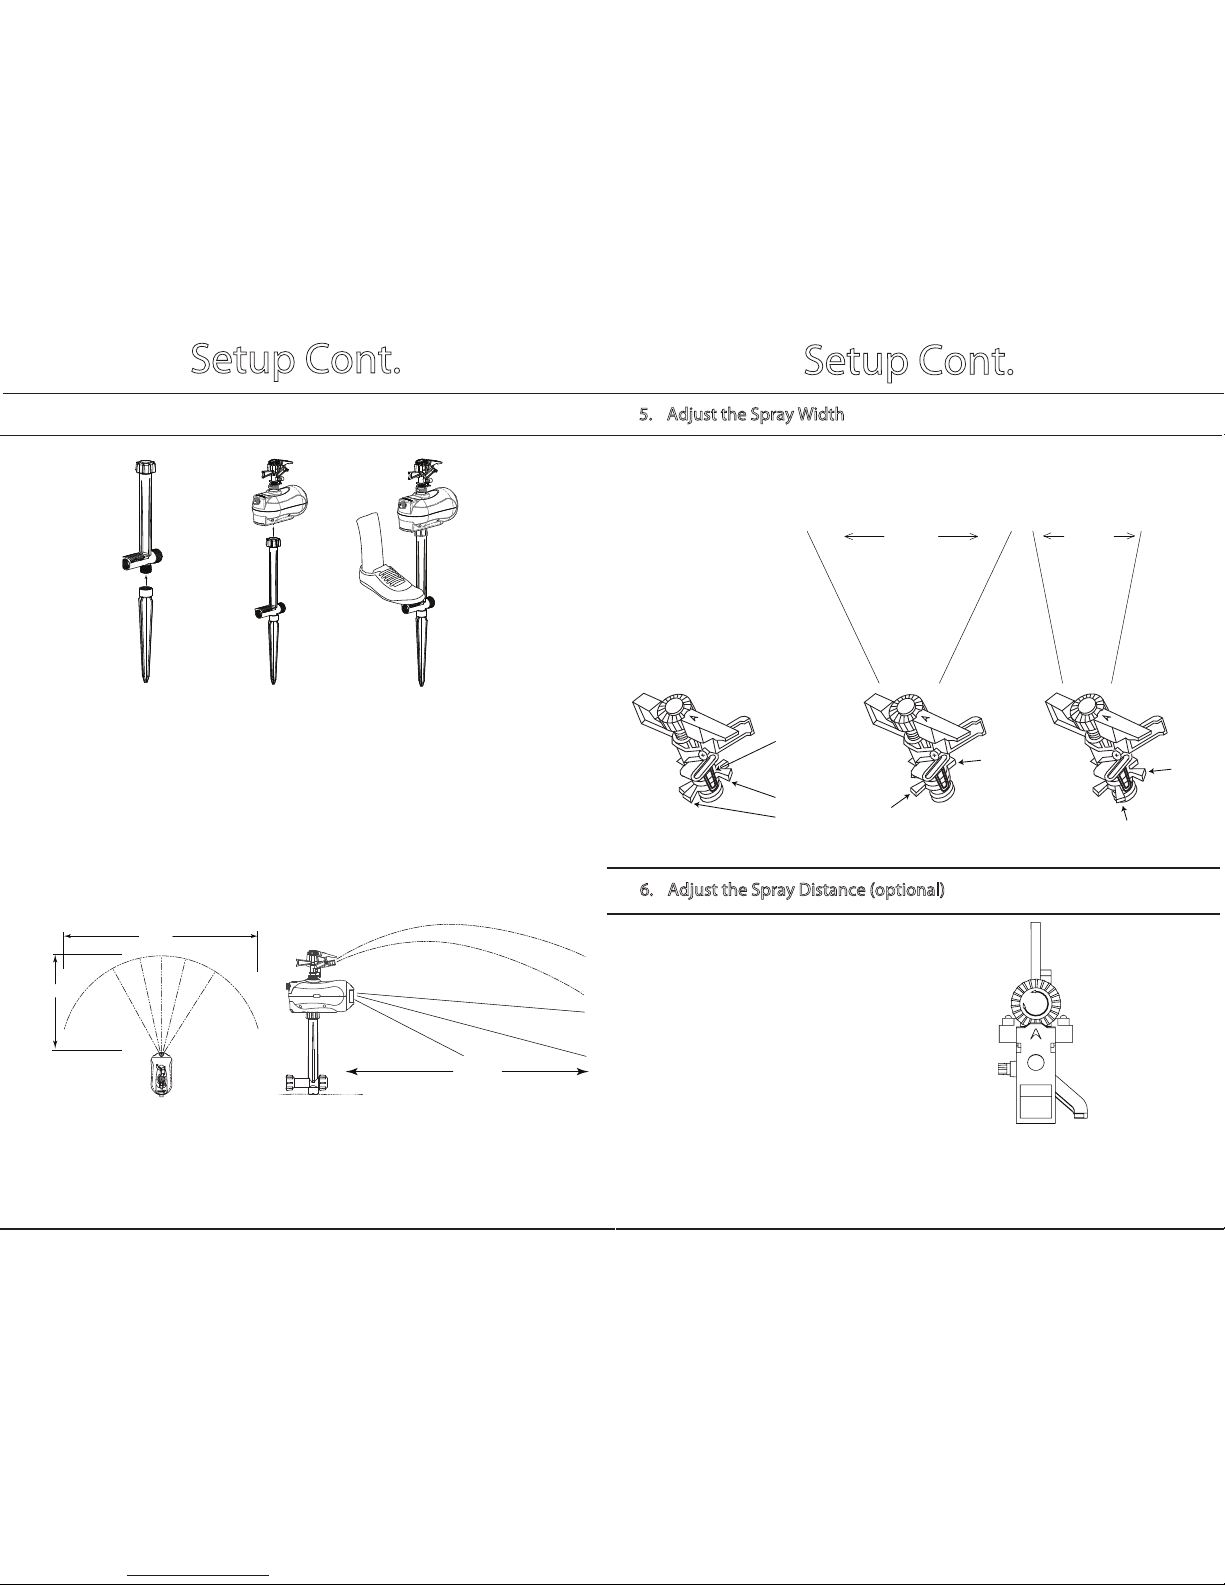
4. Stake in Area You Want to Protect or Irrigate
50 feet
35 feet
Assemble the Step-in-Stake by attaching it to the Main Unit. (A and B)
Place your foot on stake and gently press the unit into the ground. (C)
Lean unit 5 degrees forward for smaller animals; lean unit 5 degrees
backwards for birds and larger animals. See page 12 for more
information.
Ex: Place in/next to landscape you are trying to protect with sensor
facing the direction animals are approaching.
•
•
ABC
Metal
Wire
Clip
Stem
Tabs Wide tabsproduce
wide arc
Narrow tabs produce
narrow arc
Adjust the Spray Distance (optional)6.
Rotate dial on top of the Sprinkler Head
to adjust Spray Distance. Use “MIN” and
“MAX” as guidelines (MAX = 35 feet).
Note: Spray distance also varies depending on
water pressure.
MIN
MAX
DISTANCE
Adjust the Spray Width (spray width from left to right)
Position Metal Clip between the stem tabs to achieve desired
spray width (use images below as a guide).
Be sure to position Metal Clip so it is facing the same direction
as Infrared Sensor
•
5.
25 FT
40 FT
•
•
•
35 feet
•
Max weight:
150lbs.
Setup Cont.
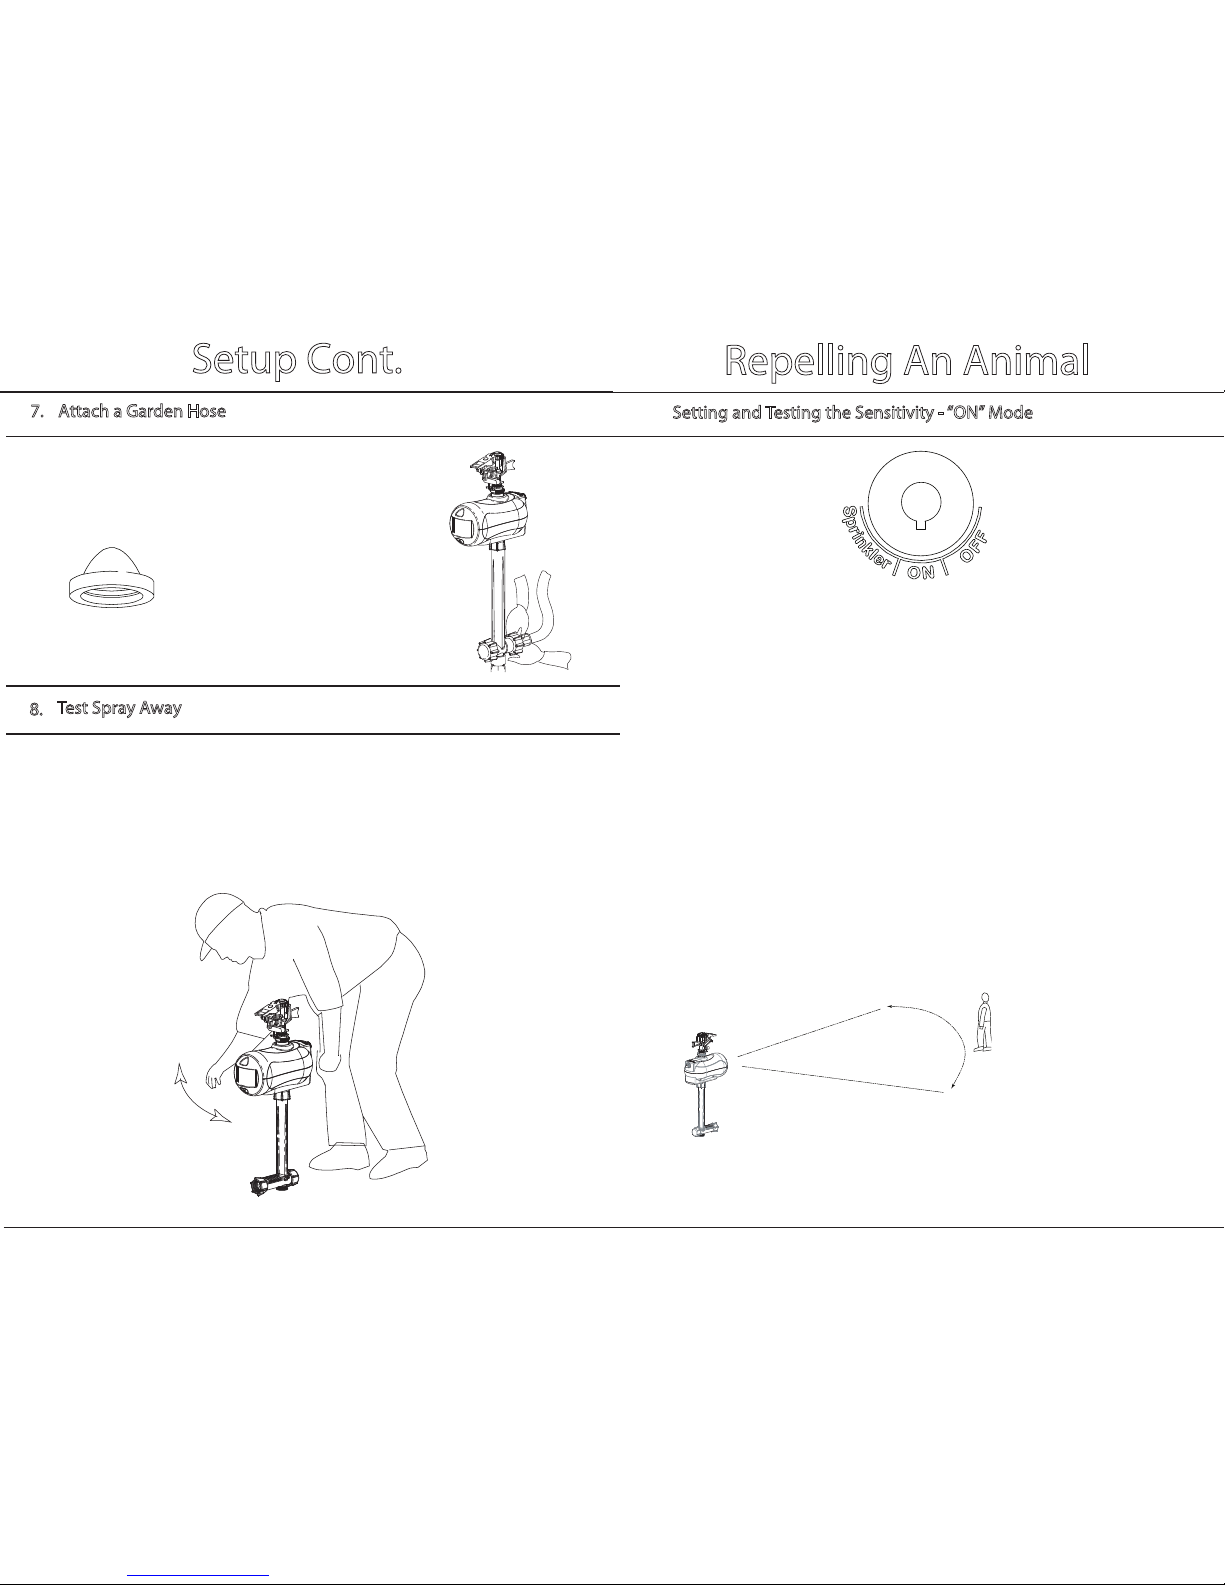
Setting and Testing the Sensitivity - “ON” Mode
With your water OFF, stand in front of the Spray Away® at the furthest
distance you want to detect. (Max. is 35 feet away from unit.)
Point Remote Control toward Spray Away® and press Low. (This gives
you a starting point to adjust from.)
•
•
•
•
•
•
Use the Sensitivity Guide (Page 12) as a reference
IMPORTANT NOTE: Spray Away® does not sense for 10 seconds after an
activation. This means when testing the coverage area you will need to wait
(remain still) for 10 seconds before moving again.
10 11
- Spray Away® Indicator Light will blink to indicate that it received
the signal
Wait 10 seconds (remain still as it calibrates). See Important Note below.
Staying the same distance from the unit walk back and forth to test if the
unit can see you. The Indicator Light will blink twice if it sees you.
If Spray Away® does not see you, select the next highest sensitivity level.
Continue to select the next highest sensitivity level until the Spray Away®
sees you.
Once it sees you, your desired coverage area has been set correctly.
Repelling An Animal
Attach a Garden Hose7.
With your water OFF, attach a garden hose to the
Main Unit.
Ensure the Screen Gasket is secure inside the
Main Unit.
•
•
Test Spray Away
8.
Turn water ON and approach Spray Away from behind.
Wait 15 seconds. Then wave your hand in front of the Infrared Sensor.
Adjust the spray width and distance as needed (Page 9).
•
•
Screen Gasket

Sensitivity Guide
12 13
Animal Size Examples:
Small - Birds, Rabbits, Squirrels
Medium - Cats, Raccoons, Skunks, Groundhogs
Large - Deer, Dogs, Foxes
•
•
•
Desired Detection Distance
10 feet 20 feet 30 feet
Animal
Size
Small Medium High High
Medium Medium Medium High
Large Low Low Medium
Desired Detection Distance
10 feet 20 feet 30 feet
Animal
Size
Small High High High
Medium Medium High High
Large Medium Medium High
Occasionally sensitivity may need to be adjusted based on outside
temperature.
When the weather is warmer, higher sensitivity levels are required.
When the weather is cooler, lower sensitivity levels are required.
Use charts as a guide.
Below 80°F
Above 80°F
Sensitivity Guide
To optimize the effectiveness of your unit for the animals you are
trying to get rid of, the correct amount of lean could significantly help.
1) The unit leaned
back 5 degrees. 2) The unit put straight
into the ground.
3) The unit leaned
forward 5 degrees.
1) Leaning the unit back would be benefical if you are primarily trying to
repel birds or deer.
2) Putting the unit straight into the ground would help protect
against medium to large size animals.
3) Leaning the unit forward would be beneficial if you are
primarily worried about small to medium sized animals.
Watering Your Yard
Controlling the Sprinkler with your Remote Control
1415
When Mode Knob is in “ON” or “SRINKLER” Mode, use the green
portion of your Remote Control to stop and start the sprinkler as
necessary.
To start the Sprinkler: Select 15, 30, or 60 minutes.
The Sprinkler will automatically turn o after the time you have
selected.
•
•
Use as
sprinkler
and
repellent
Use as
sprinkler
only
“ON” Mode: When Sprinkler timer has ended, unit will go
back to repelling and detecting animals. It will default to
your last/saved sensitivity setting.
“SPRINKLER” Mode: Unit can only be used as a sprinkler
and will not detect animals. The unit will continuously
spray/water your yard. Selecting the desired minutes on
the remote will set the timer.
•
•
Troubleshooting
Problem Solutions Diagram
Spray Away® does
not “see” animals
• Change batteries and repeat
setup process.
• Clean the Infrared Sensor with
a damp cloth
• Increase the Sensitivity and
re-test the sensing area (Page
10 and 12)
Spray Away® is not
spraying, or is only
lightly spraying
• If the Indicator Light is blinking
every 3 seconds, change the
Batteries.
• Ensure the Hose and Sprinkler
Head are tightly secured.
Spray Away® is
activating when no
animal is present
• Reduce the Sensitivity and
re-test the sensing area (page
10 and 12).
Spray Away® will not
stop spraying
• Ensure Screen Gasket is secure
in Main Unit, at the hose
connection. If it is not, it is
likely that debris from your
hose has made its way up into-
the Main Unit, causing it to
malfunction.
Your water pressure could be
too high - it should not
exceed 80 psi.
Unit is leaking • Make sure the Hose and
Sprinkler Head are tightly
secured.
• Ensure that the Hose thread
is not damaged.
• Check to be sure that the hose
connection is free from debris.
• Ensure water pressure is not
too high - it should not exceed
80 psi.
Screen Gasket
•

Warranty
This warranty, two (2) years from the purchase of the unit, is extended
only to the original purchaser/user of products.
Woodstream Corp. warrants its products to be free from defects in
materials and workmanship for the warranty period by the original
purchaser/user.
For warranty service, please contact our Customer Service at
(855) 5-HAVAHART. Please indicate the nature of the defect.
If Woodstream Corp. determines there may be a defect, Woodstream Corp.
will issue a Return Goods Authorization (RGA) number. The defective unit
or parts must be returned for warranty inspection using the RGA number,
when applicable, as identication within (30) days of return authorization
date. DO NOT return products to our factory without our prior consent, as
they, as well as C.O.D. shipments will be refused. Woodstream Corp., at its
option, shall replace the unit, or replace the defective part(s) and return
such unit to you. Woodstream Corp.’s sole obligation and your exclusive
remedy under this warranty shall be limited to such replacement.
Limitations and Exclusions: The warranty shall not apply to problems
arising from normal wear , or failure to adhere to the enclosed instructions.
In addition, the foregoing warranty shall not apply to serial numbered
products if the serial number has been removed or defaced; products
subject to negligence, accident, improper operation, maintenance or
storage; products damaged by circumstances beyond Woodstream Corp.’s
control; or products modied (including, but not limited to modications
through the use of unauthorized parts or attachments) or repaired by
anyone other than Woodstream Corp. or its designee.
The foregoing warranty is exclusive and in lieu of all other warranties,
express or implied, including without limitation the implied warranties of
merchantability and tness for a particular purpose. It shall not extend
beyond the duration of the express warranty provided herein, and the
remedy for violations of any warranty shall be limited to repair or
replacement of the defective product pursuant to the terms contained
herein. Woodstream Corp. shall not be liable for any consequential or
incidental damages whatsoever.
This warranty gives you specic legal rights and you may also have other
legal rights which may vary based on location.
Visit us at:
www.Havahart.com
1617
FCC Statement
WARNING: Changes or modications to this device not expressly approved
by Woodstream Corporation could void the user’s authority to operate
the equipment. “NOTE: This equipment has been tested and found to
comply with the limits for a Class B digital device, pursuant to Part 15 of
the FCC Rules. These limits are designed to provide reasonable protection
against harmful interference in a residential installation. This equipment
generates, uses, and can radiate radio frequency energy and, if not
installed and used in accordance with the instructions, may cause
harmful interference to radio communications. However, there is no
guarantee that interference will not occur in a particular installation. If
this equipment does cause harmful interference to radio or television
reception, which can be determined by turning the equipment o and
on, the user is encouraged to try to correct the interference by one or
more of the following measures:
• Reorient or relocate the receiving antenna.
• Increase the separation between the equipment and receiver.
• Connect the equipment into an outlet on a circuit different from that
to which the receiver is connected.
• Consult the dealer or an experienced radio/TV technician for help.
This Device complies with part 15 of the FCC rules. Operation is subject
to the following two conditions. (1) This Device may not cause harmful
interference, and (2) this device must accept any interference received,
including interference that may cause undesired operation.
Under Industry Canada regulations, this radio transmitter may only
operate using an antenna of a type and maximum (or lesser) gain
approved for the transmitter by Industry Canada. To reduce potential
radio interference to other users, the antenna type and its gain should
be so chosen that the equivalent isotropically radiated power (e.i.r.p.) is
not more than that necessary for successful communication.
Conformément à la réglementation d’Industrie Canada, le présent
émetteur radio peut fonctionner avec une antenne d’un type et d’un
gain maximal (ou inférieur) approuvé pour l’émetteur par Industrie
Canada. Dans le but de réduire les risques de brouillage radioélectrique
à l’intention des autres utilisateurs, il faut choisir le type d’antenne et son
gain de sorte que la puissance isotrope rayonnée équivalente (p.i.r.e.) ne
dépasse pas l’intensité nécessaire à l’établissement d’une communication
satisfaisante.

18
This device complies with Industry Canada licence-exempt RSS
standard(s). Operation is subject to the following two conditions: (1)
this device may not cause interference, and (2) this device must accept
any interference, including interference that may cause undesired
operation of the device.
Le présent appareil est conforme aux CNR d’Industrie Canada applicables
aux appareils radio exempts de licence. L’exploitation est autorisée aux
deux conditions suivantes : (1) l’appareil ne doit pas produire de
brouillage, et (2) l’utilisateur de l’appareil doit accepter tout brouillage
radioélectrique subi, même si le brouillage est susceptible d’en
compromettre le fonctionnement.
19
FCC Statement Cont.
Table of contents
Other Havahart Lawn And Garden Equipment manuals


Popular Lawn And Garden Equipment manuals by other brands


SPYKER
SPYKER 46 Operation guide service manual parts list

Hydro-Force
Hydro-Force FlexiPRO user manual

Ecotec
Ecotec Water Drops operating instructions

Poulan Pro
Poulan Pro PPB3000B instruction manual

FRAME IT ALL
FRAME IT ALL Cumberland quick start guide

Land Pride
Land Pride CA2548 Specifications & Capacities