Ecotec Water Drops User manual
inuence of the weather, e.g. against too strong rain or direct spraying with
the water hose.
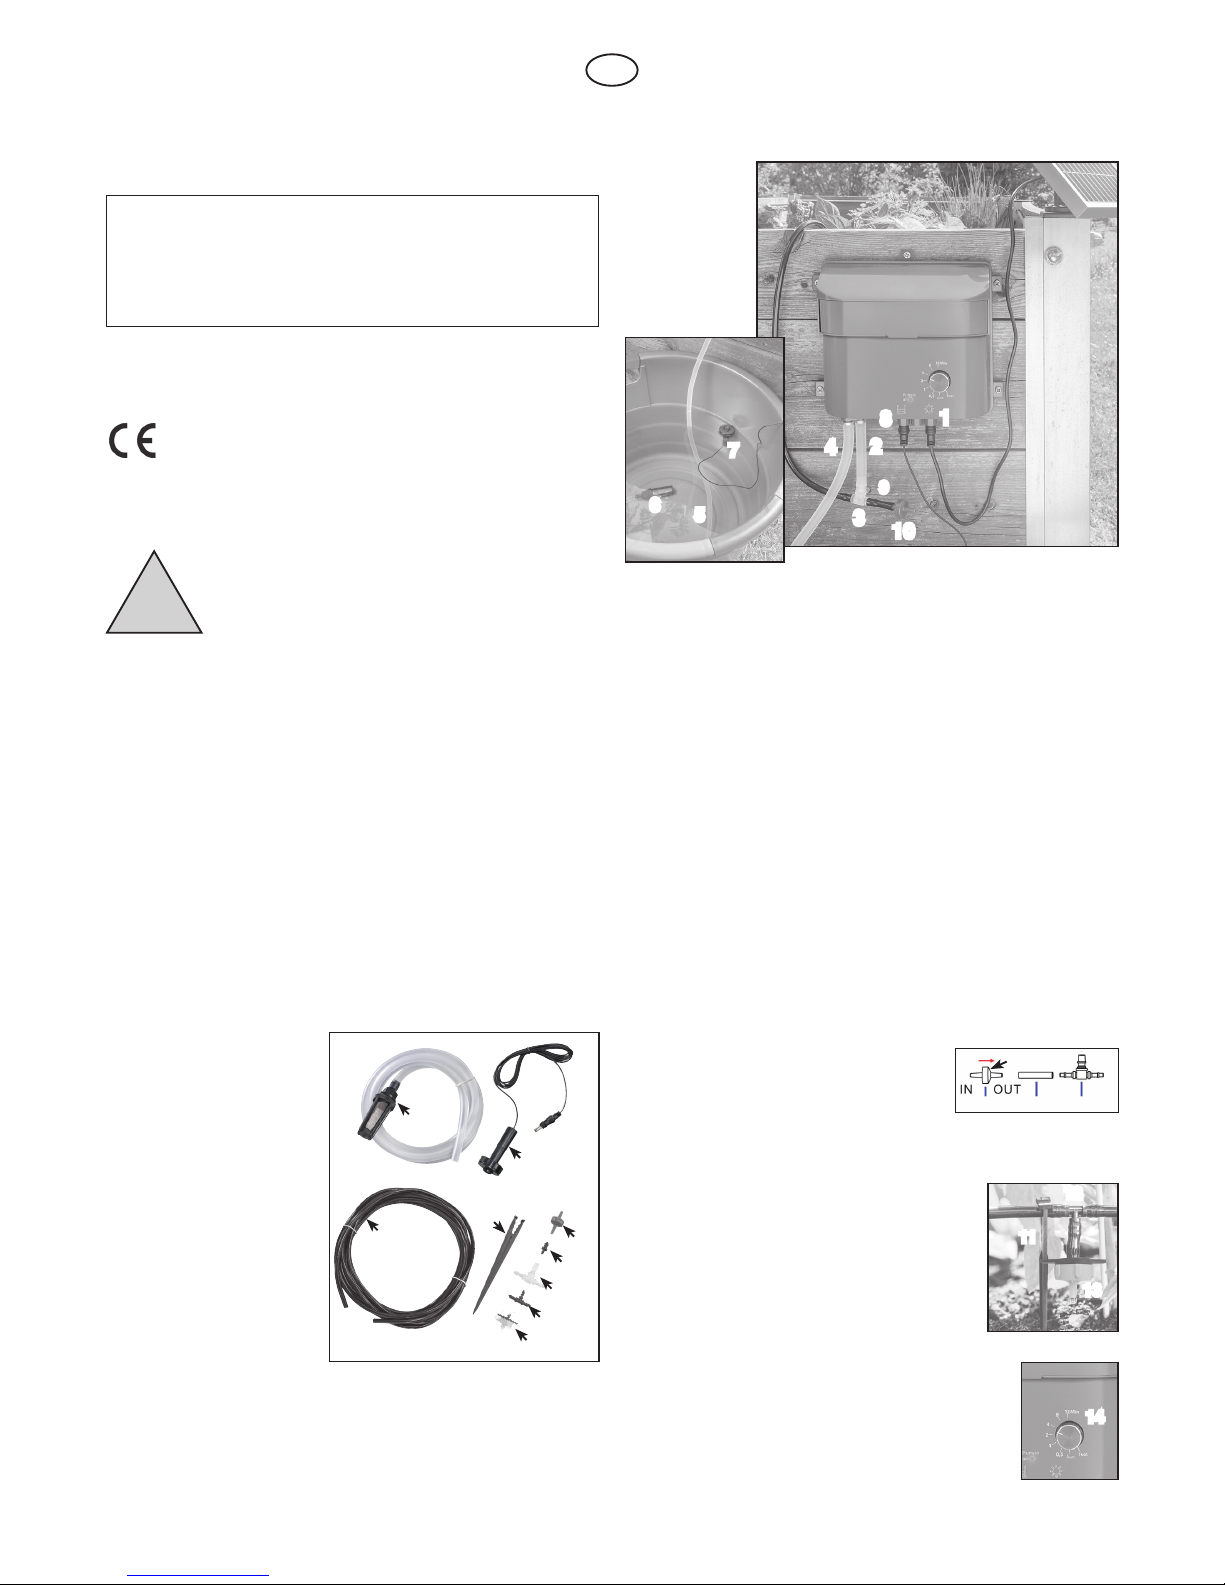
3. Now choose a sunny, shadow-free place for the solar module. The solar
module may be inserted into the ground with the ground spike or screwed-
on with the enclosed holder.
4. Lay the cable for the solar module carefully and without tripping hazards.
Connect the plug of the cable on the solar module with the associated
socket on the control unit (1). The integrated battery is charged in case of
adequately intensive solar radiation onto the solar module.
5. Remove the 2 protective caps from both nozzles for inowing and
outowing water.
6. Cut off approx. 20 centimeters from the (transparent) suction hose (2) and
attach this short piece onto the nozzle for outowing water. (2).
7. In this short piece of hose, please insert the T-reducer with its larger side
(3).
8. On the nozzle for inowing water, please attach the remaining (transparent)
suction hose auf (4). This hose has to be laid up to the reservoir tank for
water, e.g. a rainwater barrel (5).
9. Insert the suction lter (if not already assembled) onto the suction hose
(6). This lter keeps coarse dirt away from the pump. Throw this lter into
the lled water barrel.
Note: Please don´t install the lter on the bottom from the water reservoir. This
prevents the pump from sucking sand grains or similar and losing power.
10. Now take the black oat switch and also put it into the lled water barrel (7).
Now insert the plug of the oat cable into the socket on the control unit (8).
The pump is working if the oat is upright in the water. In case it should lay
on its side due to the lack of water, then the pump will be deactivated and
it is required to rell an adequate amount of water.
11. Cut off approx. 10 centimeters from the (black)
irrigation hose and insert this short piece onto
the free end of the T-reducer (9) which points
upwards. In this short piece, please insert
the (blue) ventilation valve (10). This valve
prevents the uncontrolled running on of the water.
Note: Here, please make sure that the valve is inserted with the right side up!
12. With the remaining piece of the irrigation hose, the
15 hose holders (11), the 15 black T-pieces (12)
and the 15 water drippers (13) you are now able to
install the desired distribution grid for the irrigation.
The dripping volume is xed to 2 l/h.
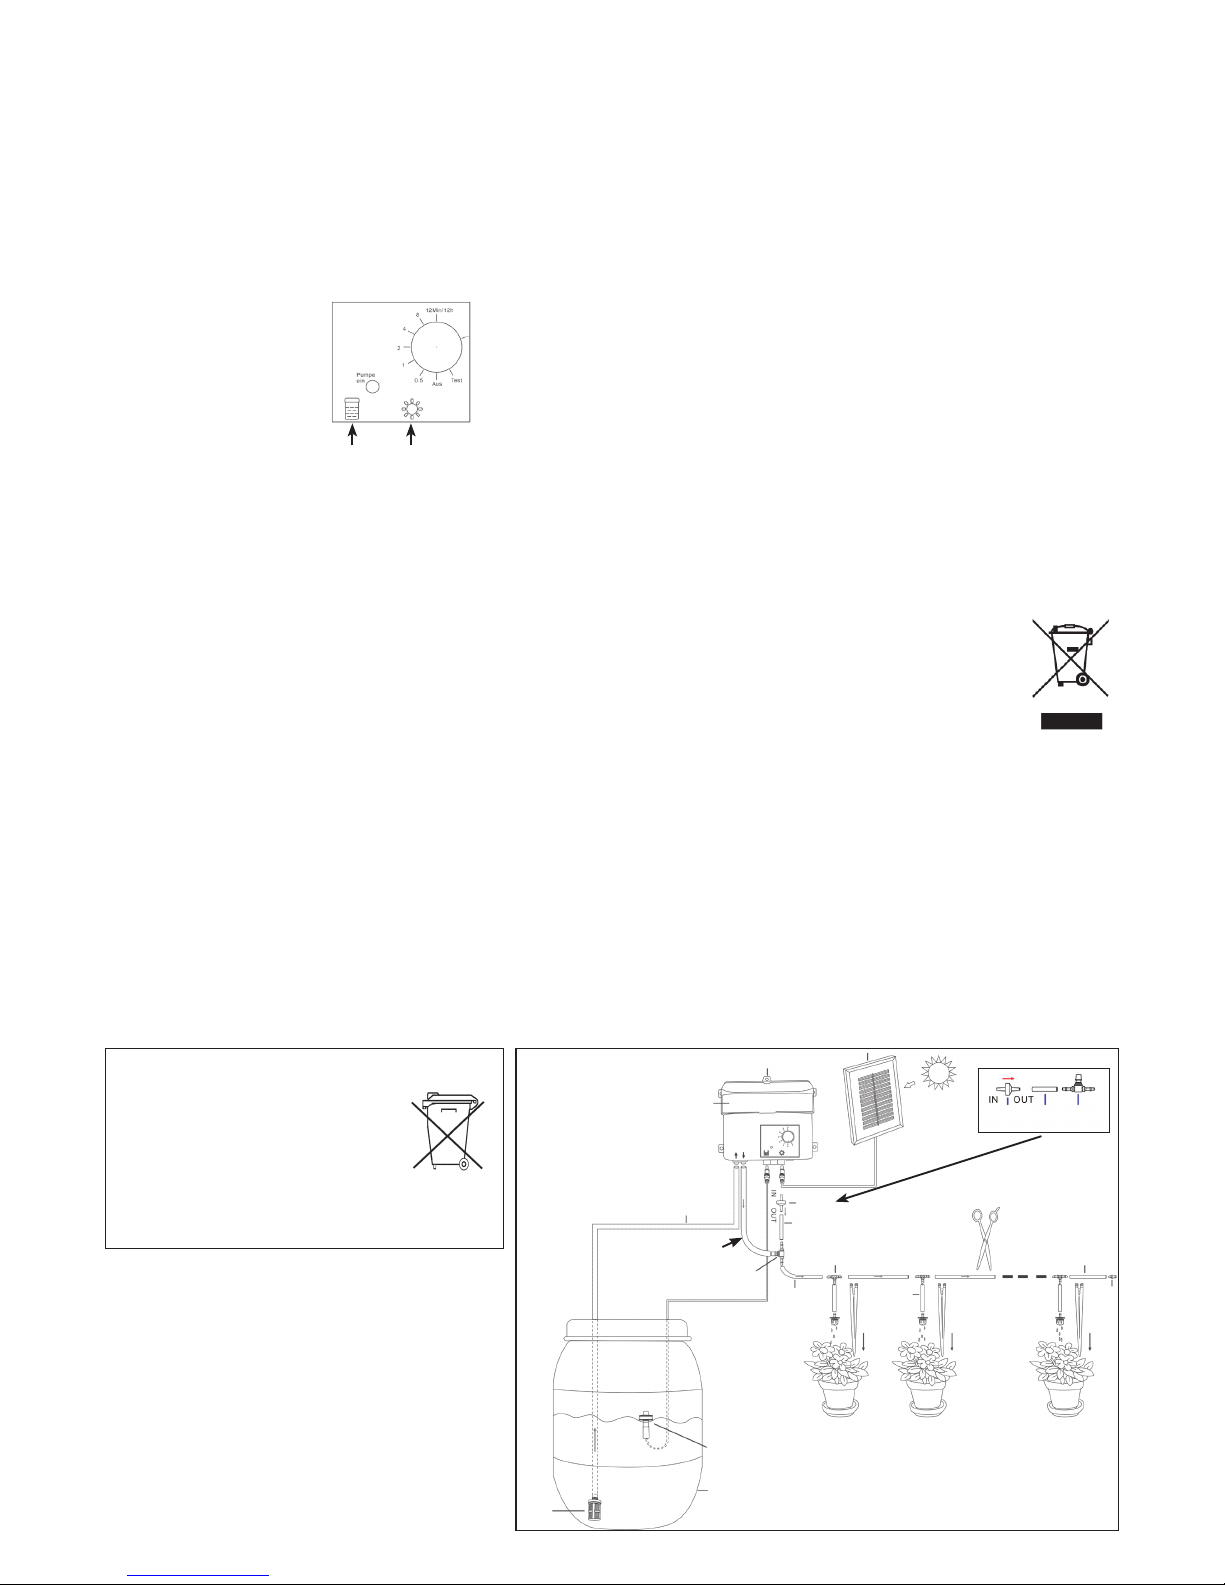
13. With the multistage selector switch (14) on the housing
you may set the time of operation of the pump. The pump
pumps at the break of dawn and at nightfall depending on
the set value. It may be selected in 6 stages in a range
of 30 seconds (0.5 min) up to a maximum of 12 minutes.
In the position „Test“ it is possible to test the pump or
pump the air out of the hoses when the pump is put into
operation for the rst time.
Operating instructions
Solar irrigation system “Water Drops”
These instructions relate ONLY to this product and contain important infor-
mation for using the product for the first time. Please keep these instructions
for later reference and should always accompany the product in the event of
transference to a new user.
1. Introduction
Dear Costumer, thank you for purchasing the solar pump kit.
With this solar pump kit you purchased a product manufactured according to the
current state of technology.
This product fulfils all requirements of the valid European and nati-
onal regulations. The conformity was proved. The relevant declara-
tions and documentation are deposited with the manufacturer.
To maintain this state and guarantee a safe operation, you as the user will have to
follow this operating manual!
2. Safety Instructions
- In case of damages caused by not following
this operating manual, the warranty rights
will expire! We exclude liability for any
consequential damages!
- We exclude liability for property or
personal damages caused by inappropriate
handling or not following the safety instructions.
- In these cases any guarantee rights will expire.
Due to safety and admission reasons (CE) it is not allowed to arbitrarily reconstruct
and/or change the solar pump kit.
Therefore, please keep to the operating manual.
The accident prevention rules of the association of the industrial trade cooperative
association for electric plants and working material are to be considered in industrial
environments.
3. Function and intended use
The solar irrigation system is intended for outdoor use. With this system it is
possible to irrigate the plants in the garden, in the greenhouse, in the hotbed,
on the balcony or on the raised bed with a maximum of 15 water drippers. The
irrigation is performed once a day at the break of dawn and once at nightfall. The
operating time of the pump may be set between 0.5 minutes and 12 minutes.
The dripping volume is xed to 2 l/h.
Thus, you have the ideal solution for an automatic and network-independent
irrigation of your potted plants or vegetable bed. The integrated diaphragm
pump sucks water from a depth of up to 2 meters e.g. from a rainwater barrel.
The crystalline solar module charges the integrated battery pack during the day
and sunshine.
The means complete independence from the mains current!
4. Scope of delivery
1. 1 x control unit
2. 1 x solar module including
connecting cable and holder
3. 1 x Float switch
4. 2 m suction hose with lter
transparent
5. 5 m pressure hose black
6. 1 x T-piece transparent
7. 15 x T-piece small black
8. 15 x hose holder
9. 15 x water dripper 2 l/h
10. valve
11. seal plug
5. Assembly and putting into operation
1. Please carefully take all parts out of the package. Make sure that you have
really taken all parts out of the package before disposing the package
materials in an environmentally compatible way.
2. Choose an appropriate location for the control unit. In doing so, please pay
attention to the fact that its position has to be higher than the maximum
water level of the water reservoir. Protect the control unit against the direct
!
GB
3
4
5
6
7
9
11
10
8
14
1
2
3
4
8
9
10
5
6
7
910
bevel
Customer support:
If you have problems or questions regarding this product, simply contact us!
Monday to Friday 9 am to 12 noon and 1 pm to 4 pm.
By phone: +49 9605-92206-0
By e-mail for ordering spare parts: [email protected]
By e-mail for questions about the product: [email protected]
Product: Manufacturer Item No.: 101100
11
12
13
14. As soon as everything is assembled, please put the selector switch to the
position „Test“. The pump will then start to work if the battery is charged
sufciently. The pump sucks in the water autonomously. In doing so, make
sure that the lter of suction hose is below the water surface.
15. Now move the controller on the control unit to the desired pumping time.
The solar irrigation system is now ready for use!
Not required parts may be stored in the drawer in the control unit and taken out
if needed.
6. The control unit
1. Rotary switch position Function
Test Test function and for the initial putting into
operation
Off Switched off, but the battery is charged via the
solar module.
0.5 – 12 min/12h The pump pumps at the break of dawn
and at nightfall depending on the set time.
2. LED display „Pump on“ Meaning
Green: The pump is working.
Green ashing: The battery is charging and the pump is off.
Red ashing: Not enough water in the rain barrel.
Dark: The built-in battery is discharged or defective.
3. Connection for the oat switch
4. Connection for the solar module
7. Exchange of battery
1. To exchange the battery, please switch the rotary switch to the position
“Off”.
2. Unscrew the 5 screws on the back side of the control unit and remove the
cover.
3. Disconnect the battery and remove it from the holder.
4. Now insert an identical in construction battery pack with 3.6 V and a
minimum of 1200 mAh (esotec spare part No.: 901021 „www.esotec.de“).
5. Close the cover and screw in the 5 screws.
6. Put the rotary switch into the desired position
7. The solar irrigation system is now ready for operation again.
Note: Used batteries have to be disposed of in an environmentally sound way and
do not belong into the household waste. Your dealer is required by law to take back
our old batteries.
8. Care and maintenance
Occasionally wipe the solar module with the soft and slightly wet cloth.
The suction lter has to be washed out depending on the contamination.
9. Technical data
- Solar module nominal power: 0.7 Wp
- Max. water delivery volume: 36 l/h
- Volume each water dripper: 2 l/h
- Max water dripper: 15 pcs.
- battery pack: NiMh 3,6 V/ 1200 mAh
- protection class: III
- protection type: IP 44
The battery pack has to be exchanged at the latest every 2 years!
For spare parts available for this system, please see under www.esotec.de
Note: Protect the pump against frost!
The system has to be dismantled in the cold winter months and stored in a warm
place!
10. Safety Instructions:
DANGER for children! Keep children away from swallowable small parts (ascending
pipe and sprinklers) and the packaging material. Danger of suffocation!
WARNING: risk of stumbling! Lay the connecting cable so that it will not become a
trip hazard!
CAUTION Material damage! When setting up the solar module without module
bracket, please pay attention to an adequate stability. The solar module may be
damaged in case of tipping or in case of an impact of a foreign object.
Disposal instruction for electric appliances:
Dear customer, if you want to get rid of the article, please dispose
it according to the current regulations. The municipal authority will
provide you with information.
Rechargeable battery notes
- Rechargeable batteries should not be played with by children. Never leave rechar-
geable batteries lying around; they could be swallowed by children or pets.
- Rechargeable batteries must never be short-circuited, disassembled or thrown into
fire. This leads to a danger of explosion!
- Leaking or damaged rechargeable batteries can cause chemical burns when they
come into contact with skin. For this reason, please make use of suitable protective
gloves.
- Rechargeable batteries should only be replaced by structurally identical rechar-
geable batteries from the same manufacturer. Normal batteries must not be used
since these are not rechargeable.
- Make sure the rechargeable batteries are inserted with the correct polarity.
- For long periods of time of non-use (for example, storage), remove the inserted
rechargeable batteries to avoid damages via the leaking rechargeable batteries.
Battery take-back
- Batteries must not be discarded into domestic
waste.
- The consumer is legally required to return bat-
teries after use, e.g. to public collecting centers
or to battery distributors.
- Contaminant-containing batteries are labeled
with the sign “crossed-out trashcan“ and one of
the chemical symbols. Used batteries should
be disposed environmentally friendly and
should not be discarded into domestic waste.
Your dealer is legally required to take back old batteries.
NiMh suction hose transparent
control unit
Filter
Water tank
Float switch
solar panel
Max. 15
water dripper
T-piece
black
valve
black hose
black hose
T-piece
transparent black hose
valve hose T-piece
1.
2.
3. 4.
Disorders:
- During operation water runs out of the non-return valve!
The check valve was mounted incorrectly. Turn around and insert in
the other way.
- LED in the control unit does not light up!
Is the solar module connected? Change the batterypack!
length max. 15 cm
This manual suits for next models
1
Table of contents


