Havso Carolina 1.1 User manual

Carolina 1.1
Bruksanvisning
Infravärmare
Förläng kvällarna på terassen
Svenska, English

2

3
Svenska
Innehåll och montering 4–5
Användning 6–7
Rengöring 8
Säkerhetsanvisningar 9–10
Info 11
English
Contents and assembly 12–13
How to use 14–15
Cleaning and maintenance 16
Safety Instructions 17–18
Info 19
Carolina 1.1
Infravärmare
Förläng kvällarna på terassen

4
Innehåll och montering
Läs igenom hela bruksanvisningen innan du monterar värmaren och bestäm-
mer dig för var den ska sättas upp. Läs instruktionerna noga, så att värmaren
installeras, används och underhålls korrekt, enligt beskrivningen i bruksanvis-
ningen. Spara bruksanvisningen som referens.
Innehållet i förpackningen
• 1 st. infrarödvärmare
• 1 st. universalfäste, litet
• 1 st. universalfäste, stort
• 1 st. gummiplatta
• 2 st. justeringsskruvar
• 2 st. långa vingskruvar
• 2 st. korta vingskruvar
• 4 st. nylonbrickor
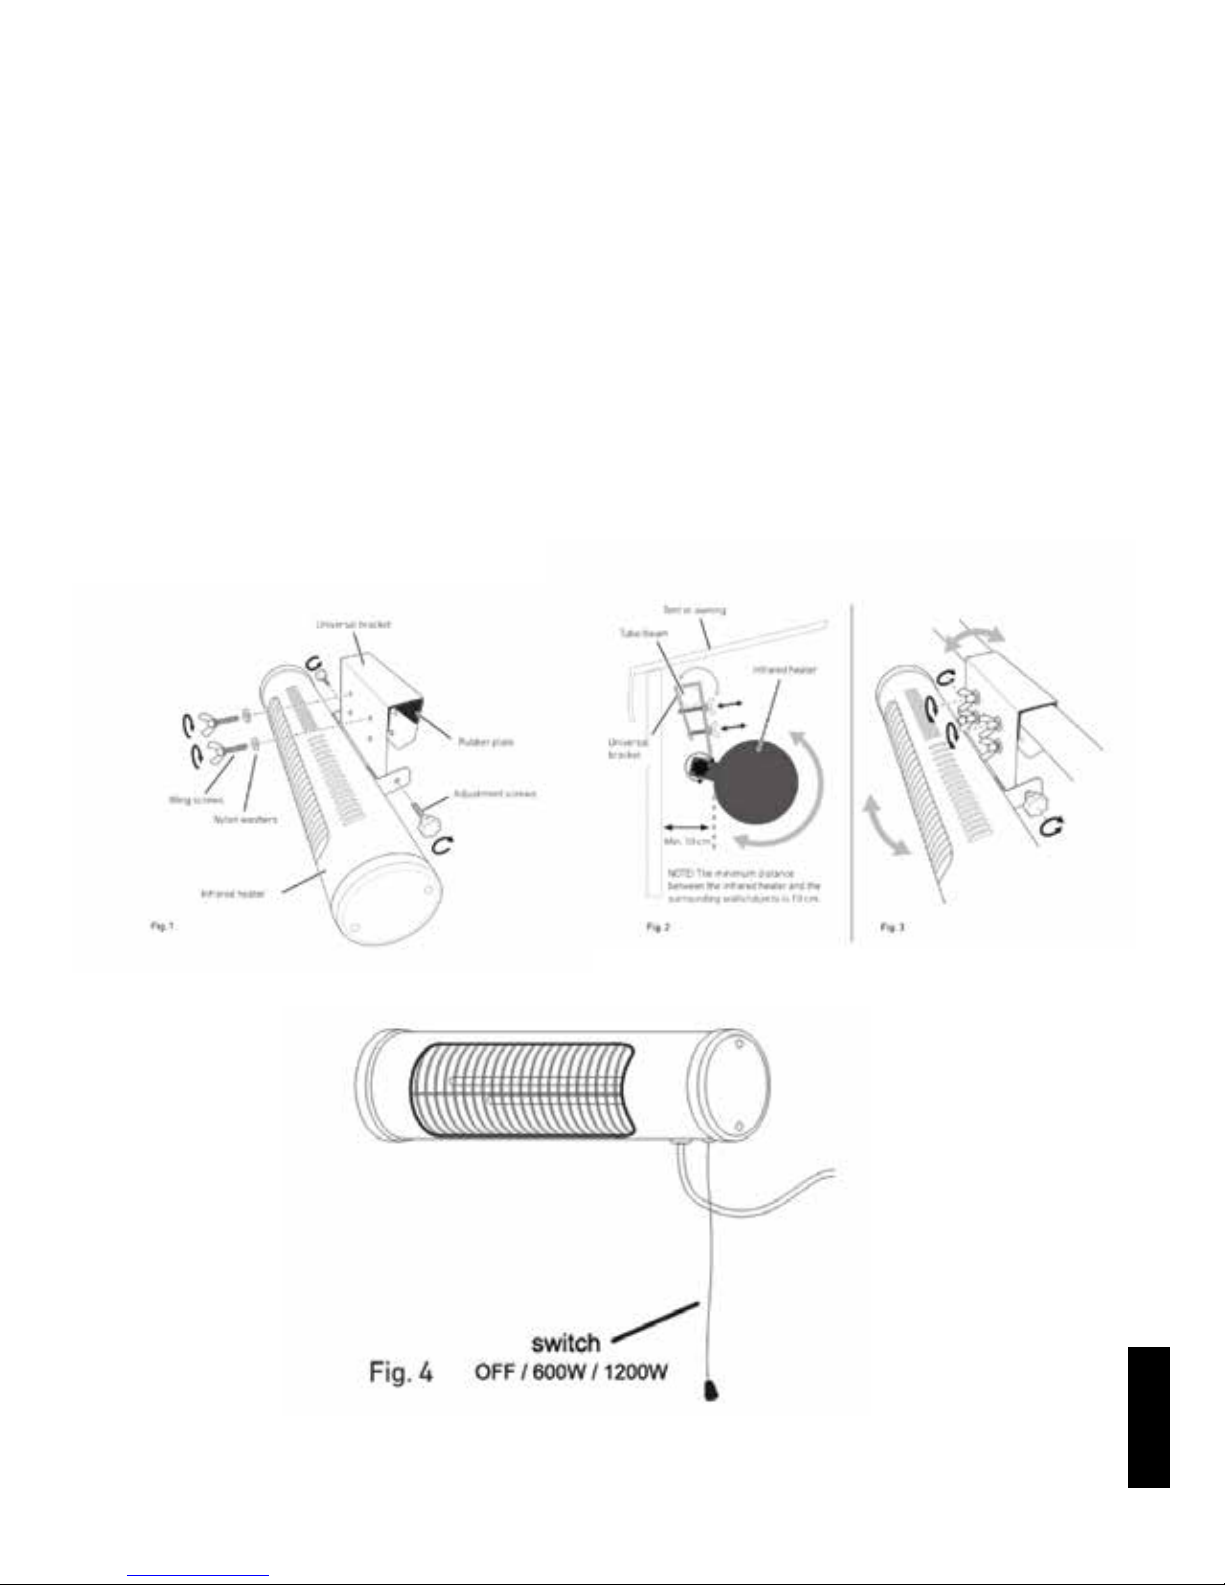
Montering
1. Fästenas baksida är böjbar för att underlätta installationen. Läs efter-
följande sidor för att avgöra var värmaren ska placeras.
2. När du har valt plats och fäste klipper du till gummiplattan till rätt
storlek och placerar på insidan av fästet. Se till att du inte täcker
några av hålen för vingskruvarna. Detta förhindrar skador och rost och
tillser att värmaren sitter som den ska. Se figur 1.
3. Skruva fast fästet i värmaren med justeringsskruvarna. Se figur 1.
4. Du kan nu montera infravärmaren där du vill ha den.
5. Vinkla värmaren så att avståndet till föremål/ytor i närheten är minst
10 cm i alla riktningar. Du vinklar värmaren med hjälp av justerings-
skruvarna och genom att vrida på universalfästet. Se figur 2 och 3.
5
SVENSKA
6. Du kan böja baksidan av fästet runt ett rör eller en bjälke och sedan
fästa det säkert med vingskruvarna. Se till att dra åt skruvarna or-
dentligt. Använd nylonbrickorna mellan skruvarna och fästet för att
motverka risken för rost. Se figur 1.
7. Anslut kontakten till ett jordat 230 V-uttag. Vi rekommenderar att
du använder jordfelsbrytare.
8. Dra i snöret för att sätta på och stänga av infravärmaren. Se figur 4.
Innehåll och montering

6
Värmaren är avsedd för utomhusbruk. Med hjälp av universalfästet kan du
placera den exempelvis under en markis eller i ett partytält. Du kan fästa
värmaren runt ett rör eller bjälke med en diameter på högst 4 cm. Välj fäste
beroende på var du tänker montera värmaren. Värmaren måste placeras
på minst 10 cm avstånd från andra föremål. Tänk på att också ovan- och
baksidan bir varma.
Förslag på var du kan placera värmaren
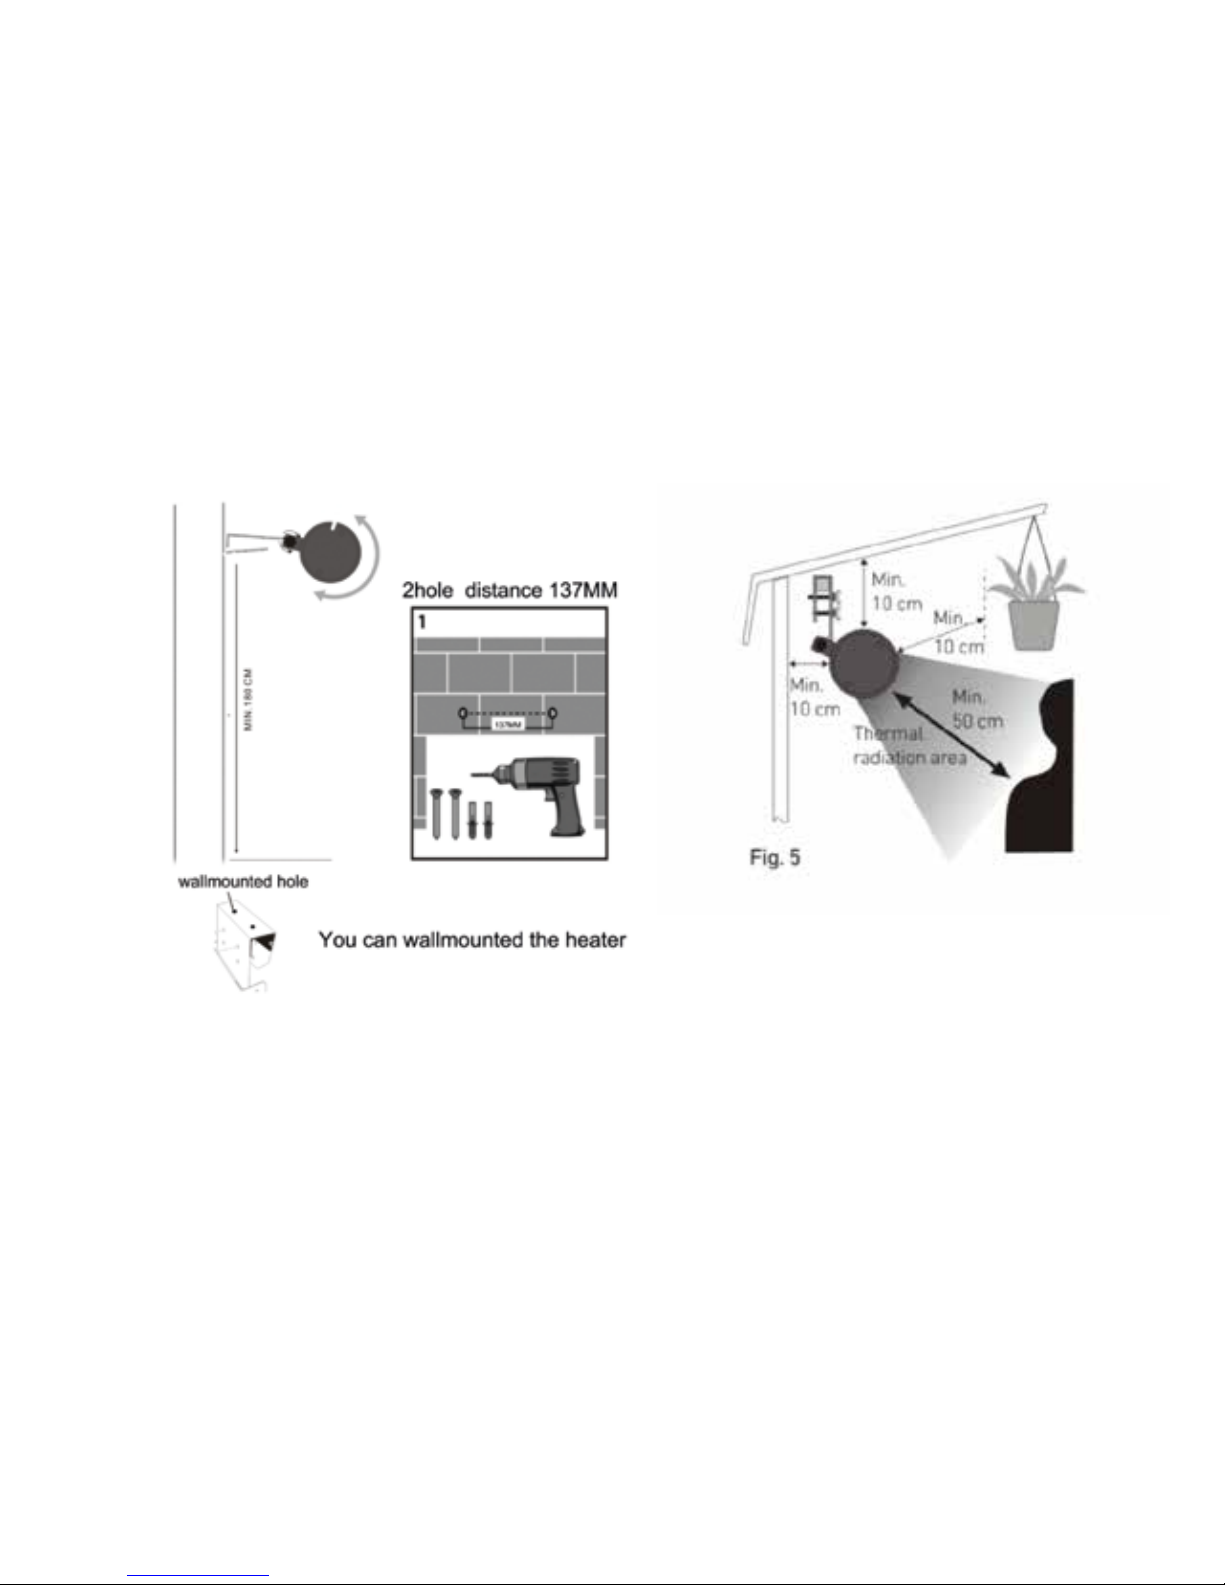
Partytält:
• Du måste se till att värmaren inte kommer i kontakt med kanten av
tältduken. Värmaren ska antingen hängas ner under kanten eller vink-
las med hjälp av fästet så att avståndet till kanten är minst 10 cm. Var
noga med att dra åt vingskruvarna så att värmaren är stabil. Se figur 5.
Användning
Varning! Du måste på
se till att det finns
utrymme för värme-
strålningsområdet!
7
Användning
SVENSKA
• Om tältet har väggar måste du montera värmaren med fästet så att
avståndet till väggen blir minst 10 cm. Var noga med att dra åt ving-
skruvarna.
• Värmaren kan monteras på något av rören i taket. Den vinkel som då
uppstår är inget problem bara du drar åt vingskruvarna så att värmaren
sitter ordentligt.
• Avståndet till tältduken måste hela tiden vara minst 10 cm.
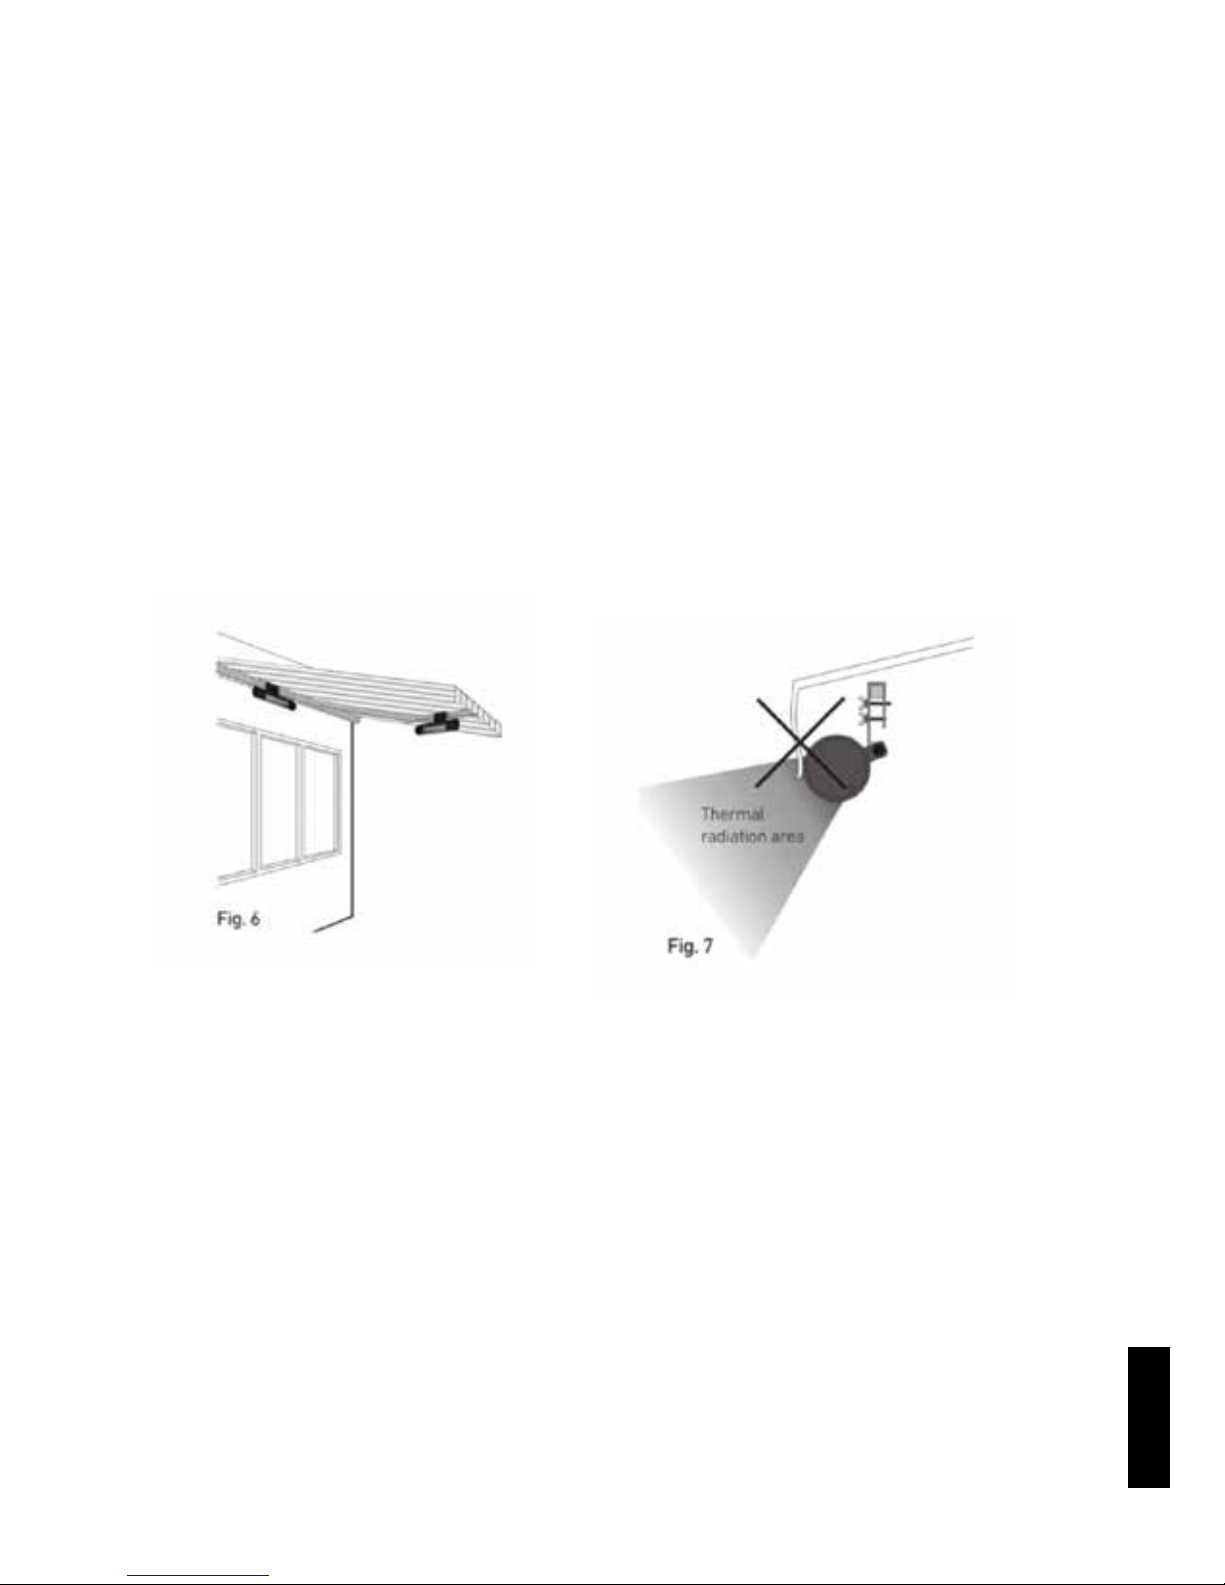
Markis:
• Du kan montera värmaren under en markis, på en av armarna eller på
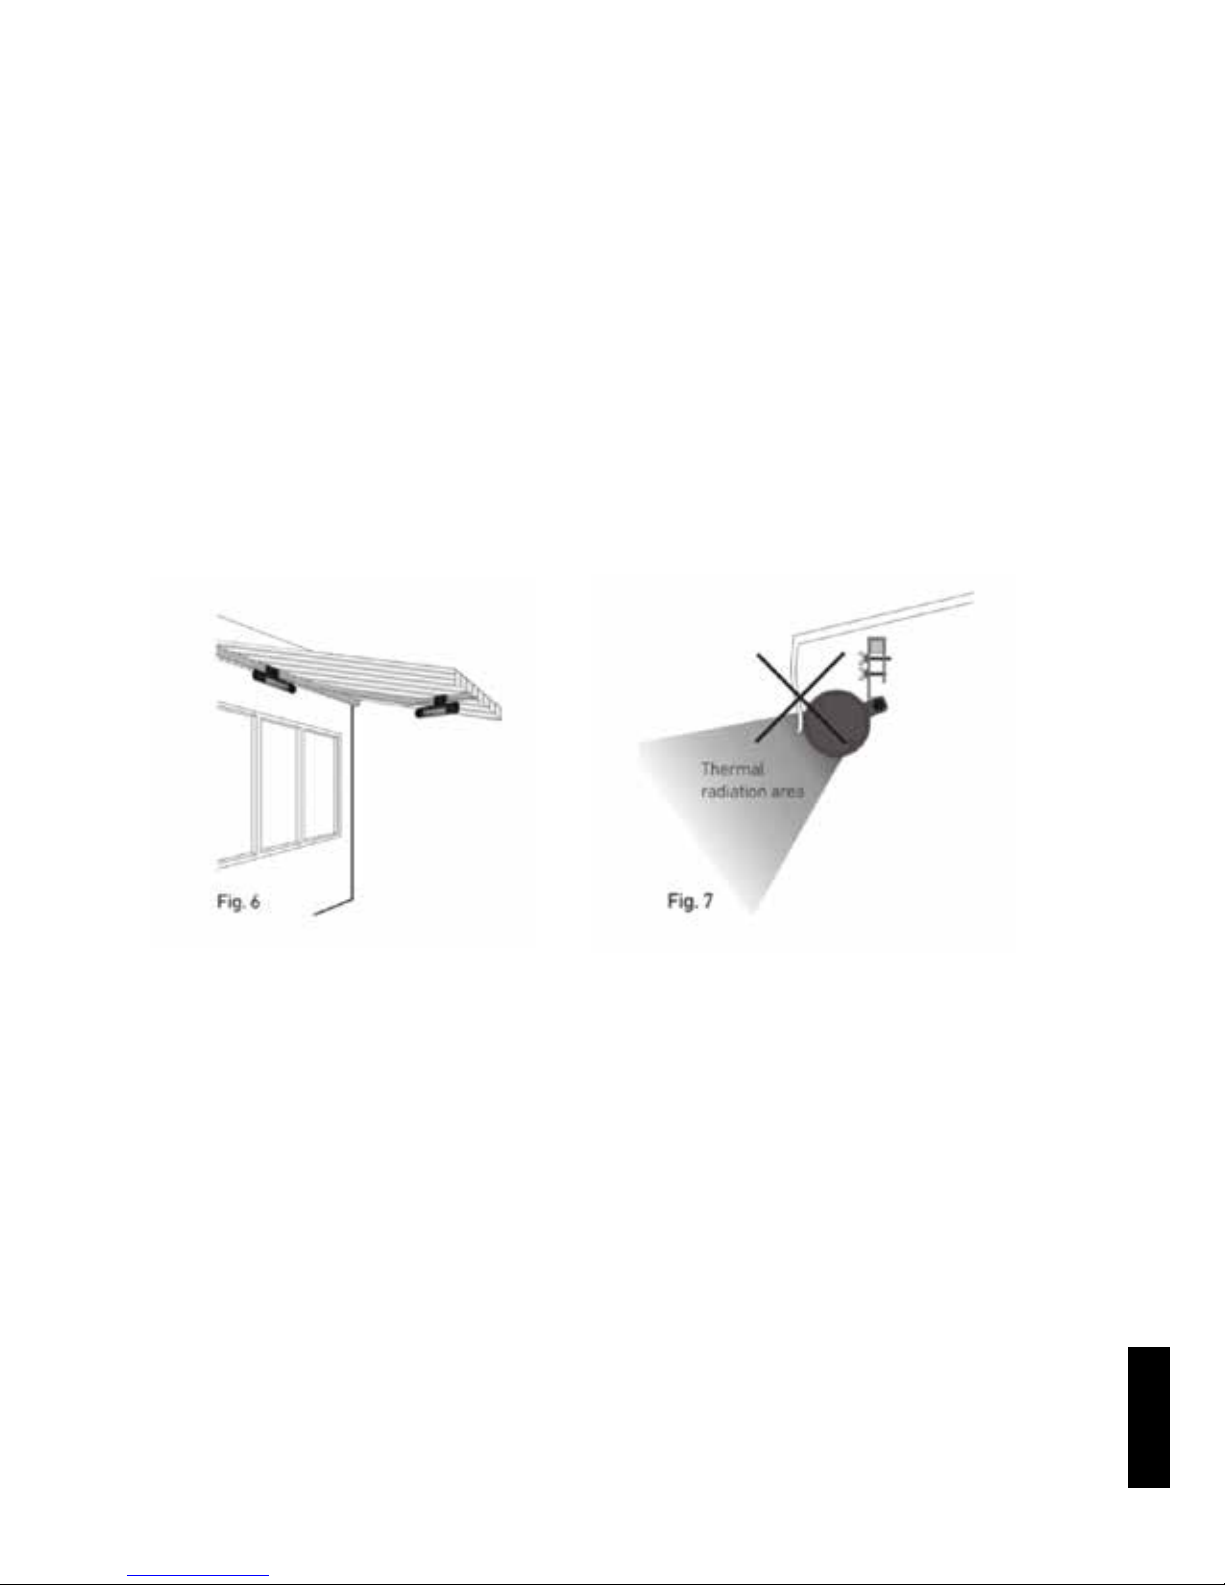
väggstativet. Se figur 6.
• Se till att ingen duk hänger ner på värmaren. Avståndet mellan värma-
ren och markisduken ska vara minst 10 cm. Se figur 7.
• Beroende på hur du monterar finns det en risk att värmaren kommer
för nära markisduken när markisen dras in. Du måste därför alltid
stänga av värmaren och låta den svalna innan du drar in markisen.
Varning! Du måste på
se till att det finns
utrymme för värme-
strålningsområdet!

8
Viktig information om placering och användning av värmaren
• Kom ihåg att värmaren blir mycket varm när den används, även ovan-
sidan och baksidan. Se till att du har ett avstånd på minst 10 cm till
närmaste föremål.
• Placera värmaren på ett säkert ställe, så att den inte hänger i vägen
och inte kan nås av barn.
• Avståndet mellan värmaren och andra föremål måste vara minst 10
cm, så att de inte skadas eller missfärgas.
• Stäng alltid av värmaren när den inte används (dra i snöret). Dra ur
kontakten och låt värmaren svalna.
Rengöring och förvaring
• Rengör värmaren med jämna mellanrum och innan du ställer undan
den för säsongen.
• Stäng av värmaren genom att dra i snöret och dra ur kontakten. Låt
den svalna innan du rengör och förvarar den.
• Använd en torr duk när du rengör höljet. Använd inte vatten, vax,
polermedel eller rengöringsmedel.
• Förvara värmare i ett torrt utrymme med god luftväxling. Rengör
värmaren med jämna mellanrum och innan du ställer undan den för
säsongen.
• Stäng av värmaren genom att dra i snöret och dra ur kontakten. Låt
den svalna innan du rengör och förvarar den.
• Använd en torr duk när du rengör höljet. Använd inte vatten, vax,
polermedel eller rengöringsmedel.
• Förvara värmare i ett torrt utrymme med god luftväxling.
Rengöring

9
SVENSKA
Säkerhetsanvisningar
• Läs bruksanvisningen noga innan du använder värmaren för-
sta gången och spara den så att du kan titta i den vid behov.
• Tänk på att värmaren blir het när du sätter på den. Rör inte
några av de varma ytorna.
• Var extra uppmärksam om det finns barn i närheten.
• Låt inte värmaren stå på utan övervakning.
• Dra alltid ur kontakten när värmaren inte används.
• Använd inte värmaren om kontakten eller sladden är skadad
eller om värmaren inte fungerar som den ska.
• Värmaren kan användas både inomhus och utomhus under
uppsikt.
• Värmaren måste anslutas till ett jordat uttag.
• Jordfelsbrytare rekommenderas som en extra säkerhetsåt-
gärd.
• Värmaren får inte användas i närheten av badrum, duschar
eller pooler.
• För inte in föremål innanför gallret – du kan få en elektrisk
stöt.
• Se till att avståndet mellan värmaren och antändliga föremål
är minst 10 cm.
• Täck inte över värmaren medan den är på.
• Värmaren kan bli överhettad om du täcker över den med nå-
got.
• Använd inte värmaren i utrymmen där bensin, färg eller andra
lättantändliga vätskor förvaras.

10
Säkerhetsanvisningar
• Använd bara värnaren för det avsedda ändamålet.
• Låt värmaren svalna innan den ställs undan.
• Anslut inte värmaren till utrustning som automatiskt slår på/
stänger av den, till exempel en timer eller ett termostat.
• Om sladden skadas ska den ersättas av elektriker.
• Värmaren får inte användas av personer (inklusive barn) med
begränsad fysisk, sensorisk eller mental förmåga eller som
saknar erfarenheter och kunskaper om de inte får hjälp av
någon som ansvarar för deras säkerhet.
• Barn måste hållas under uppsikt när värmaren används och
får inte leka med den.
• Värmaren är IPX4-klassad.

11
SVENSKA
Produkter med denna märkning ska inte slängas tillsammans med
vanliga hushållsartiklar. För att hindra skada på miljön och människor bör
denna produkt återvinnas under kontrollerade former. Lämna antingen in
produkten på en återvinningsstation som tar emot elektriska produkter
eller kontakta återförsäljaren som sålde produkten. De kan ta emot och
se till att produkten återvinns på ett säkert och miljövänligt sätt.
Reklamation
Enligt lag måste produkten vid reklamation återlämnas till inköpsstället
tillsammans med kvittot. Användaren ansvarar för skador som uppstått
på grund av att värmaren använts på annat sätt än det avsedda eller för
att användaren inte följt denna bruksanvisning.
Tekniska data
Spänning: 230 V – 50 Hz
Eekt: 600W/1200 W
Säkerhetsklass: IPX4
Info
12
Contents and assembly
Please read through the entire user manual before you start assembling and
deciding where to put your infrared heater. Read the instructions carefully to
make sure that the infrared heater is installed, used and maintained correct-
ly, as described in these instructions. Keep the user manual for future refe-
rence.
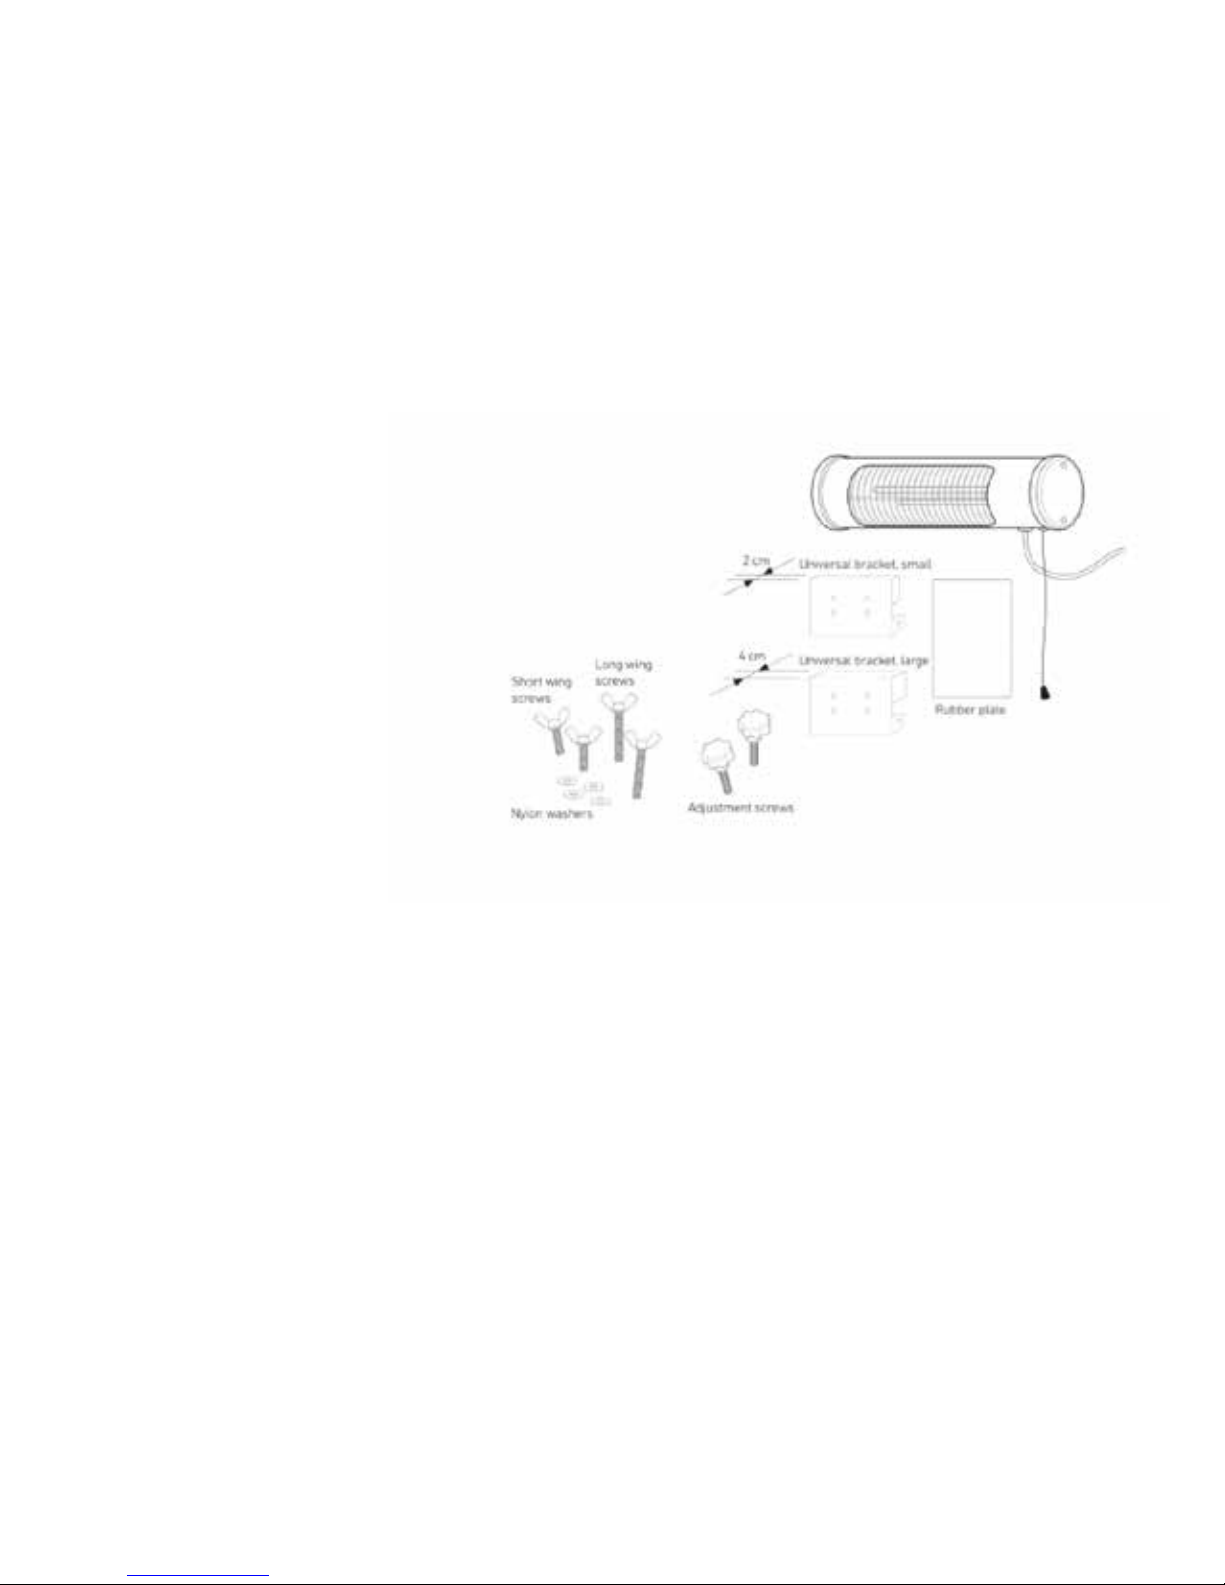
Package contents
• 1 st. Infrared heater
• 1 st. Universal bracket, small
• 1 st. Universal bracket, large
• 1 st. Rubber plate
• 2 st. Adjustment screws
• 2 st. Long wing screws
• 2 st. Short wing screws
• 4 st. Nylon washers
Montering
1. The back of the brackets is pliable and flexible to make it easy to
install the heater. Look at the following pages when deciding where to
put your heater.
2. When you have selected the location and the universal bracket you
are going to use, adapt the rubber plate to the universal bracket by
cutting it to size and then putting it on the inside of the universal
bracket. Make sure that you do not cover any of the holes that you
need to use for the wing nuts. This prevents damage and rust, and
also ensures that the heater is firmly attached to the tube/beam. See
figure 1.
3. Attach the universal bracket to the infrared heater using the adjust-
ment screws. See figure 1.
4. You can then hang the infrared heater on the tube/beam that you
have chosen.

13
ENGLISH
Contents and assembly
5. Angle the infrared heater so that the distance between the infrared
heater and the surrounding surfaces/objects is at least 10cm from
every direction. You angle the infrared heater using the adjustment
screws by turning the entire universal bracket with the infrared hea-
ter. See figures 2 and 3.
6. You can bend the back of the universal bracket around the tube/
beam, attaching it securely using the wing screws. When you angle
the heater, make sure that the wing screws are tightened securely
to fix the angle. Put the nylon washers between the wing screw and
the universal bracket to prevent rust. Se figure 1.
7. Connect the power cable to a grounded 230 V power socket. We
recommend using a ground fault circuit interrupter.
8. Pull the cord to switch the infrared heater on and o. See figure 4.
14
How to Use
This infrared heater is intended for outdoor use. The universal bracket
enables you to put the infrared heater in, for example, a pavilion, awning
or party tent. You can attach the infrared heater to tubes or beams up to a
maximum of 4 cm. Choose the universal bracket depending on where you
want to put the heater. You need to put the infrared heater at least 10 cm
away from other objects. Note that the back and top of the infrared heater
will also get hot.
Suggestions on where to
put your infrared heater
Party tents and gazebos:
• When you put your infrared heater in a party tent, you have to make
sure that it is not directly against the edge of the party tent’s canopy.
The infrared heater should either hang down under the edge of the
party tent’s canopy, or you can angle the infrared heater at a distance
of at least 10 cm from the edge of the party tent’s canopy using the
universal bracket. Make sure that you tighten the wing screws securely
in the universal bracket to ensure that the infrared heater is stable. See
figure 5.
Warning! When deciding
where to put your infrared
heater, make sure there is
plenty of space for the
thermal radiation area.
15
ENGLISH
How to Use
• If the party tent has walls, you need to angle the infrared heater so
that it is at least 10 cm away from the wall of the party tent using the
universal bracket. Tighten the wing screws in the universal bracket to
secure the angle.
• You can choose to put the infrared heater on one of the tubes in the
party tent roof. This would mean that the infrared heater would be at
an angle, but this is not a problem if you tighten the wing screws on
the universal bracket to ensure that the infrared heater is stable and in
place. The infrared heater must be at least 10 cm away from all parts
of the party tent.
Awning:
• You can choose to put your infrared heater in your awning. You can
either attach it to one of the awning arms or on the awning beam aga-
inst the wall. See the example in figure 6.
• Make sure that the awning valance does not hang down onto the inf-
rared heater. Make sure there is a distance of at least 10 cm between
the infrared heater and the awning valance. Se figure 7.
• Depending on where you put the infrared heater, there is a risk that
the awning valance will get closer than 10 cm to the infrared heater
when the awning is being closed. You therefore have to make sure that
the infrared heater has been switched o and has cooled down before
closing the awning.
Warning! When deciding
where to put your infrared
heater, make sure there is
plenty of space for the
thermal radiation area.

16
Cleaning and maintenance
Important information when deciding where to put your heater and
when using it
• Remember that the infrared heater will get very hot when it is on,
including the top and back of the heater. You should therefore make
sure that it is a safe distance, a minimum 10 cm from other objects.
• Hang the infrared heater in a safe location. Make sure it is high up,
somewhere where no-one can walk into it, and where it is out of the
reach of children.
• The infrared heater must be at least 10 cm away from other objects,
as the heat can damage or discolor fabric or other objects nearby.
• Remember to always switch o your infrared heater when it is not in
use (pull the cord of the main switch). Pull out the plug and make sure
the infrared heater has cooled down before leaving it unsupervised.
Cleaning and storage
• You need to clean the infrared heater regularly and before you store it
away.
• Switch o the infrared heater by pulling the cord (main switch) and
then pull the plug out of the electric socket. Allow it to cool before
cleaning and storing it.
• Use a dry cloth to clean the casing. Do not use water, wax, polish or
other cleaning agents.
• Store the infrared heater in a dry and well ventilated place.

17
ENGLISH
Safety instructions
• Read the user manual carefully before using the heater for the
first time and save it for future reference.
• Remember that the infrared heater will get hot when it is
switched on. Do not touch any of the hot surfaces.
• Pay particular attention when using the infrared heater close
to children.
• Do not leave the infrared heater unsupervised when it is
switched on.
• Always pull the plug out of the socket when the infrared hea-
ter is not in use.
• Do not use the infrared heater if the plug or the electric cable
is damaged or if the infrared heater is not working correctly.
• The infrared heater may be used in both indoors and outdoors,
and must under supervision.
• The infrared heater must be connected to an earthed electric
socket.
• Extra protection is recommended by installing a ground fault
circuit interrupter.
• Do not use the infrared heater right next to bathrooms,
showers or swimming pools.
• Do not put any objects in the grating of the infrared heater –
there is a risk of electric shock.
• Make sure the infrared heater is at least 10 cm from flamma-
ble objects.
• Avoid the risk of fire – do not cover the infrared heater when it
is switched on.

18
Safety instructions
• The infrared heater can overheat when covered.
• Do not use the infrared heater in areas where petrol, paint or
other flammable liquids are stored.
• Only use the infrared heater for its intended purpose.
• Let the infrared heater cool before storing it.
• Do not connect the infrared heater to any equipment that au-
tomatically switches the infrared heater on/o, for example, a
timer or automatic temperature control equipment.
• If the electric cable is damaged, it must be replaced by a quali-
fied electrician.
• The infrared heater is not intended to be used by people
(including children) with reduced physical, sensory or mental
capabilities or with a lack of experience and knowledge, unless
they are supervised or are given instructions on how to use the
infrared heater by a person who is responsible for their safety.
• Children must be supervised to ensure that they do not play
with the infrared heater.
• The infrared heater is rated IPX4.

19
ENGLISH
Info
Reklamation
By law the product must be returned to the place of purchase along with
a stamped receipt in the event of a complaint. The user is liable for any
damage to the product that is caused by not using the product for its
intended purpose or by not following this user manual correctly. The right
of complaint will not apply in these instances.
Tekniska data
Voltage: 230 V – 50 Hz
Power: 600 W/1200 W
Safety class: IPX4
This marking indicates that this product should not be disposed with
other household wastes throughout the EU. To prevent possible harm
to the environment or human health from uncontrolled waste disposal,
recycle it responsibly to promote the sustainable reuse of material
resources. To return your used device, please use the return and collec-
tion systems or contact the retailer where the product was purchased.
They can take this product for environmental safe recycling.

Table of contents
Languages:
Popular Heater manuals by other brands


Argo
Argo Soultt operating instructions

Chromalox
Chromalox CXH-A/B-03S Installation, operation and maintenance instructions

Standler Form
Standler Form Max operating instructions

Oceanic
Oceanic OCEABH1500W user manual

Prem-I-Air
Prem-I-Air EH1712 manual

Nortek
Nortek Reznor 85 Installation and operating manual