Hawksmoor 12102 User manual

Original User’s Instructions
High-pressure Washer 1800W
SKU:12102
READ BEFORE USE
PLEASE KEEP THESE INSTRUCTIONS FOR FURTHER REFERENCE

⚫WHAT’S IN THE BOX--------------------------------------------------------------------- 3
⚫TOOLS REQUIRED------------------------------------------------------------------------ 4
⚫SPECIFICATIONS-------------------------------------------------------------------------- 4
⚫EXPLANATIONS AND SYMBOLS, CAUTIONS AND WARNINGS---------- 5
⚫IMPORTANT SAFETY WARNINGS--------------------------------------------------- 6
⚫PRODUCT DESCRIPTION AND IDENTIFICATIONS----------------------------- 9
⚫ASSEMBLY AND OPERATING INSTRUCTIONS--------------------------------- 10
⚫CARE AND CLEANING------------------------------------------------------------------ 16
⚫TROUBLE SHOOTING------------------------------------------------------------------- 17
⚫DECLARATION OF CONFORMITY / PERFORMANCE------------------------ 18
⚫ENVIRONMENTAL INFORMATION-------------------------------------------------- 19
⚫GUARANTEE------------------------------------------------------------------------------- 20
⚫CUSTOMER SUPPORT------------------------------------------------------------------ 20
CONTENT

WHAT’S IN THE BOX
Trigger gun
Pressure hose
Rotary nozzle
Adjustable spray nozzle
nozzle
Pressure lance
Patio cleaner brush
Water hose connecter
Trigger gun holder
Trigger gun protector
Screw x4
Angle connector
High pressure hose hook
Nozzle cleaning needle
Rotating nozzle
Foam sprayer
Machine body

PH2 Screwdriver
•230V~50Hz
•Max pressure:140Bar(14Mpa)
•Max flow:8 L/min
•Auto stop/start function
•On-board accessory storage
•6 m PVC high-pressure hose
•5 m Power cord
TECHNICAL DATA
Model
YLQ5630H-140A
Rated Voltage
230V~50Hz
Rated Power Rate
1800W
Plug
BS plug
Power Cord Length(mm)
5000
Power Cord Spec
H05VV-F2*1.0mm²
Dimensions (H x W x D-mm)
approx.
821*380*325
Weight approx.(g)
7800
Detergent tank-volume(ml)
1000
Max water temperature℃
60
Protection Class
II
Degree of protection
IPX5
Rated pressure
9.5Mpa
Max(Allowable) pressure
14Mpa
Rated flow
5.1L/min
Max inlet pressure
0.7Mpa
Sound pressure level
Uncertainty
LpA=77.2 dB(A)
KpA=3dB
Sound power level
LwA=90dB (A)
Hand arm vibration ah
Uncertainty K
1.96m/s2
1.5m/s2
TOOLS REQUIRED
SPECIFICATIONS

Wear eye protection.
Wear protective gloves.
Switch the product off and disconnect it from the power supply before assembly,
cleaning, adjustments, maintenance, storage and transportation.
Wear protective, slip-resistant footwear.
Always ensure that other people and pets remain at a safe distance from the
product when it is in operation. In general, children must not come near the
area where the product is.
Local regulations can prohibit connection of the product to drinking water supply
equipment.
Do not direct the water jet onto people, animals, electrical equipment or onto the
product itself.
Do not reach the patio cleaner as long as the motor is running.
Wait until all components have completely stopped before touching them.
Guaranteed sound power level value in dB.
EXPLANATIONS AND SYMBOLS, CAUTIONS AND WARNINGS

This product is of protection class II. That means it is equipped with enhanced or
double insulation.
UK Conformity Assessed
The product complies with the applicable European directives and an evaluation
method of conformity for these directives was done.
WEEE symbol. Waste electrical products should not be disposed of with
household waste. Please recycle where facilities exist. Check with your Local
Authority or local store for recycling advice.

Product shall not be used by children. Children should be supervised
to ensure that they do not play with the product.
This product can be used by people with reduced physical, sensory
or mental capabilities or lack of experience and knowledge if they
have been given supervision or instruction concerning the use of the
product in a safe way and understand the hazards involved.
If the power cord is damaged, it must be replaced by the manufacturer,
its service agent or similarly qualified persons in order to avoid a
safety hazard.
WARNING: This product has been designed for use with the cleaning
agent supplied or recommended by the manufacturer. The use of
other cleaning agents or chemicals may adversely affect the safety of
the product.
WARNING: High-pressure jets can be dangerous if subject to misuse.
Never direct the jet at persons, live electrical equipment or the product
itself.
WARNING: Do not use the product within range of persons unless
they wear protective clothing.
WARNING: Wear appropriate Personnel Protection Equipment (PPE)
while operating the product.
WARNING: Do not direct the jet against yourself or others in order to
clean clothes or foot-wear.
WARNING: Risk of explosion –Do not spray flammable liquids.
This product shall not be used by children or untrained personnel.
WARNING: High-pressure hoses, fittings and couplings are important
for the safety of the product. Use only hoses, fittings and couplings
recommended by the manufacturer.
WARNING: Only use original spare parts from the manufacturer or
approved by the manufacturer to ensure product safety. The use of
non-original accessories and any other accessories not specifically
intended for the model in question is prohibited.
WARNING: Consider water that has flown through backflow
preventers to be non-potable.
WARNING: Switch the product off and disconnect it from the power
supply removing the power plug from the socket outlet before
assembly, cleaning, adjustments, maintenance, storage and
transportation or converting the product to another function.
IMPORTANT SAFETY WARNINGS

WARNING: Do not use the product if the power cord or any part of
the product is damaged, e. g. safety devices, high-pressure hoses,
trigger gun. Never use the product if the high-pressure hose is
damaged.
WARNING: Inadequate extension cords can be dangerous. If an
extension cord is used, it shall be suitable for outdoor use, and the
connection has to be kept dry and off the ground. The plug and socket
must be of watertight construction. It is recommended that this is
accomplished by means of a cord reel which keeps the socket at least
60 mm above the ground.
WARNING: Always switch off the mains disconnecting switch when
leaving the product unattended.
Have the electric supply connection to be made by a qualified
electrician and in compliance with IEC 60364-1. It is recommended
that the electric supply to this product should include either a residual
current device that will interrupt the supply if the leakage current to
earth exceeds 30 mA for 30 ms.
Never use the product with inflammable or toxic liquids, or liquids with
characteristics incompatible with its proper operation.
Never use the product outdoors in the rain.
Never touch the plug and/or socket with wet hands.
Never lock the gun trigger in the operating position.
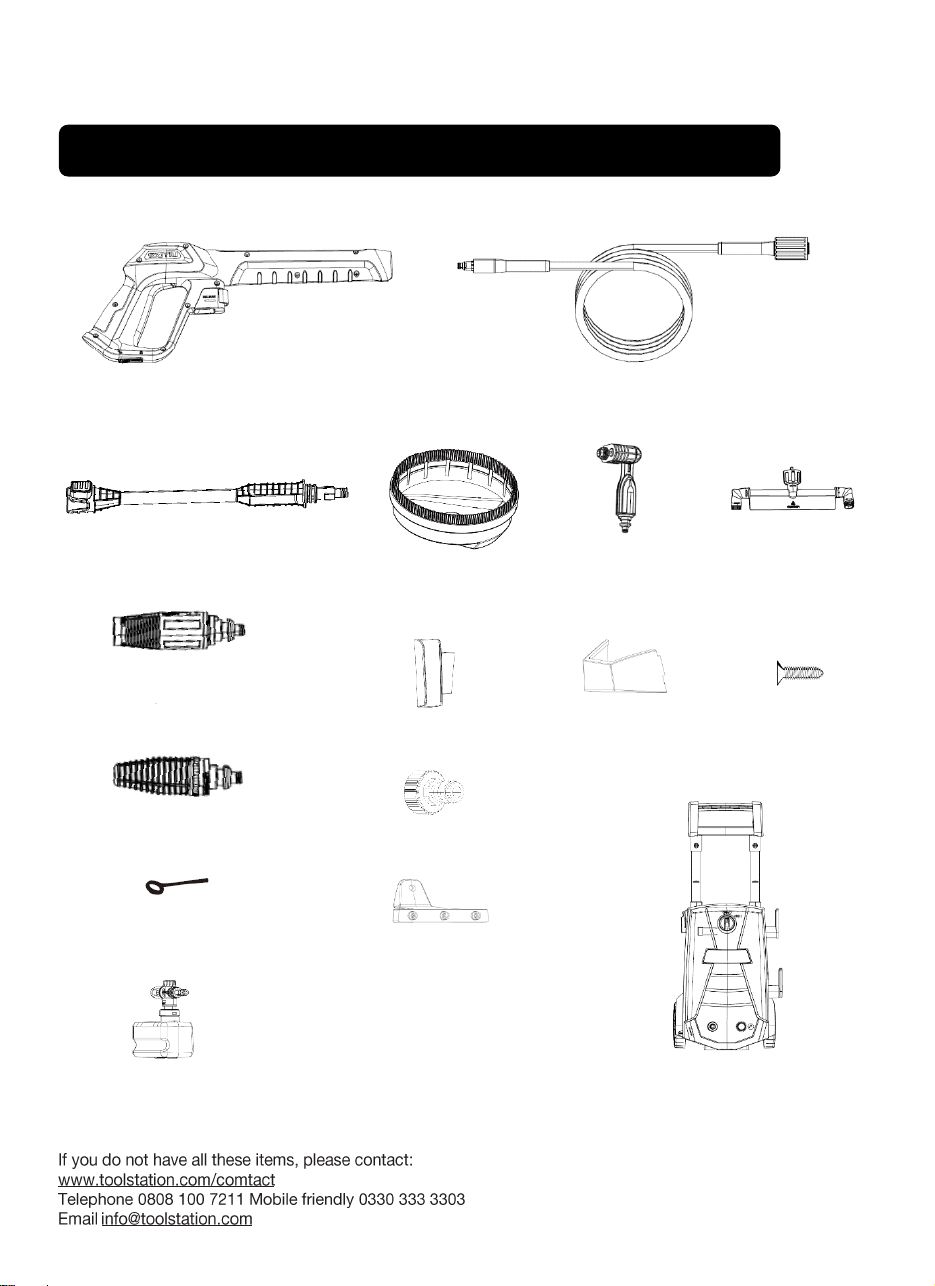
Check that theproduct isfitted with itsrating label, contact your dealer
if it is missing. Products without rating label must not be used, since
they cannot be identified and are potentially hazardous.
Never tamper with or adjust the setting of the safety valve or the safety
devices.
Never change the original diameter of the adjustable nozzle.
Never leave the product unattended when it is connected to the power
supply.
Never move the product by pulling on the electrical power cord.
Do not allow vehicles to drive over the pressure hose.
Do not move the product by pulling on the pressure hose.
When directed towards tires, tire valves or other pressurized
components, the high-pressure jet is potentially dangerous. Do not
apply a jet stream and always keep the nozzle at a distance of at least
30 cm during cleaning.
Protect all electrical conductors against the water jet.
During start-up, the product may generate interference on the
electricity supply system.

High-pressure may cause parts to rebound: wear all the protective
clothing and equipment needed to ensure the operator’s safety.
Be aware of kick-back: grip the gun firmly when pulling the trigger.
Comply with the regulations of the local water supply authority. Under
BS EN 12729 (Type BA) the product can be connected directly to the
mains drinking water supply only if the supply hose is fitted with a
backflow preventer device with drainage facility.
Have maintenance and/or repair work on electrical components to be
carried out by qualified staff.
Discharge residual pressure before disconnecting the hose from the
product.
Check before each use, and at regular intervals, that all metal
fasteners are tight and the product’s components are in good
condition; inspect for broken or worn parts.
Use only detergents compatible with the high-pressure hose /
electrical power cord cladding materials.
Use only authorized electrical extension cords with suitable conductor
gauge.
To reduce the impact of noise and vibration emission, limit the time of
operation, use low-vibration and low-noise operating modes as well
as wear personal protective equipment.
Take the following points into account to minimize the vibration and
noise exposure risks: Only use the product as intended by its design
and these instructions. Ensure that the product is in good condition
and well maintained. Use correct accessories for the product and
ensure they in good condition. Keep tight grip on the handles/grip
surface. Maintain this product in accordance with these instructions
and keep it well lubricated (where appropriate). Plan your work
schedule to spread any high vibration tool use across a longer period
of time.
Familiarize yourself with the use of this product by means of this
instruction manual. Memorize the safety directions and follow them to
the letter. This will help to prevent risks and hazards.
Always be alert when using this product so that you can recognize
and handle risks early. Fast intervention can prevent serious injury
and damage to property.
Switch off and disconnect from the power supply if there are
malfunctions. Have the garden power tool checked by a qualified
professional and repaired, if necessary, before you operate it again.
Even if you areoperating this product in accordance with all the safety

requirements, potential risks of injury and damage remain. The
following dangers can arise in connection with the structure and
design of this product: Health defects resulting from vibration
emission if the product is being used over long periods of time or not
adequately managed and properly maintained. Danger of injury and
property damage caused by flying objects. Injuries and damage to
property due to broken accessories or the sudden impact of hidden
objects during use.
WARNING! This product produces an electromagnetic field
during operation! This field may under some circumstances
interfere with active or passive medical implants! To reduce the
risk of serious or fatal injury, we recommend persons with
medical implants to consult their doctor and the medical implant
manufacturer before operating this product!

1. Handle 10. Trigger gun holder
2. Trigger gun 11. Accessory holder
3. Power cord hook 12. Foam sprayer
4. On/off switch (“ON/I”/“OFF/O”) 13. Wheel
5. Front case 14. Patio cleaner
6. Water inlet 15. Rotary nozzle
7. Water outlet 16. Power cord
8. High-pressure hose hook 17. Trigger gun lever lock
9. High-pressure hose 18. Trigger gun hose release
19. Telescopic handle release button
PRODUCT DESCRIPTION AND IDENTIFICATIONS

WARNING! The product and the packaging are not children’s toys! Children must not play with plastic small
parts! There is a danger of choking and suffocation!
Assemble the pressure washer
Unpack all parts and lay them on a flat, stable surface.
Remove all packing materials and shipping devices, if applicable.
Make sure the delivery contents are complete and free of any damage. If you find that parts are missing
or show damage do not use the product but contact your dealer. Using an incomplete or damaged
product represents a hazard to people and property.
Ensure that you have all the accessories and tools needed for assembly and operation. This also
includes suitable personal protective equipment.
Use this pressure washer for private households only:
If connection is made to a potable water system, the system shall be protected against backflow.
This high-pressure cleaner is designated with a rated input current. The intended use of this product
covers the cleaning of vehicles, buildings, terraces, facades and garden equipment using clean water
and biodegradable chemical detergents. Like-wise the product can be used to clean paving slabs or rain
gutters.
This product may not be used to clean clothing, shoes and other textiles. The water jet should not be
directed against persons. Animals, any electrical equipment or on the product itself. Do not flush any
objects which contain health hazardous materials. The product must not be run with inflammable,
explosive and toxic liquids.
For safety reasons it is essential to read the entire instruction manual before first operation and to
observe all the instructions there-in.
Mount loose parts delivered with appliance prior to start-up. Slide the trigger gun holder into position of
unit left.
ASSEMBLY AND OPERATING INSTRUCTIONS

Install the trigger gun protector using screw provided. Align the mounting hole and assemble the trigger
gun protector onto the product. Secure the connection with the long screw.
Install the high-pressure hose hook. Align the mounting holes and assemble the pressure hose holder
onto the product. Secure the connection with the long screws provided.

Installing the spray wand: Attach the adjustable spray nozzle or rotary nozzle to pressure lance to the
trigger gun and rotate them until the three parts are completely locked.
Align the tongues of the pressure lance with the grooves of the lance connection port of the spray gun
and insert it. There is a spring in the connection port of the spray gun. The spring has to be pressed
down and might need some pressure.
Securely fit the pressure lance by turning it clockwise and letting it lock into place.
To remove the pressure lance, press it towards the lance connection port of the spray gun and turn it
anticlockwise to remove it.
Attach the adjustable spray nozzle or rotary nozzle to pressure lance in the same way of fitting pressure
lance to the trigger gun.
Connect the high-pressure hose to the trigger gun: Push the hose release and hold it in position. Insert
the connector of the pressure hose into the hose connection port of the spray gun. Ensure it snaps in
place. Release the hose release afterwards.
Adjustable spray nozzle
nozzle
Rotary nozzle
Pressure lance

Connect the high-pressure hose to the water outlet: Connect the other end of the high-pressure hose to
the water outlet on the washer and twist the black rotatable end-piece as indicated to secure the
connection.
Connect the garden hose to the water inlet: Connect the water hose connecter to the water inlet of the
pressure washer, then thread yourgarden hose into the water hose connecter. The water hose connector
is supplied with an insulating washer. The water hose connector contains a filter to protect the product
against larger particles. Ensure that this is fixed appropriately. Do not use the water hose connector
without a washer and filter. Impurities in the water can damage the high-pressure pump and the
accessories.
.
Start up the pressure washer
Park the appliance on an even surface.
Make sure the on/off switch is in its off position “OFF/O”.
Connection to water supply. WARNING! Although this product is suitable for attachment to the drinking
water supply local regulations may prohibit the connection to drinking water connections! Observe the
regulations of your local utility company when connecting the product to a water supply line! If it is
prohibited to connect to the drinking water facility, you must use a backflow preventer which corresponds
to BS EN 12729 Type BA or BS EN 61770!
Attach a suitable water hose (not included) to the water supply and the other end to the water hose
connector.
Insert the mains plug into the socket. WARNING! Check the voltage! The voltage must comply with the
information on the rating label! If using an extension cord it must be suitable for outdoor use with sockets

protected against water splashing. Ensure the extension cord is of the proper size and type for your
product (≥1.5 mm²)! Always use a residual current device (RCD) protected supply.
Start up the device as follows prior to operation:
•Turn on the appliance by switching the switch in its on position “ON/I”
•Unlock the lever of the trigger gun.
•Push the lever of the trigger gun, the device will switch on.
•Let the device run (max. 2 minutes) until the water exits the trigger gun without bubbles.
•Release the lever of the trigger gun.
•Lock the lever of the trigger gun.
High pressure washing operation
Dry running of more than 2 minutes might lead to damage of the high-pressure pump. If the appliance
does not build up pressure within 2 minutes, switch the appliance off and proceed in accordance with
the instructions in Chapter “Troubleshooting”
Do not operate the product when the ambient temperature is below 0 °C. Water will freeze inside the
product and damage it.
Keep a distance of at least 30 cm when using the jet for cleaning painted surfaces to avoid damage.
Make sure the on/off switch is set to “OFF/O” position and insert the plug into a properly installed socket.
The washer must be used on a secure and stable surface in a standing, upright position.
The spray gun is equipped with a trigger lock in order to prevent accidental activation of the trigger.
When the trigger lock is in locked position, the spray gun trigger will be disabled. When the trigger lock
is in unlocked position, the spray gun trigger will be enabled and ready for use. Use the safety trigger
lock, when the product is not in use, when it is left unattended or during assembly of additional
accessories.
Automatic motor start/stop device is operated by the spray gun trigger. When the trigger is released, the
dynamic pressure automatically cuts out the motor. When the trigger is depressed the automatic drop in
pressure starts the motor and the pressure is restored after a very slight delay.
Connect the product to power and water supply as described.
•Open the water supply.
•Hold the spray gun with both hands.
•Direct the nozzle of the chosen accessory away from you towards the surface to be cleaned.
•Unlock the trigger and press it until a constant amount of water flows through the nozzle, to allow air
trapped in the hose to escape.
•Release the trigger.

•Turn the on/off switch to “ON/I” (on). Hold the spray gun with both hands. Direct the water jet to the
object to be cleaned and press the trigger. Release the lever of the trigger gun, the device will switch off
again and stop the water jet. High pressure remains in the system.
WARNING! Beware of kickback when pressing the trigger! Always hold the spray gun with both hands!
Using the patio cleaner brush
Always use the patio brush together with the pressure lance when cleaning floors.
Align the angle connector to the top of the patio brush and the rotating nozzle to the bottom side.
Screw the rotating nozzle on the thread of the angle connector. Tighten it well.
Operation with detergent
Only use mild, environmentally friendly detergents. Never use aggressive chemicals, abrasive
detergents or similar to avoid damage to your health, the product and the environment.
Detergent can only be added when the device is operated in low pressure mode.
When using detergents, the material data safety sheet issued by the detergent manufacturer must be
adhered, especially the instructions regarding personal protective equipment. Gently pull the onboard
detergent tank out of its storage position. Remove the cap, fill the tank with detergent designed
specifically for use with pressure washers until the level riches the upper graduation mark
To connect the foam sprayer to ex to the trigger gun, then twist counterclockwise until the three parts
are completely locked.
Pressure lance

Turn on the pressurecleaner. Press the trigger to operate the unit. The liquid detergent will automatically
mix with water and be discharged through the nozzle.
Handle adjustment
Pushing the handle release button and hold it in position.
Slightly move the transportation handle upward.
Release the handle release button and keep moving the transportation handle until it snaps in place.
WARNING! Always ensure that the handle release button snaps into place after adjusting the
transportation handle in upper position! Never adjust the transportation handle to an intermediate
position!
Storage position
Transport position

Tips
WARNING! Prevent water from penetrating the air vents of the product to minimize the risk of damage
to the product and to reduce the risk of electric shock to the operator!
When dealing with vertical surfaces work from the bottom upwards. Rinse from the bottom upward, use
the high-pressure jet at a minimum distance of 30 cm at 45° angle and then from the top downward.
In some cases, scrubbing with brushes is needed to remove dirt. High-pressure is not always the best
solution for goodwashing results,since itmay damage some surfaces. The finest (thinnest jet)adjustable
nozzle jet setting should not be used on delicate or painted parts, or on pressurized components (e. g.
tires, inflation valves, etc.).
Effective washing depends on both the pressure and volume of the water used, to the same degree.
Begin by spraying in a testing area free and clear of people and objects.
Wood and vinyl decks
Reduce your work area to smaller sections and clean each section one at a time for optimal results.
Rinse at high pressure using fan spray keeping the nozzle at least 15-25 cm from the cleaning surface.
Maintain a further distance from the cleaning area when using jet spray.
Caution! Increase the distance from the cleaning area for softer woods.
Cement patios, stone, and brick
Rinse at high pressure using fan spray in a sweeping motion keeping the nozzle at least 7-15 cm from
the cleaning surface.
Maintain a further distance from the cleaning area when using jet spray.
Cars, boats, and motorcycles
Clean one side at a time to achieve the best results.
Rinse at high pressure using fan spray in a sweeping motion keeping the nozzle at least 20 cm from the
cleaning surface. Maintain a further distance from the cleaning area when using jet spray.
Wipe surface dry for a polished finish.
Do not clean the engine with this product!
After use
WARNING! Only separate the high-pressure hose from the spray gun and the water hose from the
product when no more pressure exists in the system! Also ensure that the product is turned off and
separated from electrical supply!
Release the trigger and lock it.
Turn the on/off switch to its off position “OFF/O”.
Turn off the water tap.
Unlock and press the trigger to release the pressure still present in the product.
Lock the trigger.
Disconnect the product from the power supply.
Separate the water hose from the water supply and then from the water hose connector.
Wind the pressure hose and place it onto the pressure hose holder.
Ensure that the hose is not bent or twisted but winded up evenly.
Dismantle the accessories in the reverse sequence of the assembly instructions if you are not going to
use this product for a long period of time.
Check, clean and store the product as described below.

WARNING! Always switch the product off, disconnect the product from the water and power supply and
let the product cool down before performing inspection, maintenance and cleaning work!
Keep the product clean. Remove debris from it after each use and before storage.
Regular and proper cleaning will help ensure safe use and prolong the life of the product.
Inspect the product before each use for worn and damaged parts. Do not operate it if you find broken
and worn parts.
Clean the product with a dry cloth. Use a brush for areas that are hard to reach.
In particular clean the air vents after every use with a cloth and brush.
Remove stubborn dirt with high pressure air (max. 3 bar).
Do not use chemical, alkaline, abrasive or other aggressive detergents or disinfectants to clean this
product as they might be harmful to its surfaces.
Check for worn or damaged parts. Replace worn parts as necessary or contact an authorized service
centre for repair before using the product again.
Before and after each use, check the product and accessories (or attachments) for wear and damage. If
required, exchange them for new ones as described in this instruction manual. Observe the technical
requirements.
Park the machine on an even surface.
Detach pressure lance from the trigger gun.
Push the disconnect button on the trigger gun and pull the high-pressure hose out of the trigger gun.
Place the trigger gun into the storage for the trigger gun.
Put both rotary nozzle and adjustable spray nozzle into the storage for nozzles.
Coil the high-pressure hose and hang it over the hose storage.
Store the mains connection in the accessory compartment.
Prior to extended storage periods, as during the winter, also observe the instructions in thecare section.
Always store the pressure cleaner, parts, and accessories in a place that is inaccessible tochildren. The
ideal storage temperature is between 10 °C and 30 °C. Store the power washer indoors to prevent the
water in the unit from expanding under freezing conditions.
We recommend using the original package for storage or covering the product with a suitable cloth or
enclosure to protect it against dust.
WARNING! Only perform repairs andmaintenanceworkaccordingto theseinstructions!Allfurther works
must be performed by a qualified specialist!
High-pressure hose: The high-pressure hose is specially constructed with reinforced walls it can be
easily damaged and should be stored carefully. Do not kink. Do not drive vehicles over the hose. Do not
expose the hose to sharp edges or corners. Misuse will lead to ballooning or premature failure and will
invalidate warranty.
Nozzle: Remove any dirt deposits from the nozzle hole using the cleaning needle
Filter: Remove the water hose connector from the water inlet. Disassemble the water hose connector.
Rinse the parts with clear water.
Frost protection: Appliance and accessories that are not completely drained can be damaged by frost.
Completely drain appliance and accessories and protect them against frost. Store the appliance and the
entire accessories in a frost-free room.
CARE AND CLEANING
Table of contents
Popular Pressure Washer manuals by other brands

Craftsman
Craftsman CMXGWAS020733 Quick Start Up/Shutdown Guide

Kärcher
Kärcher K 2 Compact operating instructions

Generac Power Systems
Generac Power Systems 1037-0 owner's manual

Kärcher
Kärcher K 4 Basic manual

V-TUF
V-TUF HDC140-110V Operator's manual

Briggs & Stratton
Briggs & Stratton POWERflow+ TECHNOLOGY Operator's manual

Ryobi
Ryobi RACPW140 manual

PowerBlast
PowerBlast PowerShot HotWash HW1408 instruction manual

SNOWJOE
SNOWJOE sunjoe SPX3000-RM Operator's manual

DeVillbiss Air Power Company
DeVillbiss Air Power Company Devap A16091 Operation manual

Kärcher
Kärcher K 6.685 manual

Kärcher
Kärcher K 2 Basic Original operating instructions