Hayes HY PRO Series User manual

Socket Fusion Pipe Welder
HY PRO Series
DESCRIPTION
The HAYES HY PRO Series is the new digital socket fusion pipe welder (heating tool) that is
suitable for joining a variety of thermoplastic pipes and fittings for different applications in the
industry. This machine can weld HDPE (Polyethylene), PP-R (Polypropylene), PB
(Polybutene).
Our heating tool is designed and manufactured according to the American international
standard ASTM F2620. Our line of ancillary accessories such as heating adapters, cold ring
pliers and chamfer/depth gages are manufactured to ASTM F1056 guidelines, which will
assist in completing a quality fusion consistently if the pipe manufacturer's procedures are
followed carefully.
We offer a variety of options for all our customer’s needs. Our goal is to deliver world class
guaranteed plastic pipe fusion tools with fast shipping for a very competitive price.
PROCEDURE / APPLICATION
Definition according to the ASTM F2620: The socket fusion technique consists of
simultaneously heating both the external surface of the pipe end and the internal surface of
the socket fitting to a designated temperature, then fuse them together by application of a
sufficient force. Thereby resulting in fusion.
Socket fusion tools consist of a heating tool, heating adapter, cold rings pliers and
chamfer/depth gages.

P A G E | 2
www.hayesfusion.com | HAYES FUSION
TECHNICAL INFORMATION
✓Heating tool features
•Heat resistant aluminum plate
•Digital screen with adjustable temperature control
•Accurate heating temperature
•Automatic adjustable environment temperature
•Ergonomic handle
•Durable and efficient to maximize the pipe fusion
•Voltage protection
•Different working pipe sizes
Heating Tool
HY1PRO
HY2PRO
HY4PRO
Working range
(Inches)
½” –1” IPS
½” –2” IPS
½” –4” IPS
Power
600W
800W
1200W
Voltage range
110V
110V
110V
Frequency
50 / 60Hz
50 / 60Hz
50 / 60Hz
Display Temperature
Fahrenheit
Fahrenheit
Fahrenheit
Temperature setting
range
0°F - 554°F
0°F - 554°F
0°F - 554°F
Factory Setting
500 ± 10°F
500 ± 10°F
500 ± 10°F
Warning Temperature
599°F
599°F
599°F
Socket temperature
range
500 ± 10°F
500 ± 10°F
500 ± 10°F
Environment
temperature
-68°F - 140°F
-68°F - 140°F
-68°F - 140°F
Relative humidity
45% - 95%
45% - 95%
45% - 95%
Insurability Resistance
≥1MΩ
≥1MΩ
≥1MΩ
Leakage Current
≦5Ma
≦5Ma
≦5Ma
Weight and
dimensions
2.09 LBS
13x5x2 inches
3.52 LBS
15x5x2 inches
3.96 LBS
19x8x7 inches

P A G E | 3
www.hayesfusion.com | HAYES FUSION
✓Basic heating tool kits
All our kits include:
Steel case, support stand, table clamp, tongs, allen key, mounting screws and user manual.
HY1PRO KIT
This specific kit also
includes?
•Heating tool HY1PRO
capable to weld up to 1”
•3 IPS Heating adapters
►½ in
►¾ in.
►1 in.
•Weight:
10.56 LBS / 4.8 KG
•Dimensions:
17x9x4 in
42x24x10 cm
HY2PRO KIT
•Heating tool HY2PRO
capable to weld up to 2”
•6 IPS Heating adapters
►½ in.
►¾ in.
►1 in.
►1-1/4 in.
►1-1/2 in.
►2 in.
•Weight:
18.7 LBS / 8.5 KG
•Dimensions:
17x9x5 in
44x24x12 cm
HY4PRO KIT
•Heating tool HY4PRO
capable to weld up to 4”
•2 IPS Heating adapters
►2 in. IPS
►3 in. IPS
•Handle
•Weight:
19.14 LBS / 8.7 KG
•Dimensions:
17x9x5 in
44x24x12 cm

P A G E | 4
www.hayesfusion.com | HAYES FUSION
✓Complete heating tool kits
All our complete kits include:
Steel case, support stand, table clamp, tongs, allen key, mounting screws and user manual.
HY1CKIT
This specific kit also
includes?
•Heating tool HY1PRO
capable to weld up to 1”
•3 IPS Heating adapters
•3 IPS Cold rings pliers
•3 IPS Chamfer/Depth gage
►½ in
►¾ in.
►1 in.
•Weight:
25 LBS / 12 KG
•Dimensions:
18x11x5 in
46x28x12 cm
HY2CKIT
•Heating tool HY2PRO
capable to weld up to 2”
•6 IPS Heating adapters
•6 IPS Cold rings pliers
•6 IPS Chamfer/Depth gage
►½ in.
►¾ in.
►1 in.
►1-1/4 in.
►1-1/2 in.
►2 in.
•Weight:
35 LBS / 16 KG
•Dimensions:
18x11x10 in
46x28x25 cm

P A G E | 5
www.hayesfusion.com | HAYES FUSION
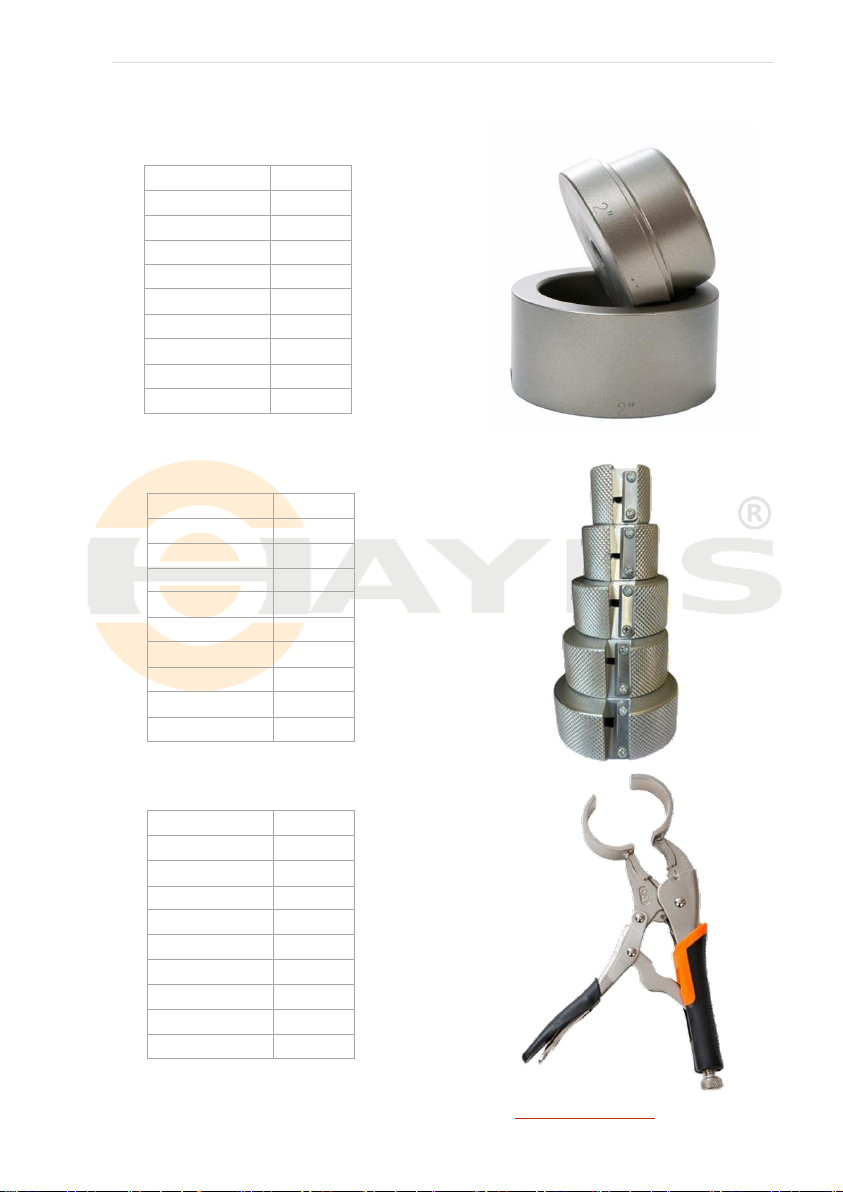
✓Heating accessories
Heating adapters
Chamfer and depth gage
Cold Ring Pliers
Standard (In.)
Ref.
½”CTS
SK1/2C
½”IPS
SK1/2I
¾”IPS
SK3/4
1”IPS
SK1
1-1/4”IPS
SK1-1/4
1-1/2”IPS
SK1-1/2
2”IPS
SK2
3”IPS
SK3
4”IPS
SK4
Standard (In.)
Ref.
½”CTS
BS1/2C
½”IPS
BS1/2I
¾”IPS
BS3/4
1”IPS
BS1
1-1/4”IPS
BS1-1/4
1-1/2”IPS
BS1-1/2
2”IPS
BS2
3”IPS
BS3
4”IPS
BS4
Standard (In.)
Ref.
½”CTS
AF1/2C
½”IPS
AF1/2I
¾”IPS
AF3/4
1”IPS
AF1
1-1/4”IPS
AF1-1/4
1-1/2”IPS
AF1-1/2
2”IPS
AF2
3”IPS
AF3
4”IPS
AF4

P A G E | 6
www.hayesfusion.com | HAYES FUSION
USER’S MANUAL
Socket Fusion Pipe Welder
(Before use, please read the manual carefully)
ABOUT THIS MANUAL
This manual is only a manufacturer´s guide. It does not take the place of proper training by
qualified instructors and does not exceed the experience of a professional. The information in
this manual is operational and cannot cover all the situations that may occur in the field such
as environmental temperature, pipe material, thickness, selected welding standard, etc.
BEFORE THE WELDING PROCESS
A. Cut and chamfer the pipe.
B. Place the cold ring at the proper depth on the pipe as determined by the depth gauge.
C. Attach the coated heating adapters to the heating tool when the tool is cold.
D. Connect to a 110V grounded power source only and begin operating the welding machine.
Permit enough preheating to stabilize the temperature.
MACHINE SET UP
•Once the unit is connected to proper power source it will automatically turn on and begin
to heat to the temperature that is set.
•Set the desired temperature by pressing the button and then using the “up/down”
buttons to choose the proper temperature and then press button again to
start the heating process.
•Red light displays when the unit is in process of heating up.
•Green light displays when the unit has reached the desired temperature.
WELDING PROCESS
Put the pipes and fittings into the heating adapters, remove pipes and the fittings from the
heating adapters when they reach the proper heating time. Connect the pipes and fittings
together until the bead is formed.

P A G E | 7
www.hayesfusion.com | HAYES FUSION
IMPORTANT NOTES
Welding procedure
✓Skill and knowledge are required to obtain a good quality joint.
✓Ensure you select the proper temperature according to the pipe manufacturer’s
recommendation.
✓It is important to know the technical information before you use your heating tool.
Non-stick coating
The heating adapters have a coated surface that has been treated to reduce polymer
adhesion. If the polymer adheres to the heating plate, lightly wipe with a clean cotton cloth to
remove. Do not use a wire brush or an abrasive.
Welding parameters
Pipe and fitting manufacturers have established qualified fusion procedures which should be
followed precisely. You should obtain a copy of the pipe manufacturer's procedures or
appropriate joining standard for the pipe being fused.
Heating iron temperature
To meet pipe manufacture’s temperature specifications, the surface temperature of the
heating adapters should be measured with a surface pyrometer prior to initial use and at
reasonable time intervals thereafter.
Ensure you test the temperature on the surface of the heating adapters and not on the heating
plate itself. The heater’s built-in thermometer indicates internal temperature and should only
be use for reference.
CAUTION
Heating iron
✓The heater is to be used with AC power only. Check heater to confirm correct power
requirements and only use a power source with the correct voltage and current capacity.
✓Connect heating tool to power and permit sufficient preheating to stabilize the
temperature before the welding process.
✓When welding, if temperature adjustment is needed, please turn off the heating tool first
and turn it on again to adjust the new temperature. Adjustment of the temperature when
it is already set will damage the temperature control components.
✓It is recommended to use an insulated heater bag to store the heating tool when it is hot.

P A G E | 8
www.hayesfusion.com | HAYES FUSION
¡WARNING!
Avoid Injury
This unit must be operated by trained personnel only.
Industrial Safety
RISK MATRIX
Be alert and report anything that you see, feel, smell or hear differently than expected, or that
you think is unsafe.
SOURCE: Heating tool and heating adapters
Do not adjust temperature above 575 °F. This can result in damage to the heater components
and the non-stick surfaces.
HAZARD
RISK
RISK CONTROL
ELECTRICAL
Electrocution
•Make sure to use a power source with the
correct voltage and current capacity.
•Connect to a 110V grounded power source
only.
•Keep the cables away from chemical agents
or water.
THERMAL
Risk of fire
•Do not use the machine in atmospheres with
explosion risk, due to the presence of gases,
flammable vapors, etc
•Wear protective gloves. Never touch the
surface of the heating tool or heating
adapters when they are hot.
•Move the heating plate cautiously when it is
hot and carefully remove the heating
adapters.
Burn Risk

P A G E | 9
www.hayesfusion.com | HAYES FUSION
SOCKET FUSION TIME CYCLES
American National Standard - ASTM F2620
Polyethylene (PE)
Temperature: 490 - 510 °F / 254 - 266 ℃
PIPE SIZE
PE80 MDPE
Medium Density Polyethylene -
PE 2406/PE 2708
PE100 HDPE
High Density Polyethylene - PE
3408/PE 3608/PE 4710
Pipe Size
Heating
Time
Fusion
Time
Cooling
Time
Heating
Time
Fusion
Time
Cooling
Time
Inches
mm
Sec.
Sec.
Sec.
Sec.
1/2"CTS
16
6-7
Immediate
30
6-10
Immediate
30
1/2"IPS
20
6-7
Immediate
30
6-10
Immediate
30
3/4"
25
6-7
Immediate
30
6-10
Immediate
30
1"
32
10-12
Immediate
30
15-17
Immediate
30
1 1/4"
40
12-14
Immediate
45
18-21
Immediate
60
1 1/2"
50
14-17
Immediate
45
20-23
Immediate
60
2"
63
16-19
Immediate
45
24-28
Immediate
60
2 1/2"
75
18-20
Immediate
45
24-28
Immediate
60
3"
90
20-24
Immediate
60
28-32
Immediate
75
4"
110
24-29
Immediate
60
32-37
Immediate
75
* Allow the joint to cool an additional five (5) minutes before exposing the joint to any type of
stresses.
NOTE: Some recommend using a 50-60 grit emery or garnet cloth to roughen the outside of
the pipe and inside of the fitting as a means of minimizing any possible skin interface when
making the fusion. Sandpaper is not recommended for this purpose, as it might disintegrate
and contaminate the joint interface.
Pipe chamfer(c) and Insert depth (d)
Pipe Size (s)
Pipe Chamfer
Insert depth
Inches
mm
(c)
(d)
1/2"CTS
16
2 mm
13 mm
1/2"IPS
20
14 mm
3/4"
25
15 mm
1"
32
17 mm
1 1/4"
40
18 mm
1 1/2"
50
20 mm
2"
63
3 mm
26 mm
2 1/2"
75
29 mm
3"
90
32 mm
4"
110
35 mm

P A G E | 12
www.hayesfusion.com | HAYES FUSION
WARRANTY CERTIFICATE
LIMITED WARRANTY
Hayes Industrial Solutions Inc. warrants all products distributed. All products have 12 months
warranty against manufacturer's defects from the date of purchase from Hayes Industrial
Solutions Inc. or Hayes Industrial Solutions Inc. authorized dealers. Furthermore, this
warranty only covers factory defects.
RETURN OF GOODS
Buyer must receive written authorization from Hayes Industrial Solutions Inc. or Hayes
Industrial Solutions Inc. authorized dealer before any returns. The goods must be in the same
condition as received. The buyer has 15 days to request a return of goods after the date of
the purchase. Buyer is responsible for return freight for any reason other than manufacturer's
defects.
IMPROVEMENT
Hayes Industrial Solutions Inc. reserves the right to make any changes in or improvements
on its products without incurring any liability or obligation to update or change previously sold
machines and/or the accessories.
PROPRIETARY RIGHTS
All proprietary rights pertaining to the design, colors, and branding, are exclusively the
property of Hayes Industrial Solutions Inc.
HAYES INDUSTRIAL SOLUTIONS INC
Heating Tool Model No:____________________ Inspector: _______________________
Heater Serial No.: ________________________ Date Tested: _____________________
Factory Setting:____________________
This manual suits for next models
3
Table of contents
Other Hayes Welding System manuals
Popular Welding System manuals by other brands

BOC
BOC Smoothcut Plasma 40 operating manual

Saf-Fro
Saf-Fro PRESTOTIG 200 AC/DC Operator's manual

Lincoln Electric
Lincoln Electric WELDLINE PROTIG NG S 10 Instructions for safety, use and maintenance

Silverline
Silverline 633505 manual

Nelson
Nelson N800iTM Operation and service manual

Lampert
Lampert PUK U4 operating manual