HAYGAIN HG ONE User manual

Hay Steamers
USER MANUAL |BENUTZERHANDBUCH |MANUEL
D’UTILISATION |MANUAL DEL USUARIO |MANUALE UTENTE |
GEBRUIKERSHANDLEIDING | INSTRUKCJA OBSŁUGI
© Haygain

2© Haygain
3 - 29
30 - 56
57 - 83
84 -110
111 - 137
138 - 164
165 - 191
English
Deutsch
Français
Español
Italiano
Nederlands
Polski
Languages
Languages
ENGLISH DEUTSCH FRANÇAIS ESPAÑOL ITALIANO NEDERLANDS POLSKI

User Manual
ENGLISH
Compatible with all models:
HG ONE | HG 600 | HG 2000 | HG 2002
Hay Steamers

4© Haygain
Languages ........................................................................................... 2
About your Haygain®Hay Steamer .................................................... 5
Getting started .......................................................................................7
Overview ............................................................................................... 5
Where to set up your Haygain®Hay Steamer ................................... 8
Connecting the steam generator to the hay chest .......................... 11
Safety .................................................................................................. 12
General safety ................................................................................. 13
Electrical safety ............................................................................... 13
Using your Haygain®Hay Steamer .................................................. 14
Filling the steam generator with water ............................................ 15
Loading forage ............................................................................... 15
Steaming forage ............................................................................. 17
Unloading forage ............................................................................. 18
Weather specic conditions ............................................................. 18
Maintenance ...................................................................................... 19
Cleaning the hay chest .................................................................... 20
Cleaning the steam generator ......................................................... 20
Descaling the steam generator ....................................................... 21
Storing your Haygain®Hay Steamer for long periods of time ......... 22
Troubleshooting ................................................................................ 23
Warranty ............................................................................................. 26
Maintenance records ........................................................................ 28
Contents
Contents
ENGLISH

5© Haygain
Congratulations on purchasing your Haygain®Hay Steamer!
Here at Haygain®we are committed to improving the health and well-being of your horse.
All hay even of the best quality will contain high levels of respirable dust, made up of mould,
bacteria, fungi, micro-organisms. These conditions compromise the ability of your horse to
breathe properly. Mould growth also reduces the nutritional quality of the forage.
Your Haygain® Hay Steamer is the only system scientically proven to kill mould spores and
bacteria in forage, and reduce up to 99% of the potentially allergenic respirable dust. Steamed
hay helps to protect your horse from harmful dust and microorganisms, which allows your horse
to perform to the best of its ability. Your horse will also love the improved taste of steamed
forage. After you steam forage, the forage is warm and smells sweet. Most horses love the taste
and prefer it to dry or soaked hay. We recommend you make any changes to your horse’s diet
slowly, to give their digestive system time to adapt. When you rst start using steamed forage,
mix it with your horse’s existing forage for a few days.
You can feed steamed forage to your horse immediately or up to 24 hours after steaming.
About this user manual
This user manual describes how to safely use and maintain your Haygain®Hay Steamer, and
how to get the best results from it.
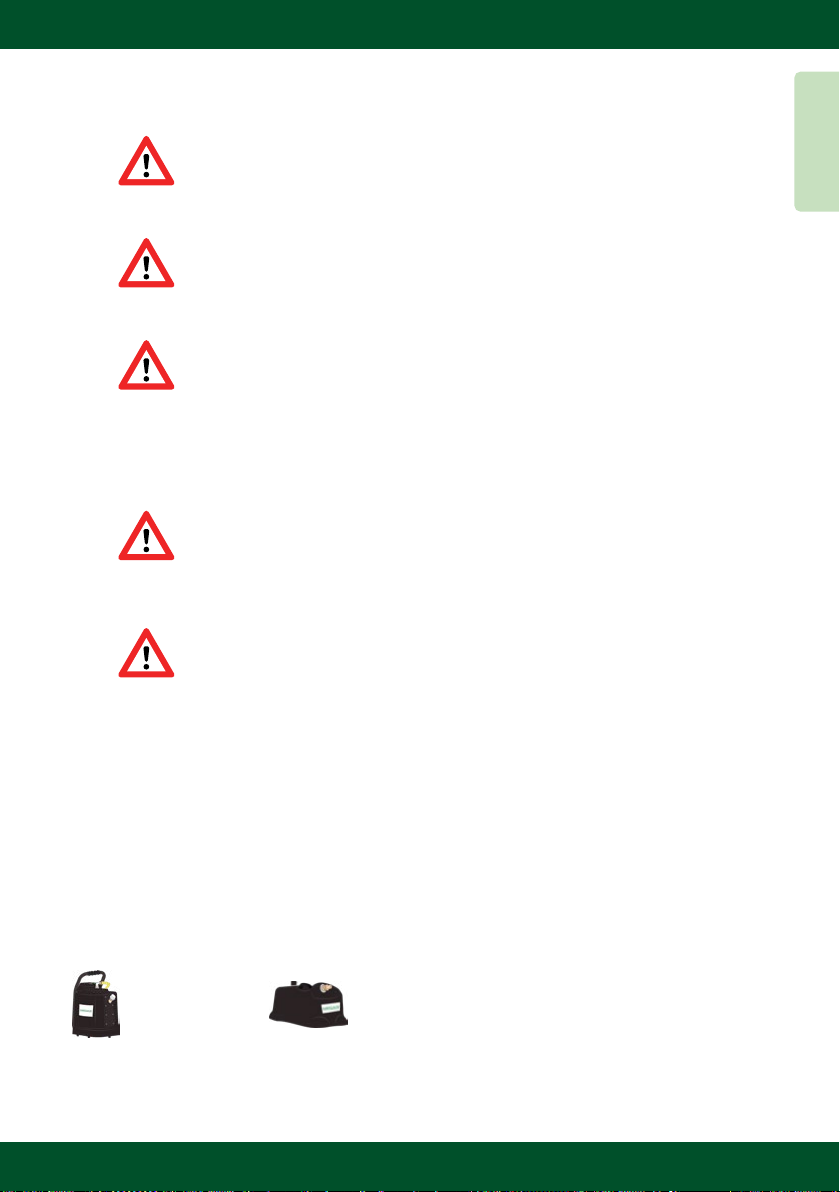
This manual will detail two different steam generators; your geographical location and hay
steamer model will determine which steam generator you have been supplied. Please follow
the diagrams throughout.
About your Haygain®Hay Steamer
About your Haygain®Hay Steamer
Jiffy Steam Generator: PB Steam Generator:
ENGLISH
6© Haygain
Read this user manual before use
Before you get started, read this user manual. When you use your Haygain®Hay Steamer,
follow all instructions carefully and safely.
Disclaimer
We have made every effort to ensure that the information in this user manual is correct at
the time of publishing. However, we reserve the right to change the information at any time
without notice.
Failure to observe the requirements of this user manual may result in the user being held
responsible for the consequences and will invalidate the warranty. We accept no liability for
misuse or unauthorized modications to your Haygain®Hay Steamer.
The steaming time of 60 minutes is based on an ambient temperature of 15°C/59°F, a sufcient
power supply and a location at sea level.
Your Haygain®Hay Steamer details
Before you get started, make a note of serial numbers and the date of delivery.
Serial number (hay chest):
Serial number (steam generator):
Date of delivery:
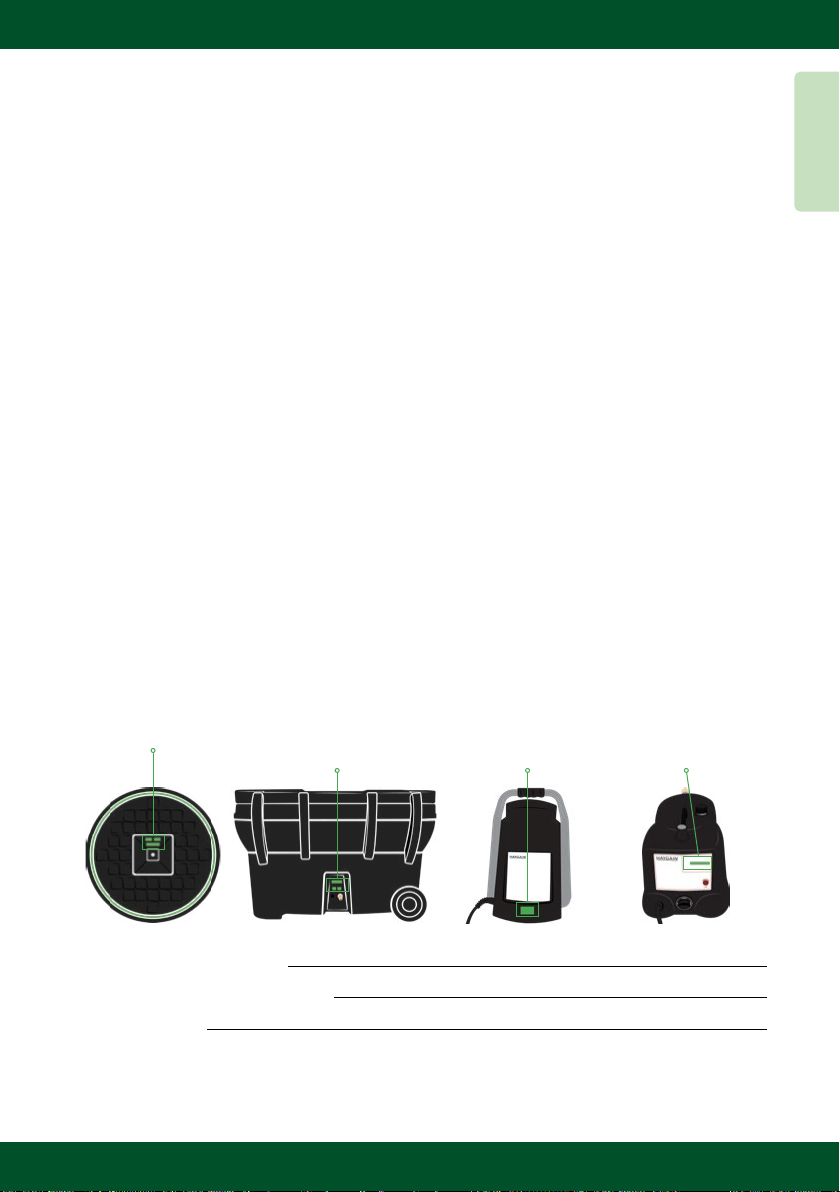
About your Haygain®Hay Steamer
HG ONE:
Serial number
located on
underside of lid.
PB Steam
Generator:
Serial number
located on
backside of unit.
Jiffy Steam
Generator:
Serial number
located on
backside of unit.
HG 600, 2000,
and 2002: Serial
number located on
backside of unit.
ENGLISH

7© Haygain
Getting Started
Unpacking your Haygain®Hay Steamer
Check you have all of the following parts. If you do not have a part, contact your supplier within
7 working days of delivery.
1. Haygain hay chest, with a xed 5-spike steam manifold(s)
2. Steam generator(s), with a steam hose with quick release tting
3. Funnel
4. Watering can/jug (location dependent)
5. Packet of Haygain®descaler
6. User manual
7. Gloves and Drip tray (dependent on availability)
If you are using your Haygain®Steam Generator in a different region
to where it was purchased please check electrical compatibility.
Getting Started
ENGLISH

8© Haygain
Overview
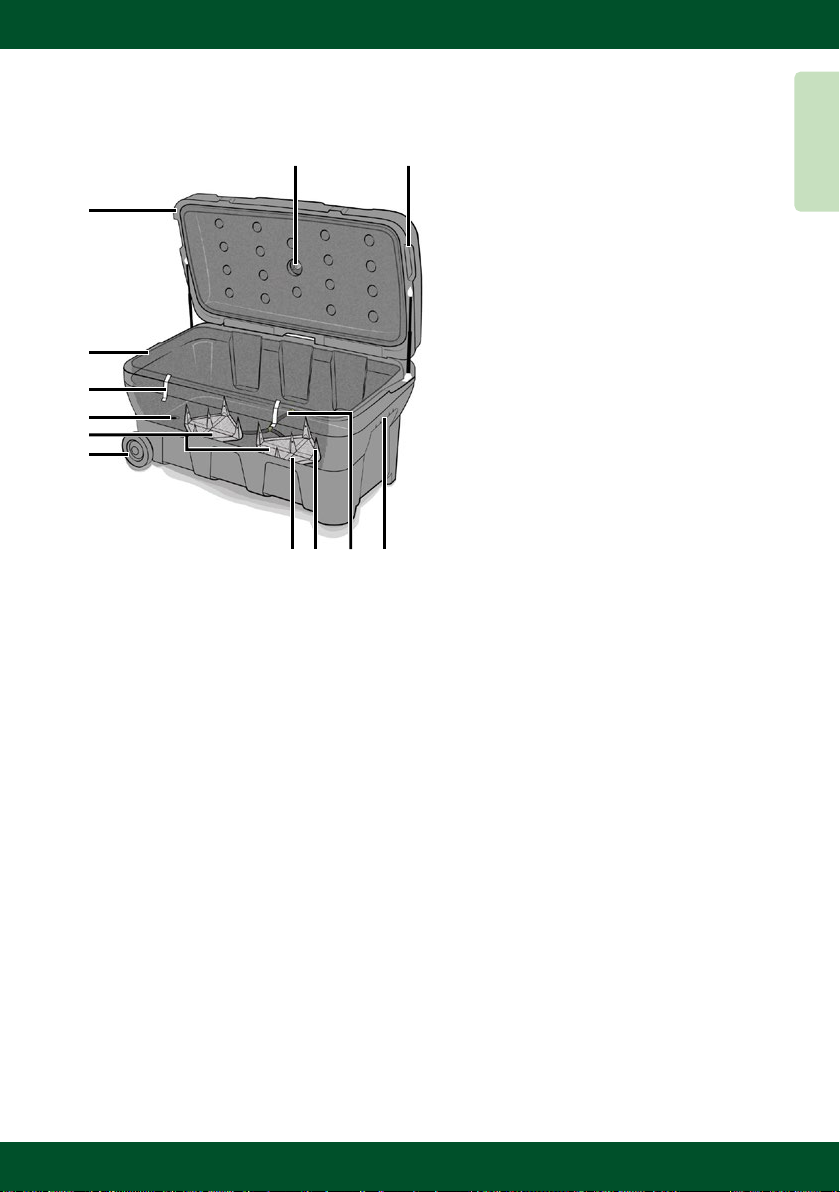
HG ONE Hay Chest
HG 600 Hay Chest
A
A
B
C
C
D
K
E
I
F
H
E F
G
JL G
J
H
I
A Lid
B Lid seal
C Handle (on both sides)
D Manifold Spike
E Steam Hole
F Drain Hole
G Steam Manifold Plate
H Thermometer
I Connector for Steam Hose
J Internal Hose
A Lid
B Lid seal
C Latch
D Thermometer
E Height
Adjustable
Handle
F Lid Gas Struts
G Wheel
H Internal Hose
I Steam Hole
J Steam Manifold
Plate
K Drain Hole
L Manifold Spike
B
D
ENGLISH
9© Haygain
Overview
HG 2000/2002 Hay Chest
A
B
C
D
F
E
G H
L JK I
A Lid
B Lid seal
C Latch
D Drain Hole
E Steam Manifold Spikes
F Wheel
G Thermometer
H Rebated Handle on Both Sides of Lid
I Internal Hose
J Handle
K Steam Hole
L Manifold Spike
ENGLISH
10 © Haygain
Overview
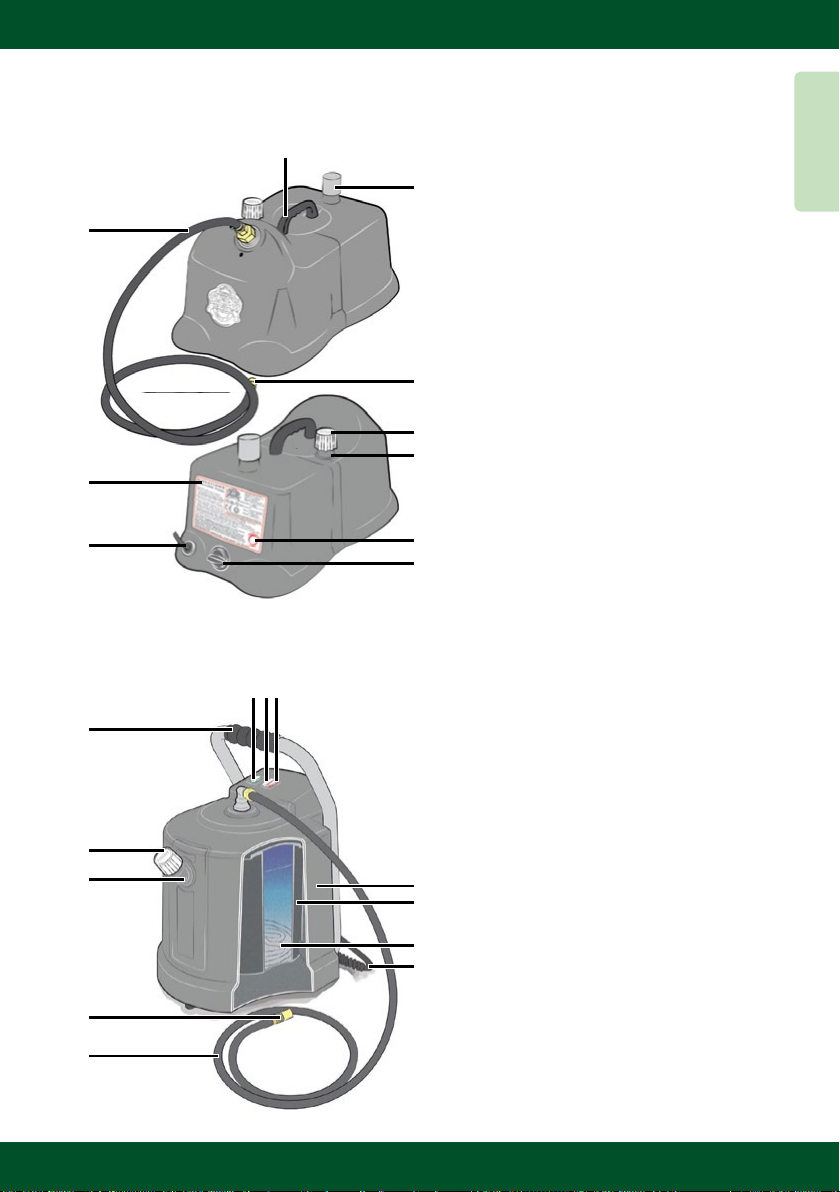
Jiffy Steam Generator
PB Steam Generator
A
A
B
C
D
E
J
G
D
H
I
I
J
K
L
E
F
B
FGH
A Steam Hose
B Handle
C Connector for Hay Chest
D Second Cap, Not Used
E Safety Label
F Power Cable and Cable
Restraint
G Power Switch
H Safety Cap
I Filler Spout
J Heating Indicator Light
A Handle
B Safety Cap
C Filler Spout
D Connector for Hay Chest
E Steam Hose
F Power Button
G Heating Indicator Light (Amber)
H Empty Indicator Light (Red)
I Polycarbonate Insulated Outer
Case
J Stainless Steel Tank
K Copper-Plated Nickel Heating
Element
L Power Cable and Cable
Restraint
C
ENGLISH

11 © Haygain
Setting Up Your Haygain®Hay Steamer
Where to set up your Haygain®Hay Steamer
To move the hay chest, lift it by the handle(s), lift from the side opposite to the wheels if moving
an HG 600, 2000, or 2002 and push or pull it. The higher you lift the hay chest, the easier it
is to move.
To move the steam generator, lift it by the handle.
Set up your Haygain® Hay Steamer in a location that meets the following specications:
The steam generator should be housed
indoors on at level ground.
Electric point sited close-by but not
directly behind the chest.
The steam generator should not be
raised up above the chest and the
steam hose should be free from kinks
or restrictions of any kind (e.g. the hose
goes round a corner).
The steam generator should not be
located too close to the dry stack of hay
and once steamed, the hay should be
kept separately.
Place
• Steam generator: indoors only
• Hay chest: indoors or outdoors
• Note: Some water will come out of the
drain hole in the hay chest.
• Not accessible by children or animals
Floor
• Level and hard oor that drains well
• Clean and free from mould or damp
Ventilation
• Well ventilated, to avoid damp
conditions
• Nothing covering the hay chest or
steam generator
Power
Within 4m/13.1ft
of a power outlet
Within 2m/6.5ft of
a power outlet
• Not directly under a power outlet, as
steam can corrode the power outlet
• Complies with the electrical
specications on page 13
Water
• Near a source of clean tap water
1
1
2
3
4
2
3
4
ENGLISH
12 © Haygain
Connecting the steam generator to the hay chest
Safety
When the hay chest and steam generator are in a suitable location, use the steam hose to
connect them.
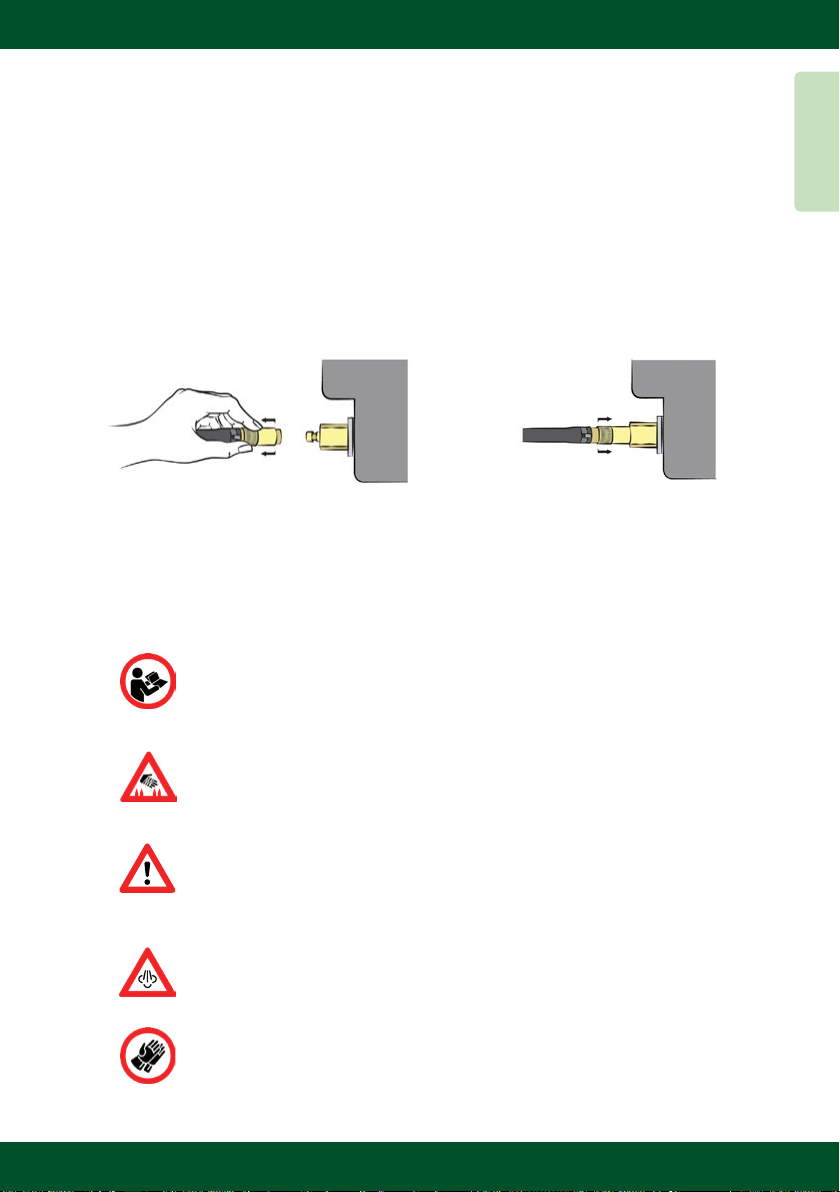
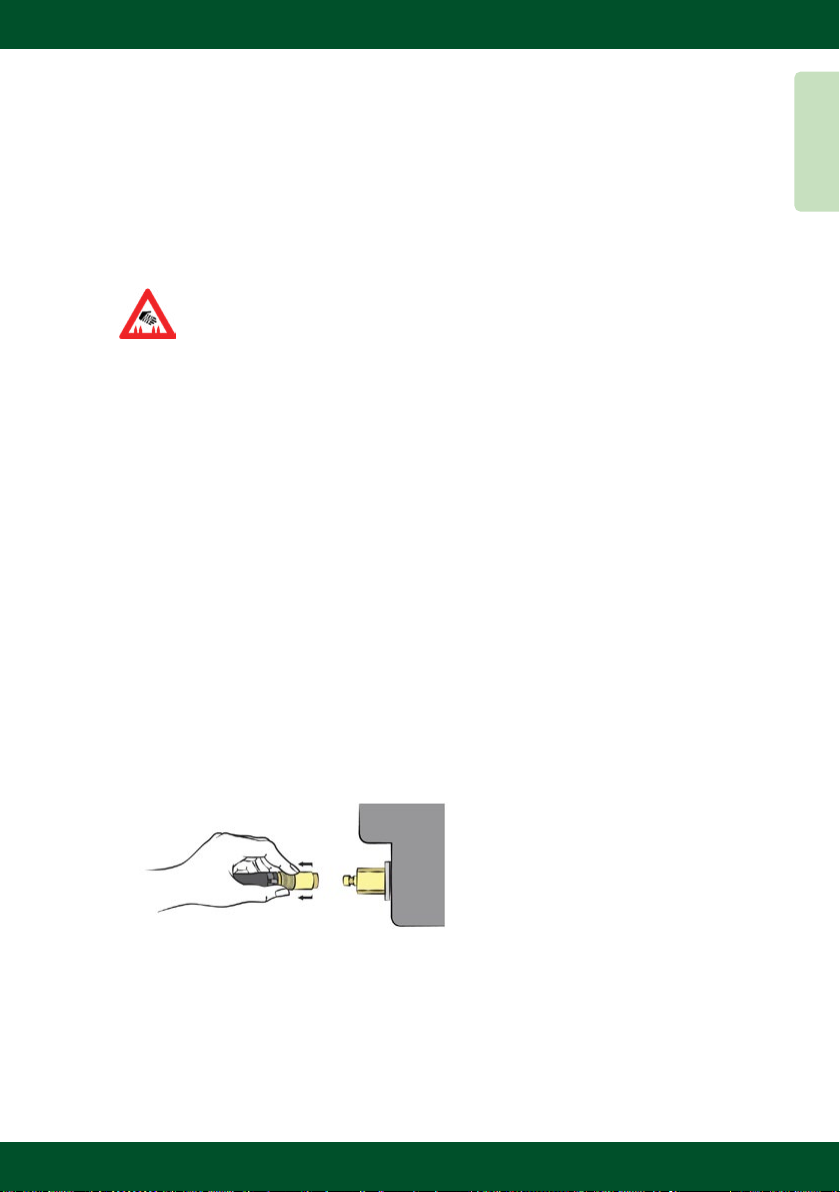
To connect the steam generator to the hay chest
1. Find the quick release tting at the end of the steam hose.
4. To check that the steam hose is securely connected, pull the hose. Ensure the hose is
not kinked or restricted.
2. Pull back the barrel of the quick
release tting on the hose, and push it
rmly onto the hose connector of the
hay chest.
3. Release the barrel of the quick release
tting on the hose, so that it slides into
the locked position.
Use your Haygain®Hay Steamer in a safe place
Set up your Haygain
®
Hay Steamer in a location that meets the
specications on page 11.
Hot steam and temperatures can cause burns
When the steam generator is switched on, it produces hot steam that
comes out of it and the hay chest. Before you open the safety cap of
the steam generator, allow it to cool down.
Areas of the hay chest, for example the manifold spikes, can get very hot.
Take care when you steam forage and unload it.
General Safety
Read this section carefully before setting up and using your Haygain®
Hay Steamer.
Manifold Spikes
Be careful when loading hay into your hay chest. Mind the manifold
spikes at the bottom, they can be sharp.
Setting Up Your Haygain®Hay Steamer & Safety
ENGLISH
13 © Haygain
Electrical Specications
The steam generator is an electrical device. Before you use the steam generator, check there
is no damage to the plug, cable, and cable restraint.
Routinely check the condition of the electrical cable and plug to ensure it is not getting dirty,
corroded or damaged, and is still fully plugged in.
This product should only be used with a professionally installed and certied electrical system
meeting the following requirements:
2750 W
50/60 Hz
230 V
1500 W
50/60 Hz
230 V/110V
Handle with care
Take care not to damage your Haygain
®
Hay Steamer. Do not use sharp
objects, for example hay forks, inside the hay chest. If any part of your
Haygain
®
Hay Steamer is damaged, including the steam hose, electrical
cable or thermometer, do not use it. Contact us for help.
Keep children and animals safe
Keep children and animals away from your Haygain®Hay Steamer.
Maintain your Haygain®Hay Steamer
Follow the maintenance instructions in this user manual. If you do not
maintain your Haygain®Hay Steamer, it may stop working or become
dangerous. Use only genuine Haygain®spare parts and approved
accessories including descaler.
Electrical equipment can be dangerous
Ensure your electrical delivery system meets the specications for the
steam generator. If you have any questions about your electrical
setup,contact a qualied electrician.
Electrical Compatibility
If you are using your Haygain Hay Steamer in a different region to where
it was purchased please check electrical compatibility.
Electrical Safety
Safety
ENGLISH

14 © Haygain
Extension Cables
Wall Timers
Using your Haygain®Hay Steamer
This product should not be used with an extension lead.
Contact our Customer Care Team or your local distributor
for correctly rated wall timers.
To switch on or off the steam generator at a certain time, you can use a wall timer.
If you plug the steam generator into a wall timer, ensure the wall timer meets the electrical
specications on page 13. Ensure the steam generator is securely tted into the wall timer and
the wall timer is securely tted into the power outlet.
After you set up your Haygain®Hay Steamer and make sure it is safe, you can start steaming
forage.
Read the Safety Chapter
Before you use your Haygain®Hay Steamer, read the Safety chapter
in this user manual.
Freezing Conditions
If you are working in freezing conditions, see page 18.
The steam generator must be earthed/grounded
The plug, cable, cable restraint and power outlet are not damaged.
The plug and cable are clean and dry when you plug them into the power outlet.
We recommend you plug the steam generator into a power outlet that is RCD (residual-current
device) protected.
Safety & Using Your Haygain®Hay Steamer
ENGLISH

15 © Haygain
Before you can start steaming forage, you need to ll the steam generator with water.
To ll the steam generator with water
1. To ensure the steam generator is empty, hold it by the handle and tilt it. Empty the
water through the ller spout into a drain or container.
2. Place the funnel in the ller spout.
Please note not all hay bales are created equally. Hay capacities are estimated.
Filling the steam generator with water
Loading Forage
HG ONE: HG 600:
Carefully pour up to 8 litres/1.7 gallons of clean tap water into the steam
generator.
Can hold 8 kg of loose
forage, or one hay net.
Can hold just over half a bale
of forage, several hay nets, or
loose forage up to 15kg.
Carefully pour up to 3.5 litres/0.76 gallons of clean tap water into the
steam generator. The wooden dipstick can be used to check the water
level.
If you are only steaming one bale, we recommend you use 6 litres of
clean tap water.
Warning: Do not open the safety cap on the steam generator when the
steam generator is hot. Ensure the steam generator has cooled down.
Unscrew the safety cap on the steam generator.
Take care not to overll the steam generator with water. Never add
anti-freeze or other additives to the water. Do not pour cold water into
an empty boiler when hot as this will damage the element.
3. Remove the funnel from the steam generator, then screw on the safety cap and
tighten it by hand. l
Using Your Haygain®Hay Steamer
ENGLISH

16 © Haygain
To load forage
1. Lift the lid of the hay chest or remove the lid (HG ONE) from the hay chest.
2. Place the forage into the hay chest. Place hay nets or wedges of loose forage
vertically, so that they are parallel with the sides of the chest.
3. Press the forage down rmly, being careful of the manifold spikes. Ensure the
manifold spikes are fully inserted into the forage.
4. Close the lid of the hay chest and fasten the latches, or push down rmly on the lid
(HGONE) .
HG 2000 /
HG 2002:
Can hold a standard size bale
of forage, several hay nets, or
loose forage up to 35-40kg.
Forage Capacity
With all models the weight of hay that can t in will vary according to
how densely the hay is packed. Loosely lling from big bale hay will get
a fraction of the suggested weight in and a dense, compacted bale will
weigh the most and would mean you can get more kg’s of hay inside the
same chest. Our weights/amounts of hay are suggested only.
Re-Tying Bales
When steaming part of a bale of forage, re-tie it using baling twine to
keep it together. Please use care when removing a tied bale and lift
straight up to avoid damage to the manifold(s). After steaming, cut and
remove any baling twine.
After steaming, any metal parts on hay nets will be very hot. The hot temperatures in the hay
chest can also cause some hay nets to shrink. We recommend you use Haygain®hay nets,
which do not have any metal parts and are heat-resistant so will not shrink.
Using Your Haygain®Hay Steamer
Contact our Customer Care Team or your local
distributor to purchase Haygain®hay nets.
ENGLISH

17 © Haygain
Steaming Forage
When you steam the forage in the hay chest, the internal temperature of the hay chest can
reach 80°C/176°F and above. This represents a temperature of around 100°C/212°F in the
forage. The combination of hot temperature and moisture (wet heat) kills the mould spores and
bacteria in the forage, protecting your horse from harmful dust and microorganisms.
To Steam Forage
1. Warning: Before you plug the steam generator into a power outlet, mop up any water
spillages around your Haygain®Hay Steamer. Ensure the plug, cable, and power
outlet are clean and dry. Plug the steam generator into a power outlet.
2.
To switch on the steam generator,
press the power button at the top
of the unit. The power button turns
green and the heating indicator light
turns amber.
To switch on the steam generator,
turn the rotary switch on the back
of the unit clockwise to the “Steam”
position and a red light will illuminate.
Power
Heating
Indicator
Heating
Indicator
Rotary
Switch
Using Your Haygain®Hay Steamer
3. Steam your forage for 60 minutes
4. If the temperature on the lid thermometer shown is at least 80°C (green zone), steaming
is complete.If the temperature shown is below 80°C, continue steaming until it is 80°C
(green zone).
5. Unplug the steam generator from the power outlet.
6. Once the steam generator has cooled, unscrew the safety cap on the steam generator.
7. Hold the steam generator by the handle and tilt it. Empty the water through the ller
spout into a drain or container. This will help reduce the build-up of lime scale.
Do not allow the steam generator to run out of water.
If the steam generator runs out of water, also known as “boils dry”, it
will be damaged. In the case of PB boilers, if the steam generator boils
dry, a buzzer sounds and the empty indicator light turns red. Switch off
the steam generator immediately. Before you unscrew the safety cap
and add more water, allow it to cool down. Do not stand over the steam
generator when you unscrew the safety cap.
ENGLISH

18 © Haygain
Using Your Haygain®Hay Steamer
To Unload Forage
1. Lift the lid of the hay chest or remove the lid (HG ONE), opening it from the side to
allow steam to escape.
2. Unload the forage from the hay chest. Warning: If the forage in the hay chest is too
hot, please wear protective gloves when you handle it. Take care when you unload
hay nets or tied bales and make sure to lift directly up and not levered against the
mainfold spikes.
3. Close the lid of the hay chest.
Weather Specic Conditions
Working in freezing conditions
When the ambient temperature is 0 degrees or below, water can freeze in the hay chest, steam
generator or steam hose. Disconnect the steam generators and tilt the hay chest backwards
to allow water to drain out of the steam manifold(s) and to help prevent ice from forming in the
hay chest when not in use.
To steam hay in freezing conditions:
1. Disconnect the steam hose from the hay chest.
2. To ensure there is no ice in the steam hose, ll the steam generator with water and
then switch it on. Do not load forage in the hay chest.
• If steam comes out of the safety cap and not out of the steam hose, switch off
the steam generator. To remove ice in the steam hose, place it in warm water
and gently squeeze it. Then switch on the steam generator again.
• Warning: Do not unscrew the safety cap.
• If steam comes out of the steam hose, connect to the hay chest.
Hot steam and temperatures can cause burns
Beware of hot steam when you open the hay chest lid. When you open
the lid of the hay chest, stand to one side of the hay chest to allow steam
to escape. Do not lean over the hay chest as steam escapes.
Unloading Forage
The steamed forage is slightly wet on the outside due to condensation on the bottom of the
hay chest lid. However, the inside of the forage is dry to the touch. To ensure the hay chest
and its lid always t together properly, keep the lid on the hay chest in the closed position as
they cool down.
ENGLISH

19 © Haygain
Using Your Haygain®Hay Steamer & Maintenance
3. If steam comes out of the manifold spikes, you can steam forage as normal.
4. After you use your Haygain®Hay Steamer, disconnect the steam hose from the hay
chest.
Top Tips
Follow the steps to help avoid your Haygain®Hay Steamer from freezing after
each use.
Keep your steam generator in a heated location overnight where possible
Filling the chest with hay overnight will help insulate the manifold(s)
Working in Hot Climates
Top Tips
We advise feeding your steamed hay as soon as possible as you may nd the
forage drys out quickly in the hot ambient temperatures.
Please ensure you clean out the hay chest regularly to prevent any mould growth
on the manifolds due to the warm/humid environment.
Do not use anti-freeze products
Do not use anti-freeze or other additives in the steam generator. Additives
in the steam generator can be a health hazard to your horse, or can
damage the steam generator. It will also void the warranty.
Maintenance
To continue steaming forage and keeping your horse happy, maintain your Haygain®Hay
Steamer. Complete the following tasks in this chapter:
Every week:
• Clean the hay chest - remove any loose hay.
• Empty and rinse out the steam generator. Wipe clean the external surfaces.
Once a month:
• Descale the steam generator once a month as standard. If you are in an area
with hard water or your steam generator is in heavy use you may need to
descale more often.
ENGLISH
20 © Haygain
Cleaning the Hay Chest
Clean the hay chest every week. To clean the hay chest after steaming forage, switch off the
steam generator and wait at least 30 minutes for it to cool down. To clean the hay chest:
1. Lift the lid of the hay chest.
2. Remove all loose forage from inside the hay chest, including from the drain hole and from
under the steam manifold.
Warning: Take care as the manifold spikes are sharp.
3. To rinse the hay chest, use a power washer or hose attachment and clean tap water.
4. Use warm soapy water and scrub the manifold with a brush – a Noncorrosive veterinary
grade disinfectant can be used.
5. Rinse thoroughly with a power washer or hose attachment.
6. Allow the water to drain through the drain hole at the bottom of the hay chest.
7. Ensure the chest is dry before closing the lid of the hay chest.
Cleaning the steam generator
To clean the inside of the steam generator after steaming forage, switch it off and wait at least
30 minutes for it to cool down.
1. Unplug the steam generator from the power outlet.
2. To disconnect the steam hose connected to the hay chest, do the following:
a. Pull back the barrel of the quick release tting on the hose.
b. Pull the quick release tting from the hose connector of the hay chest.
3. Empty the steam hose of water.
4. Unscrew the safety cap on the steam generator. Remove any forage or other material
from the safety cap.
Maintenance
ENGLISH
This manual suits for next models
3
Table of contents
Languages:
Other HAYGAIN Farm Equipment manuals


Popular Farm Equipment manuals by other brands

Schaffert
Schaffert Rebounder Mounting instructions

Stocks AG
Stocks AG Fan Jet Pro Plus 65 Original Operating Manual and parts list

Cumberland
Cumberland Integra Feed-Link Installation and operation manual

BROWN
BROWN BDHP-1250 Owner's/operator's manual

Molon
Molon BCS operating instructions

Vaderstad
Vaderstad Rapid Series instructions


