HAYMAC eCONO Apex User manual

12x10 & 12x12 eCONO Apex & Apex PLUS Shelter
FITTING INSTRUCTIONS
The area you choose to install your building must be level and flat - the more care you take in ensuring the
ground where your building is to be installed is level and flat, the easier your building will be to install.
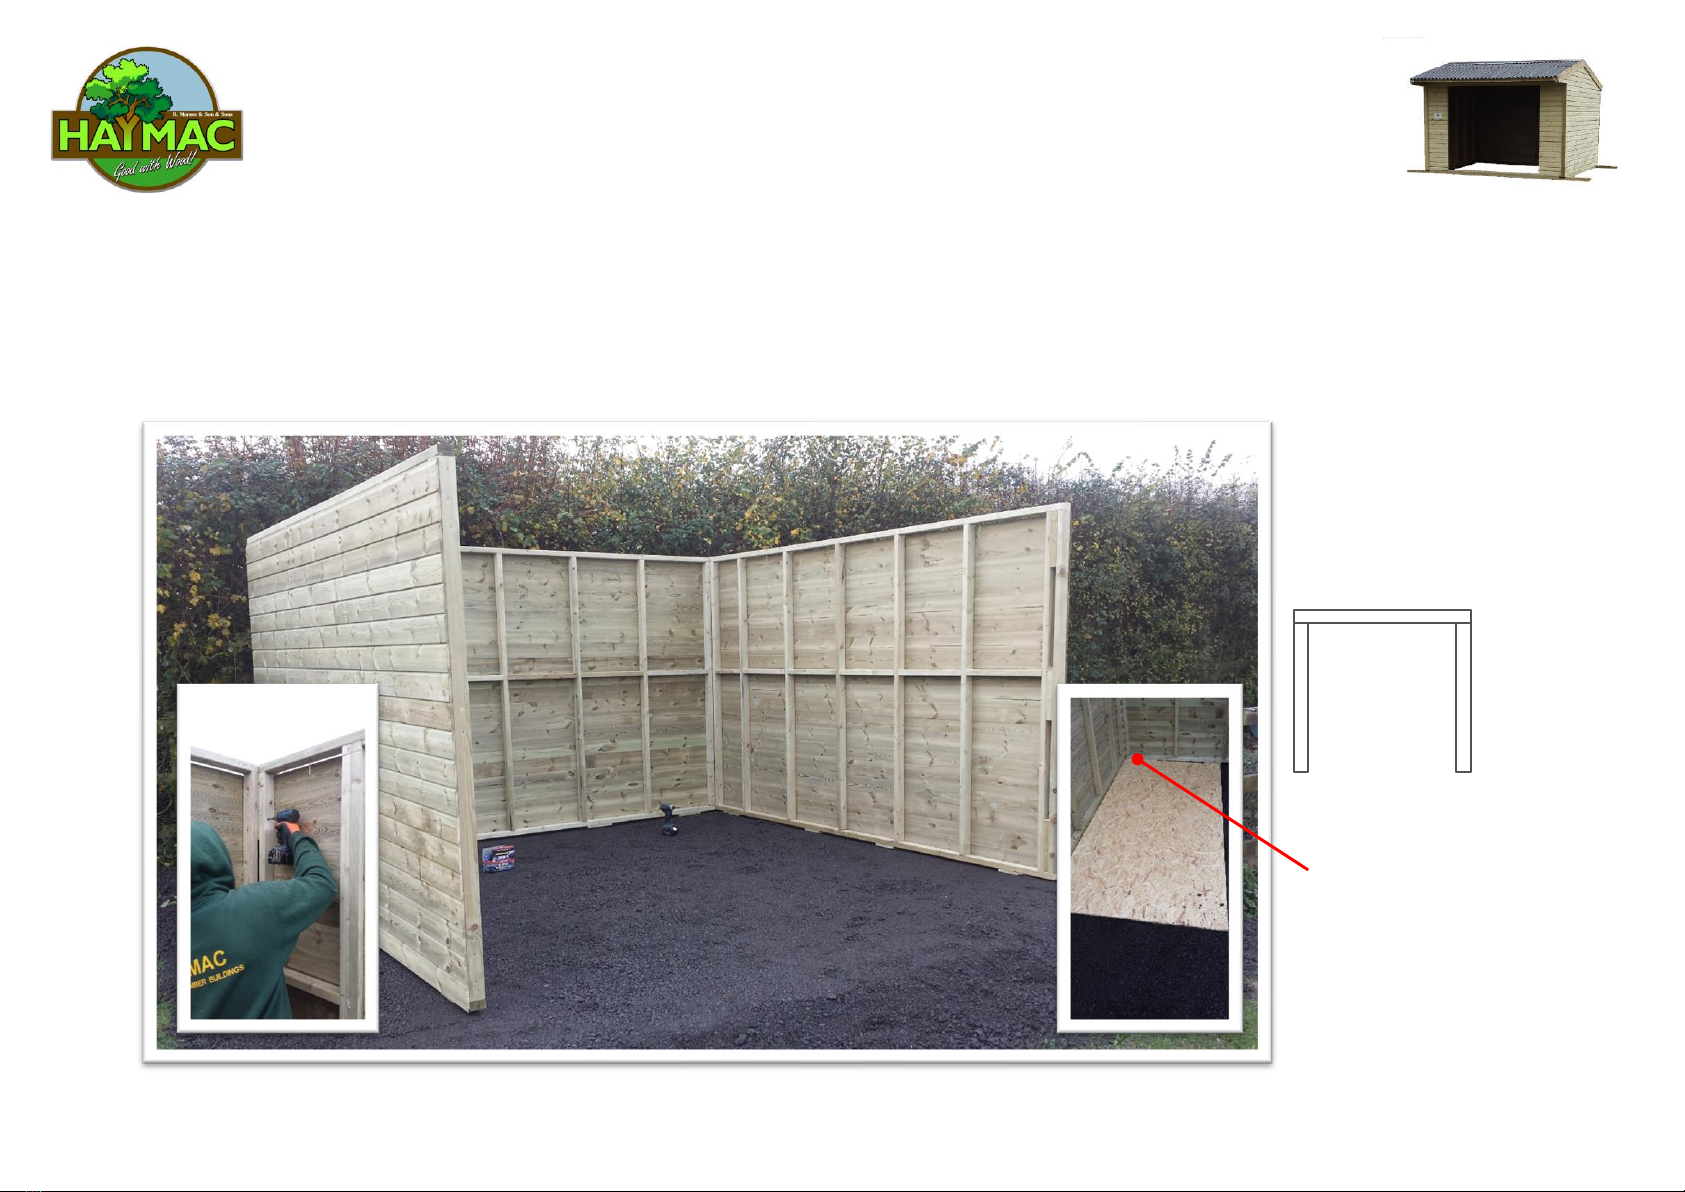
Fit left-hand side panel to rear panel as below using 3 x M8x100mm coach screws and washers –top,
middle & bottom. Ensure the panel is level & upright. You can temporarily fix using 100mm screws and
install the coach screws and washers when all 4 walls are fitted together and squared up.
Approx. 3.47m
Approx. 3.0m or 3.6m
depending on depth of
building purchased
Use the square corner of a
sheet of kick board lining to
check the building is square
12x10 & 12x12 eCONO Apex & Apex PLUS Shelter
FITTING INSTRUCTIONS
Fit right-hand side panel to rear panel as below using 3 x M8x100mm coach screws and washers - top,
middle & bottom. Ensure the panel is level & upright.
You can temporarily fix using 100mm screws and install the coach screws and washers when all 4 walls are
fitted together and squared up.
Approx. 3.0m
or 3.6m
depending on
depth of
building
purchased
Use the square corner of a
sheet of kick board lining to
check the building is square
12x10 & 12x12 eCONO Apex & Apex PLUS Shelter
FITTING INSTRUCTIONS
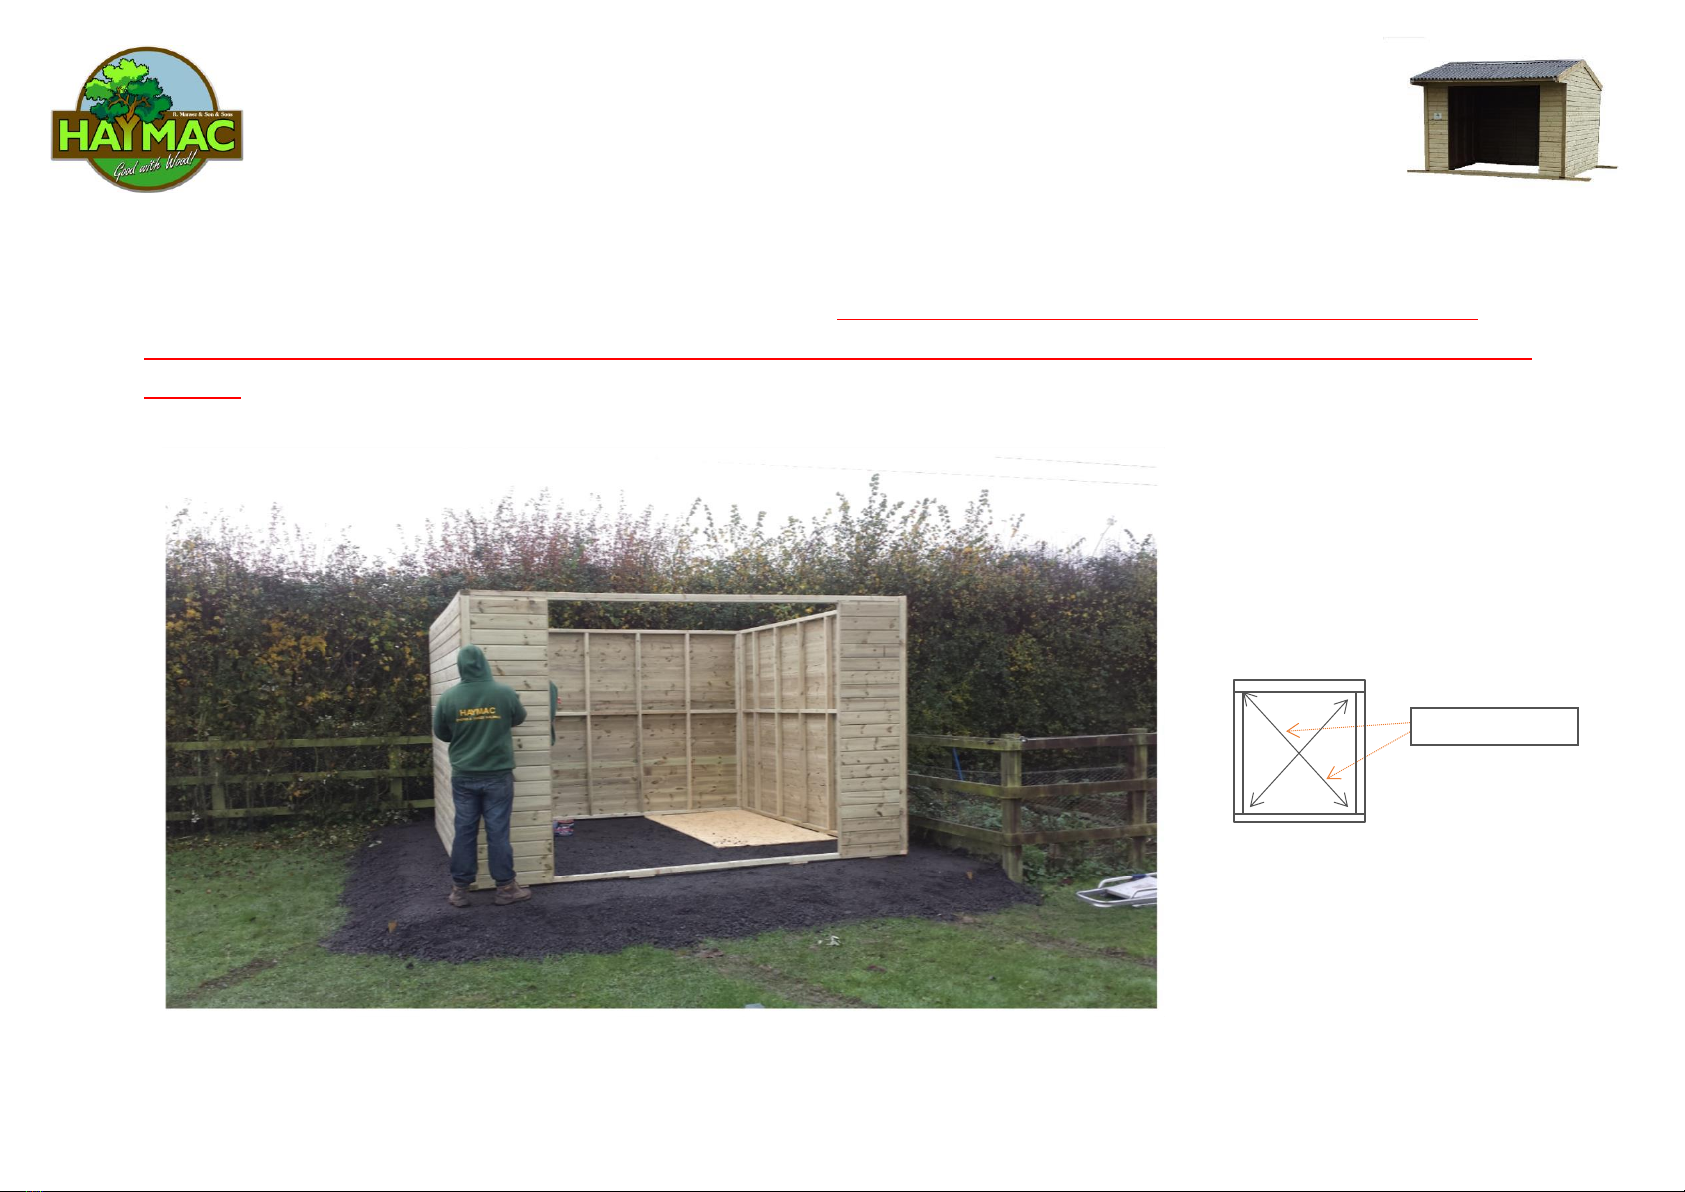
Fit front panel to both side panels as below using 3 x M8x100mm coach screws and washers to each side - top, middle &
bottom. Ensure the panel is level & upright. You can temporarily fix using 100mm screws and install the coach screws and
washers when all 4 walls are fitted together and squared up. Measure both internal diagonals to ensure they are both
equal –this will ensure the building is square - DO NOT PROCEED UNTIL BUILDING IS SQUARE OR YOUR ROOF SHEETS WILL
NOT FIT.
MUST BE EQUAL

12x10 & 12x12 eCONO Apex & Apex PLUS Shelter
FITTING INSTRUCTIONS
Fit left & right-hand gable ends to the top of side walls (the block fixed to the underside of the gable end needs to butt up to the shelter wall).
Fix the gables in position temporarily using 100mm screws, once you are happy with the position, fix using 3 x M8x100mm coach screws and
washers from the underside of the top rail of the sidewall up and into the uprights on the gable ends.
The gable end bottom shiplap board over sails the
bottom timber and when in position the over sail
shiplap needs to be nailed to the side panel. Using the
40mm nails provided fix the bottom shiplap board of
the gable ends to the upright timbers of the side walls

12x10 & 12x12 eCONO Apex & Apex PLUS Shelter
FITTING INSTRUCTIONS
Fit the front height extension panel to the top of the front panel. The height extension panel bottom shiplap board over sails the bottom
timber and when in position the over sail shiplap needs to be nailed to the front panel top beam.
Temporarily fix using 100mm screws, once you are happy with the position, fix using 3 x M8x100mm coach screws and washers. Fix from
underneath, also fix into the 2 sidewalls for additional support using 100mm screws.
Using the 40mm nails provided, fix the bottom shiplap board of the height extension panel to the top frame rail of the front panel.

12x10 & 12x12 eCONO Apex & Apex PLUS Shelter
FITTING INSTRUCTIONS
Fix roof purlins to top of support rail, each purlin sits above the indicated pencil mark - fix from below using 100mm screws - also install
additional screws from side or top of purlin through the top rail of the gable end to stop any twisting.
The 2 purlins which fit into the metal hangers, front & back, are slightly smaller in depth to the standard purlins (these will have one sawn cut
face on the 45mm face) DO NOT USE A STANDARD DEPTH PURLIN IN THE HANGERS the correct purlin will sit flush with the top of the gable
end top plate while a standard purlin will sit above the gable end top plate and is an incorrect fit - must be flush! The 2 purlins that fit on either
side of the ridgeline have an add-on to help to fit the ridge cap. The add-ons must sit facing the ridgeline.
Fix the purlins into the hangers using the 40mm galvanised nails provided.
Fit the front purlin centre support - screw through face of
front purlin into centre support using 2 x 5x100mm screws.
Screw either side of the centre support into the front wall
timber plate - dovetail screws in.
12x10 & 12x12 eCONO Apex & Apex PLUS Shelter
FITTING INSTRUCTIONS
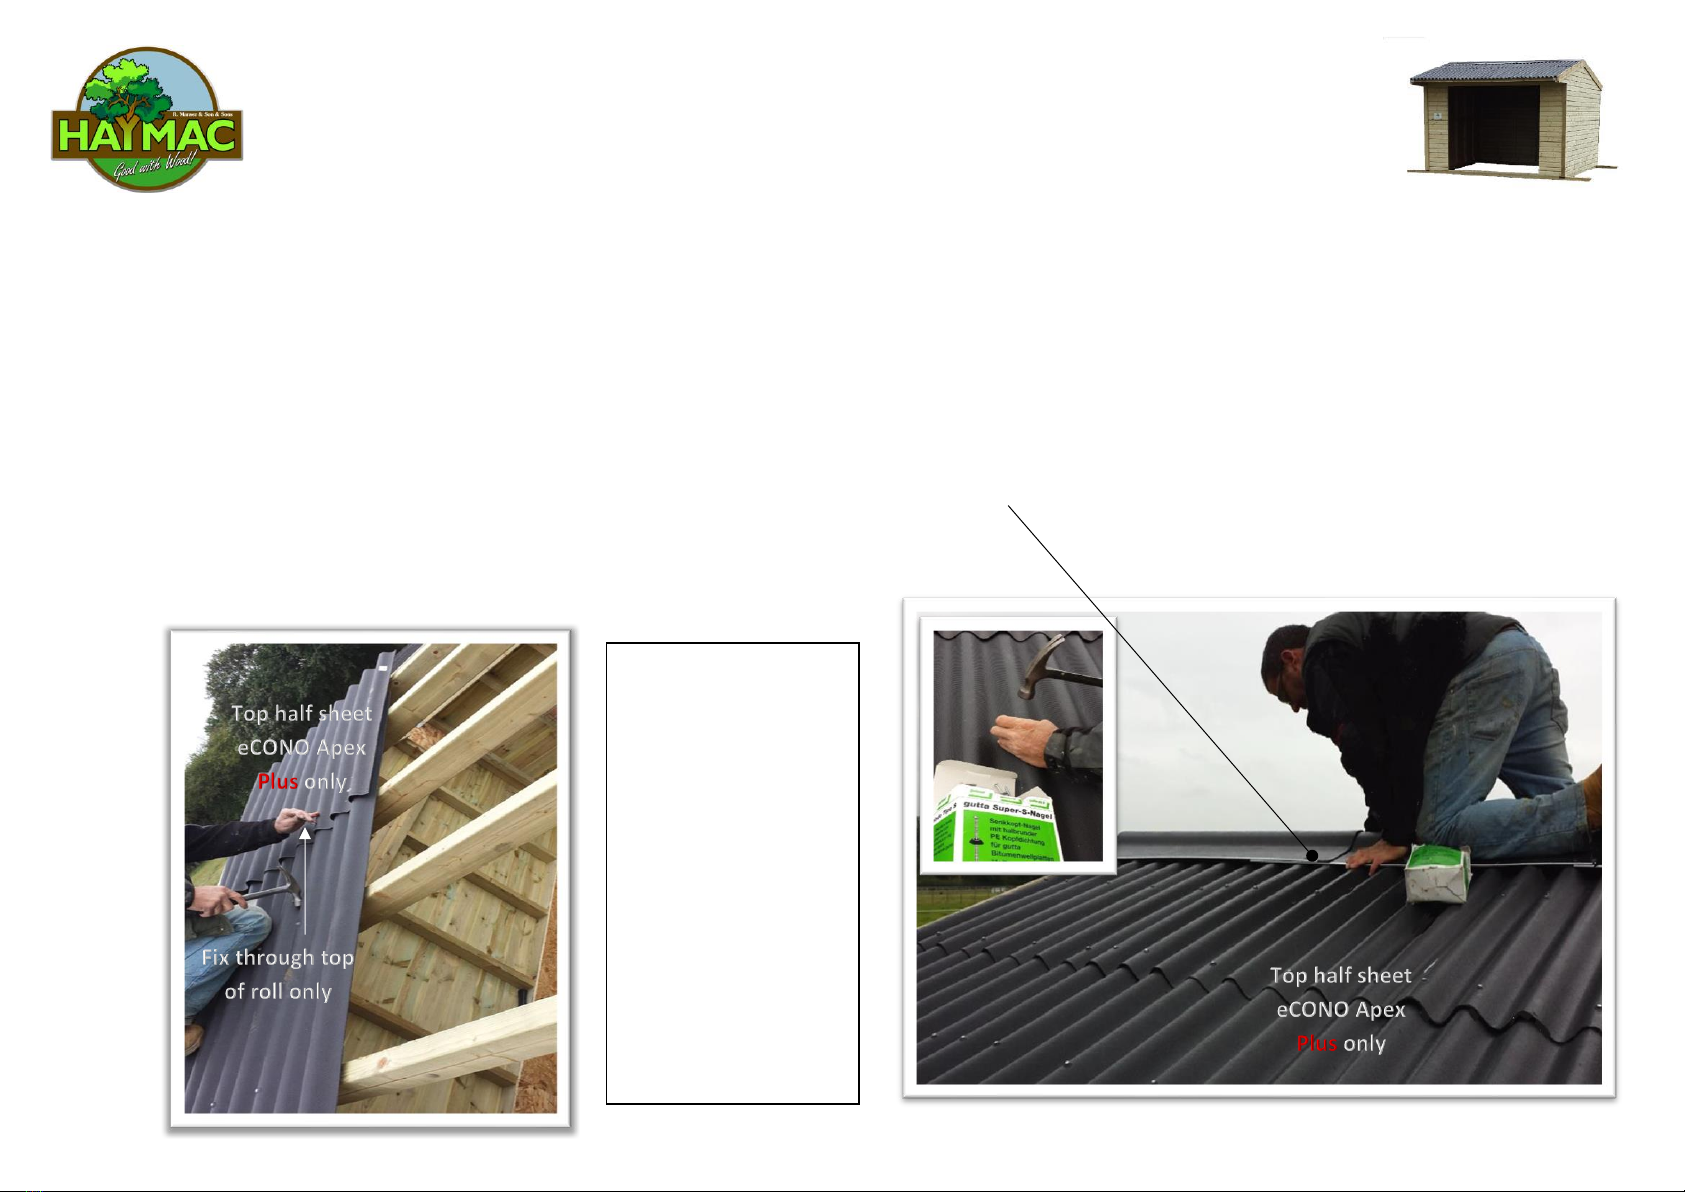
Fit the first full-length roof sheets starting with the back, you should start from either the left or right-hand side so that the prevailing wind
direction blows over an over lap and not into an overlap (note 10ft deep shelters only need one full sheet to reach from eave to Apex). Ensure
the edge of the first sheet fits tight into the bargeboard on the gable end and ensure the overlap to back of building is adequate for water run-
off. Make sure you leave a 20mm gap back from the ridgeline, this gap will be covered by the ridge cap. Continue fitting the back run of sheets.
For 12ft deep shelters, fit the half sheet needed directly above the bottom sheet noting a good cover of overlap and 20mm gap at ridgeline.
You should use 20 x roof nails per sheet. Do not put a nail where the next sheet overlaps until the next sheet is fitted (allow min. one roll
overlap). Do not nail the top of the sheet at the first Apex purlin as this will be fixed when the ridge cap is fitted. You may need to stretch
sheets to fit the width of your shelter exactly. Repeat the above for the front section of the roof. Install ridge caps - nail through the bottom of
ridge cap flat section and sheet beneath into the top purlins either side of the Apex - thus fixing the top of the sheet previously left unfixed -
allow 70-100mm overlap between ridges, you should fix the ridge cap on every other top roll of the sheet below. ONLY FIX THROUGH THE TOP
OF A ROLL - not in the gutter - ONLY BANG IN ENOUGH TO GIVE A TIGHT FIT OF THE NAIL CAP TO THE SHEET, OR YOU WILL DISTORT THE
SHEET PROFILE.
PLEASE NOTE - 10ft
deep shelters only use a
full sheet - the half
sheet shown in the
picture is not required -
the half sheet is only
used on the 12ft deep
shelter.
On 10ft deep Apex
shelters, a full sheet
covers the roof from
Apex to eaves.

12x10 & 12x12 eCONO Apex & Apex PLUS Shelter
FITTING INSTRUCTIONS
Fit the front and rear corner cover fillets, screw in place using 2 x No.4x70mm screws - top, middle & bottom. For eCONO Apex Plus shelters, fit the
gallows brackets using No.5x100mm screws, one top & bottom. Fit the front fascia timber (18mmx145mm) using 8 x No.5x50mm screws.

12x10 & 12x12 eCONO Apex & Apex PLUS Shelter
FITTING INSTRUCTIONS
Install the kick boarding sheets following the design below - the kickboards will have letters marked in pencil on them.
Start with the first board hard into the corner, fix using 40mm galvanised nails. Start with A - finish with H.
A
B
C
D
E
F
G
H
12x10 & 12x12 eCONO Apex & Apex PLUS Shelter
FITTING INSTRUCTIONS
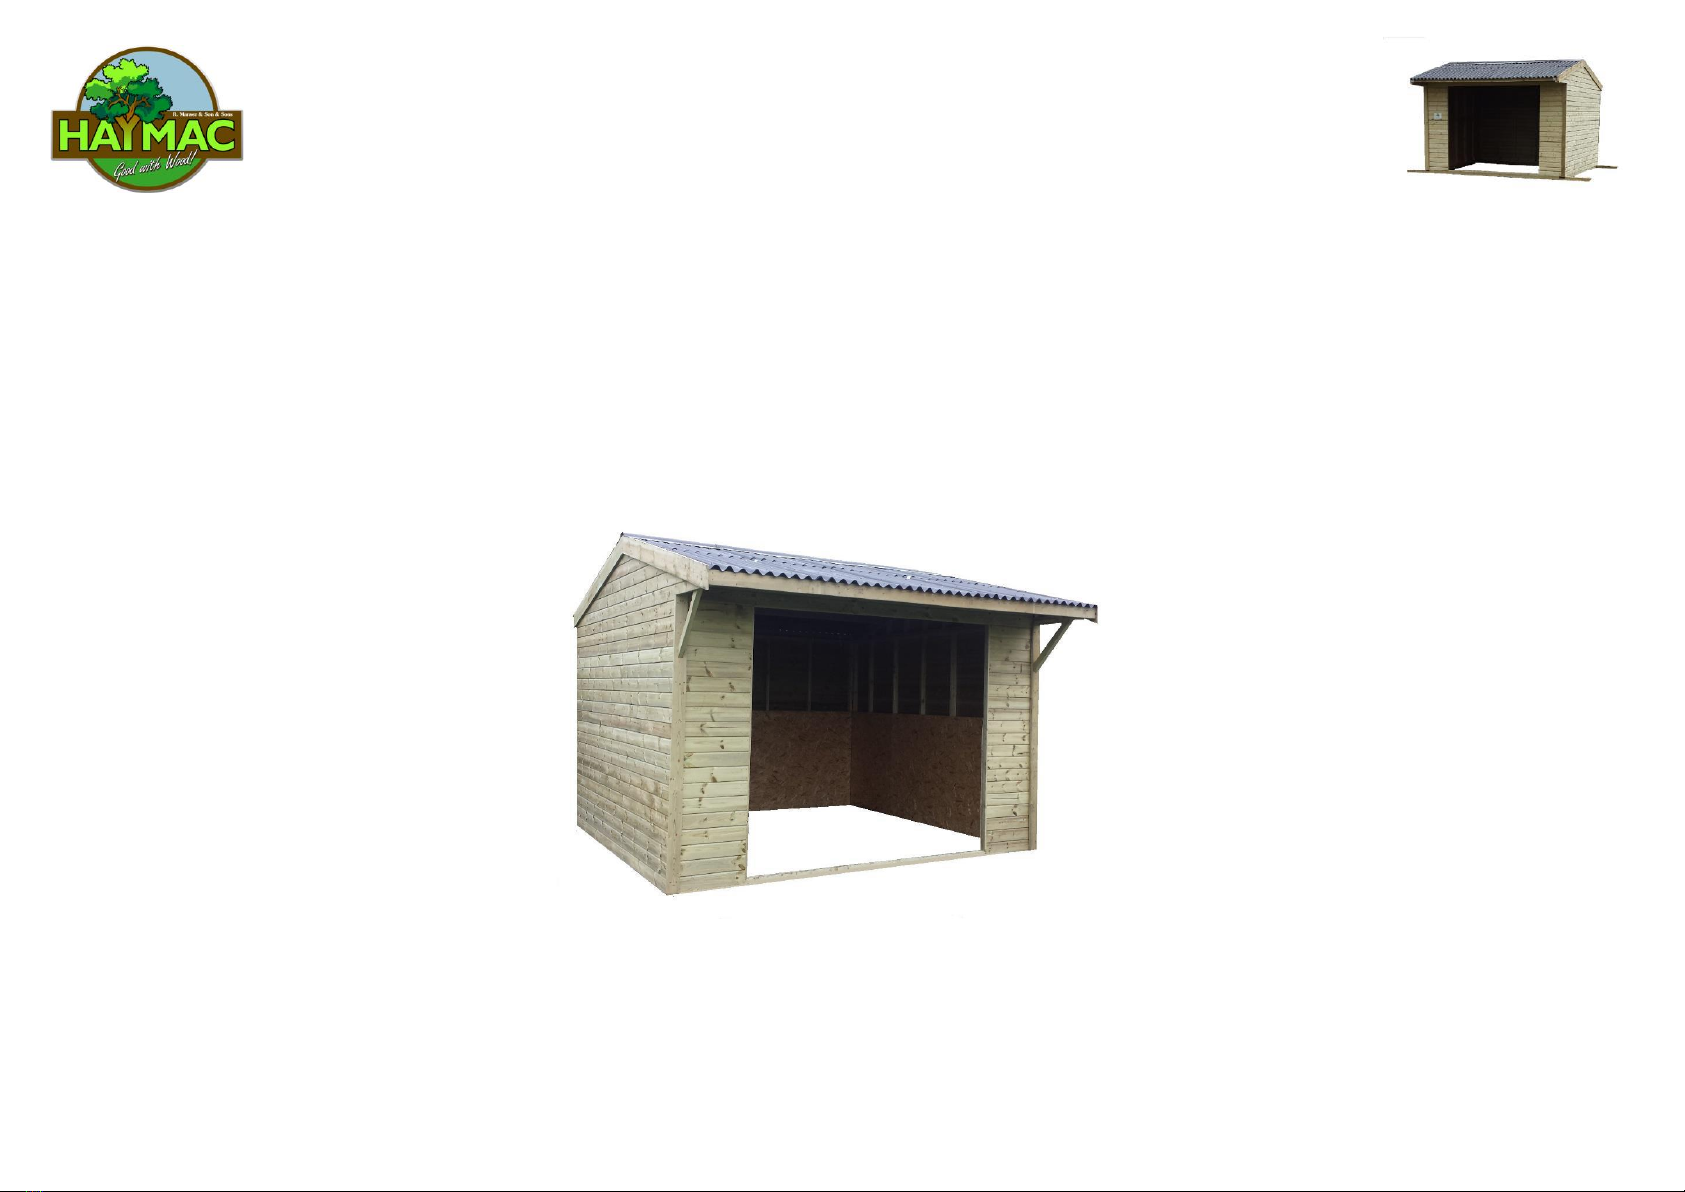
Completed shelter
PLEASE FIX YOUR SHELTER DOWN TO STOP YOUR SHELTER BLOWING OVER IN HIGH WINDS.
We suggest bolting down to a concrete slab or using fence posts driven into the ground a minimum of 2ft on all corners
and bolted to the shelter. The more fence posts you drive in and fix to the shelter, the more secure your shelter will be in
high winds.

12x10 & 12x12 eCONO Apex & Apex PLUS Shelter
FITTING INSTRUCTIONS
eCONO Apex 12 x 10 Materials List
•10 x full black roof sheets
•5 x black ridge caps
•1 x back panel - approx. 3.47m wide
•2 x side panels - approx. 3.0m wide
•1 x front panel - approx. 3.47m wide with door opening
•2 x gable ends
•1 x front height extension panel
•6 x full depth roof purlins
•2 x full depth roof purlins with side add-on for purlins at ridgeline
•2 x reduced depth roof purlins (for first and last purlins in metal hangers - shorter in depth than standard)
•1 x centre canopy support
•21 x M8x100mm coach screws and washers
•1 box (100) x No.5x100mm screws
•24 x No.4x70mm screws - for front & rear corner cover fillets
•250 x roofing nails
•Kickboard lining - 8 x individual kickboards labelled A through H
•500g bag of 40mm galvanised nails

12x10 & 12x12 eCONO Apex & Apex PLUS Shelter
FITTING INSTRUCTIONS
eCONO Apex PLUS 12x12 Materials List
•10 x full black roof sheets
•10 x half black roof sheets
•5 x black ridge caps
•1 x back panel - approx. 3.47m wide
•2 x side panels - approx. 3.6m wide
•1 x front panel - approx. 3.47m wide with door opening
•2 x gable ends
•1 x front height extension panel
•8 x full depth roof purlins
•2 x full depth roof purlins with side add-on for purlins at ridgeline
•2 x reduced depth roof purlins (for first and last purlins in metal hangers - shorter in depth than standard)
•2 x gallows brackets
•1 x front fascia board - 18mm x 145 x approx. 3.5m
•1 x centre canopy support
•21 x M8x100mm coach screws and washers
•1 box (100) x No.5x100mm screws
•24 x No.4x70mm screws - for front & rear corner cover fillets
•8 x No.5x50mm screws - for front fascia board fixing
•400 x roofing nails
•Kickboard lining - 8 x individual kickboards, labelled A through H
•500g bag of 40mm galvanised nails

12x10 & 12x12 eCONO Apex & Apex PLUS Shelter
FITTING INSTRUCTIONS
YOU WILL NEED THE TOOLS BELOW TO INSTALL YOUR SHELTER
6ft Level, hammer, tape measure, Posi-drive No.2 screwdriver, 13mm socket wrench or spanner, ladder.
HEALTH & SAFETY
You have chosen to fit your shelter yourself - please be very careful during construction
•DO NOT INSTALL YOUR SHELTER DURING PERIODS OF HIGH WINDS.
•MAKE SURE YOU WEAR YOUR PERSONAL PROTECTIVE EQUIPMENT (not supplied).
•PLEASE ENSURE THAT WHEN USING A LADDER THAT IT HAS BEEN INSPECTED AND IS FREE FROM FAULTS.
•ALWAYS HAVE SOMEONE WITH YOU TO ‘FOOT’ THE LADDER WHILE YOU CLIMB THE LADDER.
•ENSURE THAT THE LADDER IS USED ON STABLE, HARD GROUND.
•TAKE EXTRA CARE WHILE WORKING AT HEIGHT.
Other manuals for eCONO Apex
1
This manual suits for next models
1
Table of contents
Other HAYMAC Shelter manuals


