manuals.online logo
Brands
  1. Home
  2. •
  3. Brands
  4. •
  5. hayneedle
  6. •
  7. Outdoor Furnishing
  8. •
  9. hayneedle Belham Living Santa Clara Hexagonal Polycarbonate... User manual

hayneedle Belham Living Santa Clara Hexagonal Polycarbonate... User manual

For assistance with assembly, please contact
Customer Care Center
1-888-880-4884
ITEM NAME: Belham Living Santa Clara Hexagonal Polycarbonate Gazebo
SKU:
PACA054-1 & PACA054-2
1/9
PRE-ASSEMBLY PREPARATION:
!THISPACKAGE MAY CONTAIN SMALL ITEMS WHICH SHOULD BE KEPT AWAY FROM CHILDREN
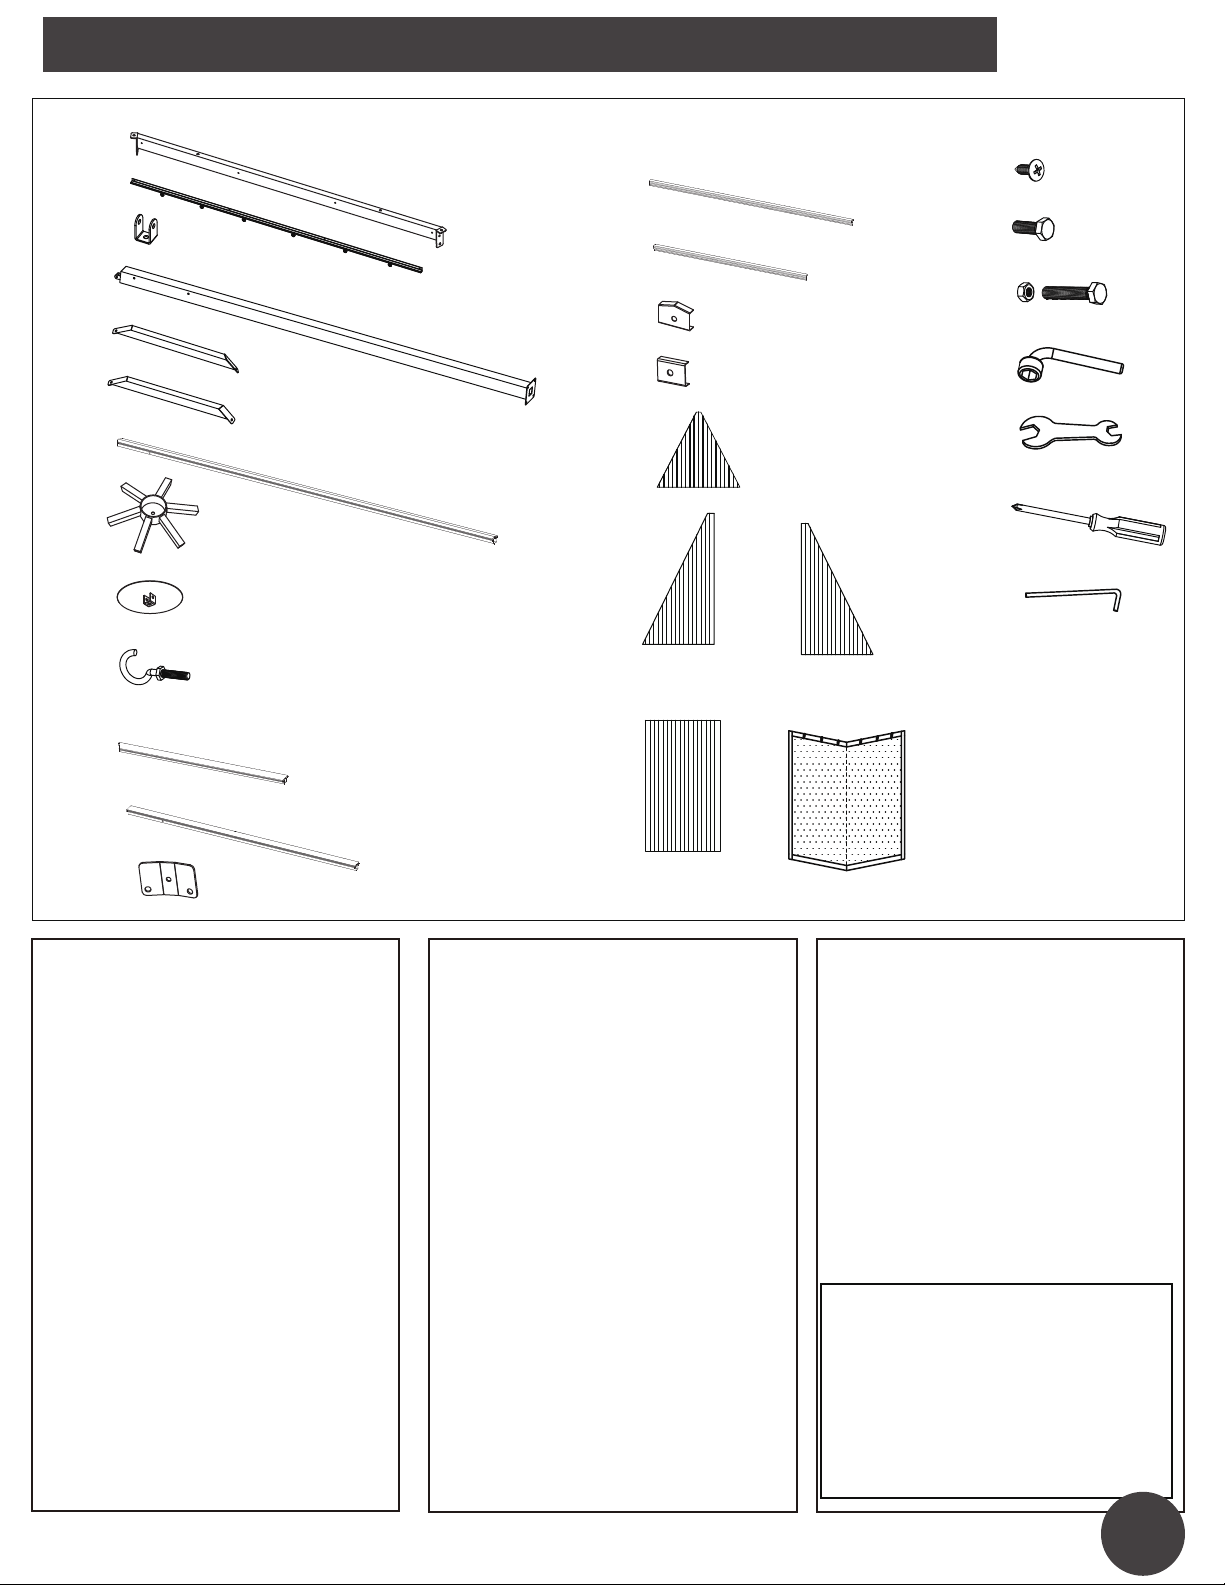
•Please check that all parts and hardware are included before beginning assembly.
•Save all packing materials until assembly is complete to avoid accidentally discarding smaller
parts or hardware.
•Read through the preparation and assembly instructions in full before beginning assembly
•Please use CAUTION AND CARE WHEN LIFTING the product to avoid personal injury and
(or) damage to the product.
to reduce the risk of personal injury and damage to product or surroundings.
Always install on level ground utilizing ground stakes. This garden
permanently staked or attached to concrete floor or platform.
house cannot be
Keep all children and pets away from assembly area.
Begin assembly no less than 6 feet from any obstruction such as fence, garage, house,
overhanging branches, clothes line or electrical wires.
Some parts may contain sharp edges, wear protective gloves if necessary. At least two or
more people are recommended for safe assembly.
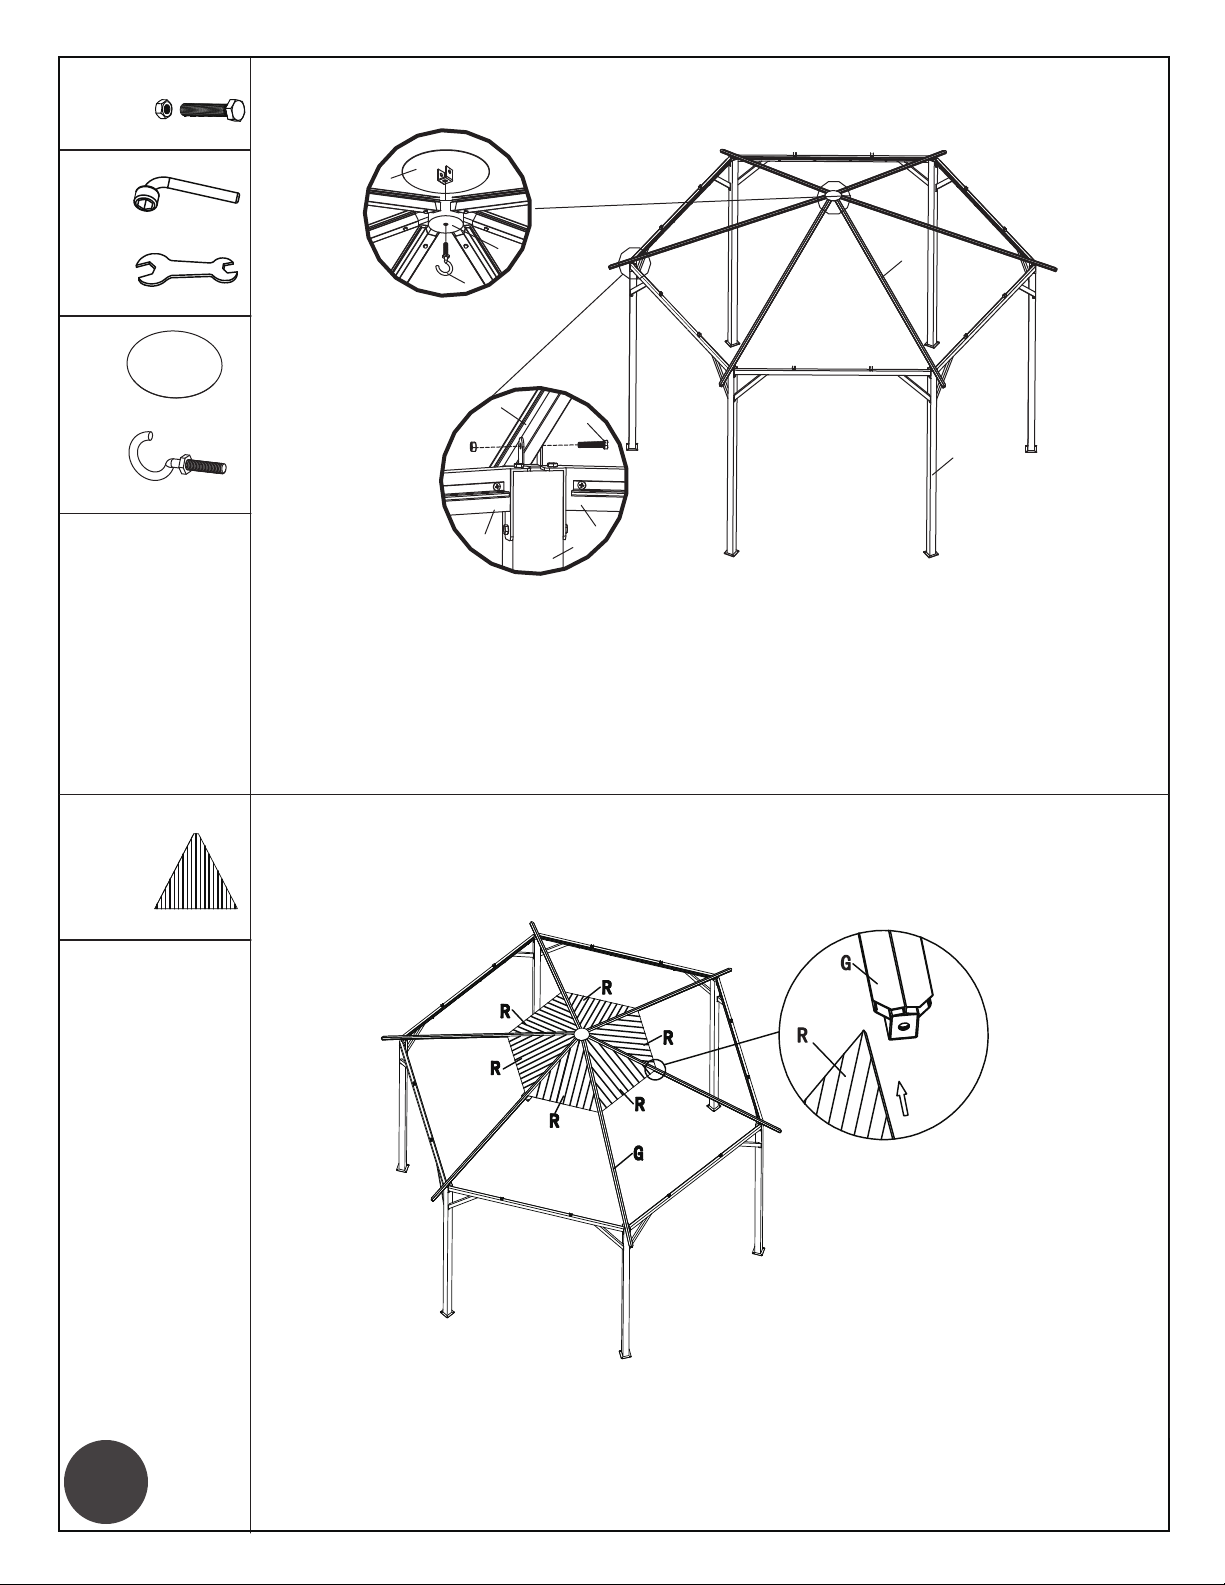
Please have a ladder and a rubber mallet ready before assembly.
Note:
It is very important to read and follow these Safety Precautions before assembly and during the use of this
product.
•
•
•
•
•
Notice:
This gazebo / pergola is intended as a temporary shade structure, not a permanent structure.
As a result the canopy / top must be removed during heavy rain, winds, or inclement weather
including but not limited to thunderstorms, hurricanes, snow , and sleet.
Failure to do so will risk damage to the canopy / top and the structure of the unit itself.
Damage occurred to the unit from not removing the top is not covered by the manufacturer.
1) Keep all flame and heat sources away from this tent fabric. This tent is made with fabric that meets CPAI-84
specifications for the flame resistance. It is not fire proof. The fabric will burn if left in continuous contact
source. The application of any foreign substance to the tent fabric may render
sistance properties ineffective.
2) When assembling and using this product, basic safety precautions must always be followed to reduce the
risk of personal injury and damage to product or surroundings. Do not cook
3)
4) Garden house fabrics are water resistant but not waterproof and may leak during
precipitation. Fabrics will fade from direct exposure to sunlight.
or barbeque under the canopy.
MAINTENANCE
AND CARE
TIPS GARDEN HOUSEROF
Please properly tighten all hardware and perform periodic inspections during usage for
cracked welds or loose nuts or bolts.
5)
with any flame
the flame-re
2/9
K Cross bar 6
A
B
C
D
E
F
G
H
I
J
K
L
M
AA
BB
CC
DD
EE
FF
GG
N
O
P
Q
R
S
V
T
U
A Cross Beam 6
B Netting rail 6
C U-Shaped bracket 12
D Corner Post 6
E Support bar 6
F Support bar 6
G Roof tube 6
H Roof hub 1
I Roof hub cover 1
J Hook 1
L Middle roof tube 12
M Washer plate 6
Part Description Quantity
N Roof rim 12
O Roof rim 6
P Tube end cover 6
Q Tube end cover 12
R Roof sheet 6
S Roof sheet 6
T Roof sheet 6
U Roof sheet 6
V Netting panel 6
Part Description Quantity
AA Self tapping screw 24
BB Hex bolt 96
CC Hex bolt & Nut 18
DD Spanner 1
EE Spanner 1
FF Philip screw
driver
GG Ground stake 12
Part Description Quantity
1
Important: Do not
remove the safety film
until Step 6 and
are ready to place
the roof sheets on
the frame.
3/9
PART LIST
1.1 Attach two U-shaped brackets (C) onto the top of each cross beam (A)
with bolts (BB) using spanner (DD). (Fig. 1.1)
1.2 Attach two netting rails (B) to the inner side of each cross beam (A) with four
screws (AA)
using Philips screwdriver (FF). (Fig. 1.2)
Step 2
Step 1 Attaching the netting rail and U-bracket
Erecting the main frame
2.1 Join two corner posts (D) with one cross beam (A) at the top with four bolts (BB)
using spanner (DD) until the whole main frame is erected.
Dx6
DD
FF
Ax6
Bx6
Cx12
AAx24
BBx 12
BBx 24
DD
AA
AA
AA
AA
AA
A
C
B
A
A
C
B
BB
DD
D
D
DD
AAA
A
A
A
AA
D
BB
BB
BB
Fig. 1.1
Fig. 1.2
4/9
STEP-BY-STEP ASSEMBLY:
C
Step 3 Attaching Support Bars
Step 4 Assembling the Roof Frame
3.1 Install supports bars (E)/(F) between post (D) and cross beams (A) with bolts (BB) using
spanner (DD) to stabilize the main frame. (Note: Attach the support bars (E & F) to
the corner post (D) first loosely then to the cross beam (A) before fully tightening bolts
for ease of assembly).
4.1 Snap one roof tube (G) into each receiver of roof hub (H) until an audible click is heard.
Ex6
Fx6
BBx24
DD
Gx6
Hx1
AA
5/9
G
H
G
G
G
G
G
G
G
G
H
GH
G
G
G
Step 5 Attaching the Roof Frame to the Main frame
5.1 From a free standing ladder in the center of the main frame, place the complete roof
5.3 Cover the roof hub (H) with top hub cover (I), secure the top hub cover (I) and the roof
hub (H) firmly by screwing the hook (J) through the roof hub (H) into the top hub cover (I).
5.2 Secure roof tubes in the bracket at the top of corner posts with bolts and nuts (CC)
using spanners (DD) and (EE). (Fig.5.1)
Step 6 Installing Roof Sheets on Roof Tubes
6.1 Slide one roof sheet (R) into the rails between each two roof tubes (G) until
it firmly fits the rails.
CCx6
DD
EE
frame on the main frame.
Ix1
Jx1
Rx6
Fig. 5.1
Fig. 5.2
(Fig. 5.2)
6/9 Important: To avoid scratching the roof sheets only remove
Safety Film as you are assembling roof sheets onto the frame.
G
D
I
J
H
GCC
A
D
A
G
8.1 Secure the top of two middle roof tubes (L) onto one washer
Step 7 Attaching Cross Bars
Step 8 Installing Middle Roof Tubes
7.1 Attach cross bars (K) to the bottom of roof sheets (R).
plate (M) with bolts (BB).
Secure the washer plate onto the roof tube (G) with bolt (BB) using wrench (DD).
Do not fully tighten bolts until the end of Step 8.2 (Fig. 8.1)
Kx6
Fig. 8.1
Fig. 8.2
8.2 Secure the middle roof tubes (L) onto the cross beams (A) with bolts and nuts (CC)
.2)
Fully tighten all bolts and nuts. (Fig.8.1 & Fig. 8.2)
A
Mx6
Lx12
CCx12
BBx18
DD
EE
using spanners (DD) and (EE). (Fig.8
8.3
M
A
7/9
K
K
K
K
K
KK
K
G
RR
L
K
L
L
L
LL
L
L
L
L
L
L
CC
C
L
K
L
L
Step 9 Installing Roof Sheets
Step 10
9.1 Slide roof sheets (S), (U) and (T) into the rails of roof tubes (G) and middle
roof tubes (L) until they firmly fit the rails.
Attaching Roof Rims
10.1 Cover the bottom of roof sheets (S) and (T) with roof rims (N).
10.2 Cover the bottom of roof sheets (U) with roof rims (O).
8/9
Step 11
Step 12
Installing Tube End Covers
Attaching Netting Panels and Staking the Garden House
11.1 Cover the bottom of roof tubes (G) with tube end covers (P) with bolts (BB)
using spanner (DD). (Fig. 11.1)
11.2
Cover the bottom of middle roof tubes (L) with tube end covers (Q ) with bolts (BB)
using spanner (DD). (Fig. 11.2)
P
18
6
12.1 Identify the top of the netting panels (V), unzip one of the netting panels and place the
zippers in the middle of each cross beam (A). From inside the frame hang the netting panels
onto the hooks in the netting rails (B) at the holes at the top of the netting panels (V).
12.2 Secure each netting panel (V) to the corner post (D) with the ties at the corners of
the netting panels.
12.3 Adjust corner posts to stand upright and level. Hammer two stakes (GG) through the post
base of each corner post (D) into soft ground. (Fig. 12.2)
Fig. 11.2
Fig. 11.1
(Fig. 12.1)
Fig. 12.1
Fig. 12.2
/99
Q
Q
Q
Q
Q
Q
QQ
P
P
P
P
P
P
Q
Q
Q
Q
V
V
VV

This manual suits for next models

2

Other hayneedle Outdoor Furnishing manuals

hayneedle NWF004-2 User manual

hayneedle

hayneedle NWF004-2 User manual

hayneedle DAS005-1 User manual

hayneedle

hayneedle DAS005-1 User manual

Popular Outdoor Furnishing manuals by other brands

Crivit 273307 instructions

Crivit

Crivit 273307 instructions

Premium Poly Patios Luxcraft Crestville Classic CV-5CPG quick start guide

Premium Poly Patios

Premium Poly Patios Luxcraft Crestville Classic CV-5CPG quick start guide

Everbloom Cornerstone Raised Garden Bed installation guide

Everbloom

Everbloom Cornerstone Raised Garden Bed installation guide

Suncast WRP7000 Assembly instructions

Suncast

Suncast WRP7000 Assembly instructions

Sunjoy L-GZ501PST Assembly instructions

Sunjoy

Sunjoy L-GZ501PST Assembly instructions

SELT SB500 manual

SELT

SELT SB500 manual

tepro ROWA instruction manual

tepro

tepro ROWA instruction manual

Country Living SPRINGFIELD TETE-A-TETE - WHITE owner's manual

Country Living

Country Living SPRINGFIELD TETE-A-TETE - WHITE owner's manual

ALDI 47052-15 user guide

ALDI

ALDI 47052-15 user guide

Courtyard Creations KUS128U Assembly instructions

Courtyard Creations

Courtyard Creations KUS128U Assembly instructions

sweeek. Napoli CCW004 manual

sweeek.

sweeek. Napoli CCW004 manual

Liberty Garden Everwood Savannah SR-K-620PBD Assembly instructions

Liberty Garden

Liberty Garden Everwood Savannah SR-K-620PBD Assembly instructions

Broyhill CRESTFIELD GBO23-925-1 Assembly instructions

Broyhill

Broyhill CRESTFIELD GBO23-925-1 Assembly instructions

Greemotion GM-1011 quick start guide

Greemotion

Greemotion GM-1011 quick start guide

PERGOLA SPR10010 instruction manual

PERGOLA

PERGOLA SPR10010 instruction manual

Hanover MONDN5PCBN-SU-T manual

Hanover

Hanover MONDN5PCBN-SU-T manual

BENITO Universal VBU01 quick start guide

BENITO

BENITO Universal VBU01 quick start guide

YitaHome FTPLCG-0229 Assembly instructions

YitaHome

YitaHome FTPLCG-0229 Assembly instructions

manuals.online logo
manuals.online logoBrands
  • About & Mission
  • Contact us
  • Privacy Policy
  • Terms and Conditions

Copyright 2025 Manuals.Online. All Rights Reserved.