HDX SL-THDUS-006B User manual
ITEM#SL-THDUS-006B
SKU#207149520
Use and Care Guide
6-Shelf Storage Unit
Assembly
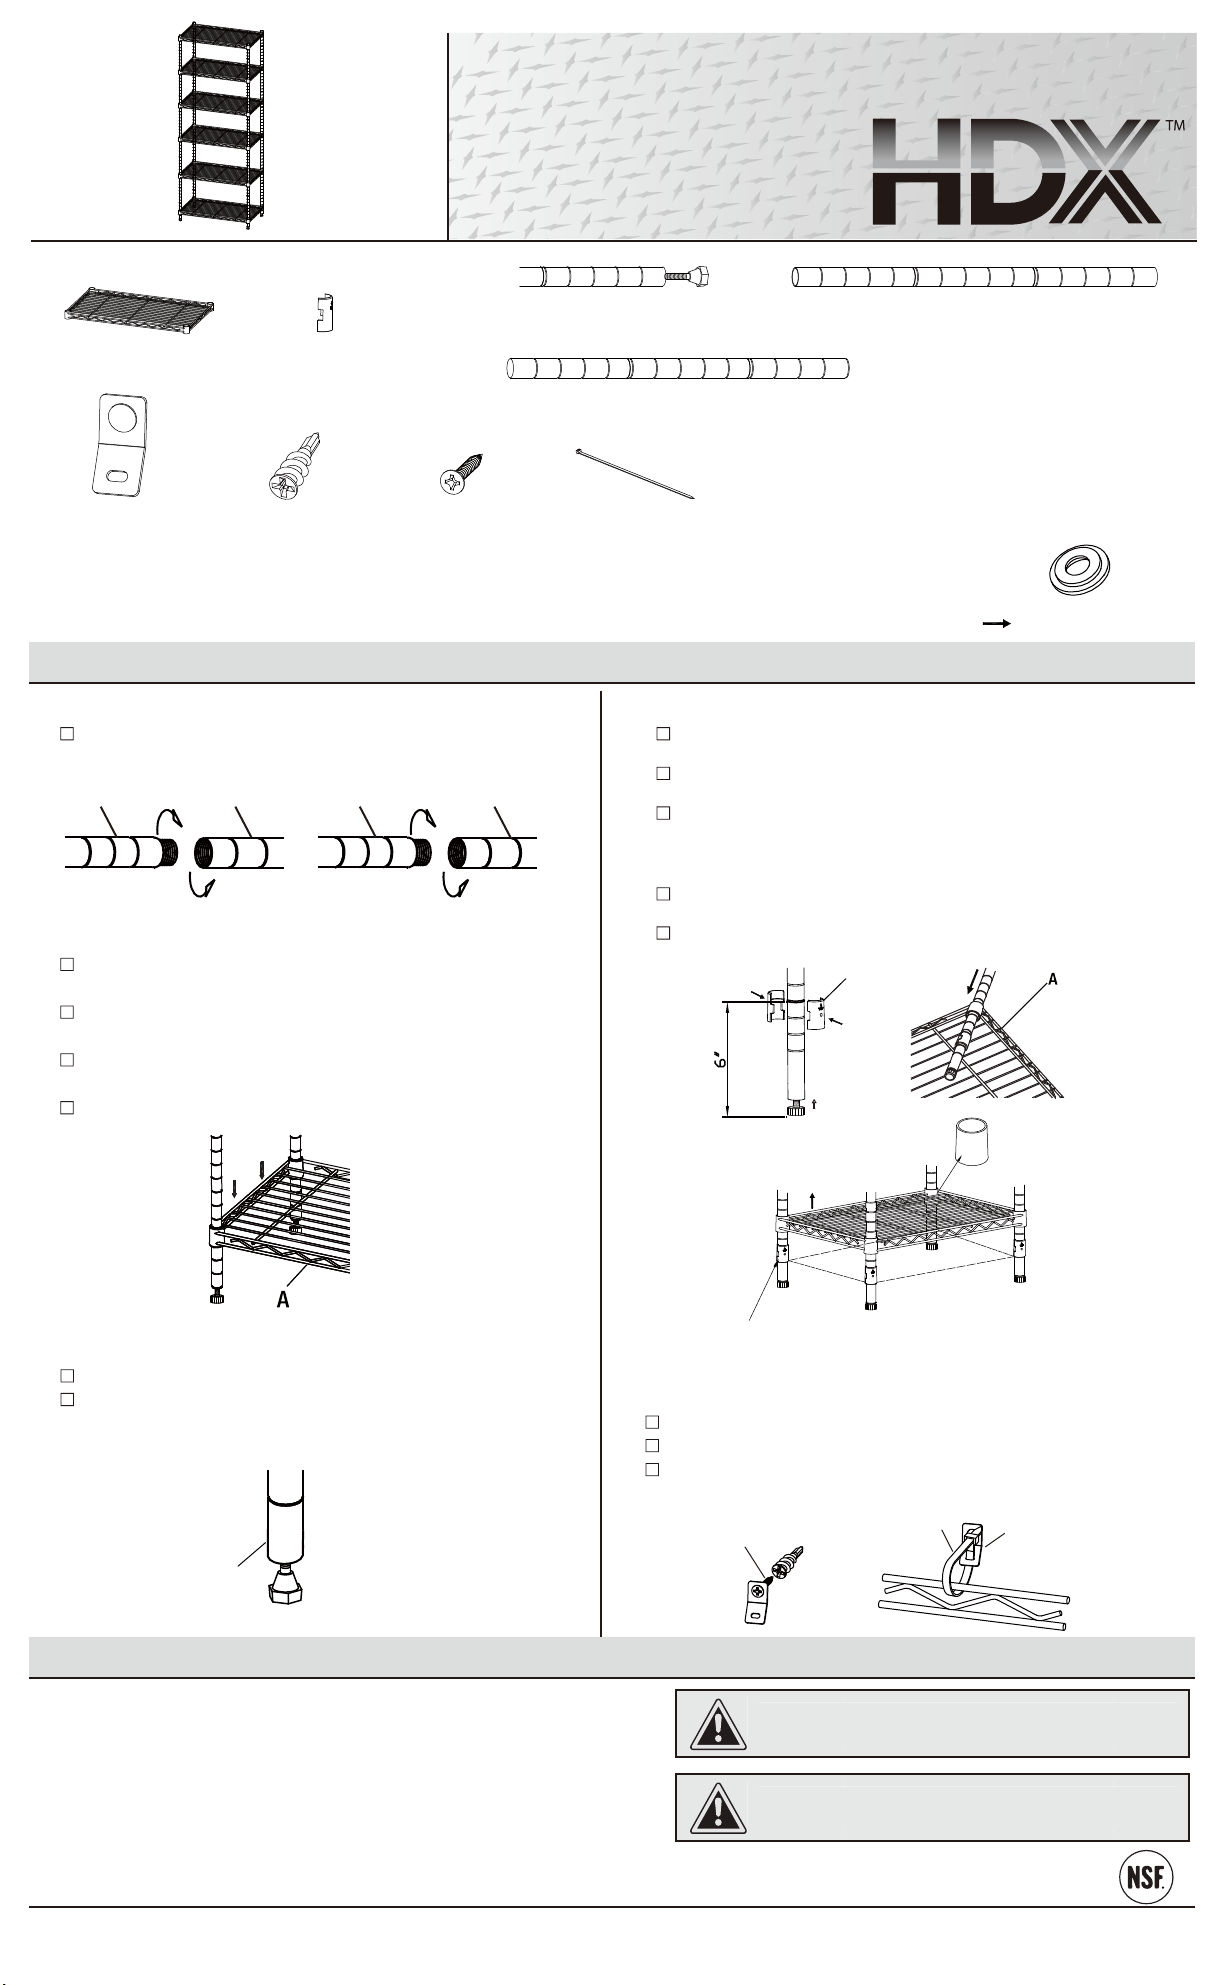
A - Shelf x 6
Assembling the posts
PACKAGE CONTENTS
DC
Screw a bottom pole (C) to middle pole (D), middle pole (D) to top
poles (E). Repeat for the remaining bottom, middle & top poles.
Locate the desired position of the bottom shelf (A). Ensure that it is
no more than 6 inch from the floor.
Place two tapered sleeves (B) into the appropriate groove on each
pole assembly. Make sure the “UP”arrow is facing up.
Place the shelf (A) on its side and slide each pole assembly with
tapered locks through the bottom of the shelf (A) until snug.
Make sure that the shelf corner cylinders are positioned
over the slip sleeves.
After all pole assemblies are in place, position the unit in the upright
position.
Push down on each corner of the shelf (A), ensuring the shelf (A) is
in a fully locked position.
★Please read the manual carefully before you start assembling★
★Please inspect box contents to ensure you have received all components★
Note: The black circular plastic tops in between the shelves are used only for
packaging purposes. They are NOT NEEDED. Please discard.
1Assembling the bottom shelf
2
C - Bottom Poles with Levelers
Pre-installed x 4
D - Middle Poles with Connector
Pre-installed x 8
E - Top Poles with Pole Connector & Caps
Pre-installed x 4
B - Tapered
Sleeves x 48
Spare Plastic
Tapered Sleeves x 2
F - Washer x 2 G - Anchor x 2 H - Screw x 2 I - Plastic tie x 2
IF
F
G
H
black circular
plastic tops
B
Note:
The tapered sleeves must be at the same height for each pole
to ensure the shelf sit on the sleeves levelly.
up
down
NSF
UPSIDE (level side)
HOMEDEPOT.COM
Please contact 1 (855) 439-4663 for further assistance.
customer[email protected]
Between 9 a.m and 4 p.m(Central Time) Monday to Friday
ED
Adding shelves
Locate the desired position of the next lowest shelf and place the
tapered sleeves (B) on to the pole assemblies.
Slide the shelf (A) down from the top of the pole assemblies and
onto the tapered sleeves (B).
Push down on each shelf (A) corner, ensuring the shelf (A) is in
a fully locked position.
Repeat for the remaining shelves (A).
3
Safety Information
Adjusting the levelers
Move the assembly to the desired location.
If required, adjust the levelers on the bottom of the bottom poles
(C) to ensure the assembly is level. Rotate the levelers
counterclockwise to raise the poles, clockwise to lower the poles.
1. Two adults are recommended for ease of assembly. Use care when
handing.
2. Assembly recommended on a soft surface, such as carpet, to a
scratching flooring finish.
3. Discard the black circular plastic pieces. These are used to separate
the shelves for shipping purposes.
4
Tip resistant kit
CAUTION: Do not allow children to climb or
play in or around the shelves.
CAUTION: Each shelf holds up to 250 lbs,
evenly distributed. Do not overload.
Fix to wall to prevent tipping over.
Screw anchor (G) in wall at the height of the top shelf.
Put washer (F) over screw (H), install the screw (H) to the wall and
use plastic tie (I) to connect the washer (F) & the unit.
5
C

F
a
vor
d
e
l
e
e
r
e
l
m
a
nua
l
c
on a
t
e
nc
i
ón a
nt
e
s d
e
c
om
e
nz
a
r
e
l
e
nsa
m
bl
e
F
av
or
de r
evi
s
ar
el
cont
eni
do de l
a caj
a par
a
as
egur
ar
s
e
q
ue s
e han
r
eci
bi
do t
odos
l
os
com
ponent
es
N
o
t
a
:
l
a
s
c
u
b
i
e
rt
a
s
c
i
rc
u
l
a
re
s
d
e
p
l
á
s
t
i
c
o
n
e
g
ro
e
n
t
re
l
o
s
e
s
t
a
n
t
e
s
s
ó
l
o
s
e
u
s
a
n
p
a
ra
p
ro
p
ó
s
i
t
o
s
d
e
e
m
p
a
q
u
e
.
N
O
S
E N
EC
ES
I
T
A
N
. F
a
vor
de
de
se
c
ha
r
l
a
s.
A
se
g
ur
a
r
se
que
l
a
f
l
e
c
h
a
"
U
P
"
e
st
é
ha
c
i
a
a
r
r
i
ba
.
A
se
g
ur
a
r
se
que
l
os c
i
l
i
ndr
os de
l
a
s e
squi
na
s de
l
e
st
a
nt
e
e
st
é
n c
ol
oc
a
dos
sobr
e
l
os
m
a
ng
ui
t
os
de
sl
i
z
a
nt
e
s.
6
D- Postes medios con conector
Pre-instalados x 8
F- Arandela x 2
G- Anclaje x 2
H- Tornillo x 2
I- Amarre plástico x 2
Arriba
Equipo resistente a la inclinación
l
os
m
a
ng
ui
t
os
a
hu
sa
dos
de
be
n
e
st
a
r
a
l
a
m
i
sm
a
a
l
t
ur
a
pa
r
a
c
a
da
post
e
,pa
r
a
a
se
g
ur
a
r
que
e
l
e
st
a
nt
e
se
a
si
e
nt
e
ni
ve
l
a
do e
n l
os
m
a
ng
ui
t
os.
N
ot
a
:
Atornillar un poste inferior (C) al poste medio (D), el poste m
edio (D) a los
postes superiores (E). Repetir para los dem s postes
inferiores, medios
y superiores
.
Atornillar el anclaje (G) en la pared a la altura del estante s
uperior.
Colocar la arandela (F) sobre el tornillo (H), instalar el torn
illo (H) a la pared y usar el
amarre pl stico (I) para conectar la arandela (F) y la unidad
.
l
a
s
c
u
b
i
e
rt
a
s
c
i
rc
u
l
a
re
s
d
e
p
l
á
s
t
i
c
o
n
e
g
ro
Fijar a la pared para prevenir que se caiga
Ensamblaje
á
HOMEDEPO
T
.COM
Póng
ase en contacto con el 1 (855) 439-4663 par
a asistencia adicional.
customer
.solutions@y
ahoo
.com
Entr
e las 9 a.m y las 4 p
.m (Hor
a del Centr
o) de lunes a viernes
á
207149520
SL-THDUS-006B
250
D
C
E
D
C
B
NSF
UPSIDE (level side)
INVERTIDO (lado del suelo)
Abajo
I
F
F
G
H
48
Unidad de almacenaje de
6 estantes
This manual suits for next models
1
Other HDX Indoor Furnishing manuals


