Healthcraft P.T.Rail User manual

P.T.Rail™
PT-WR(28/32)(R/L)-(PCW/SS)
(DC110 - RevE)
P.T.Rail™Mast
PT-WRM-(CRP/PCW/SS)
healthcraftproducts.com

A
2
4
3
1
2
HW155 HW154
HW241

B
11
13
8
7
12
9 10
5 6
3
HW513 HW183
HW402 HW407
HW317
WR111C
HW182

C
???
Fe
4
56
7
12 34

E
32-34" /
813-864mm
28-32" /
711-813mm
D
???
5
1,2 435
MIN
2"
51mm

F
6
12
34
HW241
HW155
HW154

G
7
1
23
45
HW513
HW183
HW407
HW241
HW155
HW154
HW402
WR111C
HW182

9" / 229mm
FE / LDPE / NBR
16.7lbs
7.57kg
FE
15.0lbs
6.80kg
FE / NBR
2.60lbs
1.18kg
H
8"
203mm 7.5"
191mm
38.5"
978mm
4.0" / 102mm
MAX
400lbs
181kg
MAX
400lbs
181kg
28.5" / 724mm
32.5" / 826mm
4.0" / 102mm
5.5" / 140mm
4.5" / 114mm
9" / 229mm
8"
203mm
5.5" / 140mm
4.5" / 114mm
6.0" / 152mm
Ø 1.5" / 38.1mm
Ø .390"
9.9mm
Ø .390"
9.9mm
8

E
I
1 3 3
1 3 3
9

English
OVERVIEW
Thank you for choosing the P.T.Rail system from HealthCraft. Please read
and understand the instructions in this manual; keep manual for future
reference. It is your responsibility to see that your P.T.Rail system is
properly assembled, installed, and cared for. Failure to follow instructions in
this manual could result in serious injury or death. If you are not equipped
to undertake the outlined work, we would recommend that you have your
P.T.Rail system installed by a qualified contractor.
The P.T.Rail is a high quality, commercial grade, fold down rail for use
beside a toilet. The P.T.Rail features an offset handle to help reduce strain
when gripping the lower rail. The P.T.Rail is intended for moderate vertical
and horizontal load bearing to provide sitting and standing toilet support for
people with reduced mobility.The P.T.Rail is intended to bear weight ONLY
when the handle is in the down position; the handle is not intended to bear
weight in any other position. The P.T.Rail handle is intended to be folded up
when not in use.Afriction hinge ensures that the handle will not
inadvertently lower when it is in the up position. The P.T.Rail is installed
with appropriate fasteners to a structural wall.
The Floor Mast is a floor mounted structural member intended to provide a
mounting surface for a P.T.Rail (in cases where wall fastening is not an
option). The Floor Mast is installed with appropriate fasteners to a
structural floor. The P.T.Rail is height adjustable on the Floor Mast. Must
use supplied fasteners to install P.T.Rail to Floor Mast.
The maximum user weight for this product is 400lbs / 181kgs. Note:
Product is not intended to support full body weight. The P.T.Rail and Floor
Mast are not to be used in any other way than described above.
WARRANTY
All HealthCraft Products are covered by a one year limited warranty with
the exception of hand grips which are subject to normal wear. Buyer
hereby indemnifies, agrees to hold harmless and defend HealthCraft
Products Inc. from and against any and all liabilities, claims, (founded and
unfounded), losses, damages, costs and expenses (including without
limitation consequential damages and reasonable professional fees)
resulting from buyers specification, application, or improper use of goods
described hereon; buyers omission or neglect.
HealthCraft Products Inc. does not assume any liability for damage
resulting from services performed by others or faulty installation, misuse or
misapplication of goods sold by HealthCraft Products Inc.
HealthCraft Products Inc. shall not be liable for prospective profits or
special, indirect, or consequential damages, or for the cost of any
corrective work done without HealthCraft Products Inc. prior approval.
HealthCraft Products Inc. total liability hereunder shall in no event exceed
the purchase price of the goods specified hereon.
Specifications subject to change without notice.
HealthCraft Products Inc.
2790 Fenton Road
Ottawa, Canada
K1T 3T7
DELIVERYCONTENTS - P.T.RAIL FIGUREA.
1. P.T.Rail
2. Washer, 1/4", Lock (x5)
3. Washer, 1/4", Flat (x5)
4. 1/4" x 3" length Lag Bolt (x5)
DELIVERYCONTENTS - FLOOR MAST FIGURE B.
5. Floor Mast
6. Clamp Plate
7. Bolt, 3/8"-16 x 3", S/S (x4)
8. Plastic Cover Sleeve (x4)
9. Vinyl Cap (x4)
P.T.RAIL INSTALLATION WARNINGS FIGURE C.
1. P.T.Rail must be installed to walls that are structurally sound. Add wood
blocking if required.
2. If installation into concrete wall is required, we recommend sleeve or
wedge type anchors suitable for floor construction.
3. CAUTION - Do not install if structure behind wall is unknown.
4. CAUTION - Do not install into metal studs.
5. CAUTION - Only use rail for assistance in down position.
6. CAUTION - Pinch point between rail and wall plate.
7. CAUTION - Rail and bathtub are slippery when wet.
Supplied fasteners for wood structure only (minimum thread engagement
2" / 51mm). If using other fasteners, ensure screw retention force rating at
least 600lbs/272kgs.
FLOOR MAST INSTALLATION WARNINGS FIGURE D.
1. Mast must be installed to floors that are structurally sound.
2. Ideal if mast can be aligned and secured directly to floor joist.
3. If desired installation location does not have adequate structure, add
wood blocking.
4. If installation into concrete floor is required, we recommend minimum
5/16" sleeve or wedge type anchor.
5. CAUTION - do not install if structure under floor is unknown.
SUGGESTED P.T.RAIL POSITIONS FIGURE E.
To determine the optimal mounting location, we recommend holding the
rail in place and simulating the through the motions of a transfer (sitting,
standing, reaching ,etc.). Recommended rail height 32-34" / 813-864mm.
If one rail is installed on both sides of the toilet, suggested width between
top rails 28-32" / 711-813mm.
P.T.RAIL INSTALLATION INTO WOOD STRUCTURE FIGURE F.
1. Hold P.T.Rail in desired location and ensure unobstructed rail travel in
all positions, and the space above rail is adequate to fold.
2. Using wall plate a template, mark off hole locations.
3. Drill pilot holes appropriate for fasteners.
4. Secure P.T.Rail to wall using appropriate fasteners.
FLOORMAST INSTALLATION INTO WOOD STRUCTUREFIGURE G.
1. Secure mast to floor using appropriate fasteners.
2.Attach the clamp plate to the back of the P.T.Rail.
3. Slide clamp plate with P.T.Rail over top of the mast.
4. With P.T.Rail at desired height, tighten bolts to secure in place.
5. Install vinyl caps to cover bolt heads.
TECHNICALDATA
See Figure H.
PRODUCT USAGE
See Figure I.
EC REP
Gate 88
Kanalgatan 45B
Skellefteå, Sweden
93123
10. Nut, 3/8"-16, S/S (x4)
11. Lock Washer, 3/8", S/S (x4)
12. Flat Washer, 3/8", S/S (x4)
13. Hex Key, 5/16"
10

Français
11
APERÇU
Nous vous remercions d’avoir opté pour la rampe P.T.Rail de HealthCraft. Veuillez
lire et vous familiariser avec les instructions du présent manuel; veuillez conserver
ce manuel pour consultation ultérieure. Il vous incombe de veiller à ce que la rampe
P.T.Rail est correctement assemblée, installée et entretenue. Le défaut d’observer
les instructions contenues dans le présent manuel pourrait entraîner des blessures
graves ou la mort. Si vous ne disposez pas de l’équipement nécessaire pour
effectuer le travail décrit, nous vous conseillons de recourir à un entrepreneur
compétent pour l’installation.
La rampe P.T.Rail est d’une grande qualité commerciale, à poignée rabattable pour
utilisation à côté d’une toilette. La P.T.Rail dispose d’une poignée décalée afin de
réduire la tension lors de la préhension de la rampe inférieure. La P.T.Rail est
conçue pour un soutien vertical et horizontal modéré afin de procurer assistance
aux personnes à mobilité réduite pour la position assise et debout lorsqu’elles vont
à la toilette. La P.T.Rail est destinée à supporter le poids UNIQUEMENT lorsque la
poignée est en position vers le bas; la poignée n’est pas conçue pour soutenir le
poids dans toute autre position. La poignée de la P.T.Rail est conçue pour se
rabattre lorsqu’elle n’est pas utilisée. Une charnière de friction garantit que la
poignée ne descendra pas plus bas par mégarde lorsqu’elle est en position
relevée. La P.T.Rail doit être installée à la paroi structurelle au moyen de dispositifs
de fixation appropriés.
Le mât de sol est un élément structurel installé au plancher et destiné à procurer
une surface de montage pour la P.T.Rail (dans certaines situations, la fixation au
mur s’impose). Le mât de sol est installé au moyen de dispositifs de fixation
appropriés à la structure du plancher. La P.T.Rail s’ajuste en hauteur sur le mât de
sol. Il faut utiliser les dispositifs de fixation fournis afin d’installer la P.T.Rail au mât
de sol. Le poids maximal de l’utilisateur pour ces produits est de 181 kg/400 lb.
Remarque : Le produit n’est pas destiné à soutenir entièrement le poids corporel.
La P.T.Rail et le mât de sol ne doivent pas être utilisés autrement qu’il est décrit
ci-dessus.
GARANTIE LIMITÉE À VIE
Les produits sont protégés par une garantie à vie contre les défauts, pièces et
main-d’œuvre, pour l’acheteur initial. La garantie ne s’applique pas aux produits qui
ont été endommagés en raison d’un abus, d’un dommage accidentel, d’une
modification, d’une usure normale, non plus qu’elle s’applique aux matériaux en
bois ou aux taches, ou suite à l’utilisation de produits d’entretien abrasifs et
corrosifs.
L'acheteur, par la présente, indemnise, accepte de garantir et de défendre
HealthCraft Products inc. à l'égard de toutes responsabilités, réclamations (fondées
et non fondées), pertes, dommages, coûts et dépenses (y compris, mais sans s'y
limiter, des dommages consécutifs et des honoraires professionnels raisonnables)
résultant de la spécification des acheteurs, une application ou une mauvaise
utilisation des produits décrits ici; l'omission ou la négligence des acheteurs.
HealthCraft Products inc. décline toute responsabilité pour les dommages résultant
de services rendus par d'autres parties ou suite une installation défectueuse, une
mauvaise utilisation ou une mauvaise application des marchandises vendues par
HealthCraft Products inc. HealthCraft Products inc. ne sera pas responsable pour
les bénéfices potentiels ou dommages spéciaux, indirects ou consécutifs, ou pour
le coût des travaux correctifs réalisés sans l'approbation préalable de HealthCraft
Products inc. La responsabilité totale de HealthCraft Products inc. en vertu des
présentes ne doit en aucun cas excéder le prix d'achat des marchandises, tel que
précisé aux présentes. Les caractéristiques peuvent faire l’objet de à changement
sans préavis.
HealthCraft Products Inc.
2790 Fenton Road
Ottawa, Canada
K1T 3T7
CONTENU À LALIVRAISON - P.T.RAIL FIGUREA.
1. P.T.Rail
2. Rondelle de blocage de ¼ po (x5)
3. Rondelle plate de ¼ po (x5)
4. Boulon de décalage, longueur de ¼ po x 3 po (x5)
CONTENU À LALIVRAISON – MÂT DE SOL FIGURE B.
5. Mât de sol
6. Plaque de serrage
7. Écrou, 3/8 po-16 x 3 po, S/S (x4)
8. Manchon en plastique (x4)
9. Capuchon en vinyle (x4)
AVERTISSEMENTS LORS DE L’INSTALLATION DE LAP.T. RAIL FIGURE C.
1. La P.T.Rail doit être installée sur des parois dont la structure est solide.Ajoutez
des blocs de bois au besoin.
2. Si une installation doit être effectuée sur un mur de béton, nous conseillons
d’utiliser des douilles ou des ancrages précisément conçus pour une structure de
plancher.
3.ATTENTION – Ne pas installer si la structure derrière le mur n’est pas connue.
4.ATTENTION – Ne pas installer dans des colombages métalliques.
5.ATTENTION – Utiliser la rampe uniquement en position basse en cas
d’assistance nécessaire.
6.ATTENTION – Point de pincement entre la rampe et la plaque murale.
7.ATTENTION – La rampe et la baignoire sont glissantes lorsque mouillées.
Les dispositifs de fixation fournis sont uniquement pour une structure en bois
(Engagement minimum du filetage 51mm / 2 po). Si vous utilisez d’autres dispositifs
de fixation, il faut s’assurer que la force de retenue soit d’au moins 272 kg/600 lb.
AVERTISSEMENTS LORS DE L’INSTALLATION DU MÂT DE SOL FIGURE D.
1. Le mât doit être installé sur un sol dont la structure est solide.
2. Il faut idéalement aligner le mât et le fixer directement à une poutre du plancher.
3. Si l’emplacement choisi ne dispose pas d’une structure adéquate, ajoutez des
blocs de bois.
4. Si l’installation doit être effectuée dans du béton, nous conseillons d’utiliser une
douille de 5/16 po ou un ancrage.
5.ATTENTION - Ne pas installer si la structure du plancher n’est pas connue.
EMPLACEMENT SUGGÉRÉ POUR LAP.T.RAIL FIGURE E.
Afin de déterminer l’emplacement optimal pour l’installation, nous conseillons de
tenir la rampe en place et de simuler les mouvements d’un transfert (assis, debout,
atteinte, etc.). La hauteur recommandée de la rampe est de 813-864 cm/32-34 po.
Si une rampe est installée de chaque côté de la toilette, la largeur suggérée entre
les rampes est de 711-813 mm/28-32 po.
INSTALLATION DE LAP.T. RAILDANS UNE STRUCTURE EN BOIS FIGURE F.
1. Tenez la P.T.Rail à l’emplacement désiré et assurez-vous qu’il n’y a aucun
obstacle dans toutes les positions et que l’espace au-dessus de la rampe est
suffisant pour la rabattre.
2.Au moyende laplaque muraleen guisede gabarit, marquez l’emplacement destrous.
3. Percez les trous pilotes correspondant aux dispositifs de fixation.
4. Fixez la P.T.Rail au mur au moyen des dispositifs de fixation appropriés.
INSTALLATION DU MÂT DE SOLDANS UNE STRUCTURE EN BOIS FIGURE G.
1. Fixez le mât au plancher au moyen de dispositifs de fixation appropriés.
2. Reliez la plaque de serrage à l’arrière de la P.T.Rail.
3. Faites glisser la plaque de serrage avec la P.T.Rail au-dessus du mât.
4.Alors que la P.T.Rail est à la hauteur désirée, serrez les écrous pour bien mettre
en place.
5. Installez les capuchons en vinyle sur la tête des écrous.
DONNÉES TECHNIQUES
Voir la Figure H.
UTILISATION DU PRODUIT
Voir la Figure I.
EC REP
Gate 88
Kanalgatan 45B
Skellefteå, Sweden
93123
10. Écrou, 3/8-16 po, S/S (x4)
11. Rondelle de blocage, 3/8 po, S/S (x4)
12. Rondelle plate, 3/8 po, S/S (x4)
13. Clé hexagonale 5/16 po

Español
12
GENERAL
Gracias por elegir el sistema P.T.Rail de HealthCraft. Lea y asegúrese de
comprender las instrucciones de este manual, y guárdelo para referencia futura. Es
su responsabilidad verificar que el sistema P.T.Rail sea ensamblado, instalado y
cuidado correctamente. Si no se siguen las instrucciones de este manual, podrían
producirse como resultado lesiones graves o aun la muerte. Si usted no tiene los
medios para realizar el trabajo que se describe, recomendaríamos que haga
instalar el sistema P.T.Rail por un contratista calificado.
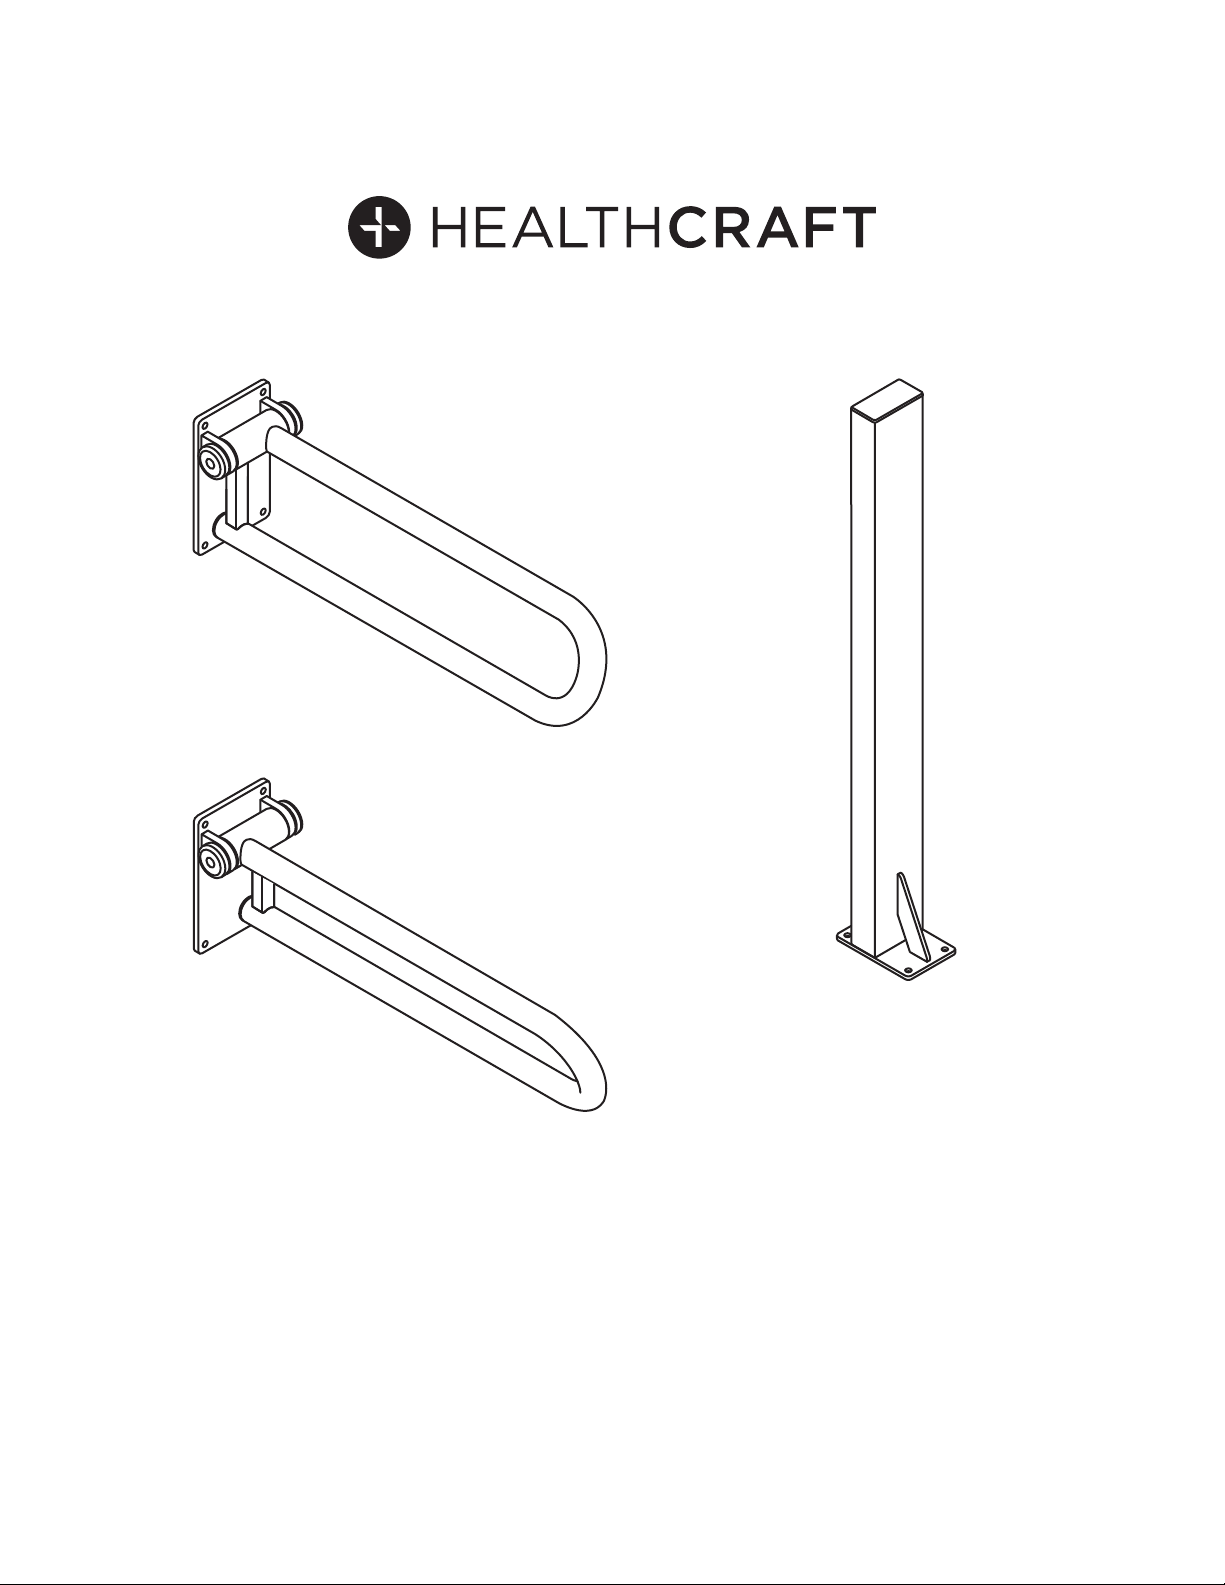
El P.T.Rail es un barandal de alta calidad y de categoría comercial, plegable, para
usar al lado de un WC. El P.T.Rail tiene una agarradera desplazada para ayudar a
reducir el esfuerzo que se hace al sujetar la parte inferior del barandal. El P.T.Rail
ha sido concebido para soportar una carga vertical y horizontal moderada, con el
objetivo de ofrecer apoyo a las personas con movilidad reducida cuando se sientan
en el WC o se ponen de pie. El P.T.Rail ha sido concebido para soportar peso
ÚNICAMENTE cuando la agarradera está baja; la agarradera no ha sido concebida
para soportar peso en ninguna otra posición. La agarradera del P.T.Rail ha sido
concebida para quedar plegada hacia arriba cuando no está en uso. Gracias a una
bisagra de fricción, la agarradera no bajará impensadamente cuando está hacia
arriba. El P.T.Rail se instala con sujetadores apropiados que lo fijan a una pared
estructural.
El mástil para el piso (Floor Mast) es una pieza estructural que se monta sobre el
piso y está pensada para ofrecer una superficie donde montar el P.T.Rail (en los
casos en que no existe la opción de montarlo sobre la pared). El mástil para el
piso se instala con sujetadores apropiados que lo fijan a un piso estructural. La
altura del P.T.Rail sobre el mástil para el piso se puede ajustar. Para instalar el
P.T.Rail sobre el mástil para el piso se deben usar los sujetadores suministrados.
El peso máximo del usuario de este producto es de 400 lb/181 kg. Nota: El
producto no está destinado a soportar el peso total del cuerpo. El P.T.Rail y el mástil
para el piso no deben usarse de ninguna otra forma fuera de lo antes descrito.
GARANTÍALIMITADADE POR VIDA
Los productos están cubiertos por una garantía limitada de por vida por defectos
en los materiales y la mano de obra, en beneficio del comprador original. La
garantía excluye productos que hayan sido dañados por uso incorrecto, daño
accidental, alteración, desgaste normal, materiales de madera y teñido, o el uso de
productos de limpieza corrosivos o abrasivos.
Por el presente, el comprador mantiene indemne y se manifiesta de acuerdo en
liberar y defender a HealthCraft Products Inc. de toda responsabilidad, reclamo
(fundado o infundado), pérdida, daño, costo y gasto (incluidos, sin que esto
excluya otras posibilidades, los daños derivados y las costas profesionales
razonables) que resulte de la especificación, la aplicación o el uso inapropiados de
los productos que aquí se describen, como también de toda omisión o negligencia
por parte del comprador. HealthCraft Products Inc. no asume ninguna
responsabilidad por daños resultantes de los servicios prestados por otros, como
tampoco de la instalación defectuosa, del uso incorrecto o de la aplicación
incorrecta de los bienes vendidos por HealthCraft Products Inc. HealthCraft
Products Inc. no será responsable por los beneficios potenciales o los daños
especiales, indirectos o derivados, ni por el costo de ninguna tarea correctiva
realizada sin la previa aprobación de HealthCraft Products Inc. La responsabilidad
total de HealthCraft Products Inc. en virtud del presente no será superior en ningún
caso al precio de compra de los productos aquí especificados. Las
especificaciones están sujetas a cambios sin previo aviso.
HealthCraft Products Inc.
2790 Fenton Road
Ottawa, Canada
K1T 3T7
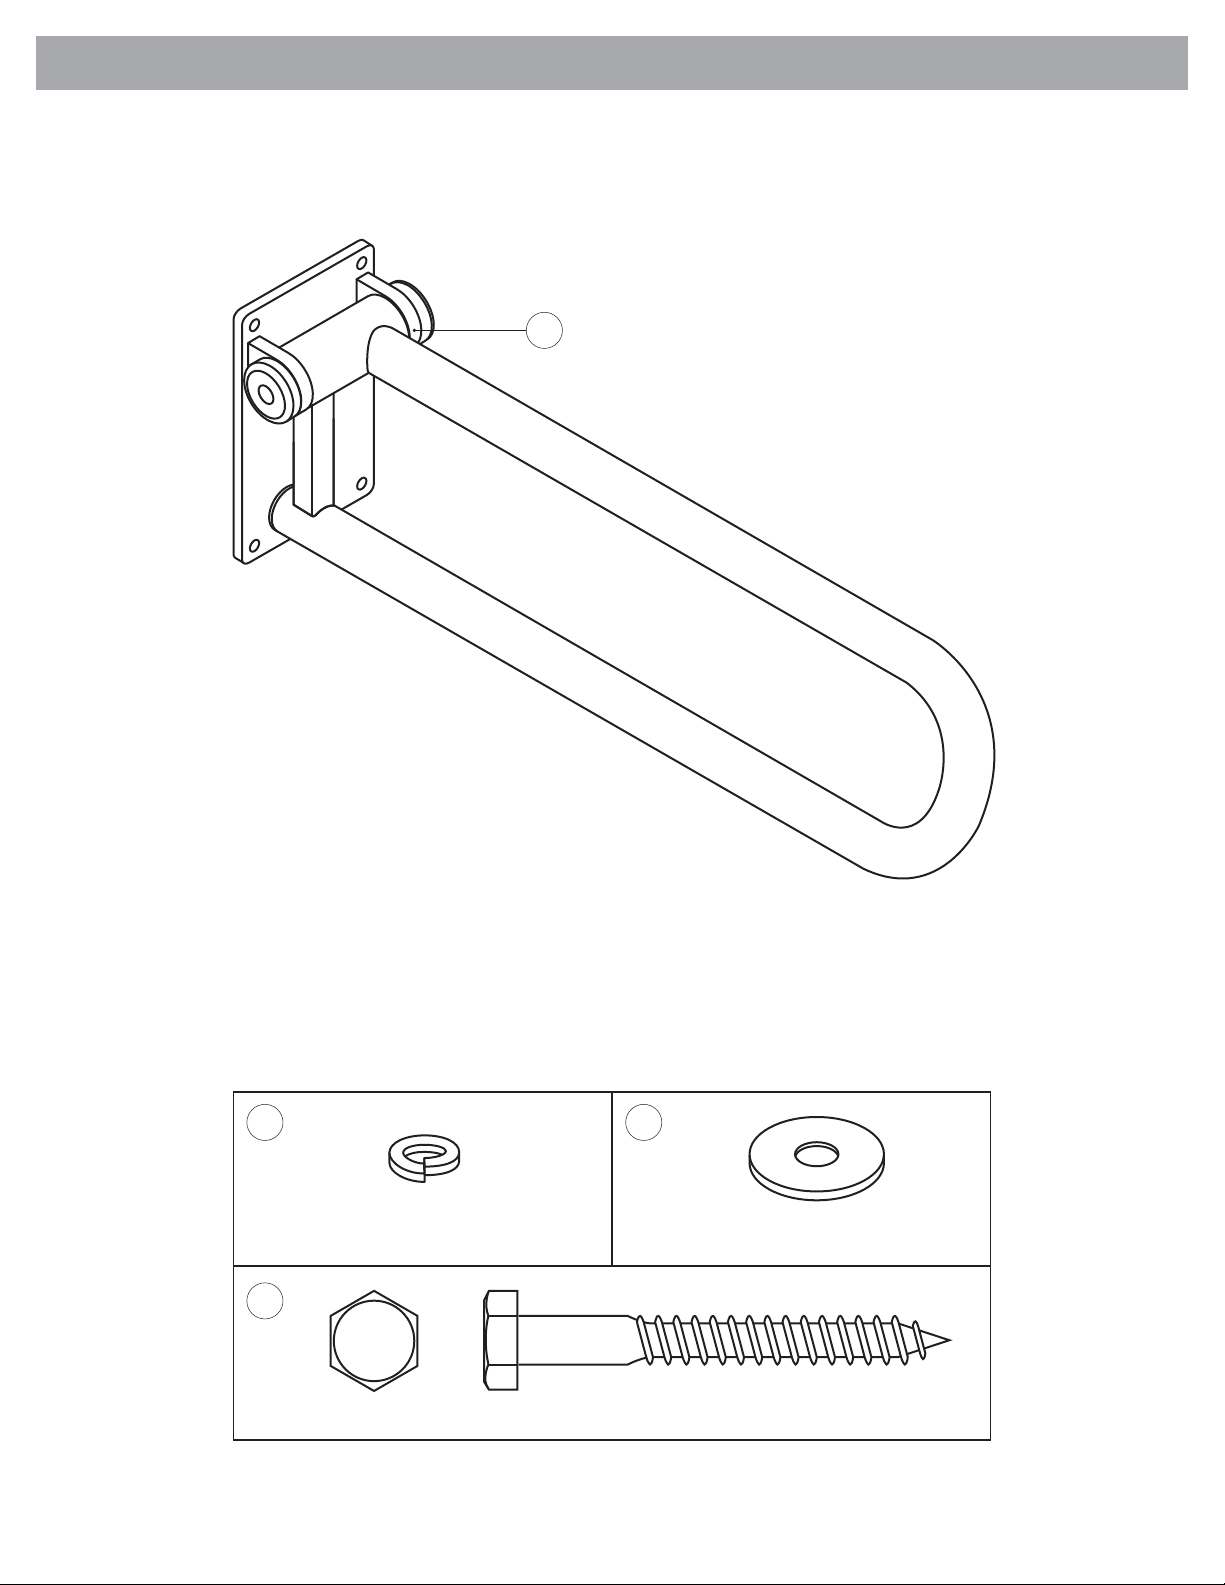
CONTENIDO ENTREGADO/ P.T.RAIL FIGURAA.
1. P.T.Rail
2.Arandela, 1/4", de seguridad (x5)
3.Arandela, 1/4", plana (x5)
4. Tirafondo de 1/4" x 3" de largo (x5)
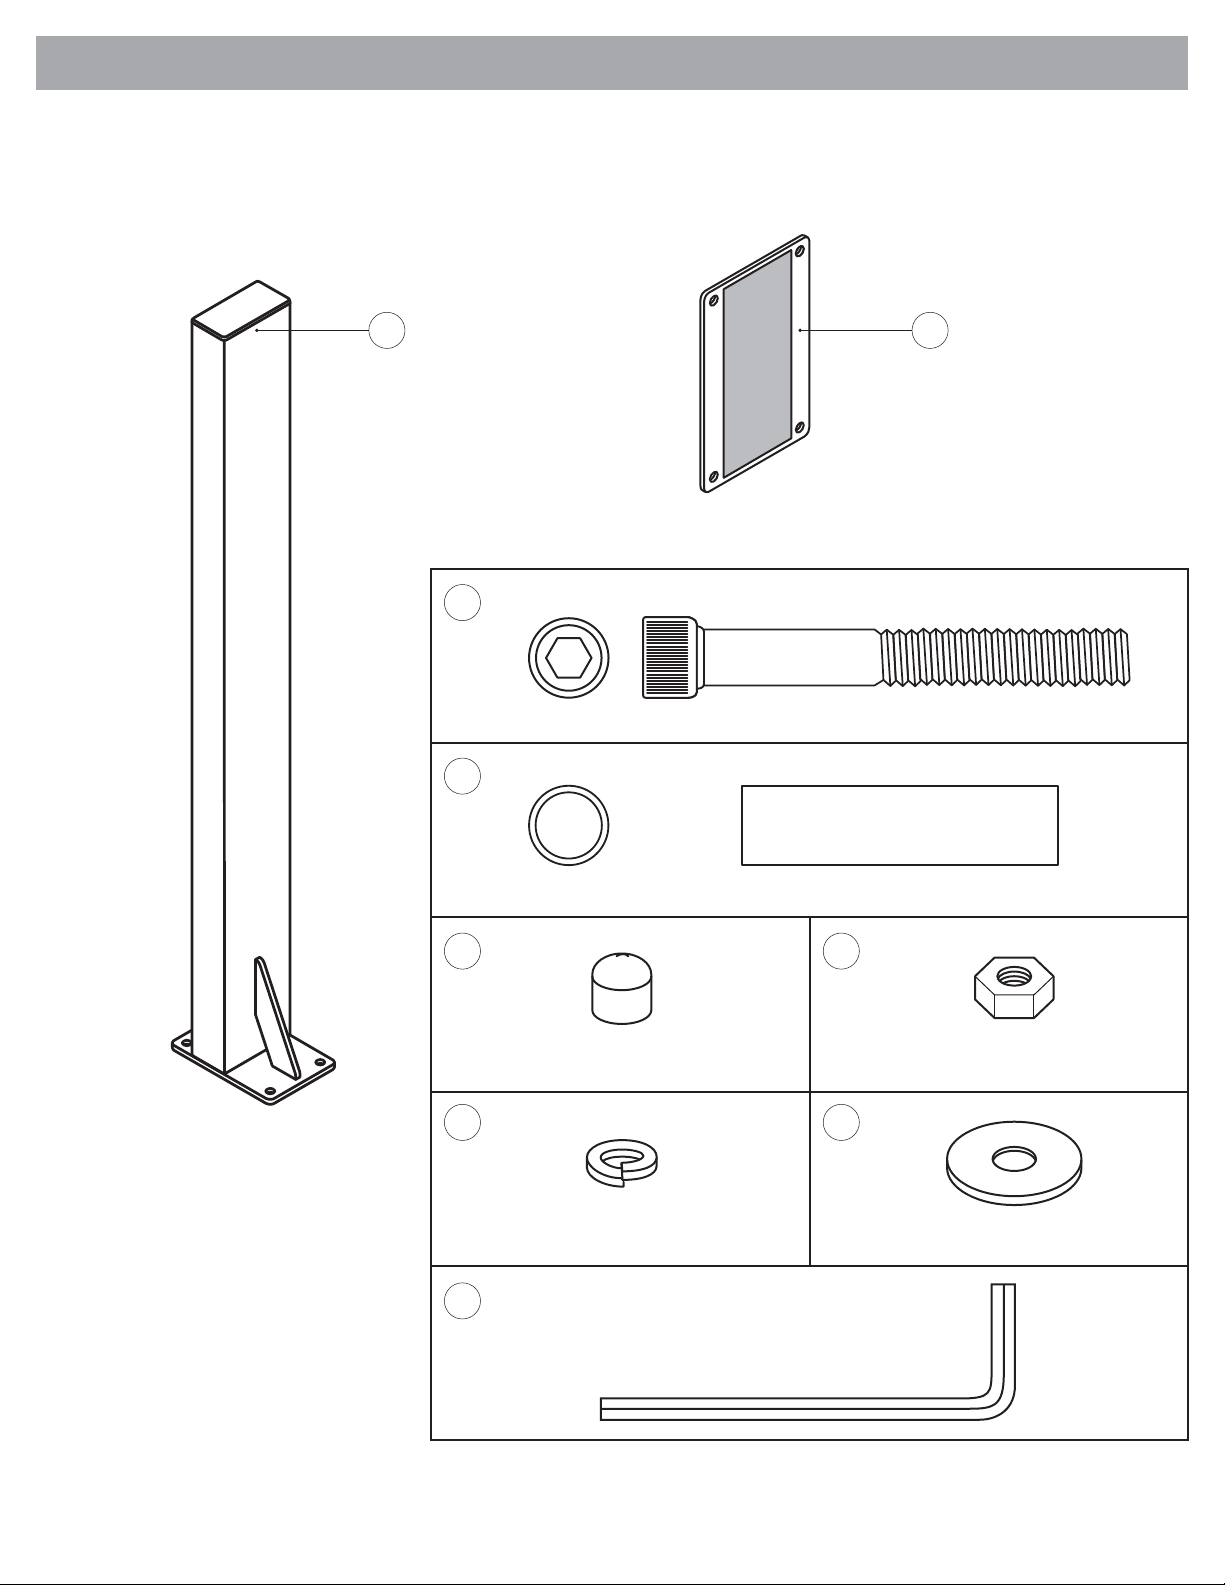
CONTENIDO ENTREGADO/ MÁSTILPARA ELPISO FIGURAB.
5. Mástil para el piso
6. Placa abrazadera
7. Perno, 3/8"-16 x 3",A/I (x4)
8. Funda plástica (x4)
9. Casquete vinílico (x4)
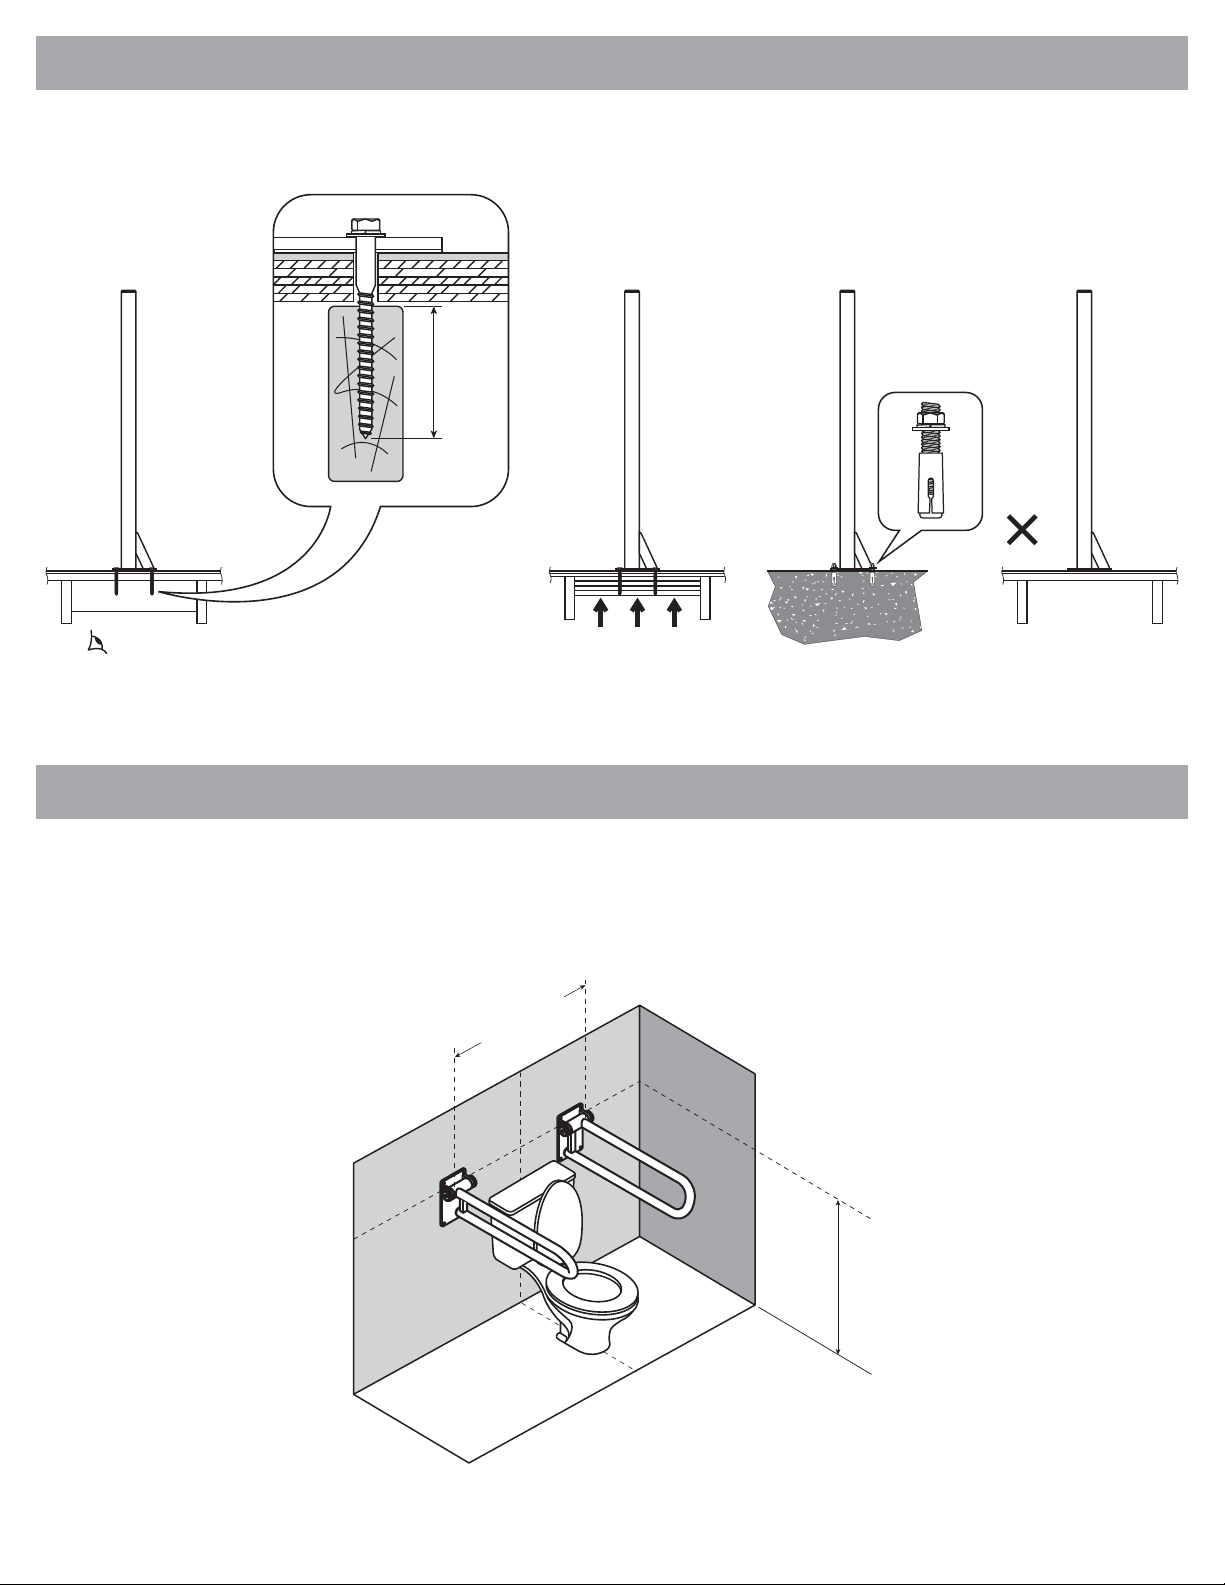
ADVERTENCIAS DE INSTALACIÓN DEL P.T.RAIL FIGURAC.
1. El P.T.Rail se debe instalar sobre paredes de estructura sólida. Si es necesario,
agregue suplementos de madera.
2. Si se requiere hacer la instalación sobre una pared de hormigón,
recomendamos utilizar anclaje tipo manga o cuña apto para construcción de pisos.
3.PRECAUCIÓN– Noinstalarsi sedesconocela estructuraqueestá detrásde la pared.
4. PRECAUCIÓN – No instalar sobre montantes de metal.
5. PRECAUCIÓN – Utilizar el barandal para asistencia únicamente cuando está bajo.
6. PRECAUCIÓN – Punto de compresión entre el barandal y la placa de la pared.
7. PRECAUCIÓN – El barandal y la tina son resbaladizos cuando están húmedos.
Solo se suministran sujetadores para estructuras de madera (Enganche de rosca
mínimo 2 "/ 51mm). Si se utilizan otros sujetadores, asegúrese de que los tornillos
tengan una fuerza de retención mínima de 600lbs/272kgs.
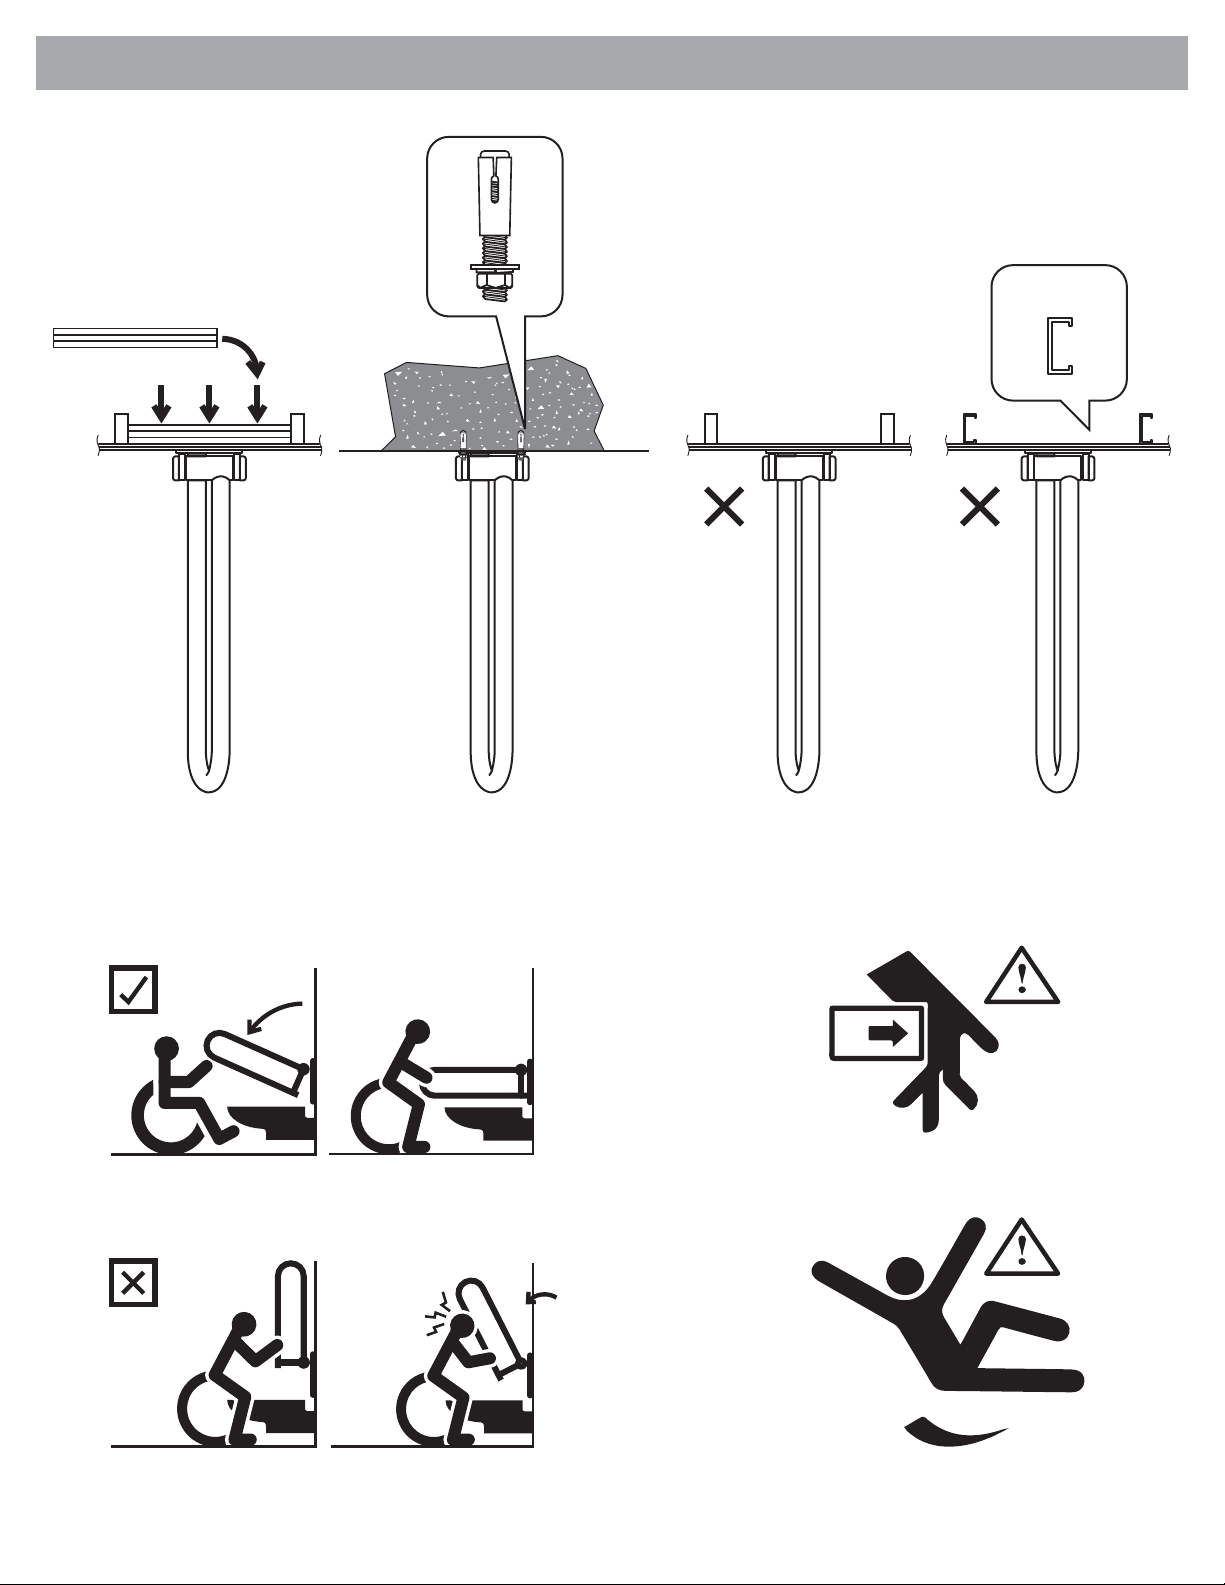
ADVERTENCIAS DE INSTALACIÓN DEL MÁSTILPARAELPISO FIGURAD.
1. El mástil se debe instalar sobre pisos de estructura sólida.
2. Lo ideal es alinear y fijar el mástil directamente sobre una vigueta del piso.
3. Si el lugar donde se desea hacer la instalación no tiene una estructura
adecuada, agregue suplementos de madera.
4. Si se requiere hacer la instalación sobre un piso de hormigón, recomendamos
utilizar anclaje tipo manga o cuña como mínimo de 5/16".
5.PRECAUCIÓN – No instalar si se desconoce la estructura que está debajo del piso.
POSICIONES SUGERIDAS PARAEL P.T.RAIL FIGURAE.
Afin de determinar la ubicación óptima para montarlo, recomendamos sostener el
barandal en el lugar y simular los movimientos de traslado (sentarse, ponerse de
pie, estirarse, etc.). La altura recomendada para el barandal es de 32-34" /
813-864mm. Si se instala un barandal a cada lado del WC, sugerimos un espacio
entre barandales superiores de 28-32" / 711-813mm.
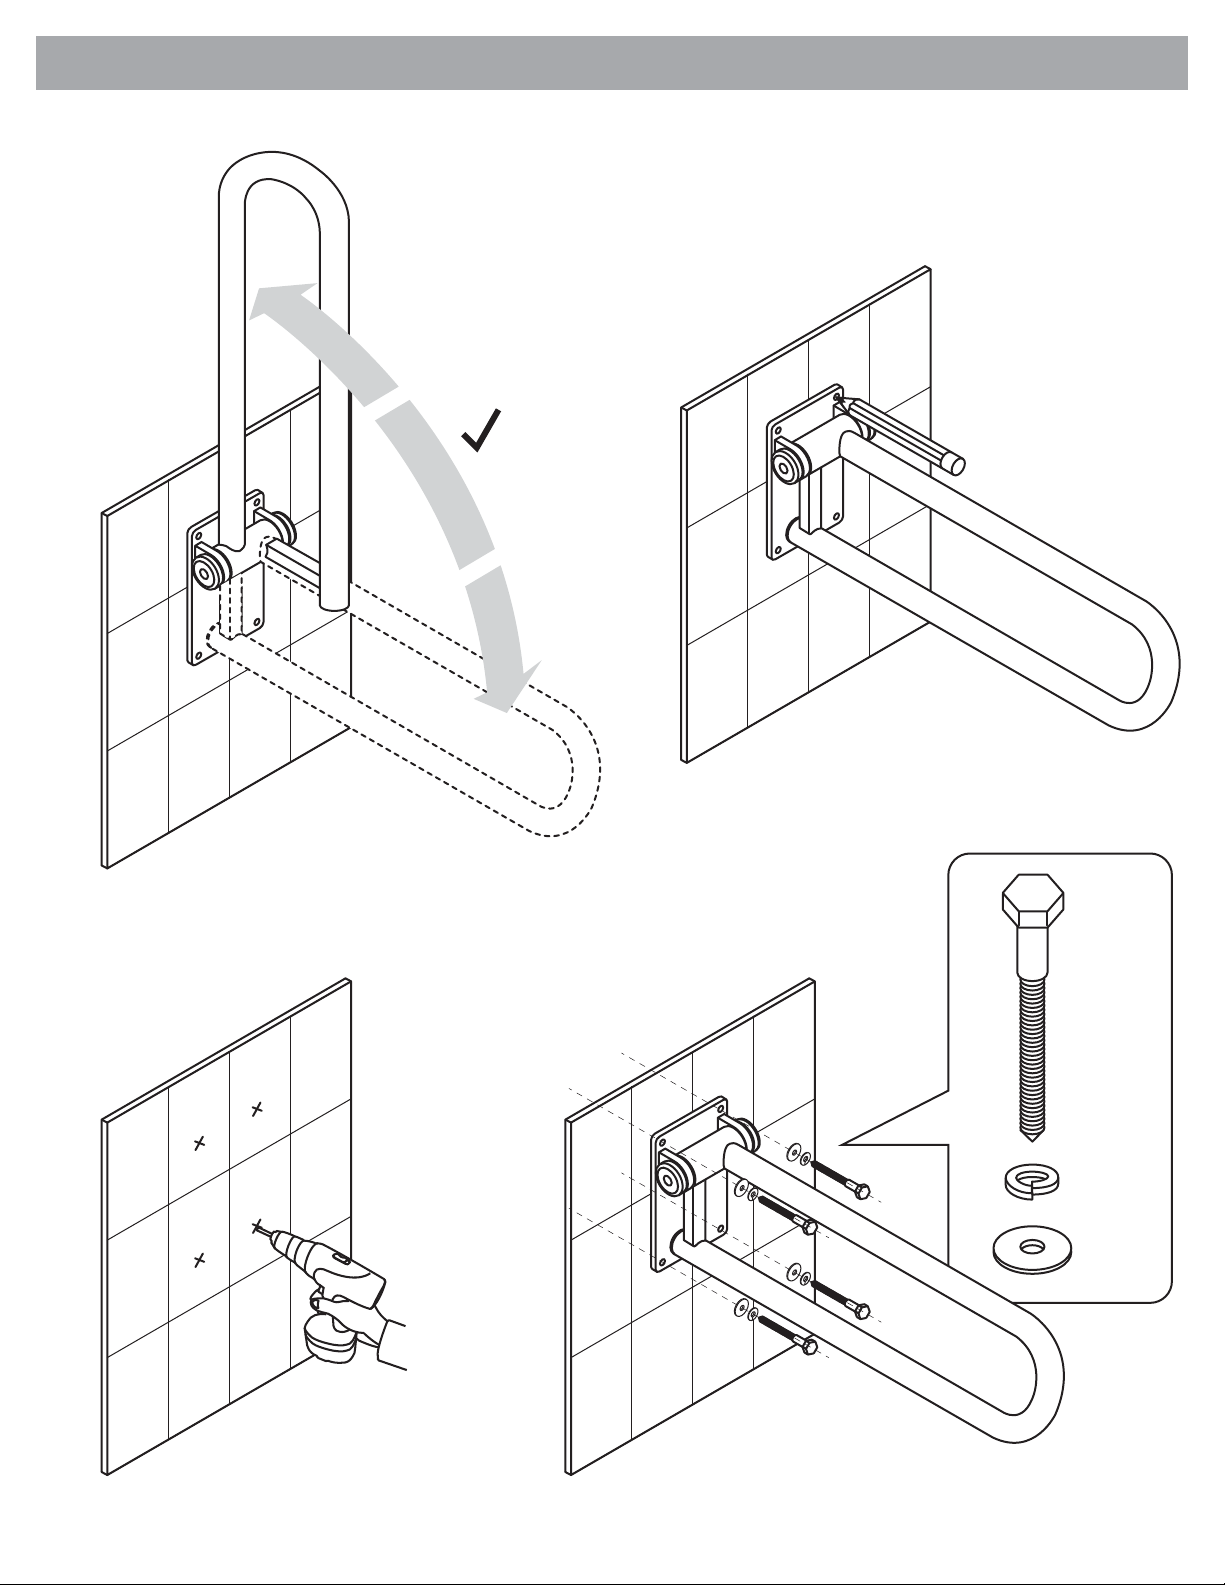
INSTALACIÓN DEL P.T.RAILSOBRE ESTRUCTURADE MADERAFIGURAF.
1. Sostener el P.T.Rail en el lugar deseado y asegurarse de que el barandal pueda
moverse sin obstáculos en todas las posiciones, y de que encima del barandal
haya espacio suficiente para plegarlo.
2. Usando la placa de pared como plantilla, marcar la ubicación de los orificios.
3. Perforar orificios guía apropiados para los sujetadores.
4. Fijar el P.T.Rail a la pared usando sujetadores apropiados.
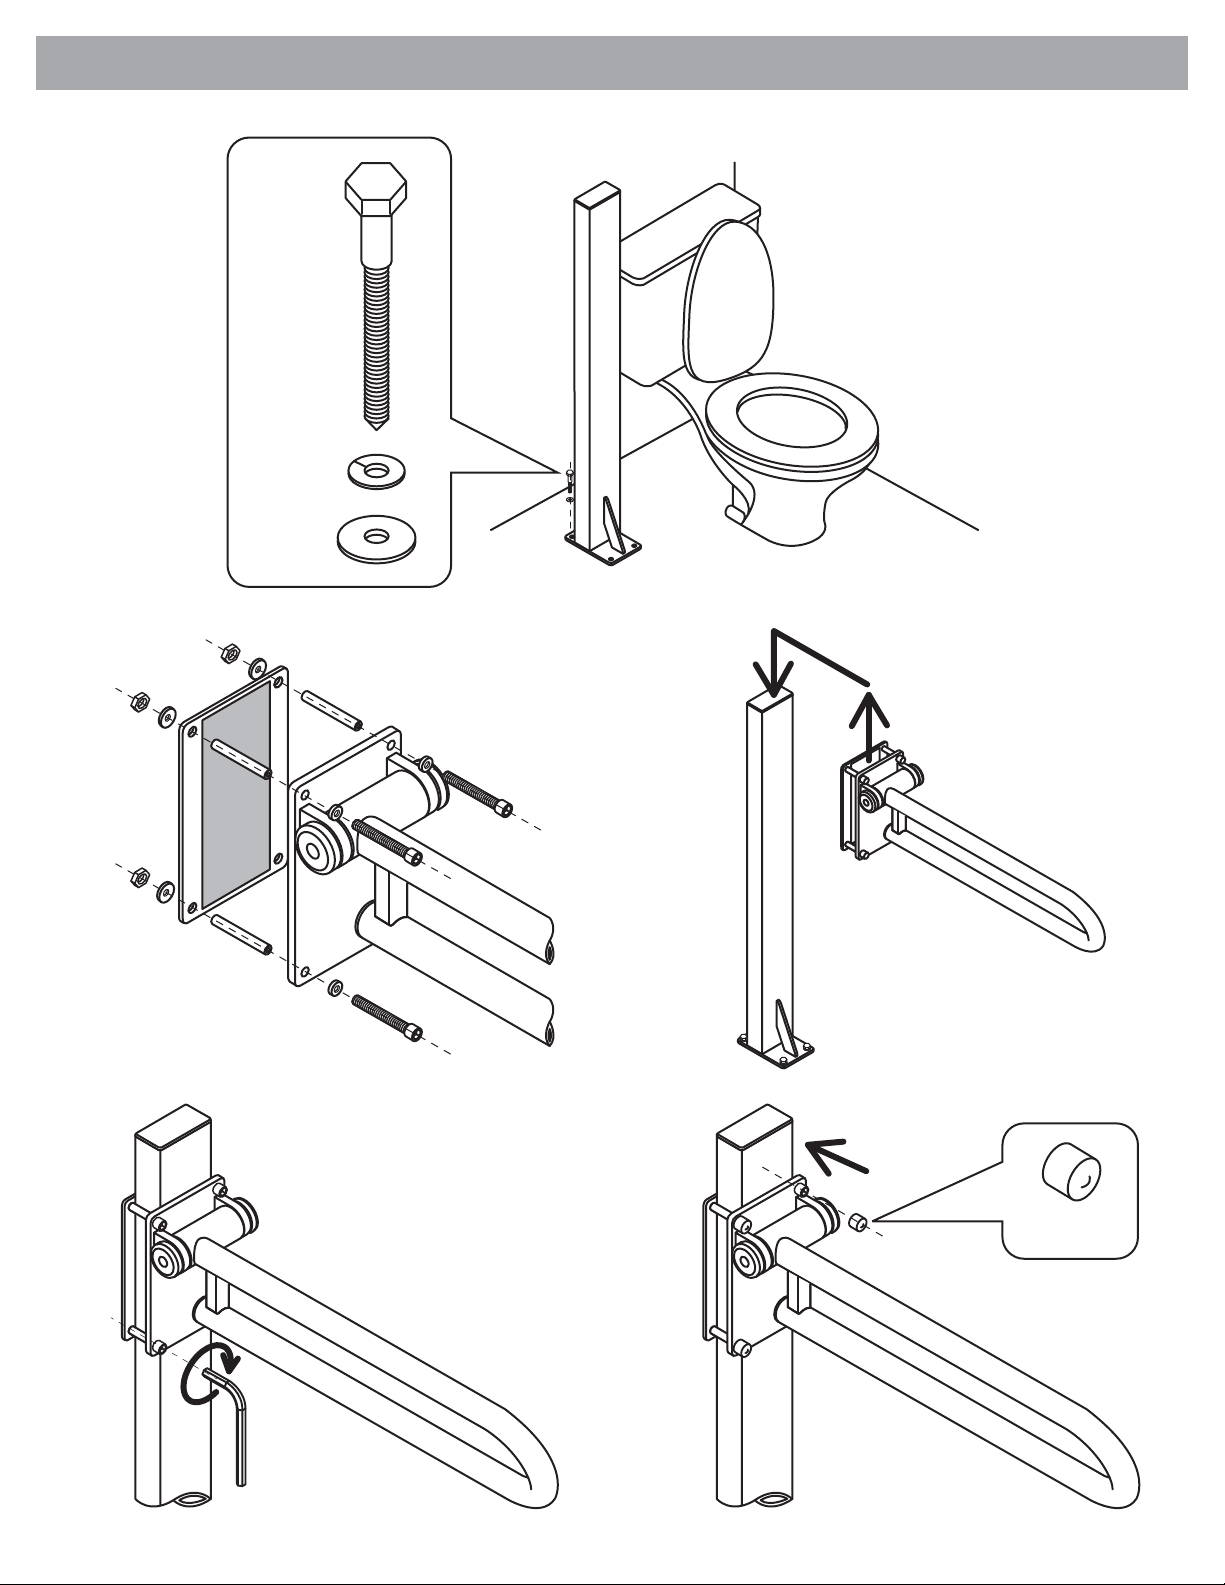
INSTALACIÓN DEL MÁSTILPARAEL PISO SOBRE ESTRUCTURADE MADERA
FIGURAG.
1. Fijar el mástil al piso usando sujetadores apropiados.
2. Fijar la placa abrazadera a la parte posterior del P.T.Rail.
3. Deslizar la placa abrazadera con el P.T.Rail sobre la parte superior del mástil.
4. Con el P.T.Rail a la altura deseada, ajustar los pernos para asegurar en la
posición.
5. Instalar casquetes vinílicos para cubrir las cabezas de los pernos.
DATOS TÉCNICOS
Consulte la Figura H.
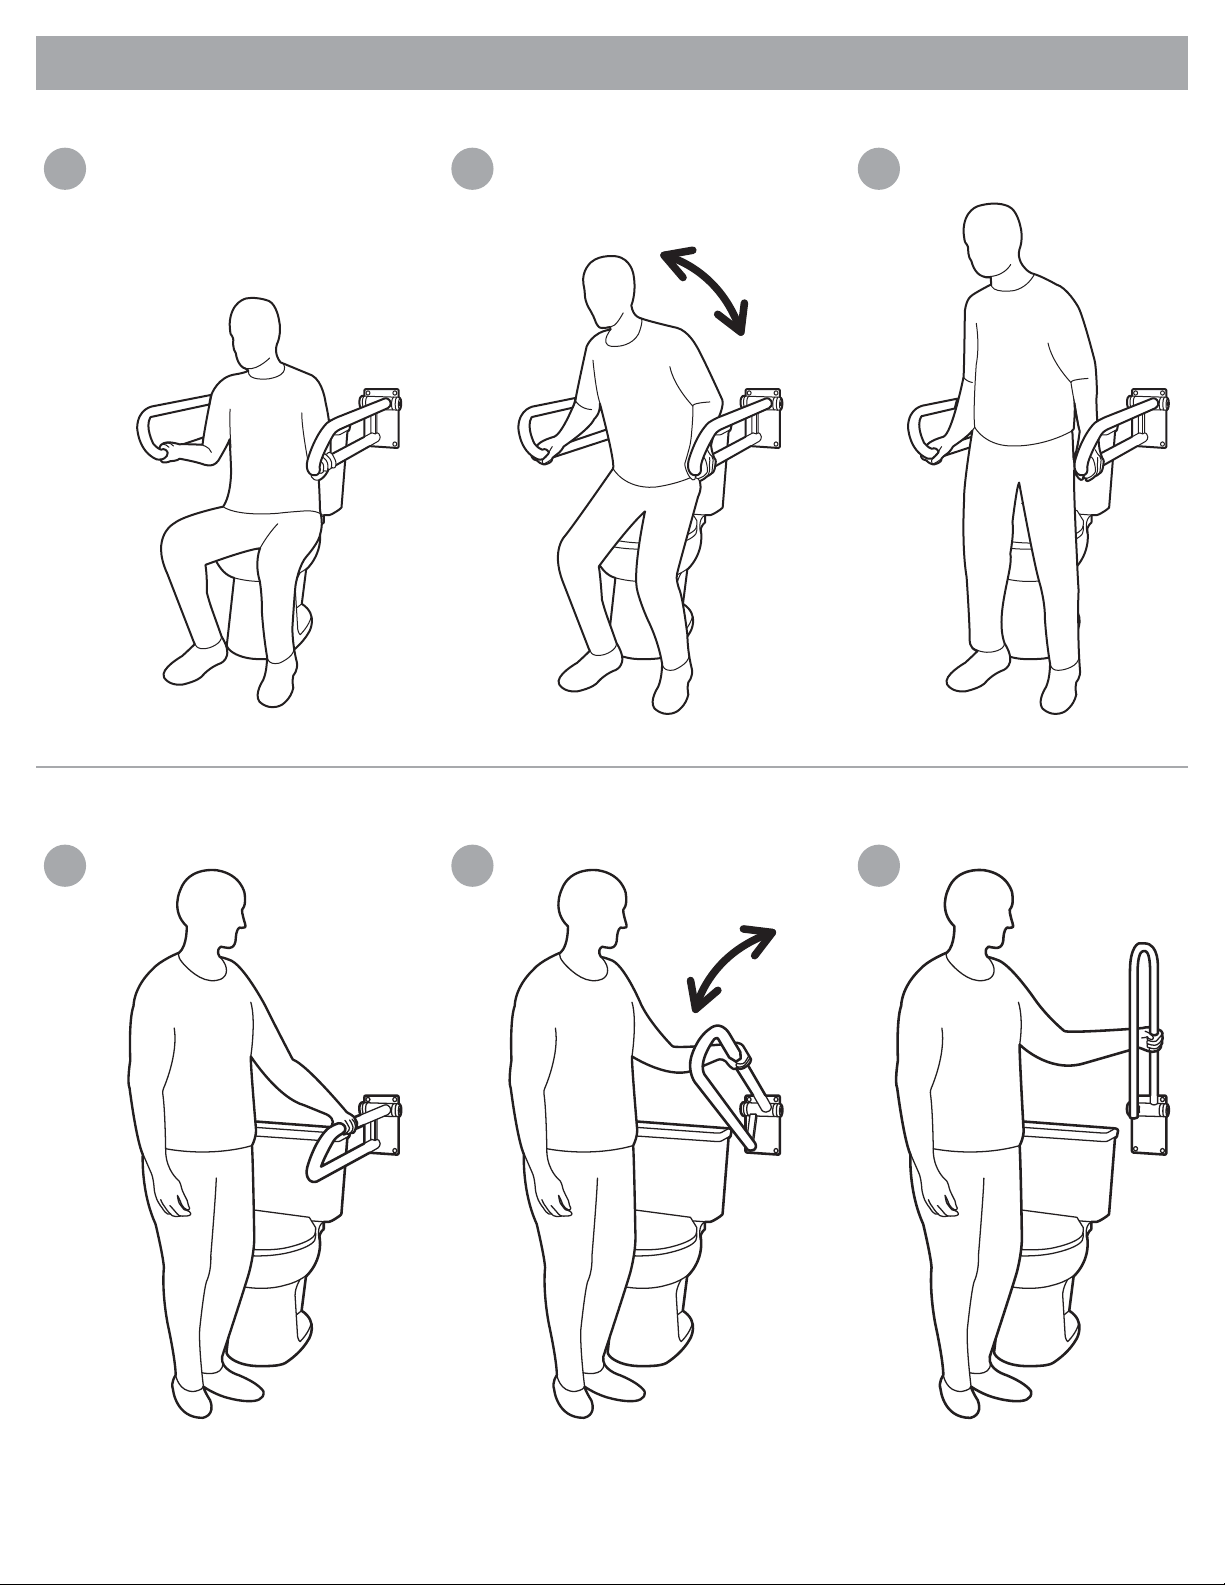
UTILIZACIÓN DELPRODUCTO
Consulte la Figura I.
EC REP
Gate 88
Kanalgatan 45B
Skellefteå, Sweden
93123
10. Tuerca, 3/8''-16,A/I (x4)
11.Arandela, de seguridad, 3/8'', A/I (x4)
12.Arandela plana , 3/8'',A/I (x4)
13. Llave hexagonal, 5/16''

Svenska
ÖVERSIKT
Tack för att du har valt P.T.Rail-systemet från HealthCraft. Läs igenom och se
till att du förstår anvisningarna i den här handboken. Spara handboken för
framtida bruk. Du ansvarar själv för att se till att ditt P.T.Rail-system monteras,
installeras och underhålls ordentligt. Underlåtelse att följa anvisningarna i den
här handboken kan leda till allvarliga skador eller dödsfall. Om du inte klarar
av att utföra det arbete som beskrivs, rekommenderar vi att du låter en
behörig hantverkare installera P.T.Rail-systemet.
P.T.Rail är en högkvalitativ nedfällbar stödstång av handelskvalitet som är
avsedd för användning bredvid en toalett. P.T.Rail har ett vinklat handtag
som hjälper till att minska belastningen när du greppar den lägre
stödstången. P.T.Rail är avsedd för måttlig belastning vertikalt och
horisontellt för att tillhandahålla stöd vid sittande och stående ställning för
personer med nedsatt rörlighet. P.T.Rail är avsedd att ENDAST belastas i
nedfällt läge – stödhandtaget är inte avsett att belastas i något annat läge.
P.T.Rail-stödet är avsett att fällas upp när det inte används. Ett
friktionsgångjärn ser till att den inte sänks oavsiktligt när den är i uppfällt
läge. P.T.Rail installeras med lämpliga fästen på en bärande vägg.
Golvhållaren är en golvmonterad enhet som är avsedd att fungera som
monteringsplats för P.T.Rail (vid tillfällen då väggmontering inte är möjligt).
Golvhållaren installeras med lämpliga fästen på ett bärande golv. P.T.Rail
kan justeras i höjdled på golvhållaren. Medföljande fästelement måste
användas om P.T.Rail installeras i golvhållaren.
Maxvikten för en användare av den här produkten är 181 kg. Obs!
Produkten är inte avsedd att stödja full kroppsvikt. Varken P.T.Rail eller
golvhållaren får användas på något annat sätt än enligt beskrivningen ovan.
BEGRÄNSAD LIVSTIDSGARANTI
Den ursprungliga köparen får en begränsad livstidsgaranti som täcker fel i
material och tillverkningen av produkterna. Garantin gäller inte produkter
som har skadats till följd av felaktig användning, genom olyckshändelse,
modifiering, normalt slitage, kontakt med eller missfärgning från
trämaterial, eller användningen av frätande eller slipande rengöringsmedel.
Köparen samtycker härmed till att gottgöra, försvara och hålla HealthCraft
Products Inc. skadelösa från alla betalningsskyldigheter, anspråk (med
eller utan grund), förluster, skador, kostnader och utgifter (inklusive, men
inte begränsat till, följdskador och rimliga arvoden) som uppstår till följd av
köparens specifikation, tillämpning eller felaktiga användning av varor som
beskrivs häri, samt köparens försummelse eller vårdslöshet. HealthCraft
Products Inc. bär inget ansvar för skador som uppstår till följd av tjänster
som utförs av tredje part eller felaktig installation, felaktig användning eller
tillämpning av varor som säljs av HealthCraft Products Inc. HealthCraft
Products Inc. bär inget ansvar för eventuella vinster eller särskilda eller
indirekta skador eller följdskador, eller för kostnaden av korrigerande
arbeten som utförs utan godkännande från HealthCraft Products Inc.
HealthCraft Products Inc. totala betalningsskyldighet ska inte under några
omständigheter överstiga inköpspriset för varorna som anges häri.
Specifikationerna kan ändras utan föregående meddelande.
HealthCraft Products Inc.
2790 Fenton Road
Ottawa, Canada
K1T 3T7
Distribueras av Now BoardingAB i Sverige.
LEVERANSINNEHÅLL– P.T.RAIL FIGURA.
1. P.T.Rail
2. Fjäderbricka, 1/4" (× 5)
3. Plan bricka, 1/4" (× 5)
4. Träskruv, längd 1/4" x 3" (× 5)
LEVERANSINNEHÅLL– GOLVHÅLLARE FIGUR B.
5. Golvhållare
6. Fästplatta
7. Skruv, 3/8"-16 × 3", S/S (× 4)
8. Plasthölje (× 4)
9. Vinyllock (× 4)
INSTALLATIONSVARNINGAR FÖR P.T.RAIL FIGUR C.
1. P.T.Rail ska installeras på väggar som är konstruktionsmässigt
lämpliga.Använd kortlingar vid behov.
2. Om installation i betongvägg krävs rekommenderar vi hylsexpander
eller kilankare som passar till golvkonstruktioner.
3. VARNING – Installera inte P.T.Rail om du inte känner till hur
konstruktionen bakom väggen ser ut.
4. VARNING – Sätt inte fast P.T.Rail i metallreglar.
5. VARNING – Stödstången ska endast användas som stöd i nedfällt läge.
6. VARNING – Klämrisk mellan stödstången och väggplattan.
7. VARNING – Stödstången och badkaret är hala när de är våta.
Medföljande fästelement är endast avsedda att användas i
träkonstruktion. Om du använder andra fästelement ska du se till att de
håller för minst 272 kg.
INSTALLATIONSVARNINGAR FÖR GOLVHÅLLARE FIGUR D.
1. Golvhållaren ska installeras på golv som är konstruktionsmässigt lämpliga.
2. Det bästa är att passa in och fästa golvhållaren direkt i golvbjälklag.
3. Om konstruktionen på önskad installationsplats inte är godtagbar kan du
använda kortlingar.
4. Om installation i betonggolv krävs rekommenderar vi minst 5/16"
hylsexpander eller kilankare.
5. VARNING – Installera inte golvhållaren om du inte känner till hur
konstruktionen under golvet ser ut.
FÖRESLAGNAPLACERINGARAV P.T.RAIL FIGUR E.
För att fastställa den bästa möjliga installationsplatsen rekommenderar vi
att du håller stödstången på plats och simulerar de olika rörelserna (t.ex.
när man sätter sig, ställer sig upp, sträcker sig efter något osv.).
Rekommenderad höjd för stödstången är 81–86 cm.
Om du installerar stödstänger på båda sidor av toaletten, rekommenderar
vi en bredd på 71–81 cm mellan de övre stödstängerna.
INSTALLATIONAV P.T.RAILI TRÄKONSTRUKTION FIGUR F.
1. Håll P.T.Rail på önskad plats och säkerställ att stödstången kan flyttas
obehindrat åt alla håll och att utrymmet ovanför stödstången är tillräckligt
för att den ska kunna fällas upp.
2.Använd väggplattan som mall och märk upp hålens placeringar.
3. Förborra lämpliga hål för fästelementen.
4. Sätt fast P.T.Rail i väggen med hjälp av lämpliga fästelement.
INSTALLATIONAV GOLVHÅLLARE I TRÄKONSTRUKTION FIGUR G.
1. Sätt fast golvhållaren i golvet med hjälp av lämpliga fästelement.
2. Sätt fast fästplattan på baksidan av P.T.Rail.
3. Sätt i fästplattan med P.T.Rail från golvhållarens ovansida.
4. När P.T.Rail sitter i önskad höjd fäster du den genom att dra åt skruvarna.
5. Sätt dit vinyllocken för att täcka skruvhuvudena.
TEKNISKAUPPGIFTER
Se figur H.
PRODUKTANVÄNDNING
Se figur I.
EC REP
Gate 88
Kanalgatan 45B
Skellefteå, Sweden
93123
10. Mutter, 3/8"-16, S/S (× 4)
11. Fjäderbricka, 3/8", S/S (× 4)
12. Plan bricka, 3/8", S/S (× 4)
13. Insexnyckel, 5/16"
13
This manual suits for next models
1
Table of contents
Other Healthcraft Bathroom Aid manuals
Popular Bathroom Aid manuals by other brands

Kohler
Kohler AC Power installation instructions

Galvin Engineering
Galvin Engineering GalvinAssist 41992CP Installation guidelines

Pressalit
Pressalit R1192 Mounting instruction

squatty potty
squatty potty Fold-N-Stow Assembly

Gordon Ellis & CO
Gordon Ellis & CO Big John Instructions for use

IKEA
IKEA GODMORGON quick start guide