Healthmark EndoDolly User manual
Instructions for Use: EndoDolly™
Brand Name of Product
EndoDolly™
Generic Name of Product
Flexible Endoscope Assistance Pole
Product Code Number(s)
110405-SP
Intended Use
To hold endoscopes and allow them to hang properly while conducting active drying,
quality assurance testing, and transportation procedures.
Range of Applications for Product
Hanging endoscopes to perform cleaning verification and transporting the scopes.
Key Specifications of Product
●Height of pole is 55 in
●3 self-adjusting poles:
○2 outside poles extend an additional 8 ft
■Adjusted maximum height of 211.58 cm
■Lowered to a minimum height of 133.35 cm
○Middle pole extends an additional 9.5 ft
■Adjusted to a maximum height of 271.78 cm
■Lowered to a minimum height of 148.59 cm
●2 cups for each self-adjusting pole
●2 hooks per pole to support a scope up to 15 lbs
●5-wheel base
●Hex key (large)
Shipping & Storage
Shipping Conditions &
Requirements
N/A
Storage Conditions
For transport and stockkeeping: temperature from -25 ℃ to 70 ℃.
Packaging Contents
N/A
Shelf Life
N/A
Instructions for Using Product
Description of Use(s)
To hold the endoscopes and transport.
Preparation for Use
Remove all parts from the packaging.
Diagrams (drawings, pictures)

Figure 1
Figure 1A
Figure 1B
Figure 1C
Figure 2
Figure 3 Figure 3A

Figure 3B Figure 3C
Figure 4 Figure 5

Figure 5A
Figure 6 Figure 6A
Figure 7 Figure 7A

Figure 7B Figure 7C
Figure 7D
Figure 8 Figure 8A
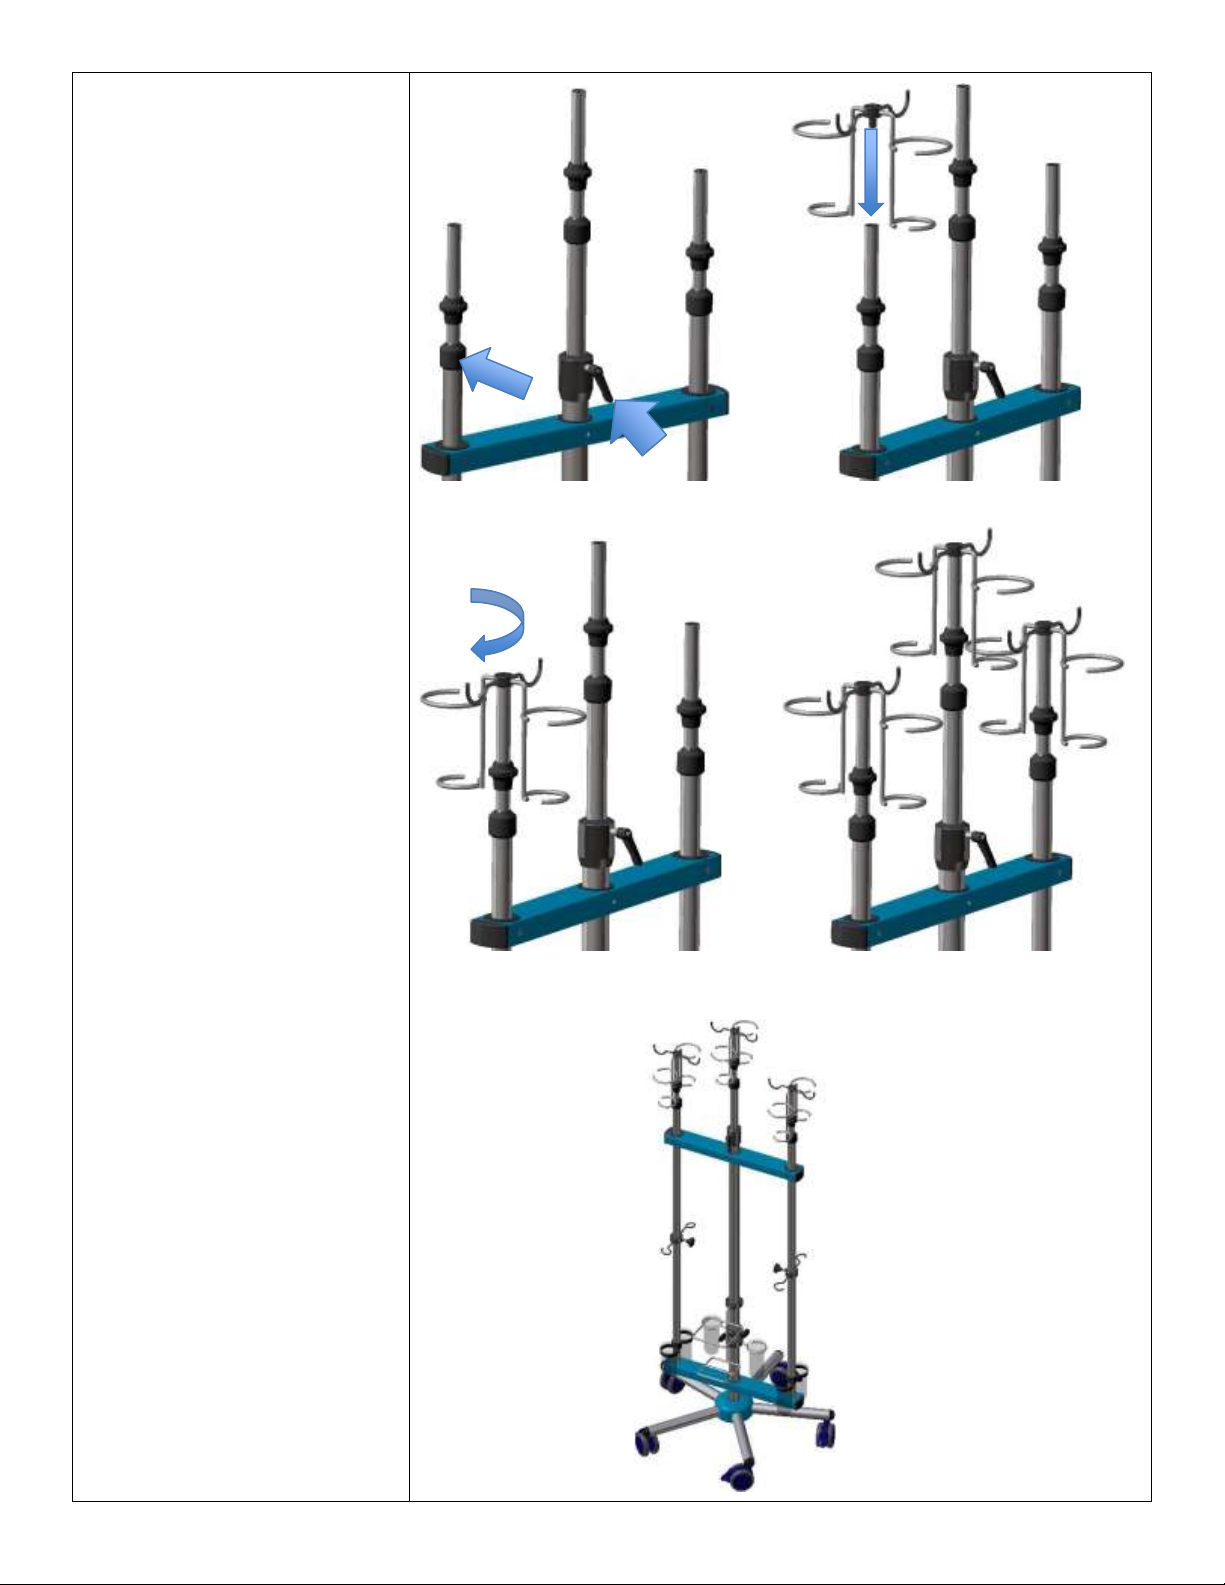
Figure 9 Figure 10
Figure 10A Figure 10B

Steps for Use of Product
Assemble the Base:
1. Attach the base using the (5) five large bolts included in the kit. Insert one of the
wheel posts into the base collar and adhere with one (1) large bolt using the hex
key. Repeat for each wheel post until all (5) five-wheel posts are inserted and
tightened. (Fig. 1-1C)
Assemble the Accessories:
2. Carefully stand the pole up and loosen the “C” hook screws from the bracket.
Slide the bracket down the middle pole close to the base and tighten to secure the
pole. The opening of each hook should be facing opposite each other (Fig. 2)
3. Next, attach the air pressure gauge holder to the pole. Place the holder against
the pole with the bracket and attach the other half of the bracket to the other side.
Tighten the two screws with the provided hex key to secure in place (Fig. 3-3C)
Assemble the IV-Pole:
4. Slide the remaining two poles down through the (top) blue beams attached to the
middle pole (Fig. 4)
5. Slide the pole into the “C” hooks before sliding the poles into the (bottom) blue
beam. Tighten the hooks to the pole (Fig. 5-5A)
6. Tighten the lever on the “C” hooks to the pole
Secure the screws underneath the bottom of the blue beam with the hex key (Fig. 6-6A)
Assemble the Drip Cup Holders:
7. Attach the drip cups by snapping two holders onto the pole at the bottom of the
outer two poles with one below the other (facing opposite each other). Place the
cups into the holder (Fig. 7-7D)
8. Place the drip cups into the holders (“C hook” that were placed on the middle
pole in step 2) as shown in figure 8 (Fig. 8-8A)
Note: In total there are six drip cups that are attached to all three poles.
Assemble the Scope Brackets:
9. Adjust height of the poles by loosening the pole grip and sliding the inner
pole up or down. to secure the pole grip when desired height is achieved (Fig. 9)
10. To adjust the height of the middle outer pole, loosen the lever on the external
pole, then adjust the outer pole to the desired height. Tighten the lever to secure
the pole in place (Fig. 9)
11. Place the scope brackets onto the top of each pole and tighten clockwise until
secured. (Fig. 10-10B)
Note: A total of six scopes can be placed on the EndoDolly™
Placing endoscope on the EndoDolly™:
1. Place the endoscope(s) into the brackets at the top of the pole(s) and allow the
endoscope to hang vertically
2. Put the insertion tube into the “C” hooks to keep it stable
3. Place the distal tip into the cup during active drying procedures with suitable
quality of air, quality assurance testing, or transportation
4. After drying and quality assurance testing has been completed, the EndoDolly™
can be used for transport to storage
Interpretation of Test Results
N/A
Contraindications of Test Results
N/A
Documentation
N/A
Special Warnings and Cautions
●Holder is only to be used for the purposes described in the Instructions for Use.
Any other use should be refrained from as it may conceal unknown hazards.
●Indoor use only
●Holder must be used on flat and solid ground with a maximum slope of 5°.
●Holder should not tip when tilting the unit by 10° if used correctly. Attach heavy
items as close to the base as possible.

●When moving holder, make sure the roller brakes are unlocked. Take extra care
when rolling across obstacles, soft flooring, and slants. It may be necessary to
lower the hanging load to the minimum infusion height.
●Always lock the roller brakes when not in use.
●The electrically conductive rollers serve only to divert static charges.
●Use of non-pH-neutral cleaning detergents or wipes can lead to surface and
material damage over time
Disposal
The holder can be disposed of at the nearest bulky waste disposal point.
Reprocessing Instructions
Point of Use
N/A
Preparation for Decontamination
N/A
Disassembly Instructions
N/A
Cleaning –Manual
1. Chloride-containing fluids (e.g.: blood, physiological saline) must be removed to
avoid formation of rust.
2. Wipe down the pole from top to bottom with a facility approved disinfectant. Start
by wiping the pole and cross bar, then moving to the hooks at the top and middle
of the poles. Finally, wipe down the base by the wheels.
3. Rinse well with water after disinfecting.
Cleaning –Automated
1. Extend the outer poles
2. Middle pole: extend lower unit and wipe down. Slide lower unit back down into
pole and extend the top part of the pole.
3. Place the EndoDolly™ in the cart washer for cleaning and run on the equipment
cycle
Disinfection
EndoDolly™
It is recommended to use a disinfectant wipe with a disinfectant surface.
Poly cups
Facility approved surface disinfectant wipes or Isopropyl Alcohol.
Drying
N/A
Maintenance, Inspection, and
Testing
●Check the holder (at least once a year). Repairs must be made by authorized
personnel or customer service using original equipment manufacturers (OEM)
products only
●If the holder has not been in use for an extended period, it should be checked as
described in the maintenance plan/checklist
Proof of Maintenance-Conformity
Integrity
The EndoDolly™ should
be checked at least once a
year on full functionality
of all components.
Function
All screws in place and
tightened.
Completeness
If an error is detected, only
original (OEM) spare parts
may be used and must be
replaced by a specialist of
Customer Service only.
Date
Signature
Date
Signature
Date
Signature
Reassembly Instructions
N/A
Packaging
N/A
Sterilization
Poly cups:
Steam sterilization at 270 °F (132 °C) for 4 minutes, 275 °F (135 °C) at 3 minutes.
Storage
For transport and stockkeeping: temperature -25 ℃ to 70 ℃.
Additional Information
N/A
Related Healthmark Products
N/A
Other Product Support Documents
Storage Products Brochure, Storage Products Price List
Reference Documents
N/A
Customer Service Contact
Healthmark Industries Company, Inc.
18600 Malyn Blvd.
Fraser, MI 48026
1-586-774-7600
healthmark@hmark.com
hmark.com
2021-07-21 Suzanne Latta
Other Healthmark Medical Equipment manuals


