Healthstream HS1.ORW User manual

If you have any questions , please contact The Fitness Generation, +61 (03) 9765 9999.
www. healthstreamfitness.com.au
Free call number 1300 796 636

machine
machine
machine
machine machine
machine
machine
HS1.0RW
If you have any questions , please contact The Fitness Generation, +61 (03) 9765 9999.
www. healthstreamfitness.com.au
1
A
intended only as exercise aids in determining heart rate trends in general.
SAFETY HINTS
WARNING - Read all instructions before using this appliance.
ϮDo not operate machine on deeply padded, plush or shag carpet. Damage to both
carpet and machine may result.
ϮKeep children away from the machine. There are obvious pinch points and other
caution areas that can cause harm.
ϮKeep hands away from all moving parts.
ϮNever operate the machine if it has a damaged cord or plug. If the machine is not working
properly, call your dealer.
ϮKeep the cord away from heated surfaces.
ϮNever drop or insert any object into any openings.
ϮDo not use outdoors.
ϮThe pulse sensors are not medical devices. Various factors, including the user’s
movement, may affect the accuracy of heart rate readings. The pulse sensors are
ϮWear proper shoes. High heels, dress shoes, sandals or bare feet are not suitable
for use on your machine. Quality athletic shoes are recommended to avoid leg fatigue.
SAVE THESE INSTRUCTIONS - THINK SAFETY!
CAUTION!! Please be careful when opening this unit.
Free call number 1300 796 636
ϮInstructions for assembly, including correct fitting of guards and other safety devices, and warning
about the likely injuries to young children if exercies cycles are operated in their vicinity without
properly fitted guards.
ϮInstructions for maintenance, including regular checking of the integrity of guards and safety devices.
ϮInstructions for the correct adjustment of the seat.
2
If you have any questions , please contact The Fitness Generation, +61 (03) 9765 9999.
www. healthstreamfitness.com.au
Free call number 1300 796 636
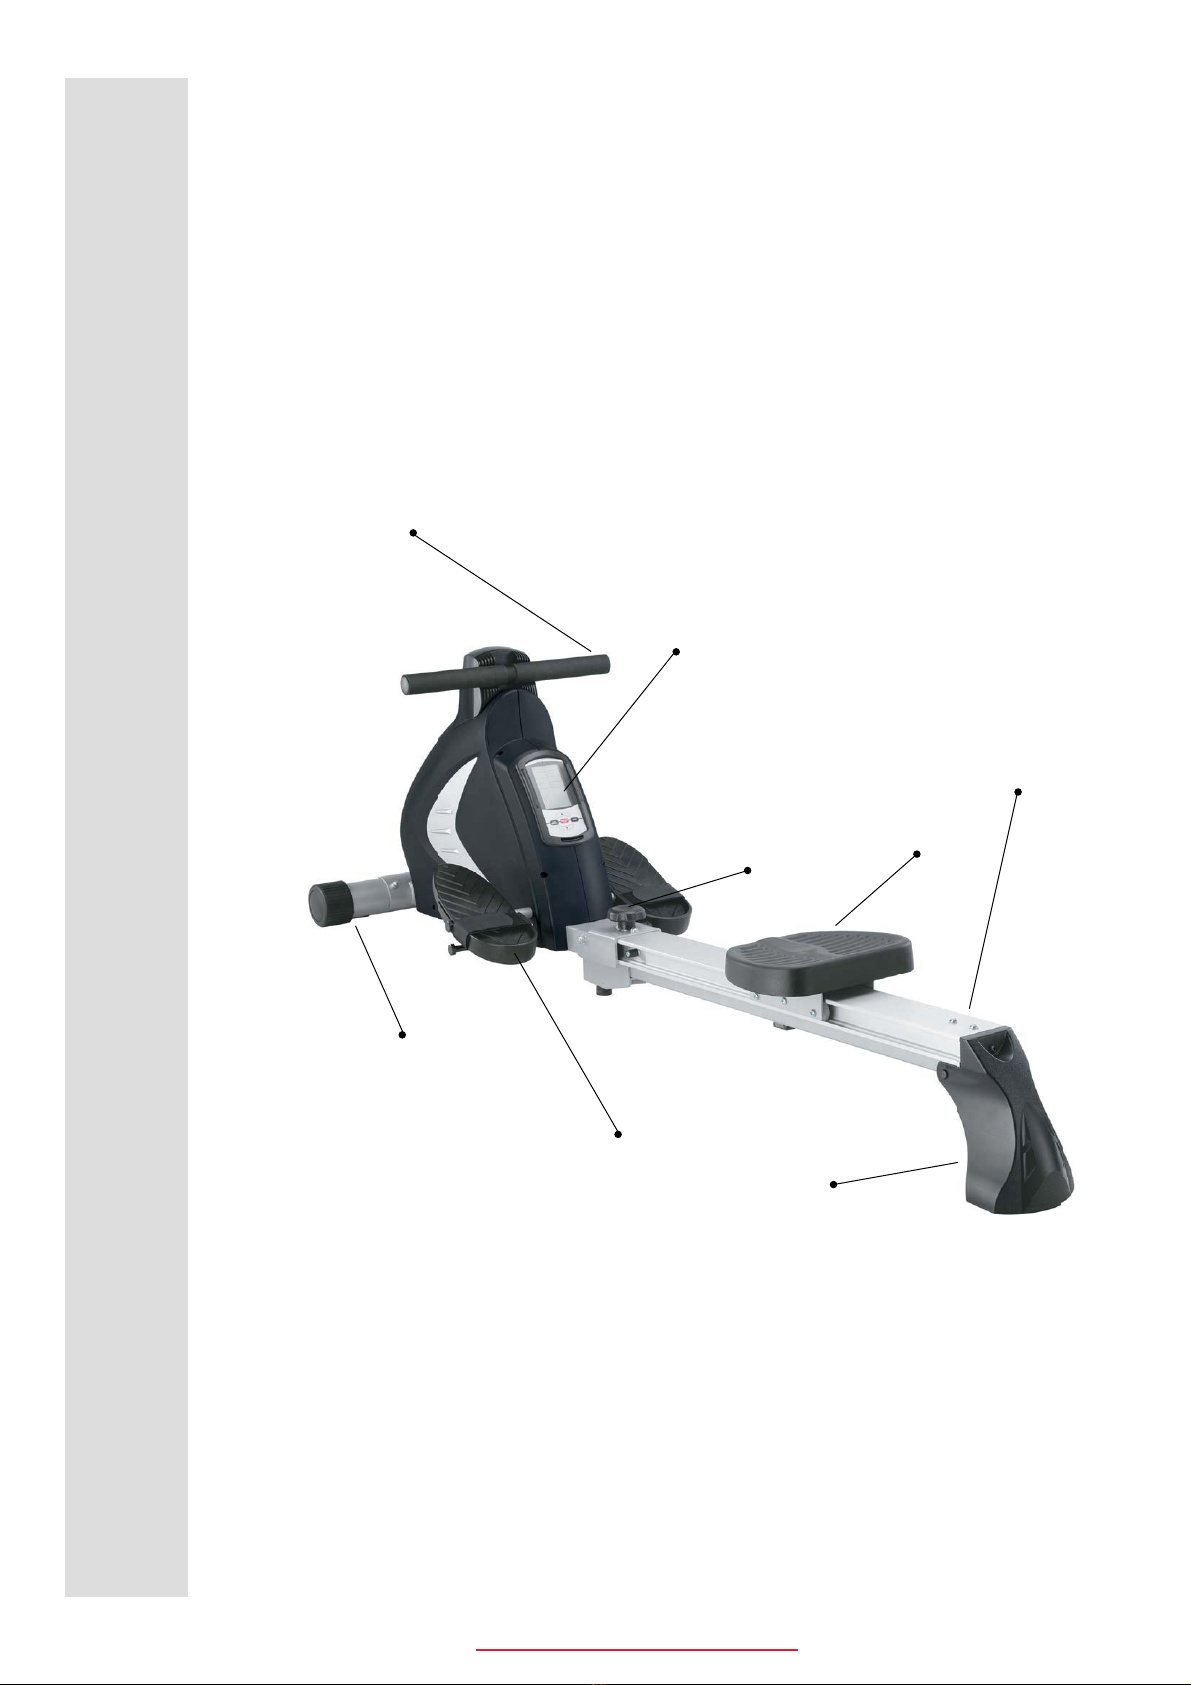
HANDLE BAR
CONSOLE
SADDLE
REAR STABILIZER
PEDAL
FRONT STABILIZER
KNOB
TRACK

3
FIGURE 1
ASSEMBLY PACK CHECK LIST
If you have any questions , please contact The Fitness Generation, +61 (03) 9765 9999.
www. healthstreamfitness.com.au
Free call number 1300 796 636
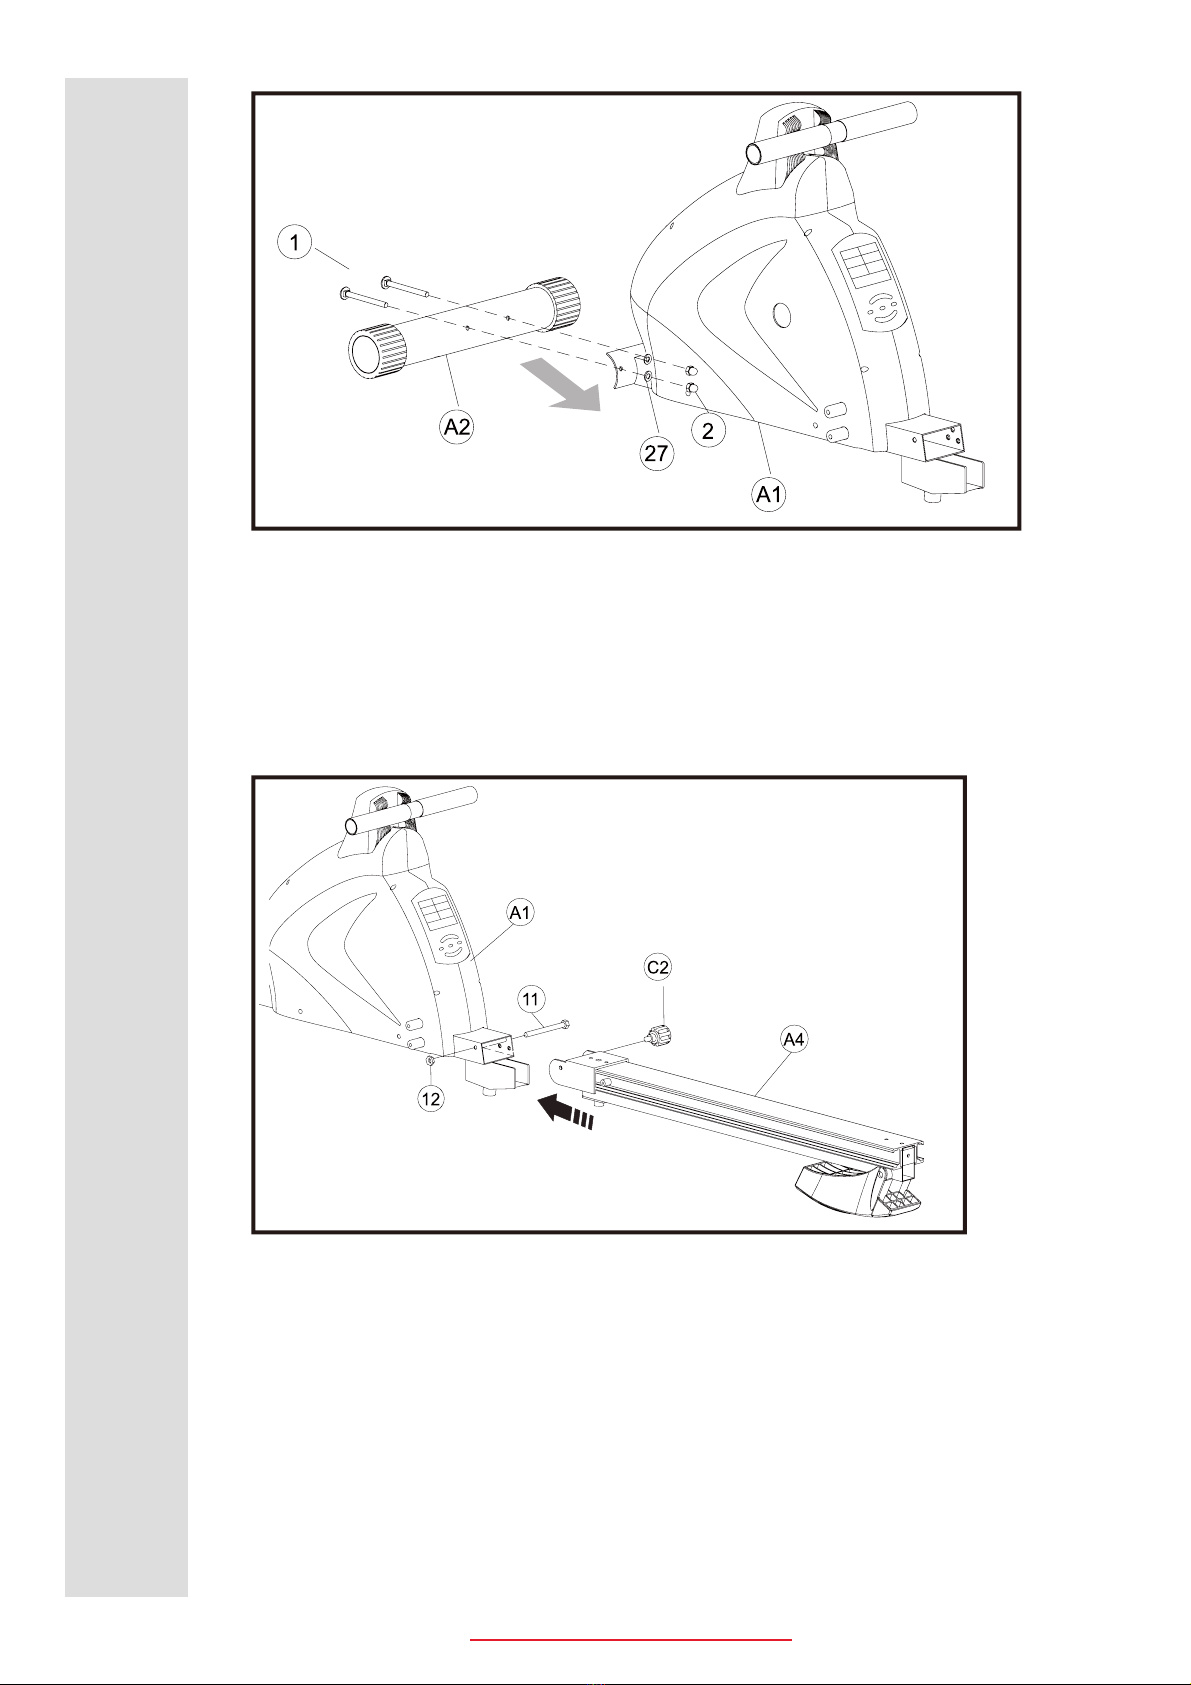
(2) NUT (27) WASHER
FIGURE 2
(1) SCREW
(11)SCREW (12)NUT (C2)KNOB
FIGURE 4
(28)WASHER(C1)KNOB
(24)SCREW(10)SCREW
FIGURE 4
4
If you have any questions , please contact The Fitness Generation, +61 (03) 9765 9999.
www. healthstreamfitness.com.au
Free call number 1300 796 636
Figure 1
Assembly for front stabilizer with main frame
Step 1. Secure the front stabilizer (A2) and main frame (A1) using carriage bolts (1) &
Nuts (2), and Washers (27).
Figure 2
Assembly for upper track
Step 1. Secure main frame (A1) with upper slide track (A4) using bolt (11),
Nut (12) and tight it by knob (C2).
5
If you have any questions , please contact The Fitness Generation, +61 (03) 9765 9999.
www. healthstreamfitness.com.au
Free call number 1300 796 636
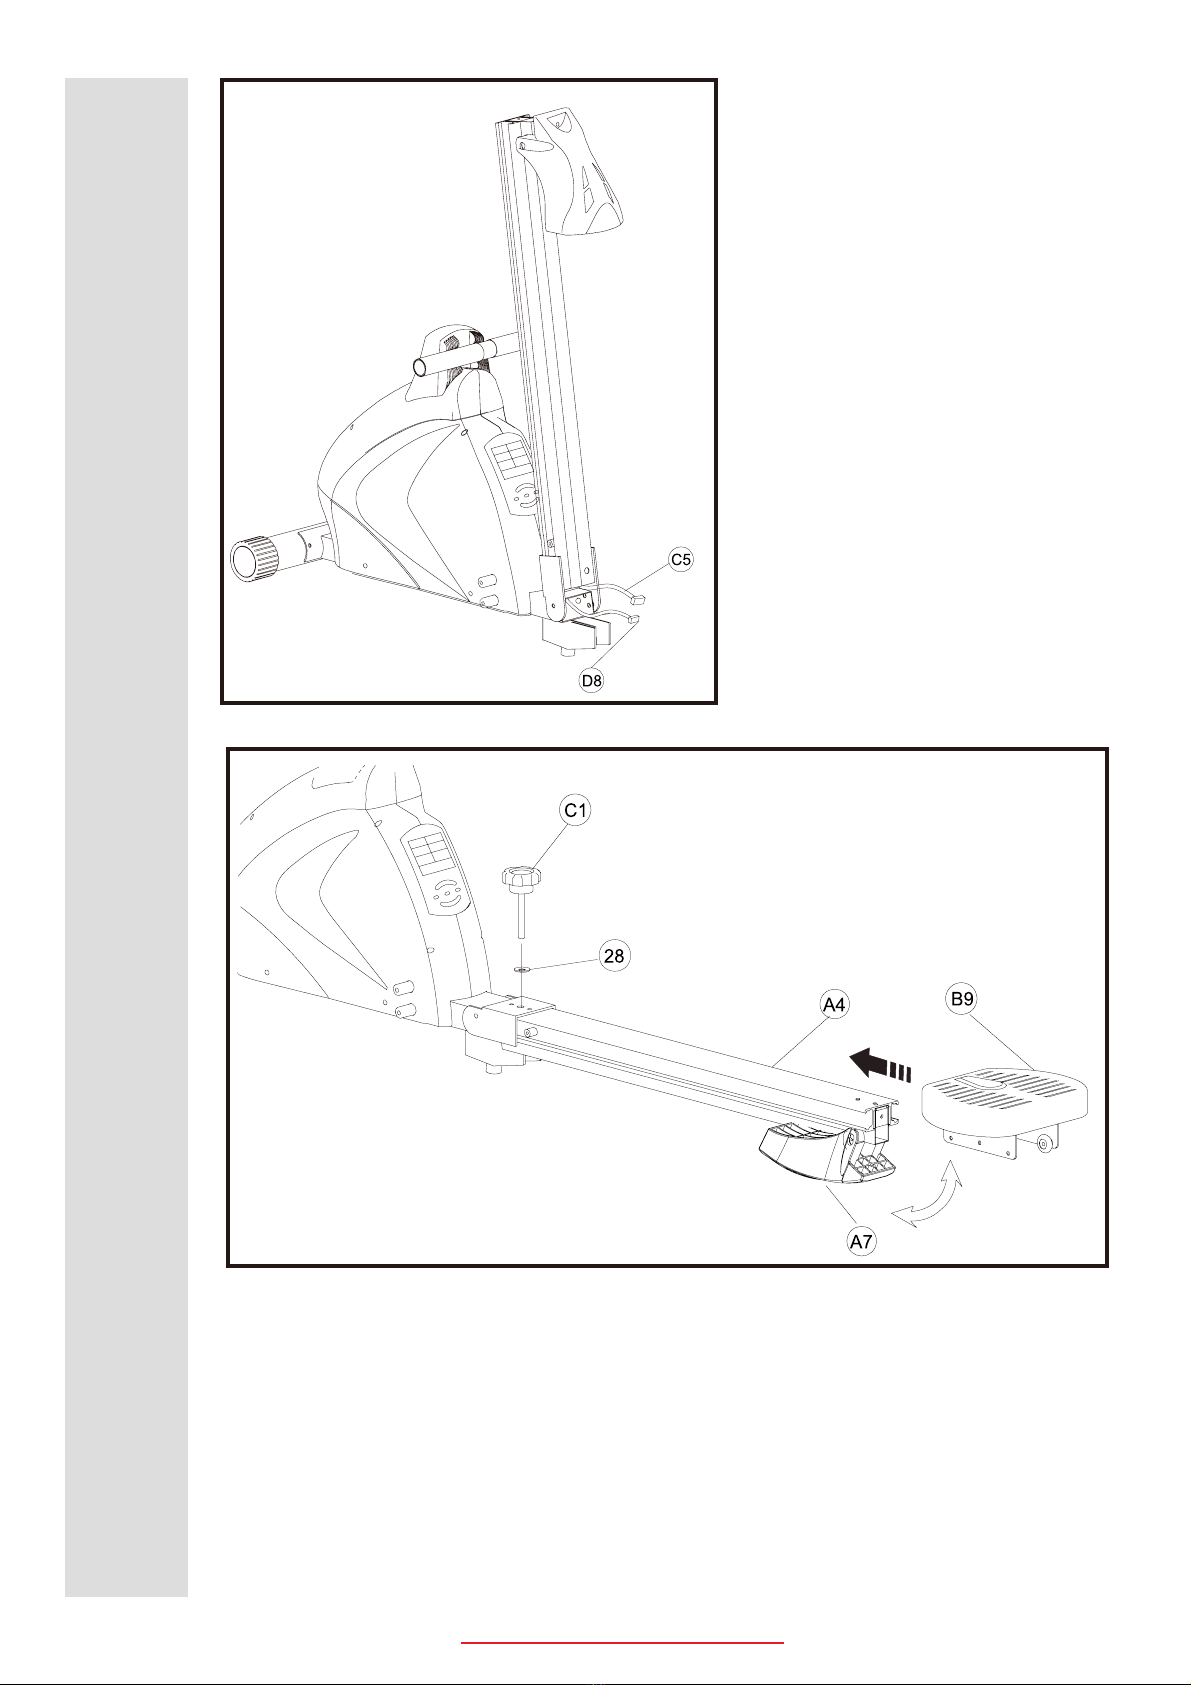
Figure 3
Assembly for Wireless Pulse Receiver
Step 1. Lift up the Power 10 slide track by
pull-ing out knob (C2).
Once the slide track is in place, release knob
(C2) to secure it in the elel-vated position.
Step 2. Connect cable (D8) & wireless pulse
receiver (C5).
Figure 4
Assembly for saddle seat with slide track
Step 1. Lower slide track back into place.
Step 2. Equip saddle (B9) into slide track (A4).
Step 3. Fold up rear stabilizer (A7)
Step 4. Secure the knob with (C1) and washer (28).
6
If you have any questions , please contact The Fitness Generation, +61 (03) 9765 9999.
www. healthstreamfitness.com.au
Free call number 1300 796 636
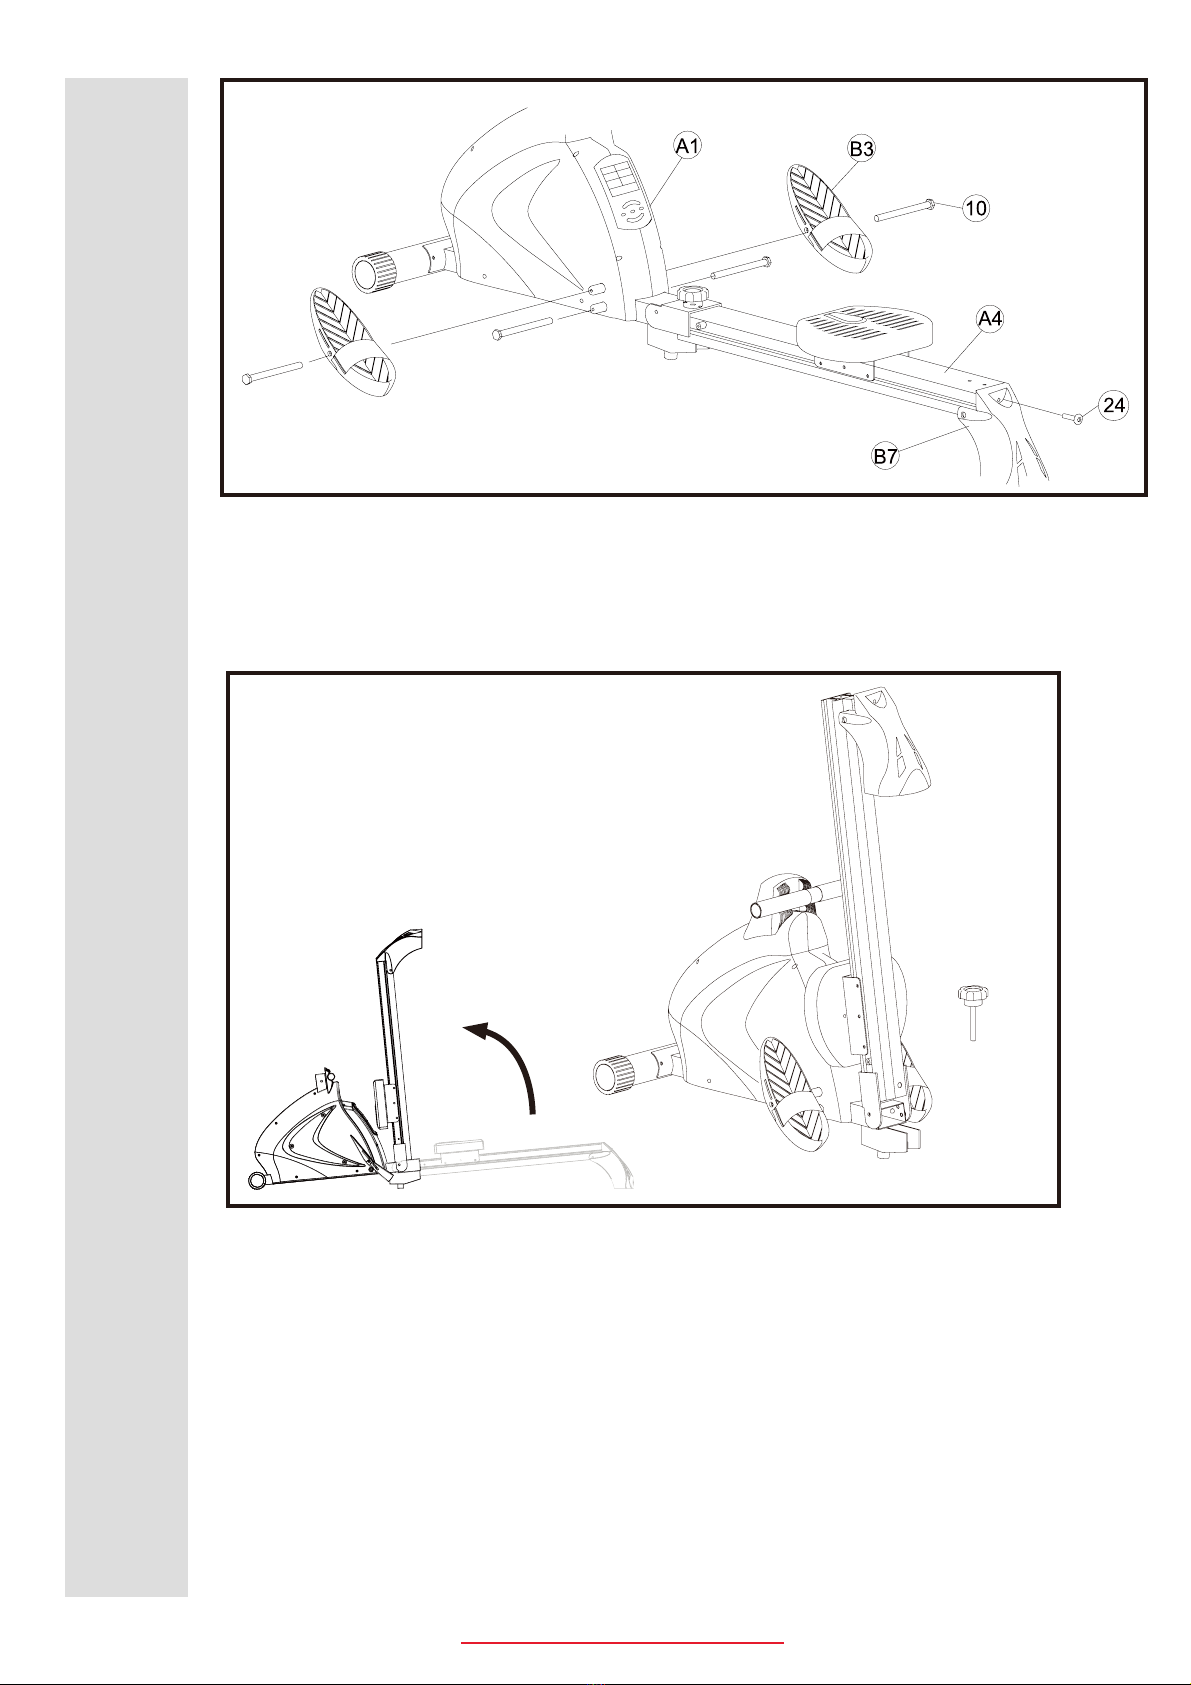
Figure 5
Assembly for pedals
Step 1: Insert shaft bolt (10) into pedal (B3) and secure it into main frame.
Step 2: Use screw (24) to secure rear stabilizer to slide track.
Figure 6
How to fold your machine
Step 1. Lift up the machine from it’s original extended position.
:KLOHKROGLQJLWLQDQXSULJKWSRVLWLRQXQVFUHZWKH&¿[NQREWKDWVHFXUHVWKHWUDFN
Step 2. Gently lay it back down and pull the knob (C2) to release the Slide track (low) to raise it.
<RXFDQSODFHWKH¿[NQREEDFNLQWRWKHKROHZKLOHLWVDWDVOLJKWDQJOHDQGIROGLWFRPSDFWO\LQ
with the unit.
The knob (C2) shall secure the machine for storage.
(C1)
7
If you have any questions , please contact The Fitness Generation, +61 (03) 9765 9999.
www. healthstreamfitness.com.au
Free call number 1300 796 636
8
If you have any questions , please contact The Fitness Generation, +61 (03) 9765 9999.
www. healthstreamfitness.com.au
Free call number 1300 796 636
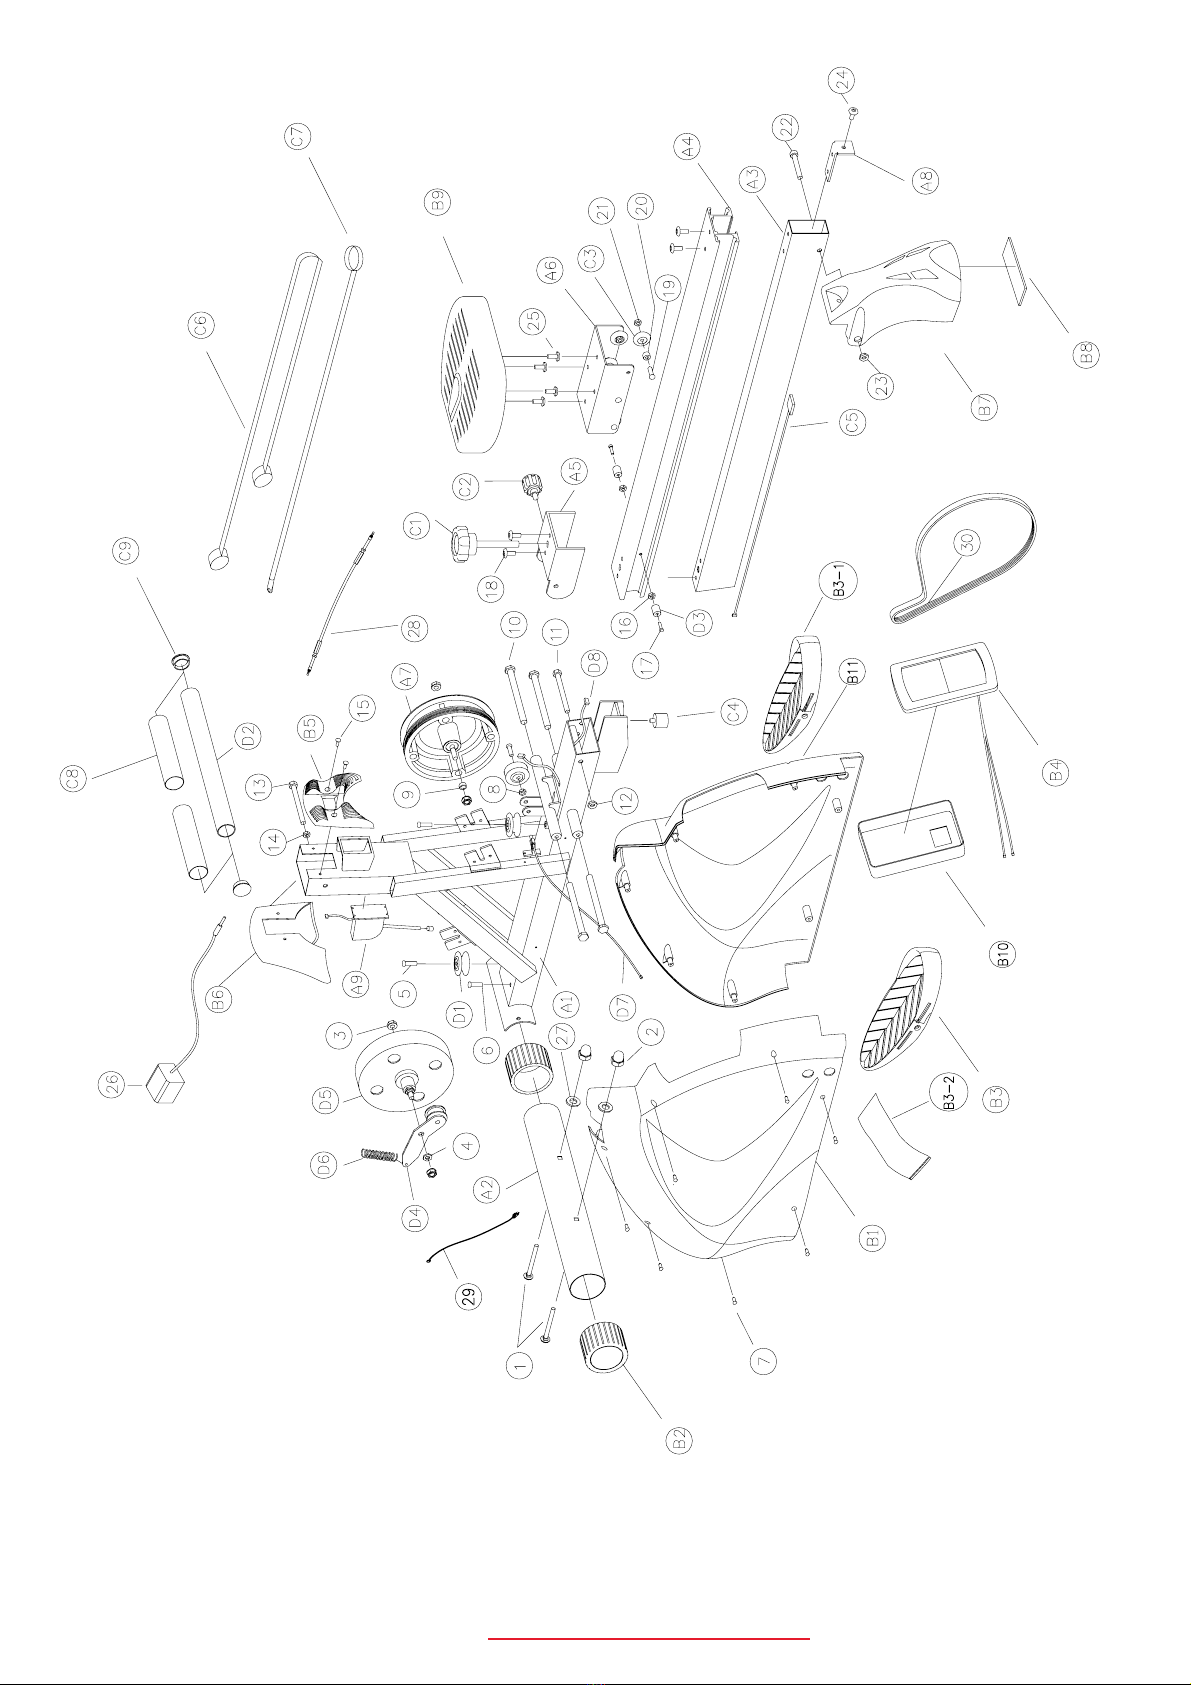
NO DESCRIPTION Q'TY NO DESCRIPTION Q'TY
A1 Main frame 1 1 Carriage bolt M8=90L 2
A2 Front stabilizer 1 2 M8 Nut 2
A3 Slide track(low) 1 3 Nut 3/8*26 4
A4 Slide track(upper) 1 4 Nut 3б83T 1
A5 Slide plate 1 5 screw M8=35L 3
A6 Slide plate 1 6 screw M8=30L 1
A7 Pulley 1 7 Ta
pp
in
g
screw 4Ϡ16 8
A8 fixing housing 1 8 M8 Nut 1
A9 Motor 1 9 Nut 3б8*4T 1
B1 Chain cover(left ) 1 10 Shaft 1/2 4
B2 76 End cap 2 11 Bolt 3/8=120 L 1
B3 Pedal(R) 1 12 3б8 Nut 1
13 Bolt 3/8=105L 1
14 3б8 Nut 7t 1
15 Bolt m5*p0.8*15L 2
16 m6 Nut 2
17 Screw M6=25L 2
18 Screw M8=25L 4
19 Bolt M8=25L 6
20 Pipe 12.5*8.2*10L 6
21 M8 Nut 6
22 Bolt 3/8=90L 1
23 3б8 Nut 1
24 Screw M8=40L 1
25 Screw M8=12L 4
26 Adaptor 1
Tool
Tool 6mm 1
Tool 14mm 2
Tool 21mm 1
B4 Console 1
B5 Plastic cover (upper) 1
B6 Plastic cover (lower) 1
B7 Back cover 1
B8 Foot cap 1
B9 Saddle 1
B3-1
B3-2
Pedal(L) 1
Pedal strap 2
C1 fixed knob 1
C2 Knob for folded 1
C3 37 -PU wheel 1
C4 Rubber cushion 1
C5 Wireless pulse receiver 1
C6 Tension belt 1
C7 10 elastic belt 1
C8 Sponge 35 2
C9 End cap 2
D1 Plastic pulley 3
D2 hand grip 1
D3 Rubber cushion 2
D4 Tension pulley 1
D5 Magnetic flywheel 1
D6 Spring 1
D7 Sensor pipe 1
D8 Cable 1
B10
B11
Console cover
Chain cover(right )
1
1
27 Washer 2
28
29
30
Tension cable 1
Dc wire 1
Belt 1
9
If you have any questions , please contact The Fitness Generation, +61 (03) 9765 9999.
www. healthstreamfitness.com.au
Free call number 1300 796 636
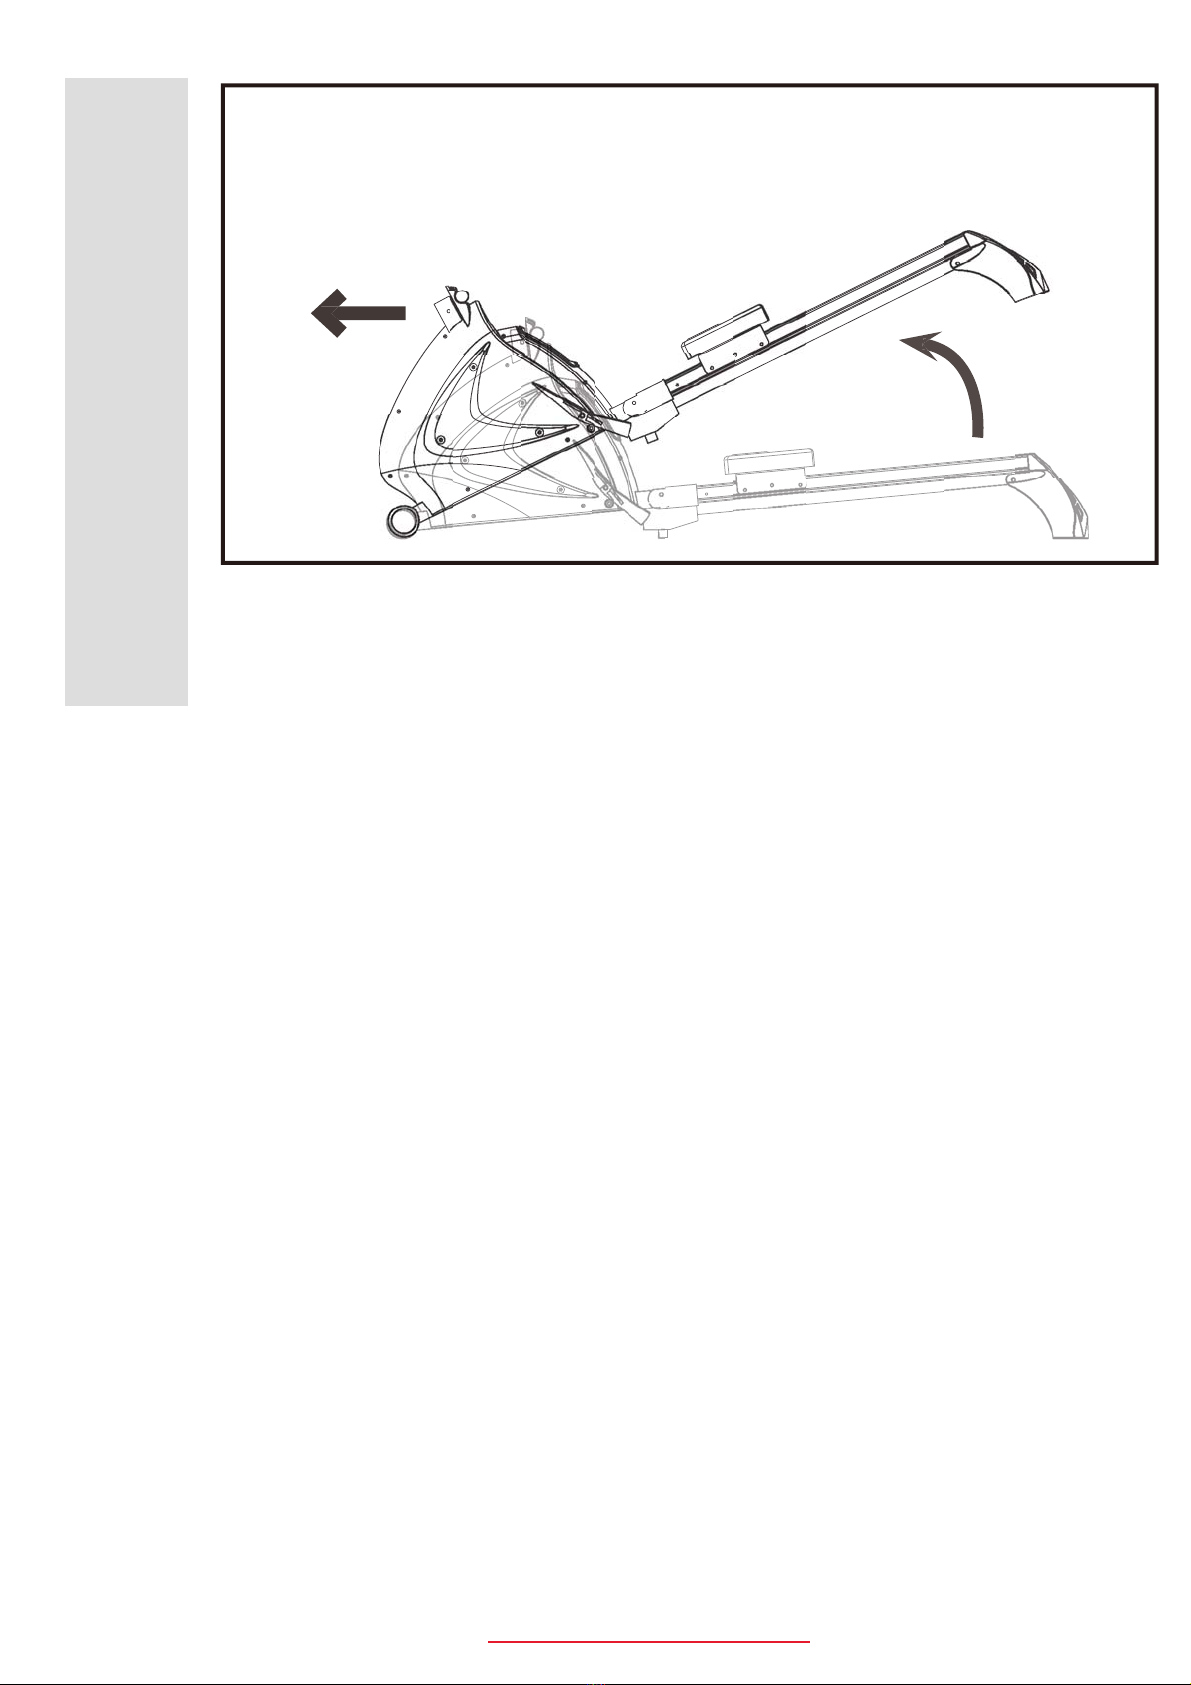
Figure 7
How to move your machine
Step 1: Lift up the machine till its on the front stabilizer wheels.
Step 2: Use the rear stabilizer as a anchor to push the machine to its desired piosition
10
If you have any questions , please contact The Fitness Generation, +61 (03) 9765 9999.
www. healthstreamfitness.com.au
Free call number 1300 796 636
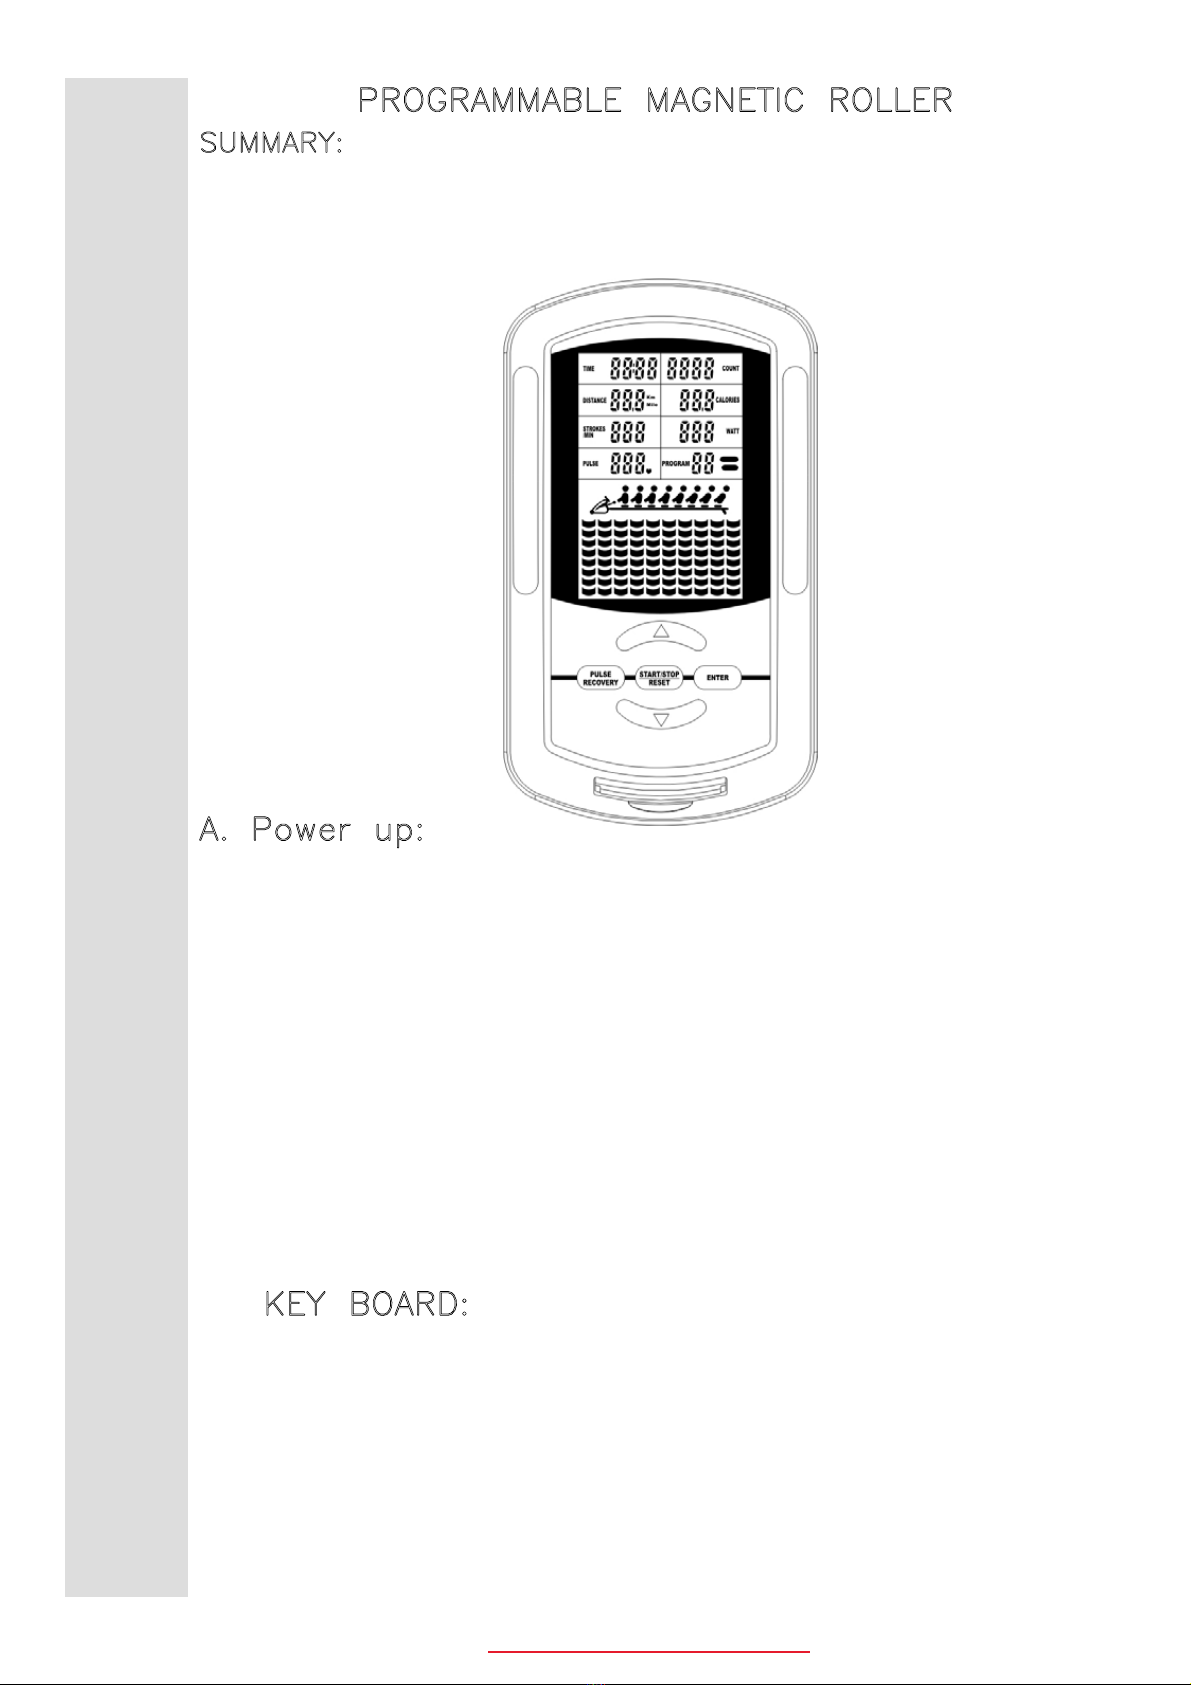
PROGRAMMABLE MAGNETIC ROLLER
SUMMARY:
This system is designed for programmable magnetic bike. There
are 3 parts to this system the monitor (BC-81186), motor
& controller and magnetic braking system.
A. Power up:
a. Connect all of the cables to the monitor.
b. After power up, all LCD segments will light up for
2 seconds and CPU will be reset the resistance into
level 1. The monitor will go to initial mode.
1. If the connection cables were installed incorrectly, monitor
will display “E1”on matrix display and generate a beep sound.
Before asking service, please examine if all connection cables
are well connected and then reset the power to release the
beep sound or press “START / PAUSE (Hold to reset) “button
to restart system. If the monitor still show “E1”message,
please call service.
2. If the monitor shows “E2 ”message, please call service.
B. KEY BOARD:
a. ENTER:
1. During PAUSE mode, press ENTER key to enter desired
program.
2. Confirm the setting values of TIME, COUNT, DISTANCE,
CALORIES, PULSE in the heart rate control program 8,

11
If you have any questions , please contact The Fitness Generation, +61 (03) 9765 9999.
www. healthstreamfitness.com.au
Free call number 1300 796 636
and PROGRAM PROFILE in the User setting program.
b. START/PAUSE/ RESET:
1. To start or pause exercising.
2. Hold this button for 2 seconds can enter initial mode
& reset all value to zero.
c. У:ϧ
1. During the pause mode, Select Program or increase
the setting value of TIME, COUNT, DISTANCE, CALORIES,
PULSE in the heart rate control program 8, and PROGRAM
PROFILE in the User setting program.
2. During the exercise mode, Press this button to increase
the load level.
d. ϰ:
1. During the pause mode, Select Program or decrease
the setting value of TIME, COUNT, DISTANCE, CALORIES,
PULSE in the heart rate control program 8, and PROGRAM
PROFILE in the User setting program.
2. During the exercise mode, Press this button to decrease
the load level.
e. PULSE RECOVERY:
1. Press this button going into pulse recovery detecting.
F1.0 = Excellent F2.0 = Good F3.0 = Fair F4.0 = below average
F5.0 = NoGood F6.0 = Poor
C. FUNCTIONS:
TIME:
Exercise time will be shown on the display when exercising.
If there is no signal is detected within 4 seconds, it will reset
zero.
Count up: Without setting the time value, the monitor will count
up the time from 0:00 to 99:59.
Count down: Setting the exercise time, the monitor will count
down from your setting values. Once reach setting value, monitor
will produce bi sounds, and then the value of time becomes
counting up form 0:00.
Count:
Count will be shown on the display when exercising. If there
is no signal is detected within 4 seconds, it will reset zero.
Count up: Without setting the count value, the monitor will count
up the count from 0 to 9999.
Count down: Setting the exercise time, the monitor will count
down from your setting values. Once reach setting value, monitor
will produce bi sounds, and then the value of count becomes
counting up form 0.
CALORIE
12
If you have any questions , please contact The Fitness Generation, +61 (03) 9765 9999.
www. healthstreamfitness.com.au
Free call number 1300 796 636
The calories burned will be displayed on the window. Its scope
is 0.0-999kcal.
Count up: Without setting the calorie value, the monitor will
count up the count from 0.0 to 999.
Count down: Setting the calorie consumption, the monitor will
count down from your setting values. Once reach setting value,
monitor will produce bi sounds, and then the value of count
becomes counting up form 0.0.
DISTANCE
The distance will be displayed on the window. The monitor begins
to calculate from 1 meter to 999meter and the measure unit
is 1 meter. After reach 1 KM, the measure unit become to
0.1 KM (100meter). The monitor will display from 1.1KM to
99.9KM.
Count up: Without setting the distance value, the monitor will
count up from 0.1-99.9 KM or Mile.
Count down: Setting the exercise distance, the monitor will count
down from your setting values. Once reach setting value, monitor
will produce bi sounds, and then the value of count becomes
counting up form 1 meter.
PULSE
The monitor will display your current heart beat rate in beats
per minute. The value of pulse make count is 40-220. If signal
is input, the monitor will count the beats. If no pulse input
is detected within 16 seconds, the display will indicate “p”. This
is power saving device.
Setting the pulse value, the heart rate will limit on certain value
(90-220) as your setting. One your heart rate is more than
your setting value. The window will blink and remind you the
value is higher than your setting value. You need to work slowly
to reduce your heart rate.
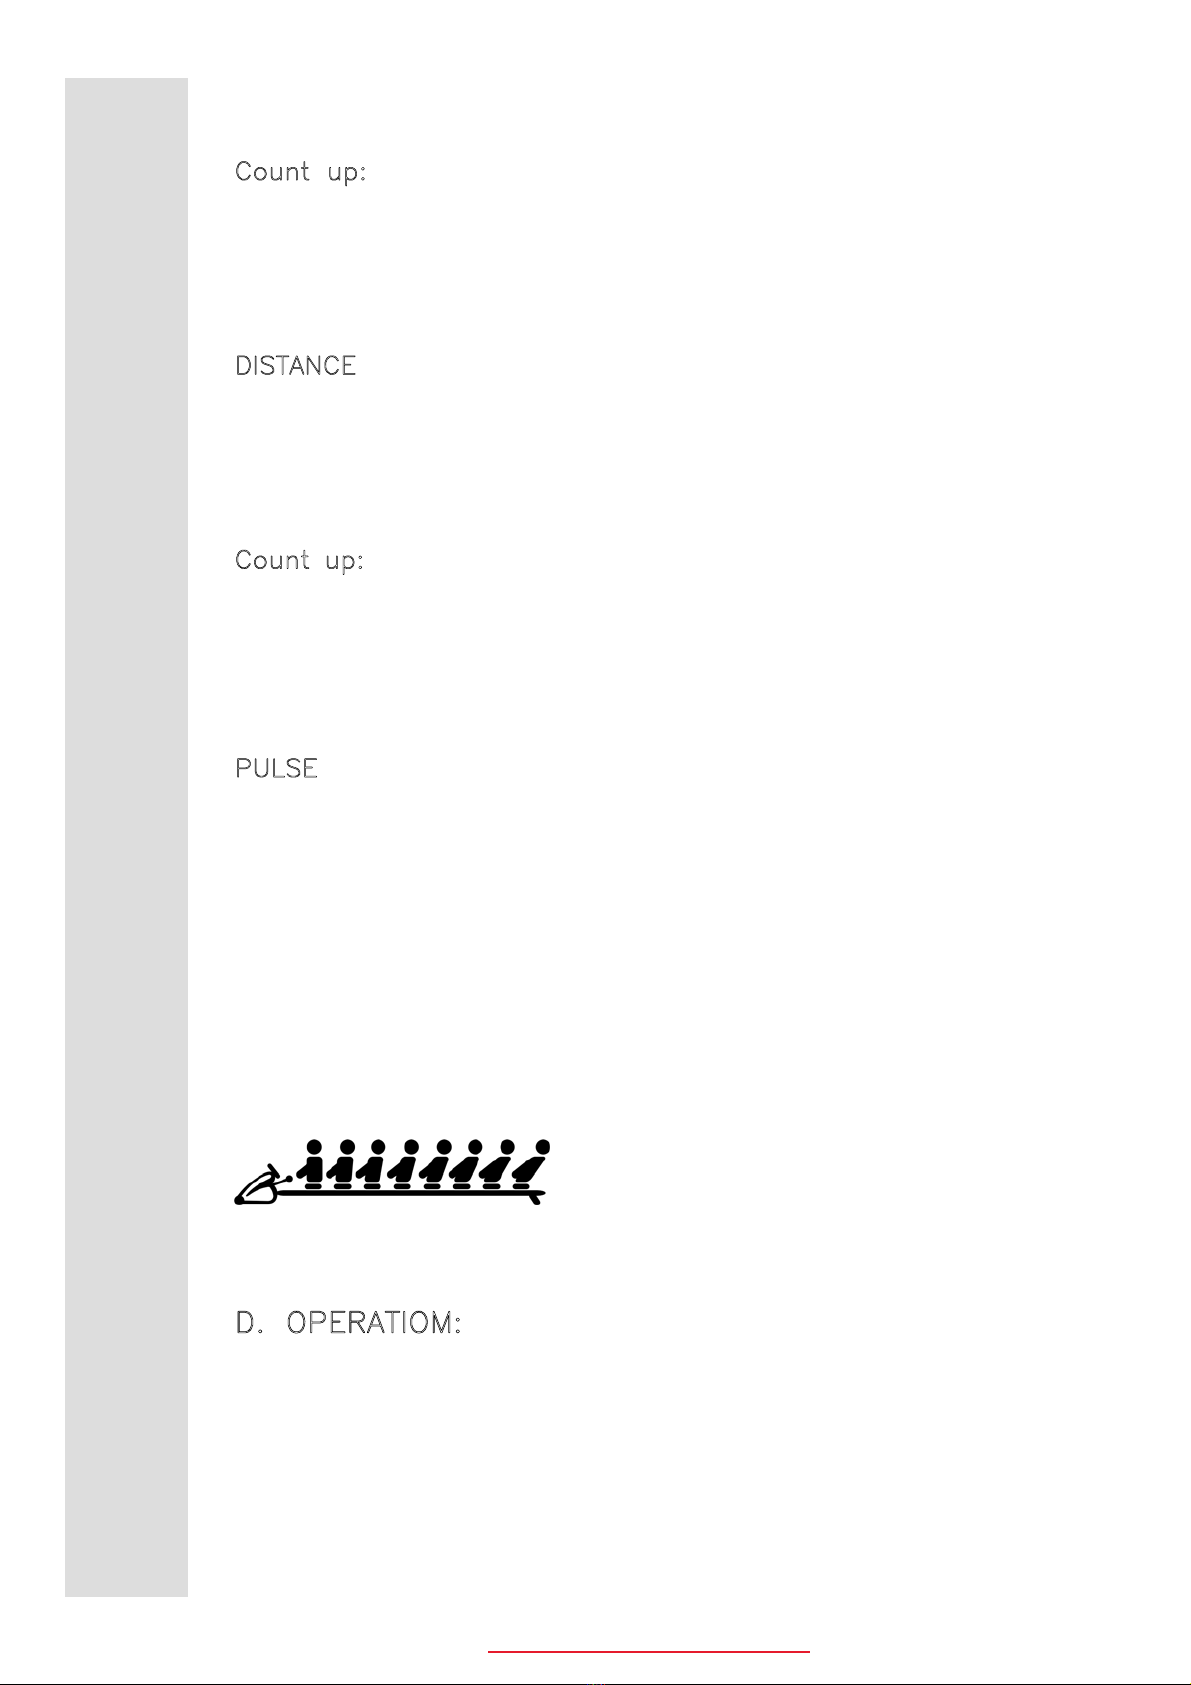
The picture indicates the travel distance on the roller machine
during exercise.
D. OPERATIOM:
This system contains of 12 different programs and you can
preset the workout time and system will divide the time by
10 intervals. If you don’t preset workout time, system will
cont up the workout time in one-second increment. Without

13
If you have any questions , please contact The Fitness Generation, +61 (03) 9765 9999.
www. healthstreamfitness.com.au
Free call number 1300 796 636
setting the workout time, the time will count up and each
interval will retain 3 minutes.
Preset Program: Program 1- Program 7
1. Press the Up and down button to the desired
program.
2. Press the Enter Button to enter your desired
program.
3. The Time display will flash, and then press the “up
or down”button to set up the desired time to do
the exercise. Press ENTER button to confirm your
setting value.
4. The count display will flash, and then press the
“up or down”button to set up the desired value.
Press ENTER button to confirm your setting value.
5. The distance display will flash, and then press the
“up or down”button to set up the desired distance
you would like to reach. Press ENTER button to
confirm your setting value.
6. The calorie display will flash, and then press the
“up or down”button to set up the desired calorie
you would like to reach. Press ENTER button to
confirm your setting value.
7. Press the start/stop to begin exercise.
Note:
If you would like to skip the function setting, press
the Enter button to the next setting function.
1. When you reach the target, the monitor will
produce beep sound and then stop.
2. If you set up more than one target and you
would like to reach next target, press start to
exercise again.
TARGET HEART RATE PROGRAM: (PROGRAM 8)
In this program, the computer will adjust the level of
loading according to the heart rate detected. For example,
the level of loading may increase while the heart rate
detected is lower than TARGET H.R. Also, the level of
loading may decrease while the heart rate detected is

14
If you have any questions , please contact The Fitness Generation, +61 (03) 9765 9999.
www. healthstreamfitness.com.au
Free call number 1300 796 636
higher than TARGET H.R. As a result, the user’s heart
rate will be adjusted to close the TARGET H.R. in the
range of TARGET H.R. –5 and TARGET H.R. +5.
1. Press the Up and down button to the program
8.
2. Press the Enter Button to enter your target heart
rate program.
3. The pulse display will flash, and then press the
“up or down”button to set up the desired limit
heart rate you would like to keep. Press ENTER
button to confirm your setting value.
4. The Time display will flash, and then press the
“up or down”button to set up the desired time
to do the exercise. Press ENTER button to confirm
your setting value.
5. The count display will flash, and then press the
“up or down”button to set up the desired value.
Press ENTER button to confirm your setting value.
6. The distance display will flash, and then press
the “up or down”button to set up the desired
distance you would like to reach. Press ENTER
button to confirm your setting value.
7. The calorie display will flash, and then press
the “up or down”button to set up the desired
calorie you would like to reach. Press ENTER
button to confirm your setting value.
8. Press the start/stop button to begin exercise.
Note:
1. You must set up the pulse value in this
program, because is a heart rate control
program.
2. If you do not set the pulse value, the initial
setting value is 90 bpm (heart beats per
minute).
3. When you reach the one of the targets such
as Time, Count, Distance, and Calories, the
monitor will produce beep sound and then
stop.

15
If you have any questions , please contact The Fitness Generation, +61 (03) 9765 9999.
www. healthstreamfitness.com.au
Free call number 1300 796 636
4. If you set up more than one target and
you would like to reach next target, press
start to exercise again.
User Setting Program: U1 to U4
Users are free to edit the values in the order of TIME, COUNT,
DISTANCE, CAL, and the level of loading in 10 intervals. The
values and profiles will be stored in the memory after setup.
Users may also change the ongoing loading in each interval
by pressing up or down button, and they will not change the
level of loading stored in the memory.
1. Press the Up and down button to the User setting
program.
2. Press the Enter Button to enter this program.
3. The Time display will flash, and then press the “up
or down”button to set up the desired time to do
the exercise. Press ENTER button to confirm your
setting value.
4. The count display will flash, and then press the “up
or down”button to set up the desired value. Press
ENTER button to confirm your setting value.
5. The distance display will flash, and then press the
“up or down”button to set up the desired distance
you would like to reach. Press ENTER button to confirm
your setting value.
6. The calorie display will flash, and then press the “up
or down”button to set up the desired calorie you
would like to reach. Press ENTER button to confirm
your setting value.
7. The column 1 will flash, and then press the “up
or down”button to create your personal exercise
profile.
8. Press the Enter button to confirm your first column
of your exercise profile.
9. The column 2 will flash, and then turn the “MODUS”
button to create your personal exercise profile.
10.Press the Enter button to confirm your second column
of your exercise profile.
16
If you have any questions , please contact The Fitness Generation, +61 (03) 9765 9999.
www. healthstreamfitness.com.au
Free call number 1300 796 636
11.Follow the above descriptions to finish your personal
exercise profile.
12.Press the START/ST0P to begin exercise.
NOTE:
1. Your personal exercise profile will be stored in the
memory of the monitor.
2. When you reach the one of the targets such as Time,
Count, Distance, and Calories, the monitor will produce
beep sound and then stop.
3. If you set up more than one target and you would like
to reach next target, press start to exercise again.
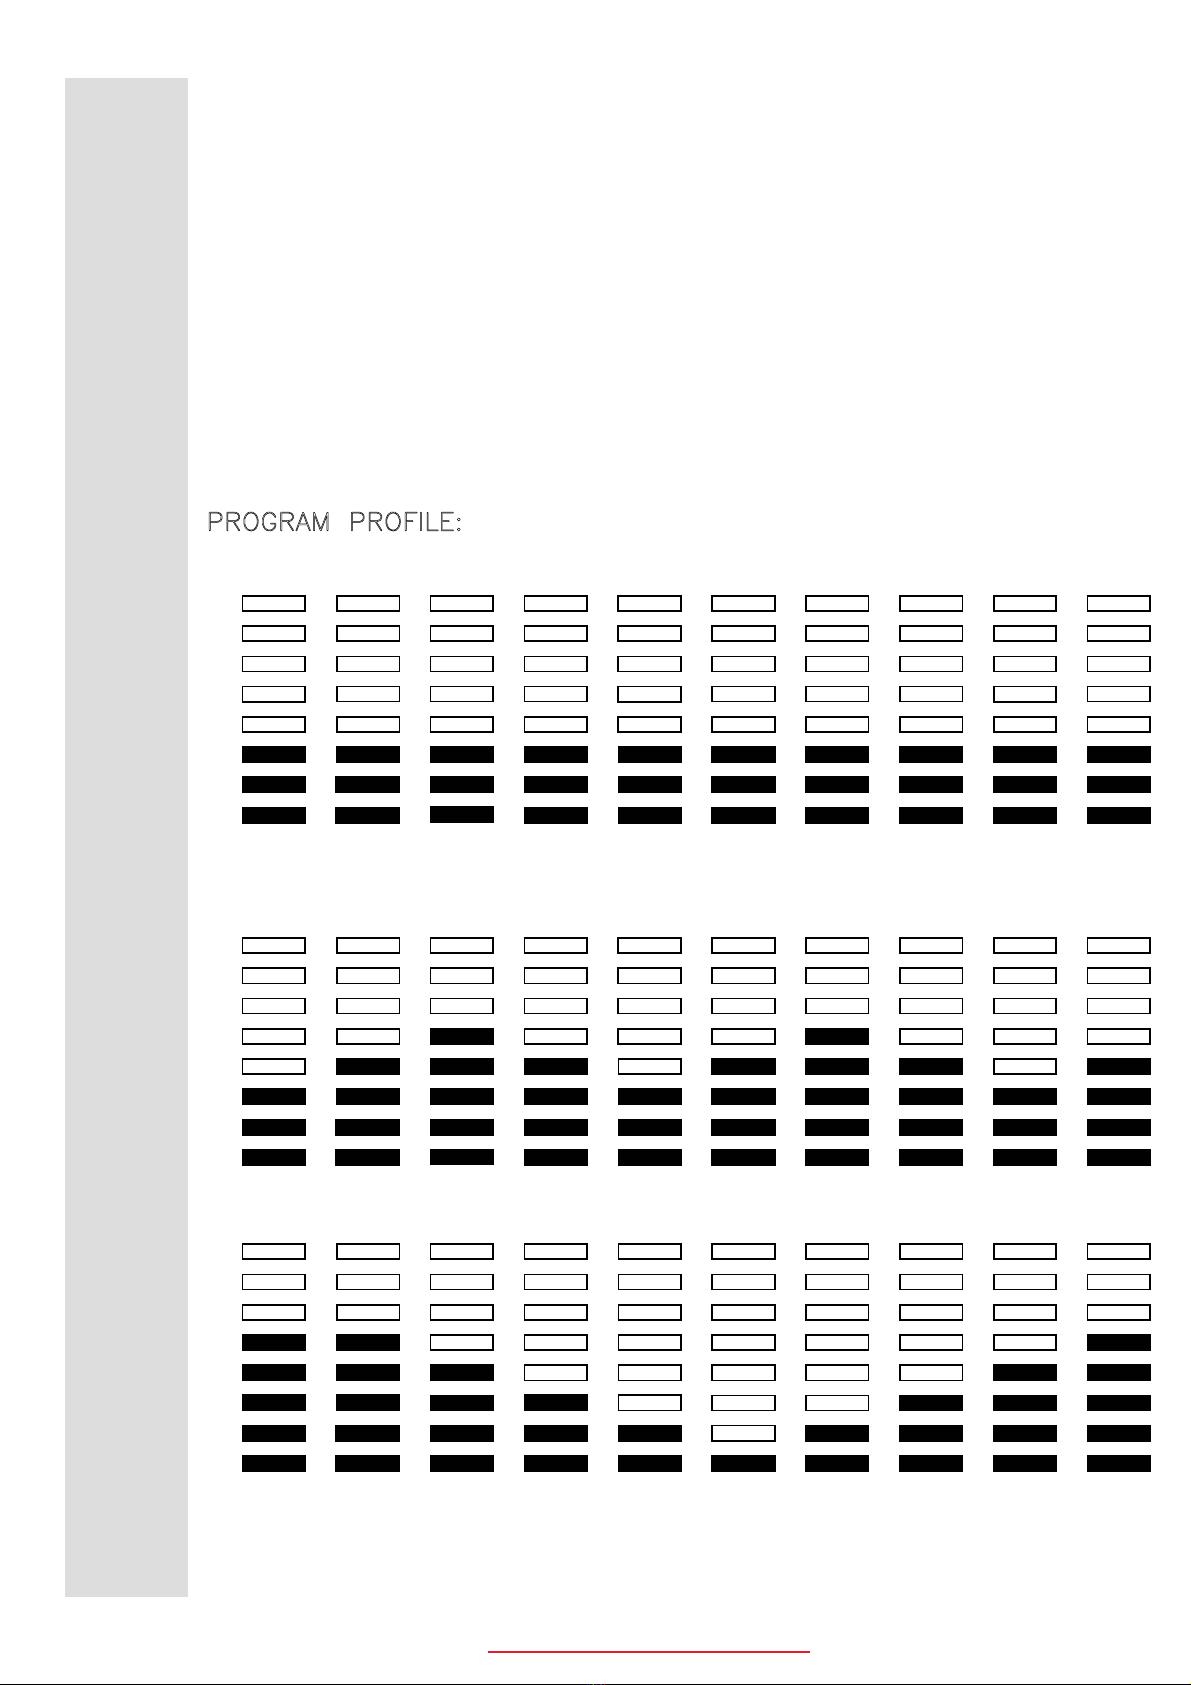
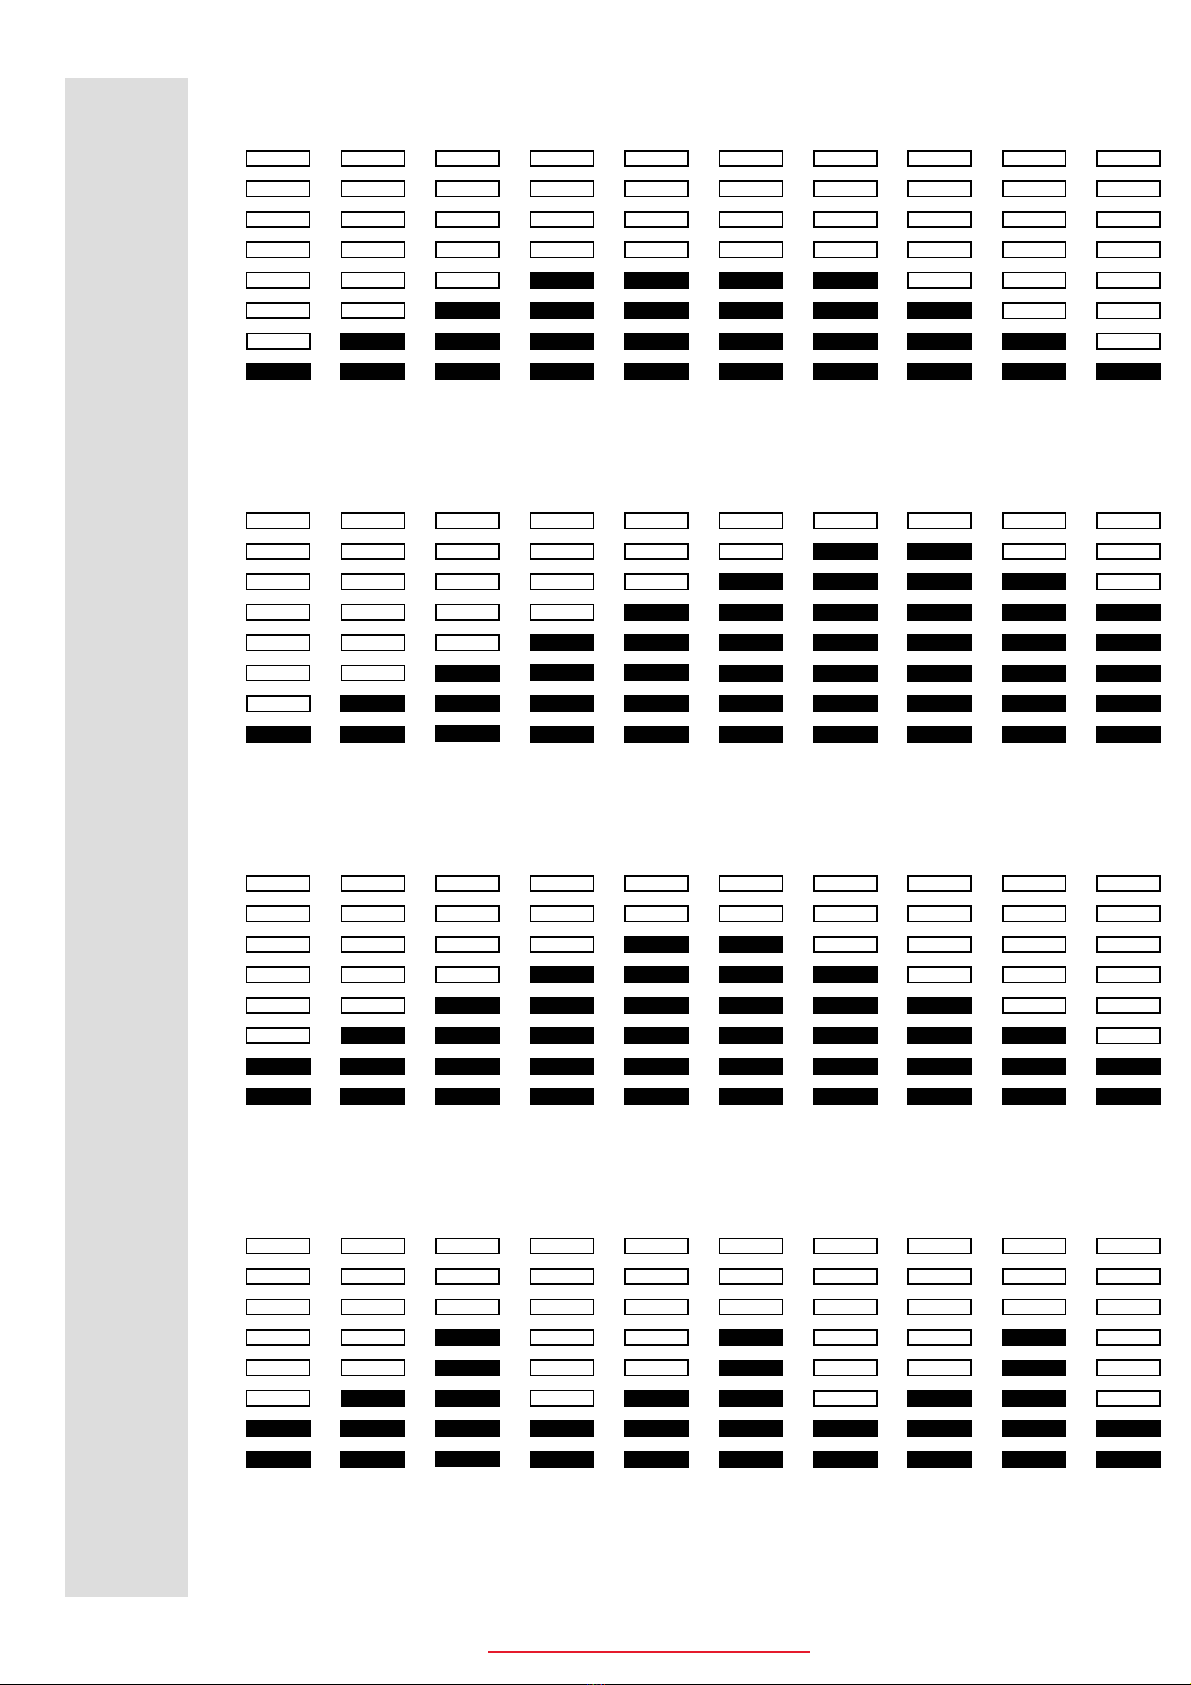
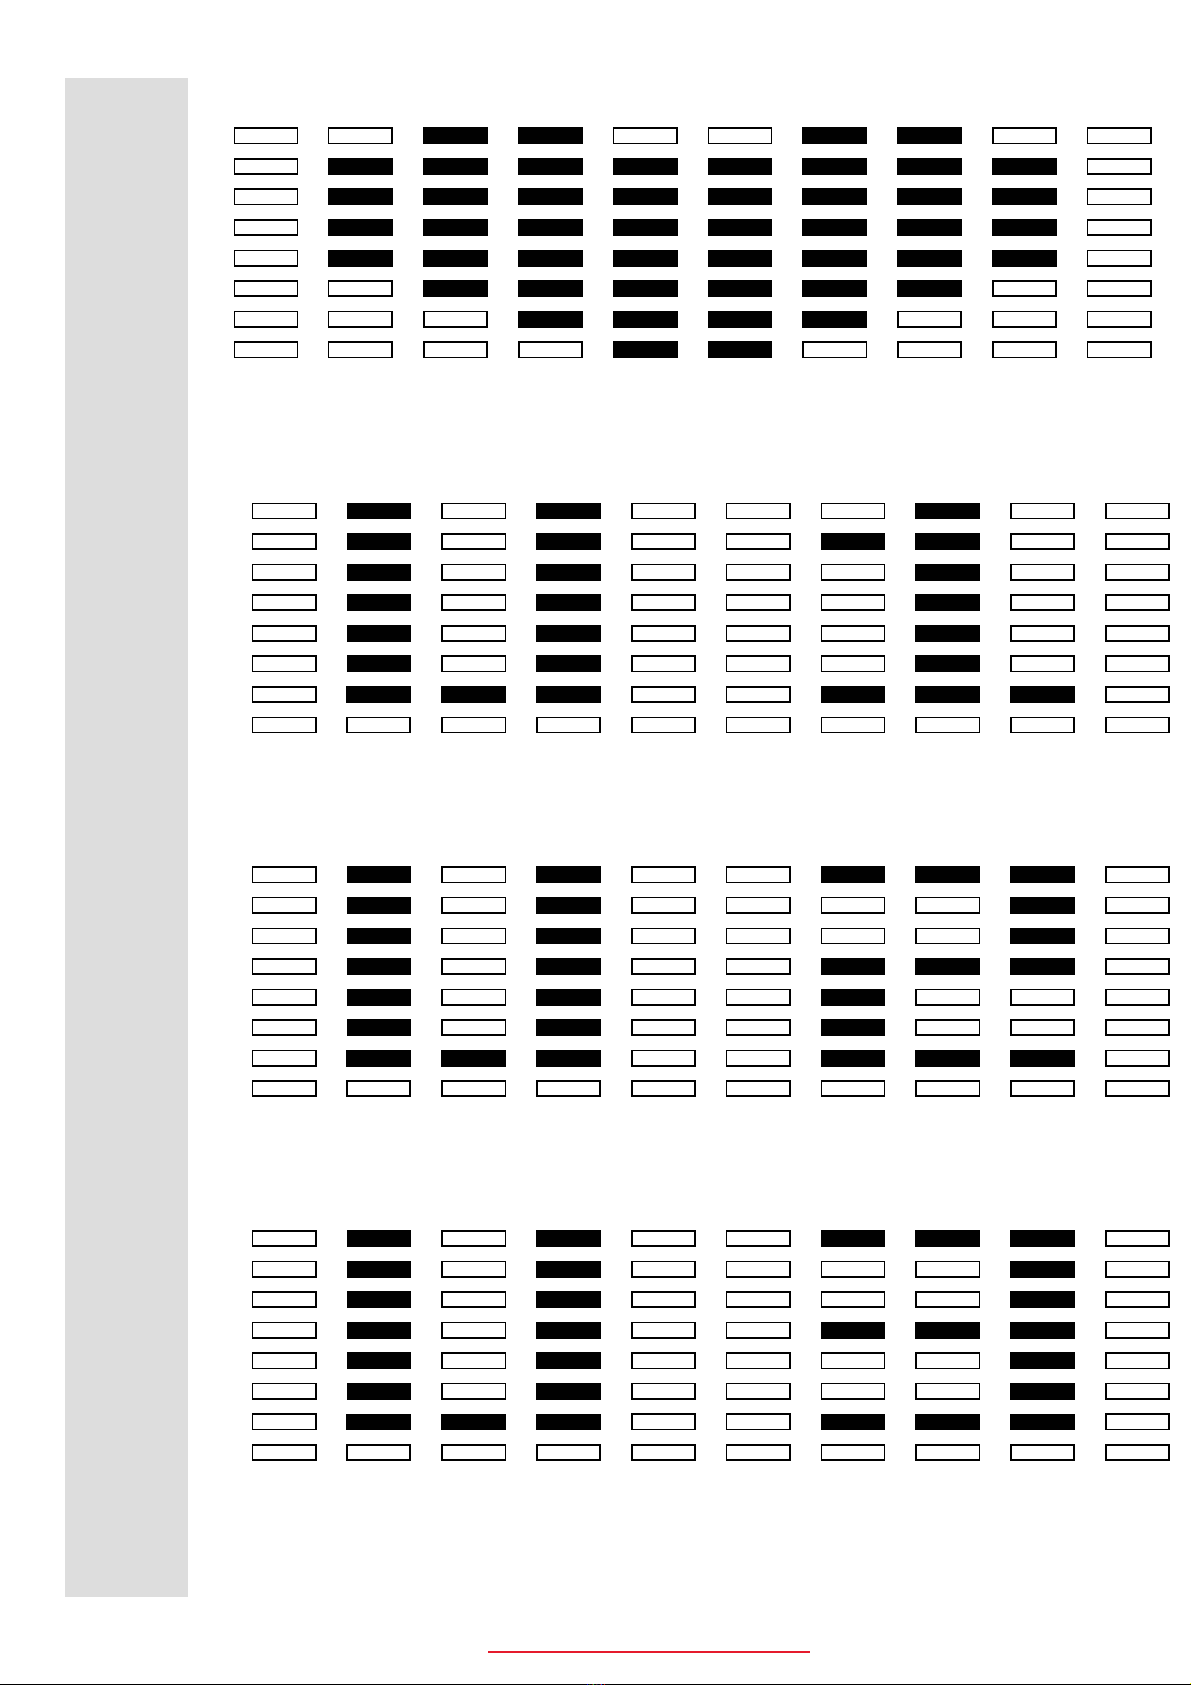
PROGRAM PROFILE:
1. PROGRAM 1 (MANUAL)Κ
2. PROGRAM 2 (POLLING)Κ
3. PROGRAM 3 (VALLEY)Κ
17
If you have any questions , please contact The Fitness Generation, +61 (03) 9765 9999.
www. healthstreamfitness.com.au
Free call number 1300 796 636
4. PROGRAM 4 (FAT BURN)Κ
5. PROGRAM 5 (RAMP)Κ
6. PROGRAM 6 (MOUNTAIN)Κ
7. PROGRAM 7 (INTERVALS)Κ
18
If you have any questions , please contact The Fitness Generation, +61 (03) 9765 9999.
www. healthstreamfitness.com.au
Free call number 1300 796 636
8. PROGRAM 8 (TRAGET H.R.)Κ
9. PROGRAM 9 (user setting)Κ
10.PROGRAM 10 (user setting)Κ
11.PROGRAM 11 (user setting)Κ

19
If you have any questions , please contact The Fitness Generation, +61 (03) 9765 9999.
www. healthstreamfitness.com.au
Free call number 1300 796 636
12.PROGRAM 12 (user setting)Κ
Table of contents
Other Healthstream Fitness Equipment manuals


Popular Fitness Equipment manuals by other brands


G-FITNESS
G-FITNESS AIR ROWER user manual

CAPITAL SPORTS
CAPITAL SPORTS Dominate Edition 10028796 manual

Martin System
Martin System TT4FK user guide

CIRCLE FITNESS
CIRCLE FITNESS E7 owner's manual

G-FITNESS
G-FITNESS TZ-6017 user manual

Accelerated Care Plus
Accelerated Care Plus OMNISTIM FX2 CYCLE/WALK user manual


