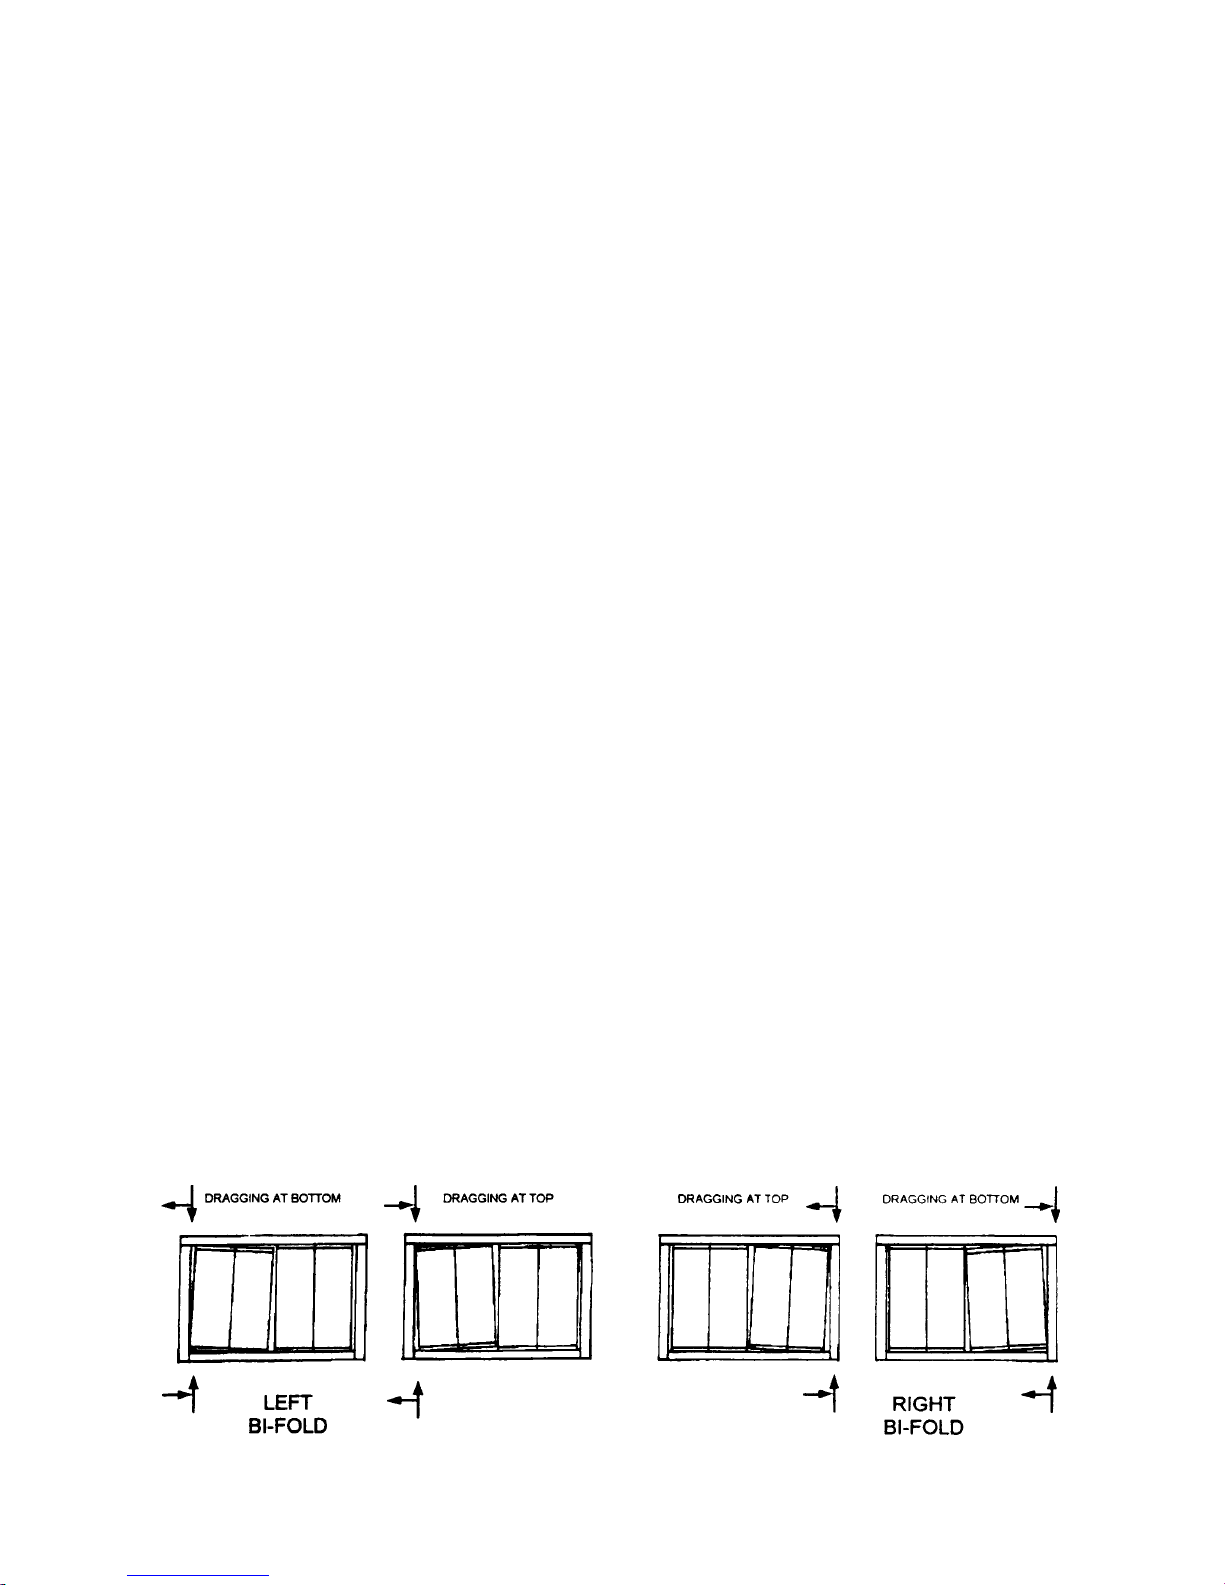
Hearth Craft Glassdoor Firescreen User manual

This Hearth Craft glass enclosure is designed for use with vented Class A
chimney (lined with clay, tile, porcelain or stainless steel). If in doubt, check
with your building inspector. Be sure flue and firebox are free of creosote
and cracks (read “Creosote”, page 3). If your fireplace is new, check for
“Acid Hearth”, page 3.
Do not use in factory-built (zero-clearance) fireplaces. Consult the
retail operation that sold you this enclosure for information about
Hearth Craft glass enclosures designed for factory built (zero-
clearance) fireplaces.
INSTALLATION TIPS FOR GLASS FIREPLACE
ENCLOSURES
1. Read and understand the instructions, owners manual and warranty.
Should you have any questions, call the dealer that you purchased your
enclosure from.
2. Prior to removing protective plastic film from your glass enclosure finish,
be sure the glass enclosure fits your fireplace opening.
NOTE: Hearth Craft will not accept returns on glass enclosures with the
plastic film removed.
3. Do not install your glass enclosure until you have read “ACID HEARTH”,
Page 3.
4. Install with fiberglass insulation.
5. Place wood or gas log grate and/or andirons to the back of your
fireplace, at least 6" away from the enclosure.
6. Avoid large, hot fires from wood or gas logs. Excessive temperatures
can cause frame discoloration, frame warpage and even glass
breakage. Hearth Craft does not cover discoloration, frame warpage or
glass breakage due to excessive heat.
7. Burn with your doors open.
8. Do not allow burning logs to contact glass.
9. Keep combustibles away from the fireplace.
10. Do not clean glass doors while they are hot, breakage may occur.
11. Open and close doors evenly and fully.
12. Mesh curtain is included for total enjoyment and safety
SAVE THESE INSTRUCTIONS
OWNER’S MANUAL
GLASSDOOR
FIRESCREEN
HEARTH CRAFT
A Division of BottomLine Management, Inc.
NorthlineExpress.com
http://www.northlineexpress.com
Toll-Free 1-866-667-8454

PAGE 2
TABLE OF CONTENTS
FRONT COVER . . . . . . Installation Tips
PAGE 3 . . . . . . . . . . . . . Important Information
➤ Acid Hearth
➤ Creosote
➤ Ash Disposal
PAGE 4 . . . . . . . . . . . . . ULTRAVIEW & BRILLIANCE Installation
PAGE 5 Optional Installation for ULTRAVIEW and BRILLIANCE
Bottom Mounting Installation (All Hearth Craft glass
enclosures)
PAGE 6 . . . . . . . . . . . . . HORIZON & MYSTIQUE Installation
PAGE 7 . . . . . . . . . . . . . SENTRY, CLASSIC & SLIMLINE Installation
PAGE 8 . . . . . . . . . . . . . Optional Installation
PAGE 9 . . . . . . . . . . . . . Troubleshooting
PAGE 10 . . . . . . . . . . . . Building a Fire
Care and Cleaning
PAGE 11 . . . . . . . . . . . . Parts Listing
BACK COVER . . . . . . . 5 Year Limited Warranty
NorthlineExpress.com
http://www.northlineexpress.com
Toll-Free 1-866-667-8454

PAGE 3
IMPORTANT INFORMATION...
Please read before installing your enclosure
ACID HEARTH: Hydrochloric (muriatic) acid is often used by builders to clean excess mortar
from new fireplaces.The fumes from this acid are highly corrosive and will damage the finish
on your fireplace fixtures or other nearby metal objects.This corrosive action damages brass,
steel and iron and can last for many years if not neutralized. Consult your builder/mason for
correction.
The following suggestion while not a guaranteed remedy, may aid in correcting this condition.
1. To neutralize, saturate the masonry with ammonia water or a hearth cleaner. Use care to
avoid contact with adjacent carpet, floor etc.
2. Rinse thoroughly with clean, warm water;
3. Rinse several times with cool water to remove all ammonia;
4. Allow hearth to dry and seal with a hearth sealer.
Any acidic or caustic material used around your fireplace can damage the finish of your
enclosure.This includes some mortars or sealants that may be used to install and seal
enclosures and some paints used on fireplace faces.
“Hearth Craft ASSUMES NO RESPONSIBILITY FOR DAMAGES CAUSED TO GLASS
ENCLOSURES CAUSED BY ACID HEARTH”
CREOSOTE FORMATION AND THE NEED FOR REMOVAL: Wood never burns completely.
Wood smoke is a combination of unburned gases and a fog of unburned tar-like liquids.When
these gases come in contact with a cool surface they will condense and form a nasty brown or
black substance which has an unpleasant, acrid odor.This is creosote.When ignited, creosote
makes an extremely hot fire.The chimney connector and chimney should be inspected at least
twice monthly during the heating season to determine if a creosote buildup has occurred. If
creosote has accumulated, it should be removed to reduce the risk of a chimney fire.
HOW TO MINIMIZE CREOSOTE
1. Burn only seasoned hardwoods;
2. Do not allow the fire to smolder overnight;
3. Do not burn trash in your fireplace;
4. Check for buildup at least two times per month during the burning season. (You can check
for creosote by opening the damper and looking into the smoke chamber with a flashlight.
Take a screwdriver and scratch through the buildup to the masonry. If the buildup is more
than 1/4”, a clean-up is due. If the chimney is a factory built metal type, it should be
cleaned after 1/8” buildup.The smoke chamber is where the fire starts, not the top of the
chimney.)
ASH DISPOSAL: Ashes should be placed in a metal container with a tight-fitting lid.The
closed container of ashes should be placed on a noncombustible floor or on the ground, well
away from all combustible materials, pending final disposal. If the ashes are disposed of by
burial in soil or otherwise locally dispersed, they should be retained in the closed container
until all cinders have thoroughly cooled.
NorthlineExpress.com
http://www.northlineexpress.com
Toll-Free 1-866-667-8454

PAGE 4
ULTRAVIEW & BRILLIANCE
INSTALLATION INSTRUCTIONS
1ALWAYS lift enclosure by sides. NEVER top bar.
Remove enclosure from box and lean upright against
the wall.
Remove and save fiberglass and hardware kit from the
box. Remove contents from hardware kit and check
against parts list on page 11.
2FIG.A: Place T-bracket in slots on back of baffle.
T-bracket will raise or lower as needed to fit lintel bar
height.
Screw thumbscrews into lintel clamps.
Put machine screws into lintel clamps DO NOT
TIGHTEN.
Apply two-way adhesive strip to top of baffle. Pull the
protective cover from strip and apply insulation to
adhesive and around T-bracket. Repeat this for both
upright sides as well. Use only as much insulation as
needed to provide a seal against the face of the
opening.
With doors in a folded and 180 degree open position,
center enclosure with firebox.
Position T-bracket to lintel bar, with pencil mark
T-bracket location on lintel.
Remove enclosure from the opening.
Position T-bracket to lintel bar in position marked and
tighten in place with thumbscrews.
FIG.B: Position enclosure on firebox with doors in open
position, insert machine screws through T-bracket into
lintel bar clamp. Hold enclosure firmly against face of
the opening, tighten machine screws firmly. If excessive
insulation is visible, loosen enclosure, remove any
excess insulation under the upright bar.
If the above step will not work on your opening, refer to
Optional Installation on page 5.
3Adjusting Doors
FIG.C: Slightly loosen screws top & bottom in frame
hinge. Adjust door left to right or front to back as
required. Tighten screws firmly.
TOOLS REQUIRED
• Phillips Screwdriver
• Flathead Screwdriver
• Pencil
Adjustment
Screws
Top & Bottom
NorthlineExpress.com
http://www.northlineexpress.com
Toll-Free 1-866-667-8454

PAGE 5
OPTIONAL INSTALLATION INSTRUCTIONS
(ULTRAVIEW & BRILLIANCE)
1FIG D: If lintel clamps do not fit lintel bar, hold enclosure away from
fireplace, install as shown in FIG.D.
• Install T-brackets on enclosure.
• Install fiberglass and center enclosure against fireplace.
• Push T-bracket up to lintel bar.
• Mark lintel bar through slot in T-brackets. Remove enclosure.
• While wearing safety glasses, drill into lintel bar.
• Reposition enclosure and align T-brackets with index drilled into lintel bar.
• Insert screws into drilled holes and tighten.
TOOLS REQUIRED
• Phillips Screwdriver
• Electric Drill
• 5/32" & 7/32" high-speed bits
• 1/4" masonry bit
• 5/8" Phillips head self-tapping screws
• 3/8" Nut Driver
• Safety Glasses
2Door removal: If for some reason doors need to be removed, it is
recommended you call your installer. If it is not possible, follow the
directions below:
• Open door to full fold position.
• Remove 2 screws in lower hinge. FIG E.
• Remove 2 screws in top hinge. FIG E.
• Lean door forward to remove.
• Repeat for other side.
BOTTOM MOUNT INSTRUCTIONS
(ALL HEARTH CRAFT GLASS ENCLOSURES)
• Mount unit to opening per instructions found in Owner’s Manual.
• Using proper screws for your model, attach short leg of flex
bracket to back inside of the frame. Long leg of the flex bracket
should lay on the floor of the firebox.
• Mark floor for position of hole required for anchor bolts.
• Remove brackets and drill hole in floor for each bracket. Hole
size depends on anchor bolts (not provided).
• Clean debris from holes and insert anchor bolts. DO NOT
TIGHTEN.
• Replace flex brackets on back of frame and under the washer on
concrete anchor.
• Tighten flex brackets to back of frame. Hold unit firmly against the
bottom of the fireplace opening and tighten anchor bolt nuts until
unit is secure.
Removal &
Adjustment
Screws,
Top & Bottom
DRILL 5/32" HOLE
IN LINTEL BAR
T-Bracket
1/4 20x5/8
PHILLIPS HEAD
SELF-TAPPING
SCREW
INSTALL FIBERGLASS ON TOPAND SIDES
NorthlineExpress.com
http://www.northlineexpress.com
Toll-Free 1-866-667-8454

PAGE 6
HORIZON & MYSTIQUE
INSTALLATION INSTRUCTIONS
1ALWAYS lift enclosure by sides, NEVER top bar.
Remove enclosure from box and lean upright against
the wall.
Remove and save fiberglass and hardware kit from the
box. Remove contents from hardware kit and check
against parts list on page 11.
2FIG. F:
• FIG. F. - Put hex screws (G) through slot in flex bracket
(B). Attach flex bracket to back of enclosure, screwing
bracket into proper hole. DO NOT TIGHTEN.
• Screw thumbscrews (D) into lintel clamps (A).
• Put machine screws (F) through slot in flex bracket (B)
and screw into lintel clamps (A). DO NOT TIGHTEN.
• Place fiberglass in back of top bar and both uprights.
• Push enclosure firmly against fireplace so it overlaps
evenly on both sides.
• FIG. G. - Attach lintel clamps (A) to fireplace lintel bar
and tighten thumbscrews (D).
• Tighten hex screws (G) and machine screws (F).
Be sure enclosure is firmly attached to fireplace and
fiberglass is in place.
• If excessive insulation is visible, loosen enclosure,
remove any excess insulation under the upright bar.
3Bottom Mounting (Refer to Page 5)
4Adjusting Doors
FIG. H: Slightly loosen screws top & bottom in frame
hinge. Adjust door left to right or front to back as
required.Tighten screws firmly, Frame alignment can be
adjusted in corners by accessing screws in each of the
corners on the back side of the frame. Loosen screws
slightly and adjust frame as required. Retighten screws.
TOOLS REQUIRED
• Phillips Screwdriver
• Flathead Screwdriver
Adjustment
Screws
Top & Bottom
NorthlineExpress.com
http://www.northlineexpress.com
Toll-Free 1-866-667-8454

PAGE 7
SENTRY, CLASSIC & SLIMLINE
INSTALLATION INSTRUCTIONS
1Before installing enclosure, be sure fire is out and
fireplace is cool and clean. Read “Ash Disposal” (page 3)
ALWAYS lift enclosure by sides, NEVER top bar.
Remove enclosure from box and lean upright against
the wall. Remove and save fiberglass and hardware kit
from the box. Remove packing material and any shipping
support from under doors.
TO OPEN TRACK DOORS ONLY, ALWAYS LIFT UP
ON HANDLES
2REMOVAL OF TRACK DOORS - FIG 1.
• Fully open doors.
• With right hand, depress hinge clip above door to
release hinge pin.
• Tilt top of door toward center of enclosure.
• Remove door and place on padded surface to avoid
scratches.
• Repeat for left-hand door.
3INSTALLING ENCLOSURE - FIG J.& FIG K.
(SENTRY, HORIZON, CLASSIC & SLIMLINE)
• Remove parts from hardware kit.
• FIG J. - Put hex screws (G) through slot in flex bracket
(B). Attach flex bracket to back of enclosure, screwing
bracket into proper hole. DO NOT TIGHTEN.
• Screw thumbscrews (D) into lintel clamps (A).
• Put machine screws (F) through slot in flex bracket (B)
and screw into lintel clamps (A). DO NOT TIGHTEN.
• Place fiberglass in back of top bar and both uprights.
• Push enclosure firmly against fireplace so it overlaps
evenly on both sides.
• FIG K. - Attach lintel clamps (A) to fireplace lintel bar
and tighten thumbscrews (D).
• Tighten hex screws (G) and machine screws (F). Be
sure enclosure is firmly attached to fireplace and
fiberglass is in place.
4OPTIONAL INSTALLATION INSTRUCTIONS
• FIG N: If lintel clamps do not fit lintel bar, hold
enclosure away from fireplace, install as shown in FIG N.
• Install flex brackets on enclosure. DO NOT TIGHTEN.
• Install fiberglass and push enclosure against fireplace.
• Push flex bracket (B) up to lintel bar.Tighten hex
screws (G).
• Mark lintel bar through slot in flex brackets. Remove
enclosure.
• While wearing safety glasses, drill into lintel bar.
• Reposition enclosure and align flex brackets with holes
drilled into lintel bar.
• Insert screws into drilled holes and tighten.
• Some enclosures contain a bottom mount kit. Please
refer to instructions on the kit for installation.
5BOTTOM MOUNTING (Refer to Page 5)
TOOLS REQUIRED
• Flat Head Screwdriver
• Phillips Screwdriver
• Electric Drill
• 5/32" & 7/32" high-speed bits
• Safety Glasses
TRACK MODEL SHOWN HERE
HOLE IN UPPER
CORNER
LINTEL
CLAMP
(A)
FLEX
BRACKET (B)
(High Position)
FLEX
BRACKET (B)
(Low Position)
NorthlineExpress.com
http://www.northlineexpress.com
Toll-Free 1-866-667-8454

PAGE 8
OPTIONAL
INSTALLATION INSTRUCTIONS
1INSTALLING DOORS (FIG L):
• FIG L Pickup right-side door as shown, handle at top.
• With door folded, put lower door pin into hole in right-side lower door
track. Angle top of door forward toward center of enclosure.With both
pins in upper door track, push top of door firmly to the right until steel
door pins snap into hinge clip hole.
• Repeat for left-side door.
2ADJUSTING TRACK DOORS (FIG L):
• Doors are factory adjusted for fit and smooth operation. Misalignment
can occur during shipment or handling. If this happens to your
enclosure, the doors may be readjusted by the following method(s):
(CLASSIC & SENTRY MODELS ONLY)
• Slightly loosen screws in the hinge clips located in the top corners of the
door opening.
• Slightly loosen screws in the pivot clips located in the bottom corners of
the door opening. DO NOT REMOVE SCREWS.
• With the doors closed, center the doors within the opening. Leave
approximately 1/8" gap in the center where the doors meet.
• While maintaining the position of the hinge and pivot clip, open the left-
hand door halfway and tighten the screws in corner clips and hinge.
Repeat this process for the right-hand door.
• Test each door by opening and closing a few times. Readjust as
necessary.
3ADJUSTING FULL-FOLD DOORS (FIG M):
• Slightly loosen screws in top & bottom frame hinge.
• Adjust door left to right or front to back as required.
• Tighten screws firmly
4DOOR LATCH CLIPS (TRADITIONAL DOORS ONLY):
Door latch clips are located at the bottom center of each door.They
provide a means of holding the doors in the closed position.This feature
is designed to prevent doors from opening if your fireplace experiences
a downdraft.
There are two methods for adjusting tension on these clips:
• Loosen the screw and slide the clip down to increase tension.
Raising the clip will provide less tension.
• Test the doors by opening and closing a few times.
• Readjust as necessary.
5FIG N: If lintel clamps do not fit lintel bar, or hold enclosure away from
fireplace, install as shown in FIG N.
• Install flex brackets on enclosure. DO NOT TIGHTEN.
• Install fiberglass and push enclosure against fireplace.
• Push flex bracket up to lintel bar (B).Tighten hex screws (G).
• Mark lintel bar through slot in flex brackets. Remove enclosure.
• While wearing safety glasses, drill into lintel bar.
• Reposition enclosure and align flex brackets with holes drilled into lintel
bar.
• Insert screws into drilled holes and tighten.
• Some enclosures contain a bottom mount kit. Please refer to page 5.
TRACK MODEL SHOWN HERE
Adjustment
Screws
Top & Bottom
BRICK
LINTEL BAR
FLEX BRACKET (B)
INSTALL FIBERGLASS IN TOP AND SIDES
HEX SCREW (G)
DRILL 5/32" HOLE
IN LINTEL BAR
NorthlineExpress.com
http://www.northlineexpress.com
Toll-Free 1-866-667-8454

TROUBLESHOOTING
ADJUSTING DOORS:
1. Be sure the enclosure is mounted level and plumb. This is done by using a level, placing
the level on top bar and each upright bar.
2. Look at the bi-folds to see if all the gaps are equal from right to left and top to bottom. It is
critical that the glass panels are parallel.
3. The door end caps that are held by spring clips are usually the culprit in most of the cases.
The clips become knocked out of place or loosened.To correct this problem, decide which
bi-fold is out of place and remove it from the enclosure. Look at the ends of the glass and
see if they meet the metal caps. If they do not, place the bi-fold upright on a hard surface
as if the bi-fold were installed in the open position.With the heel of your hand, hit the top
cap to tighten both the top and bottom at once. Be sure not to bend the guide pins on the
end of each bi-fold.
4. Next, replace the bi-folds in the frame and close. Be sure pins lock in place. After closing,
check for center, where the ramp is for the bi-folds, there is some adjustability in each
corner. A phillips screw is used for adjustments only if glass is not parallel and/or you have
a glide dragging, Adjust bi-folds accordingly for a dragging problem. See illustrations below.
5. Several problems may arise at once, but always check these steps in order, because one
can lead to another and fixing one could eliminate the next procedure Sometimes all steps
may have to be followed. All steps should not take more than 30 minutes total, with some
steps taking no more than five minutes.
6. After all aligning has been finished, adjust the locks on the inside pane of the right & left
bi-fold.This is done by loosening the screw and letting the lock drop to whatever height is
needed to work properly after the bi-fold is closed. Now the enclosure should work with
just two fingers on the bottom inside of each handle. Using a quick, upward and outward
motion, the bi-folds should glide open smoothly (and of course, in reverse to close) Lift to
latch and lock.
7. If the glass panels require adjustment, please call your Hearth Craft dealer for assistance.
PAGE 9
NorthlineExpress.com
http://www.northlineexpress.com
Toll-Free 1-866-667-8454

PAGE 10
BUILDING A FIRE
WARNING: NEVER USE GASOLINE, GASOLINE-TYPE LANTERN FUEL, KEROSENE,
CHARCOAL LIGHTER FLUID, OR SIMILAR LIQUIDS TO START OR
“FRESHEN UP” A FIRE KEEP ALL SUCH LIQUIDS WELL AWAY FROM THE
FIREPLACE WHILE IT IS IN USE.
WARINING: DO NOT PLACE COMBUSTIBLE MATERIALS CLOSE TO FIREPLACE
OPENING.
A properly built fire will maximize the heat output and enjoyment from your fireplace. For best
results, use a sturdy grate placed against the back wall of your fireplace (for good circulation and heat radiation).
Always use at least three logs, as they will radiate heat to each other and help keep the fire burning with minimal
attention.
Follow these steps for a quick starting and successful fire:
1. Open your damper.
2. Check the draft. If the flow of the chimney is reversed, or stagnant, you may find you have a room full of
smoke before the draft begins to move in the right direction.You can check this by striking a match and
extinguish it directly in front of the fireplace, watching where the smoke goes. If it flows into the fireplace, you
have a draft.
3. Prepare the ashes.You should always have a one or two inch bed of ash under your fire Always be certain
however, that there is one to two inches between the ashes and the grate.
4. Prepare some kindling by splitting wood into pieces no larger than about 11/4inch diameter and a few larger
pieces (split about 1 to 2 inches in diameter). Also select about three or more pieces of wood about 8 to 10
inches in diameter (normal fire-sized pieces)
5. Place tender into the fireplace under the grate. Roll a newspaper into a cone and place it pointing to the back
of the fireplace.You may substitute with cedar twigs, birch bark, dry pine needles or hemlock.
6. Place about one inch of kindling on the bottom of the grate. Place a moderate sized log at the rear, almost,
but not quite touching the wall. Arrange a second log at the front of the grate. Fill the space between these
two with additional kindling. Finally, place a split log diagonally across the top of the first two logs, forming a
‘Z’ between the three logs.
7. Close the mesh curtain and keep closed while the fire is burning to prevent any sparks or hot coals from
escaping the fireplace.
8. It is recommended !hat you burn with the doors open. Avoid large, hot fires. Excessive temperatures can
cause frame discoloration, frame warpage and even glass breakage.Warranties do not cover glass breakage
due to excessive heat.
CARE AND CLEANING:
WARNING - DO NOT CLEAN GLASS WHEN HOT OR BREAKAGE MAY OCCUR.
1. The glass in your glass enclosure is safety tempered. It may be broken by contact with burning wood or
spilled liquids, by cleaning the glass with a wet cloth or by too large a fire. Broken glass or discolored trim is
usually a result of too large a fire or contact with burning wood.Tempered glass, if broken, will crumble into
small pieces less than 1/2" square. If glass breaks into larger pieces, it has been detempered by too large a
fire. Replace all glass you suspect has been detempered. Replace with tempered glass only.
2. Do not use ammonia-based glass cleaner to clean the glass or the enclosure as these types of cleaners may
damage the finish of your enclosure. Minor finish scratches can be removed by applying lemon oil.
NorthlineExpress.com
http://www.northlineexpress.com
Toll-Free 1-866-667-8454

PAGE 11
MOUNTING PARTS CHECKLIST
ULTRAVIEW
ONLY
AA
Part #: 03-92001
Description:
LINTEL
CLAMP (TM)
Quantity: 2
DD
Part #: 03-92001
Description: 1/4- 20 x 11/2"
Thumb Screw (TM)
Quantity: 4
GG
Part #: 10-2700
Description: #1/4x 1/2" AB Hex Screw
(TM/BM)
Quantity: 6
EE
Part #: CP-0006
Description: #10 External Star Washer
(Tm/BM)
Quantity: 4
FF
Part # 03-92001
Description: 1/4 - 20 x 7/16" Penh MS
Quantity: 2
BB
Part #: 03-92001
Description:
Flex Bracket
(TM/BM)
Quantity: 2
CC
Part #: 42-92007
Description:
T-Mounting Bracket
(TM)
Quantity: 2
II
Part #: 42-60120
Description:
Insulation
2 x 2 x 120 (in bag)
Quantity: 1
JJ
Part #: 42-60121
Description: U/V
Insulation Kit w/
two-way tape
Quantity: 1
ULTRAVIEW
ONLY
REMOVE ALL PARTS FROM HARDWARE KITS AND THE CARTON. TO
ENSURE YOU HAVE ALL THE NECESSARY PARTS, MATCH UP
PIECES WITH THE PARTS LISTED ABOVE.
NorthlineExpress.com
http://www.northlineexpress.com
Toll-Free 1-866-667-8454

FIVE YEAR LIMITED WARRANTY
HEARTH CRAFT GLASS DOOR ENCLOSURES ARE NOT INTENDED
FOR USE ON VENT-FREE FIREPLACES.
ALL MASONRY DOORS ARE warranted by the manufacturer to
the original retail buyer for five (5) years from date of purchase
against defects in materials and workmanship. This includes any
implied warranties of merchantability and fitness for a particular
purpose, which are also limited in duration to five (5) years from
the original purchase of this product.
ALL RAINBOW SERIES AND HORIZON FOR ZC are warranted by
the manufacturer to the original buyer for one (1) year.
This warranty covers only parts, and applies only to the
products purchased for consumer use. This warranty does not
apply to color changes in the finish resulting from contact with
flames or burning embers and does not cover damages, which
occur in transit or result from alteration, accident, misuse,
abuse, acid hearth, or improper installation. The manufacturer
shall not be liable for consequential or indirect damages, which
are caused by defects in its repair and replacement.
If this product does not conform to this warranty, contact your
dealer. Proof of the original purchase will be required.
This warranty gives you specific legal rights and you may have
other rights, which vary from state to state.
HEARTH CRAFT
A Division of BottomLine Management, Inc.
1410 Johnson Lane
Clarksville, IN 47129-1402
800-876-7557 • 800-397-0248 (fax)
NorthlineExpress.com
http://www.northlineexpress.com
Toll-Free 1-866-667-8454
Table of contents
Popular Fireplace Accessories manuals by other brands

Costway
Costway JV11174 manual

pleasant hearth
pleasant hearth IRIS SCROLL quick start guide

Valor
Valor 1595CFKV2 Installation & operating instructions

Lennox Hearth Products
Lennox Hearth Products Gas Conversion Kit FGCK installation instructions

Valor
Valor LEGEND G3 BSK742 installation instructions

Enclume
Enclume COUNTRY HOME FIREPLACE TOOL STAND FPTS2 Assembly and installation instructions

Napoleon
Napoleon GD862KT installation instructions

BuckMaster
BuckMaster EMBER VISION 100 SERIES manual

pleasant hearth
pleasant hearth SHEFFIELD FA146S quick start guide

Enclume
Enclume LR14NT Assembly and installation instructions

Gardus
Gardus SootEater operating instructions

IHP
IHP BWBK quick start guide