HEB MWD-600 User manual

Packing list
Instrument Name: Closed Intelligent Microwave Digestion System
Instrument Model: MWD-600
No. Name Picture Quantity
1
Main Body 1
2
Touch-screen Controller 1
3
High Pressure Digestion Combined Tank 12
4
Pressure Control Device 12
5
Explosion-proof Framework 12
6Sample Loading Platform
1
7
Auxiliary Platform 1
8
Exhaust Pipe 1
9
Tank Holder 1
10
Unload Tool 1
11
Pressure-plate 2
12
Controller Protective Box
13
Controller Serial Cord 1
14
Power Cord 1
15
Operation Manual 1
Inspector: Inspection Date:
Тля тендера UA-2017-07-19-000683-а

Closed Intelligent Microwave Digestion System
MWD-600
Operation Manual
Тля тендера UA-2017-07-19-000683-а

Important Statement
Please read the operation manual seriously and completely before using the
instrument, make sure to fully understand all safety related matters, to ensure the
instrument running safely, high efficiency and smoothly.
During operation, please strictly follow the requirements in the operation
manual, Please pay special attention to the contents begin with the mark ‘NOTE’,
‘CAUTION’, ‘WARNING’ and the bold important warning content, to ensure the
instrument running smoothly and safety and to avoid unnecessary loss and
damage. If the users don’t comply with the operation manual or don’t follow the
lab routine operation attentions and accident happens, our company will not take
any responsibility.
Please put the operation manual in a convenient place for future reference.
The content of the manual has the possibility to change and modify without prior
notice.
Тля тендера UA-2017-07-19-000683-а

Content
Chapter 1 General Introductionof Microwave Digestion System.............1
Chapter 2 Instrument Structures and Accessories.........................2
2.1 MWD-600 Introduction of External Structures...................2
2.2 MWD-600 Major Accessories................................2
Chapter 3 InstallationConditions andInstallationGuide....................4
3.1 MWD-600 Installation Conditions............................4
3.2 MWD-600 Installation Guide and Maintenance..................5
Chapter 4 Technical Specifications.....................................7
Chapter 5 Safety Guide..............................................8
5.1 Operation Safety Guide...................................8
5.2 Accessories Safety Guide....................................8
5.3 Pressure Module Safety Guide........................9
5.4 Temperature Module Safety Guide.....................9
5.5 Sample &Acid Solution Safety Guide.........................9
5.6 Other Considerations......................................10
Chapter 6 Instrument Operation Guide................................11
6.1 Instrument Operation Flowchart.............................11
6.2 Assembly of High Pressure Digestion Combined Tank...........12
6.3 Considerationsof usingDigestion Tank........................13
6.4 Introductionof OperationInterfaces.........................14
Chapter 7 Instrument Quality Guarantee..............................19
Chapter 8 Instrument Maintenance...................................21
Equipment Warranty................................................22
Тля тендера UA-2017-07-19-000683-а

Chapter 1 GeneralIntroduction of Microwave Digestion System
Thank you for purchasing and using MWD-600 Closed Intelligent Microwave Digestion
System. We are very grateful for your trust, we will try our best to ensure that in coming days
your instrument running smoothly. In addition, if you need to form a complete set of
pretreatment equipment, welcome to choose and buy SPH-1 Sample Pretreatment Heating
Equipment which is tailored specifically for MWD series products.
Microwave digestion technology is a highly efficient sample preparation technology that
develops fast in recent years. It means,in a sealing container, using microwave heating principle,
under high temperature and high pressure to achieve the quickly and completely digestion of
inorganic or organic samples. Microwave digestion technology could well satisfy the
requirements of modern analytical instrument for sample preparation, with the advantages of
fast and uniform heating, less reagent dosage, low blank value, not easily polluted, energy
efficient, etc. Especially in the analysis of volatile element, it’s better to maintain sample
integrity and has a higher sample rate.
Microwave digestion system general consists of main body, temperature control system,
pressure control system, digestion tank, rotor system, exhaust system and software system.
MWD-600 Closed Intelligent Microwave Digestion System is a high-end microwave digestion
instrument. It has zero consumables design, all digestion tanks’ temperature and pressure
double control and display, self-recover sealing of high-pressure digestion function, sample
solution of the actual temperature and pressure monitoring and zero lag function. The MWD-600
is especially suitable for AAS, UV-VIS, ICP-AES, AFS, GFAA, XFS, ICP-MS, HPLC, etc. analysis; it
could accelerate the reaction, shorten processing time and improve the work efficiency. At
present the microwave digestion technology has been widely used in food, textile, geology,
metallurgy, plastics, coal oil, cosmetics, chemical, biological medicine, environment, wastewater
treatment, battery manufacturing, and other fields.
1
Тля тендера UA-2017-07-19-000683-а

Chapter 2 Instrument Structures and Accessories
2.1 MWD-600 Introduction of External Structures
1 Upper Cover 2 Door Handle 3 Touch-screen Line
4 Touch-screen Controller
5 Pause Button 6 Turn Button 7 Door Switch Button 8 Instrument Model
9 Air Outlet 10 Air Intake 1 11 Touch-screen Serial Port
12 Upper Computer Serial Port 13 Air Intake 2
2.2 MWD-600 Instrument Accessories
2.2.1 Major Accessories
(1) Main Body
It’s one of the main components of the instrument, in which the digestion experiment
would be finished completely.
(2) Touch-screen Controller
It’s the liaison between operator and instrument, using “man-machine conversation”
control model.
(3) Pressure Control System
It monitors and controls the pressure changes in real time during the digestion process.
2
Тля тендера UA-2017-07-19-000683-а

(4) Temperature Control System
It monitors and controls the temperature changes in real time during the digestion
process.
(5) Digestion Tank
The digestion tank consists of a High Pressure Digestion Combined Tank and an Explosion-
proof Framework.
(6) High Pressure Digestion Combined Tank
The high pressure digestion combined tank combined by a sample digestion tank and a
protective outer tank. The sample digestion tank also known as the inner tank used to
contain the samples and acids .It provides a closed environment for the high temperature
and high pressure digesting, volume 100 ml. The protective outer tank also known as the
outer tank, it provides a protective environment for the high temperature and high
pressure digesting.
(7) Explosion-proof Framework
It provides a further security for the high temperature and high pressure digesting.
(8) Rotor System
It combined by a drive motor, a sample loading platform and an auxiliary platform. The
sample loading platform provides a space for loading the digestion tank. The auxiliary
platform provides a stable platform for monitoring the pressure. The drive motor keeps the
sample loading platform rotating uniformly and continuously on the auxiliary platform
toward the same direction.
(9) Exhaust System
It can blow out the spilling acids from the digestion tank in time and cool the digestion tank
when digestion completed.
(10)Software System
It ensures the instrument running intelligent and efficient.
2.2.2 Other Accessories
(1) Tank Holder
Users can place the inner tank into the tank holder.
(2) Unload Tool
Users cantake out the inner tank thattoo tight to remove after digestion with it.
(3) Pressure-plate
Users can calibrate instrument pressure signal in Instrument Calibration Interface with the
pressure-plate. There are two pressure-plates, the thick one is pressure-plate-6 that is used
to calibrate P6, and the thin one is pressure-plate-3 that is used to calibrate P3.
3
Тля тендера UA-2017-07-19-000683-а

Chapter 3 Installation Conditions and Installation Guide
3.1 MWD-600 Installation Conditions
Please confirm the following conditions before installing the
instrument. 3.1.1 Working Power Supply
(1) Working Voltage: AC 220V, ±10%.
(2) Working Frequency: 50 or 60Hz, ±4%.
(3) Working Power: More than 2200W. The power should be over 2500W if there is any other
assist device.
(4) Earth Wire: Earth resistance should not be less than 100Ω, and should be in accordance
with the relevant regulations. The plug must be plugged into an outlet that is properly
installed and earthed.
3.1.2 Worktable
(1) The instrument must be installed on a horizontal and stabilization worktable over 640mm
length and over 630mm width which could bear over 75kg weight.
(2) The bigger worktable is required if assist device is also installed on the same worktable.
(3) For correct operation, the instrument must have sufficient air flow. Allow with 200mm of
space at the back and both sides of the instrument.
(4) The instrument is around 1055mm height when opening the upper cover, Please select
suitable worktable for the convenience of instrument operation.
(5) It is allowed to place the worktable next to the fume hood, but it is strictly prohibited to
put the instrument into the fume hood. Please avoid strong or continue vibration.
3.1.3 Installation Environment
The stand or fall of instrument working environment has a great influence for the
instrument performance and service life. Please confirm the following environment of the
installation place.
(1) Working environment temperature range: 5~40℃。
(2) Working environment humidity range: 45~85%。
(3) Storage environment temperature: -20~70℃。
(4) Indoor environment:
1) Make sure that there is no acidic or alkaline gas in room.
2) Make sure that there is no corrosive organic gas to etch the paint in room, especially for
gases such as benzene.
3) Make sure that there is concentrated exhaust device in room. Do not use the
instrument in corrosive gas environment and long time, that’s not conducive to the
instrument maintenance.
4) The external surface of instrument should be kept clean frequently.
(5) Sample Reagent
1) Please don’t place the corrosive solution such as sample reagents, acid and alkali
solution near the instrument.
2) It must be careful when taking the corrosive solution to avoid dripping or upset on the
surface of instrument or furnace chamber or the accessories such as digestion tank or
platform. If happened, please wipe clean immediately with a soft cloth or paper.
4
Тля тендера UA-2017-07-19-000683-а

(6) Other Important Notes
1) Make sure there is enough space for user’s operation.
2) Make sure to keep the instrument avoiding the direct sunlight. Long time sunlight would
lead to the pain of the instrument surface discoloration or loss.
3) Make sure to avoid the strong and continual shock or shake, which will affect
instrument performance.
4) Make sure there is no any heating device near the instrument, to prevent the
instrument shell temperature over 70℃.
5) It is forbidden to use the instrument together with any other high power electrical
appliance at the same time.
6) The instrument should be far from the water supply, to avoid the water into the
instrument and cause the danger of electricity leakage.
7) The instrument should be far from the high intensity magnetic field, electric field and
high frequency wave equipment, to avoid disturbing the uniform distribution of the
magnetic field and decrease the heating efficiency.
8) Keep working voltage stable to avoid any noise which will affect instrument accuracy.
9) Avoid frequent switching the electrical equipment which is using the same power supply
withthe instrument.
3.2 MWD-600 Installation Guide and Maintenance
3.2.1 The microwave digestion system should be installed by technical persons.
Before installation, please make preparation.
3.2.2 Instrument Installation
(1) Packing Opening: Please do not place it in horizontal or inverted direction. Avoid shocking
when opening the packaging, take out of the instrument and place it on the worktable.
(2) Checking: Check all the spare parts and accessories, if there is any damage, please
contact distributor or our company.
(3) Installation Procedure
WARNING: The 220V voltage may cause electrical shock hazards, please connect
the power cord after finishing installation procedure.
1) Take out of the exhaust pipe from the accessory box. Install the side with hoop set into
the air outlet on the back of the instrument and fix it. Connect the other side to the
exhaust system.
2) Take out of the auxiliary platform from the accessory box and fix it into the two locating
pins in the furnace chamber with the beads upward.
5
Тля тендера UA-2017-07-19-000683-а
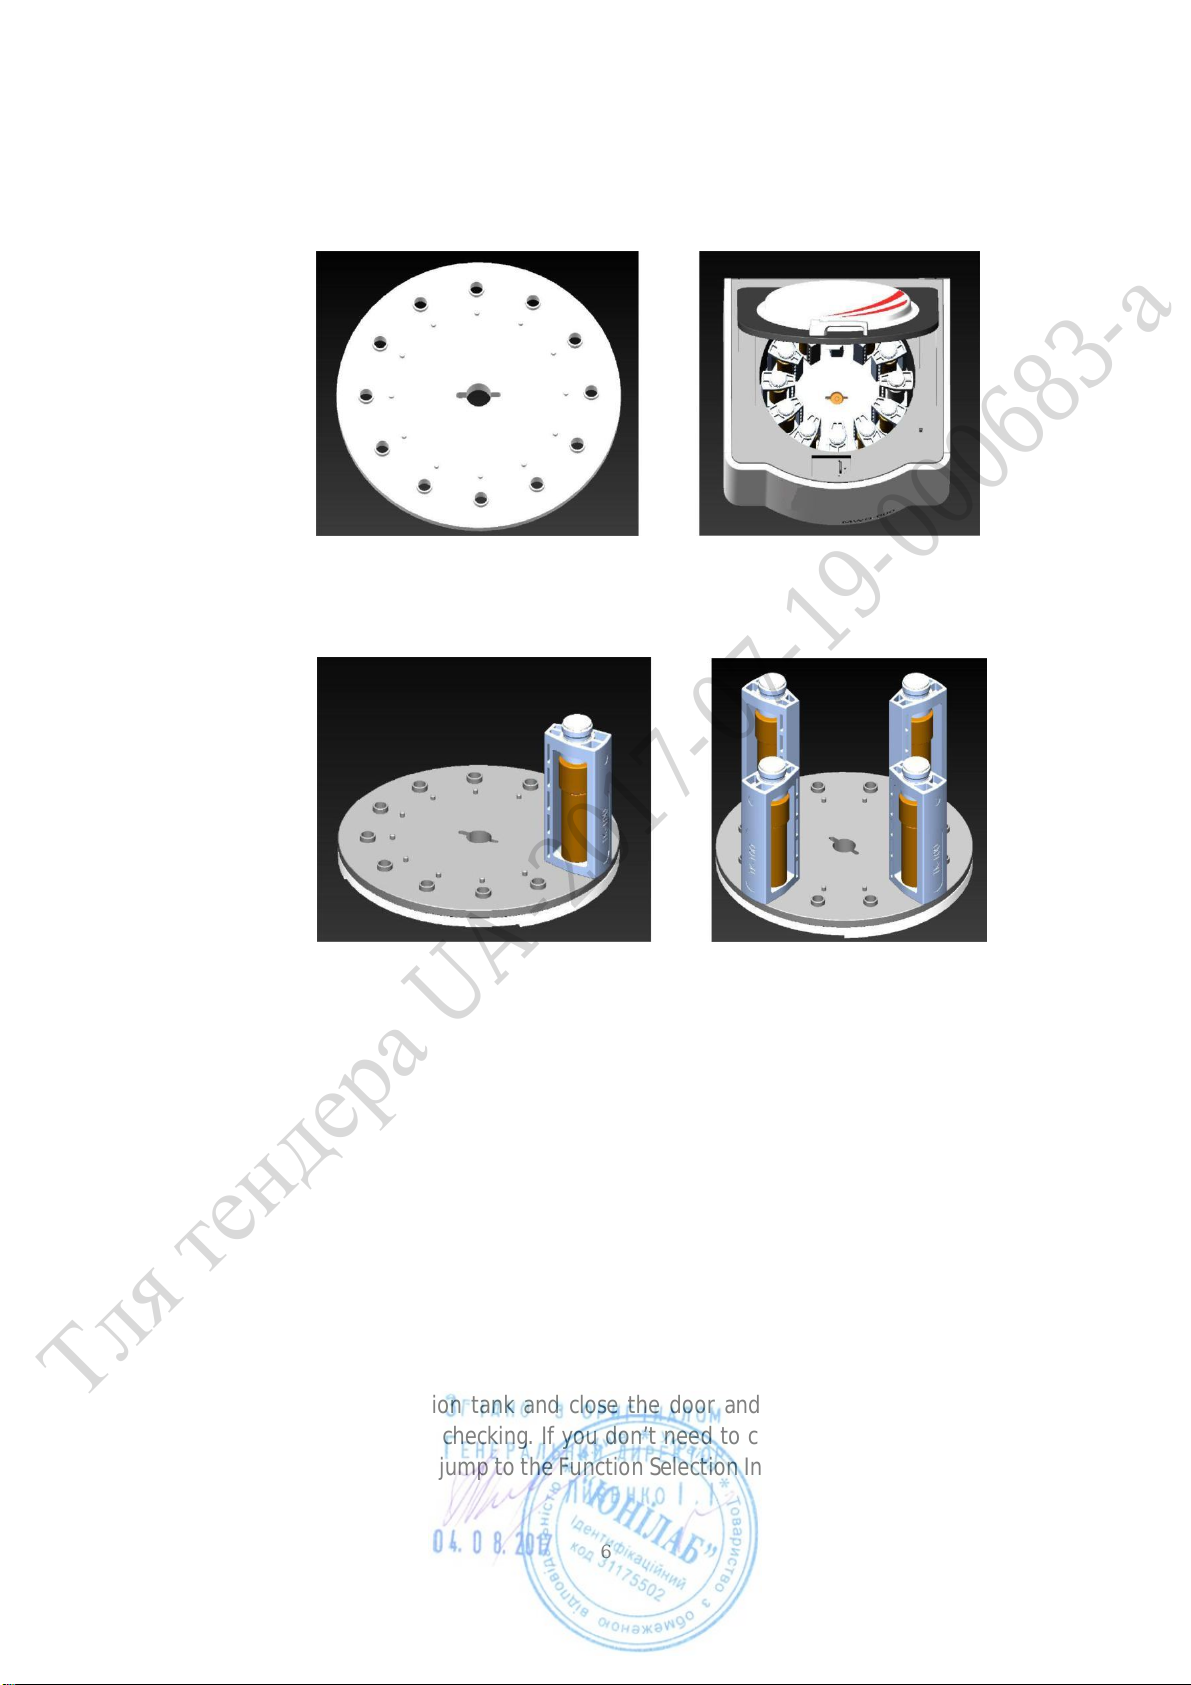
3) Take out of the sample loading platform from the accessory box and fix it into drive
shaft in the furnace chamber. Pay attention to the thick card slot in line with the drive
shaft thickness direction.
4) Put the assembled digestion tank into the tank positioning slot (assembly process of
digestion tank, please to see Chapter sixth 6.2). If multiple digestion, please make the
digestion tanks evenly arranged in the loading platform.
5) Take out of the touch-screen controller from the accessory box and connect it to the
touch-screen serial port on the back of the instrument.
6) The connection of the power cord and the ground wire
WARNING: The 220V voltage may cause electrical shock hazards, please make sure
the power switch is in the state of closed (0) before connecting the power cord.
uMake sure power supply and ground wire is normal.
uMake sure the voltage of power supply is normal.
uInsert two sides of the power cord respectively into the power grid socket and
the power supply socket of the instrument.
7) Make sure the connection of the power line and the ground wire is normal. Put the
power switch to “1”, the instrument is powered on and enters the Automatic System
Check Interface. When system checks to “Pressure detecting…” it stops and prompts
“no digestion tank” if you don’t load the digestion tank before power on, you can load
the assembled digestion tank and close the door and press the button of [Check] to
continue the pressure checking. If you don’t need to check the pressure you can press
the button of [Skip] to jump to the Function Selection Interface.
6
Тля тендера UA-2017-07-19-000683-а
Chapter 4 Technical Specifications
Instrument Model
MWD-600
Platform Model TP-6
Digestion Tank Type
TK-100
Explosion-proof Framework Type
TK-100
Sample Quantity
12
Sample digestion tank Volume Up to 100ml
Pressure Control Type
All tanks controlled
Pressure Monitoring Type
Non-contact optical fiber monitored
Temperature Control Type
All Tanks Controlled
Temperature Monitoring Type
Non-contactinfrared through monitored
Sample Digestion Tank(Inner Tank) Material
Imported TFM (modified Teflon)
Outer Protective Tank(Outer Tank) Material
Imported PEEK(polyether-ether-ketone) +
Glass Fiber
Explosion-proof Framework Material
PP(Polypropylene)/
TFM
modified Teflon +
Glass Fiber
(ON REQUEST)
Working Pressure Range
0
~
6 MPa (0
~
60kg/cm
2
)
Working Temperature Range
Room Temperature
~
250
℃
Extreme Pressure of Inner Tank
10MPa
Extreme Temperature of Inner Tank
300
℃
Touch-screen Controller
8 Inch Touch Screen
Furnace Chamber Volume
60L
Microwave Power
2000 W
(
set from 0 to 2000W according to
requirements
)
Microwave Frequency
2450±13MHz
Rotation Mode
360° continuous rotation
Leakage of microwave power density
Less than5mW/cm
2
Power Supply
AC 220V±10%, 10A, 50/60Hz
Size
640mm×630mm×590mm
Weight
75kg
7
Тля тендера UA-2017-07-19-000683-а

Chapter 5 Safety Guide
Read the following safety guide carefully before operation. Please keep the safety
guide in a convenient place for future reference.
5.1 Operation safety guide
5.1.1 CAUTION: The tank positions cannot be empty when operation, there must be one or
more digestion tank installed which filled the sample and acid liquid.
5.1.2 The instrument with high voltage and microwave ray, all the users or relevant personnel
should be trained and certified to avoid any problem caused by high voltage or microwave
ray.
5.1.3 It is not allowed to install the instrument in the fume hood to avoid any damage or
problem caused by acid or chemical gas.
5.1.4 Please exchange the air when use sample or solution that is harmful to human being or
environment. If there is no enough air exchange, it may affect normal performance of the
instrument or users’ safety.
5.1.5 Please do not unauthorized disassemble and transformation instrument, replace the parts
or take off the safety devices to avoid any danger.
5.1.6 Make sure there is enough space for convenience of user’s operation.
5.1.7 WARNING: The 220V voltage may cause electrical shock hazards, please make sure all the
power is off before connecting the power cord to avoid any injury cause by high voltage.
5.1.8 WARNING: Make sure all the power is off and all the power cord is disconnected before
maintenance.
5.1.9 WARNING: The magnetron and high voltage electric parts inside will cause high
temperature which may result in injury. Make sure all the power is off and the power
cords are disconnected and wait for the instrument cooling down before replace any
parts to avoid any injury.
5.2 Accessories Safety Guide
5.2.1 CAUTION:Make sure all parts of the digestion tank, inner tank (sample digestion tank) or
outertank (outer protective tank)are dry and clean. The sample loading platform, auxiliary
platform, explosion-proof framework and inner surface of furnace chamber should also be
clean and dry.
5.2.2NOTE: Make sure the outer tank is tightened well to ensure the good seal of inner tank.
It’s better to tighten about 30° more after tightening to a resistance position.
5.2.3 CAUTION: The temperature of the outer tank will be very high after digestion, please
hold the cover of the outer tank with acid proof and heat insulation gloves and take it
out, beware of burns.
8
Тля тендера UA-2017-07-19-000683-а
5.2.4 The inner tank should be cleaned with flow water directly and then be cleaned by
deionized water. The inner wall could be cleaned with soft sponge brash instead of brash
with hard materials. If there is solution attached on the inner wall, please put it into 15-
20% nitric acid overnight or clean it with ultra-sonic cleaner, or add 10ml concentrated
nitric acid and clean it on the instrument, the programming is: 20kg/cm2,160 ℃,1500W,
Heating-Time 200s and Holding-Time 600s.
5.3 Pressure Module Safety Guide
5.3.1 Pressure control device is the key to the instrument pressure module. To the safety of
users, it is strictly prohibited opening the pressure control device without the consent or
guidance of the engineer. If the pressure control device was opened accidentally, please
contact our company engineer and install it correctly under the engineer direction. My
company is not responsible for all the loss or injures that without authorization operation.
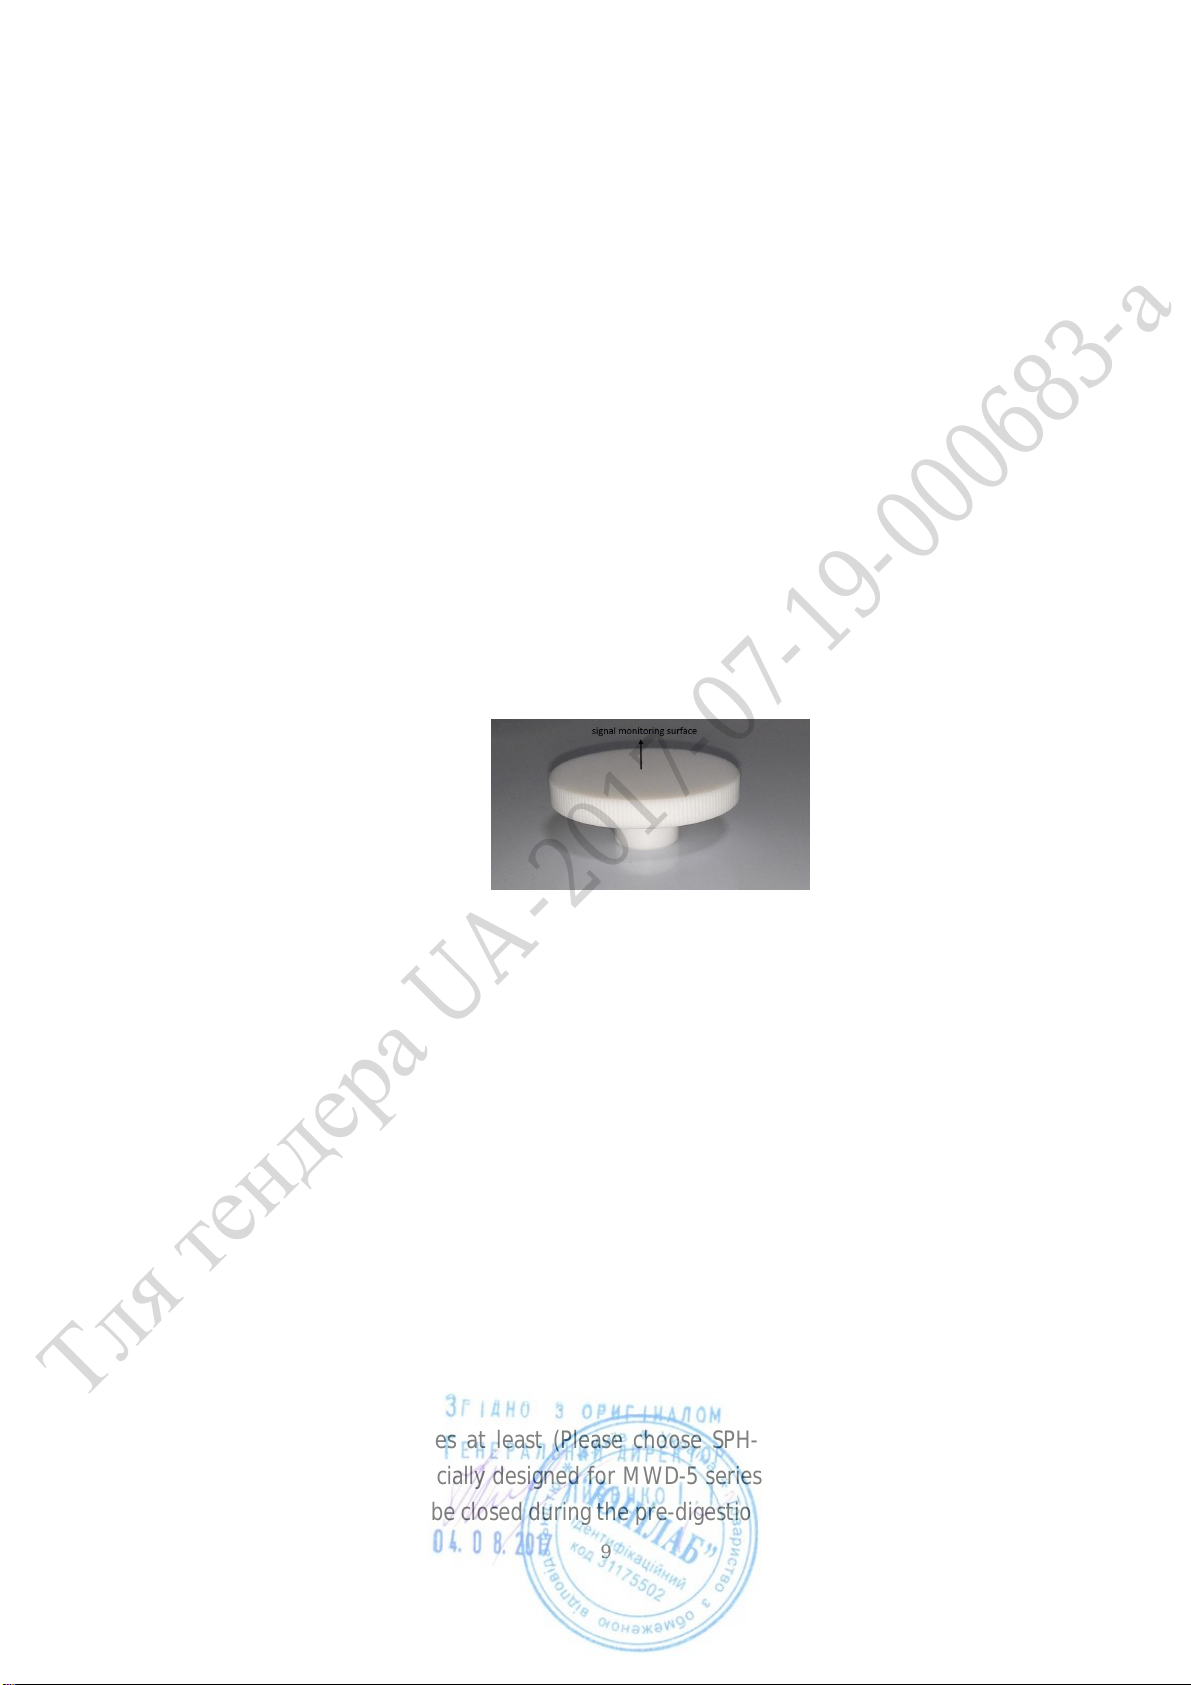
5.3.2 The signal board is a high precision part of the pressure module. Please make sure the
signal monitoring surface is smooth and there is no crack on it. It is not allowed to do any
marking on this surface.
5.4 Temperature Module Safety Guide
5.4.1 If there is a large amount of acid mist leaked, please wipe the temperature detection
probes with cotton swabs wetting by deionized water or ethyl alcohol.
5.4.2 If the temperature value needs to be calibrated please contact with our company, and
recalibrate the parameters’ values of temperature control device under the engineer
direction.
5.5 Sample & Acid Solution Safety Guide
5.5.1General sample volume: Ifthesample is solid,it should less than0.5g;if liquid, it should be
less than 10ml. The total volume in the inner tank is better between 7ml and 35ml, not
more than 50ml. Each digestion tank as far as possible to be the same sample and acid
quantity.
5.5.2 For unknown samples and samples that will generate much gas, or contain much oil, or
withcomplex components, the sample volume should be not over 0.3g. Also, it needs pre-
digestion with 15 minutes at least (Please choose SPH-1 Sample Pretreatment Heating
Equipment which is especially designed for MWD-5 series products by our company). The
digestion tank could not be closed during the pre-digestion.
9
Тля тендера UA-2017-07-19-000683-а

5.5.3 There is no limitation for HNO3, HCl, HF under 200 ℃. H2O2can be added proper to
improve digestion performance, but it should do pre-digestion. H2SO4、H3PO4should be
added with limited volume over 200℃and H3ClO4is not allowed to use. The acid solution
in each inner tank should be the same.
5.5.4 Corrosive corporations such as reagents, acid and alkali solution, please don't place near
the instrument, also must be careful when taking, avoid spattering on the instrument. If
they fall on the instrument, please immediately wipe clean with a soft cloth or paper.
5.5.5 WARNNING: The following samples cannot be digested in MWD-600. Some samples not
listed here do not mean that the useof the instrument resolution under any conditions is
absolutely safe:
(1) Explosive samples (TNT, Cellulose nitrate etc.);
(2) Propellant (hydrazine, hydrazinium, ammonium perchlorate etc.);
(3) Flammable samples;
(4) Two samples that mixed together can be flammable ( nitric acid & phenol, nitric acid &
triethylamine, nitric acid & acetone;
(5) Animal Fat;
(6) Aircraft fuel;
(7) Acetylide;
(8) Glycol (Ethylene glycol, Propylene glycol etc.);
(9) Perchlorate (Ammonium perchlorate,Potassium perchlorate etc.);
(10)ether compounds;
(11)Paint samples;
(12)Alkanes;
(13)Ketone.
5.6 Other Considerations
5.6.1 About the Operation Manual
(1) This operation manual has the possibility to change without prior notice.
(2) This operation manual copyright belongs to the technology department of the company.
5.6.2 Please be sure to comply with the instrument and operation manual on prompt attention.
Neglect of these considerations, there may be a risk of injury or equipment damage .
5.6.3 Please don’t do the operation that outside the operation manual. If there is a problem,
please contact the seller or our company.
5.6.4 Although the attentions of instrument or operation have gone by full research, but the
events occur beyond the expected also not impossible. So during the instrument operation,
please not only in accordance with the operation manual mentioned matters needing
attention in operation, the operator himself, also be careful at any time, pay attention to
safety, avoid accident happening.
10
Тля тендера UA-2017-07-19-000683-а
Chapter 6 Instrument Operation Guide
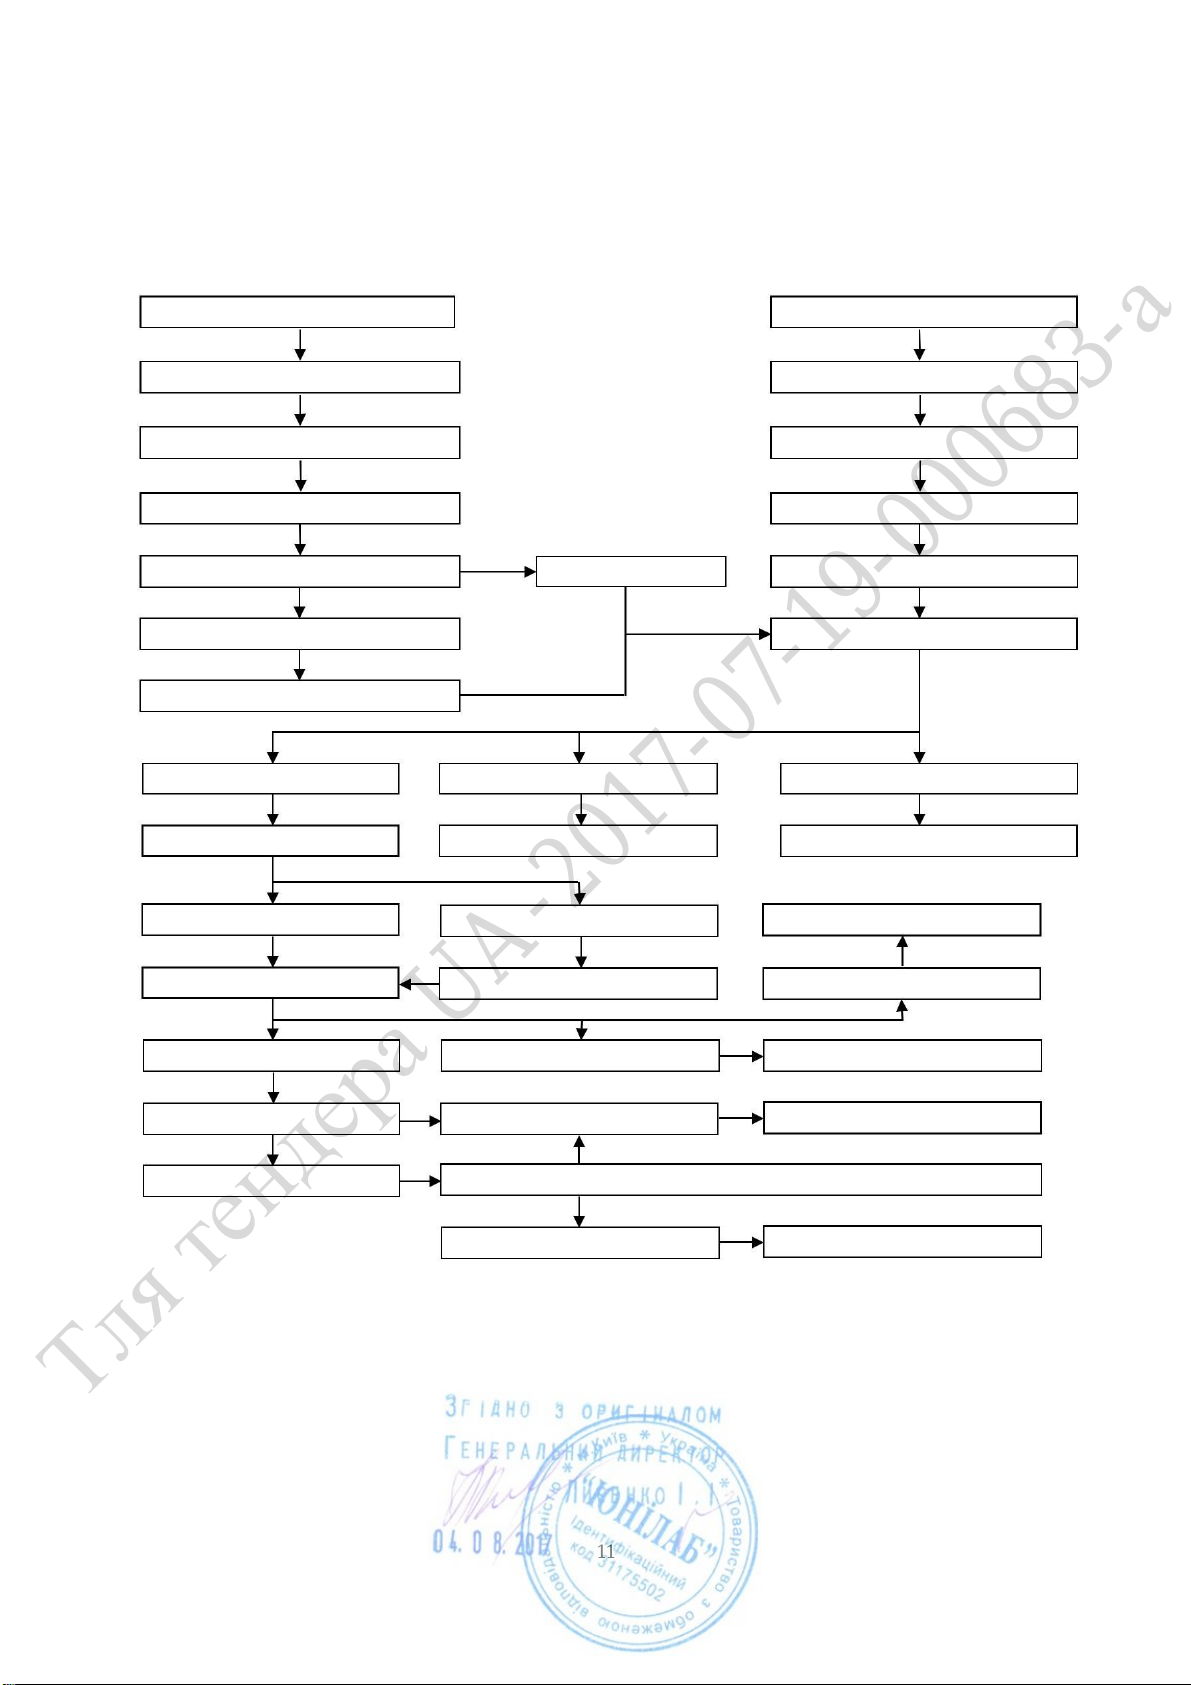
6.1 Operation Flowchart
Check Instrument and Accessories
Check Instrument and Accessories
Close the Door Load Assembled Digestion Tanks
Power On Close the Door
Instrument Initialization Power On
Automatic System Check Interface
Click [SKIP] button
Initializing and System Check
Load the Assembled Digestion Tanks
Function Selection Interface
Click[YES] button
Click[WORK] button Click [HELP] button Click [CALIBRATION] button
Reference Program Interface FAQ and Standard Methods Interface Instrument Calibration Interface
Choose oneprogram Click [Skip] button Reference Program Interface
Parameters Display/Edit Interface Enter the last used program Click[ESC] button
Click [Apply] button Click [Save] button Savethe Current Program
Working Interface Click [Program] button Parameters Display/Edit Interface
Click [Start] button
Start digesting:calibrating→working→digeson completed, cooling→waing
Click [Stop] button Stop the Current Digestion
11
Тля тендера UA-2017-07-19-000683-а
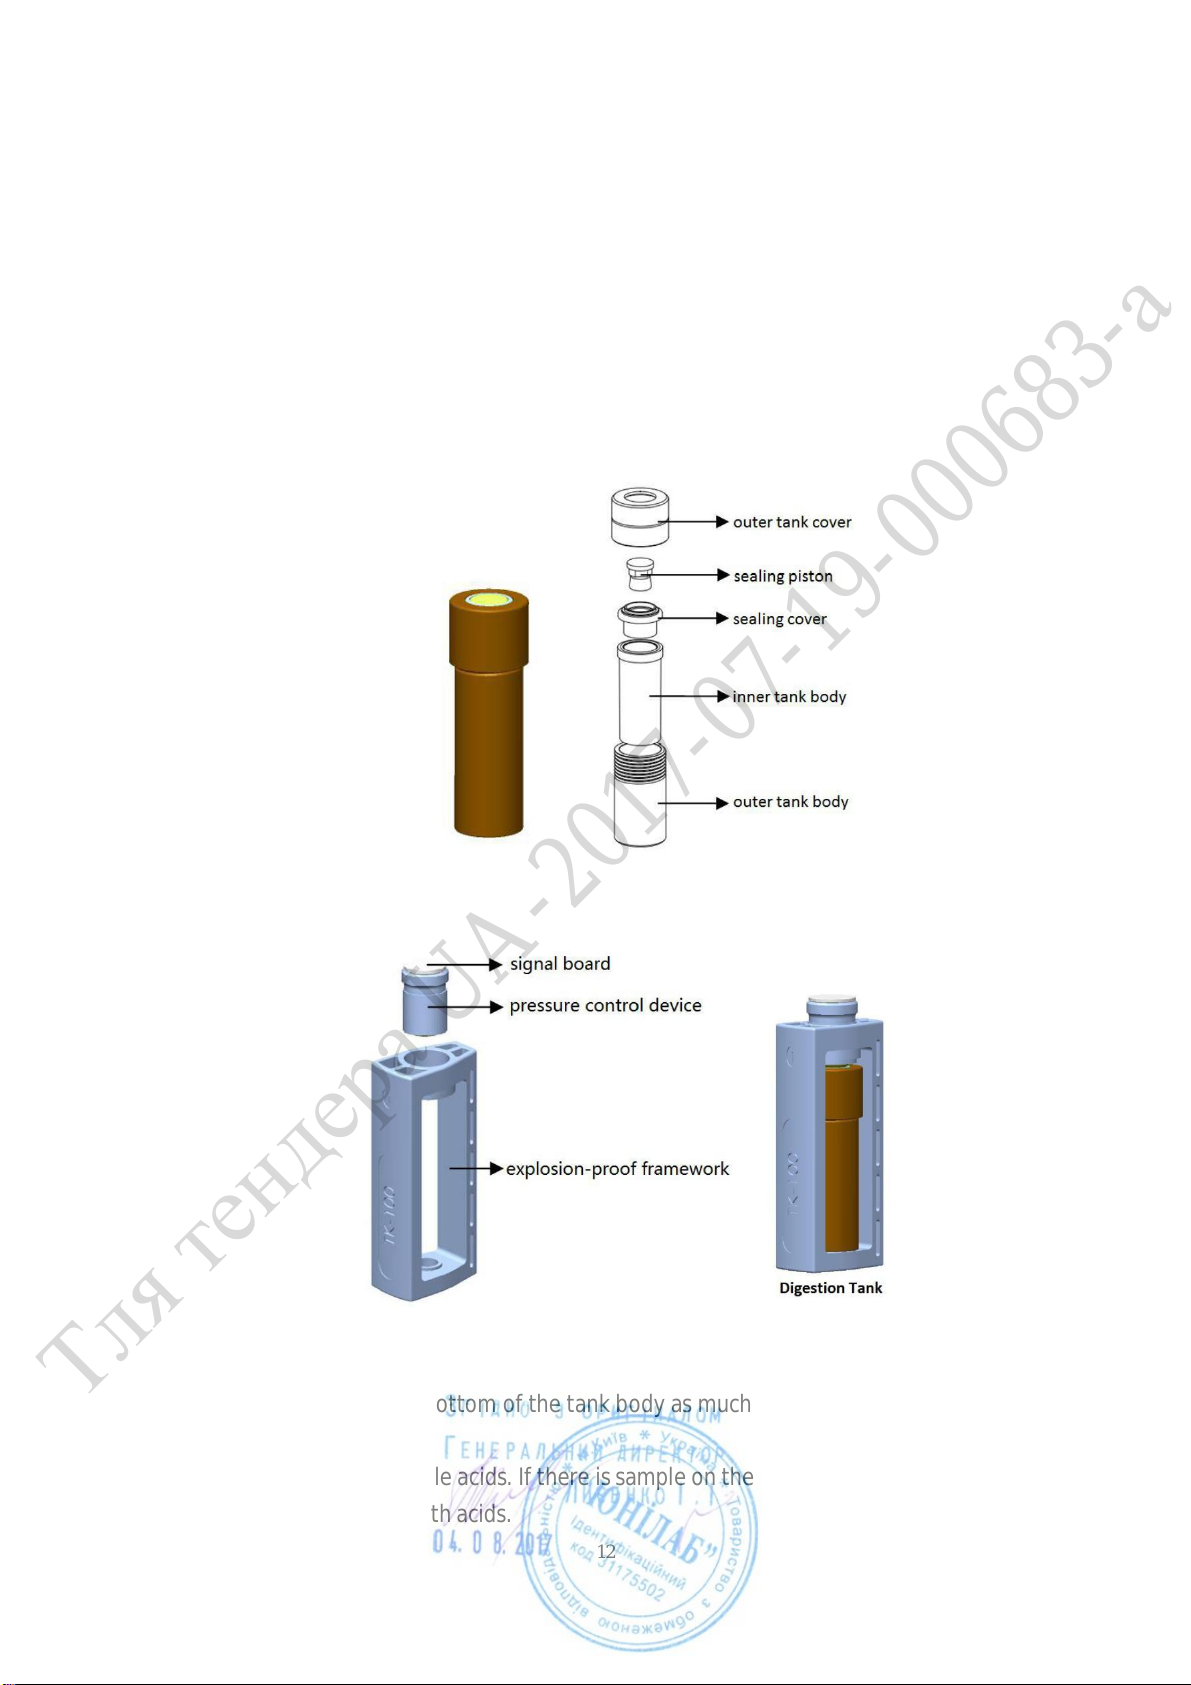
6.2 Assembly of Digestion Tank
The Digestion Tank consists of a High Pressure Digestion Combined Tank and an Explosion-
proof Framework. NOTE: In the assembly or disassembly the digestion tank, please be
sure to take acid proof gloves.
6.2.1 Structure of the High Pressure Digestion Combined Tank
(1) The High Pressure Digestion Combined Tank consists of a Sample Digestion Tank (Inner
Tank) and an Outer Protective Tank (Outer Tank).
(2) The Inner Tank consists of a tank body, a sealing cover and a sealing piston.
(3) The Outer Tank consists of a tank body and a tank cover.
6.2.2 Structure of the Explosion-proof Framework
The Explosion-proof Framework consists of a framework and a pressure control device.
6.2.3 The assembly process of the digestion tank
(1) Load the sample: Load the weighed sample to a clean inner tank, and make sure the
sample is loaded to the bottom of the tank body as much as possible and avoid hanging on
the wall.
(2) Add acids: Choose suitable acids. If there is sample on the wall you can carefully rinse the
sample to the bottomwithacids.
12
Тля тендера UA-2017-07-19-000683-а
(3) Mix: Carefully shake the inner tank, to make the sample and the acids mix well, and
remove the gas off the tank body as much as possible. Make sure the action is gentle
enough and the tank mouth cannot against the people, be careful of splashing acid, and
avoid hurt others or yourself.
(4) Seal: Seal the inner tank with the sealing cover. Note: For unknown samples and samples
that will generate much gas, or contain much oil, or with complex components, should be
predigested and then add acids again before sealing. (Please choose SPH-1 Sample
Pretreatment Heating Equipment which is especially designed for MWD-5 series products
by our company.)
(5) Tighten: Insert the sealed inner tank vertically into the outer tank. Cover the outer tank
and tighten it. Note: Make sure the outer tank is tightened well to ensure the good seal
of inner tank. It’s better to tighten about 30° more after tightening to a resistance
position.
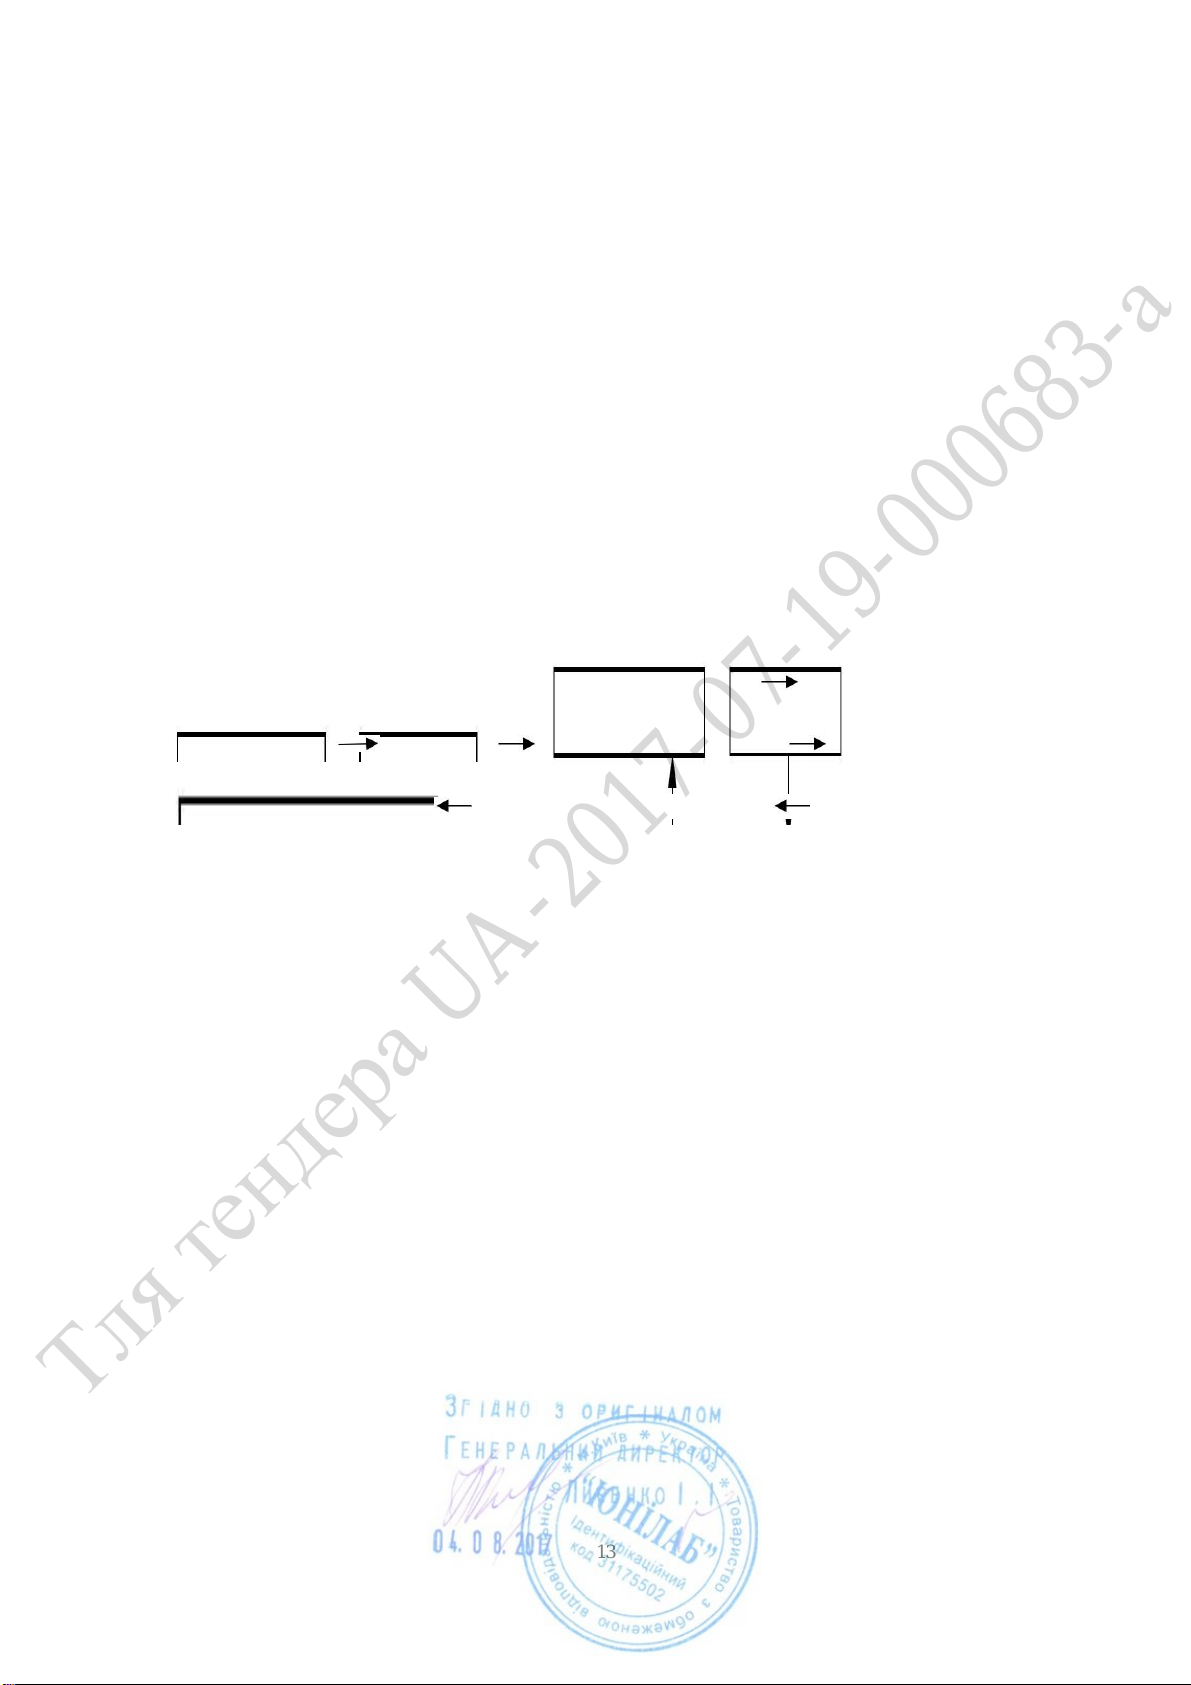
(6) Assembly process of the Digestion Tank flowchart
Predigesting (SPH-1) Add acid again
Load the sample Add the acid Carefully shake and mix well Seal with a sealingcover
The assembling is completed Cover the Outer tank and tighten it Insert vertically into the outer
6.3 Considerations of using digestion tank
6.3.1Make sure the sealing parts of the innertank are in good conditions, without any scratches
or damage.
6.3.2Make sure eachpark of the digestiontank is ina dry and clean conditions,except the inner
cavity that directly contacting the sample and the acids.
6.3.3 Please clean up the acid from the digestion tank in time after each experiment. Note: The
inner tank can be cleaned and steeped in diluted nitric acid. However, it is prohibited to
clean the outer tank with any acid solution or organic solution. Please use clean and wet
cloth to wipe the outer tank clean, and let it dry naturally. If there attached too much
digestion acids, rinse with water first, then use clean cloth to wipe and clean, and dry
naturally.
6.3.4Please always keep the signalboard of the pressure control device neat, dry and clean.
6.3.5Note: Make sure the outer tank is tightened well to ensure the good seal of inner tank.
It’s better to tighten about 30° more after tightening to a resistance position.
13
Тля тендера UA-2017-07-19-000683-а

6.4 Introduction of the operation interfaces
6.4.1 Instrument Initialization and Automatic System Check Interface
(1) Before power-on and using, please check all wirings to ensure all wirings has been
connected properly.
(2) Check the furnace chamber, ensure the auxiliary platform and the sample loading platform
are installed normally, and close the door.
(3) Turn on the power, and the instrument starts to initialize and fast automatic system check.
(4) When system finishes the initialization, it jumps to the Automatic System Check Interface.
6.4.2 Automatic System Check Interface
(1) For the first using or instrument performance periodic detection, please load one
assembled tank at least according to the prompt and click the button of [YES] to continue
the pressure detecting.
(2) In the daily use, you can click the button of [SKIP].
(3) After the pressure detection or the jump, the instrument system enters to Function
SelectionInterface.
6.4.3 Function Selection Interface
(1) Click the button of [WORK] to enter the Reference Program Interface.
(2) Click the button of [CALIBRATION] to enter the Instrument Calibration Interface.
(3) Click the button of [HELP] to enter the Frequently Asked Question and Standard Methods
Interface.
14
Тля тендера UA-2017-07-19-000683-а
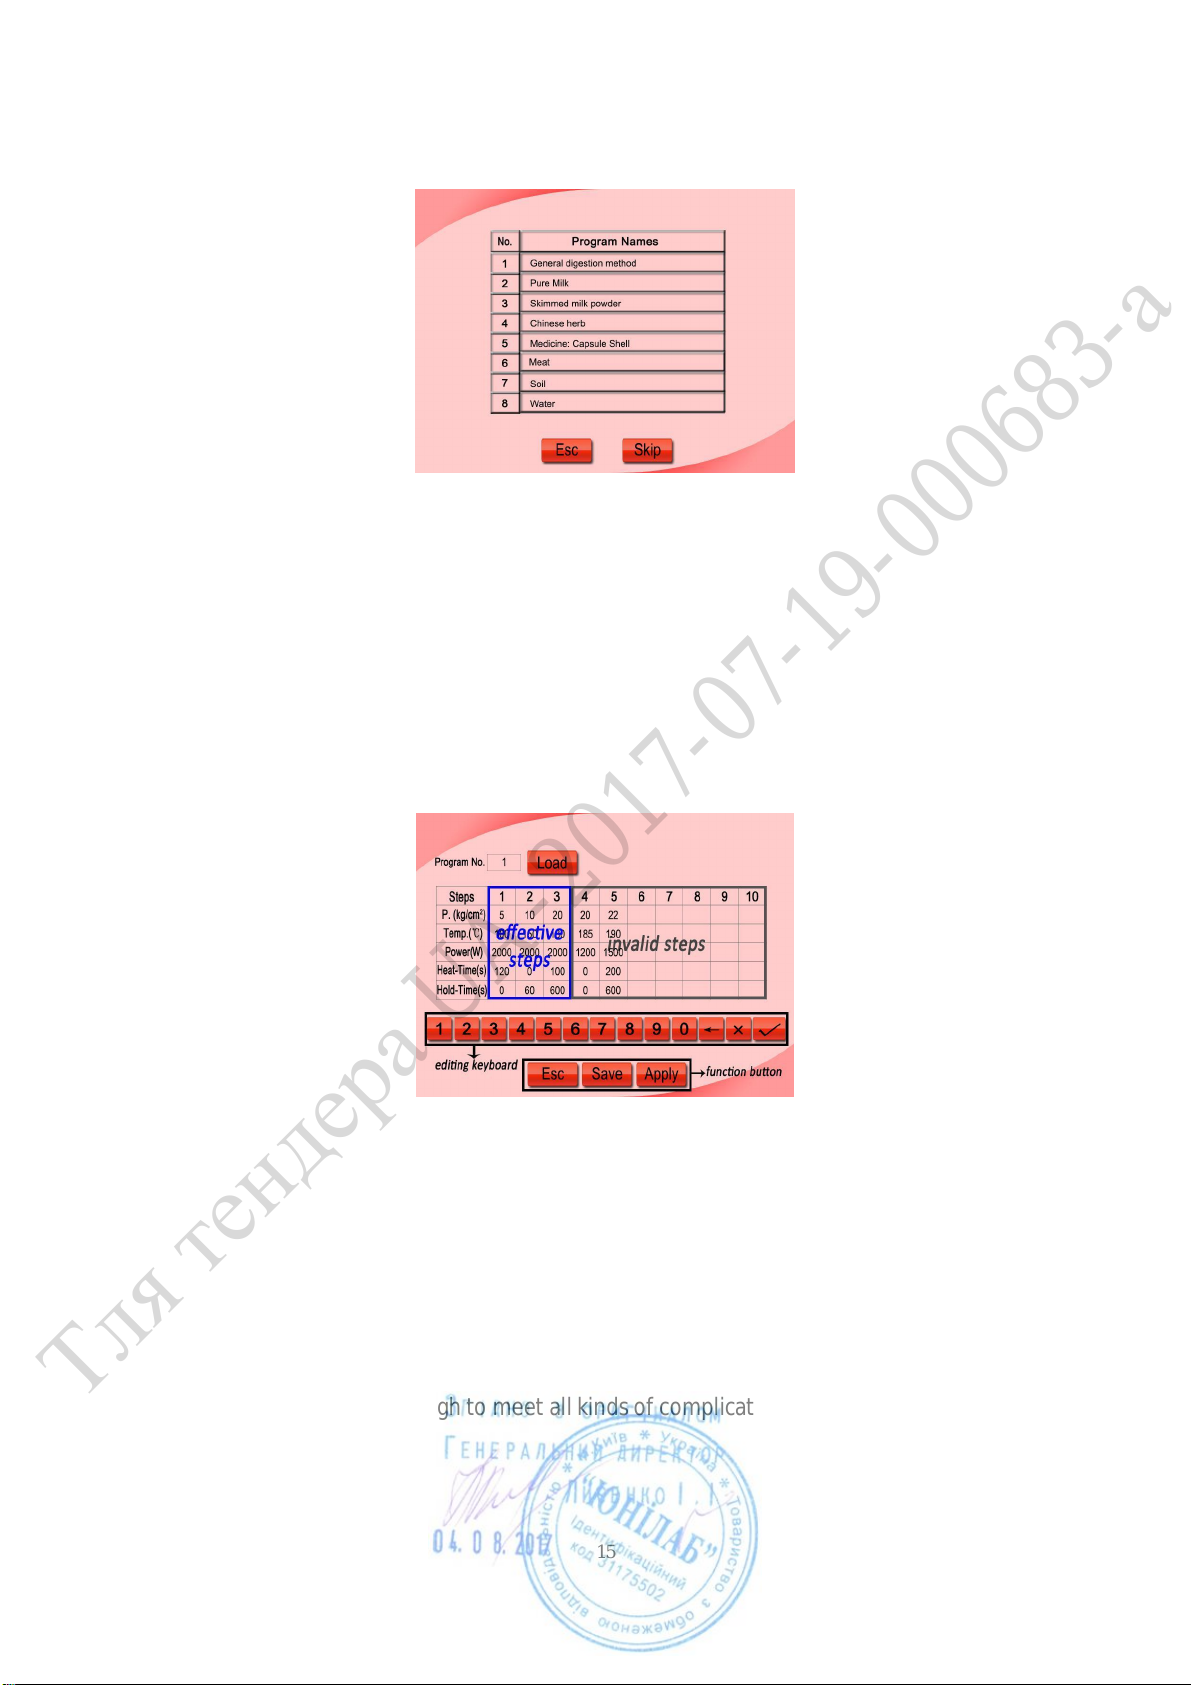
6.4.4 Reference Program Interface
(1) There are 8 preset digestion programs in the Reference Program Interface, which can
facilitate users to enter the digestion process conveniently and quickly. The users can also
modify the related parameters in program 1-8 or set up the digestion program 9-255.
(2) Click the button of corresponding program name and enter the Parameters Display/edit
Interface of the corresponding program.
(3) Click the button of [Skip] to enter the default Parameters Display/edit Interface, which is
used the last time before turning off the power supply.
(4) Click the button of [Esc] to return the previous interface that is Function Selection
Interface.
6.4.5 Parameters Display/Edit Interface
(1) In the Parameters Display/edit Interface, users can modify the program steps or edit the
parameters’values suchas pressure, temperature, power, heat-time and hold-time.
(2) Click the button of [Save] to save the current modification, Click the button of [Apply] to
invoke the current program and apply it to the Working Interface, click the button of [Esc]
to return the previous interface that is Reference Program Interface.
(3) Users can input 1-255 into “Program No.” display frame and click the button of [Load] to
call the corresponding digestion program.
(4) Each digestion program consists 10 working steps, each working steps consists of a heat-
time step and a hold-time step. In other words, each digestion program consists of 20
digestion steps; it is enough to meet all kinds of complicated samples in the control process
of digestion.
15
Тля тендера UA-2017-07-19-000683-а
(5) In the process of digestion, the step that is not set the parameter or the parameters value
of heat-time and hold-time are all “0”, the system judges the step and all the following
steps are invalid. The instrument system runs the effective steps and will stop when meet
the invalid steps.
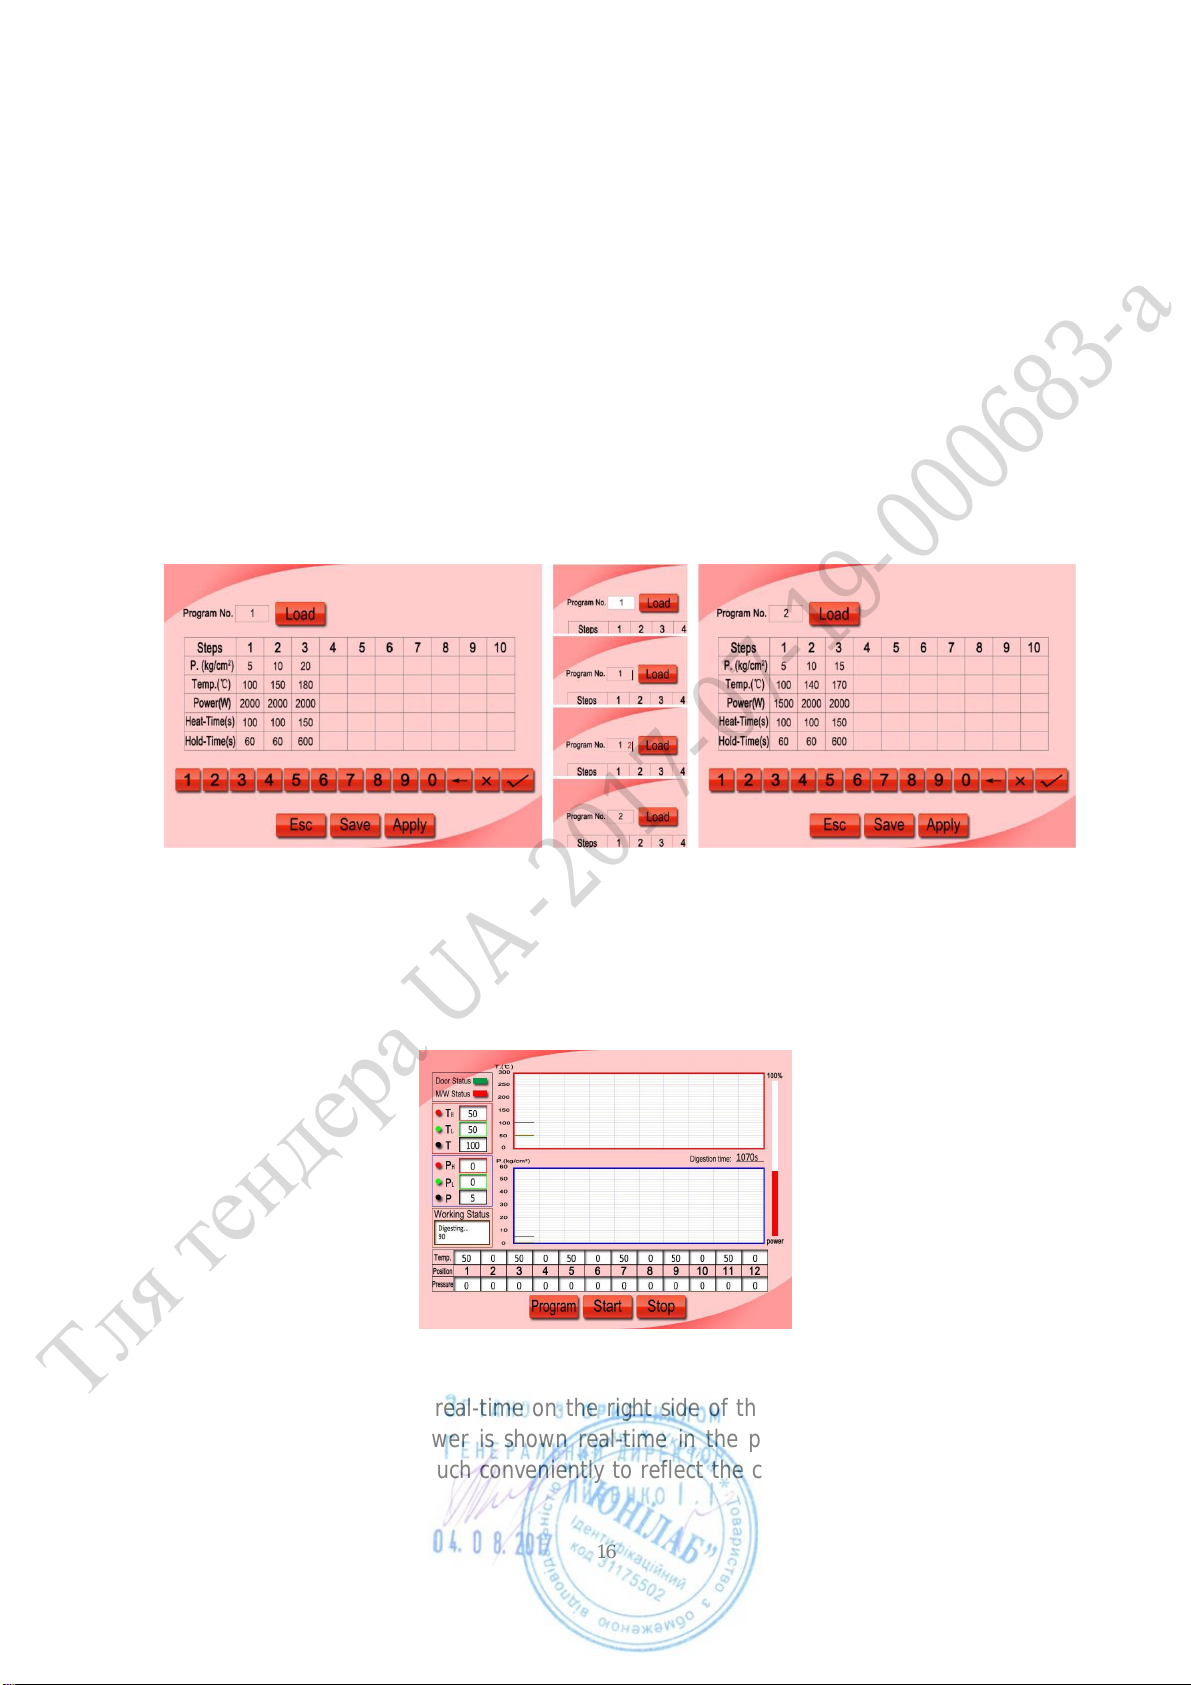
(6) Click the parameter in the display frame, edit or modify it use the “editing keyboard”. For
example, click the program No. display frame, the background color become white, when
the click is finished the background recover as before and there is a black cursor on the
right of the display frame. Input the new program No. value using the editing keyboard, the
newprogram No. value is redand on the right side of the display frame,click [←] todelete
the recently input value, click [×] to cancel the modified editor, click [√] to replace the
original black value with the red value, and the red value will be saved and become to
black. For example, using the program 2 replace the program 1, the operation process as
follows:
(7) The setting range of Pressure parameter is 0-60, use “kg/cm2” as a unit. The setting range
of Temperature parameter is 50-250, use “ ℃” as a unit. The setting range of Power is 0-
2000, use “W” as a unit. The setting range of Time is 0-9999, use “s” as a unit. All
parameter values should not exceed the setting range. Otherwise, click [√] is invalid, the
value won’t be saved, and it should be set again.
6.4.6 Working Interface
(1) The current working state parameters will be shown real-time on the left side of the
Working Interface. The current working parameters curve’s status in the whole process of
digestion will be shown real-time on the right side of the Working Interface. The output
status of microwave power is shown real-time in the progress bar on the right of the
pressure curve. So it’s much conveniently to reflect the changes of digestion condition in
the working process.
16
Тля тендера UA-2017-07-19-000683-а
Table of contents
Other HEB Laboratory Equipment manuals

Popular Laboratory Equipment manuals by other brands


Microm
Microm HM 355 S instruction manual

DataApex
DataApex Shimadzu GC2010 APC/AFC user manual

GE
GE Frac-920 operating instructions

Drucker Diagnostics
Drucker Diagnostics HORIZON 24 Flex-AH Operator's manual

Metrohm
Metrohm 930 Compact IC Flex Oven/ChS/Deg manual

Clinispin Horizon
Clinispin Horizon 755VES Operator's manual


