OPERATION
Raise Saddle Assembly
1. Locate and close release valve by turning it clockwise
firmly,then pump the handle until the load is contacted.
2.Follow vehiclemanufacturersrecommendedprocedures
forremovingtheloadasoutlinedinvehicleservicemanual
orrepair guide.
3.Secure loadwith provided chains.
Important: Ensure the transmission is centered on the
jack. An off-center transmission could cause the jack to
tipoverresulting inpropertydamageor personalinjury.For
your safety, do not exceed 100tilt angle of the saddle
assembly in all directions.
Lower Saddle Assembly
Caution: Be sure all tools and personnel are clear
before lowering load. Dynamic shock loads are
created by quickly opening and closing the release valve
as the load is being lowered. The resulting overload may
cause hydraulic system failure.
1.Slowly, gently, turnreleasevalvecounterclockwisetolower
load. Nomorethan1/2fullturnuntillloadisfully lowered.
2. Secure the transmission to the jack with the chain.
3.For model HW93718,adjustthe boltto thedesiredchain
link. The transmission should be tightly secured to the
jack if proper adjustment is used.
MAINTENANCE
Important: Use only a good grade hydraulic jack oil.
Avoid mixing different types of fluid and never use brake
fluid, turbine oil, transmission fluid, motor oil, or glycerin.
Improperfluid cancause failureof thejack andthe
potentialfor sudden and immediate loss of load.
Adding Oil
1. With saddle fully lowered, set jack in its upright, level
position.Locateandremove oil fillerplug/ airvent screw.
2. Fill with oil until just below the rim of the oil filler hole,
then reinstall the oil filler plug/ air vent screw.
4
!
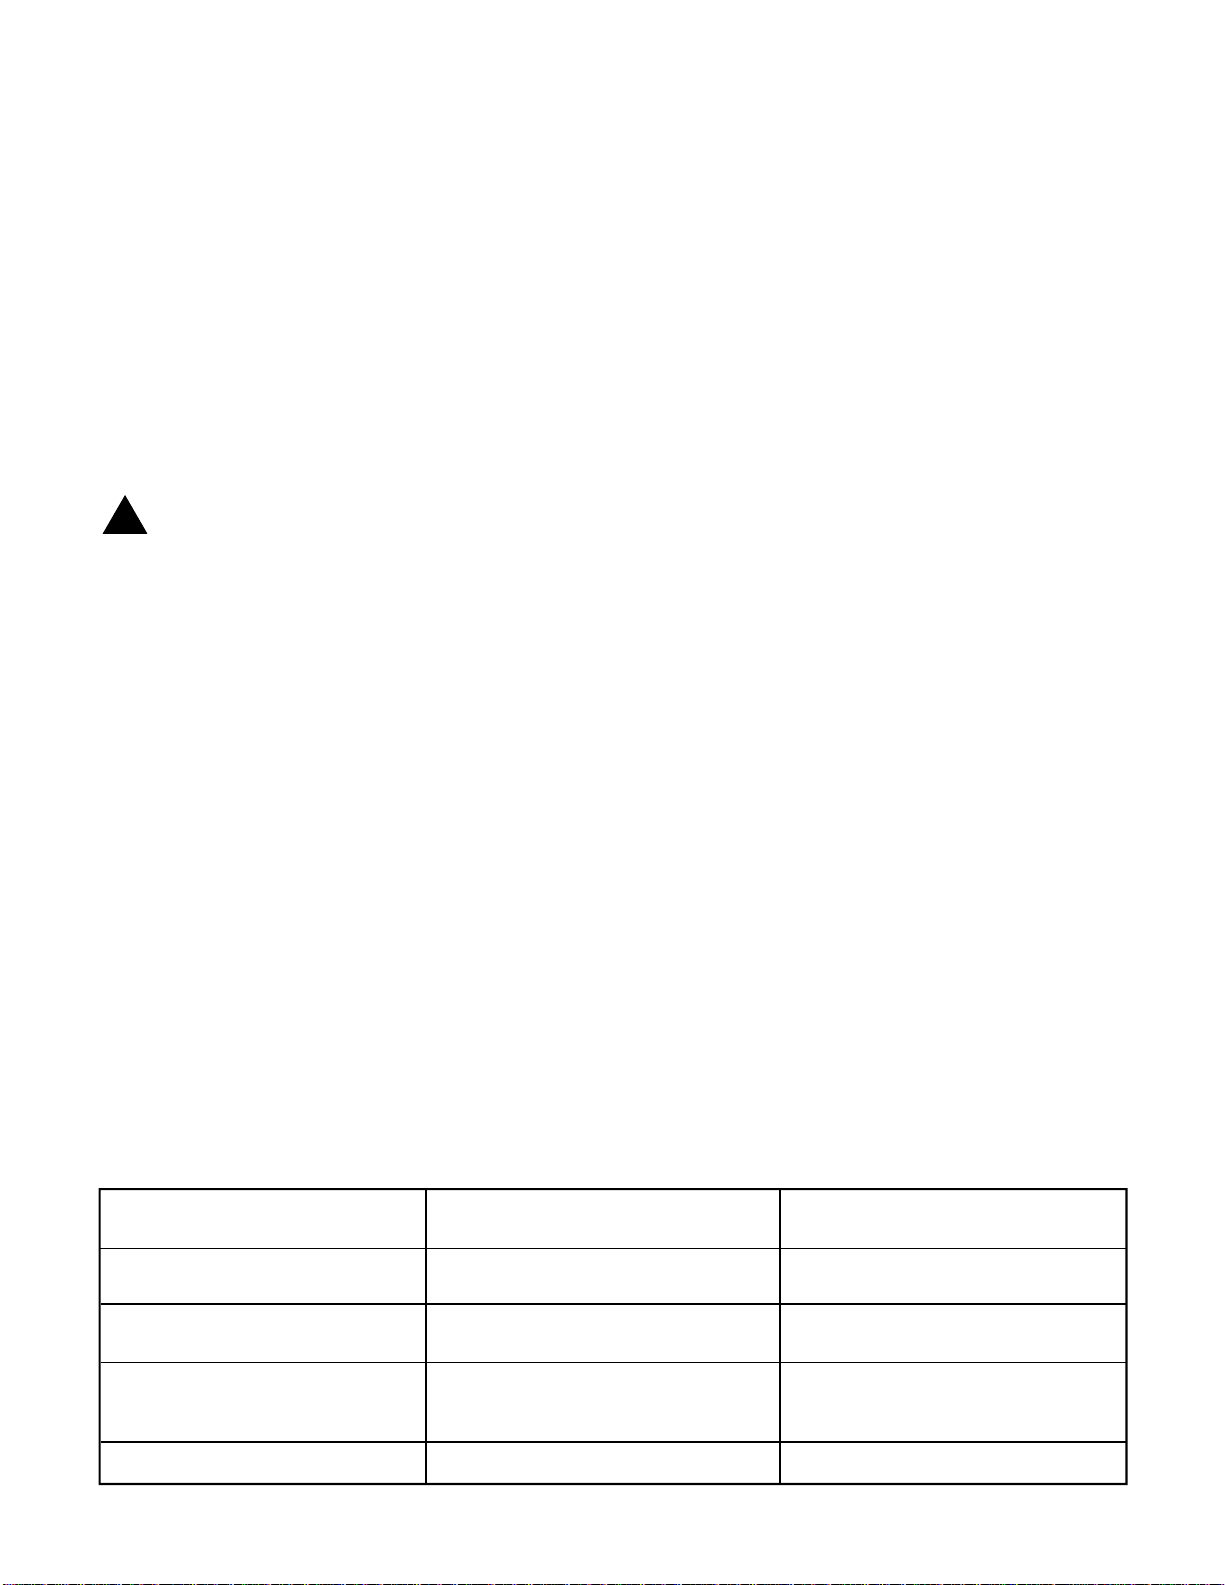
PossibleCauses Corrective Action
Jack will not lift load or bleeds off
afterlift
Will not lift to full extension •Fluidlevel low
•Fluidlevel low
•Air trapped (Apply to HW93718 only)
•Overloadcondition
• Hydraulic unit malfunction •Remedyoverloadcondition
•Contact Snap-on Tech.Service
•Ensureproperfluidlevel
•Ensureproperfluidlevel
•Withram fullylowered, removeoil
filler plug to bleeds air
Poorliftperformance
Jackwill notlower after unloading •Reservoiroverfilled
•LinkageBinding •Drain fluidtoproper level
•Cleanand lubricatemoving parts
Symptom
REPLACEMENT PARTS
Not all components of the jack are replacement items,
butare illustratedas a convenientreference oflocation
and position in the assembly sequence. When ordering
parts,give Modelnumber, parts numberand description
on pages 5-8. Call or write for current pricing:
Phone:(888)332-6419or contactHein-WernerCustomer
or 10939 N. PomonaAve. Kansas City, MO 64153
Changing Oil
Forbest performanceandlongest lift,replace the
complete fluid supply annually.
1. With saddle fully lowered, and pump piston fully
depressed,remove oil fillerplug/air ventscrew.
2. Lay the jack on its side and drain the fluid into a
suitablecontainer.
Note: Dispose of hydraulic fluid in accordance with local
regulations.
3. Set jack in its level, upright positon and fill with oil until
just below the rim of the oil filler hole.
4. Reinstall the oil filler plug / air vent screw.
Librication
1. A periodic coating of light lubricating oil to pivot points,
axles, and hinges will help to prevent rust and assure
thatwheels,castors, and pumpassemblies movefreely.
2. When used on a daily basis, air pump model should be
internally lubricated before each use. Use only good
quality air tool lubricant.
Cleaning
Periodically inspect the ram for signs of rust or corrosion.
Clean as needed and wipe with an oily cloth.
Note: Neveruse sandpaper orabrasivematerial onthese
surfaces!
Storage
When not in use, store the jack with ram fully retracted.
TROUBLESHOOTING
MAINTENANCE contd...


