Heinz Walz MINI-PAM-II User manual

1st Edition: December 2023
Porometer_1223.docx
©Heinz Walz GmbH, 2023
Heinz Walz GmbH •Eichenring 6 •91090 Effeltrich •Germany
Phone +49-(0)9133/7765-0 •Telefax +49-(0)9133/5395
MINI-PAM-II/
POROMETER
Manual
Manual

Contents
_____________________________________________________________________________________________________________________________________________
2
1Contents
1Contents.............................................................. 2
2Safety Instructions ............................................ 4
2.1 General Safety Instructions ......................................................4
2.2 Special Safety Instructions .......................................................5
3Introduction ....................................................... 6
3.1 Description of the pneumatic pathway and its components......8
4Components ......................................................10
4.1 Components ...........................................................................10
4.2 Optional Components.............................................................10
5Setup ..................................................................11
5.1 Mounting fiberoptics................................................................13
5.2 Mounting dark shield...............................................................14
5.3 Black gaskets for needles.......................................................15
5.4 Tripod Mount...........................................................................17
5.5 External LED Light Source 2054-L .........................................18
6Taking Measurements .....................................19
7Touchscreen Operation ...................................24
7.1 Porometer windows, data and graph......................................25
7.2 Porometer action key bar........................................................27
7.3 Porometer side panel..............................................................29
7.4 Sett./Porometer Settings.........................................................30
7.5 Porometer topics in the Main Menu........................................40
7.6 Memory...................................................................................46
8WinControl-3 Operation...................................48
8.1 WinControl-3 Status panel......................................................48
8.1 WinControl-3 Porometer Values.............................................50
8.1 WinControl-3 Porometer Settings...........................................51
9Maintenance .....................................................53
9.1 Pressure-sensor calibration....................................................53
9.2 Match......................................................................................55

Contents
_____________________________________________________________________________________________________________________________________________
3
9.3 CO2-sensor calibration........................................................... 56
9.4 Calibration of Orientation Sensors .........................................57
9.5 Cleaning.................................................................................58
9.6 Light Calibration procedures ..................................................58
9.1 Gasket....................................................................................59
9.1 Pore Standard PORO/POR....................................................61
9.2 Signal LED.............................................................................63
10 Calculations...................................................... 64
10.1 Parameters.............................................................................64
10.2 H2O mole fractions.................................................................66
10.3 Transpiration Rate (E)............................................................ 68
10.4 Vapor Pressure Deficit (VPD).................................................69
10.5 Water Vapor Conductance (gt)...............................................71
10.6 Stomatal Conductance (gs) ....................................................71
10.7 Geospatial Data .....................................................................73
11 Saturation Vapor Pressure above Water...... 74
12 Specifications ................................................... 77
12.1 MINI-PAM-II/Porometer..........................................................77
12.2 Transport Case PORO/T........................................................79
Warranty........................................................................... 80
12.3 Conditions..............................................................................80
12.4 Instructions.............................................................................81
13 Index.................................................................. 82

Safety Instructions
_____________________________________________________________________________________________________________________________________________
4
2Safety Instructions
2.1 General Safety Instructions
- Read safety instructions and the operating instruc-
tions prior to operation of the device and its accesso-
ries.
- Pay attention to all safety warnings.
- Keep device and its accessories away from water or
high moisture areas.
- Keep the device and its accessories away from dust,
sand and dirt.
- Do not put the device and its accessories near sources
of heat.
- Ensure that neither liquids nor foreign bodies get in-
side the device or its accessories.
- Ensure sufficient ventilation.
- Connect the device only to the power source indicated
in the operating instructions or on the device. If the
device is not in use, remove the mains plug from the
socket.
- The device and its accessories should only be repaired
by qualified personnel.

Safety Instructions
_____________________________________________________________________________________________________________________________________________
5
2.2 Special Safety Instructions
- Turn off MINI-PAM-II before connecting or disconnect-
ing MINI-PAM-II/POROMETER.
- The MINI-PAM-II/POROMETER is a highly sensitive in-
strument which should be only used for research pur-
poses. Follow the instructions of this manual in order
to avoid potential harm to the user and damage to the
instrument.
- The MINI-PAM-II can emit very strong light! In order to
avoid harm to your eyes, never look directly into the
light port of the MINI-PAM-II or its fiberoptics.
Turn off MINI-PAM-II before connecting or disconnecting MINI-
PAM-II/POROMETER or 2054-L External LED Light Source.

Introduction
_____________________________________________________________________________________________________________________________________________
6
3Introduction
The MINI-PAM-II/POROMETER is a new leaf-clip for MINI-PAM-II
instruments. It combines measurements of stomatal conduct-
ance and chlorophyll afluorescence for the assessment of PSII.
As a lightweight, compact device, it is ideally suited for use in
the field as well as in greenhouses and laboratories. The
porometer provides precise information on evaporation and
stomatal conductance for rapid screenings, and high-through-
put stress assessment, but also analysis of stomatal movement
in combination with well-established protocols like induction-
curves or light-curves. Together with chlorophyll afluores-
cence, these are important aspects for describing the photo-
synthetic activity.

Introduction
_____________________________________________________________________________________________________________________________________________
7
The porometer is equipped with:
- humidity sensors for the determination of H2O evapo-
ration of the leaf and ambient humidity
- leaf temperature sensor
- pressure sensor
- flow sensors and a very silent pump
- adjustable pressure of the closing mechanism
- a GPS-module for tracking the sample and sun position
in field applications and determination of angle of sun-
incidence on the leaf
- a sensor to measure photosynthetically active radiation
(PAR) at leaf level with high accuracy, providing reliable
light intensity data for electron transport rate (ETR) cal-
culations
- a dark shield for easy determination of F0,FMand meas-
urements with controlled actinic light intensities
- ambient CO2-sensor to monitor ambient CO2-levels
which are of interest in laboratory or greenhouse con-
ditions

Introduction
_____________________________________________________________________________________________________________________________________________
8
3.1 Description of the pneumatic pathway and its
components
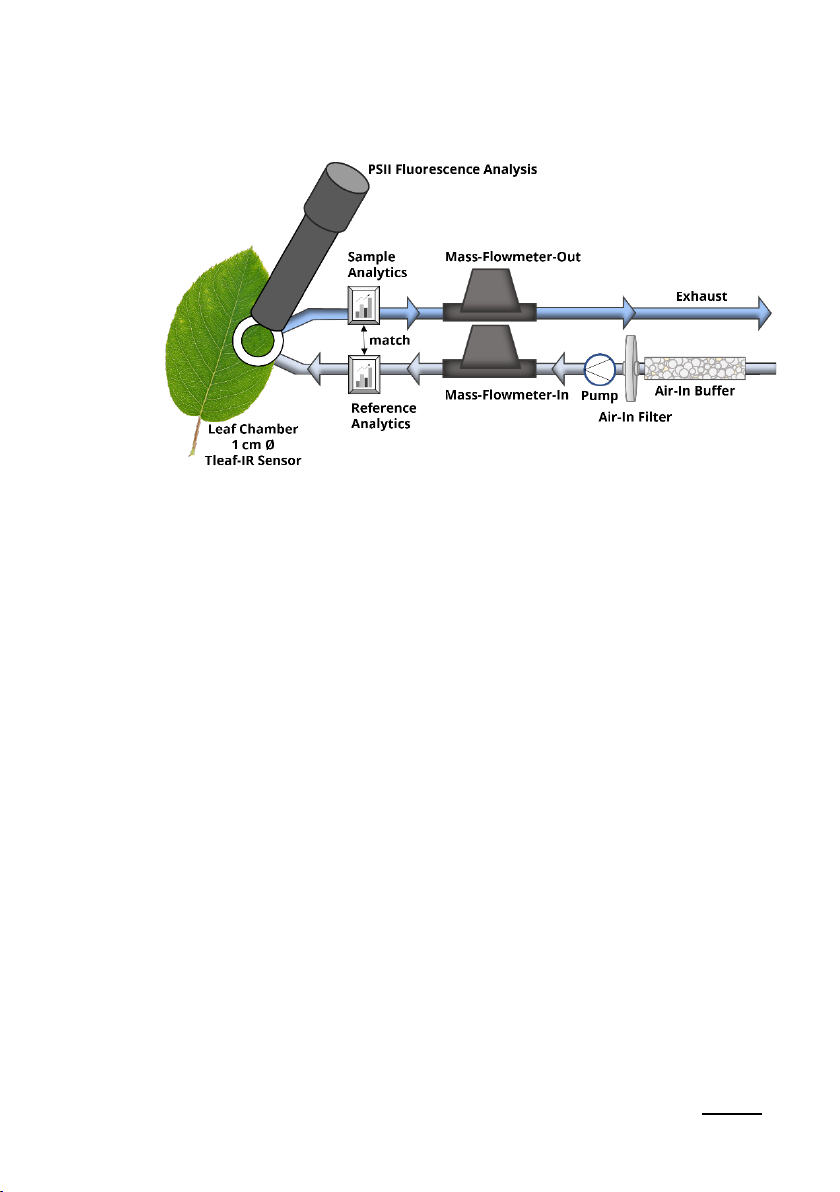
The MINI-PAM-II/POROMETER is an open system porometer.
Fig. 1 displays the pneumatic pathway through the porometer.
Air is drawn in from the surroundings and passes through a
buffer (Air-In-Buffer) that compensates for peaks fluctuations.
For system safety, the incoming air is filtered through a 1-2 µm
filter. The pump follows, delivering the air at the preset flow
rate. This is controlled by the following flowmeter (Mass-Flow-
meter-In). The air is now analyzed in the reference analytic cell
to determine the water vapor concentration within the ambi-
ent air. Subsequently this air passes by the leaf in the leaf
chamber and absorbs the humidity released by the leaf. In the
leaf chamber, additionally the leaf temperature is determined
by a non-contact infrared temperature sensor (Tleaf-IR-sensor)
and the PSII fluorescence is analyzed by PAM-technique (the
fiber MINI-PAM/F is positioned in a 60° angle to the leaf for PSII
fluorescence analysis). The air enriched with humidity evapo-
rated from the sample is then analyzed in a second analytic cell
(Sample Analytics). The difference in water vapor concentra-
tion of incoming air and sample enriched air is the basis for the
porometer parameter calculation (see chapter 10). With a sec-
ond mass flow meter (Mass-Flowmeter-Out) the system pro-
vides information about the amount of air coming from the
leaf chamber and thus about the system´s airtightness. Finally,
the air is released through exhaust.
Introduction
_____________________________________________________________________________________________________________________________________________
9
Fig. 1: Pneumatic pathway of MINI-PAM-II/POROMETER

Components
_____________________________________________________________________________________________________________________________________________
10
4Components
4.1 Components
Porometer MINI-PAM-II/POROMETER
Leaf clip cable PORO/AL
Air-in buffer PORO/B
Gasket (5x) white 000246900414
Gasket (5x) black 000246903214
Dark Shield 000246901014
Tripod Mount 000246901114
Pore standard PORO/POR
Filter paper (20x) PORO/FP
Transport Case PORO/T
MINI-PAM-II/POROMETER Manual
4.2 Optional Components
CO2-calibration kit (zero) PORO/CAL
External LED Light Source 2054-L

Setup
_____________________________________________________________________________________________________________________________________________
11
5Setup
The porometer is ready for immediate use. As MINI-PAM-II leaf
clip, it only needs to be connected to the MINI-PAM-II. The in-
strument recognizes the porometer and provides the required
operation elements. Together with the MINI-PAM-II it can be
used in stand-alone configuration e.g. in field experiments and
controlled by an external computer.
Please connect the leaf clip cable to the MINI-
PAM-II/POROMETER and LEAF CLIP socket (#1) of the MINI-
PAM-II instrument (see Fig. 2).
Fig. 2: Back panel of MINI-PAM-II Power-and-Control-Unit
Note: Great caution should be exercised to prevent dirt or for-
eign matter from entering the ports or sockets of the
MINI-PAM-II. Do not force a plug into the wrong socket. Orien-
tate each plug so that the red dot on the plug coincides with
Setup
_____________________________________________________________________________________________________________________________________________
12
the red dot of the socket. Do not try to disconnect a plug by
pulling at the cable. Disconnect plug by pulling at the rippled
bushing of the plug.
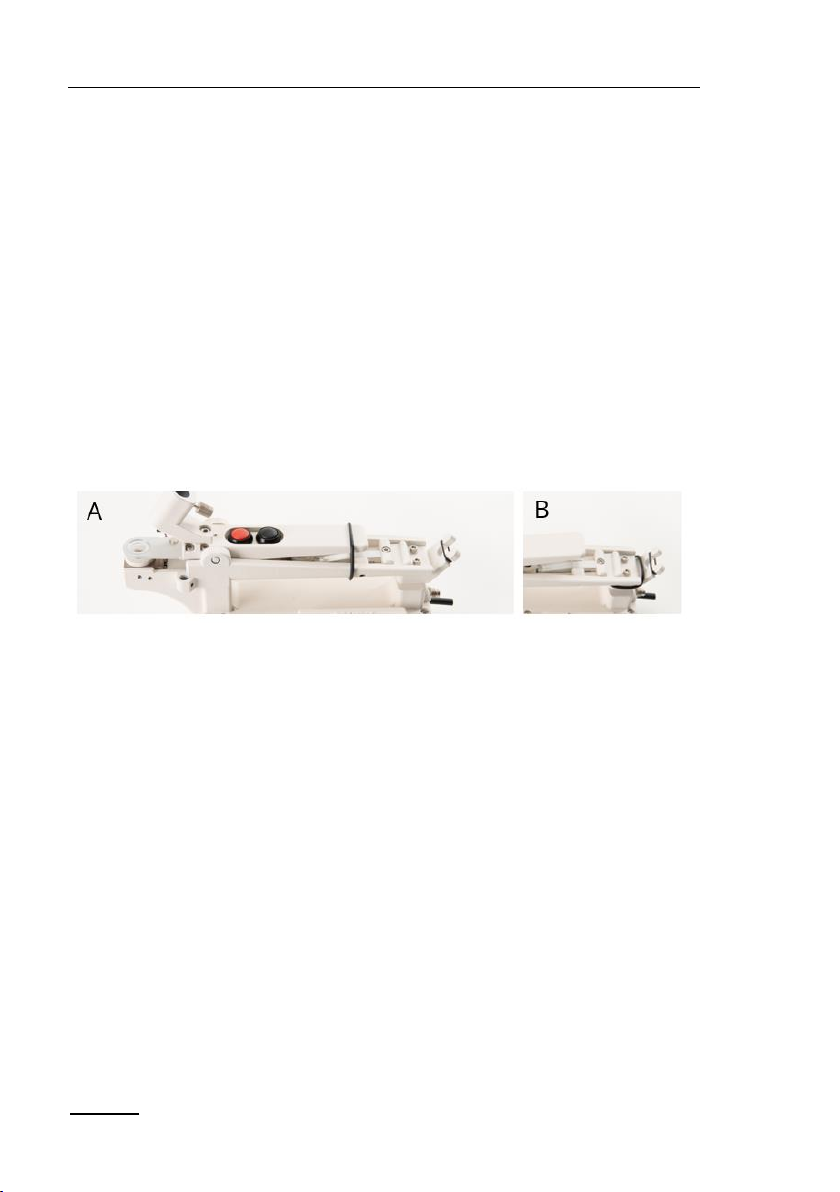
To protect the gasket, the porometer is stored with an open
leaf chamber when not in use. For this purpose, a black ring
can be slipped over the handle and keeps the chamber open.
When the porometer is in use, this black ring can be tucked
away at the end of the handle.
Fig. 3: Black ring holding the chamber in an open position (A) and
tucked away for measurements (B)
If there is a strong humidity gradient between the experiment
location and the porometer storage location, it is recom-
mended to store the buffer column at the experiment location
or to switch on the flow ahead of the experiment so that the
humidity buffer can equilibrate.

Setup
_____________________________________________________________________________________________________________________________________________
13
5.1 Mounting fiberoptics
For PAM-measurements, the MINI-PAM/F fiberoptic is fixed at
an 60° angle to the sample area. The bending of the fiber is
secured by the mounting aid. Already purchased fibers can
also be equipped with the mounting aid. To do this, please at-
tach the mounting aid as shown in Fig. 4 at a distance of 30 cm
to the fiber tip. Please use the black Ø 1.4 cm ring to attach the
mounting aid to the porometer (see Fig. 5)
Fig. 4: MINI-PAM/F mounting aid
Fig. 5: Rear mounting of MINI-PAM/F

Setup
_____________________________________________________________________________________________________________________________________________
14
The light intensity at the leaf area level is determined among
other things by the optical geometry between fiber and sam-
ple. Therefore, the internal light list of the MINI-PAM-II should
be calibrated in the initial setup process. To calibrate the inter-
nal light list please follow the procedure described in chapter
9.6.
5.2 Mounting dark shield
The porometer can measure stomatal conductance quickly
and accurately in single point measurements under ambient
light conditions. Additionally, the porometer can combine typ-
ical MINI-PAM-II measurement protocols such as Actinic+Yield,
induction- and light-curves with its data. If the experiments re-
quire controlled light conditions, shielding from ambient light,
such as for assessing of FV/FMafter dark acclimation, the dark
shield can be used for easier handling. It prevents the sample
area from being exposed to ambient light. The dark shield is
mounted to the fiber between sample area and fiber holder
see Fig. 6.

Setup
_____________________________________________________________________________________________________________________________________________
15
Fig. 6: Mounting MINI-PAM/F and dark shield.
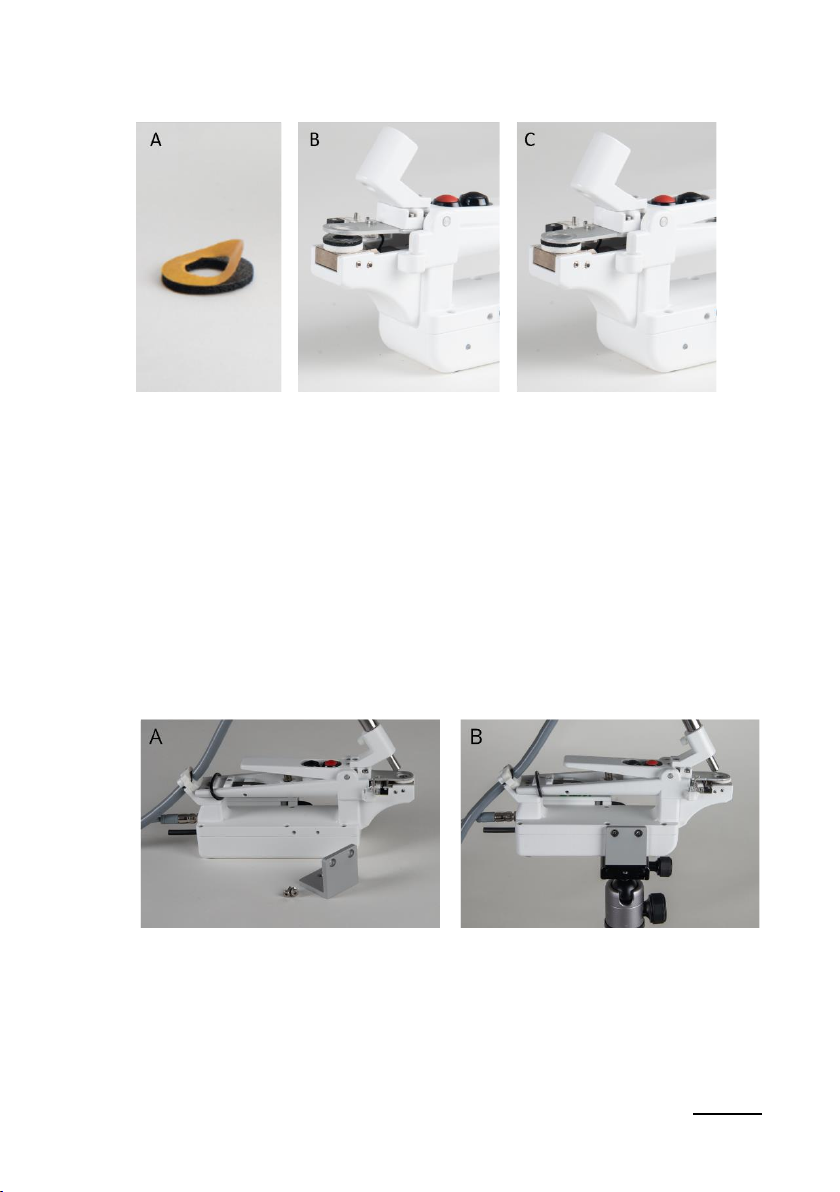
5.3 Black gaskets for needles
In addition to the standard white gaskets, 2 mm black gaskets
are included in the scope of delivery. These are for special ap-
plications where the sample does not cover the entire leaf
chamber. The black gaskets are attached to the top of the leaf
chamber for better sealing of the cuvette.

Setup
_____________________________________________________________________________________________________________________________________________
16
Fig. 7: Black gaskets for sealing specific samples.
Note: if the sample area is not covered entirely the parameter
leaf area needs to be adjusted (see chapter 7.4 Parameter –
Leaf area).
To attach the black gasket, remove the protective layer from
the adhesive surface (Fig. 8; A). With the porometer open, place
the black gasket with the adhesive surface facing up on the
white gasket (Fig. 8; B). Carefully close the porometer to ensure
that the black seal adheres precisely to the surface of the leaf
chamber (Fig. 8; C).
Setup
_____________________________________________________________________________________________________________________________________________
17
Fig. 8: Mounting the black gasket
5.4 Tripod Mount
For experiments with longer measuring times, the porometer
can be used with a tripod. For this purpose, the tripod mount
is attached to the side of the porometer with two screws. There
is a ¼” thread in the lower part of this adapter.
Fig. 9: Tripod Mount and Porometer (A); mounted (B)

Setup
_____________________________________________________________________________________________________________________________________________
18
5.5 External LED Light Source 2054-L
For actinic illumination of the leaf the LED Light Source 2054-L
can be used. It offers the ability to adjust the colors red, green,
blue, and white independently. Thus, the spectrum of the ac-
tinic illumination can be set individually for each experiment.
The 2054-L light source is mounted to the side brackets of the
porometer and connected to the SYNC port of the MINI-PAM-
II. Adjustment of light color and intensity is done either via the
MINI-PAM-II menu “Light Sources”- “Light Panel Sett.” or via
WinControl-3.
Further information about the External LED Light Source
2054-L can be found in the MINI-PAM-II manual.

Taking Measurements
_____________________________________________________________________________________________________________________________________________
19
6Taking Measurements
The MINI-PAM-II/POROMETER is equipped with sensor tech-
nology that enables the calculation of stomatal conductance
and the determination of stomatal movement. These parame-
ters can be combined with PAM-measurements of MINI-PAM-
II instruments, to get detailed information about physiological
aspects of photosynthesis.
This chapter describes the measurement procedure and gives
useful tips on how to perform porometer experiments. All op-
erating keys are described in detail in the next chapter.
Two measurement procedures can be distinguished with the
MINI-PAM-II/POROMETER: One for the rapid determination of
stomatal conductance and another for the recording of sto-
matal conductance and stomatal movement over multiple data
points. These general handling tips apply to both measure-
ment procedures.
Before starting a series of measurements:
•Setup the MINI-PAM-II/POROMETER (chapter 5)
•Check the porometer baseline. Close the leaf cham-
ber of the porometer to purge both analytical cells
with the same air. If there are differences in humidity

Taking Measurements
_____________________________________________________________________________________________________________________________________________
20
(e.g. dH2O), please follow the maintenance “Pressure-
sensor calibration”and “Match” chapter 9.1 and 9.2.
•If you are interested in the ambient CO2level, please
calibrate CO2sensor prior your experiments (chapter
9.3.)
•Charge the batteries or take a set of charged batter-
ies with you. 6 AA (Mignon) rechargeable batteries
(Eneloop 1.2 V/2 Ah) within the MINI-PAM-II typically
provide power for more than 8 hours continuous
porometer operation at maximum flow. Fluorescence
measurements shorten the operation time. The most
power consuming elements are the sensors for the ge-
ospatial data. Please turn GPS off, when not in use.
Positioning of the leaf clip:
•Orient the leaf side of interest toward the white
gasket.
Air flows through the bottom of the leaf chamber.
When the sample area is completely covered, a one-
sided measurement is made. If the upper leaf side is
to be analyzed, the porometer can be rotated so that
the top of the leaf faces the white gasket.
•Avoid positioning onto the veins of the leaf.
Mechanical force on the leaf vascular structure can af-
fect the measurement results. If the vascular structure
is pronounced and therefore the surface is uneven,
Table of contents
Other Heinz Walz Measuring Instrument manuals


