Helios TL64 User manual
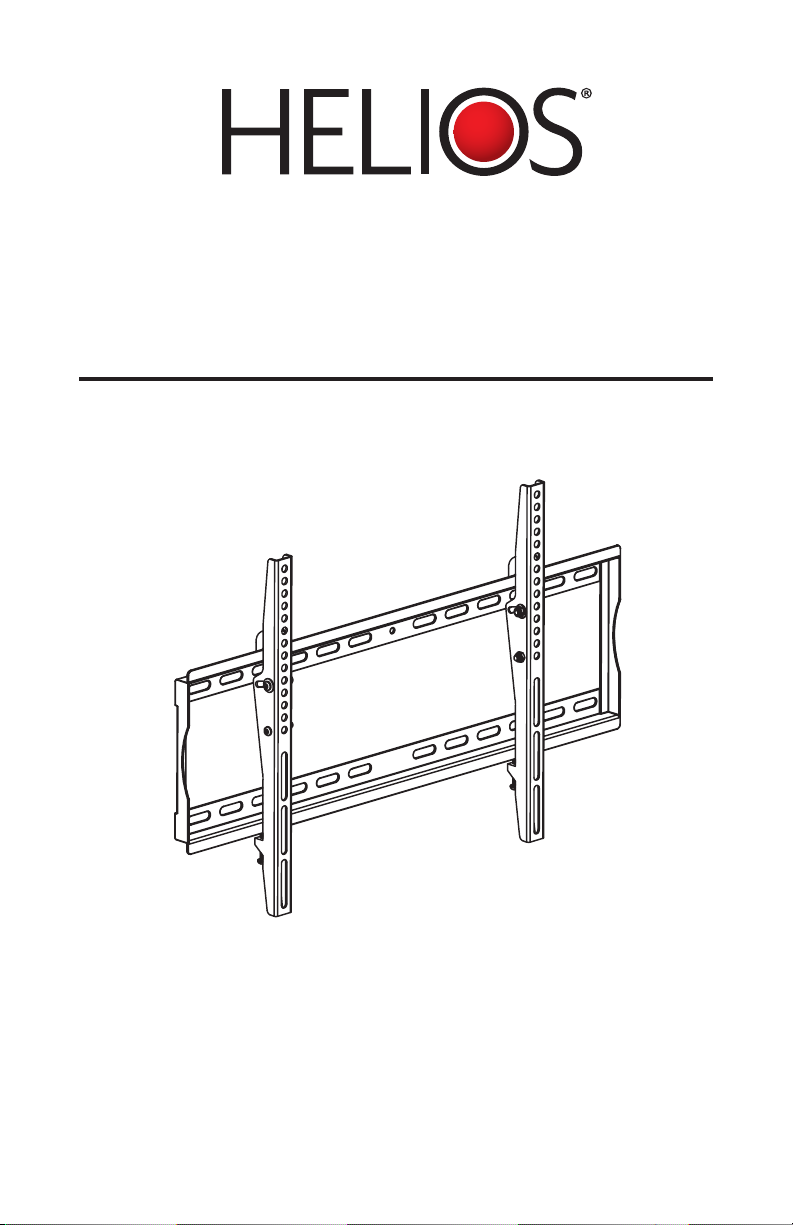
Assembly Instructions
TL64
• Please read these instructions carefully before using.
• This model will hold most 32-60 Flat Panel TVs.
• Load capacity: 40kg (88Lbs).
TL64 Information
• Please read these instructions carefully before starting.
• This product will hold most 32-60 Flat Panel TVs.
• Load capacity: 40kg (88Lbs).
• VESA Compliant: 100x100, 200x200, 400x400, 600x400
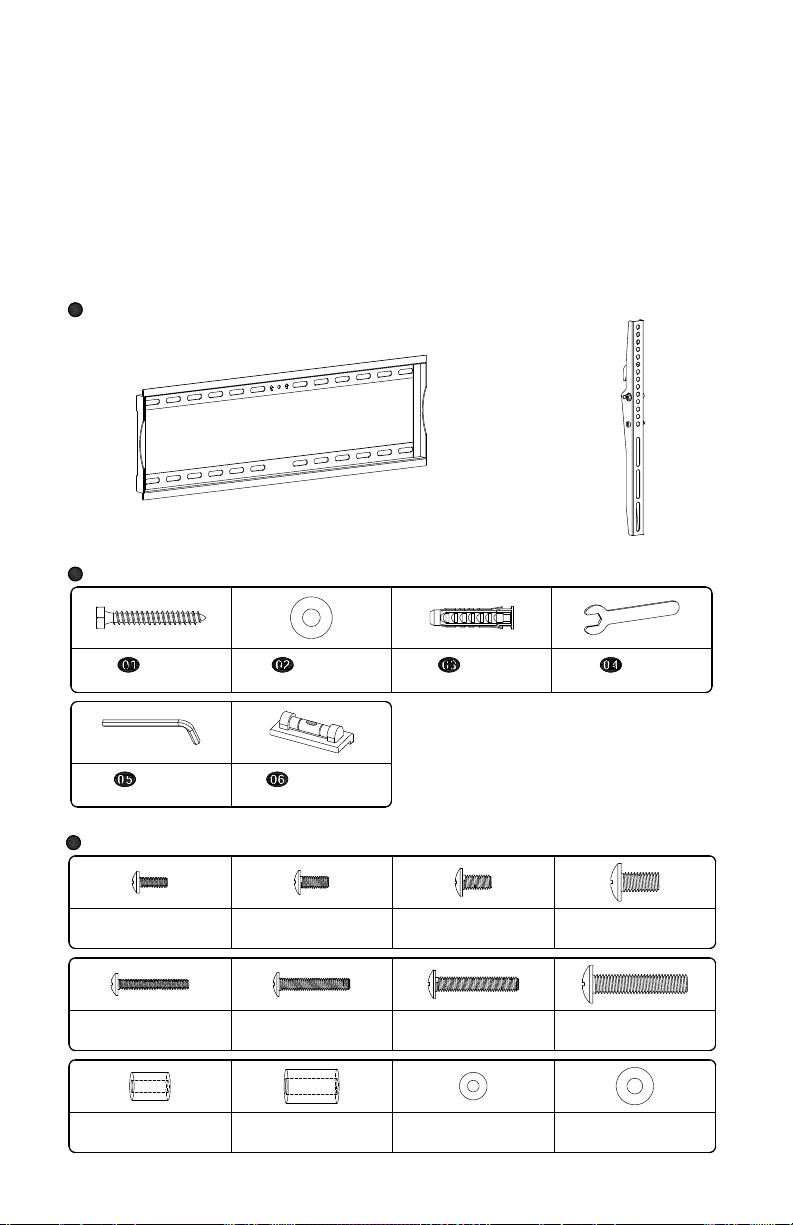
Supplied Parts and Hardware: (Some parts not shown at same scale)
SAFETY WARNING:
Never let children climb on product or play with product.
Do not sit or stand on product.
Do not fasten a TV that is heavier than the recommended load rating to the mount.
Using suitable concrete wall or wood stud wall.
Improper installation may cause property damage and/or personal injury,so the installation
must be done by two qualified contractors. The manufacture is not liable for damage or
injury caused by incorrect mounting, assembly or use.
Improper handling can result in cuts and lacerations.
Pictures for reference only, subject to our available products.
Keep this instruction for future reference.
CAUTION :
CAUTION : This mount is intended for use with weights not exceeding "maximum
weight capacity 88lbs." Pls don't over tighten screws in order to avoid any injury.
Use with products heavier than the maximum weights indicated may result in
collapse of the mount and its accessories causing possible injury.
Wall mounting hardware:
①
Part list:
A-Wall plate 1pc
B-TV Bracket
2pcs
--Anchor
4pcs
--M8 washer
4pcs
--Lag bolt
4pcs
--Wrench
1pcs
--Allen Key
1pc
--Bubble level
1pc
TV mounting hardware
②
a--M4x12 bolt
4pcs
b--M5x12 bolt
4pcs
c--M6x12 bolt
4pcs
d--M8x16 bolt
4pcs
e--M4x30 bolt
4pcs
f--M5x30 bolt
4pcs
g--M6x35 bolt
4pcs
h--M8x40 bolt
4pcs
i--M4/M5
spacer 4pcs
j--M8/M6
spacer 4pcs
k--M4/M5
washer 4pcs
l--M6 washer
4pcs
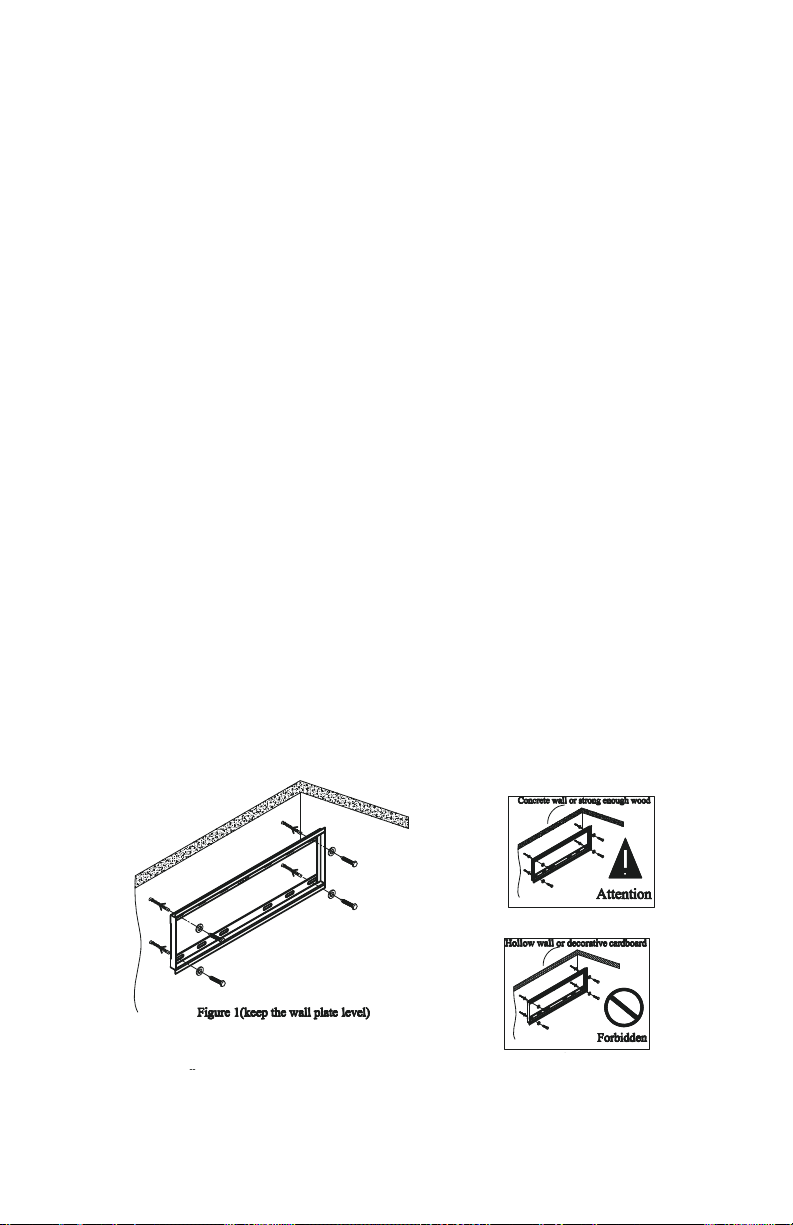
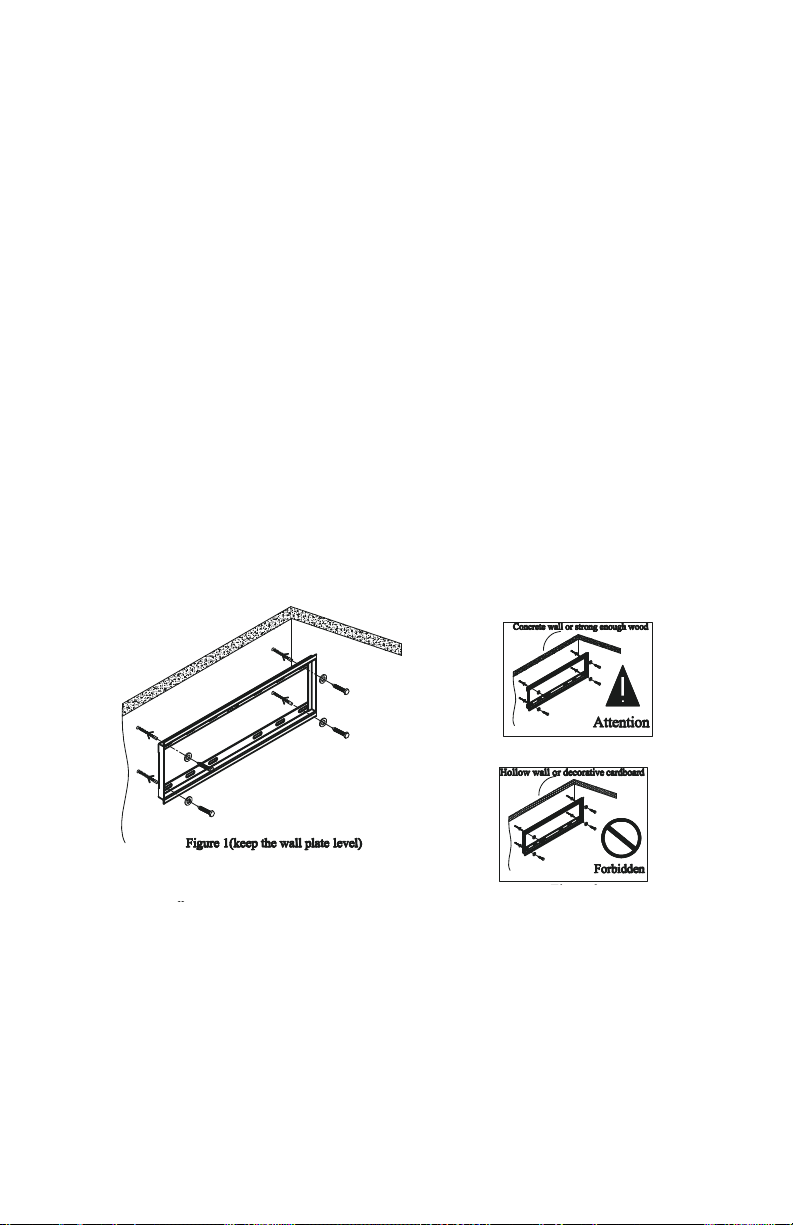
Step 1:Pls remove the plaster board on the surface of concrete wall when assembling
mount on the concrete wall. Hold Wall plate (A) against wall at desired position on concrete
wall, then using a pencil mark 4 hole locations. Then drill holes according pencil marks using
3/8" size drill bit to a depth of 2.5". Then you will need to use wall anchors . Insert wall
anchors into holes, you may need to use hammer to lightly tap wall anchors into wall. Then
fix Wall plate (A) to the wall with screws and washers . (Figure 1)
CAUTION: The concrete wall minimum thickness no less than 5.5 inches, and
surface covering can't more than 3/8 inches.
If you mount TV mount into wood studs ,pre-drill the mark 4 holes using 7/32" drill bit to a
depth of 2.5", fix Wall plate (A) to the wall with screws and washers . (Figure 2)
CAUTION: The wood stud min size is 2x4 inches, and surface covering can't more
than 5/8 inches. Drill hole on the wooden pillars middle line.
CAUTION: Don't use it on the concrete block.
Concrete wall
No!
Level
A
Figure 1 (keep the Wall plate level)
3/8"
1

Safety Warning
Please read this entire manual carefully before assembling this unit to
avoid bodily injury and/or any property loss. If you do not understand
these directions, or have any doubts about the safety of the installation,
please call Tech Support at 1-866-839-9187.
Please check carefully to ensure there are no missing or defective parts.
Our customer representatives can quickly assist you with installation
questions and missing or defective parts. Replacement parts for products
purchased through authorized dealers will be shipped to you directly.
Do not attempt to use any parts not provided by the manufacturer. Using
other screws could cause injury or property loss.
Never use defective parts, as improper installation may cause damage or
serious injury.
Do not use this product for any purpose not explicitly specified by Metra
Home Theater Group™. Metra Home Theater Group™ cannot be liable for
damage or injury caused by incorrect assembly, or incorrect use.
• Read these instructions.
• Keep these instructions.
• Heed all warnings.
• Follow all instructions.
• WARNING: Use only the supplied screws intended for the current
application to avoid personal injury or property damage.
2
Assembly Instructions
Step 1: Read and understand all of the directions. Use only as according to
the directions.
Step 2: Mount the wall plate (A) on the wall
Wood Stud Mounting:
The Wall Plate must be mounted to the center point of two wood studs that are
at least 16 inches apart. The minimum width of these wood studs should be at
least 1.5” (standard US 2” x 4”).
Find the stud locations then hold the wall mount bracket against the wall.
While using a level to verify that the wall mount bracket is correct, mark the
bolt hole locations that coincide with the studs.
Using a 7/32 drill bit Pre-drill a 2.5” deep hole in each marked location.
Attach the Wall Plate to the wall using the supplied lags and washers. Please
make sure that the lags have been tightened and are secure.
Attach the vertical arms (B) to the back of your display (securely).
Hang the display on the top rail of the wall mount bracket (C).
Before seating the mount into the lower rail of the wall mount bracket connect
and route all of the connecting cables and power cord.
3
Assembly Instructions
Step 1:
Read and understand all of the directions. Use only as according to
the directions.
Step 2: Mount the wall plate (A) on the wall
Wood Stud Mounting:
The Wall Plate must be mounted to the center point of two wood studs that are
at least 16 inches apart. The minimum width of these wood studs should be at
least 1.5” (standard US 2” x 4”).
Find the stud locations then hold the wall mount bracket against the wall.
While using a level to verify that the wall mount bracket is correct, mark the
bolt hole locations that coincide with the studs.
Using a 7/32 drill bit Pre-drill a 2.5” deep hole in each marked location.
Attach the Wall Plate to the wall using the supplied lags and washers. Please
make sure that the lags have been tightened and are secure.
Attach the vertical arms (B) to the back of your display (securely).
Hang the display on the top rail of the wall mount bracket (C).
Before seating the mount into the lower rail of the wall mount bracket connect
and route all of the connecting cables and power cord.
3
(A)
(A)
4
(A)
Concrete Wall Mounting:
Choose a solid wall area (avoid the hollow wall or the screws in the joint of the
bricks).
Hold the wall mount bracket against the wall. While using a level to verify that
the wall mount bracket is correct, mark the bolt hole locations.
Pre-Drill the marked locations with a 3/8” masonry bit then insert the plastic lag
inserts.
Attach the vertical arms (B) to the back of your display (securely).
Hang the display on the top rail of the wall mount bracket (C).
Before seating the mount into the lower rail of the wall mount bracket connect
and route all of the connecting cables and power cord.
Note:
Be sure to choose a smooth wall area that is strong enough to hold the
weight of the TV and wall mount. The installation should be far away from water
and direct sunlight.
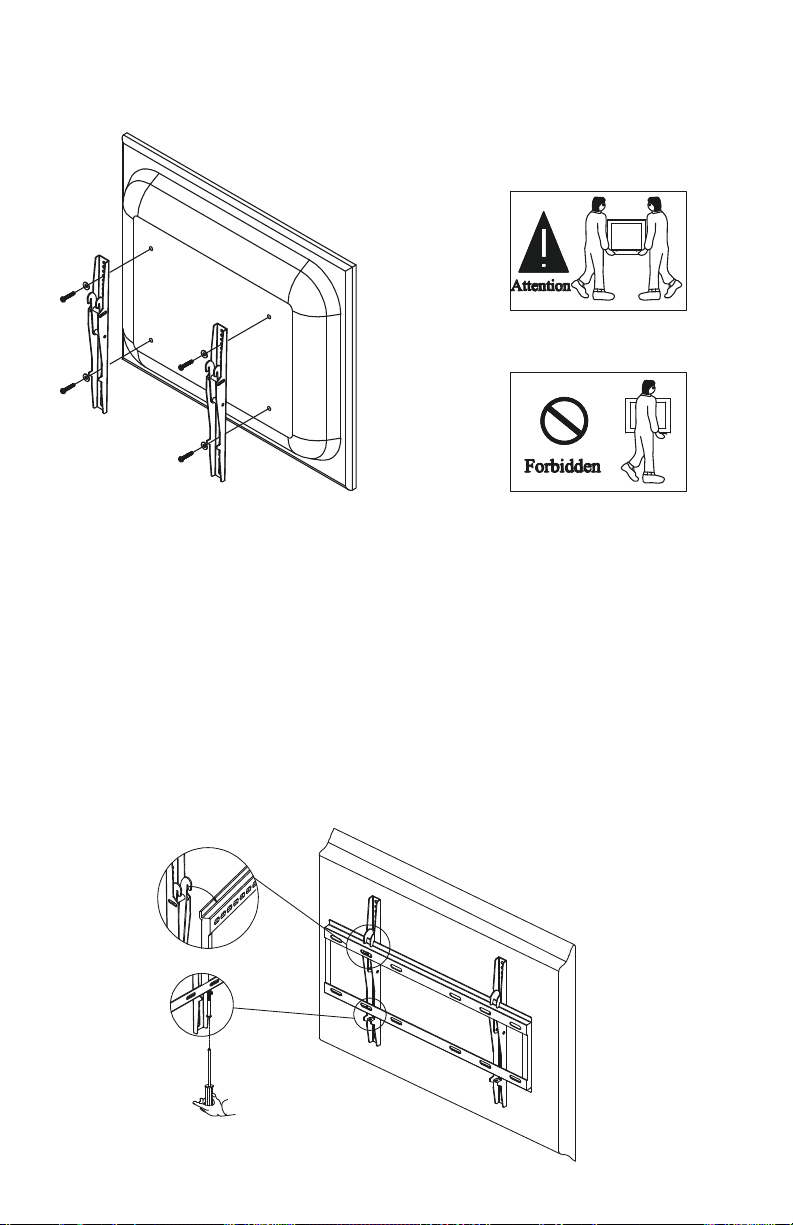
Step 3: Attach two brackets (B) to TV back
Note: Please use the correct screw & washer for the holes of the TV back,
Assembly with incorrect screw & washer will damage the holes on the TV
back, uneven assembly will cause slantwise TV screen.
Reasonable knowledge is required to mount the flat panel TV and the
wall mount and at least 2 people need to be used to finish the mounting
procedure (D). Do not attempt to do the installation alone as injury to self
and damage to equipment/property may occur.
Step 4:
Hang pro-assembled TV unit on the wall plate and tighten the safety
screws at the bottom of the verticle arms.
5
(B)
(C)
(D)
(E)
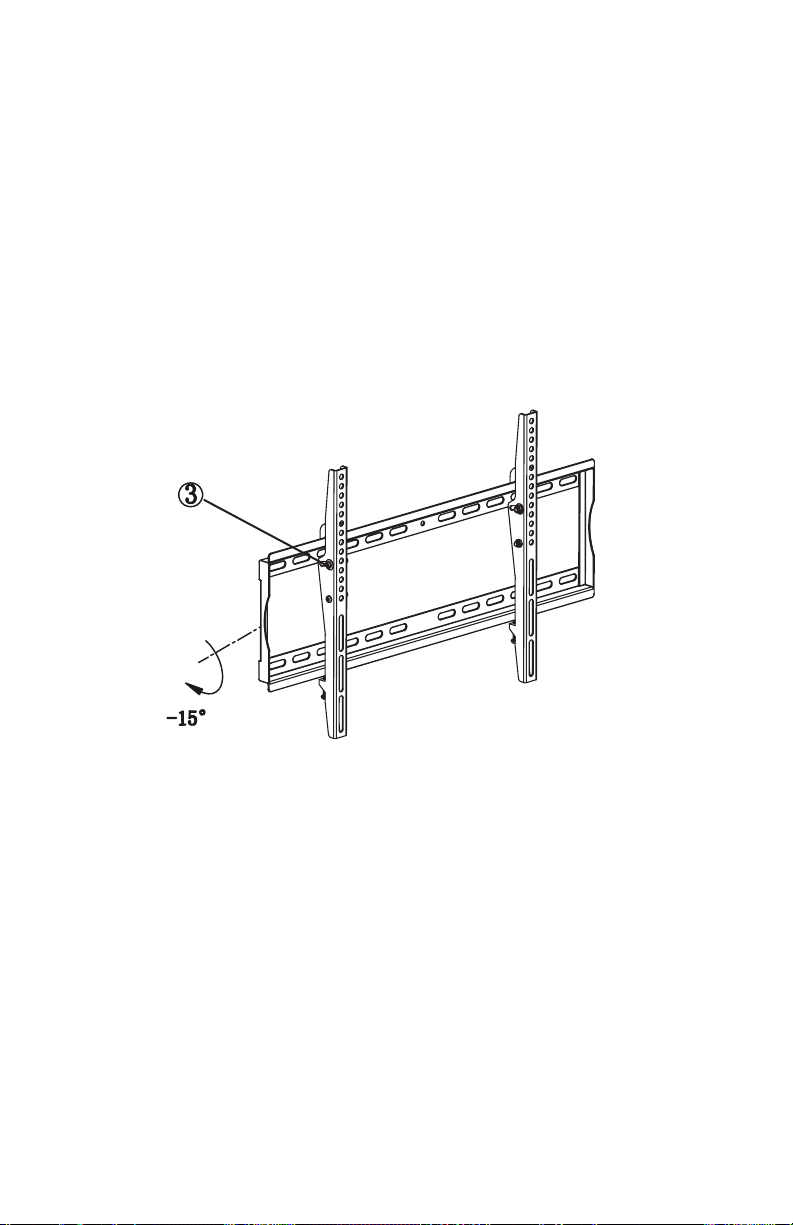
Note: This step requires 2 or more people to finish (E).
Step 5: Adjust the TV angle and manage the wire
You can loosen screw (3) to adjust tilting angle.
When it is at your desired angle, you can tighten screws.
Function: With this wall mount, you can enjoy the TV from different
angles freely (F)
6
Note: This step requires 2 or more people to finish (E).
Step 5: Adjust the TV angle and manage the wire
You can loosen screw (4) to adjust tilting angle.
When it is at your desired angle, you can tighten screws.
Function: With this wall mount, you can enjoy the TV from different
angles freely (F)!
6
(F)
(F)

©2019 Metra Electronics Corporation, 460 Walker Street, Holly Hill, FL 32117-2699
Specifications are subject to change without notice.
All trademarks are the property of their respective owners.
1-866-839-9187
Table of contents
Other Helios TV Mount manuals


