Helioscreen RUBIX User manual

www.helioscreen.com.au | Phone 1300 766 319
Helioscreen Rubix • INSTALLATION GUIDE | 1
INSTALLATION GUIDE
RUBIX
Helioscreen Australia Pty Ltd – Dealers Australia Wide
www.helioscreen.com.au | enquiries@helioscreen.com.au | Phone 1300 766 319
SAFETY NOTESAND IMPORTANT INFORMATION ARE INTEGRATED IN THE TEXT ASAPPROPRIATE. THESE NOTESARE
ALSO HIGHLIGHTED BY SYMBOLS.
This symbol means that the relevant note is important for the safety of persons or for the function of the awning.
This symbol highlights important product information for the installation engineer or user.
1. SAFETY NOTES, WARNINGSAND MOUNTING INFORMATION:
1.1 EXPLANATION OF THE SAFETY NOTES
1. SAFETY
1.1 Explanation of the safety notes .............................................................3
1.2 General safety information .............................................................. 3
2. INSTALLATION
2.1 Tools, resources and materials .............................................................3
2.2 Preparing the installation .................................................................3
2.3Mounting situations: Wall, ceiling and rafter ...................................................4
2.4Mounting height and position of the brackets.................................................. .5
2.5Mounting technique .................................................................. 6-7
2.6Fastening the awning ................................................................. . .7
3. INITIAL OPERATION
3.1 With motor drive .......................................................................
3.2 Adjust inclination of the awning ............................................................9
3.3 Completing the installation / Transfer to the client ..............................................10
4. DISMOUNTING . ......................................................................10
5. TROUBLESHOOTING .................................................................. 10
Page
CONTENTS
www.helioscreen.com.au | Phone 1300 766 319
Helioscreen Rubix • INSTALLATION GUIDE | 2

•Drill
• Drillbits,suitableforthedrillingsubstrateandthemountingpieces
• SW3,SW5andSW10Allenkeys
• RatchetwithSW17socket
• SW13ringorforkspanner
• Spiritlevelandstringforalignment
• Stringforalignmentofthebrackets
• Testcable,resp.adjustmentset(forinitialoperation)
2. inStallation
2.1 toolS and materialS
Beforecommencingtheinstallation,pleaseverifywhetherthetypeandnumberofbracketsisinconformitywiththeorderand
whether the base material is the same as that stated on your order.
Ifsignificantdifferencesmakethesafeinstallationoftheawningseemdoubtful,pleaseconsultthemanufacturerofthesystem
and a mounting/installation specialist.
Iftheinformationaboveisnotobserved,theawningsystemmayfalldownandputthehealthofpersonsatrisk!
Transporttheawningtothesiteofinstallation,ensuringthattheorientationiscorrect.
Securetheinstallationzone(thesecuredzonemustbeatleastequivalenttothesizeofthefullydeployedawning). If
theawningishoistedtohigherinstallationpositionswithropes,theawningmustberemovedfromthepackaging.
Whenattachingthehoistingropes,ensurethattheawningisproperlyfastened,butnotdamaged.Hoisttheawning
exclusivelyinhorizontalpositionandevenly.
2.2 PreParing the inStallation
1.2 general Safety information
TheHELIOSCREEN RUBIXawninghasbeendesignedandmanufacturedinconformitywithDINEN13561.
However,whentheawningismountedoroperated,thepersonsinvolvedintherespectiveactivitymaybeputatrisk
ifthe relevant instructions are not observed.
Onlyqualifiedanddulyspecializedcompaniesortrainedspecialistpersonnelmaybepermittedtomounttheawning.
Alwaysobservetheinformationandnotesintheinstallationandoperationinstructions.
Afailuretoobservetherelevantinformationwillrenderthemanufacturer’sliabilitynullandvoid.
Thesafety-at-workandaccidentpreventionregulationsspecifictoeachcountrymustbecompliedwith.Inparticular,a
personperformingspecialworkatheightmustbesuitablysecured.
Thenotesontheproductanditspackagingmustbeobserved.
www.helioscreen.com.au | Phone 1300 766 319
Helioscreen Rubix • INSTALLATION GUIDE | 3

wall mounting
Ceiling mounting
2.3mounting SituationS
www.helioscreen.com.au | Phone 1300 766 319
Helioscreen Rubix • INSTALLATION GUIDE | 4

PoSition of the braCketS:
Onthebackofthecasingoftheawning,therearestickerswiththedefinitionofthebracketpositions.
Markthepositionalpointsonthebasematerial.
Trytofindtheidealpositionforthebracketcenter.
Donotgobeyondthelimitareasofthebracketcenters,thiscouldleadtodamagestooramalfunctionoftheawning.
determination of the mounting height for wall-mounted awningS:
Themountingheightdependsontheextendedlengthandinclinationoftheawning.Pleaserefertothedrawingontherightfor
basicorientation.Alwaysensurethatthereissufficientheadroom.
2.4mounting height and PoSition of the braCketS
mounting height:
Theawningcanproducecrushingforcesandshearstresses,forinstancebetweenthedropprofileandthecasing,on
thearticulatedarmsandatthepointwheredifferentprofilesmeet.Toprotecthumansafety,themountingheightmustbe
atleast2.50m.Ifthesituationrequiresamountingheightlessthanthestatedminimumheight,theawningmustbeope-
rated exclusively with a switch mounted at a location from where the moving parts can be observed.
Theawningisappropriatetoalimitedextentasameansofprotectionagainstrain.Inanyevent,theminimuminclinati-
onforsuchapplicationsmustbe14°.Thelimitationsoftheusearedefinedintherelevantoperatinginstructions.
www.helioscreen.com.au | Phone 1300 766 319
Helioscreen Rubix • INSTALLATION GUIDE | 5
2.5mounting teChnique
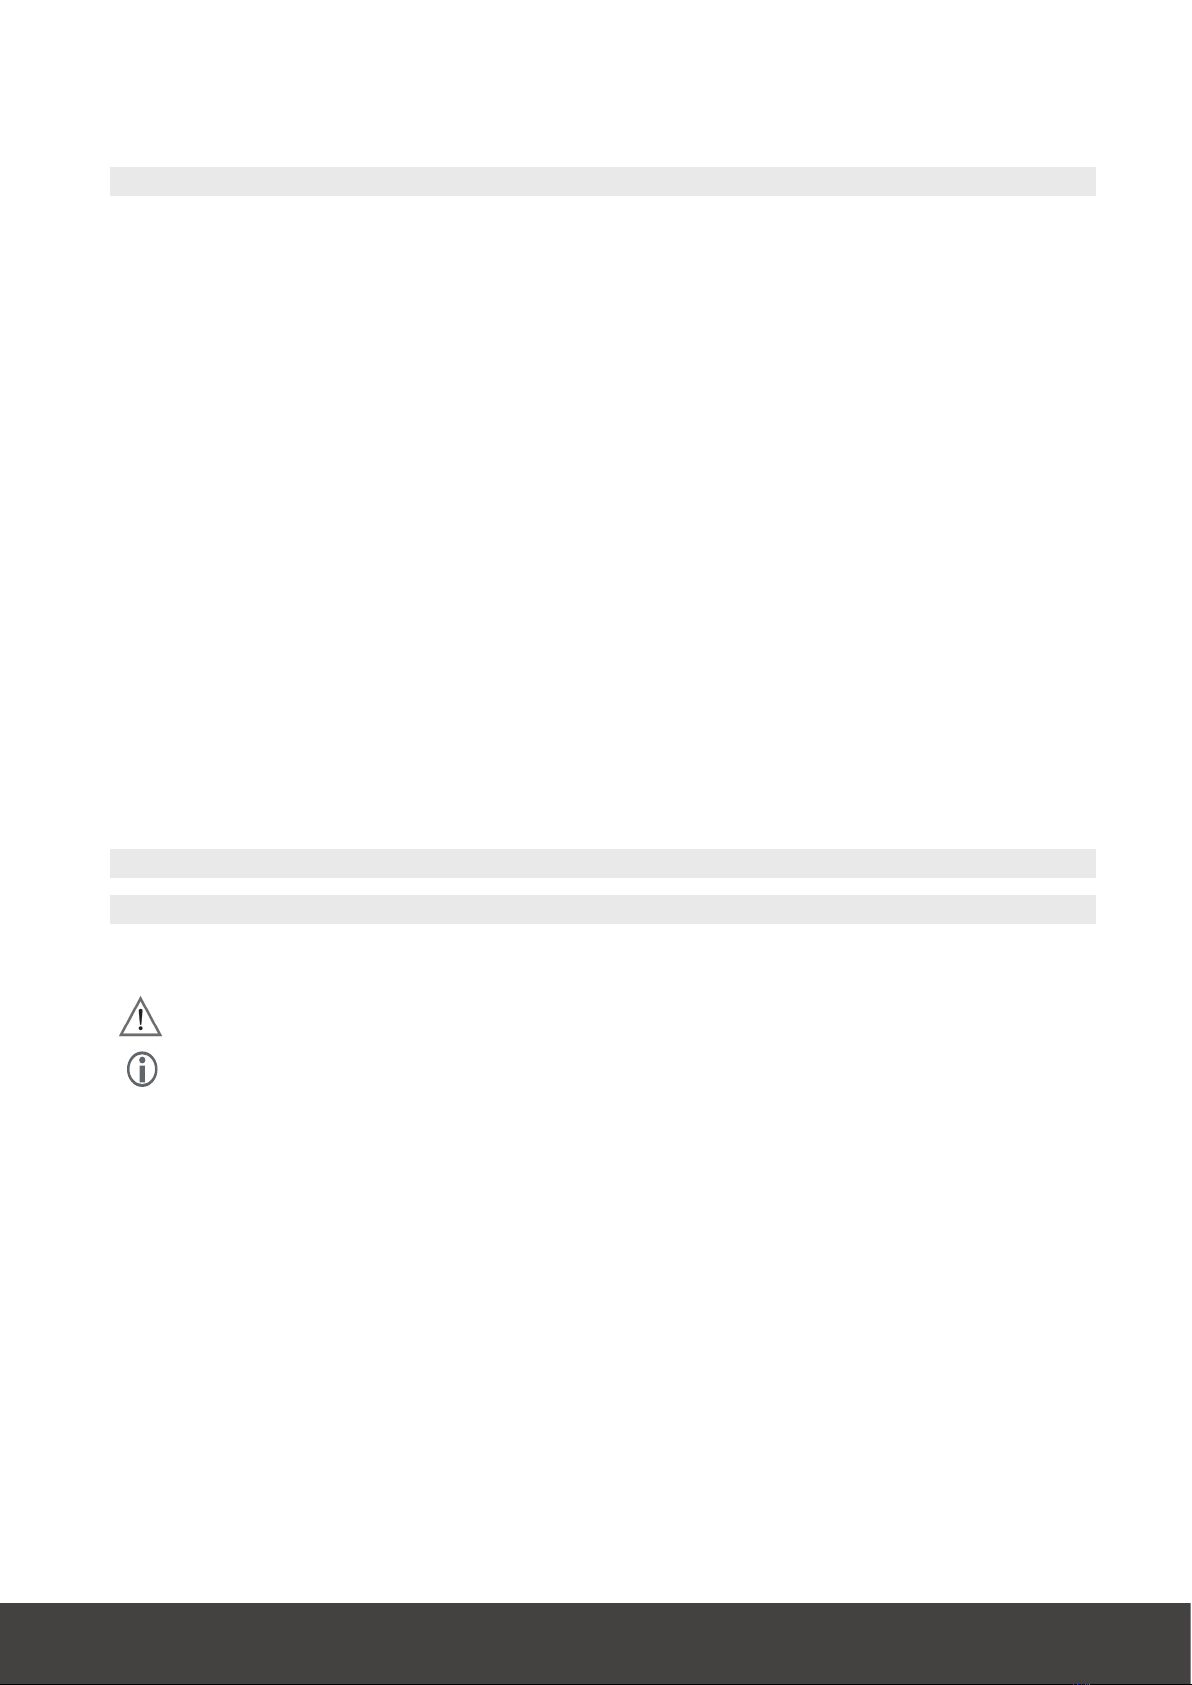
drilling holeSfor the braCketS:
Transferthedrillingoutlinesofthebracketstothedeterminedbra-
cketpositions.
Whenmountingtheawnings,selecttheappropriatedrill
bit for the respective base material and mounting
method.
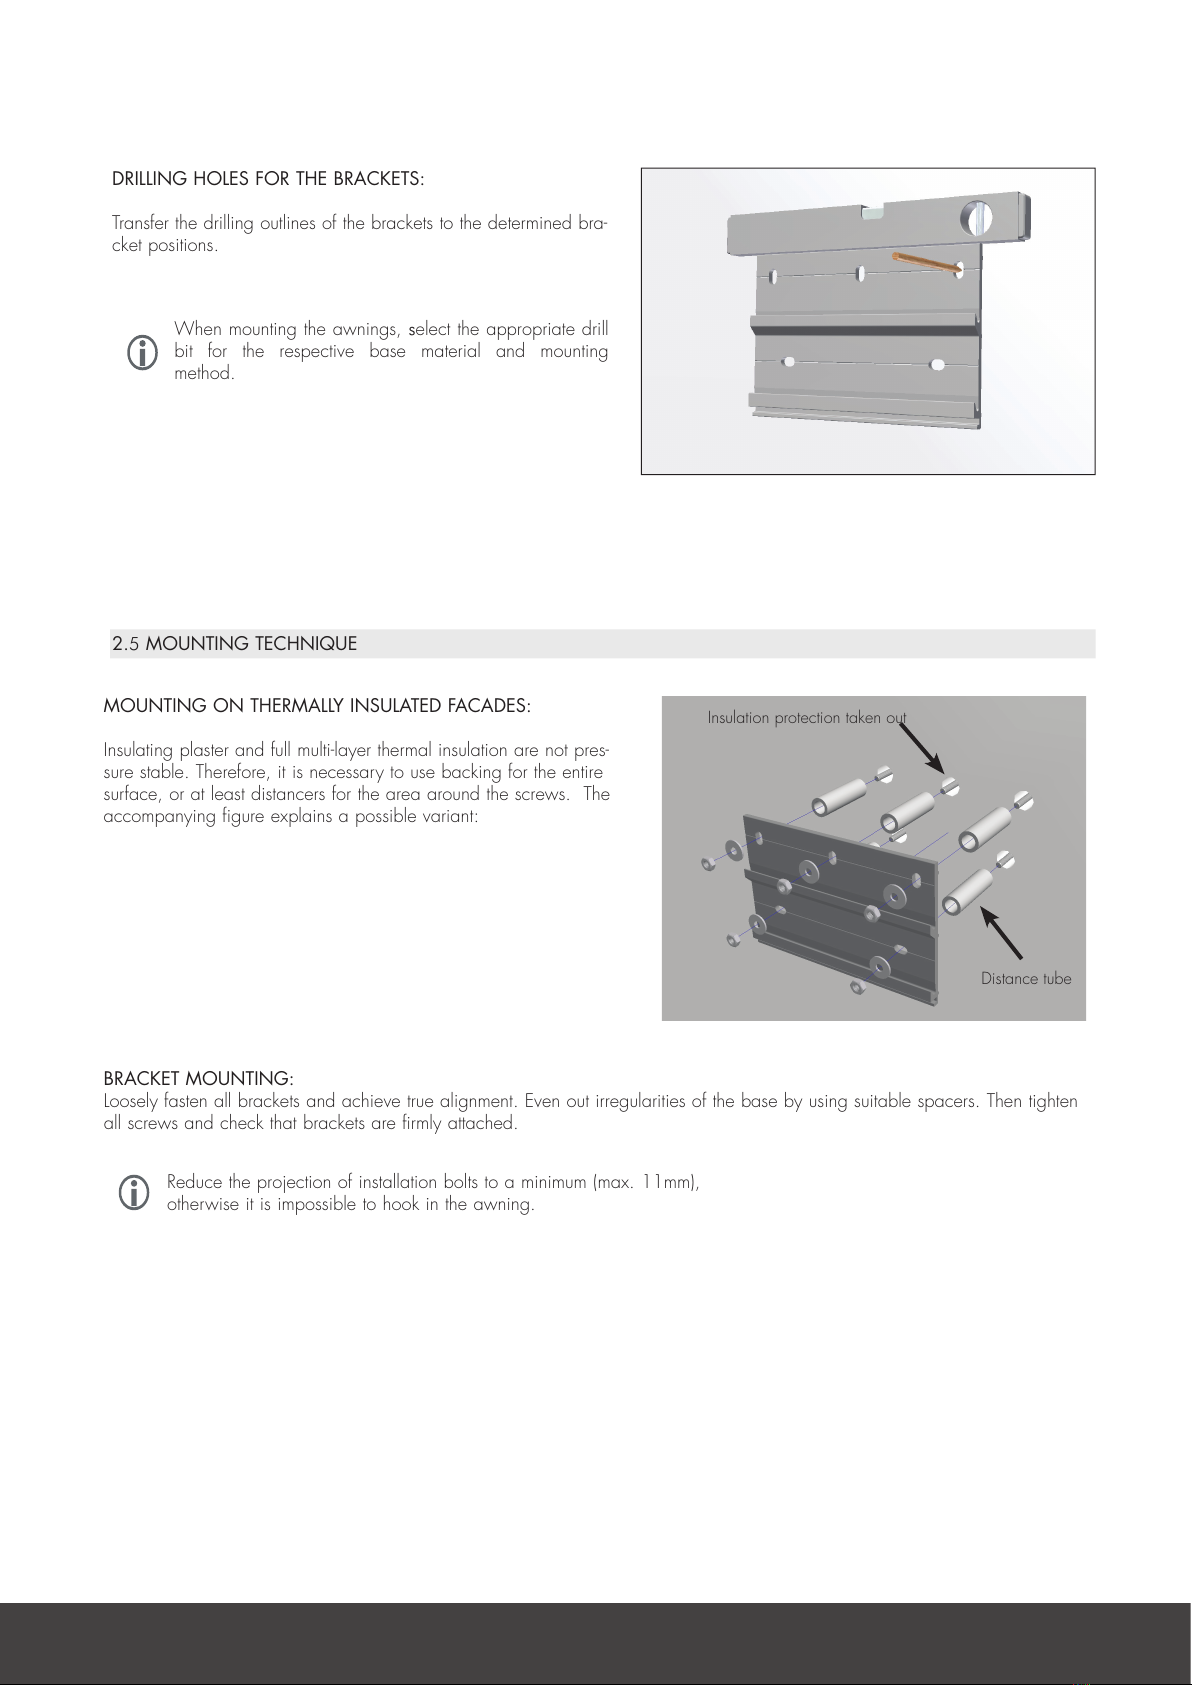
mounting on thermally inSulated faCadeS:
Insulatingplasterandfullmulti-layerthermalinsulationarenotpres-
surestable.Therefore,itisnecessarytousebackingfortheentire
surface,oratleastdistancersfortheareaaroundthescrews.The
accompanyingfigureexplainsapossiblevariant:
braCket mounting:
Looselyfastenallbracketsandachievetruealignment.Evenoutirregularitiesofthebasebyusingsuitablespacers.Thentighten
allscrewsandcheckthatbracketsarefirmlyattached.
Reducetheprojectionofinstallationboltstoaminimum(max.11mm),
otherwiseitisimpossibletohookintheawning.
Insulationprotectiontakenout
Distancetube
www.helioscreen.com.au | Phone 1300 766 319
Helioscreen Rubix • INSTALLATION GUIDE | 6
2.6fitting the awning
Ensurethatsufficientpersonnelisavailabletolifttheawning.
Theawningweighsupto75kg;theweightsare
definedonthepackaging.
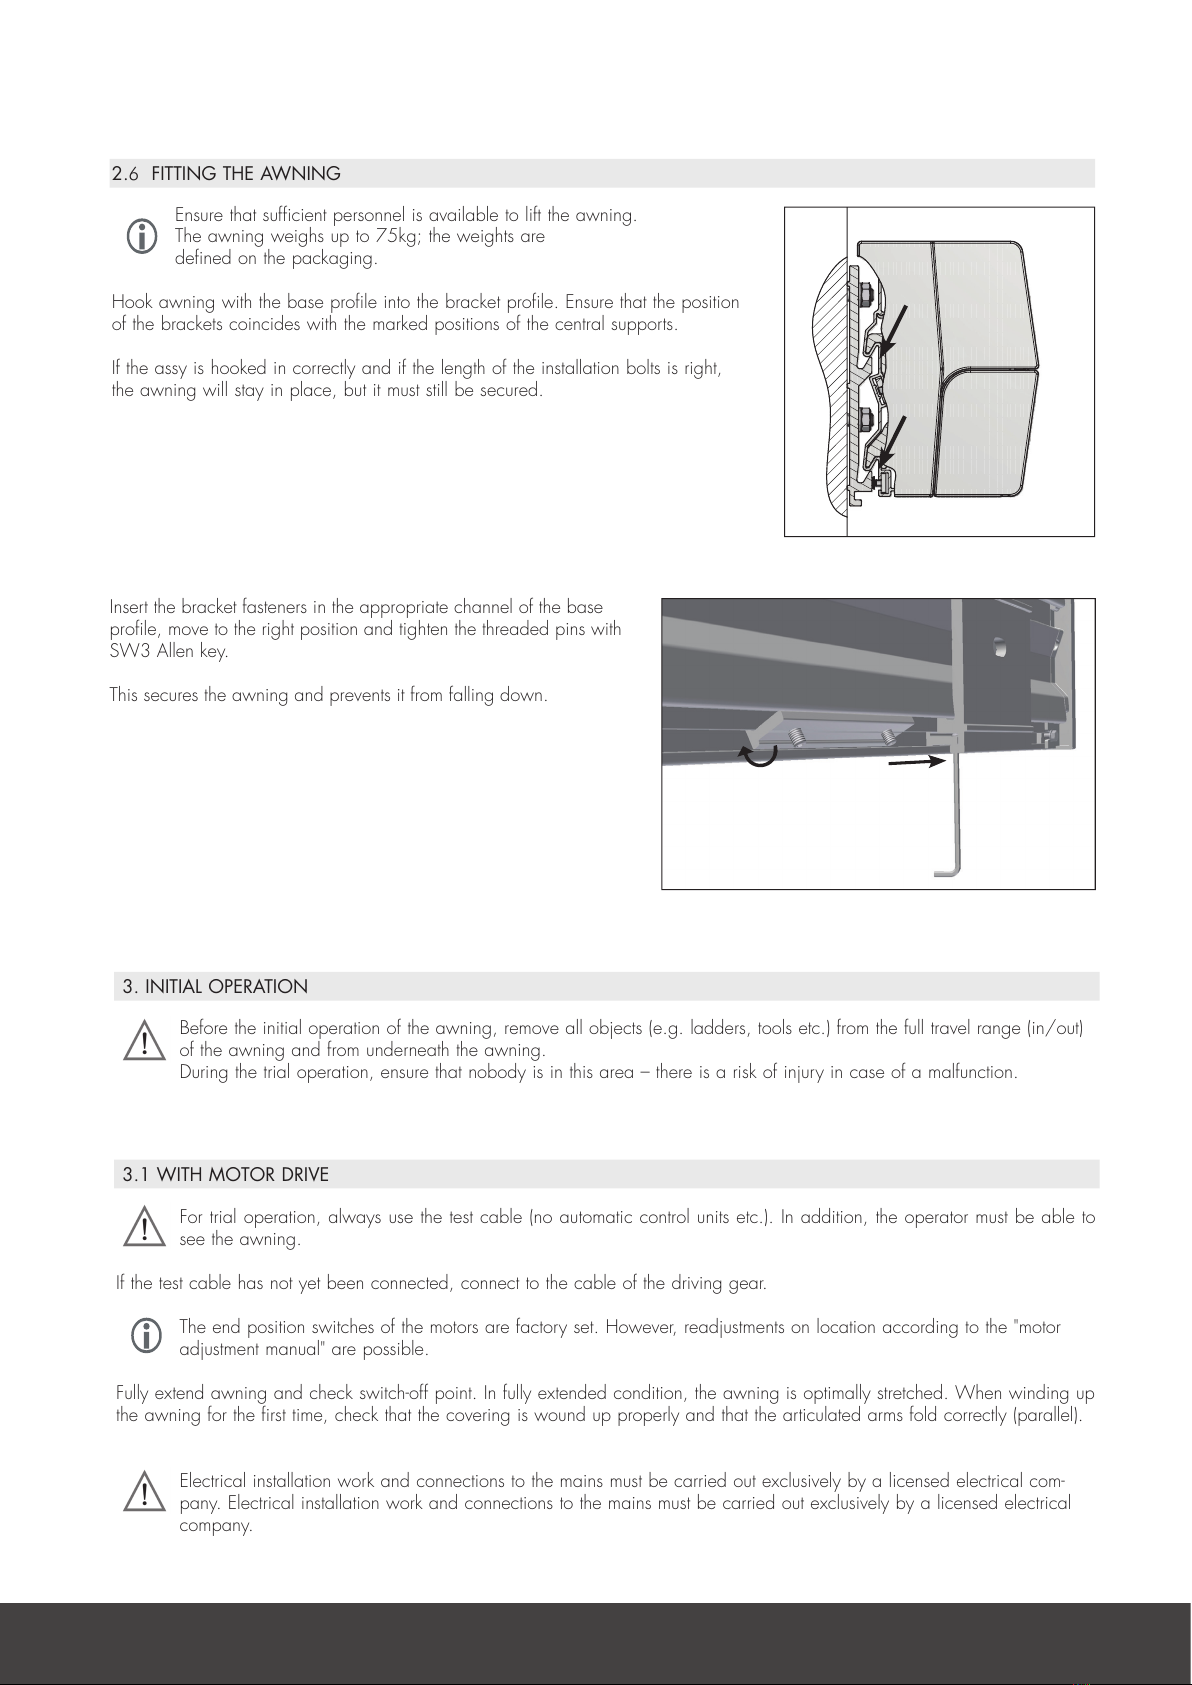
Hookawningwiththebaseprofileintothebracketprofile.Ensurethattheposition
ofthebracketscoincideswiththemarkedpositionsofthecentralsupports.
Iftheassyishookedincorrectlyandifthelengthoftheinstallationboltsisright,
theawningwillstayinplace,butitmuststillbesecured.
Insertthebracketfastenersintheappropriatechannelofthebase
prole,movetotherightpositionandtightenthethreadedpinswith
SW3Allenkey.
This secures the awning and prevents it from falling down.
3. initial oPeration
Beforetheinitialoperationoftheawning,removeallobjects(e.g.ladders,toolsetc.)fromthefulltravelrange(in/out)
of the awning and from underneath the awning.
Duringthetrialoperation,ensurethatnobodyisinthisarea–thereisariskofinjuryincaseofamalfunction.
3.1 with motor driVe
Fortrialoperation,alwaysusethetestcable(noautomaticcontrolunitsetc.).Inaddition,theoperatormustbeableto
see the awning.
Ifthetestcablehasnotyetbeenconnected,connecttothecableofthedrivinggear.
Theendpositionswitchesofthemotorsarefactoryset.However,readjustmentsonlocationaccordingtothe"motor
adjustmentmanual"arepossible.
Fullyextendawningandcheckswitch-offpoint.Infullyextendedcondition,theawningisoptimallystretched.Whenwindingup
theawningforthefirsttime,checkthatthecoveringiswoundupproperlyandthatthearticulatedarmsfoldcorrectly(parallel).
Electricalinstallationworkandconnectionstothemainsmustbecarriedoutexclusivelybyalicensedelectricalcom-
pany. Electricalinstallationworkandconnectionstothemainsmustbecarriedoutexclusivelybyalicensedelectrical
company.
www.helioscreen.com.au | Phone 1300 766 319
Helioscreen Rubix • INSTALLATION GUIDE | 7

3.2 Setting the inClination of the awning
adjuStment of the CaSSette droP Profile:
• Extendtheawningbyapproximately40to50cm.
• Loosenstopnutsatthesideofthedropprofileholderswith
SW13spanner.
• Movedropprofilewithonehandintothedesired
inclination position.
• Pushdropprofiletothedesiredpositionand fixbytightening the
stop nut.
• Makethesameadjustmentontheotherside.Usethemeshpattern
on the drop bar holder for easier orientation.
• Visuallyverifywhetherthesidepartsofthehousingandthedrop
profileareinalignment.Ifnecessary,correctdropprofileagain.
• Windupawningandcheckthatthedropprofileclosesexactly.
adjuStment of the inClination of the awning:
• Halfextendtheawning.
• RemovesecuringscrewwithAllenkey5.
• LoosenthesidescrewwithAllenkey10.
• Liftarmslightlytorelievetheloadonthepivotingpartandadjust
theinclinationbyturningthescrewinthepivotingpartwithSW
10Allenkey.
to lower the awning, turn CloCkwiSe
to raiSe the awning, turn Counter-CloCkwiSe
Intheeventofasignificantchangeoftheinclinationsetting(more
than10°),thearmsmustbeadjustedalternately.
Ensurethatthepivotingpartrestswithitssurfaceonthe
headofthecountersunkscrew.
• Followingtheadjustmentoftheinclination,firmlytightentheside
screwandinsertthesecuringscrewwiththewasher,thenalso
tighten firmly.
Loosenscrewslightly.
Stopnut
Mesh pattern
www.helioscreen.com.au | Phone 1300 766 319
Helioscreen Rubix • INSTALLATION GUIDE | 8

5. TROUBLESHOOTING
3.3 COMPLETING THE INSTALLATION / TRANSFER TO THE CLIENT
• Clearsite.Removepackagingmaterialsfromsiteanddisposeaccordingtolocalregulations.
• Handovertoclientallinstructionsconcerningtheinstallationandoperationoftheawningaswellastheinstructionsforthe
electrical connections of control units and switches.
Give client comprehensive instructions about the operation of the awning. Failure to observe the instructions and incorrect
operation can result in damages to the awning and accidents.
Notifyclientofthewindresistanceclassoftheawning.
4. DISMOUNTING
Ensurethattheareaaroundtheawningisfreeofunauthorizedpersonnel.Shutoffpowertomotor-drivenawningsand
takestepstoensuretheycannotbeswitchedonagain.
• Dismounttheawningexclusivelyinretractedcondition.
• Dismountingoftheawningisthereverseofthemountingprocedure.
TYPE OF FAULT CAUSE REMEDY
Motor drive does not work Nopower Checkconnection(specializedcompany)
Motor drive not correctly connected Checkconnection(specializedcompany)
Thermal protection of the motor drive activated Waitfor15-20mins,thenoperateagain
Remotecontrolbatteriesempty Checklightsignalonsendingunit,replace
batteries
Higher-levelcontrolunitpreventsmanual
operation
Waituntilhigher-levelsignalisnotactivated
any more.
System does not extend or retract fully Endpositionsofthemotordrivechanged,or
incorrect end position setting
Resetorre-programendpositions(seemotor
adjustmentmanual)
Awning makes grating noises Insufficient lubrication Sprayarmarticulationbearingwithasuitable
lubricant(e.g.Teonspray)
Drop profile does not close exactly Adjustmentofthedropproleinaccurate AdjustdropproleaccordingtoItem3.2
System does not close on one side Fabric unevenly sewn Linecoveringonthissidebyapplyingfabric
tape to cloth roller
www.helioscreen.com.au | Phone 1300 766 319
Helioscreen Rubix • INSTALLATION GUIDE | 9
Table of contents
Other Helioscreen Accessories manuals


