Helioscreen Neo User manual

www.helioscreen.com.au | Phone 1300 766 319
Helioscreen Neo • INSTALLATION GUIDE | 1
INSTALLATION GUIDE
NEO
Helioscreen Australia Pty Ltd – Dealers Australia Wide
www.helioscreen.com.au | enquiries@helioscreen.com.au | Phone 1300 766 319

3
July 2014 Misprint and technical changes reserved. © by WO&WO Art.-No.: 800431_EN
Page
CONTENTS
1. Safety
1.1 Explanation of the safety notes ............................................................ 3
1.2 General safety information ...............................................................3
2. Mounting
2.1 Tools, resources and materials ............................................................ 3
2.2 Preparing the installation ................................................................ 3
2.3Mounting situations: Wall, ceiling and rafter ................................................... 4
2.4Mounting height, number and position of the brackets ......................................... 5 - 6
2.5Fastening technique .................................................................6 - 7
2.6Fastening the awning ..................................................................8
3. initial operation
3.1 with hand crank ....................................................................10
3.2 with motor drive.....................................................................10
3.3 Setting the inclination of the awning .......................................................10
3.4. Awning inclination using the “inclination adjustment” option .......................................11
3.5. Mounting rain pelmet.................................................................11
3.6. Completing the installation / Transfer to the client .............................................11
4. DiSMounting ..................................................................... 11
5. troubleShooting ................................................................. 12
Safety noteSanDiMportant inforMation are integrateDin the text aSappropriate.
they are inDicateD with a SyMbol.
This symbol means that the relevant note is important for the safety of persons or for the function of the awning.
This symbol highlights important product information for the installation engineer or user.
1. SAFETY NOTES, WARNINGS AND MOUNTING INFORMATION
1.1 EXPLANATION OF THE SAFETY NOTES
www.helioscreen.com.au | Phone 1300 766 319
Helioscreen Neo • INSTALLATION GUIDE | 2

2WWW.WOuNDWO.COM
•Drill
• Drillbits,suitableforthedrillingsubstrateandthemountingpieces
• RatchetwithextensionandSW17andSW19sockets
• SW19ringspanner
• SW5andSW6Allenkeys
• Slotscrewdriver
• Spiritlevelandstringforalignment
• Stringtoalignthebrackets
• Testcable,resp.adjustmentset(forinitialoperation)
2. MOUNTING
2.1 TOOLS, RESOURCES AND MATERIALS
Transport the awning to the site of installation, ensuring that the orientation is correct.
The location of the drive side is indicated on the packaging.
Securetheinstallationzone(thesecuredzonemustbeatleastequivalenttothesizeofthefullydeployedawning).
If the awning is hoisted to higher awning positions with ropes, the awning must be removed from the packaging. When
attaching the hoisting ropes, ensure that the awning is properly fastened, but not damaged. Hoist the awning exclusi-
vely in horizontal position and evenly.
Failure to comply may result in collapsing of the awning and putting the health of persons at risk!
Before commencing the installation, please verify whether the type and number of brackets is in conformity with the order and
whether the mounting substrate is the same as that stated on your order.
If significant differences make the safe installation of the awning seem doubtful, please contact the manufacturer of the system and
a mounting/installation specialist.
2.2 INSTALLATION PREPARATON
1.2 GENERAL SAFETY INFORMATION
The NEO awning has been designed and manufactured in conformity with
DIN EN 13561. However, when the awning is mounted or operated, the persons involved in the respective activity may
be put at a risk if the relevant instructions are not observed.
Only qualified and duly specialized companies or trained specialist personnel may be permitted to mount the awning.
Always observe the information and notes in the Mounting and Operation Instructions.
A failure to observe the relevant information will render the manufacturer’s liability null and void.
Modification of the design or configuration of the awning is permitted only after consultation with the manufacturer or
an authorized representative.
The occupational safety and accident prevention regulations specific to each country must be complied with.
In particular, a person performing special work at height must be suitably secured.
The notes on the product and its packaging must be observed.
www.helioscreen.com.au | Phone 1300 766 319
Helioscreen Neo • INSTALLATION GUIDE | 3

5
July 2014 Misprint and technical changes reserved. © by WO&WO Art.-No.: 800431_EN
2.3 MOUNTING SITUATIONS
wall Mounting ceiling Mounting
Mounting with croSSeD arMS anDrain pelMet rafter Mounting
www.helioscreen.com.au | Phone 1300 766 319
Helioscreen Neo • INSTALLATION GUIDE | 4

4WWW.WOuNDWO.COM
2.4 MOUNTING HEIGHT AND POSITION OF THE BRACKETS
DeterMination of the Mounting height for wall-MounteD awningS:
The mounting height depends on the extended length and inclination of the awning. Please refer to the drawing on the right for
basic orientation. Always ensure that there is sufficient headroom.
requireD MiniMuM nuMber of trl bracketS:
The following tables indicate the number of standard supplied brackets required for mounting the NEO awning to a con-crete
base using the wall bracket and bracket plates.
Standard number of supplied brackets for the wall/ceiling bracket for mounting on a concrete base
Projection(mm) Width(mm)
1100 - 4000 4001 - 6000 6001 - 8000 8001 - 12000 12001 - 14000
1500 23469
2000 23469
2500 23469
3000 23469
3500 2 5 4 10 15
Standard number of brackets supplied for mounting using a bracket plate
Projection(mm) Width(mm)
1100 - 4000 4001 - 6000 6001 - 8000 8001 - 12000 12001 - 14000
1500 23469
2000 23469
2500 23469
3000 23469
3500 23469
Mounting height:The awning can
produce crushing forces and shear stresses,
for instance between the drop profile and the
casing, on the jointed arms and at the point
where different profiles meet.
In the interest of human safety, the mounting
height must be at least 2.50m. If the situ-
ation requires a mounting height less than
the stated minimum height, it is necessary
to operate the awning manually or with a
switch mounted at a location from where the
moving parts can be observed.
The drop profile must reflect a minimum
distance of 40 cm from fixed objects.
height of awning in mm
projection in mm
www.helioscreen.com.au | Phone 1300 766 319
Helioscreen Neo • INSTALLATION GUIDE | 5

7
July 2014 Misprint and technical changes reserved. © by WO&WO Art.-No.: 800431_EN
In coupled systems, note that after insertion into the brackets, the systems
have to be pushed about 7 cm towards one another.
poSition of the bracketS:
The brackets should be placed as close as possible to the connection points on the arms. The following sketches illustrate
thebestpossibledistributionofbrackets.Dimension>A<shouldbeamaximumof300mm.
DrillingS for bracketS:
Transfer the drilling outlines of the brackets to the deter-
mined bracket positions.
Select the appropriate drill bit for the respective
base material and mounting method.
System with 2 arms and 2 resp. 3 brackets
System with 3 arms and 3 resp. 5 brackets
System with 2 arms and 4 resp. 5 brackets
www.helioscreen.com.au | Phone 1300 766 319
Helioscreen Neo • INSTALLATION GUIDE | 6

6WWW.WOuNDWO.COM
Reduction of forces can be achieved by increasing the number of bracketsin
thevicinityofthearmsorbyusingbracketplates(seeadjoiningfigure).
Insulating layer removed
Spacer tube
Mounting on therMally inSulateD façaDeS:
Insulating plaster and full multi-layer thermal insulation
are not pressure stable. Therefore, it is necessary to use
distancers for the entire surface of the awning brackets or
at least for the area around the screws. The picture on the
right illustrates one possible variant:
bracket Mounting:
First attach and align both outer brackets. Using a string,
accurately align all other brackets precisely to the outer
brackets. Even out irregularities of the base by using
suitable spacers. Then tighten all screws and check that
brackets are firmly attached.
for a rain pelMet:
Prior to mounting the system, push the support
onto the installation tube and secure it with the threaded
pin on the underside.
(Forthefinalinstallationoftherainpelmet,
seeSection3.4.oftheInstallationInstructions).
Ensure that sufficient personnel is available to lift the awning.
The awning weighs up to 80kg; the weights are defined on the
packaging.
Slidetheawningandsupporttubeintothebracketsfromthefront.Lightly
grease the threads of the fixing screws and insert them into the drillholes
from below, then secure them with square nuts.
Straighten the awning laterally. Tighten all fixing screws.
2.6 FASTENING THE AWNING
2.5 MOUNTING TECHNIQUE
www.helioscreen.com.au | Phone 1300 766 319
Helioscreen Neo • INSTALLATION GUIDE | 7

11
July 2014 Misprint and technical changes reserved. © by WO&WO Art.-No.: 800431_EN
aDjuStMent of the arMinclination:
• Extendawningapproximatelyhalfway.
• LoosenbothlateralboltsofthebracketswithaSW6
Allen key.
• Relievethetiltingpartbyliftingthearmandsetthe
inclination by turning the bolt on the underside
with a SW 17 ring spanner.
turning counter-clockwiSe →awning iSlowereD
turning clockwiSe →awning iSraiSeD
Intheeventofasignificantchangeoftheinclinationsetting(morethan10°),thearmsmustbeadjustedalternately.
• Afterhavingperformedthearmadjustment,firmlyretightenlateralscrews.
3.3 SETTING THE INCLINATION OF THE AWNING
Adjusting the inclinationLoosen screws
Insert hook of the hand crank in the eye of the driving gear and fully extend awning.
Theendpositionoftheawning(fullyout)isfactoryset,butadjustmentsmaybepossible(pleasecontactthesystemmanufacturer).
In fully extended condition, the awning is optimally stretched.
When winding up the awning for the first time, check that the covering is wound up properly and that the articulated arms fold
correctly(parallel).
Whentheendpositions(inandout)arereached,donotforcehandcrankfurther.Otherwisethegearingmaybe
damaged.
3.1 WITH HAND CRANK
3. INITIAL OPERATION
Beforetheinitialoperationoftheawning,removeallobjects(e.g.ladders,toolsetc.)fromthefulltravelrange(in/out)of
the awning and from underneath the awning.
Duringthetrialoperation,ensurethatnobodyisinthisarea–thereisariskofinjuryincaseofamalfunction.
3.2 WITH DRIVING GEAR
Fortrialoperation,alwaysusethetestcable(noautomaticcontrolunitsetc.).Inaddition,theoperatormustbeableto
see the awning.
If the test cable has not yet been connected, connect to the drive cable. The end position switches of the motors are
factoryset.Ifcorrectionsarenecessaryonlocation,thesecanbecarriedoutinaccordancewiththe“DrivingGear
Instruction Manual“.
Fully extend awning and check switch-off point. In fully extended condition, the awning is optimally stretched. When
winding up the awning for the first time, check that the covering is wound up properly and that the articulated arms fold
correctly(parallel).
Electrical installation work and connections to the mains must be carried out exclusively by a licensed electrical company.
In the case of awnings operated with a switch, the switch must be positioned in sight of the drop profiles, but at least
0.4 m away from moving parts, and at a height corresponding to national regulations concerning handicapped persons
(preferablylessthan1.30m).
www.helioscreen.com.au | Phone 1300 766 319
Helioscreen Neo • INSTALLATION GUIDE | 8

10 WWW.WOuNDWO.COM
• Clearsite.Removepackagingmaterialsfromsiteanddisposeaccordingtolocalregulations.
• Intheeventofqueriesatalaterdate,theordernumberandtheproductnamemustberecordedbythe installer on the
operating instructions under "Product labelling".
• Handovertoclientallinstructionsconcerningtheinstallationandoperationoftheawningaswellastheinstructionsfor
the electrical connections of control units and switches.
Give client comprehensive instructions about the operation of the awning. Failure to observe the instructions and incorrect
operation can result in damages to the awning and accidents.
Notify client of the wind resistance class of the awning.
3.6. COMPLETING THE INSTALLATION / TRANSFER TO THE CLIENT
3.4. AWNING INCLINATION FOR THE "INCLINATION ADJUSTMENT" OPTION
With the “inclination adjustment” option, it should be noted
that with a greater change of inclination,
thearmsarealternatelyshiftedbyamaximumofapprox.10°.
Care should also be taken that the drop profile
is positioned horizontally using the attached spirit level,
especially when retracting the awning.
3.5. MOUNTING RAIN PELMET
The supports for the rain pelmet have already been installed
whenthebracketsweremounted(Section2.5.).
• Afterthesystemhasbeenmounted,pushtherainpelmet
from the front into the retaining bracket with both grooves
and straighten it. The flexible sealing lip pointing toward
the wall must face upward to prevent water from running
behind the awning.
• TightentheclampingscrewsusingaSW5Allenkey.
• Fastenthesidepartsoftherainpelmetwithcross-head
screws into the screw sockets of the profile.
Install the coupling in the same manner for coupled rain pelmets.
The coupling engages half of each profile.
Clamping screw Sealing lip
www.helioscreen.com.au | Phone 1300 766 319
Helioscreen Neo • INSTALLATION GUIDE | 9
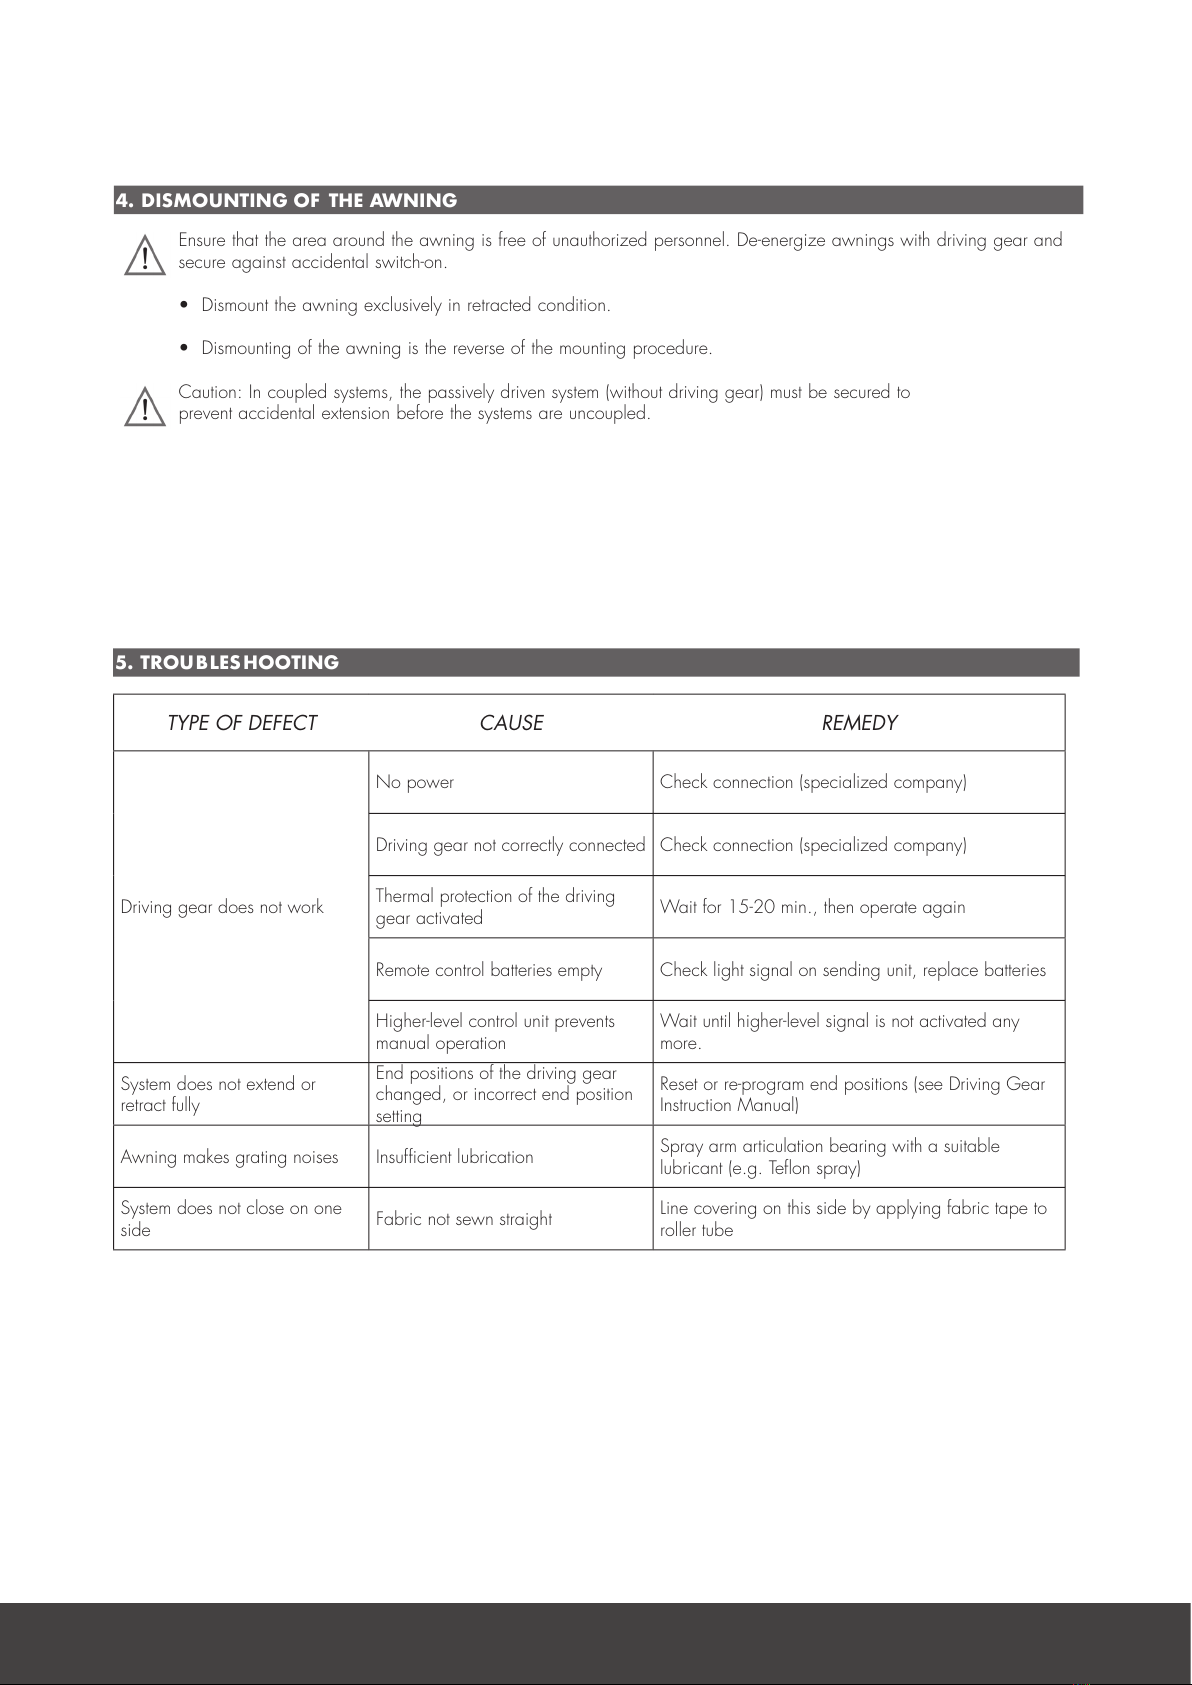
5. TROUBLESHOOTING
type of Defect cauSe reMeDy
Drivinggeardoesnotwork
No power Checkconnection(specializedcompany)
Drivinggearnotcorrectlyconnected Checkconnection(specializedcompany)
Thermal protection of the driving
gear activated Wait for 15-20 min., then operate again
Remote control batteries empty Check light signal on sending unit, replace batteries
Higher-level control unit prevents
manual operation
Wait until higher-level signal is not activated any
more.
System does not extend or
retract fully
End positions of the driving gear
changed, or incorrect end position
setting
Resetorre-programendpositions(seeDrivingGear
InstructionManual)
Awning makes grating noises Insufficient lubrication Spray arm articulation bearing with a suitable
lubricant(e.g.Teflonspray)
System does not close on one
side Fabric not sewn straight Linecoveringonthissidebyapplyingfabrictapeto
roller tube
Ensurethattheareaaroundtheawningisfreeofunauthorizedpersonnel.De-energizeawningswithdrivinggearand
secure against accidental switch-on.
• Dismounttheawningexclusivelyinretractedcondition.
• Dismountingoftheawningisthereverseofthemountingprocedure.
Caution:Incoupledsystems,thepassivelydrivensystem(withoutdrivinggear)mustbesecuredto
prevent accidental extension before the systems are uncoupled.
4. DISMOUNTING OF THE AWNING
www.helioscreen.com.au | Phone 1300 766 319
Helioscreen Neo • INSTALLATION GUIDE | 10
Table of contents
Other Helioscreen Accessories manuals


