Hello Direct Solo Convertible User manual

Hello Direct
Solo® Convertible
headset
User guide
®
Thank you!
Thank you for purchasing the Hello Direct Solo Convertible headset. To make
the most of your headset, please take a few minutes to review this user guide.
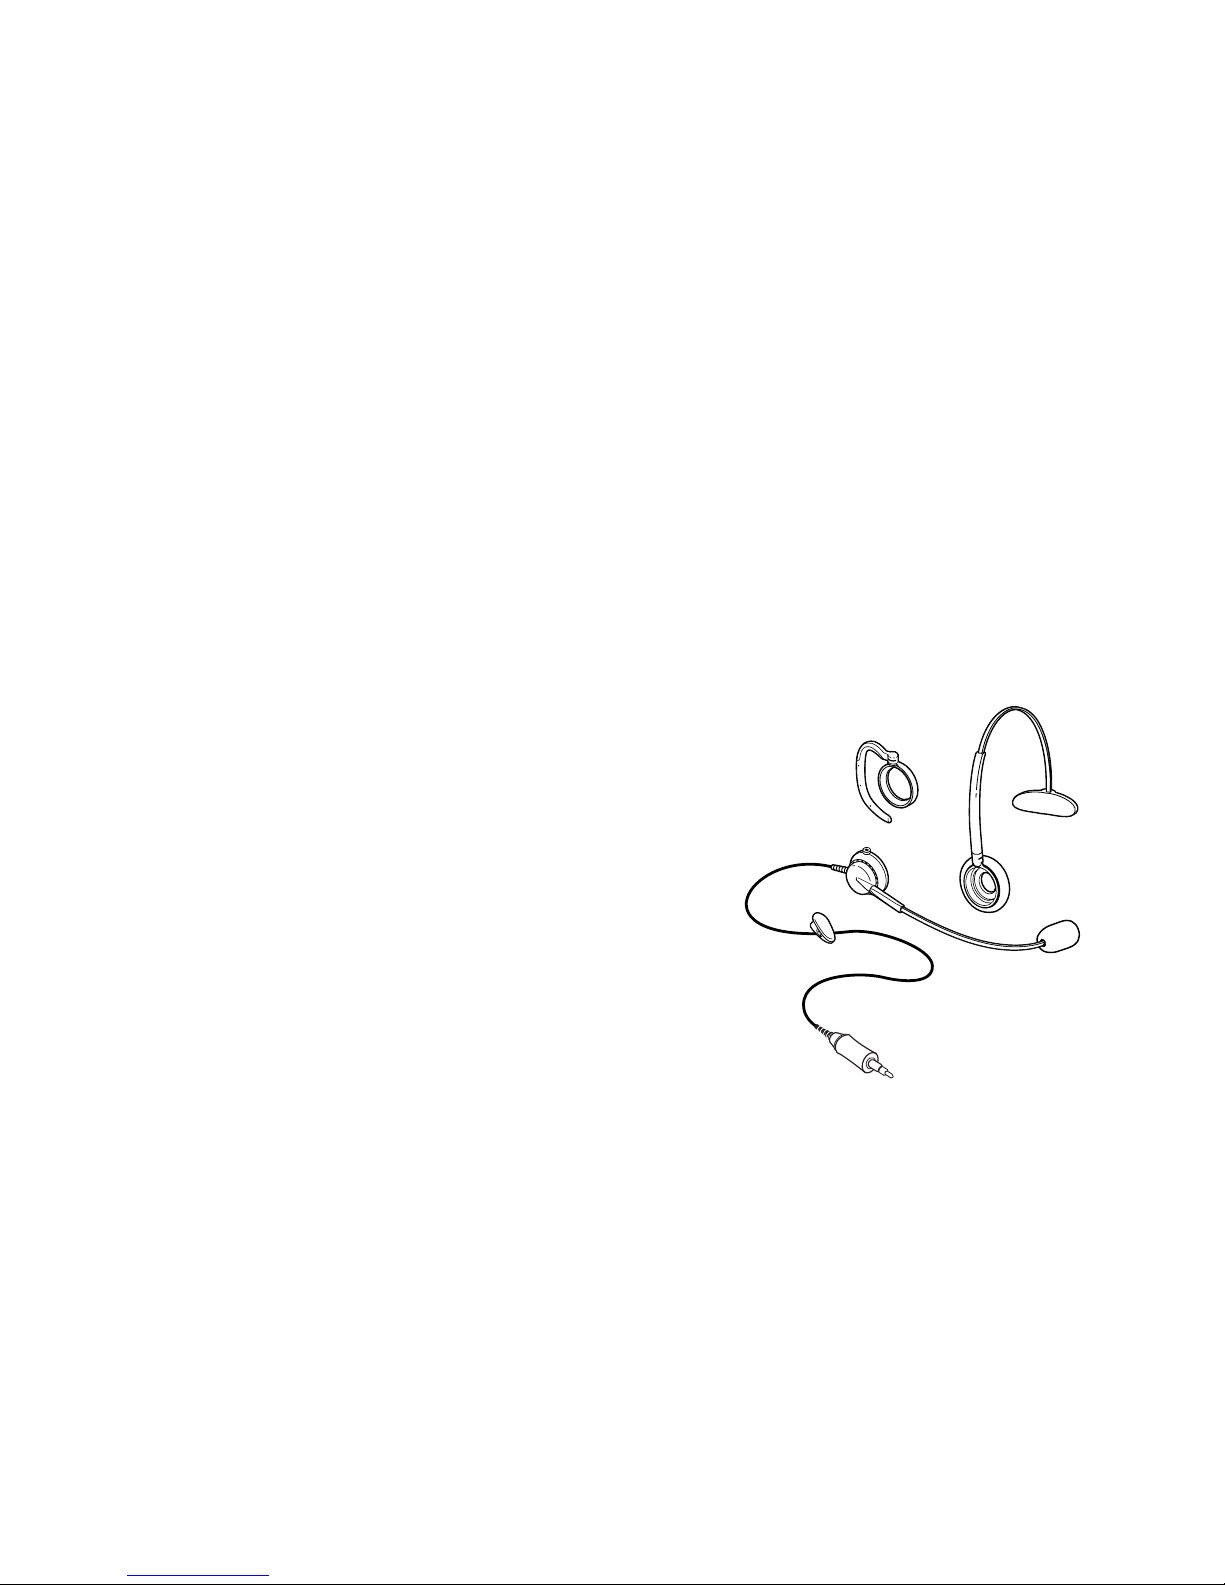
Components
This Solo Convertible headset package includes:
1. Flexible earhook
2. Clothing clip
3. Quick disconnect plug
4. Receiver/boom assembly
5. Head band
Table of contents
Wearing the Solo Convertible headset..................................................................4
Wearing the earhook style..................................................................................4
Switching from ear to ear with the earhook......................................................5
Wearing the head band style ..............................................................................5
Switching ear to ear with the head band ...........................................................5
Converting the Solo Convertible headset.............................................................6
Converting to the head band style.....................................................................6
Reverting to the earhook style ...........................................................................7
Positioning the microphone..................................................................................8
Using the clothing clip...........................................................................................8
Connecting to your telephone ..............................................................................9
Maintaining your headset .....................................................................................9
Ordering accessories..............................................................................................9
Troubleshooting...................................................................................................10
FCC information .................................................................................................11
Telephone/headset problems...............................................................................11
Cautionary notes to computer users ..................................................................11
Hello Direct 30 day unconditional money back guarantee...............................12
1 year unconditional product warranty .............................................................12
23
1.
2.
3.
4.
5.
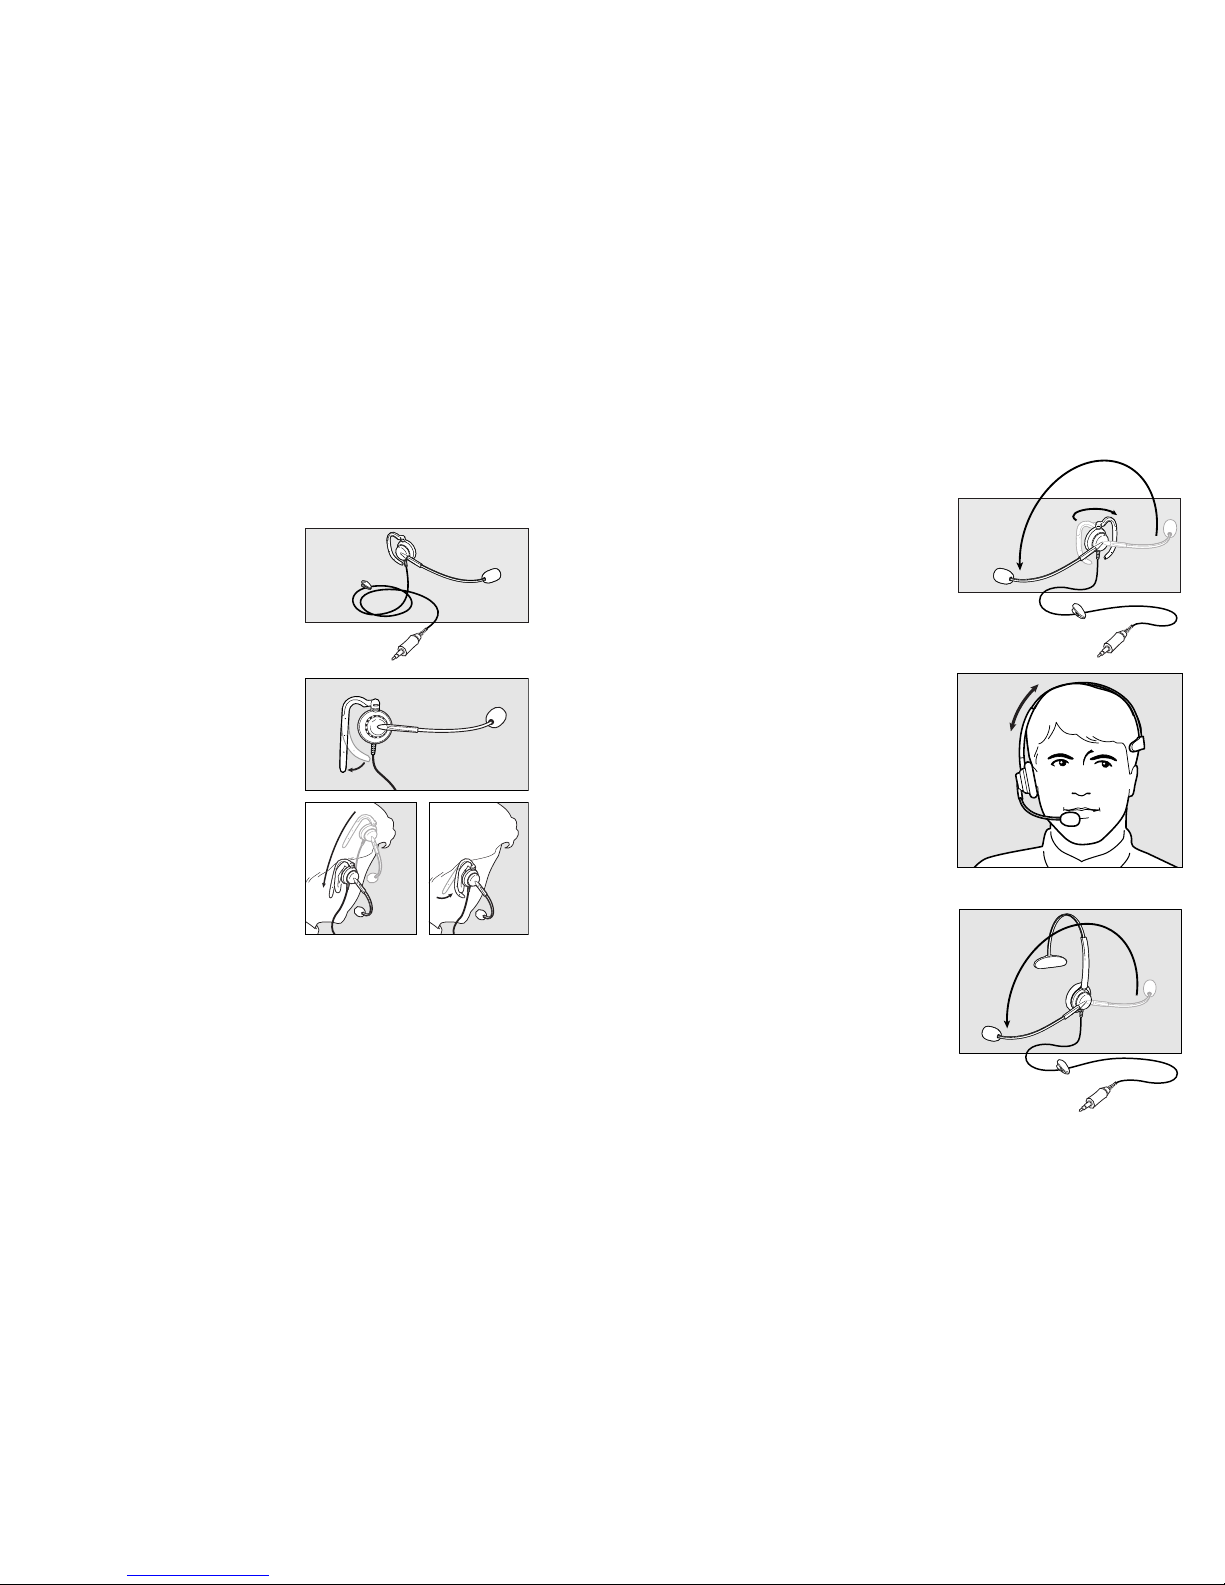
Switching from ear to ear
with the ear hook
Rotate the microphone boom 180°, and
swing the earhook to the other side of the
speaker. See Figure 3. Note: the speaker
will not rotate 360 °. Do not force it past
its stop position.
Wearing the head band
Refer to the Converting to the head band
style section to learn how to change your
Solo Convertible from earhook to head
band wearing style.
Position the headset lightly on your head.
See Figure 4. The click-stop head band
lengthens and shortens to the desired
length for a custom fit (pull to lengthen,
push to shorten). The head band retains
its length and will not need adjusting
each time it is put on. The stabilizer
cushion rests just above the ear on the
side of your head opposite the speaker.
Refer to the Positioning the microphone
section for more information.
Switching from ear to ear
with the head band
To accommodate left or right ear wearing
styles, rotate the microphone boom over
the head band. See Figure 5. Note: do not
force the microphone boom beyond the
built in stops.
Wearing the Solo Convertible headset
Wearing the earhook style
Note: if you wear glasses, we recommend
that you remove them before you put on
your headset.
The Solo Convertible headset already
has the flexible earhook installed. See
Figure 1. The earhook is worn on the
ear, and can be reshaped for a comfort-
able and secure fit. Note: black areas of
the earhook cannot be reshaped. You can
reshape only the gray areas.
1. Straighten out the earhook so that it
points away from the speaker. See
Figure 2.
2. Swing the hook away from the
speaker, and slide the Solo Convert-
ible earhook behind your ear until
the top of the hook rests on the
uppermost part of your ear.
3. Adjust the flexible portion of the
hook (gray area) with your thumb
until it rests comfortably along the
back of the ear.
4. Lightly press the speaker against
your ear for proper positioning.
5. To remove, simply lift the Solo Convertible off your ear. The Solo Convertible
earhook retains its custom contouring for the next time you put it on. Just
slip it into place and gently snug up the flexible portion of the hook.
Refer to the Positioning the microphone section for additional information.
45
Figure 1
Figure 2
Figure 3
Figure 4
Figure 5

Reverting to the earhook style
Here’s how to change the headset back into the earhook style.
1. Hold the head band with the foam cushion facing you. See Figure 8.
2. Position your fingers behind the
outer portion of the head band
mounting ring (covered by the foam
cushion).
3. With your thumbs on the receiver,
push outwardly until the head band
pops free of the receiver.
4. Align the earhook mounting ring
over the receiver with the swivel
stem notch over the mounting post
on the receiver. See Figure 9.
5. With your fingers positioned
behind the receiver, use your
thumbs to push the earhook
mounting ring until it snaps
onto the receiver.
Converting the Solo
Convertible headset
Converting to
the head band style
The Solo Convertible headset can be
equipped with a fully adjustable,
lightweight head band. You need to
remove the earhook first.
1. Position the receiver with the speaker
side up and the microphone boom
at 12 o’clock. See Figure 6.
2. Place both your thumbs on the center
of the receiver with your index
fingers wrapped around the swivel
stem and cable strain relief.
3. Push your thumbs inward until the
earhook pops free of the receiver.
4. Align the mounting post on the
receiver over the head band mount-
ing ring (covered by a foam cushion).
The mounting post fits into a notch
on the head band mounting ring. See Figure 7.
5. Place your thumbs over the boom turret.
6. Place your fingers behind the head band (on the foam cushion), and use
your thumbs to pop the head band onto the receiver.
67
Figure 8
Figure 9
Figure 6
Figure 7

Connecting to your telephone
Note: the Hello Direct Solo Convertible headset is compatible with all standard
Hello Direct brand amplifiers (Pro, Virtuoso™, and Ace).
An amplifier is needed to connect the headset to the telephone or telephone
system. The headset is equipped with a quick disconnect plug which connects
to a quick disconnect cord from the amplifier. Follow the instructions supplied
with the amplifier to connect the headset and amplifier to your telephone or
telephone system. Disconnecting the quick disconnect plug from the quick
disconnect cord allows you to move around without having to remove your
headset. If you are on a call, disconnecting the quick disconnect plug from the
quick disconnect cord effectively puts the other party on hold until you return.
Maintaining your headset
The foam covers on the head band and microphone can be washed in mild
soap and water. Replacement covers are available from your Hello Direct sales
representative or HelloDirect.com.
Ordering accessories
Keep your headset working and feeling like new by replacing ear cushions and
microphone screens regularly. Below are a few of our most popular Solo
Convertible accessories.
For a complete list of headset accessories, please refer to the Hello Direct web
site at HelloDirect.com, or call 1-800-444-3556 toll free.
Item Description
1608 Automatic Busy indicator (for Virtuoso amplifier)
1520 Pro Busy indicator (manual)
1475 Touch-N-Talk Busy indicator
1498 Touch-N-Talk (when ordered with Solo Convertible)
6216 Solo Convertible Refresher Kit (1 of each ear
cushion, microphone screens, 1 lapel clip)
2881 Microphone screens, Solo Convertible
2875 Universal clothing clip
2878* Solo Convertible ear cushion for head band
2892* Solo Convertible replacement cushion for earhook
* Multipacks available. Please ask your Hello Direct sales representative for pricing.
Positioning the
microphone
The Solo Convertible is equipped with a
noise canceling microphone. This direct-
ional microphone reduces background
noise and is better suited to noisy environ-
ments. Proper microphone positioning
is necessary to take advantage of the noise
canceling qualities of this microphone.
The Solo Convertible has a flexible
boom that can be reshaped so the
microphone is correctly positioned in
front of your mouth. Note: never forcefully rotate the microphone boom past its
stop point in the receiver.
■Grasp and steady the receiver end of the boom with one hand. Flex the
boom with your other hand.
■Adjust the boom so that the microphone is approximately one half inch
(12 mm) below and away from your lower lip. See Figure 10.
Using the clothing clip
The clothing clip prevents the weight of
the cord from dislodging the headset.
Fasten it for comfortable wearing.
See Figure 11.
■Position the clip conveniently on
your clothing.
■To reduce excess slack, reposition
the clip by sliding it up and down
the cord.
89
1/2"
(12 mm)
Figure 10
Figure 11

Do you still have poor sound quality?
■We can assist you over the phone with any Hello Direct headset. If you
have a Virtuoso amplifier, call 1-800-895-3553 for setup instructions and
optimization 24 hours a day. For other headsets, additional product
support, or if you don’t have a touch-tone phone, call 1-800-444-3556
toll free (5 a.m. to 5 p.m. Pacific Time, 8 a.m. to 8 p.m. Eastern Time).
FCC information
Your new headset complies with Part 68 of the FCC rules. Your local phone
company may need to know the compliance information, which may include
the Registration Number, Ringer Equivalence Number (REN), and other
information. This information may be found on the bottom of your amplifier.
Telephone/headset problems
If you experience problems with your headset, disconnect the amplifier from
the telephone. If your phone works properly, your headset may need repair or
adjustment. In the unlikely event that the problem is causing harm to the
telephone network, your telephone company may ask that the headset remain
unplugged until the problem is corrected.
Cautionary notes to computer users
When using any headset with a computer, care should be taken in dry or low
humidity environments to protect the user from electrostatic discharge from
the monitor. Computer monitors can induce a substantial electrostatic charge
when turned on or off, or when there is a power failure, and the resulting
electrostatic discharge can be passed from the headset to ground.
A user in close proximity to or touching the computer may feel a common
“shock” sensation, similar to touching a doorknob after walking across a
carpet, causing no harm to the user. This discharge is entirely due to the
computer monitor; the headset is merely the shortest path to ground.
To minimize the possibility of electrostatic discharge through the headset:
■Use a grounded screen in front of the monitor.
■Use static dissipative wrist bands.
■Increase the relative humidity in the room to 60% or more.
Troubleshooting
If your headset is not operating properly, check the following suggestions. If
your question or problem is not covered here, please contact Hello Direct’s
Customer Care Team toll free at 1-800-444-3556.
My caller can’t hear me, and I can’t hear my caller.
■Check installation. Make sure all cords are properly connected.
■Make sure the amplifier’s headset/handset switch is in the headset position.
■If you are using the Virtuoso amplifier, recheck steps 1, 2, and 3 in the
Virtuoso Quick Setup Guide.
My caller’s voice is low or distorted
■Adjust the listening volume control on the amplifier.
■If you are using the Pro amp, set sensitivity switch #1 to OFF.
■If you are using the Pro or Virtuoso amplifier, replace the batteries.
My caller can’t hear me, but I can hear my caller
■Make sure the mute button isn’t activated.
■Be sure microphone is properly positioned about 1
/2an inch away from
the corner of your lips and 1
/2an inch below.
■Increase the microphone volume. For the Pro amplifier, the microphone
volume control is located on the bottom of the amplifier. Move it toward
the “+”. For Virtuoso, the microphone volume control is the rocker switch
located on the top back of the amplifier.
My callers say I sound unclear or far away
■Adjust the microphone’s position. It should not be directly in front of
your mouth or nose.
My voice echoes, or I sound like I’m in a tunnel
■Decrease the microphone volume. For the Pro amplifier, the microphone
volume control is located on the bottom of the amplifier. Move it toward
the “–”. For Virtuoso, the microphone volume control is the rocker switch
located on the top back of the amplifier.
■Check the microphone position. It should not be directly in front of your
mouth or nose.
10 11

■Install static dissipative carpets or floor coverings (anti-static sprays can be
helpful).
■Remove your headset before turning the computer on or off.
The Hello Direct Solo Convertible headset meets all OSHA, UL, FCC and CSA
standards
Hello Direct 30 day unconditional
money back guarantee
If,for any reason, you’re not 100% satisfied with any product you’ve received
from us, simply contact Hello Direct within 30 days of your invoice date. If our
Technical Support Specialists are unable to resolve the problem, we’ll gladly
arrange for an exchange, company credit, or refund.
1 year unconditional product warranty
The Hello Direct Solo Convertible is warranted to you, the original owner, for
one year from date of purchase, and subject to all terms, conditions, and
limitations set forth in the standard Hello Direct Product Warranty, which is
included with each product shipped.
If a Hello Direct brand product fails, as diagnosed by an authorized Hello
Direct Customer Service Representative, we will repair the product without
product of equal or greater function and value, at our option.
or modified, or used in any manner contrary to written instructions provided
by Hello Direct. Consumable parts such as cords, ear cushions, clothing clips,
microphone screens, and batteries are not covered by this warranty. In no event
shall Hello Direct be responsible for any incidental, special or consequential
damages, even if it has been notified of the possibility of such damages.
12 13
© 2002, Hello Direct, Inc.
# 54-0312 Rev. 3/02
Hello Direct, Inc.
75 Northeastern Blvd.
Printed on recycled and recyclable paper.
Nashua, NH 03062
The Hello Direct Warranty does not apply to any product that has been altered
Tel: 1-800-444-3556
charge or replace it without charge with an identical product, if available, or a
Fax: 1-800-456-2566
Table of contents
Other Hello Direct Headset manuals

Hello Direct
Hello Direct HELLOSET1506 User manual

Hello Direct
Hello Direct Solo II 6566 User manual

Hello Direct
Hello Direct ULTRALIGHT EX 6564 User manual

Hello Direct
Hello Direct HelloSet Cordless 100 Product information sheet

Hello Direct
Hello Direct Ultralight Dual 1505 User manual

Hello Direct
Hello Direct Executive 1612 User manual

Hello Direct
Hello Direct ULTRALIGHT OP HEADSET TOPS User manual


