HENX H40DC350 User manual

40-Volt Cordless String Trimmer
H40DC350, H40DCZ350
OPERATOR’S MANUAL
WARNING: Read all safety rules and
instructions carefully before operating this tool.
Improper use can cause serious or fatal injury.
Original instructions

2
TABLE OF CONTENTS
Safety Symbols......................................................................................4
Safety Instructions.................................................................. 5-11
Introduction.......................................................................................... 12
Specifications................................................................................ 12-13
Packing List..........................................................................................14
Description.............................................................................15-16
Assembly........................................................................................ 17-20
Operation........................................................................................21-29
Maintenance..........................................................................30-37
Troubleshooting....................................................................38-39
Warranty................................................................................ 40-41

3
IMPORTANT
READ CAREFULLY BEFORE USE
KEEP FOR FUTURE REFERENCE
WARNING:
Some dust created by power sanding, sawing, grinding,
drilling and other construction activities contains chemicals known to the state
of California to cause cancer, birth defects or other reproductive harm. Some
examples of these chemicals are:
▪
Lead from lead-based paints
▪
Crystalline silica from bricks and cement and other masonry products, and
▪
Arsenic and chromium from chemically-treated lumber.
Your risk from these exposures varies, depending on how often you do this
type of work. To reduce your exposure to these chemicals: work in a well
ventilated area, and work with approved safety equipment, such as those dust
masks that are specially designed to filter out microscopic particles.

4
SAFETY SYMBOLS
The purpose of safety symbols is to attract your attention to possible
dangers. The safety symbols and the explanations with them deserve your
careful attention and understanding. The symbol warnings do not, by
themselves, eliminate any danger. The instructions and warnings they give
are no substitutes for proper accident
prevention measures.
WARNING: Be sure to read and understand all safety instructions in this
Operator’s Manual, including all safety alert symbols such as “DANGER,”
“WARNING,” and “CAUTION” before using this tool. Failure to following all
instructions listed below may result in electric shock, fire, and/or serious
personal injury.
SYMBOL MEANING
SAFETY ALERT SYMBOL:
Indicates DANGER, WARNING, OR CAUTION.
May be used in conjunction with other symbols or pictographs.
WARNING!
The operation of any power tools can result in
foreign objects being thrown into your eyes, which can result in
severe eye damage.Before beginning power tool operation,always
wear safety goggles or safety glasses with side shield and a full face
shield when
needed.WerecommendaWideVisionSafetyMask for
use over
eyeglasses or standard safety glasses with side shields.
Always use eye protection
which is marked to comply with ANSI
Z87.1.

5
SAFETY INSTRUCTIONS
This page depicts and describes safety symbols that may appear on this product. Read,
understand,andfollowallinstructionsonthe machinebeforeattemptingtoassemble
and operate it.
Safety Alert
Indicates a potential personal injury hazard.
Read the
Operator’s
Manual
Toreduce the risk of injury, user must read
operator’s manual.
Eye Protection
Always wear safety goggles or safety glasses
with side shields and a full face shield when
operating this product.
Keep bystanders
away
Never operate the machine while people,
especially children, or pets are nearby

6
It is forbidden to
use blade.
It is forbidden to use blade.
Do not expose to
rain
Do not expose to rain
Recycle Symbols
This product uses lithium-ion (Li-ion) batteries.
Local, state, or federal laws may prohibit disposal
of batteries in ordinary trash. Consult your
local waste authority for information regarding
available recycling and/or disposal options.
Charging/Store
the battery pack
Charging and Store the battery pack only in dry
rooms with an ambient temperature of 50°F to
104°F (+10°C to +40°C).
V
Volt
Voltage
mm
Millimeter
Length or size
cm
Centimeter
Length or size
in.
Inch
Length or size
kg
Kilogram
Weight
lb
Pound
Weight
DC
Direct Current
Type or a characteristic of current
RPM
Revolutions per
minute
Rotational speed
IMPORTANT SAFETY INSTRUCTIONS
1) Avoid Dangerous Environment – Don’t use appliances in damp or wet locations.
2) Don’t Use In Rain.
3) Keep Children Away – All visitors should be kept at a distance from work area.

7
4) Dress Properly – Do not wear loose clothing or jewelry. They can be caught in moving
parts. Use of rubber gloves and substantial footwear is recommended when working
outdoors. Wear protective hair covering to contain long hair.
5) Use Safety Glasses – Always use face or dust mask if operation is dusty.
6) Use Right Appliance – Do not use appliance for any job except that for which it is
intended.
7) Don’t Force Appliance – It will do the job better and with less likelihood of a risk of
injury at the rate for which it was designed.
8) Don’t Overreach – Keep proper footing and balance at all times.
9) Stay Alert – Watch what you are doing. Use common sense. Do not operate appliance
when you are tired.
10) Store Idle Appliances Indoors – When not in use, appliances should be stored indoors
in dry, and high or locked-up place – out of reach of children.
11) Check Damaged Parts – Before further use of the appliance, a guard or other part
that is damaged should be carefully checked to determine that it will operate properly and
perform its intended function. Check for alignment of moving parts, binding of moving
parts, breakage of parts, mounting, and any other condition that may affect its operation.
A guard or other part that is damaged should be properly repaired or replaced by an
authorized service center unless indicated elsewhere in this manual.
Charging battery pack only in dry conditions and an ambient temperature of 50°F to 104°F
(10°C to 40°C). Protect them from humidity and direct sunlight!
Store the charger, battery pack and machine only in dry places with an ambient
temperature of 50°F to 104°F (10°C to 40°C).
WARNING – To reduce the risk of injury, user must read instruction manual.
WARNING – Risk of Eye Injury. Use Safety Glasses or Similar Eye Protection.
WARNING –To reduce the risk of injury to persons, do not operate without
guards in place.
WARNING –To Reduce the Risk of injury to Persons, Remove Battery Pack
When Not in Use.
WARNING – Read all safety warnings and instructions. Failure to follow the
warnings, and instructions may result in electric shock, fire and/ or serious injury.
Prevent unintentional starting.
Ensure the power switch is in the off-position
before connecting to battery pack, picking up or carrying the appliances.
Carrying the appliances with your finger on the power switch, or energizing
appliances that have the switch on, invites accidents.
Make sure the power switch is off and the battery pack is removed before
clearing jammed material, making adjustments, changing accessories,
storing or servicing the appliance. Unexpected actuation of the appliance
while clearing jammed material or servicing may result in serious
personal injury.

8
Reacharge only with the charger specified by the manufacturer.
A charger
that is suitable for one type of battery pack may create a risk of fire when used
with another battery pack.
Use appliance only with specifically designated battery packs.
Use of any
other battery packs may create a risk of injury and fire.
When battery pack is not in use, keep it away from other metal objects,
like paper clips, coins, keys, nails, screws or other small metal objects
that can make a connection from one terminal to another.
Shorting the
battery terminals together may cause burns or fire.
Under abusive conditions, liquid may be ejected from the battery; avoid
contact.
If contact accidentally occurs, flush with water.If liquid contacts eyes,
additionally seek medical help. Liquid ejected from the battery may cause
irritation or burns.
Do not use a battery pack or appliance that is damaged or modified.
Damaged or modified batteries may exhibit unpredictable behavior resulting in
fire, explosion or risk of injury.
Do not expose a battery pack or appliance to fire or excessive
temperature.
Exposure to fire or temperature of 130
℃
can be replaced by the
temperature of 265
℉
.
Follow all charging instructions and do not charge the battery pack or
appliance outside of the temperature range specified in the instructions.
Charging improperly or at temperatures outside of the specified range may
damage the battery and increase the risk of fire.
Have servicing performed by a qualified repair person using only identical
replacement parts.
This will ensure that the safety of the product is maintained.
Do not modify or attempt to repair the appliance or the battery packs( as
applicable) except as indicated in the instructions use and care.
WARNING!
When using electric trimmers, basic safety precautions should
always
be followed to reduce the risk of fire,electric shock, and personal injury,
including the
following:
READ ALL INSTRUCTIONS
DANGER!
Do not rely on the tool’s insulation against electric shock. Toreduce
the
risk of electrocution, never operate the tool in the vicinity of any wires or cables
which
may carry electriccurrent.
CAUTION!
Wear appropriate personal hearing protection duringuse.Under some
conditions and duration of use, noise from this product may contribute to hearing loss.
▪
Keep Children Away
–
All visitors should be kept at a distance from work area.
▪
Avoid Dangerous Environment
– Don’t use appliances in damp or wet locations.

9
▪
Dress Properly
- Do not wear loose clothing or jewelry.They can be caught in
moving parts. Use of rubber gloves and substantial footwear is recommended
when
working outdoors.Wear protective hair covering to contain long hair.
▪
Use Safety Glasses
- Always use face or dust mask if operation is dusty.
▪
Use Right
Appliance
- Do not use appliance for any job except that for which it is
intended.
▪
Don’t Force Appliance
- It will do the job better and with less likelihood of a
risk of injury at the rate for which it was designed.
▪
Don’t Overreach
- Keep proper footing and balance at all times.
▪
Stay Alert
-Watchwhat youare doing.Usecommon sense.Do notoperate
appliance when you are tired.
▪
Do not operate the trimmer while under the influence of alcohol or drugs.
▪
Keep guards in place and in working order.
▪
Keep hands and feet away from the cutting area.
▪
StoreIdle AppliancesIndoors
-Whennot in use, appliances should bestored
indoors in
dry, and high or locked-upplace-out of reach of children.
▪
Check Damaged Parts – Before further use of the appliance, a guard or other part
that is damaged should be carefully checked to determine that it will operate properly
and perform its intended function. Check for alignment of moving parts, binding of
moving parts, breakage of parts, mounting, and any other condition that may affect its
operation. A guard or other part that is damaged should be properly repaired or
replaced by an authorized service center unless indicated elsewhere in this manual.
▪
Maintain Trimmer With Care
- Keep the cutting attachment clean for best
performance and to reduce the risk of injury. Follow the instructions for changing
accessories. Keep the handles dry, clean, and free from oil and grease.
▪
Check Damaged Parts
-Beforefurtheruseof thetrimmer,aguardorother
part
that isdamaged should becarefully checked to determinethatit will operate properly
andperform itsintendedfunction.Checkforalignment ofmoving parts, binding of
moving parts, breakage of parts, mounting, and any other condition that may affect
its operation.A guard or other part that is damaged should be properly repairedor
replaced by an authorized service center unless indicated
elsewhere in this
manual.
▪
Clear the area to be cut before each use.
Remove all objects such as rocks,
broken glass,nails,wire,or string thatcanbethrown orbecome entangled inthe cutting

10
attachment. Make sure that other persons and pets are at least 100 ft.
(30.5m) away.
▪
Always hold the trimmer firmly, with both hands on the handles, while
operating. Wrap your fingers and thumbs around the handles.
▪
Avoid Accidentally Starting
- Don’t carry the trimmer with your finger on
the trigger.
▪
Do not operate the trimmer in gaseous or explosive atmospheres.
Motors
in these appliances normally spark, and the sparks might ignite fumes.
▪
Damage to Trimmer
- If you strike a foreign object with the trimmer or it
becomes entangled, stop the tool immediately, check for damage and have any
damage
repaired beforefurtheroperationis attempted.Do notoperatewitha
broken guard or
spool.
▪
If the equipment should start to vibrate abnormally, stop the motor and
check immediately for the cause.
Vibration is generally a warning of trouble. A loose
head mayvibrate, crack,break orcome offthe trimmer,which mayresult in serious or fatal
injury. Make sure that the cutting attachment is properly fixed in position. If the head
loosens after fixing it in position, replace it immediately.
Never use a trimmer with a loose cutting attachment.
▪
Replace a cracked, damaged or worn-out cutting head immediately, even
if damage is limited to superficial cracks.
Such attachments may shatter at
high
speed and cause serious or fatal injury.
▪
Check the cutting attachment at regular short intervals during operation,
or immediately if there is a noticeable change in cutting behavior.
▪
When replacing the cutting line, use no more than0.090in.(2.3mm) nylon
line;
using heavier lines than recommended by the manufacturer increases the load
onthe
motorandreducesitsoperatingspeed.Thisresultsinoverheatingand
damage to the
trimmer.
▪
To reduce the risk of serious injury, never use wire or metal-reinforced
line or other material in place of the nylon cutting lines.
Piecesof wire
could
breakoffandbethrownathighspeedtowardthe operatororbystanders.
▪
To reduce the risk of injury from loss of control, never work on a ladder
or on any other insecure support. Never hold the cutting attachment
above
waist height.
▪
If situations occur that are not covered in this manual, use care and
good judgment. Contact the HENX Customer Service Center for assistance.

11
▪
Do not charge the battery pack in rain, or in wet locations.
▪
Use only with the battery packs and chargers listed below:
BATTERY PACK
CHARGER
H40B25
、
H40B50
H40B75
、
H40B200
H40KC400
H40MC100(XVE129-4200300)
▪
Do not dispose of the battery in a fire.
The cells may explode. Check with
local
codes for possible special disposal instructions.
▪
Do not open or mutilate the battery.
Released electrolyte is corrosive and
may cause damage to the eyes or skin. It may be toxic if swallowed.
▪
Exercise care in handling batteries in order not to short the battery with
conducting materials such as rings, bracelets, and keys.
The battery or
conductor
may overheat and cause burns.
▪
Replacement Parts
- When servicing, use only identical HENX replacement parts.
Use of any other accessory or attachment may increase the risk of injury.
▪
Battery tools do not have to be plugged into an electrical outlet;
therefore, they are always in operating condition.
Be aware of possible hazards
even when the tool is not operating.Takecare when performing
maintenance or
service.
▪
Remove or disconnect battery pack before servicing, cleaning or
removing material from the trimmer.
▪
Do not wash with ahose; avoid getting water in motor and electrical
connections.
▪
Save these instructions.
Refer to them frequently and use them to instruct
others who may use this tool. If you lend this tool to someone else, also lend
these
instructions to them to prevent misuse of the product and possible injury.
Intended use
Cordless string trimmer is a hand-held tool used to cut grass on lawn,
garden and pasture.

12
INTRODUCTION
Congratulations on your selection of the HENX 40-Volt Max Lithium-Ion Cordless
String
Trimmer.It hasbeendesigned, engineered andmanufacturedto give you
thebest
possible dependability and performance.
Should you experience any problem you cannot easily remedy, please contact
HENX
customer service center86-574-62037812.
This manualcontainsimportantinformationonto thesafeassembly,operation
and
maintenance of your string trimmer. Read it carefully before using the string
trimmer.
Keep this manual handy so you can refer to it at any time.
SPECIFICATIONS
Voltage
40V DC
No-load speed
High Speed:6000/min
Low Speed:5000/min
Cutting Mechanism
Bump Head
Cutting Line Type
0.090" (2.3mm) nylon twist line
Cutting Width
14 in. (350mm)
Weight (Without battery pack)
7.2 lb. (3.3Kg)
SERIAL NUMBER DATE OF PURCHASE
YOU SHOULD RECORD BOTH SERIAL NUMBER AND DATE OF PURCHASE AND KEEP THEM IN A
SAFE PLACE FOR FUTURE REFERENCE

13
Recommended Cutting Line
PART NAME
DESCRIPTION
Cutting
Line
0.080"/2.0mm twist line
Cutting
Line
0.090"/2.3mm twist line (Recommend)
Battery pack
Lithium-Ion
Models
H40B75
H40B50
H40B25
H40B200
voltage
40 VDC
40 VDC
40 VDC
40VDC
Capacity
7.5Ah
5.0Ah
2.5Ah
20Ah
Charger
(model)
H40KC400
Input
120VAC 60Hz, 400W
Output
40VDC, 8A
Allowable
charge
temperature
range
0 - 40 °C
Charger
(model)
H40MC100(XVE129-4200300)
Input
100-120VAC, 50/60Hz, 2.5A Max;
Output
42.0VDC, 3A
Allowable
charge
temperature
range
0 - 40 °C

14
PACKING LIST
PART NAME
QUANTITY
Lifting handle string trimmer
1
Guard
1
Auxiliary handle
1
Cross screwdriver
1
Operator's manual
1
Inner hexagon spanner(S=3)
1
Screw(ST4X14)
3
15
DESCRIPTION
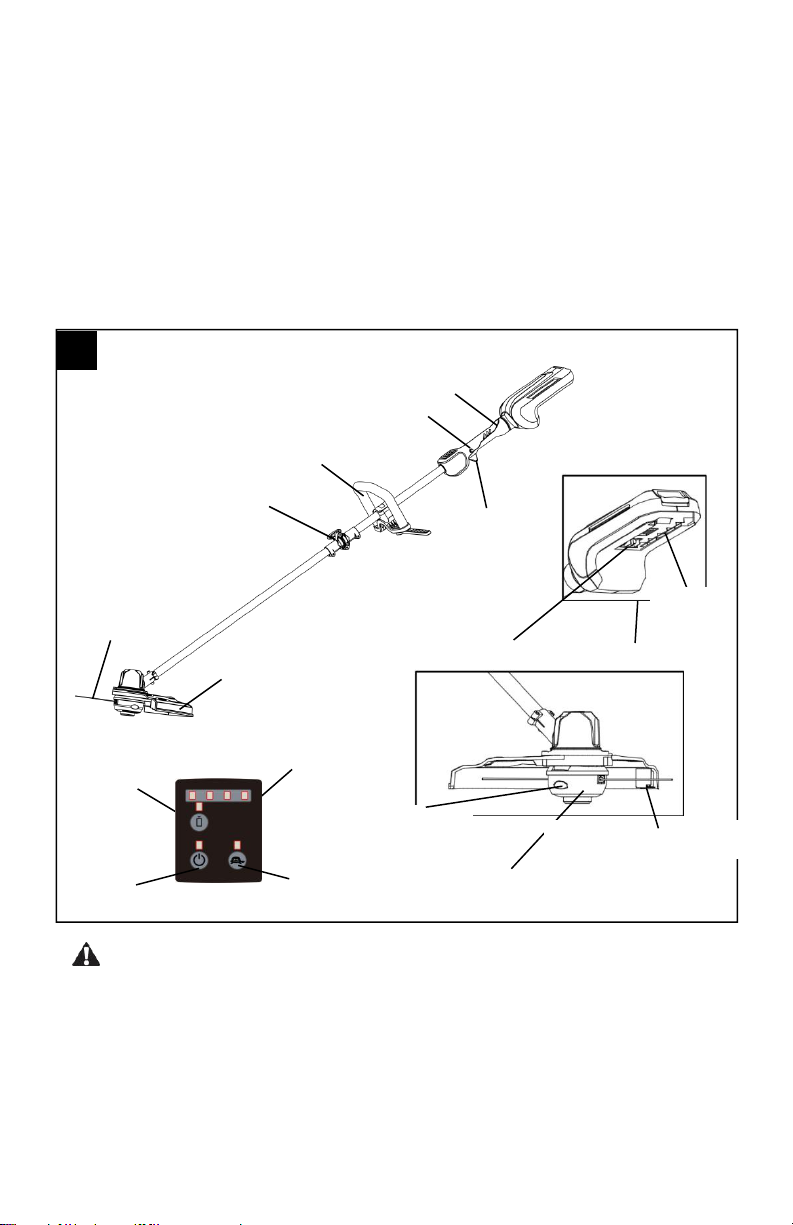
KNOW YOUR STRING TRIMMER (Fig. 1)
The safe use of this product requires an understanding of the information on the tool and
in this operator’s manual, as well as knowledge of the project you are attempting. Before
using this product, familiarize yourself with all operating features and safety rules.
WARNING:
Never operate the tool without the guard securely in place. The
guard must always be on the tool to protect the user.
1
Hinge
(H40DCZ350 Only)
Adjustable Front-Assist Handle
Lock-off Button
Rear Handle
Ejection Mechanism
Latch
Trigger
Battery Release Button
Electric Contacts
Line-Cutting Blade
Trimmer Hand(Bump Head)
Release Tab
Guard
Cutting Line
Control Panel
Low Speed Switch
Power Indicator
Battery power
On /Off

16
ADJUSTABLE FRONT-ASSIST HANDLE
For easy control of the trimmer during cutting.
REAR HANDLE
Ergonomic handle with overmold improves comfort and grip.
TRIGGER
Turns the string trimmer On and Off and adjusts the trimmer head speed.
anti lock button
Helps prevent accidental or unauthorized activation of the trigger. It must be depressed
before the trigger can be activated.
TRIMMER HEAD (BUMP HEAD)
Stores thecuttingline andreleases thecutting linewhen theheadislightlytapped on
the ground during operation.
GUARD
Reduces the risk of injury from foreign objects flung backwards toward the operator
and from contact with the cutting attachment.
LINE-CUTTING BLADE
Steel blade on the guard that maintains the cutting line at the proper length.
BATTERY-RELEASE BUTTON
Releases the battery pack from the tool.
LATCH
Secures the battery pack to the tool.
EJECTION MECHANISM
Aids in battery removal.
HINGE (H40DCZ350 Only)
Connects and locks the two foldable shafts.

17
ASSEMBLY
WARNING:Ifanypartsaredamagedormissing,donotoperatethisproduct
untilthepartsarereplaced.Useof thisproductwithdamagedormissingpartscould
result in serious personalinjury.
WARNING:Donot attempt tomodifythisproduct orcreateaccessoriesnot
recommendedforuse withthis string trimmer.Any suchalterationormodificationis
misuse and could result in a hazardous condition leading to possibly serious personal
injury.
WARNING:
Always remove the battery pack from the product when you are
assembling parts, making adjustments, cleaning, or when the product is not in use.
UNPACKING
▪
This product requires assembly.
▪
Carefullyremove theproductand anyaccessoriesfromthebox.Makesurethat
all items listed in the packing list are included.
▪
Inspect the tool carefully to make sure that no breakage or damage occurred
during shipping.
▪
Do not discard the packing material until you have carefully inspected and
satisfactorily operated the tool.
▪
If any parts are damaged or missing, please return the product to the place of
purchase.

18
UNFOLDING THE SHAFT (ONLY FOR H40DCZ350)
WARNING:
In order to avoid pinching your hands or fingers, do not
hold the shaft at the joint.
WARNING:
Do not attempt to start the trimmer until the shaft has been
locked.
1. Remove the battery pack from the
trimmer.
2. Put your trimmer on the ground or the
floor and make sure that the cable is
inside the shaft, so that it will not be
pinched when closing the joints. Carefully
unfold the shaft until the two holes in the
joint are accurately aligned (Fig. 2).
3. Insert the bolt (supplied) and tighten it
with the supplied hex wrench to lock the
shaft in place (Fig. 3).
2
3

19
MOUNTING THE GUARD
WARNING:
Always wear gloves when mounting or replacingthe guard.Be careful
of the blade on the guard and protect your hands from being injured by the blade.
1.
Remove the battery pack from
the
2.
Lift the trimmer head and face it
downward; align the two mounting
holes in the guard with the two bolts
that are preassembled on thebase
of the shaft. Make sure that the
internal surface of the guard faces
towards the trimmer head (Fig. 4).
3.
Lock the guard in place with the two
bolts and the supplied hex wrench
(Fig. 5).
4
5
trimmer.

20
MOUNTING AND ADJUSTING THE FRONT-ASSIST HANDLE
WARNING:
Always remove the battery pack from the product when you are
assembling parts, making adjustments, cleaning,or when the product is not in use.
1.
Remove the battery pack from
the trimmer
2.
Remove the auxiliary handle
assembly
3.
Loosen the four hexagon socket
screws on the upper cover of the
auxiliary handle,remove the
upper cover of the auxiliary
handle (Fig. 6).
4.
Loosen the semicircle cross
screw and unscrew the auxiliary
handle
5.
After installation as shown in
figure 4.1, turn the auxiliary
handle back and lock the
semicircle cross screw(Fig.6.1)
6.
Attach the front-assist handle and
lowerclamp ontheshaftandsecure
them by pre-tightening the four
screws. Turn the front-assist handle
upwards so that it points toward the
top of the handle (Fig. 7).
7.
Shorter users mayadjustthe
handletoa
lowerposition(away
fromyou) andtallerusersmay
adjustthehandletoanupper
position (towards you). The handle
should be adjusted so your front
arm will be
straight when using
thetrimmer.
8.
After installing the upper cover of the auxiliary handle, lock it with the hexagon
socket screw.
Tighten the four screws so that the handle cannot be rotated on the
shaft.
6
7
6.1
This manual suits for next models
1
Table of contents
Other HENX Trimmer manuals


