Makita DUM604 User manual

DUM604 /
DUH202
EN Cordless Grass Shear /
Cordless Hedge Trimmer INSTRUCTION MANUAL 10
FR Taille-Herbes sans Fil /
MANUEL D’INSTRUCTIONS 20
DE Akku-Grasschere /
Akku-Heckenschere BETRIEBSANLEITUNG 31
IT Cesoie tagliaerba a batteria /
Tagliasiepi a batteria ISTRUZIONI PER L’USO 43
NL Accugrasschaar /
accuheggenschaar GEBRUIKSAANWIJZING 54
ES
Tijeras Inalámbricas para Hierba /
Cortasetos Inalámbrico
MANUAL DE
INSTRUCCIONES 65
PT
Tesoura para Grama a Bateria /
Aparador De Cerca Viva a Bateria
MANUAL DE INSTRUÇÕES 77
DA Akku græsklipper /
Akku hækketrimmer BRUGSANVISNING 88
EL
98
TR
KULLANMA KILAVUZU 110

12
3
Fig.1
1
2
Fig.2
1
2
Fig.3
1
Fig.4
1
Fig.5
Fig.6
Fig.7
2

1
Fig.8
2
1
Fig.9
Fig.10
Fig.11
Fig.12
3
2
1
Fig.13
1 2 3
Fig.14
Fig.15
3

1
Fig.16
1
Fig.17
Fig.18
Fig.19
Fig.20
Fig.21
1
Fig.22
Fig.23
4

Fig.24
Fig.25
1
Fig.26
1
Fig.27
1 2
3
Fig.28
Fig.29
1
Fig.30
5

1
Fig.31
Fig.32
1
Fig.33
1
Fig.34
Fig.35
Fig.36
1
Fig.37
1
2
Fig.38
6

1
Fig.39
Fig.40
Fig.41
Fig.42
Fig.43
Fig.44
(1)
(2)
Fig.45
Fig.46
7

Fig.47
Fig.48
Fig.49
Fig.50
Fig.51
Fig.52
Fig.53
Fig.54
8

1
Fig.55
1
Fig.56
9

10 ENGLISH
ENGLISH (Original instructions)
SPECIFICATIONS
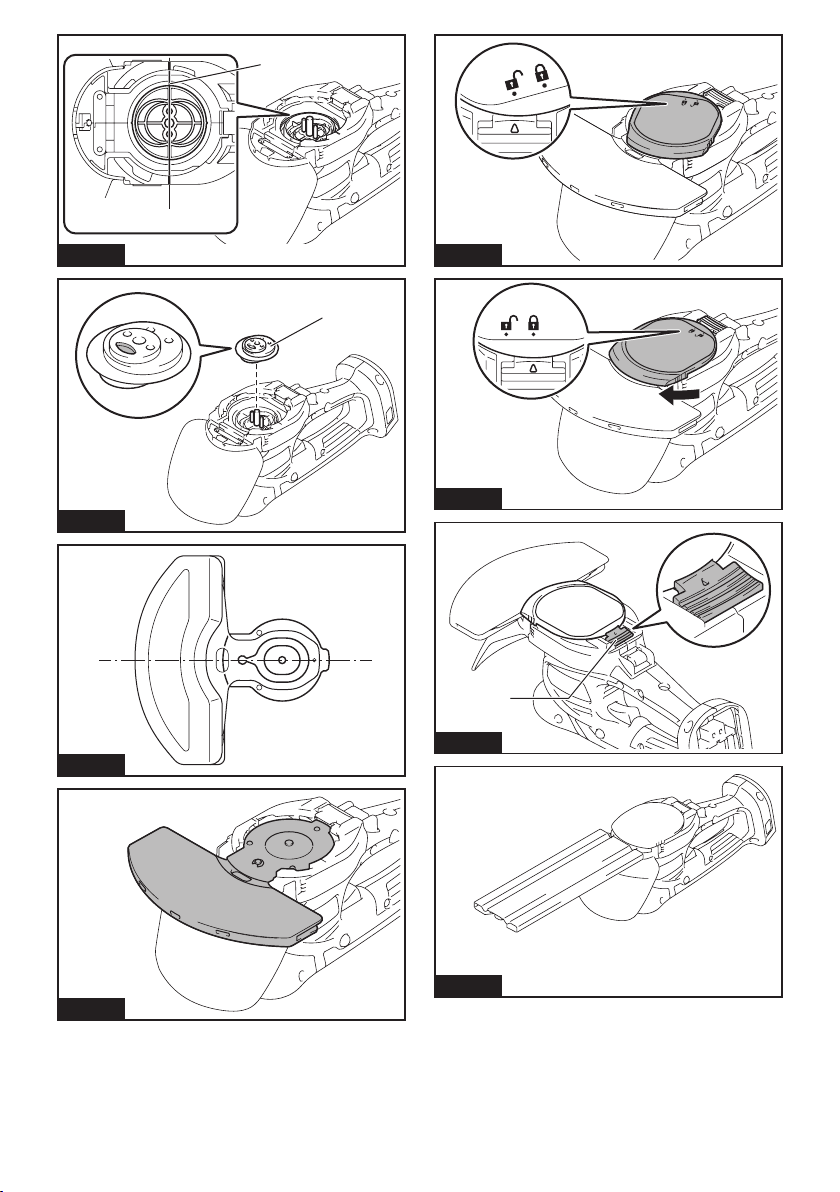
DUM604 with shear blade for grass shear installed
Model: DUM604
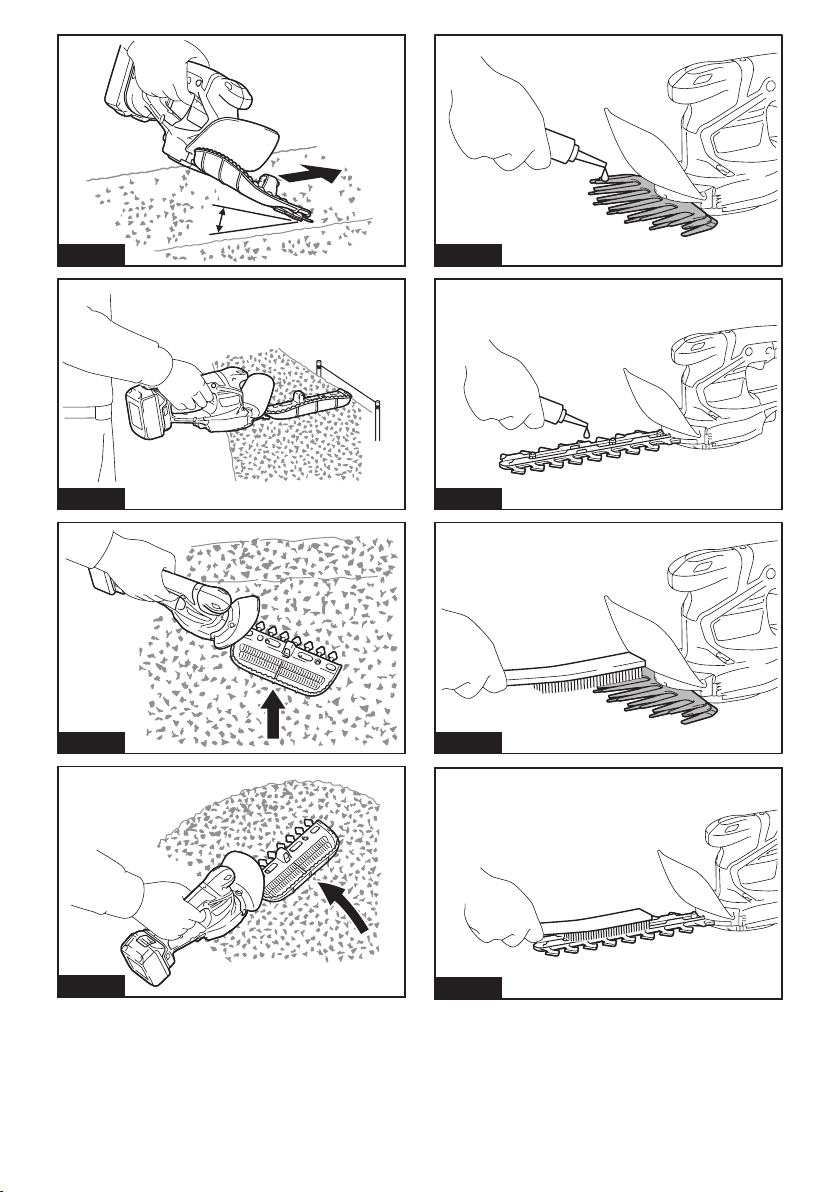
Cutting width 160 mm
Strokes per minute 2,500 min-1
Dimensions
(L x W x H)
353 mm x 177 mm x 131 mm
Rated voltage D.C. 18 V
Net weight 1.5 - 1.8 kg
DUH202 with shear blade for hedge trimmer installed
Model: DUH202
Blade length 200 mm
Strokes per minute 2,500 min-1
Dimensions
(L x W x H)
528 mm x 120 mm x 131 mm
Rated voltage D.C. 18 V
Net weight 1.5 - 1.8 kg
without notice.
-
Applicable battery cartridge and charger
Charger
DC18SH
residence.
WARNING: Only use the battery cartridges and chargers listed above.
Recommended cord connected power source
Symbols
Take particular care and attention.
Read instruction manual.
Cutting means continues to run after the
Do not expose to moisture.

11 ENGLISH
Ni-MH
Li-ion
Due to the presence of hazardous components in the
equipment, waste electrical and electronic equip-
-
tive impact on the environment and human health.
Do not dispose of electrical and electronic
waste electrical and electronic equipment and on
-
and delivered to a separate collection point for
municipal waste, operating in accordance with the
regulations on environmental protection.
NSW Noise Control Regulation
Intended use
DUM604/DUH202 with shear blade for grass shear installed
The tool is intended for cutting lawn edges or sprouts.
DUM604/DUH202 with shear blade for hedge trimmer installed
The tool is intended for trimming hedges.
Noise
-
DUM604/DUH202 with shear blade for grass shear installed
Sound pressure level (L
-
DUM604/DUH202 with shear blade for hedge trimmer installed
Sound pressure level (L
NOTE:
measured in accordance with a standard test method
NOTE:
WARNING: Wear ear protection.
WARNING:
The noise emission during actual
-
ue(s) depending on the ways in which the tool is used
especially what kind of workpiece is processed.
WARNING:
Be sure to identify safety measures
to protect the operator that are based on an estima-
tion of exposure in the actual conditions of use (tak-
ing account of all parts of the operating cycle such
it is running idle in addition to the trigger time).
Vibration
-
DUM604/DUH202 with shear blade for grass shear
installed
h2or less
2
-
DUM604/DUH202 with shear blade for hedge trim-
mer installed
h2or less
2
NOTE:
measured in accordance with a standard test method
NOTE:
WARNING: The vibration emission during
declared value(s) depending on the ways in which
the tool is used especially what kind of workpiece
is processed.
WARNING: Be sure to identify safety mea-
sures to protect the operator that are based on an
estimation of exposure in the actual conditions of
use (taking account of all parts of the operating
cycle such as the times when the tool is switched
trigger time).
EC Declaration of Conformity
For European countries only
to this instruction manual.
SAFETY WARNINGS
General power tool safety warnings
WARNING: Read all safety warnings, instruc-
with this power tool.
Save all warnings and instruc-
tions for future reference.
(cordless) power tool.

12 ENGLISH
Cordless Grass Shear Safety Warnings
General instructions
1. To ensure correct operation, user has to read
this instruction manual to make himself famil-
iar with the handling of the equipment. Users
-
selves as well as others due to improper handling.
2. Never allow children, persons with reduced
physical, sensory or mental capabilities or
lack of experience and knowledge or people
unfamiliar with these instructions to use the
machine, local regulations may restrict the age
of the operator.
3.
Use the equipment with the utmost care and attention.
Operate the equipment only if you are in good
physical condition. Perform all work calmly
and carefully. Use common sense and keep in
mind that the operator or user is responsible
for accidents or hazards occurring to other
people or their property.
5. Never operate the machine while people, espe-
cially children, or pets are nearby.
6.
case that the equipment shows any problem or
abnormal sign.
7.
resting and when leaving the equipment unat-
tended, and place it in a safe location to prevent
danger to others or damage to the equipment.
8. Avoid using the machine in bad weather
conditions especially when there is a risk of
lightning.
Personal protective equipment
1. Wear eye protection and stout shoes at all
times while operating the machine.
2. Always wear substantial footwear and long
trousers while operating the machine.
Starting up the equipment
1. Make sure that there are no children or other
people nearby, also pay attention to any ani-
mals in the working vicinity. Otherwise stop
using the equipment.
2.
Before use always check that the equipment is
safe for operation. Check the security of the cut-
ting tool and the guard and the switch trigger/lever
for easy and proper action. Check for clean and
dry handles and test the function of the start/stop.
3.
Check damaged parts before further use of the
equipment. A guard or other part that is dam-
aged should be carefully checked to determine
that it will operate properly and perform its
intended function. Check for alignment of mov-
ing parts, binding of moving parts, breakage of
parts, mounting, and any other condition that
that is damaged should be properly repaired
or replaced by our authorized service center
unless indicated elsewhere in this manual.
Switch on the motor only when the hands and
feet are away from the cutting tool.
5. Before starting make sure that the cutting tool
has no contact with any objects.
Method of operation
1. Only use the equipment in good light and
visibility. During the winter season beware
of slippery or wet areas, ice and snow (risk
of slipping). Always ensure a safe footing on
slopes and be sure to walk and never run.
2. Take care against injury to feet and hands from
the cutting tool.
3. Never stand on a ladder and run the
equipment.
Never climb up into trees to perform cutting
operation with the equipment.
5. Never work on unstable surfaces.
6.
Remove sand, stones, nails etc. found within the
working range.
7. Should the cutting tool hit stones or other hard
inspect the cutting tool.
8. Inspect the cutting tool at short regular inter-
vals for damage (detection of hairline cracks
by means of tapping-noise test).
Before commencing cutting, the cutting tool
must have reached full working speed.
10.
The cutting tool has to be equipped with the
appropriate guard. Never run the equipment with
damaged guards or without guards in place!
11. All protective installations and guards sup-
plied with the equipment must be used during
operation.
12. Always remove the battery cartridge from the
equipment:
— whenever leaving the equipment
unattended;
— before clearing a blockage;
— before checking, cleaning or working on
the equipment;
— after striking a foreign object;
— whenever the equipment starts vibrating
abnormally.
13. Always ensure that the ventilation openings
are kept clear of debris.
Cutting means continues to run after the motor
15. If the blades stop moving due to the stuck of
foreign objects between the blades during
battery cartridge, and then remove the foreign
objects using tools such as pliers. Removing
-
Cutting Tools
Employ only the correct cutting tool for the job
in hand.
Maintenance instructions
1. The condition of the equipment, in particular of
the cutting tool of the protective devices must
be checked before commencing work.
2.
cartridge before carrying out maintenance,
replacing cutting tools or cleaning the equip-
ment or cutting tool.

13 ENGLISH
3. When not in use, store the equipment indoors
in dry and high or locked-up place - out of the
reach of children. Clean and maintain before
storage.
SAVE THESE INSTRUCTIONS.
WARNING: DO NOT let comfort or familiarity
with product (gained from repeated use) replace
strict adherence to safety rules for the subject
product. MISUSE or failure to follow the safety
rules stated in this instruction manual may cause
serious personal injury.
Cordless Hedge Trimmer Safety
Warnings
1. Keep all parts of the body away from the blade.
Do not remove cut material or hold material
to be cut when blades are moving. Blades
moment of inattention while operating the hedge
2. Carry the hedge trimmer by the handle with the
blade stopped and taking care not to operate
any power switch.
trimmer will decrease the risk of inadvertent start-
3. When transporting or storing the hedge trim-
of the hedge trimmer will decrease the risk of
When clearing jammed material or servicing
and the battery pack is removed or discon-
nected. Unexpected actuation of the hedge trim-
5. Hold the hedge trimmer by insulated gripping
surfaces only, because the blade may contact
hidden wiring. Blades contacting a "live" wire
-
mer "live" and could give the operator an electric
shock.
6. Keep all power cords and cables away from
cutting area.-
7. Do not use the hedge trimmer in bad weather
conditions, especially when there is a risk of
lightning.
8. DANGER - Keep hands away from blade.
Overreaching with a hedge trimmer, particu-
larly from a ladder, is extremely dangerous.
10. Do not use the hedge trimmer in the rain or in
wet or very damp conditions. The electric motor
is not waterproof.
11. First-time users should have an experienced
hedge trimmer user show them how to use the
trimmer.
12. The hedge trimmer must not be used by
children or young persons under 18 years of
age.
-
ing training under the supervision of an expert.
13. Use the hedge trimmer only if you are in good
physical condition.
-
third parties.
-
ence of alcohol, drugs or medication.
15. Work gloves of stout leather are part of the
basic equipment of the hedge trimmer and
must always be worn when working with it.
Also wear sturdy shoes with anti-skid soles.
16. Before starting work check to make sure
that the trimmer is in good and safe working
hedge trimmer must not be used unless fully
assembled.
17. Make sure you have a secure footing before
starting operation.
18.
Do not operate the tool at no-load
unnecessarily.
20.
the battery cartridge if the cutter should come
into contact with a fence or other hard object.
Check the cutter for damage, and if damaged
repair immediately.
21. Before checking the cutter, taking care of
faults, or removing material caught in the cut-
the battery cartridge.
22.
cartridge before doing any maintenance work.
23. When moving the hedge trimmer to another
location, including during work, always
remove the battery cartridge and put the blade
cover on the cutter blades. Never carry or
transport the trimmer with the cutter running.
Never grasp the cutter with your hands.
Clean the hedge trimmer and especially the
cutter after use, and before putting the trimmer
into storage for extended periods. Lightly oil
the cutter and put on the cover. The cover sup-
-
trimmer.
25. Store the hedge trimmer with the cover on, in
a dry room. Keep it out of reach of children.
Never store the trimmer outdoors.
26. Never point the shear blades to yourself or
others.
27. If the blades stop moving due to the stuck of
foreign objects between the blades during
battery cartridge, and then remove the foreign
objects using tools such as pliers. Removing
-

14 ENGLISH
28. Avoid dangerous environment. Don't use the
tool in damp or wet locations or expose it to
rain. Water entering the tool will increase the
risk of electric shock.
cell may explode. Check with local codes for
possible special disposal instructions.
30. Do not open or mutilate the battery(ies).
Released electrolyte is corrosive and may
cause damage to the eyes or skin. It may be
toxic if swallowed.
31.
Do not charge battery in rain, or in wet locations.
32. Check the hedges and bushes for foreign
objects, such as wire fences or hidden wiring
before operating the tool.
SAVE THESE INSTRUCTIONS.
WARNING: DO NOT let comfort or familiarity
with product (gained from repeated use) replace
strict adherence to safety rules for the subject
product. MISUSE or failure to follow the safety
rules stated in this instruction manual may cause
serious personal injury.
Important safety instructions for
battery cartridge
1. Before using battery cartridge, read all instruc-
tions and cautionary markings on (1) battery
charger, (2) battery, and (3) product using
battery.
2. Do not disassemble or tamper with the battery
cartridge.
or explosion.
3. If operating time has become excessively
shorter, stop operating immediately. It may
result in a risk of overheating, possible burns
and even an explosion.
If electrolyte gets into your eyes, rinse them
out with clear water and seek medical atten-
tion right away. It may result in loss of your
eyesight.
5. Do not short the battery cartridge:
(1) Do not touch the terminals with any con-
ductive material.
(2) Avoid storing battery cartridge in a con-
tainer with other metal objects such as
nails, coins, etc.
(3) Do not expose battery cartridge to water
or rain.
A battery short can cause a large current
breakdown.
6. Do not store and use the tool and battery car-
tridge in locations where the temperature may
reach or exceed 50 °C (122 °F).
7. Do not incinerate the battery cartridge even if
it is severely damaged or is completely worn
8. Do not nail, cut, crush, throw, drop the battery
cartridge, or hit against a hard object to the
battery cartridge.
Do not use a damaged battery.
10. The contained lithium-ion batteries are subject
to the Dangerous Goods Legislation require-
ments.
forwarding agents, special requirement on pack-
-
ing an expert for hazardous material is required.
national regulations.
around in the packaging.
11. When disposing the battery cartridge, remove
it from the tool and dispose of it in a safe
place. Follow your local regulations relating to
disposal of battery.
12. Use the batteries only with the products
-
13. If the tool is not used for a long period of time,
the battery must be removed from the tool.
During and after use, the battery cartridge may
take on heat which can cause burns or low
temperature burns. Pay attention to the han-
dling of hot battery cartridges.
15. Do not touch the terminal of the tool imme-
diately after use as it may get hot enough to
cause burns.
16. Do not allow chips, dust, or soil stuck into the
terminals, holes, and grooves of the battery
cartridge.
17. Unless the tool supports the use near
high-voltage electrical power lines, do not use
the battery cartridge near high-voltage electri-
cal power lines.
18. Keep the battery away from children.
SAVE THESE INSTRUCTIONS.
CAUTION: Only use genuine Makita batteries.
charger.
Tips for maintaining maximum
battery life
1. Charge the battery cartridge before completely
discharged. Always stop tool operation and
charge the battery cartridge when you notice
less tool power.
2.
Never recharge a fully charged battery cartridge.
Overcharging shortens the battery service life.
3.
Charge the battery cartridge with room tempera-
ture at 10 °C - 40 °C (50 °F - 104 °F). Let a hot
battery cartridge cool down before charging it.
When not using the battery cartridge, remove
it from the tool or the charger.
5. Charge the battery cartridge if you do not use
it for a long period (more than six months).

15 ENGLISH
FUNCTIONAL
DESCRIPTION
CAUTION: Always be sure that the tool is
before adjusting or checking function on the tool.
Using the tool as cordless hedge
trimmer/grass shear
For DUM604
For DUH202
Installing or removing battery
cartridge
CAUTION:
installing or removing of the battery cartridge.
CAUTION: Hold the tool and the battery car-
cartridge.
Fig.1: 1. Red indicator 2. Button 3.
CAUTION: Always install the battery cartridge
fully until the red indicator cannot be seen. If not,
CAUTION: Do not install the battery cartridge
forcibly.
Indicating the remaining battery
capacity
Only for battery cartridges with the indicator
Fig.2: 1. Indicator lamps 2.
-
light up for a few seconds.
Indicator lamps Remaining
capacity
Lighted Blinking
75% to 100%
50% to 75%
25% to 50%
0% to 25%
Charge the
malfunctioned.
NOTE: Depending on the conditions of use and the
NOTE:
Tool / battery protection system
Overload protection
Overheat protection
Overdischarge protection
Switch action
WARNING: Before installing the battery car-
tridge into the tool, always check to see that the
switch trigger actuates properly and returns to
the "OFF" position when released.
WARNING: For your safety, this tool is
the tool from unintended starting. Never use the
tool if it starts when you pull the switch trigger
Makita Service Center for repairs.

16 ENGLISH
WARNING: Never disable the lock function or
NOTICE: Do not pull the switch trigger forcibly
The switch
Fig.3: 1. Switch trigger 2.
switch trigger. Release the switch trigger to stop. The
left side.
Indicator lamp
-
Fig.4: 1. Indicator lamp
Lamp status and action to be taken
Indicator lamp Status
red.
The remaining
is low.
The lamp lights up
red. *
The tool has
the remaining
The tool has
stopped due to
overload.
* The time at which the indicator lamp lights up varies depending
-
tridge conditions.
Adjusting the shearing height (for
grass shear)
CAUTION: When changing the shearing
height, be sure to attach the blade cover and be
grass receiver.
the grass receiver. The shearing height without the
1. Slide the grass receiver toward the front of the
tool.
Fig.5: 1.
2.
moving it in the direction of the arrow.
Fig.6
NOTE: The shearing height value is a guideline. The
condition of the lawn or the ground.
NOTE:
ASSEMBLY
CAUTION: Always be sure that the tool is
before carrying out any work on the tool.
CAUTION: When replacing the shear blades,
always wear gloves and attach the blade cover so
that your hands and face do not directly contact
the blades.
NOTICE: When replacing the shear blades, do
Installing or removing the blade cover
CAUTION: Be careful not to touch the blades
when installing or removing the blade cover.
in reverse.
Fig.7
Installing or removing the grass receiver
CAUTION: When installing or removing the
grass receiver, be sure to attach the blade cover
the tool and grass receiver.
Removing the grass receiver
1. Release the protrusions on the grass receiver
from the grooves on the tool while sliding the grass
receiver toward the front of the tool.
Fig.8: 1.
2. Release the hinge of the grass receiver from the
tool.
Installing the grass receiver
1. Hook the hinge of the grass receiver on the groove
of the tool.
Fig.9: 1. Hinge 2.
2.
toward the front of the tool and moving it in the direction
of the arrow.
Fig.10
NOTICE: Do not attach the hinge of the grass
receiver to the tool forcibly after aligning the pro-
trusions on the grass receiver with the grooves
on the tool.
Installing or removing the shear
blades for grass shear
NOTICE: If the parts other than the shear blades
such as the crank are worn out, ask Makita
Authorized Service Centers for parts replacement
or repairs.

17 ENGLISH
Removing the shear blades
1. Remove the grass receiver and place the tool
upside down.
Fig.11
2. While pressing the lock lever, turn the undercover
counterclockwise until on the undercover is aligned
with on the lock lever.
Fig.12
3.
Fig.13: 1. Undercover 2.3. Crank
Installing the shear blades
1.
Fig.14: 1. Crank 2. Undercover 3.
2.
Fig.15
3.
the alignment line.
Fig.16: 1.
4.
and large rounds facing up.
Fig.17: 1. Crank
5.
are lined up.
Fig.18
6.
Fig.19
7. on the under-
cover is aligned with on the lock lever.
Fig.20
8. While pressing the undercover, turn the under-
cover clockwise until on the undercover is aligned
with on the lock lever.
Fig.21
9.
the undercover.
Fig.22: 1. Lock lever
CAUTION: Never use the tool without install-
ing the undercover.
10.
NOTICE: If the shear blades do not operate prop-
erly, the blades are not engaging the crank prop-
erly. Remove the blades and install them again.
Installing or removing shear blades
for hedge trimmer
CAUTION: Attach the blade cover before
removing or installing the shear blades.
NOTICE: If the parts other than the shear blades
such as the crank are worn out, ask Makita
Authorized Service Centers for parts replacement
or repairs.
Removing the shear blades
1.
Fig.23
2. While pressing the lock lever, turn the undercover
counterclockwise until on the undercover is aligned
with on the lock lever.
Fig.24
3. Remove the undercover.
Fig.25
4. Loosen two screws with a screwdriver and remove
Fig.26: 1. Screws
NOTE:
removing the screws.
5.
Fig.27: 1. Crank
NOTE:
NOTE:
Installing shear blades
1.
Fig.28: 1. Crank 2. Undercover 3.
2.
Fig.29
3.
the alignment line.
Fig.30: 1.
4.
large rounds facing down.
Fig.31: 1. Crank
5.
Fig.32
6.
Fig.33: 1. Claw

18 ENGLISH
7.
Fig.34: 1. Screws
8. on the under-
cover is aligned with on the lock lever.
Fig.35
9. While pressing the undercover, turn the under-
cover clockwise until on the undercover is aligned
with on the lock lever.
Fig.36
10.
the undercover.
Fig.37: 1. Lock lever
CAUTION: Never use the tool without install-
ing the undercover.
11.
NOTICE: If the shear blades do not operate prop-
erly, the blades are not engaging the crank prop-
erly. Remove the blades and install them again.
Installing or removing the chip receiver
Optional accessory
CAUTION: When installing or removing the
chip receiver, always wear gloves and attach the
blade cover so that your hands and face do not
directly contact the blade.
The chip receiver gathers discarded leaves and makes
either side of the tool.
To install the chip receiver, press it against the shear
Fig.38: 1. Hooks 2. Holes
sides to release the hooks.
Fig.39: 1. Levers
NOTICE: Never try to remove the chip receiver
by an excessive force with its hooks locked in the
holes of the blades.
OPERATION
WARNING: Before shearing, clear away sticks
and stones from the shearing area. Furthermore,
clear away any weeds from the shearing area in
advance.
Fig.40
WARNING: Keep hands away from blades.
CAUTION: Avoid operating the tool in very
hot weather as much as practicable. When operat-
ing the tool, be careful of your physical condition.
Shearing (for grass shear)
Fig.41
Fig.42
Fig.43
NOTICE: Do not use the tool in a way that causes
the motor to stop or to rotate extremely slowly.
NOTICE: Do not attempt to cut thick branches.
NOTICE: Do not allow the shear blades to con-
tact the ground during operation. The blades will
be dulled, causing poor performance.
NOTICE: Do not trim the wet grass or foliage of
small trees.
Cutting long lawn
Fig.44
NOTE: Cutting long grass to a short length all at once
Trimming (for hedge trimmer)
CAUTION: Be careful not to accidentally
contact a metal fence or other hard objects while
trimming.
CAUTION: Be careful not to allow the shear
blades to contact the ground.
CAUTION: Overreaching with a hedge trim-
mer, particularly from a ladder, is extremely
dangerous.
NOTICE: Do not attempt to cut branches thicker
than 10 mm in diameter with the tool.
Fig.45: (1) Cutting height (2) 10 cm
NOTICE: Do not cut down dead trees or similar
hard objects.
NOTICE: Do not trim the grass or weeds while
using the shear blades.
tangled in the grass or weeds.

19 ENGLISH
Hold the tool with one hand, pull the switch trigger while
Fig.46
Fig.47
To tie a string at the desired height and to trim along it
Fig.48
-
carded leaves and makes clean-up afterward much easier.
Fig.49
-
wood or rhododendron, etc.), trim from the root to the
Fig.50
MAINTENANCE
CAUTION: Always be sure that the tool is
before attempting to perform inspection or
maintenance.
Cleaning the tool
NOTICE: Never use gasoline, benzine, thinner,
alcohol or the like. Discoloration, deformation or
cracks may result.
Blade maintenance
Before the operation or once per hour during operation,
-
Fig.51
Fig.52
Fig.53
Fig.54
NOTICE: Do not wash the blades in water. Doing
NOTICE: Dirt and corrosion cause excessive
blade friction and shorten the operating time per
battery charge.
Storage
-
ing the tool from a nail or screw on the wall.
of children. Store the tool in a place not exposed to
moisture or rain.
Fig.55: 1. Hole
Fig.56: 1. Hole
OPTIONAL
ACCESSORIES
CAUTION: These accessories or attachments
are recommended for use with your Makita tool
accessories or attachments might present a risk of
for its stated purpose.
-
Center.
• Long handle attachment (for grass shear use)
• Chip receiver (for hedge trimmer use)
• Storage case
NOTE:

20 FRANÇAIS
FRANÇAIS (Instructions originales)
SPÉCIFICATIONS
DUM604 avec lame de cisaille pour taille-herbes installée
Modèle : DUM604
Largeur de coupe 160 mm
2 500 min-1
Dimensions
(L x l x H)
353 mm x 177 mm x 131 mm
Tension nominale 18 V CC
1,5 à 1,8 kg
DUH202 avec lame de cisaille pour taille-haie installée
Modèle : DUH202
Longueur de la lame 200 mm
2 500 min-1
Dimensions
(L x l x H)
528 mm x 120 mm x 131 mm
Tension nominale 18 V CC
1,5 - 1,8 kg
Batterie et chargeur applicables
Batterie
Chargeur
DC18SH
•
AVERTISSEMENT : N’utilisez que les batteries et les chargeurs répertoriés ci-dessus. L’utilisation
Source d’alimentation connectée par cordon recommandée
-
•
Symboles
Lire le mode d’emploi.
la lame.
Tenez les personnes à l’écart.
Les dispositifs de coupe continuent de
tourner une fois le moteur coupé.
Ne pas exposer à l’eau.
Other manuals for DUM604
9
This manual suits for next models
6
Table of contents
Languages:
Other Makita Trimmer manuals

Makita
Makita LXT XRU16 Series User manual

Makita
Makita DUR142L Manual

Makita
Makita DUH606 User manual

Makita
Makita XRU24 User manual

Makita
Makita 3711 User manual

Makita
Makita EM2500U User manual

Makita
Makita DUR141 User manual

Makita
Makita 3709 User manual

Makita
Makita HTR4901 User manual

Makita
Makita DUR193 User manual

Makita
Makita UR012GT201 User manual

Makita
Makita EM4250 User manual

Makita
Makita XRU15 User manual

Makita
Makita UR012G User manual

Makita
Makita EM4351UH User guide

Makita
Makita DUR194SFX2 User manual

Makita
Makita DUR368L User manual

Makita
Makita GRU01 User manual

Makita
Makita UR002G User manual

Makita
Makita RPT250 User manual