hergom SAJA 7 User manual
1
INSTRUCTIONS BOOK FOR INSTALLATION,
MAINTENANCE AND USE
COMPLETE RANGE COOKER
SAJA Mod.
Edition date: 10/09/04
Code: C02230

2
IMPORTANT NOTICE
INDUSTRIAS HERGÓM, S.A., does not take any responsibi ity whatsoever for the
damages caused by or resu ting from a terations to its products that have not been
authoresed in writing or for defective insta ations.
Furthermore, it reserves the right to modify its finished products without prior
warning.
Industrias Hergóm, S.A., with registered offices in Soto de a Marina – Cantabria – Spain,
offers a TWO-YEAR warranty for a its products.
The geographica coverage for this warranty on y inc udes the countries in which
Industrias Hergóm, S.A. has a subsidiary company or an officia importer that carry out the
distribution of its products and where the Community Directive 1999/44/EC is ob igatory.
The warranty wi come into force as from the date of the purchase of the product stated on
the warranty card and on y covers the damages or breakages due to manufacturing defects
or fau ts.
WELCOME to the HERGÓM family.
We would like to thank you for the distinction you have made by choosing our
HERGÓM SAJA mod. cooker, which represents a great advance on classic coal
and wood-burning cookers in terms of technique and style.
We are sure your new cooker will give you satisfaction on many occasions, which
is the greatest attraction of our equipment.
Possessing a HERGÓM SAJA mod. cooker is the sign of an exception sense of
quality.
Please read all of the manual. Its aim is to familiarise you with your cooker,
indicating standards for its installation, operating and maintenance that will be
very useful to you. Please keep it and consult when necessary. If after reading
this manual you require any further information, please do not hesitate to contact
your normal supplier or to call the factory directly.

3
CONTENTS
Chapter Page
I.- PRESENTATION.......................................................................
II.- INSTALLATION.........................................................................
A.- Chimneys.
1.- How chimneys work
2.- Creosote formation and cleaning
3.- Options
4.- Connecting the chimney
5.- Some standards
III.- MOUNTING...............................................………….…………
1.- Connecting the oven light.
A.- Light replacement
2.-Fitting the handrail
IV.- OPTIONAL ACCESSORIES.................................................
V.- HANDLING INSTRUCTIONS………………………………..
1.- Lighting for the first time
VI.- CLEANING AND MAINTENANCE……………………………..
1.- The front and frame of the enamelled hob
2.- The ceramic hob.
3.- The polished hob with rings
4.- The cinders
VII.- SAFETY ………………………………….…..…………….
VIII.- PRODUCTS FOR PRESERVATION..........................
IX .- COOKER ACCESSORIES................................................
X.- TECHNICAL DATA...............................................................
3
4
10
11
12
13
14
15
15
18
4
I.- PRESENTATION
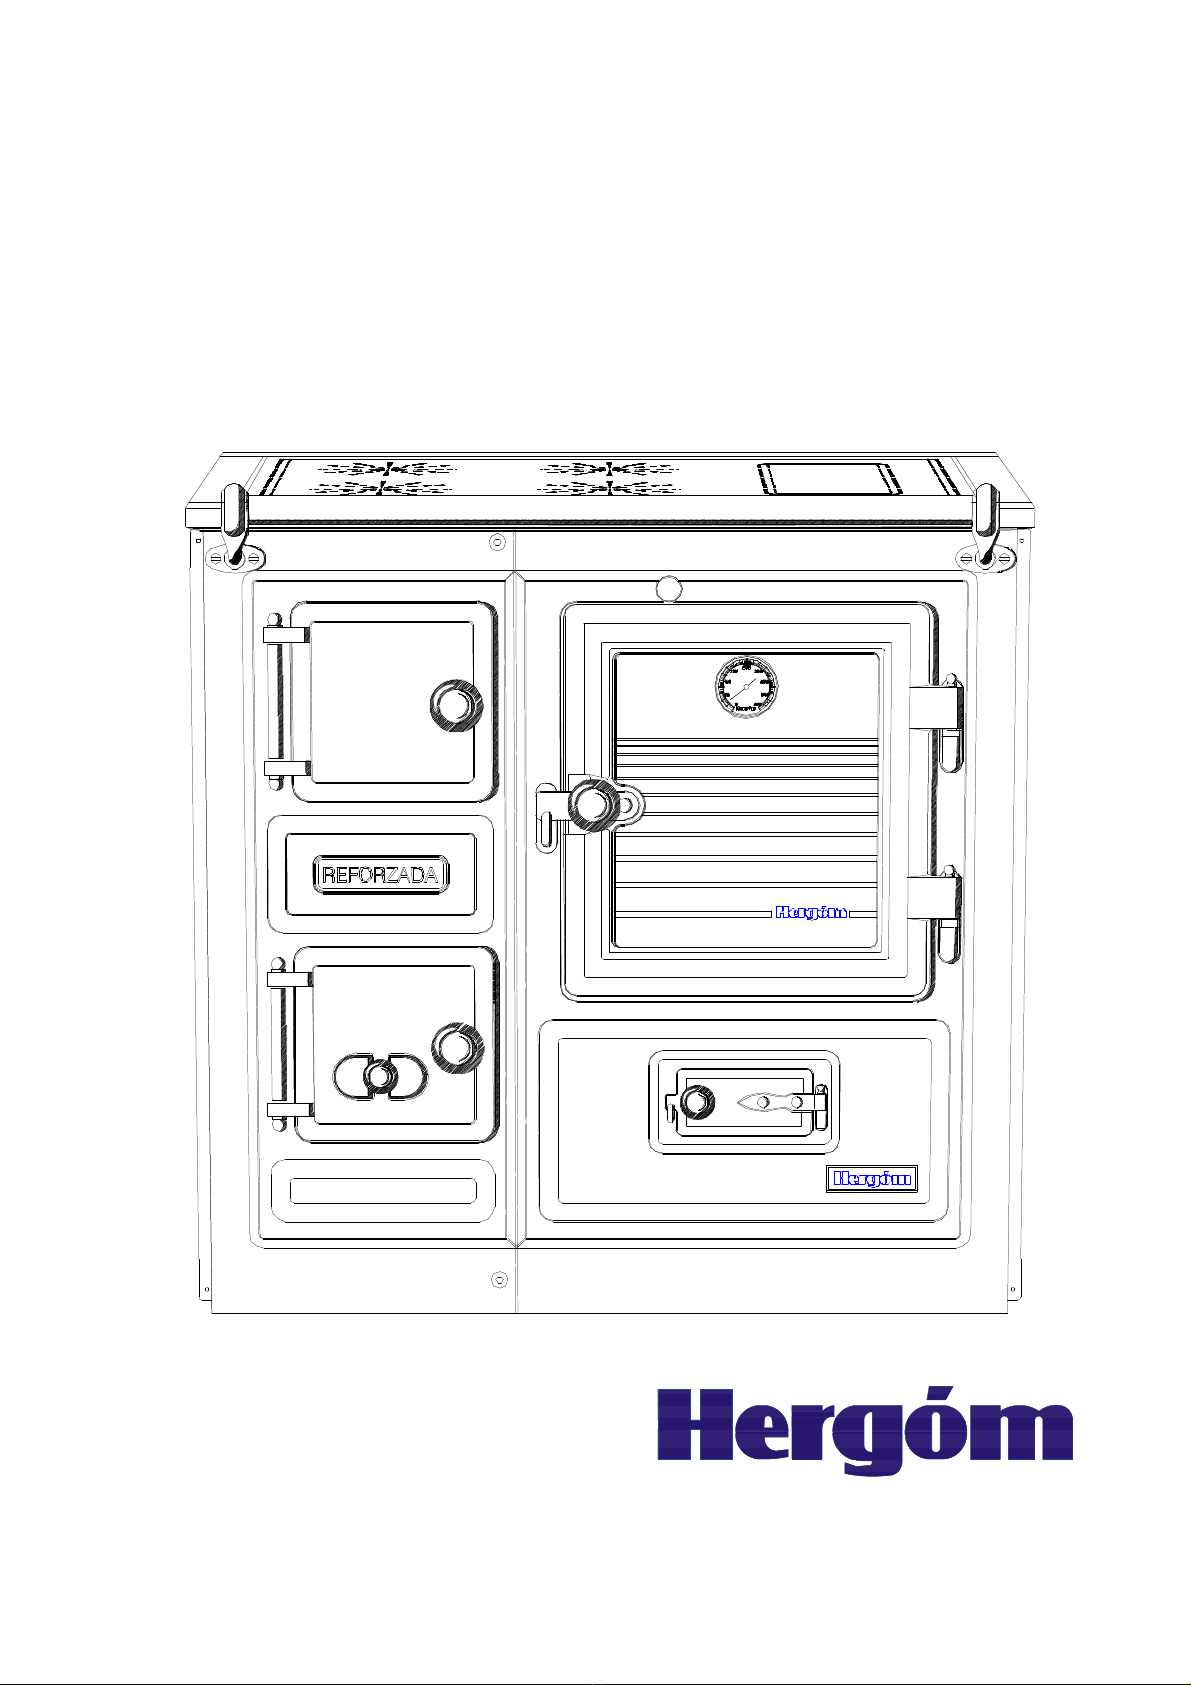
This cooker is supplied in two different sizes: Models SAJA 7 and SAJA 8.
In all models, the front of the cooker is made of cast iron, enamelled in vitrified porcelain,
and the fittings and controls are in polished cast brass with an enamelled ceramic
decoration.
Hobs:
Polished cast iron with rings or ceramic glass. With a black enamelled steel frame in both
cases.
Oven door with silk-screened glass and internal oven light with external connection.
Direct draught vent for easier lighting.
Fig.-1

5
II.- INSTALLATION
The form of installing the range cooker will decisively influence its safety and
correct working order.
It is very important for it to be well installed.
To ensure a correct installation, we recommend it be done by a professional.
A.- Chimneys.
The working order of the range cooker depends on:
a) The chimney.
b) The form of operating with it
c) The quality of the fuel used.
After years of use, you may change the type of fuel, although once the chimney is
installed in a particular spot, it is not easy to modify it or change its place.
Therefore, the following information will help you decide whether you can make us
of the existing chimney or not, or whether to decide to build a new one.
This information will help you to make the correct decision.
1.- How chimneys work
Basic knowledge of how chimneys work will help you to make the most of your
SAJA mod. cooker.
The function of the chimney is:
a) To evacuate the smoke and gases safely to the outside of the house.
b) To provide enough draught in the fireplace for the fire to remain lit.
What is draught?
The tendency of the hot air to rise creates draught.
When the range cooker is lit, the hot air rises up the chimney and goes outside.
The chimney flue heats up and keeps the draught. Until the range cooker and the chimney
are hot, the draught will not work properly.
The location, size and height of the chimney affect its draught.
The following must be taken into account:
- Chimneys located inside the home keep warm and, therefore, the draught is
greater.
- The chimney size recommended by the manufacturer maintains a good draught.
- The height of the chimney affects the draught:
greater height ⇒better draught
The chimney must stand out by at least one metre above the highest part of the
roof.
Other factors affect the draught:

6
- Houses with extremely good indoor insulation, without air currents: with no air
entering the stove, the draught is affected. This is correct by sending air from outside to
the range cooker.
- Trees and/or tall buildings close to the home hinder the draught.
- The wind speed. Generally, persistently strong winds increase the draught,
although stormy winds may decrease the draught.
- Outside temperature. The colder it is outdoors, the better the draught.
- Barometric pressure. On rainy, humid or stormy days, the draught is generally
weak.
- Liveliness of the fire. The hotter the fire, the stronger the draught.
- Cracks in the chimney, badly sealed or dirty doors, air inlets through the tube
joints, other appliances connected to the chimney, etc. may produce unsuitable draughts.
2.- Creosote formation and cleaning
When wood is burned slowly, tars and other organic vapours are produced that,
when combined with atmospheric humidity, form creosote.
The creosote vapours can be condensed if the chimney walls are cold. If the
creosote catches alight, extremely hot fires may be caused.
Any accumulation of creosote must be removed.
Due to the accumulation of creosote depending on many variables, it is very
difficult to predict the moment at which the chimney must be cleaned.
A visual inspection is the safest way of knowing whether the chimney of your stove
is clean of creosote.
We therefore recommend installations to which access is easy.
3.- Options
If you are going to build a chimney for your HERGÓM SAJA mod. cooker, you
have two alternatives:
a) Brickwork chimneys.
b) Metal chimneys
Studies reflect that there is no great difference between metal and brickwork in
terms of draught. It is you who, according to each case, will choose one or another.
Whenever possible, place your chimney inside the home to obtain a better draught
and accumulate less creosote, leading to a longer working life.
The advantages of brick chimneys are:
a) The mass of bricks and tiles reduces the cooling of smoke in the
chimney.
b) The characteristics of the bricks in accumulating heat allows for the
house to remain warm for longer after the fire has been put out.
c) It may be built to individual tastes.
d) If it is well built, it may be more fire-resistant than metal chimneys.
Brickwork chimneys must be well lined to avoid smoke cooling.
They must be built using materials that withstand high temperatures and corrosion.
7
They may be round, square, etc. What matters is their size.
For brickwork chimneys for the HERGÓM SAJA mod. cooker, the measurements
indicated in the chapter titled TECHNICAL DATA must be respected.
The advantages of metal chimneys are:
a) Easy installation.
b) Slight changes in chimney direction can be made, leading to greater
flexibility in the choice of location for the range cooker.
c) Due to there being curved elbow joint, sharp edges that make draught
difficult are removed.
4.- Connecting the chimney
When connecting the cooker to the chimney, elbow joints and long horizontal
sections must be avoided as they make the draught difficult and favour the formation of
creosote and soot.
Ensure that the connection is made at an upwards slant.
The chimney must be connected with a metal tube of ∅150 or ∅175 mm.,
according to whether it is connected to the cast iron attachment ring on the inside or on
the outside.
It is extremely important to seal the attachment ring – tube connection using
plaster, refractory filler or any other suitable material to prevent air from entering the area.
The joints of the tubes forming the chimney, in the event of using simple metal
tubes, must be sealed using refractory filler.
Each tube must fit into the next to prevent any creosote from reaching the outside.
This rule must be following whenever wood or coal fuel is used.
5.- Some standards
Below are other standards that must be respected when building the chimney:
a) Use resistant and non-combustible materials. Do not fit cement
asbestos tubes on the first 2-3 metres.
b) Choose a route that is as vertical as possible. Do not connect various
appliances to the same chimney.
Fig.-2

8
c) Prevent the flue from ending in areas near to constructions and it must
exceed the closest peak in height, where there is an adjoining building.
Fig.-3
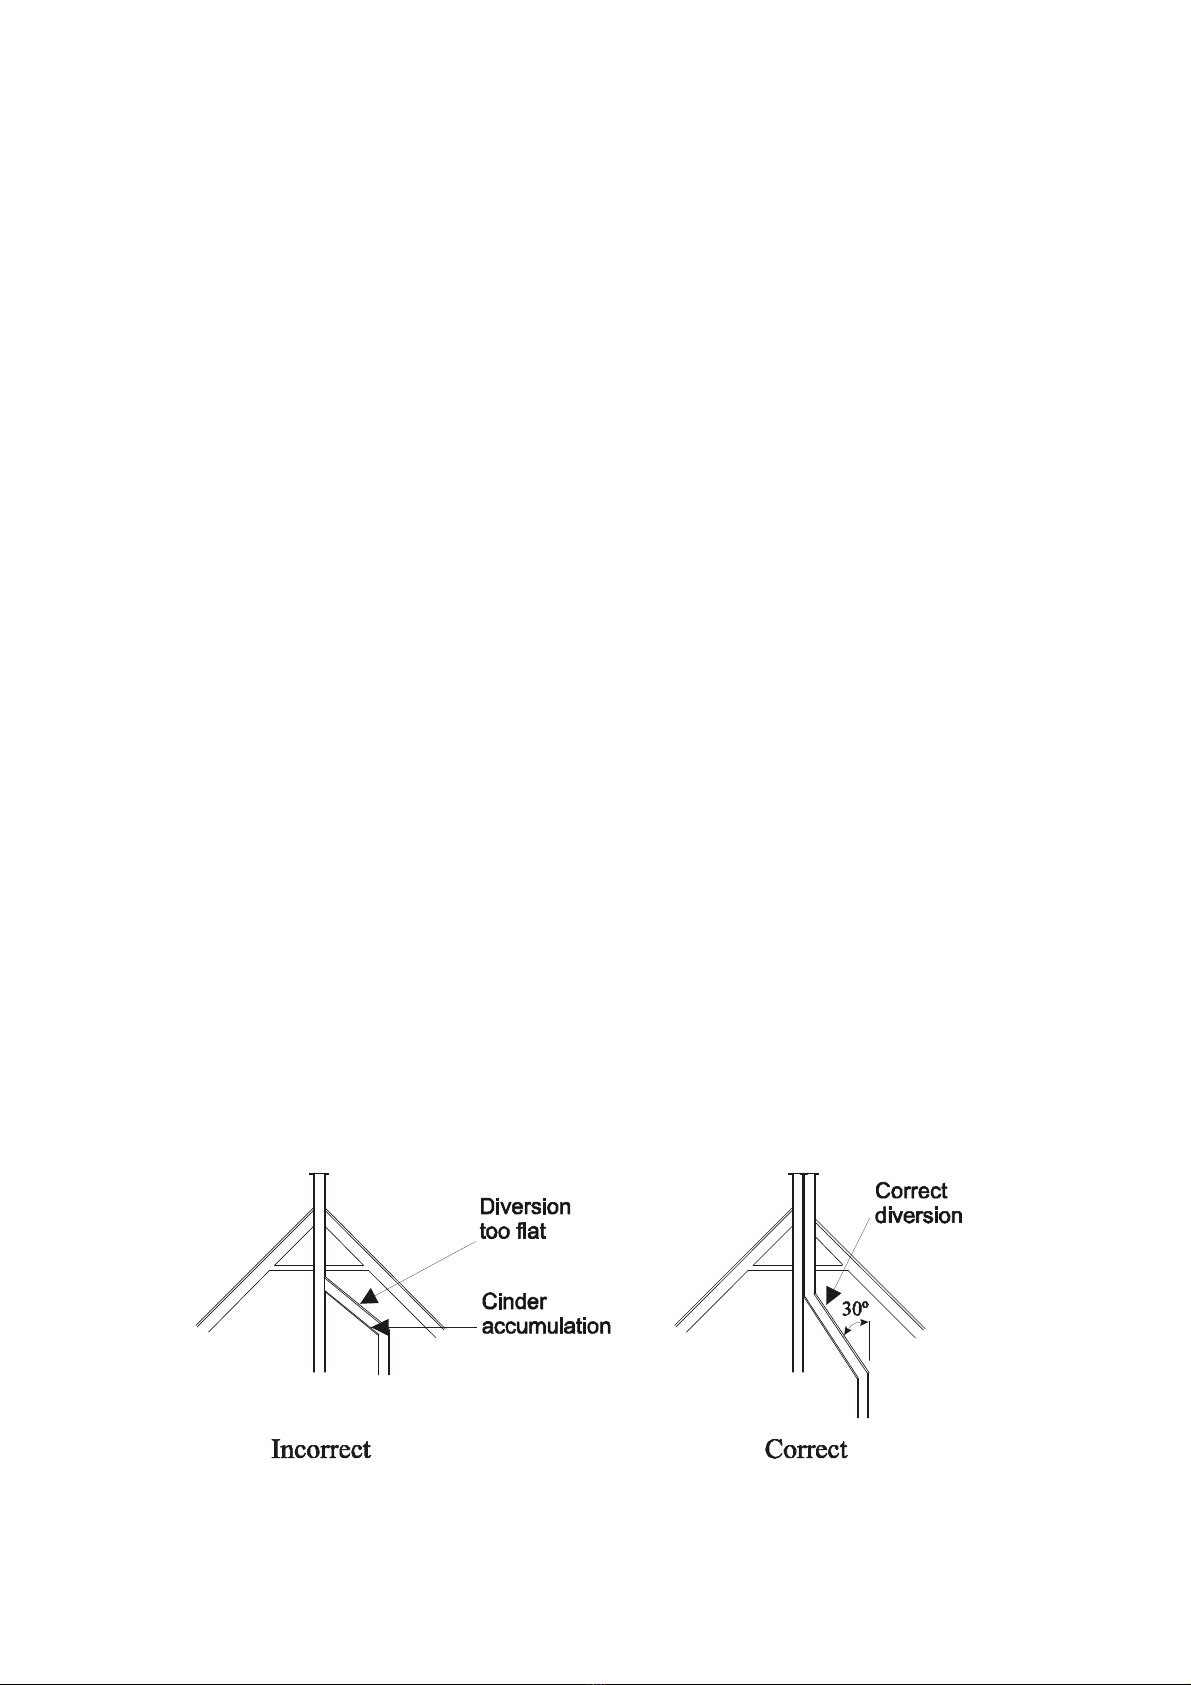
d) Choose a place that is most protected from cooling for the flue.
Where possible, the chimney must be on the inside of the house.
e) The inside walls must be perfectly smooth and free of obstacles. At
the joints of tubes with brick chimneys, avoid bottlenecks.
Fig.-4
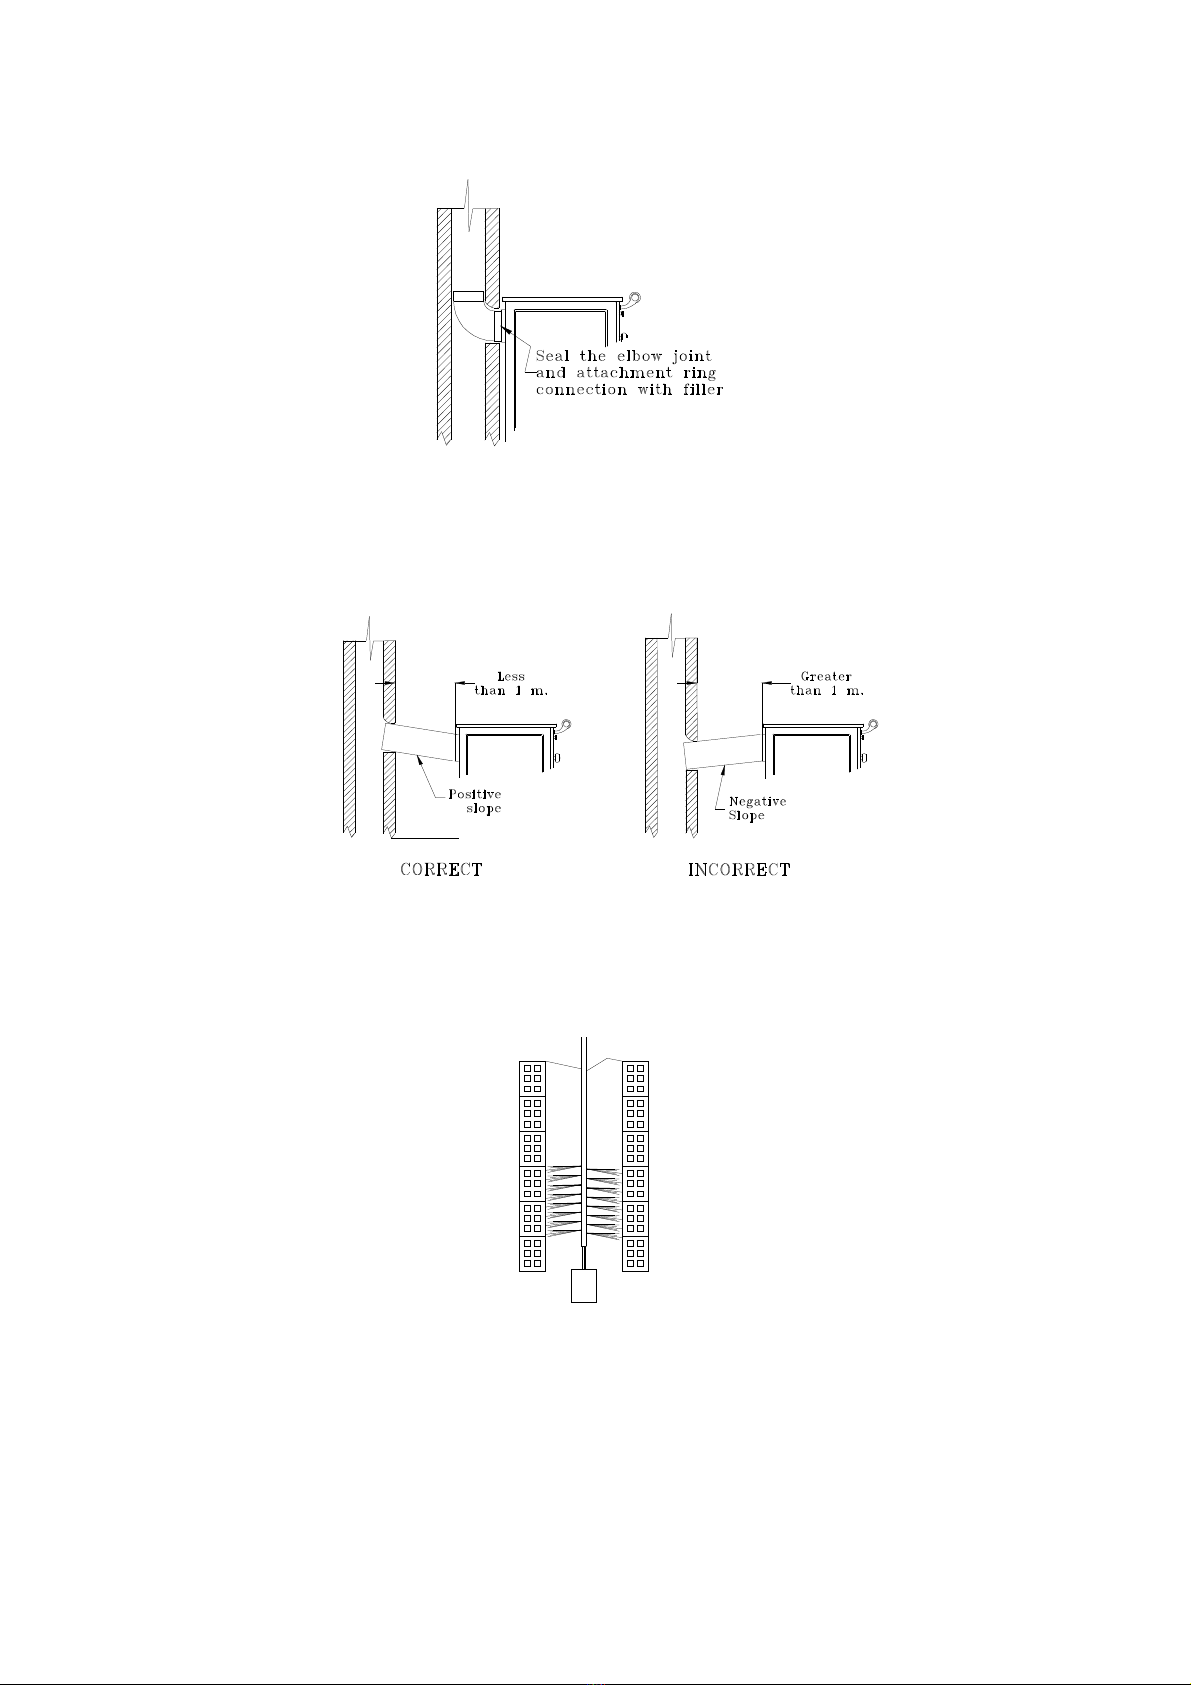
f) It is very important for the tube joints to be well sealed to cover
possible cracks that allow air to enter.
Fig.-5
9
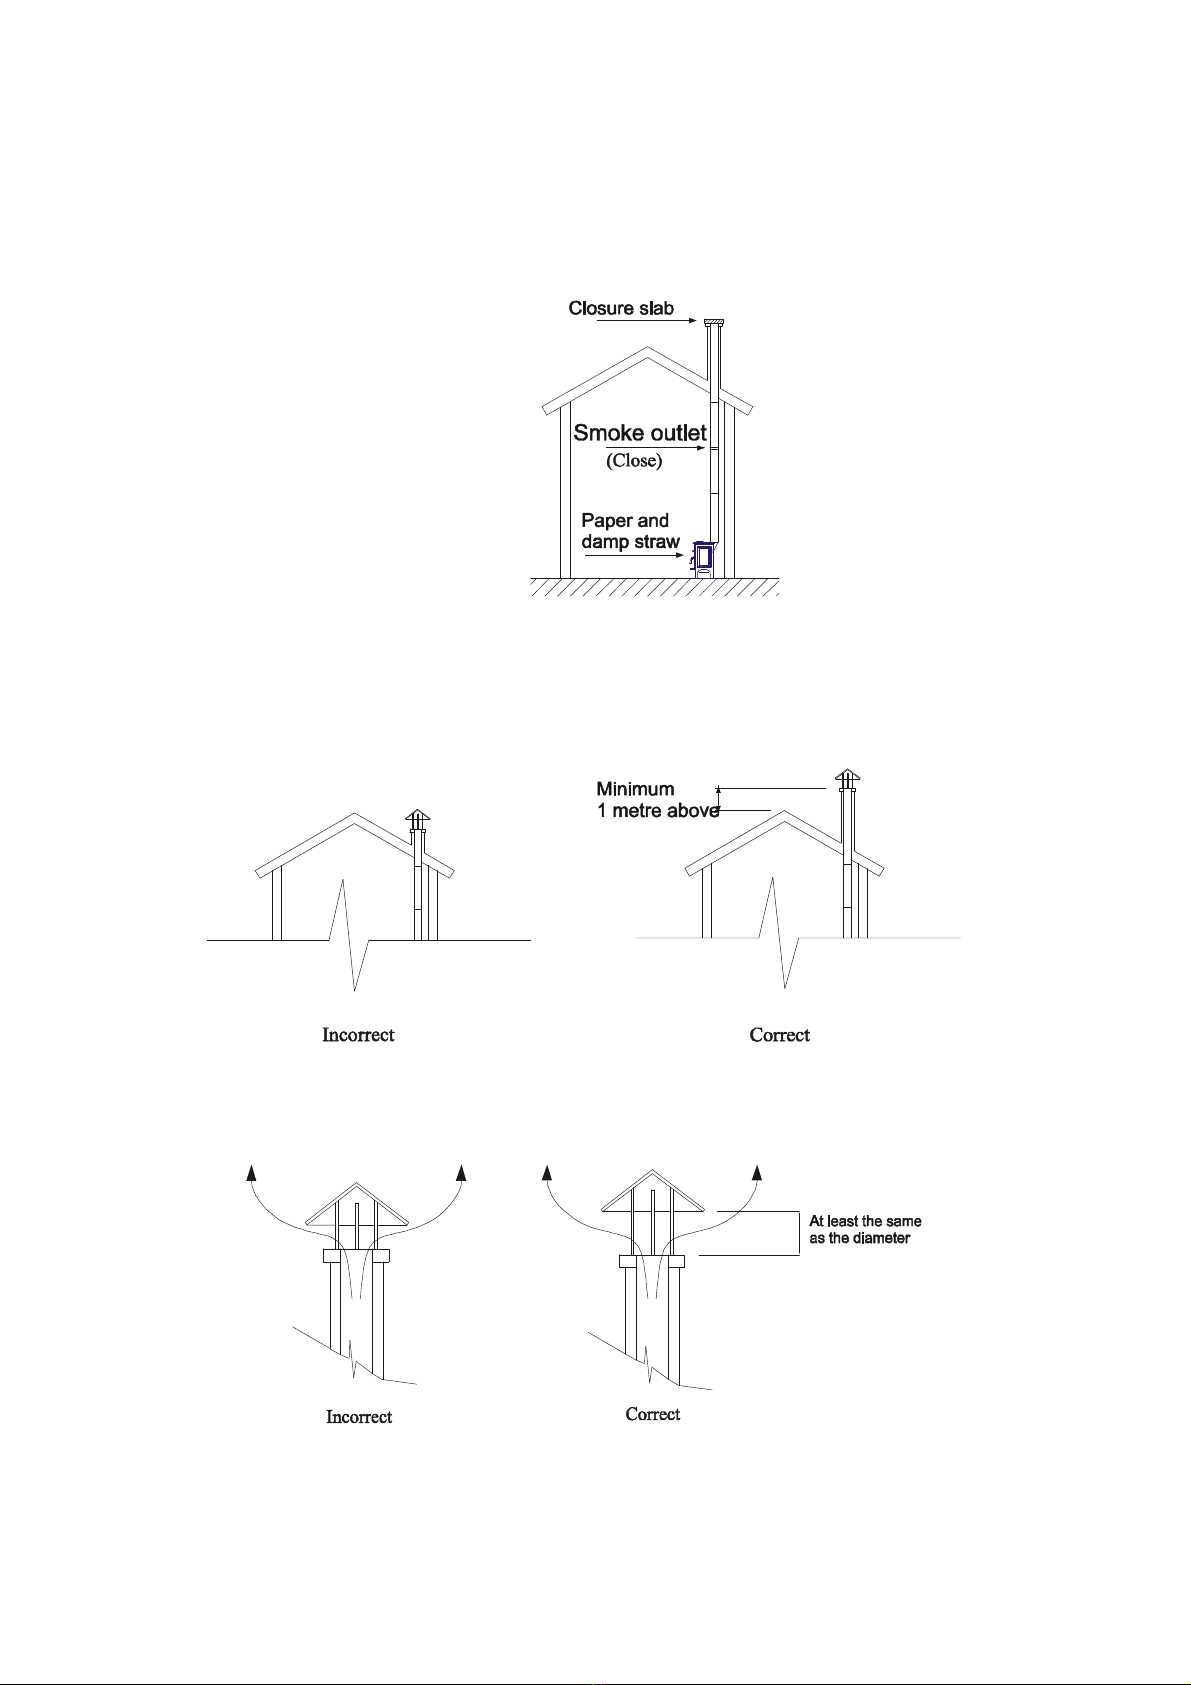
To check the chimney is airtight, proceed as follows:
- Block the hole on the roof.
- Introduce damp paper and straw into the chimney and light it.
- Check for possible cracks where the smoke escapes and seal them.
Fig.-6
g) It is very important for the chimney to stand out by more than one metre
from the highest part of the house. If the draught is to be increased, increase the height of
the chimney.
Fig.-7
h) The cowls must not hinder the draught.
Fig.-8
To ensure the perfect working order of its cookers, INDUSTRIAS HERGÓM, S.A.
Supp ies pipes, e bow pipes and adapters in different finish, to fit the measurements indicated
in the catalogue.
10
i) When the cooker is connected to a brickwork chimney, we recommend
you install a 90º elbow joint, ensuring that the connection is fully sealed.
Fig.-9
j) Avoid too much length in the connection between the cooker and the
chimney and a negative slope.
Fig.-10
k) Clean the chimney at least once a year.
Fig.-11
The most effective way of cleaning chimney flues is by using suitable chimney
brushes. There are chemical products that help delay the need for classic brush cleaning.
The brushes must be as tight fitting as possible to the chimney diameter.
k) The joints of the tubes forming the chimney, in the event of using simple
metal tubes, must be sealed using refractory filler.
l) The exterior metal chimneys must be built with special double heat-
resistant tubes for solid fuel.

11
III.- MOUNTING
Your SAJA cooker is fully assembled, except for connection of the oven light and
the handrail.
C.- Connecting the oven light
The oven light is fitted in your range cooker for direct connection to the mains.
In Fig. 12 is the wiring diagram and the material (within the dotted line) supplied by
HERGÓM.
The electrical unit supplied by HERGÓM is made up of the following parts:
- Light protected by a shade with a heat resistance of 550 ºC
- Silicon, heat-resistant cable with three terminals to connect to the light and
surrounding polyurethane cover.
- 40W incandescent bulb with heat resistance of 300ºC
The remaining parts comprising the electrical installation must be purchased by
you (Switch, cables, connections, etc...)
Light
Connection
box
three-pole silicone cable
whith polyurethane casing
GOODS SUPPLIED
Switch
N
F
220V
Yellow-green
Brown
Bleu
Fig.-12
Allow a sufficient length of cable to be able to remove and replace the installation
cable when work on it is required.
Before putting the cooker in place, check that the electrical installation works
properly.
A.- LIGHT REPLACEMENT
This operation is carried out on the inside of the oven.
Unscrew the light shade and remove the worn bulb (screw tip).
Replace it with another of the same thermal characteristics that can be bought
from specialist shops or from the supplier of your range cooker.
Do not forget to replace the protective shade.
12
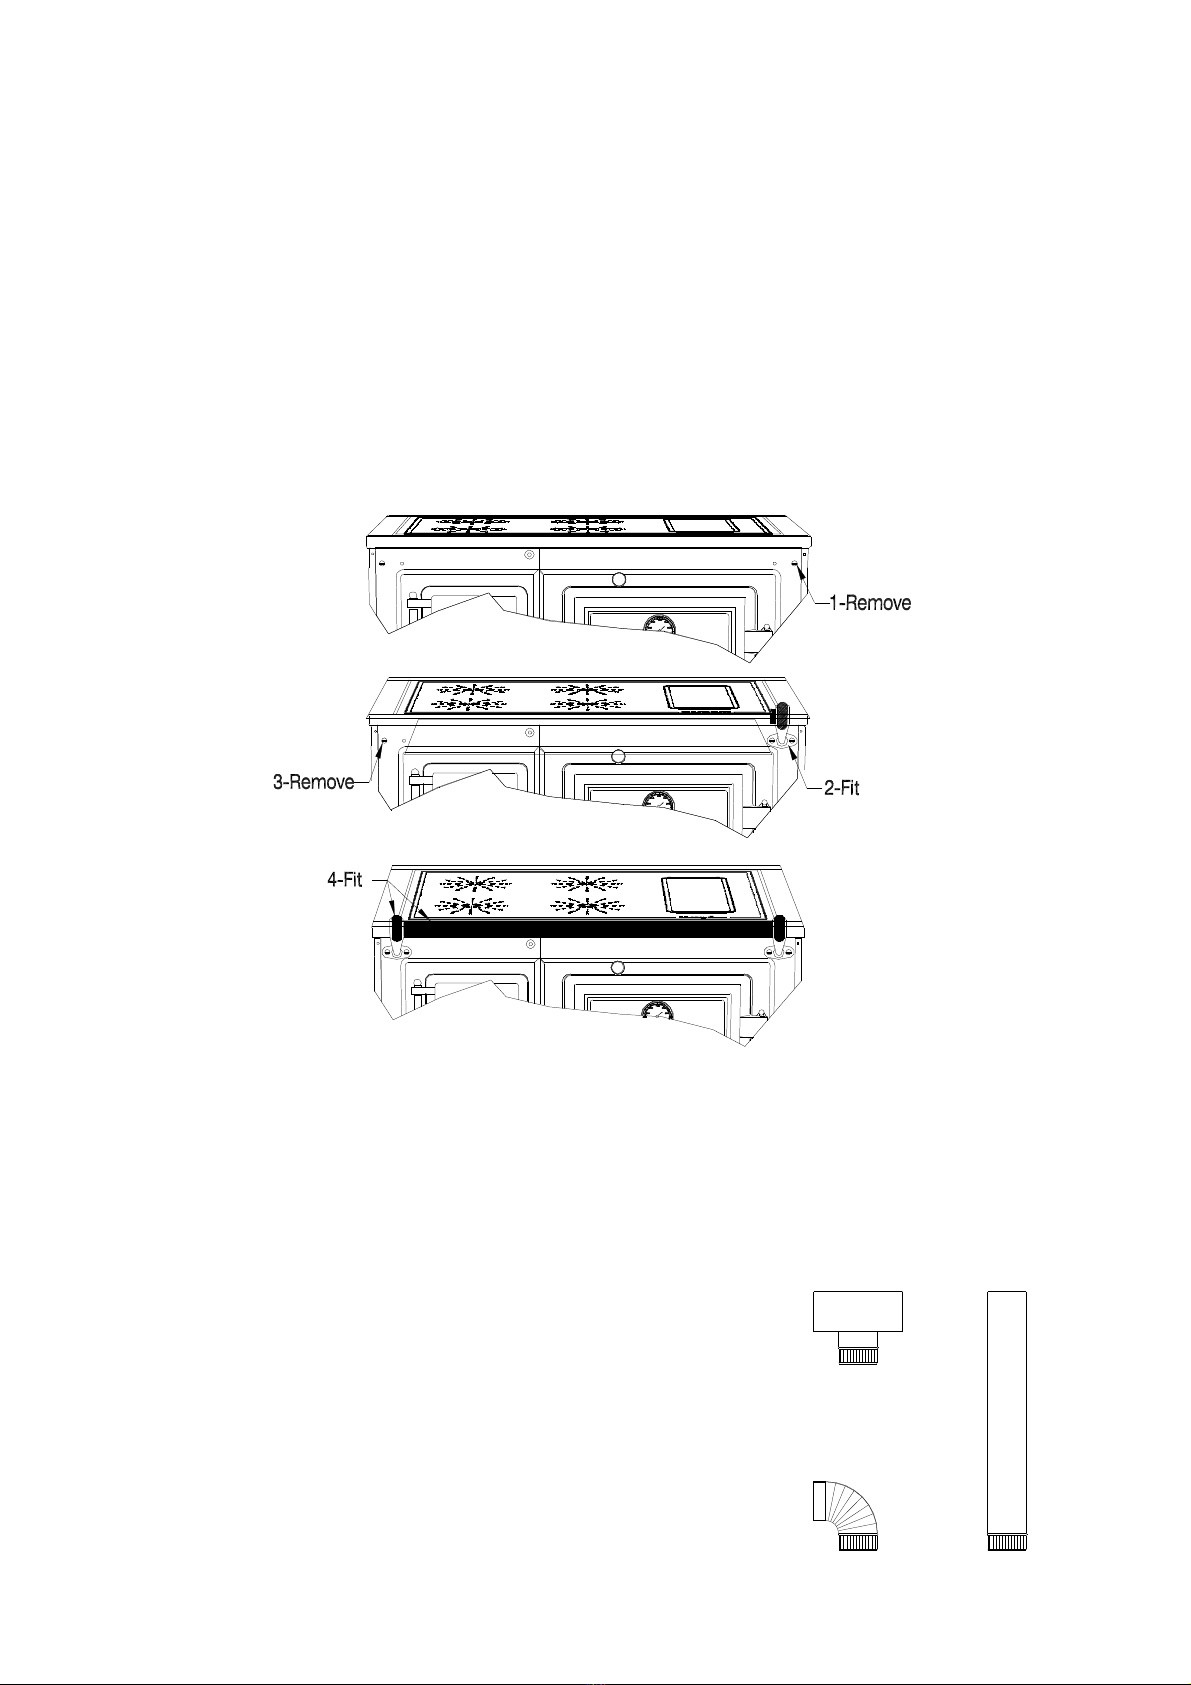
2.- Fitting the handrail
To fit the handrail, proceed as follows (Fig. 13):
1. Remove the right-hand screw securing the front of the cooker at the top.
2. Position the right-hand end of the handrail as indicated in the figure and
retighten the screw. Fit the other screw supplied and finally secure the end.
3. Remove the left-hand screw securing the front of the cooker.
4. Position the handrail and the left-hand end and retighten the screw. Fit the
other screw supplied and finally secure the handrail.
Fig.-13
IV .- OPTIONAL ACCESSORIES
HERGÓM supplies the following accessories
for this cooker:
Steel tubes in vitrified enamel.
Stainless steel tubes.
Elbow joints and cowls for chimney
construction.

13
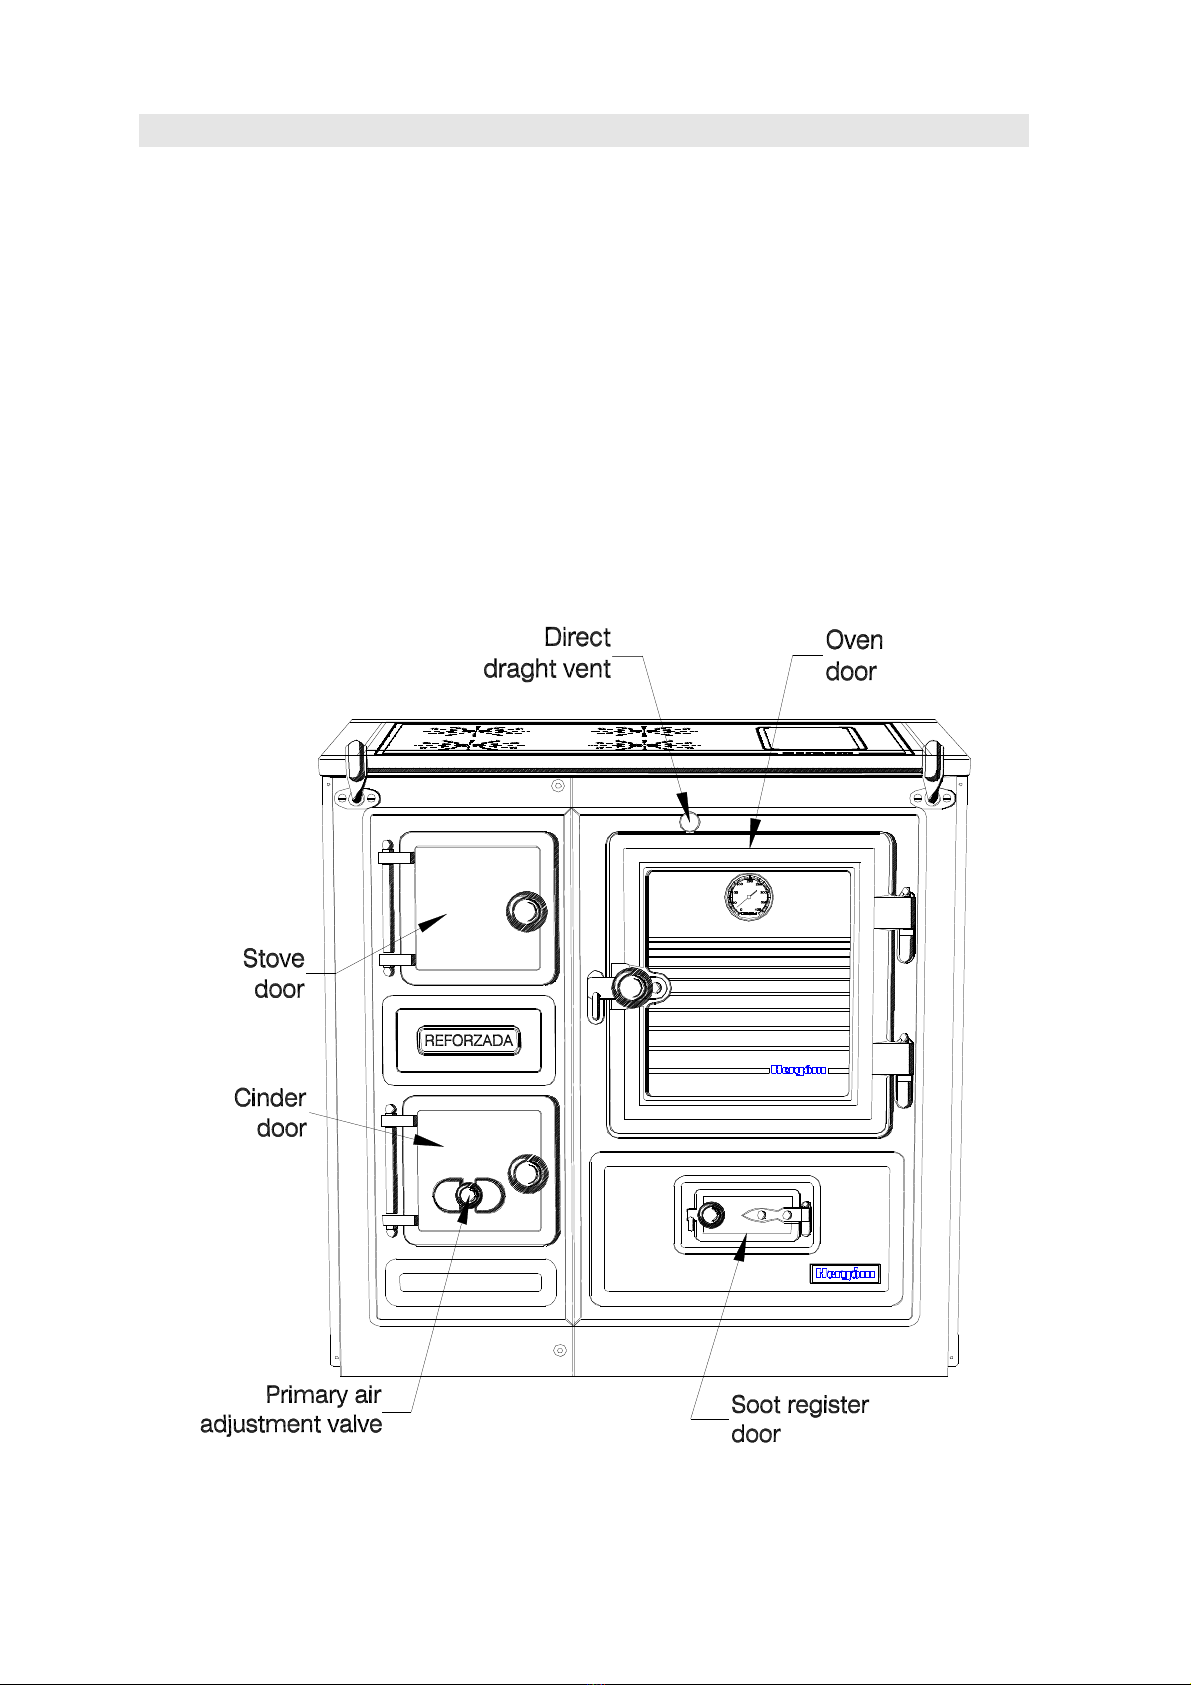
V.- HANDLING INSTRUCTIONS
Before using your cooker, please be aware of maintenance for the hob you have
purchased. The necessary advice is given in Chapter VI.
Each cooker is supplied with a set of stove utensils, comprising a hook to remove
the stove plate and a scrape to clean the cinder tray and the flue through the soot
register located underneath the oven.
Before lighting the cooker, check that the flue is perfectly clean to obtain good
draught.
When lighting the cooker, close the firewood door, open the primary air valve by
turning its knob and the direct draught vent by pulling the brass knob on the oven
door outwards.
When normal operating is achieved, close the direct draught vent by placing the
brass knob in its normal position.
Adjust the draught of your cooker using the primary air valve, bearing in mind that
when the draught is too open, as well as causing an inappropriate consumption of
coal or wood, the hob will heat up too much.
Never fill the stove completely with fuel or leave the cinder door open.
The recommended chimney draught is 1.5 mmca. For the best output of your
cooker and to avoid extremely strong combustion, a 12-hole grille is
supplied.
Once the cooker is installed, if it does not reach the appropriate operating
temperature, open more holes on the grate until a suitable draught is
achieved.
Always control the oven temperature of your cooker using the thermometer
located on the door. Should the temperature reach 250ºC (Yellow area of the
thermometer), do not add any more fuel, close the air entry valve of the
cinder tray and, where necessary, open the firewood-loading door to slow
down combustion.
Excessive heating of the cooker, detected by an oven temperature above
300ºC (Red area of the thermometer), may cause damage to the hob.
During annual cleaning, or whenever necessary, check the correct condition of the
cast iron protective plates located underneath the hob. Where necessary, change
it. This protective plate is simply fitted underneath the frame and its replacement
is a very simple operation.
Food preparation is quicker if any pans, frying pans and other utensils used have
perfectly flat bases.
1.- Lighting for the first time
The first time the fireplace is lit, it should be with a slow fire for 3 or 4 hours to
ensure the different parts are stabilised, thus avoiding any possible breakage.

14
VI.- CLEANING AND MAINTENANCE
1.- The front and frame of the enamelled hob
This must preferably be cleaned when the fireplace is cold, using cloths
slightly dampened in soapy water.
Avoid using strong detergents or abrasive products that may damage the
enamel.
2.- The ceramic hob.
Never clean the underneath of the Ceramic hob.
Clean the outside surface only with a scrape and suitable products for ceramic
hobs that are sold in supermarkets, hardware stores, department stores, etc.
Scrape:
This is used to remove any remains of food, splashes of grease, etc. when still hot
to prevent them from sticking more strongly to the surface when cooled.
The scrape must always be to hand.
Cleaning products
When the hob has cooled, a special cleaner for ceramic hobs may then be used,
applied with kitchen roll.
Then rinse using a damp cloth and dry with a clean cloth.
The use of sponges or other extremely absorbent cloths is not recommended as
the liquid part of the cleaning products are absorbed, leaving rough or very
concentrated elements on its surface that may cause scratching.
There are preserving products that leave a shiny protective layer against dirt.
Should remains of paper foil, plastic, sugar or other fast-melting products fall on
the surface of the hob, remove immediately while the hob is still hot using the
scrape to prevent the surface from being damaged.
Some materials from the bases of pans may leave a shiny metallic stain on the
Ceramic hob. Products are sold that solve these problems.
Limescale on the surface can also be removed, although this can be avoided if the
surfaces of pans are kept clean and dry.
If suitable cleaning products are used, the silk-screened decoration on the ceramic
hob will not wear.
Should stains or damage appear on it, this will only be due to products being used
that are not suitable for ceramic hobs.
Under no circumstances must metal sponges, scourers, knives or any other utensil
that may damage the Ceramic surface be used for cleaning.

15
Ensure that the pans used are specifically for Ceramic hobs and, where this is not
the case, ensure that the surface in contact with them contains no roughness or
damage that may scratch the surface.
3.- The polished hob with rings
To maintain the good appearance of this hob, clean it often with a detergent and
metal scourer.
Take care so as not to use the scourer on the Enamelled frame.
.
4.- The cinders
The special design of the oven using refractory material that ensure the maximum
use of the fuel ensures that a minimal amount of cinder is produced.
This implies that the cooker may be lit often without having to remove the cinder
from the stove.
When cinder removal is necessary, remove the grille from the stove and remove
the cinder from the tray. Empty the cinders into a metal container and immediately
remove from the house.
VII.- SAFETY
There are possible risks to be taken into account when operating your solid
fuel range cooker, whatever the brand.
These risks may be minimised if the instructions and recommendation
provided in this manual are followed.
Below are a series of standards and recommendations, although we
especially advise you to use your common sense.
1. Keep any combustible material (curtains, clothing, etc.) at a minimum
safety distance of 0.90 m.
2. Protect any nearby furniture with heat-resistant materials in the areas of
the hob and the smoke outlet.
3. Leave a 30-40 mm. gap between the furniture and the sides of the cooker
to allow air to circulate around it.
4. The cinders must be emptied into a metal container and immediately
removed from the house.
5. Never use liquid fuel to light your cooker.
Keep type of inflammable liquid (Petrol, oil, alcohol, etc). at a distance.
6. Make periodic inspections of the chimney and clean it whenever
necessary.
INDUSTRIAS HERGÓM, S.A. denies any responsibility derived from a defective installation or
from an incorrect use and reserves the right to modify its products without prior warning.
16
Fix
Sea
Responsibility for manufacturing defects will be subjected to the criteria and verification of
its technicians and, under all circumstances, will be limited to the repair or replacement of its
products, excluding any work or damage that said repair may cause.
VIII.- PRODUCTS FOR PRESERVATION
INDUSTRIAS HERGÓM S.A. supplies a series of products for the
preservation of its products:
- Refractory filler, to improve airtightness and sealing.
- Anti-soot, powerful catalyser that helps removal non-burnt waste.
- Lighting tables, a vital product when fast and clean lighting is required.
Glass cleaner, the ideal treatment for removing grease from the glass on
fireplaces, chimneys, etc.
IX .- COOKER ACCESSORIES
CAST IRON 90º ELBOW JOINT
Special ∅150 mm. elbow joint for chimneys to be built into brickwork.
Built in 2 sealed parts joined by screws.
Installation advice
Read the instruction book supplied with your cooker carefully,
particularly the chapter on chimney installation.
It is wise to seal the connection of the elbow joint with the
chimney well using refractory filler to prevent air from entering
the chimney and avoid the loss of draught.
To join the attachment ring to the cooker,
you can fix the elbow joint using the
M.5 attachment screws supplied
with it, merely by pressing them
against the attachment ring.
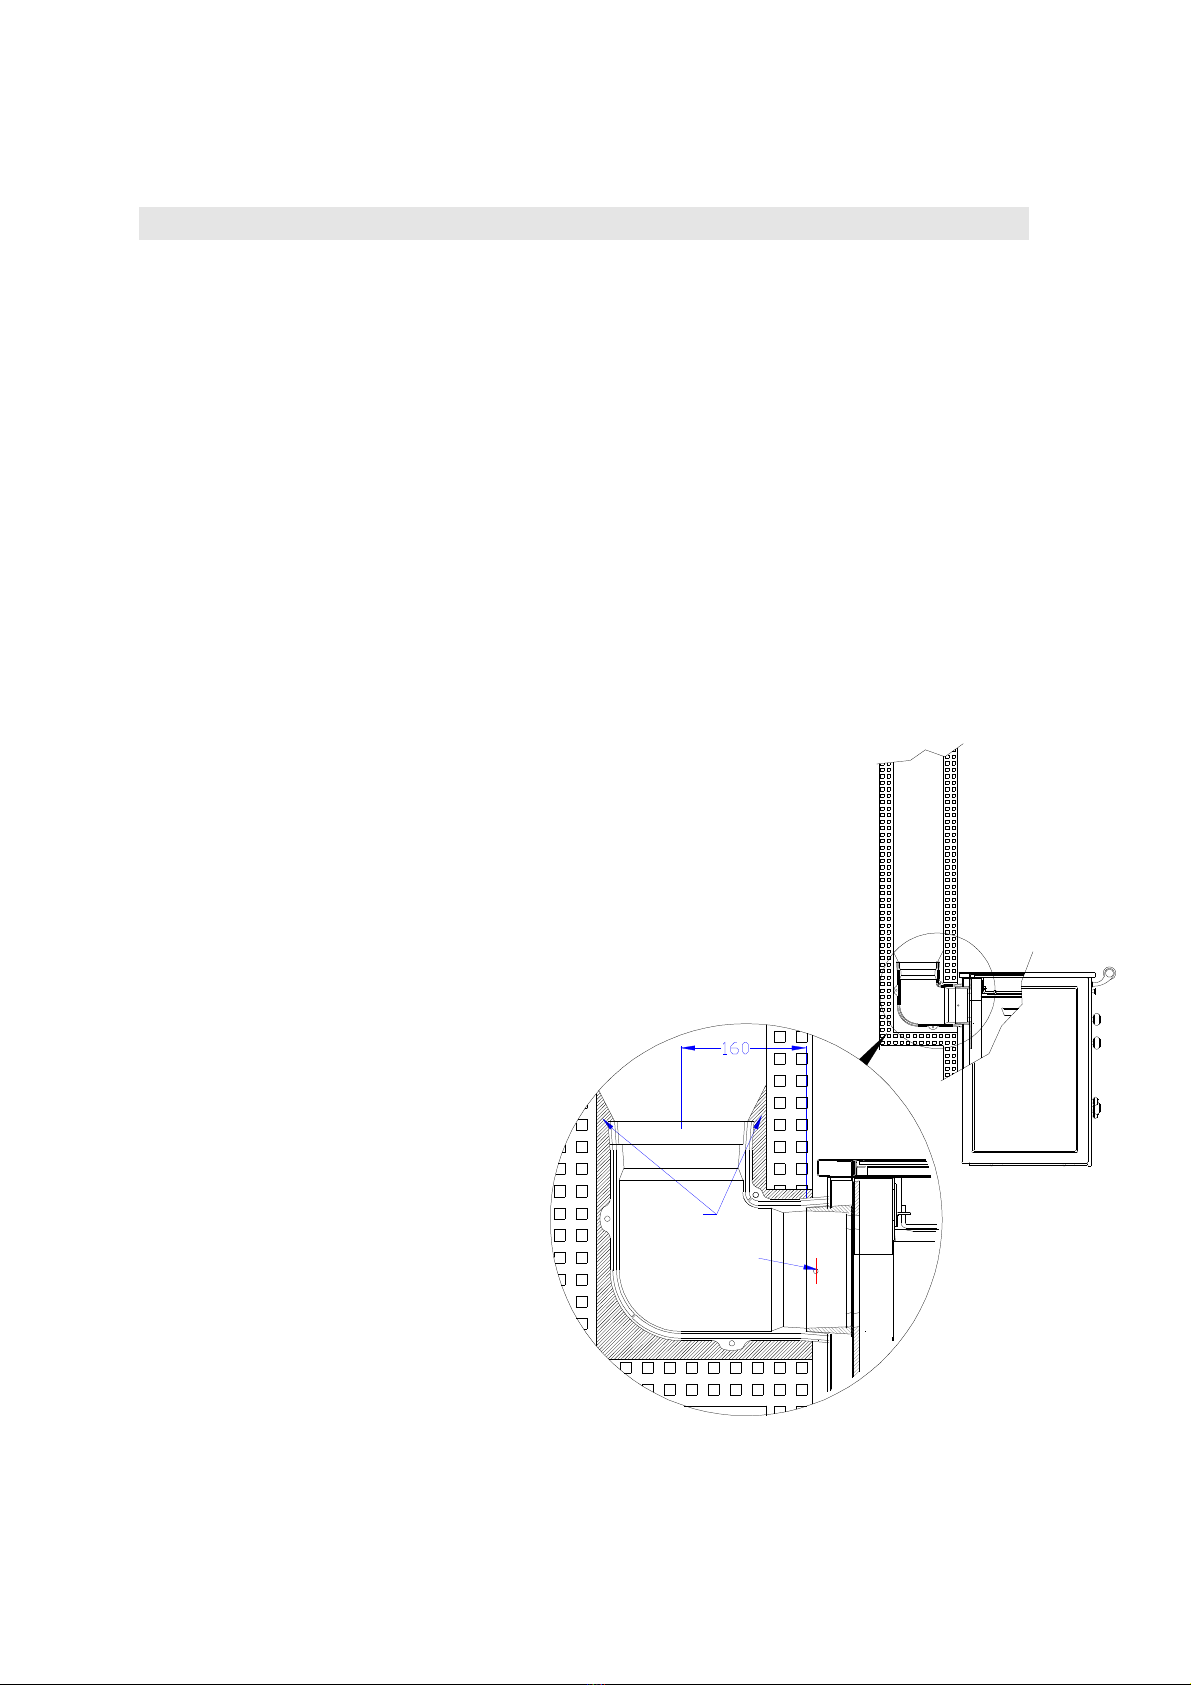
ELBOW JOINT EXTENSION COLLAR
Also made of cast iron.

17
If the distance of the location of your cooker in relation to the central point of
the chimney is greater than that provided by the elbow joint (16 cm.), you can
use these extension collars (Hergóm supplies one collar per elbow joint).
Each collar provides an additional length of 7 cm. (See figure below)
The securing system is carried out in the same manner as the elbow joint.
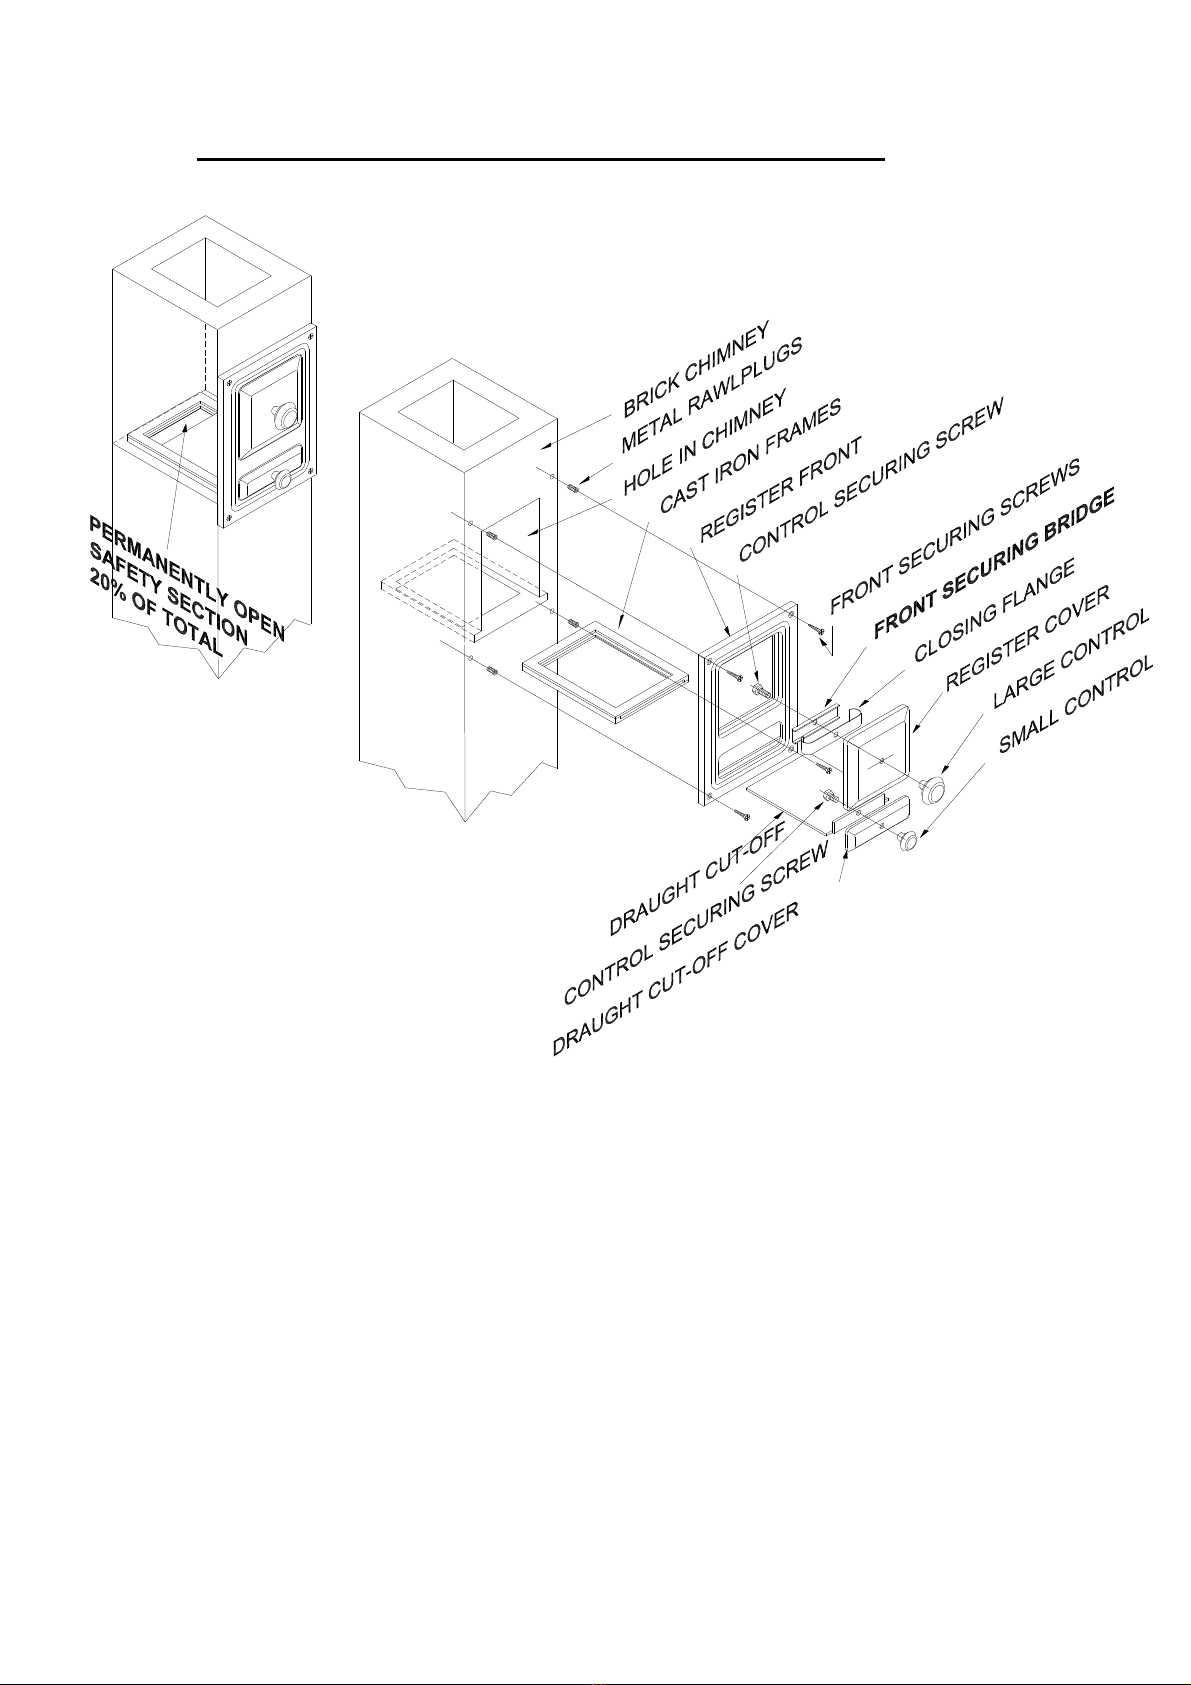
DRAUGHT REGISTER
INSTALLATION OF THE DRAUGHT REGULATION VENT AND CLEANING
REGISTER ON THE OUTLET OF COMPLETE RANGE COOKERS.
Although complete range cookers are fitted with a system to control the precise
inlet of air for combustion, mainly for installations with a high chimney draught
caused by their height (over 5 metres), good construction, insulation, etc., it is wise
to place a register on the wall at the outlet of the cooker that will help towards a
more precise control of the chimney depression and, as a result, the calorific
power and expense of fuel.
This register, due to its unique design, allows not only for the draught to be
controlled but also for easier cleaning, due to the window for access to the inside
of the chimney, thus leading to better operating.
This register is easily fitted, following the instruction indicated in the attached
diagram.
It is VERY IMPORTANT for the draught shut-off plate not to close off the
passage of smoke completely, given that this may cause an accident by not
allowing for them to evacuate if closed completely.
The free safety section for the circulation of smoke must not be below 20%
the gap in the cast iron frame. Where necessary, cut the “DRAUGHT CUT-
OFF” plate to keep the free space recommended.

19
ASSEMBLY INSTRUCTIONS (REGISTER FRONT)

20
X.- TECHNICAL DATA.
Model Cooker measurements Oven measurements Stove measurements
SAJA
Height
(mm)
Width
(mm)
Depth
(mm)
Height
(mm)
Width
(mm)
Depth
(mm)
Height
(mm)
Width
(mm)
Depth
(mm)
No. 7 850 870 600 385 350 425 250 250 425
No. 8 850 1000 600 425 450 460 250 250 425
Model Weight
Power (a) Chimney measurements Draugh
t
SAJA
Kg Kcal./h Plate
(mm)
Brick
(mm) Height
(m.) mmca.
No. 7 190 10.000 ∅150 (c) 200x200 5-6 (b) 1,5
No. 8 210 10.000 ∅150 (c) 200x200 5-6 (b) 1,5
(a) Fuel: Beech wood
(B) For other heights, consult the Distributor or the Manufacturer.
(c) When the chimney height is below 5 metres, we recommend you fit a chimney with ∅175mm. on
the outside of the attachment ring.
This manual suits for next models
1
Table of contents
Other hergom Cooker manuals


Popular Cooker manuals by other brands

elvita
elvita CGS3523V quick start guide

LIVING COLLECTION
LIVING COLLECTION TDO150SS Instructions and recipes

Electrolux
Electrolux SG 455 user manual

AEG
AEG Competence 1020F-W Instruction book

Amica
Amica 51GGTCMW Operating and installation instructions

Proline
Proline CVMP660W-1 Operating and installation instructions


