hergom Nansa User manual

28
TABLE OF CONTENTS
I.- INTRODUCTION ………………………………………………………
…
29
II.- CHANGING THE TOP OUTLET FOR THE BACK OUTLET ……… 30
III.- INSTALLATION ………………………………………………………
…
30
IV.- OPTIONAL ACCESSORIES …………………………………………. 37
V.- INSTRUCTIONS OF USE ………………………………………….…. 38
VI.- CLEANING & MAINTENANCE ………………………………………
.
39
VII.- SAFETY ………………………………………….……………………. 40
VIII.- PRODUCTS ………………………………………………….………. 40
IX.- TECHNICAL DATA ……………………………………………………
.
41
WELCOME to the Hergóm range.
We would like to thank you for choosing our Hergóm Nansa cooker,
which represents, in technique and style, a significant improvement in classical
coal and wood cookers.
We are sure that your new cooker will prove fully satisfactory, which is the
most outstanding feature of our equipment.
Owning a Hergóm Nansa cooker displays an exceptional sense of quality.
Please, read this manual in full. Its purpose is to familiarise users with the
cooker by explaining extremely useful installation, operational and maintenance
instructions. Keep the manual at hand and consult it whenever necessary. If,
after reading this manual, you should require any extra clarification, please
consult your regular dealer or directly call the factory.
IMPORTANT WARNING: If the cooker is not installed correctly, it will
not provide the excellent service for which it has been designed. Please, read
these instructions in full and trust the work to a specialist.
Industrias Hergóm, S.A. may not be held liable for any damages caused
by alterations in its products that have not been authorised in writing, or for
defective installation work.
Furthermore, it reserves the right to change its products without prior
warning.
Any liability due to manufacturing defects will be subject to the criteria and
verification of the company's experts and will be limited to the repair or
replacement of its products, excluding any construction work or damage the said
repairs may cause.

29
I.- INTRODUCTION
This model features a cast iron front with a vitreous porcelain enamel surface in
several colours; polished brass hinges (also available in chrome) and the controls are
decorated in black porcelain.
The legs are made of chromed cast iron.
The internal structure is made of galvanised steel.
The top frame is made of stainless steel with a polished cast iron rim, and the top
plate is made of cast iron enamelled in vitreous porcelain, with a hotplate area. The
smoke outlet ring is made of cast iron enamelled in vitreous porcelain. The cooker is
supplied with the smoke outlet ring installed on the top outlet. This can be changed to
the back outlet by simply removing the ring from the top outlet and placing it in the
back outlet (section II).
The oven door includes a double glass-ceramic tinted window with a thermometer to
control the temperature at which food is prepared.
The stainless steel oven includes oven tray anti-tip supports thanks to which the tray
can be pulled out almost completely without the risk of its contents sliding off. These
supports are easy to remove (slide them up, free them from the lower hole and then
slide them out to free them from the top hole) to clean outside the oven.
The hearth door includes a glass-ceramic window to be able to view the fire.
The soot cover is hidden under the oven door.

30
II.- CHANGING THE TOP OUTLET FOR THE BACK OUTLET
The cooker is supplied with
the smoke outlet ring
installed on the upper outlet.
In order to change the ring
from the top to the back
outlet, release the four screws
that attach it to the hob,
remove the cover on the back
outlet and install the ring.
Place the ring on the back
outlet and the cover on the
top outlet.
III.- INSTALLATIÓN
He way the cooker is installed will decisively affect safety issues and how it
works
It is important to install the cooker correctly.
In order to ensure it has been installed correctly, it should be installed by a
professional.
A.- Chimneys.
The way the cooker works depends on:
a) The chimney.
b) How it is used.
c) The quality of the fuel used.
Over the years, you may change the type of fuel you use but, once the chimney has
been installed in a given place, it is not so easy to alter or reposition.
Therefore, the following information will help you decide whether you can use your
present chimney or not, or help you decide to build a new one.

31
This information will help you make the correct decision
1.- How chimneys work
A basic knowledge of the dynamics of chimneys will help you make the most of your
Nansa cooker.
Chimneys:
a) Safely evacuate smoke and gasses from the house.
b) Provide sufficient draw in the hearth to keep the fire alive.
.
What is the "chimney draw"?
The tendency air has to rise generates the chimney effect.
When a cooker is lit, hot air rises through the chimney. The chimney flue heats up and
keeps it drawing. Until the cooker and the chimney are hot enough, the chimney effect
will not work properly.
The chimney effect depends on the location, size and height of the chimney.
The following must be taken into consideration:
-Chimneys located inside a house keep warm and, therefore, chimney draw is
greater.
-The chimney size recommended by the manufacturer will provide a good
chimney effect.
-The height of a chimney affects how it draws:
greater height => better chimney effect
The chimney must project at least one metre over the highest part of the roof.
Other factors also affect chimney draw:
-Houses that have very good internal insulation, free from draughts, provide
inadequate draw as no air enters the building. This can be corrected by
allowing external air to reach the cooker.
-High trees and/or buildings near the house also have a negative effect on
chimney draw.
-Wind speed. Usually, sustained strong winds increase chimney draw but
stormy winds have a negative effect.

32
-External temperature. The colder it is outside, the greater the chimney effect.
-Atmospheric pressure. The chimney effect is usually poor on rainy, damp or
stormy days.
-Intensity of the fire. The hotter the fire, the stronger the chimney effect.
-Cracks in the chimney, badly sealed or dirty covers, air entering through
pipe joints, other devices connected to the chimney.... may affect chimney
draw negatively.
2.- Creosote formation and cleaning.
When wood burns slowly, it produces tar and other organic fumes that, when
combined with a damp atmosphere, form creosote.
Creosote fumes may condense if the chimney walls are cold. If it catches fire,
extremely tall fires may be caused.
Any accumulation of creosote must be eliminated.
As the accumulation of creosote depends on a number of variables, it is very difficult
to know when the chimney should be cleaned.
The safest way of ensuring that the chimney of your cooker is creosote free is by
performing a visual inspection.
Consequently, we recommend building installations that are easy to access.
3.- Options.
If you are going to build a chimney for a Hergóm Nansa cooker, you have two
alternatives:
a) Brickwork chimneys.
b) Metal chimneys.
Studies have reached the conclusion that there is no great difference in performance
between metal and brick-cement chimneys. You will have to choose one or the other.
Whenever possible, build your chimney inside the house; this will provide better draw,
lower creosote accumulation and a longer life.
The advantages of brick chimneys include:

33
a) Fumes cool off more slowly inside the chimney due to the mass of bricks and
tiles.
b) As bricks accumulate heat, the house keeps warm longer after the fire is put
out.
c) It can be built to the specific requirements of each person.
d) If well built, it will be more resistant to fire than metal chimneys.
Brick chimneys must be well lined to prevent the fumes from losing temperature.
They must be built with materials that support high temperatures and corrosion.
They may be round, square...., what matters is their size.
Brick-work chimneys for the Hergom Nansa cooker must comply with the
measurements indicated in the chapter on TECHNICAL DATA.
The advantages of metal chimneys include:
a) Easy installation.
b) It is possible to change the direction of the chimney slightly, which provides
greater flexibility when deciding where the chimney should be installed.
c) Curved joints can be used, which eliminates acute angles that have a
negative effect on draw.
4.- Connection to the chimney
A cast iron joint is provided to connect the cooker to the chimney (in the luxe version).
The said joint is fitted to the outside of the cooker ring and, in turn, fitted to vertical
Ӆ
150mm pipes. The male coupling of the pipes is connected to the cast iron joint.
Bends and horizontal sections, which have a negative effect on draw and favour the
formation of creosote and soot, must be avoided in the vertical section of the chimney.
It is very important to seal the ring - elbow - pipe joint using refractory putty, plaster
or some other appropriate material to prevent air from seeping in.
The connection of the pipes that form the chimney, in the case of metal pipes, must be
sealed during assembly with the male coupling facing downwards. This will prevent
any creosote that forms inside from leaking out.
This advice must be followed whenever wood or coal is used as fuel.
5.- Some rules

34
We shall now explain a number of rules that should be followed when building a
chimney:
a) Use resistant, fireproof materials. Do not use cement asbestos pipes in the
first 2-3 metres.
b) Choose the most vertical route possible. Do not connect several devices to
the same chimney.
Fig.-2
c)The conduit should not come to an end near buildings and must be higher
than the nearest obstacle if there is another building nearby.
Fig.-3
d) Install the conduit in an area as protected from the cold as possible.
If possible, the chimney should be built inside the house.
e)The internal walls must be perfectly smooth and free from obstacles. Avoid
bottlenecks where pipes join to the brick chimneys.

35
Fig.-4
f) It is very important to ensure that the joints of the pipes are well sealed to
avoid possible cracks through which air may enter.
..
Fig.-5
In order to verify the air-tightness of the chimney, you may:
-Cover the outlet on the roof.
-Introduce damp paper and straw at the bottom of the chimney and light it
up.
-Watch for possible cracks through which smoke leaks out and seal them.
.
Fig.-6

36
g) The chimney should be one metre higher than the highest part of the house. If
you need to increase the draw, extend the length of the chimney.
Fig.-7
h) Chimney covers must not affect chimney draw.
.
Fig.-8
Industrias Hergóm, S.A.., with a view to ensuring the perfect performance of its
cookers, supplies painted and enamelled pipes, elbow joints and steel adaptors, based
on the measurements indicated in the catalogue.
i) When the cooker is connected to a brick-work chimney, we recommend the
use of a 90º cast iron or steel elbow joint. Make sure that the connection is
totally air-tight.
Fig.-9
Seal the joint between
the elbow joint and
the cast iron ring with putty

37
j) Avoid any excessive length in the connection of the cooker with the chimney
and any negative inclination
Less than
1 metre
Greater than
1 metre.
Positive angle
Negative angle
CORRECT INCORRECT
Fig.-10
k) Clean the chimney at least once a year.
The most efficient way of cleaning chimney conduits is using appropriate chimney
brushes. Chemical products are available to help postpone classical chimney
sweeping operations.
Chimney brushes must adapt as closely as possible to the chimney diameter.
The joints of the pipes that form the chimney, in the case of metal pipes, must be
sealed with refractory putty.
l) External metal chimneys must be built with special double insulated pipes for
solid fuels.
IV.- OPTIONAL ACCESSORIES
Hergóm offers the following accessories for this cooker:
• Steel vitreous enamel pipes.

38
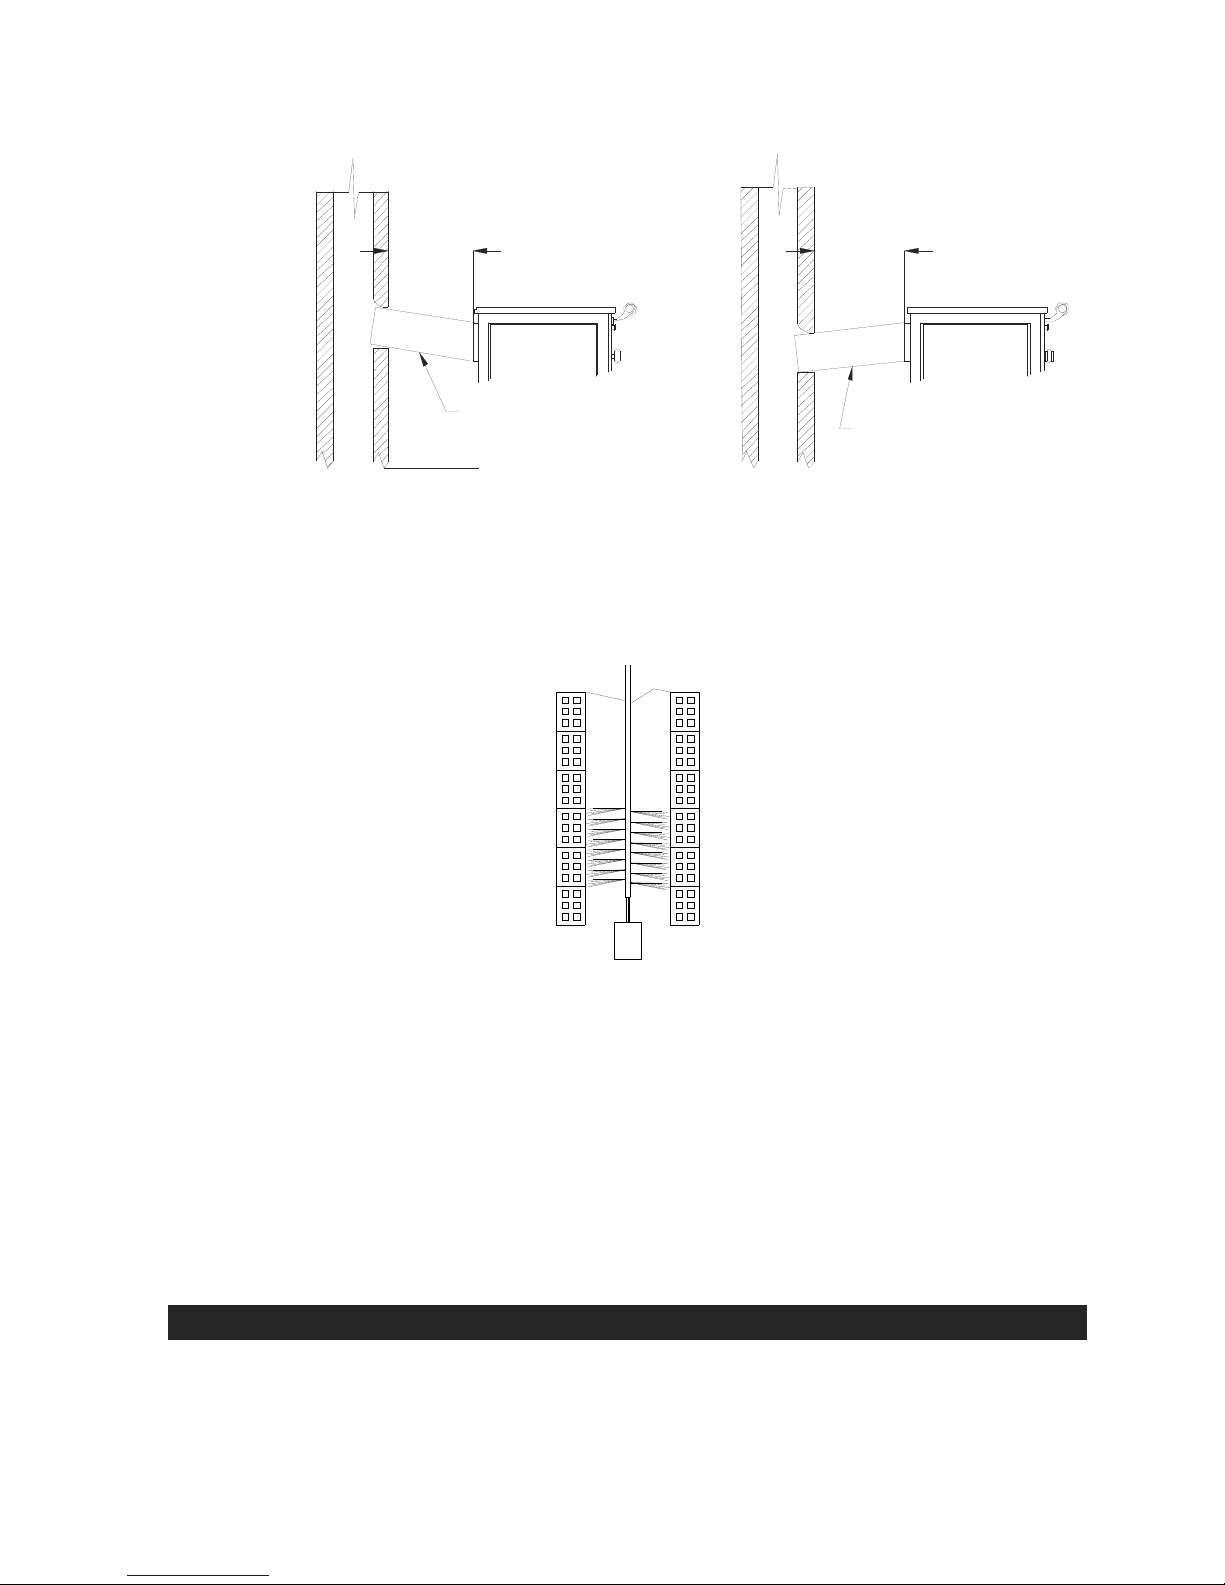
• Stainless steel pipes.
• Elbow joints and covers for chimney construction.
V.- INSTRUCTIONS OF USE
Before using your cooker, please consult maintenance information on the hob
you have purchased. Chapter VI provides advice on maintenance.
Every cooker comes with a number of utensils, such as a poker and a scraper to clean
the ash pan and the smoke outlet via the soot cover located below the oven.
Before lighting the cooker, please check that the smoke conduit is perfectly clean in
order to obtain appropriate draw.
The iron grill fused in the transport goes located inside the ashtray drawer, to place it
in the hole that has the reserve of refractory of the fire box.
When lighting the cooker, close the wood oven door, open the primary air valve by
turning the handle and the chimney valve by pulling the brass lever located above the
oven door.
Once a regular combustion level has been achieved, close the direct chimney valve by
moving the brass lever to its normal position.
Regulate draw by means of the primary air valve. Take into account that excessive
draw will lead to greater coal or wood consumption and to the overheating of the top.
Never fill the combustion chamber will fuel completely or leave the ash pan cover
open.
Do not place wood or coal near the door.
Recommended chimney draw is 1.5 mmca. In order to control the operation of the
cooker and to avoid extremely powerful combustion, a 12 gap grille is supplied.
If, once you have installed the cooker, you are unable to reach the correct
performance temperature, open more gaps on the grille until you obtain the necessary
chimney draw.
Always control oven temperature by means of the thermometer installed on the door.
If the temperature should reach 250ºC (Yellow area on the thermometer), do not add
further fuel, close the air admission valve to the ash pan and, if necessary, open the
door to the wood oven to reduce combustion.
Any overheating of the cooker, indicated by oven temperature exceeding 300ºC (red
area on the thermometer), may lead to the deterioration of the hob.
Cooking will take less time if the bottoms of pots, pans and other utensils are
perfectly flat.
1.- Lighting up for the first time
We recommend a slow fire for 3 to 4 hours when lighting-up for the first time. This
will help stabilise the different components and avoid any possible breakages.

39
VI.- CLEANING & MAINTENANCE
1.- Enamelled front.
Preferably clean when the cooker is cold. Use a damp cloth dipped in soapy water
and then dry.
The kitchens enameled in red color, during their operation, the red enamel becomes a
tone but dark, which returns to its original tone when cooling down.
All brass hinges have received a protective coating based on the following features:
Type: Polyester – TGIC
Indoor and outdoor use
Temperature supported: 190ºC for 10’ and 170ºC for 20’
Adhesion in accordance with standard, ISO 2409: 100%
Coat: 40-50 micron
Dampness test in accordance with standard ISO 6270: 1000 hours without losing
adhesion
Salt mist test in accordance with standard ISO 7253: 1000 hours without the
appearance of blisters or corrosion points.
Avoid the use of strong detergents or abrasive products that may damage the enamel.
2.- Polished top with rings.
To preserve the aspect of this top, clean frequently with detergent and a metal
scouring pad.
Do not use the scouring pad on the stainless steel rim. Dry well.
.
3.- Stainless steel rim
There are a number of appropriate products on the market to preserve metal
components that will help you keep stainless steel looking like a mirror.
Avoid utensils that may scratch steel. For stainless steel to preserve its properties, its
surface must not be damaged.
4.- Ash
The special design of the combustion chamber and the use of refractory
materials provide maximum combustion efficiency and, consequently, the quantity of
ash produced is minimal.
This means that it is possible to light the cooker a number of times before having to
empty the ash pan.

40
When this operation is required, remove the grille and move the ash to the ash pan.
Empty the ash pan in a metal container and immediately remove from the house.
5.- Soot
The cover that has to be removed to clean soot is hidden behind the oven door.
This cover is used to clean soot that may have accumulated at the bottom of the
cooker.
VII.- SAFETY
A number of possible risks are present when operating your solid fuel cooker with fuel
of any brand.
The said risks can be minimised if the instructions and recommendations included in
this manual are followed.
Below, we shall recommend some rules and advice but, above all else, we recommend
common sense.
1. Keep any flammable material (curtains, clothes...) away from cooker, at a
minimum safety distance of 0.90 m.
2. Protect nearby furniture with heat resistant materials on the hob and smoke
outlet.
3. Leave a 30-40 mm. gap between furniture and the sides of the cooker for air
to flow.
4. Ash should be emptied into a metal container and immediately removed from
the house.
5. Do not use flammable liquids to light the cooker.
Keep any type of flammable liquid (petrol, gasoline, alcohol,....) at a distance
from the cooker.
6. Periodically inspect the chimney and clean whenever necessary.
7. In order to facilitate moving the cooker, a set of slings is provided with a
view to avoid handling the cooker by pulling the top, handles, sides...
VIII.- PRODUCTS.
INDUSTRIAS Hergóm, S.A. places a range of products for the preservation of its
cookers at your disposal:
-Refractory putty, to improve air-tightness and sealing.
-Anti-soot, a powerful catalyst that enhances the elimination of unburnt by-
products.

41
-Fire-starters, an essential product when quick, clean ignition is required.
-Window cleaning liquid, an ideal product to eliminate carbonised grease
from cooker windows, chimneys...
IX.- TECHNICAL DATA.
Medidas de la cocina Medidas del horno Medidas del hogar
Modelo Alto
(mm)
Ancho
(mm)
Prof
mm
Alto
(mm)
Ancho
(mm)
Prof
mm
Alto
(mm)
Ancho
(mm)
Prof
mm
Nansa
850 1018/1010 690 385 450 425 355 315 450
Modelo Medidas de la chimenea
Peso
(kg)
Potencia(Kcal/h)
(a) De
chapa
(mm)
De obra
(mm)
Altura
(m) (b)
Tiro
(mmca)
Nansa
220 11.500 150 (c) 175x175 5-6 1,5
(a) Fuel: Beech wood
(b) Recommended height between 4 and 6 metres. In the case of other heights consult your
Dealer or the manufacturer.
(c) When a chimney is less than 5 metres high, we recommend installing a
Ӆ
175mm.
chimney around the external part of the ring.
.
Other manuals for Nansa
1
Table of contents
Other hergom Cooker manuals

hergom
hergom L-08 CCE Quick start guide

hergom
hergom Saja 7/90 Quick start guide

hergom
hergom L-05 CCE Quick start guide

hergom
hergom SAJA 7 User manual

hergom
hergom COCINA ECLECSYS Quick start guide

hergom
hergom L-09 CA Quick start guide

hergom
hergom CARES Quick start guide

hergom
hergom Pas II User manual
Popular Cooker manuals by other brands

Tatung
Tatung TAC-06EA User instructions

Parkinson Cowan
Parkinson Cowan Renown 55 GX Operating and installation instructions

Bosch
Bosch HLN39A0 0 Series instruction manual

Brandt
Brandt KV568WE1 Instructions for use and installation

Grundig
Grundig GD-KB-AP1420P user manual

Smeg
Smeg Portofino Aesthetic CPF120IGMPWH manual