hergom Pas II User manual

1
Pas II Cooker
Owner’s Manual
INSTALLATION, USE AND MAINTENANCE INSTRUCTIONS.
Please read this manual thoroughly before installing and lighting your Fireplace.
Keep These Instructions for future reference.
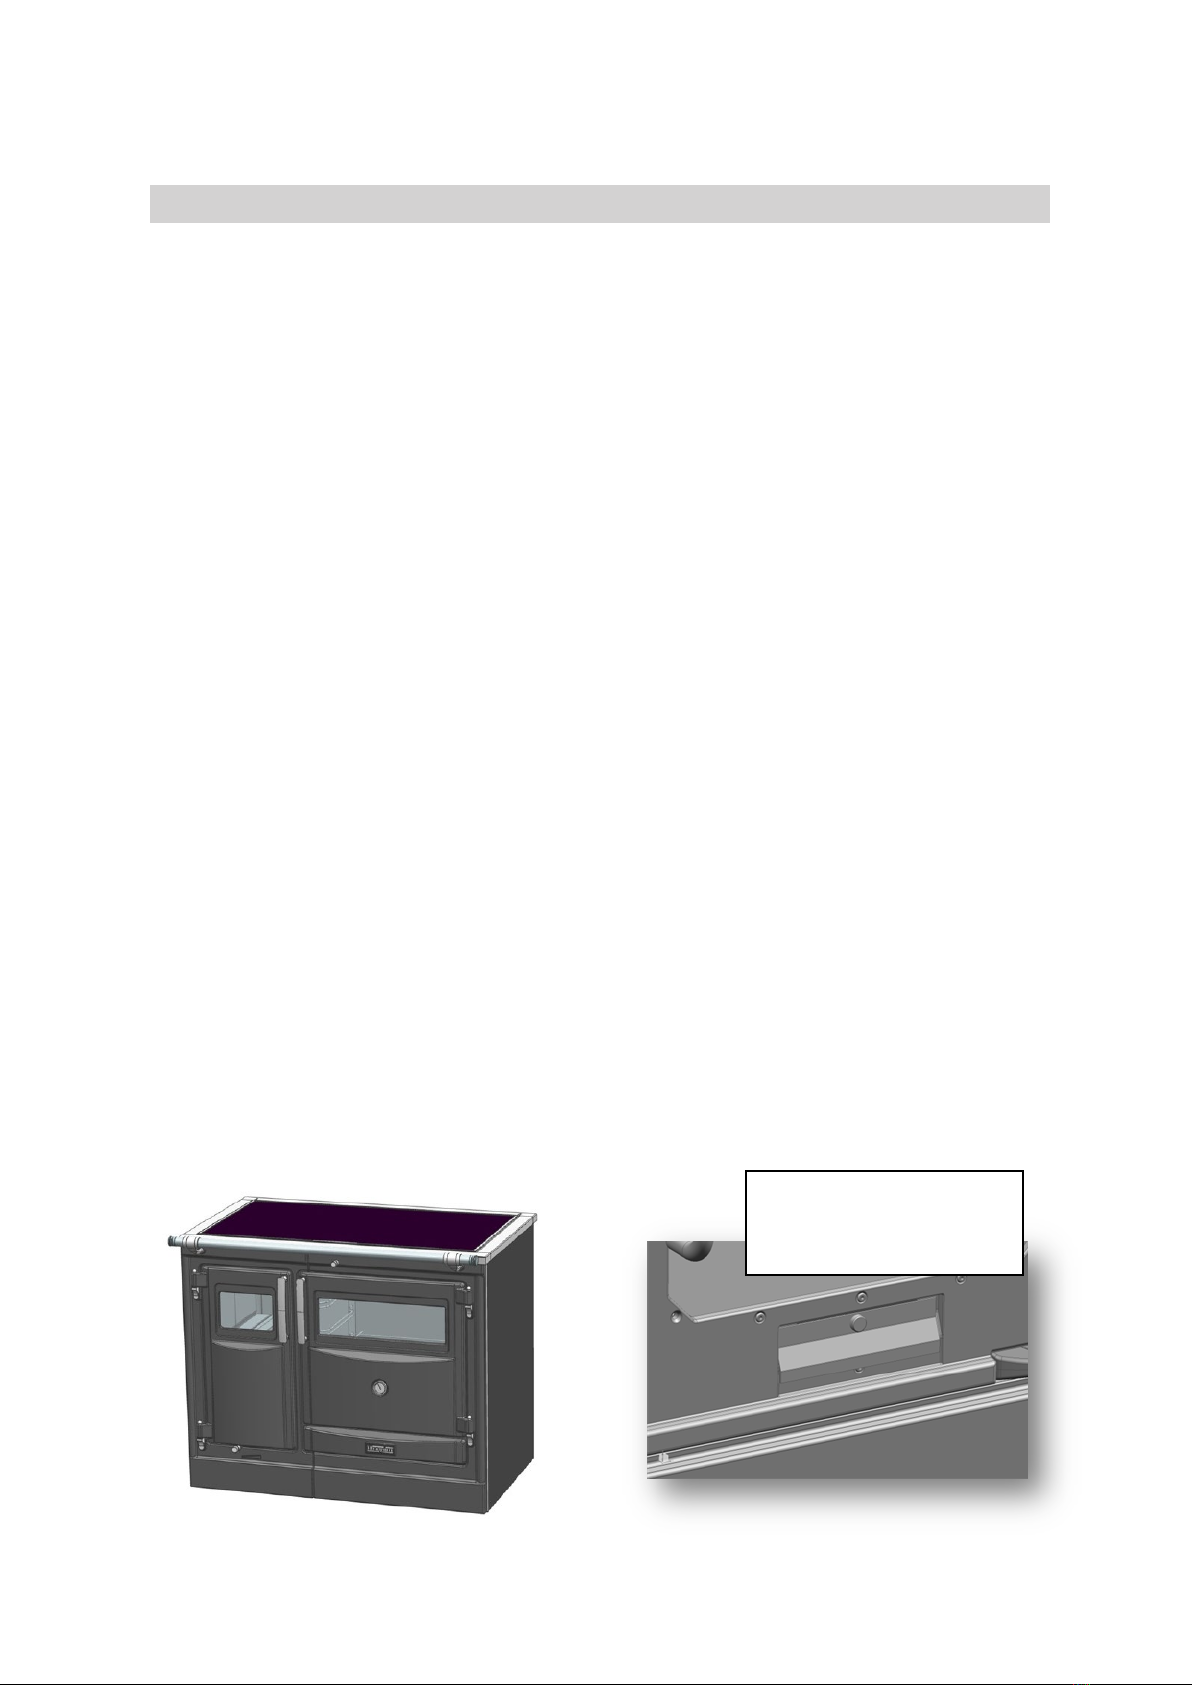
(Glass Top Pas 1 Shown)

2
WELCOME to the HERGÓM family
We appreciate the consideration that you have shown us by choosing our stove, which
represents an important step forward in technique and style for coal and wood-burning stoves.
We are sure that your new Hergóm model will satisfy you in many ways, which is the greatest
incentive for our team. Owning a Hergóm model is a demonstration of an exceptional sense
of quality.
Please read the manual in its entirety. Its purpose is to familiarise you with your stove, showing
the guidelines for installing, operating and maintaining it, which should prove very useful.
Keep it and go to it when you need it.
If, after reading this manual, you need any further clarification, do not hesitate to consult your
usual supplier.
NDUSTRIAS HERGOM, S.A. is not liable for consequential damage arising from modifications to its
products that have not been authorised in writing, or from faulty installation.
Also, the right to modify its products without prior notice is reserved.
Industrias Hergóm, S.A., with head office in Soto de la Marina - Cantabria - Spain, offers a warranty
of TWO YEARS for its appliances.
The warranty in Australia only includes product purchased through the Australian distributor
network and installed correctly by a licensed installer.
The warranty will commence on the date of purchase of the appliance shown on the warranty
receipt and only covers any damage or breakage due to manufacturing faults or defects
IMPORTANT NOTE
If the device is not installed correctly, it will not provide the excellent service for which it has been
designed. Please, read these instructions in full and ensure the installation is carried out by a
certified installer.
Your appliance is protected with a special heat-resistant paint for high temperatures. During the first
few times that you start it up, it is normal for it to smoke slightly, as some of its components
evaporate, allowing the paint to cure. For this reason, we recommend ventilating the room until this
phenomenon dies down.

3
WARNING: THE APPLIANCE & FLUE SYSTEM SHALL BE INSTALLED IN
ACCORDANCE WITH AS/NZS 2918:2018 AND THE APPROPRIATE
REQUIREMENTS OF THE RELEVANT BUILDING CODE OR CODES.
CAUTION: MIXING OF APPLIANCE OR FLUE SYSTEM COMPONENTS FROM
DIFFERENT SOURCES OR MODIFYING THE DIMENSIONAL SPECIFICATION OF
COMPONENETS MAY RESULT IN HAZARDOUS CONDITIONS. WHERE SUCH
ACTION IS CONSIDERED, THE MANUFACTURER SHOULD BE CONSULTED IN
THE FIRST INSTANCE.
CAUTION: CRACKED AND BROKEN COMPONENTS, e.g., GLASS PANELS OR
CERAMIC TILES, MAY RENDER THE INSTALLATION UNSAFE.
1. WARNING: DO NOT US FLAMMABLE LIQUIDS OR AEROSOLS TO
START OR REKINDLE THE FIRE.
2. WARNING: DO NOT US FLAMMABLE LIQUIDS OR AEROSOLS IN THE
VICINITY OF THIS APPLICANCE WHEN IT IS OPERATING.
3. WARNING: DO NOT STORE FUEL WITHIN THE HEATER INSTALLATION
CLEARANCES.
4. WARNING: OPEN AIR CONTROL (AND DAMPER WHEN FITTED)
BEFORE OPENING FIRING DOOR.
5. CAUTION: THIS APPLIANCE SHOULD NOT BE OPERATED WITH A
CRACKED GLASS.
6. CAUTION: THIS APPLIANCE SHOULD BE MAINTAINED AND OPERATED
AT ALL TIMES IN ACCORDANCE WITH THESE INSTRUCTIONS.
7. CAUTION: THE USE OF SOME TYPES OF PRESERVATIVE-TREATED WOOD
AS A FUEL CAN BE HAZARDOUS.
4
1 - Presentation
The Pas Cooker has an all cast iron front, with porcelain enamelled finish, and fittings with chrome-
plated cast brass.
The internal frame of the slow combustion cooker is made from galvanized steel. The hob outer
frame is made of plate steel with porcelain enamel finish. The worktop on the glass-ceramic top
version with folding splashback has a stainless-steel trim frame and beneath that the countertop hob
is brushed cast iron.
The oven is fully stainless steel lined, and includes a porcelain enamelled roasting tray, and chrome
plated oven rack.The Oven door includes a tempered glass viewing window with thermometer for
gauging the oven temperature.
The side rack supports are fixed to the oven walls and allow maximum extension of the oven tray
and Chrome grill, without the risk of spillage of the cooked foods.
The side racks are easily removable for easy cleaning (lift them up, freeing them slightly from the
bottom hole and then slide them out to release them from the upper hole).
The air supply for the cooker can be supplied into the rear through an outside air duct fixed to the
rear of the cooker.
Secondary air for combustion:
• Is supplied from the slot at the top of the door glass, which in turn acts as an air-wash for the glass.
The oxygen hitting the glass ensures any creosote deposits from a low burn are cleaned off. The
intake for this is next to the fire-door top hinge.
• Through the back of the refractory stove, which at the same time acts as a cooling effect to the
back of the cooker. The primary air supply can come through the holes at the bottom of the fire-
door if there is not outside air kit fitted. This air passes through the damper at the rear, controlled
by the lever at the front. This supplies primary and secondary air to the base of the firebox and up
the flutes behind the rear casting.
The hidden door below the oven hidden behind the oven door is access to cleaning of the soot build
up around the oven flue path. The flue paths must be kept clean - see section 2, Operating
Instructions.
Cleaning access
door
5
2 - Installation
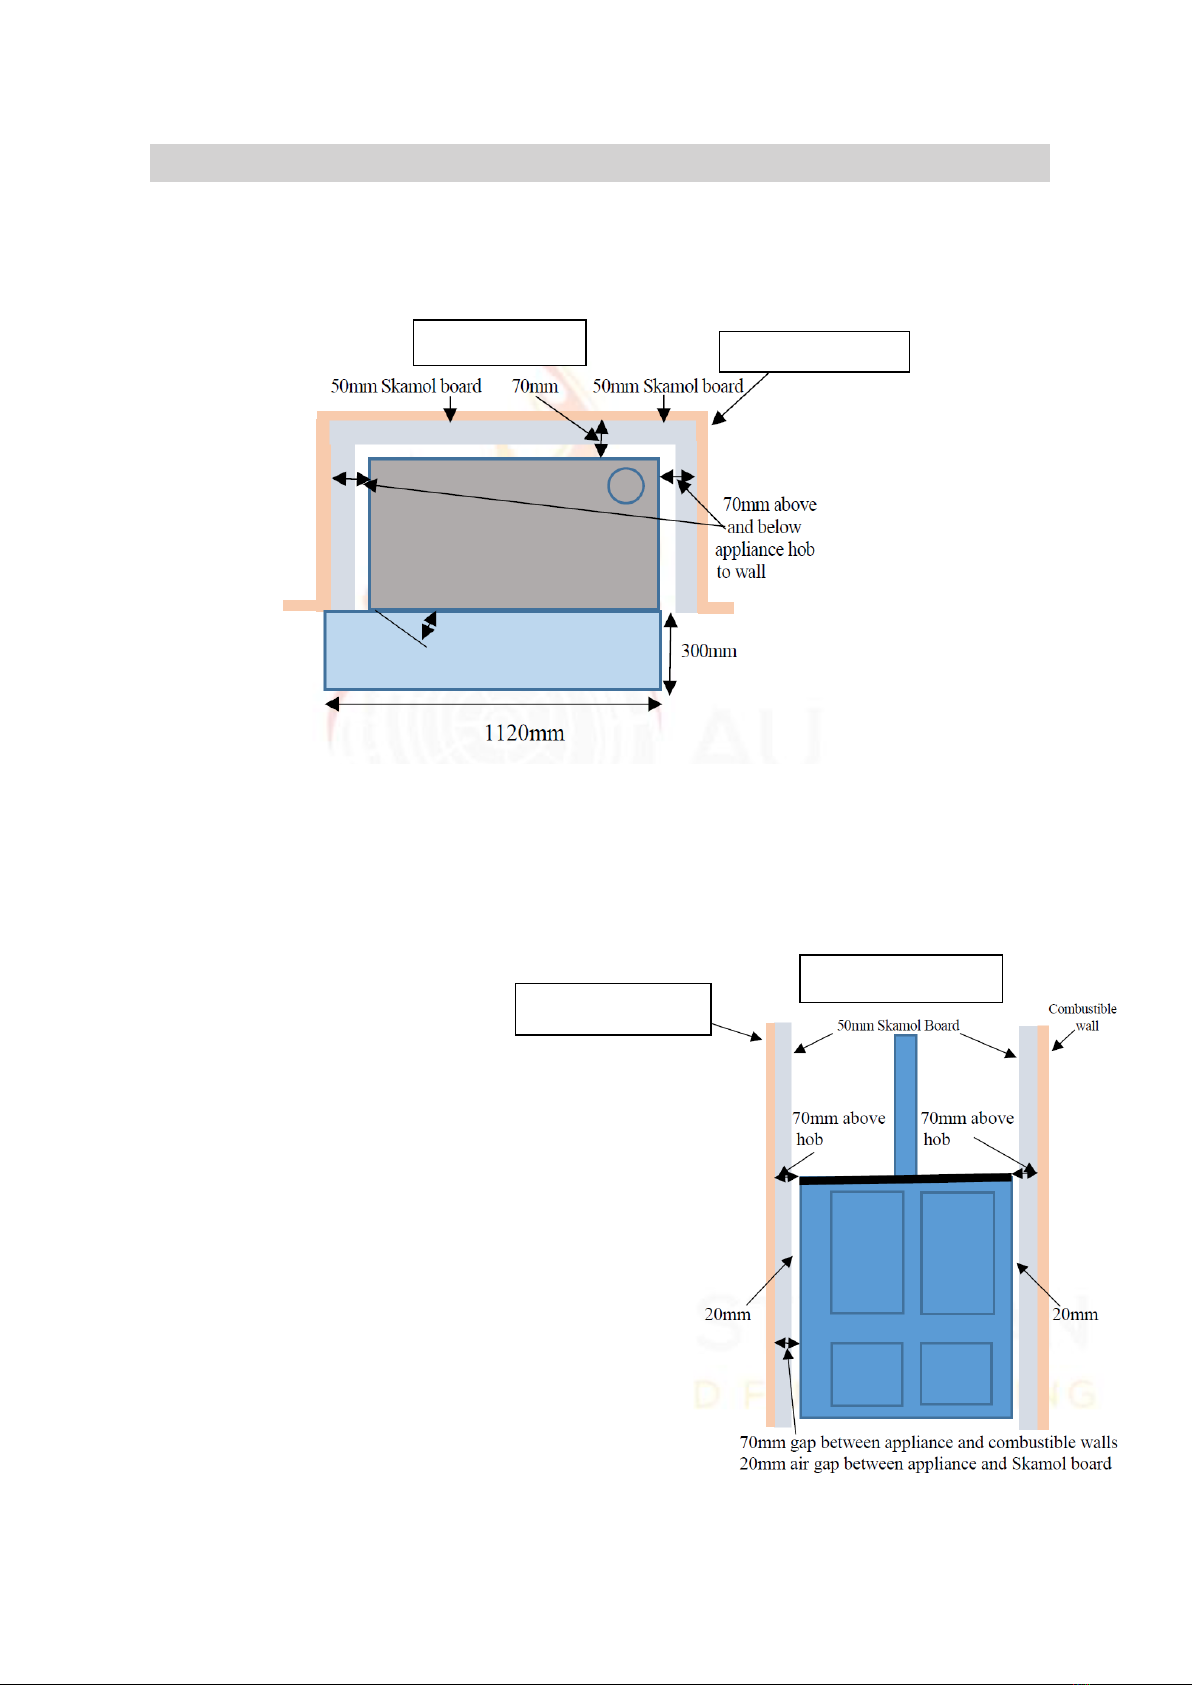
The hearth must be a minimum of 12mm thick fibre cement sheeting, ie Bellis board or equivalent,
with Thermal resistivity of 0.1m2.K/W for 9mm thick sheets. The sheet must be underneath the
appliance and minimum requirement in front of the cooker is 1120mm wide and 300mm in front,
with 200mm included to the left of the firebox door opening.
The installation alcove must be lined with 50mm Skamol enclosure board for insulation, and a 20mm
air gap between the cooker and the Skamol board (or 70mm to the combustible wall). For building
out dimensions see the dimensions on page 12. The board must be on all combustible walls to the
sides and to the rear of the appliance to a minimum height of 2m from the floor.
Skamol must start from the floor and continue to a height
of 2m above the floor.
Installation into a double brick wall alcove would need to
be equivalent to an open brick fireplace – see the Building
Code of Australia - BCA or NCC for details.
Combustible Wall
PLAN VIEW
FRONT ELEVATION
Combustible wall

6
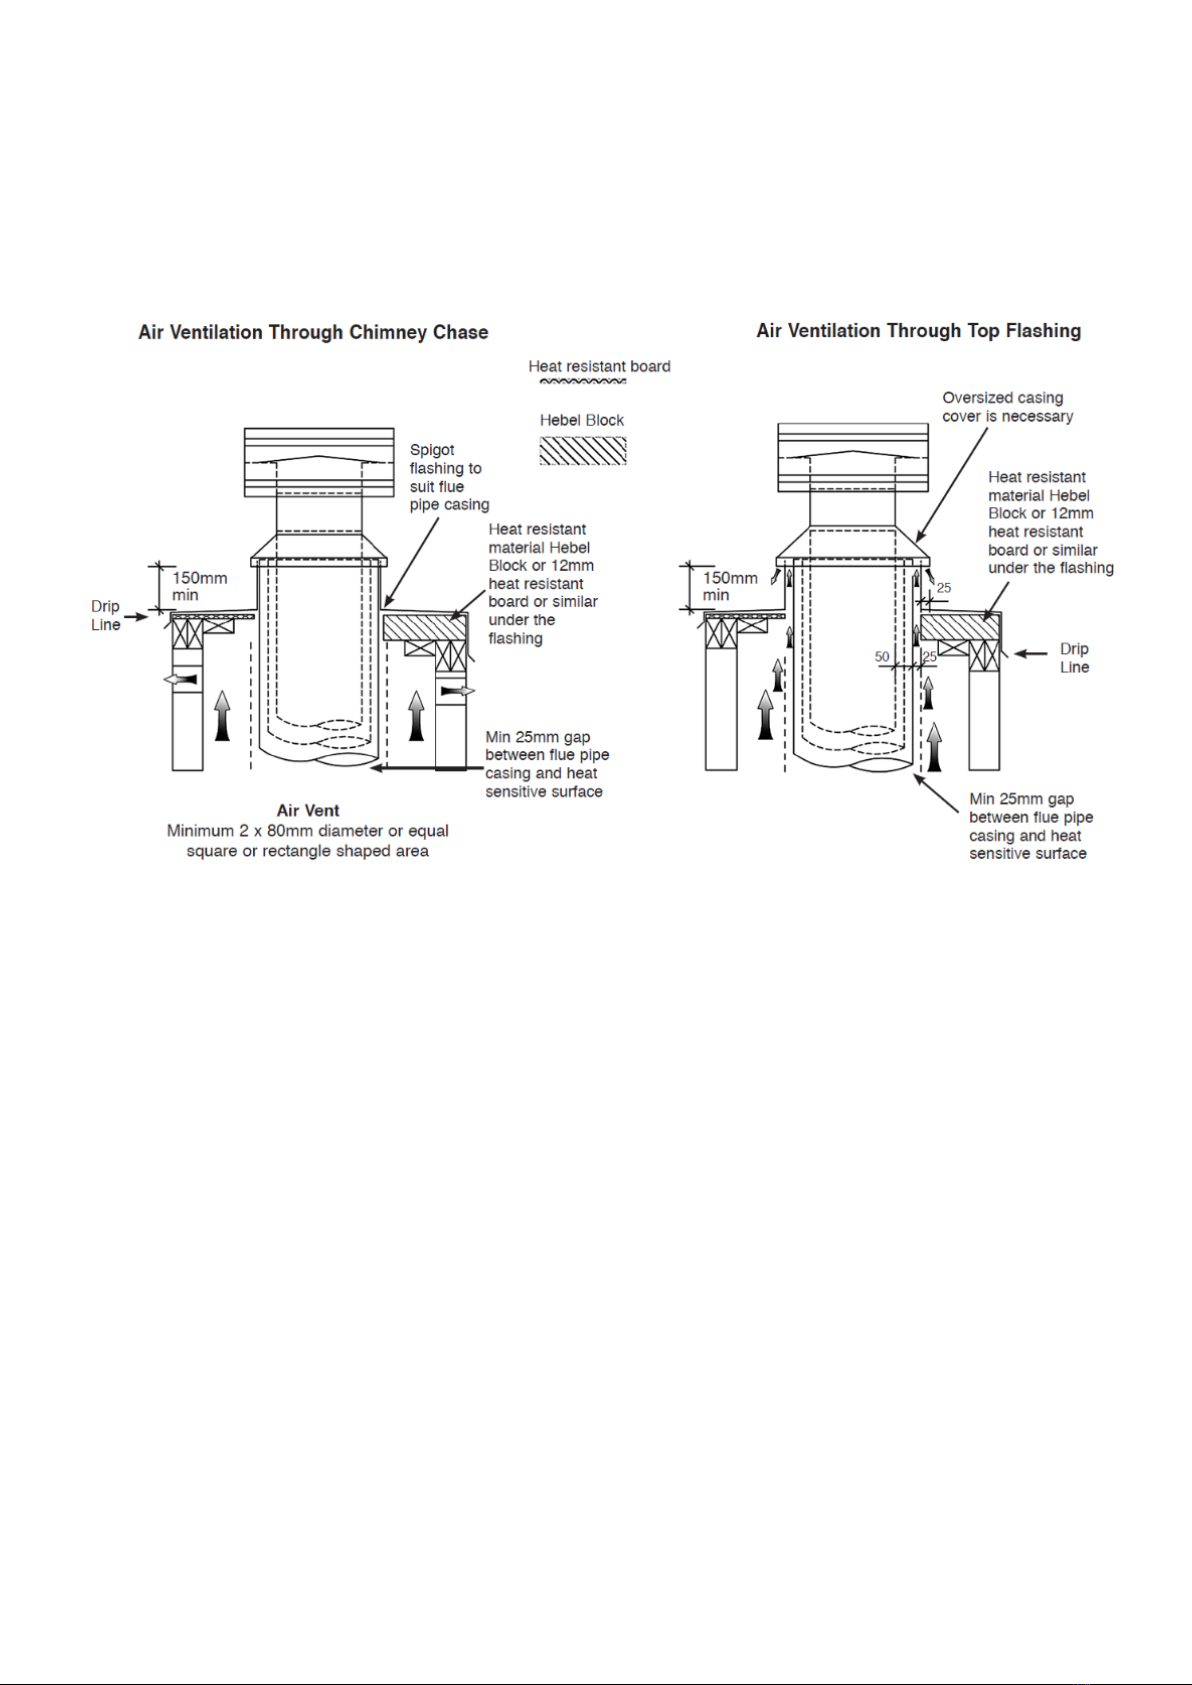
Flue Installation
The Flue type required: 152mm ( 6”) active flue and a solid 8” heat shield within the room, and air
cooled Double casing insulation (triple skin) from above the ceiling, as per AS2918:2018 default flue
kit. See diagrams below for flue requirements. The Active 152mm flue must be a tight fit into the
heater collar.
The heater must have its own dedicated flue. The active flue must be 6” for the entire length of
the flue, and always less than 45 degrees from the vertical.
Replacement room air from outside equivalent in open area to 91cm2 must be supplied into the
room.
Flue Outlet Positions
Minimum Flue Height as per AS/NZS 2918:2018
NOTE: Flue exit MUST also be as high as any nearby structure within a 6m Radius. ( AS
2918:2018 )
7
External Requirements
Refer to AS/NZS 2918:2018
Note: All external air vents & ceiling penetrations must be bird & rodent proofed with
permanently fixed screens

8
3 – Operating Instructions
Before you begin using your cooker, make sure you are fully aware of how the cooker functions, as
well as the maintenance requirements of the cooker you have purchased.
With each cooker a set of useful tools is included, including a hook to remove the hob rings, and to
use as a fire poker, and a scraper for cleaning out the Ashtray chamber, and for scraping the soot out
of the flue ways, particularly through the cleaning door, located just below the oven, behind the
oven door.
Before lighting the cooker, check that the flue way is perfectly clean, and free of packaging material.
When you are starting up the cooker, lighting
the cooker from cold, open the primary air
valve (below fire door) by pushing it fully
across to the right, and the direct-flue valve,
which is above the oven door, should be
pulled outwards all the way out.
Once the fire is burning well and you have a good bed of glowing coals (say 75 or 100mm if getting
the oven hot) and the new fuel is well lit, push the air control lever all the way to the left (see below)
and close the direct-flue damper valve (above the oven door) by pushing the handle fully back into
its normal position.
Closed –
Shut down
Open –
Heating up
9
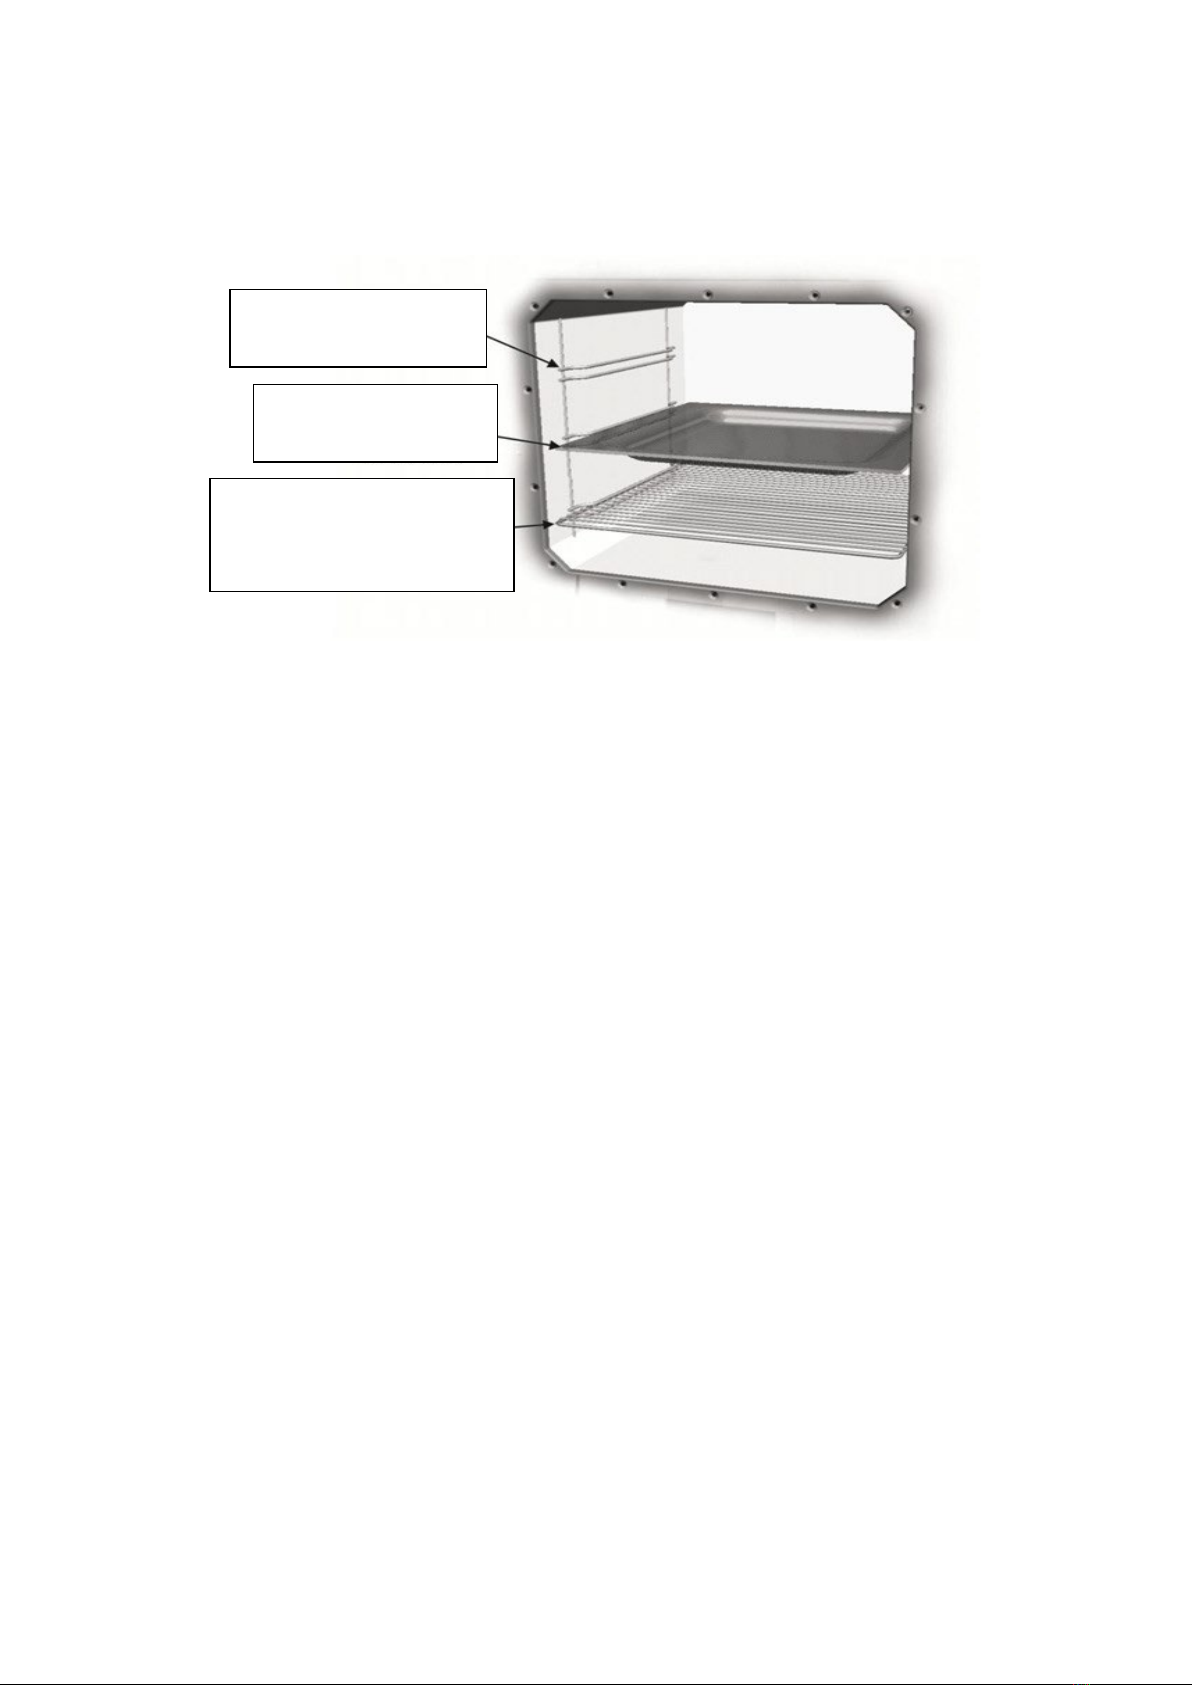
Insert the Chrome wire Rack and the Roasting tray into the side rails at the desired height.
Regulate the heat of the cooker by means of the primary air valve, always be aware that overfiring
can occur if the valve is left constantly open, this will also consume a higher consumption of
firewood, making the hotplate reach an excessive temperature. Never fully fill the firebox or leave
the ashtray door open. Do not throw firewood through the loading door when refuelling.
When running the oven, to get it up to temperature use smaller split pieces – the greater the surface
area to volume of wood, the hotter the fire. Smaller pieces will create a hotter coal bed quicker, and
then adding the smaller pieces will regulate the heat better. Larger logs can’t be removed once
going, but also will give a lesser heat over a longer period of time.
Note: Cooking pots, pans with flat bottoms will be much quicker in getting up to temperature.
FIRST IGNITION
It is recommended that the first ignition when new is just a smaller fire for 3 or 4 hours to get the
parts stabilized. DON’T over fire the cooker when first used. This allows the parts to settle and
remove any moisture in the firebricks.
In the annual cleaning and maintenance, check the condition rope / glass tape below the hot plate,
and replace if necessary.
Side Rails
Roasting Tray
Chrome Wire
Rack

10
4 – CLEANING AND MAINTENANCE
Cleaning should only be done when the cooker is cold, using a slightly damp cloth with soapy water,
drying out below.
Avoid using strong detergents or caustic cleaning products or using abrasives that could scratch or
damage the enamel or glass.
THE CERAMIC GLASS TOP
(On the Eclecsys and Pas 1 Rear flue models only)
The ceramic glass top plate should never be cleaned on its underside.
Glass top on the Eclecsys model - when the plate has been tempered you can then use a special
cleaner for ceramic hobs, applying it with a paper towel.Then rinse with a damp cloth, and dry with
a clean cloth. The use of sponges should be used with cleaning products, ensure not to use a scourer
or steel wool that will scratch the surfaces.
When hot the outer surface should only be cleaned using a scraper appropriate for ceramic glass, for
sale in supermarkets, hardware stores, etc. Use the scraper to clean food remains, grease spatters,
etc. when still hot, to stop them from sticking more firmly to the surface when they cool down.
Always keep scraper within easy reach. If small pieces of aluminium foil, plastic, sugar or other
materials that melt quickly fall onto the surface of the worktop, they should be eliminated
immediately while the worktop is hot using the scraper, to prevent the surface from getting
damaged.
Cleaning products
When the plate has already cooled, always use a special cleaner for ceramic glass, applying it with
paper towels. Then wipe it clean with a damp cloth, and dry it with a clean cloth.
We do not recommend using sponges or other high-absorption kitchen cloths, as the liquid part of
the cleaning products is absorbed, leaving the harsher or highly concentrated components on their
surface, which could lead to scratching or abrasions. There are preservative products that produce a
shiny protective layer against dirt.
Some materials on the bottom of containers can leave marks with a metallic shine on ceramic glass.
There are products on the market that solve these problems.
Limescale marks on the surface can also be eliminated, but they are avoidable if the surfaces of the
containers are clean and dry.
If discolouration marks or damages appear on the glass plate, it is due to the fact that products not
specified for ceramic glass have been used.
Under no circumstances should metal scouring pads, steel wool, knives or any another utensil that is
liable to damage the ceramic glass surface be used for cleaning the worktop. Make sure that any
cooking pans are specially for ceramic glass or at least have bottoms that do not have any roughness
or defects that could scratch the surface.

11
THE ENAMELLED WORKTOP COMPONENTS
To keep the worktop looking good, we recommend cleaning it frequently using a damp cloth.
Do not use acidic or abrasive products to clean the worktops as these products can damage the
vitreous enamel. See the comments for Ceramic glass above.
STAINLESS STEEL FRAMEWORK
To take care of the stainless steel, use dedicated stainless steel cleaners available in the market.
Avoid any utensils that may scratch the stainless steel, it is important that the outer surface is not
damaged.
EMPTYING THE ASHES
The special design of the stove in heat-resistant material, which makes it possible to make maximum
use of the fuel, means that the volume of ashes produced is low.
This makes it possible to light the stove repeatedly without needing to remove them from the stove.
When it is necessary to carry out this operation, remove the grill from the stove and move the ashes
to the ashtray. Empty the ashtray into a metal container and take it out of the house immediately.
Leave a bed of Ash in the base on the grate to insulate the fire and keep it burning, but never leave
the ash tray full so the soot has filled up all the space at the bottom of the cast grate, this can
damage the grate casting from overheating
During the annual cleaning, or when necessary, check that the hob cooktop is in good condition and
sealing with the cooker. If necessary, change the glass tape liner or change the hotplate. This plate is
simply inserted in the frame, and its replacement is a very simple operation.

12
REMOVING THE SOOT AND CLEANING THE FLUE PATH
The door cover for cleaning soot out of the base, is hidden behind the bottom of the oven door.
This door is used for scraping out the soot that accumulates in the bottom of the cooker.
The cooker has access to the rear flue path, to clean out the soot and creosote from the flue path.
To access it should proceed as follows
1. Remove the hob/hotplate from the cooker hob.
2. The chimney access cover is removed next to the direct-flue damper valve (See below)
3. Clean out the flue path down the back, the right-hand side and below the oven. Drag the soot out
through the access door at the front below the oven, to remove all the soot.
4. For the RHS of the oven, using a thick steel chain with a knot in the end push this down the RHS of
the oven and drag up and down and left and right to loosen all the soot. This should be done
regularly so the soot and creosote doesn’t get a chance to crystallise up and become much harder to
clean.

13
5 – Safety
There are potential safety risks that must be taken into consideration when it comes to running your
solid fuel cooker, regardless of the brand. These risks can be minimized by following the instructions
given in this manual. Below are several points that must be followed, but above all, remember to
use your common sense (if available – not included).
1. Keep any flammable material (curtains, clothing, fuel storage) a minimum of 1m away.
2. Ensure the relevant clearances are kept to combustible materials, both above and below the
countertop height (as per installation instructions).
3. Leave a minimum of 30 – 40 mm gap around the unit on rear and sides to allow air to
circulate around the cooker.
4. When emptying the ashes, make sure to use a non-combustible metal container, and
remove immediately from the house (hot ashes in metal container could transfer heat
through the base).
5. Never use liquid fuels to light your cooker.
6. Keep flammable liquids away from your cooker (Lighter fluid, Petrol, alcohol, cooking oil).
7. Inspect the cooker regularly and clean the cooker and flue as soon as it is necessary.
Your retailer or local distributor can supply you with a range of products for the maintenance of
your cooker, including:
-Fire cement (black) for sealing between metal and cast joins, to keep the cooker tightly air
sealed as required
-An Anti-Soot catalyst such as Smart Burn or Soot-Loose to reduce creosote build-up within
the cooker.
-Air set cement (Grey) for keeping refractory bricks in position, as well as products for
repairing bricks.
-Glass cleaner, for removing creosote / soot from the fire door, and oven door clean.
6 – TECHNICAL DATA AND EXPLODED PARTS DIAGRAMS
Flue Diameter
150mm
Nominal Output
13.7kW
Efficiency
70.6%
Flue Temperature
256 °C
Minimum Draft requirement
12 Pa
Weight
265 kg
Clearance Test AS/NZS 2918:2018
ASFT18099
14
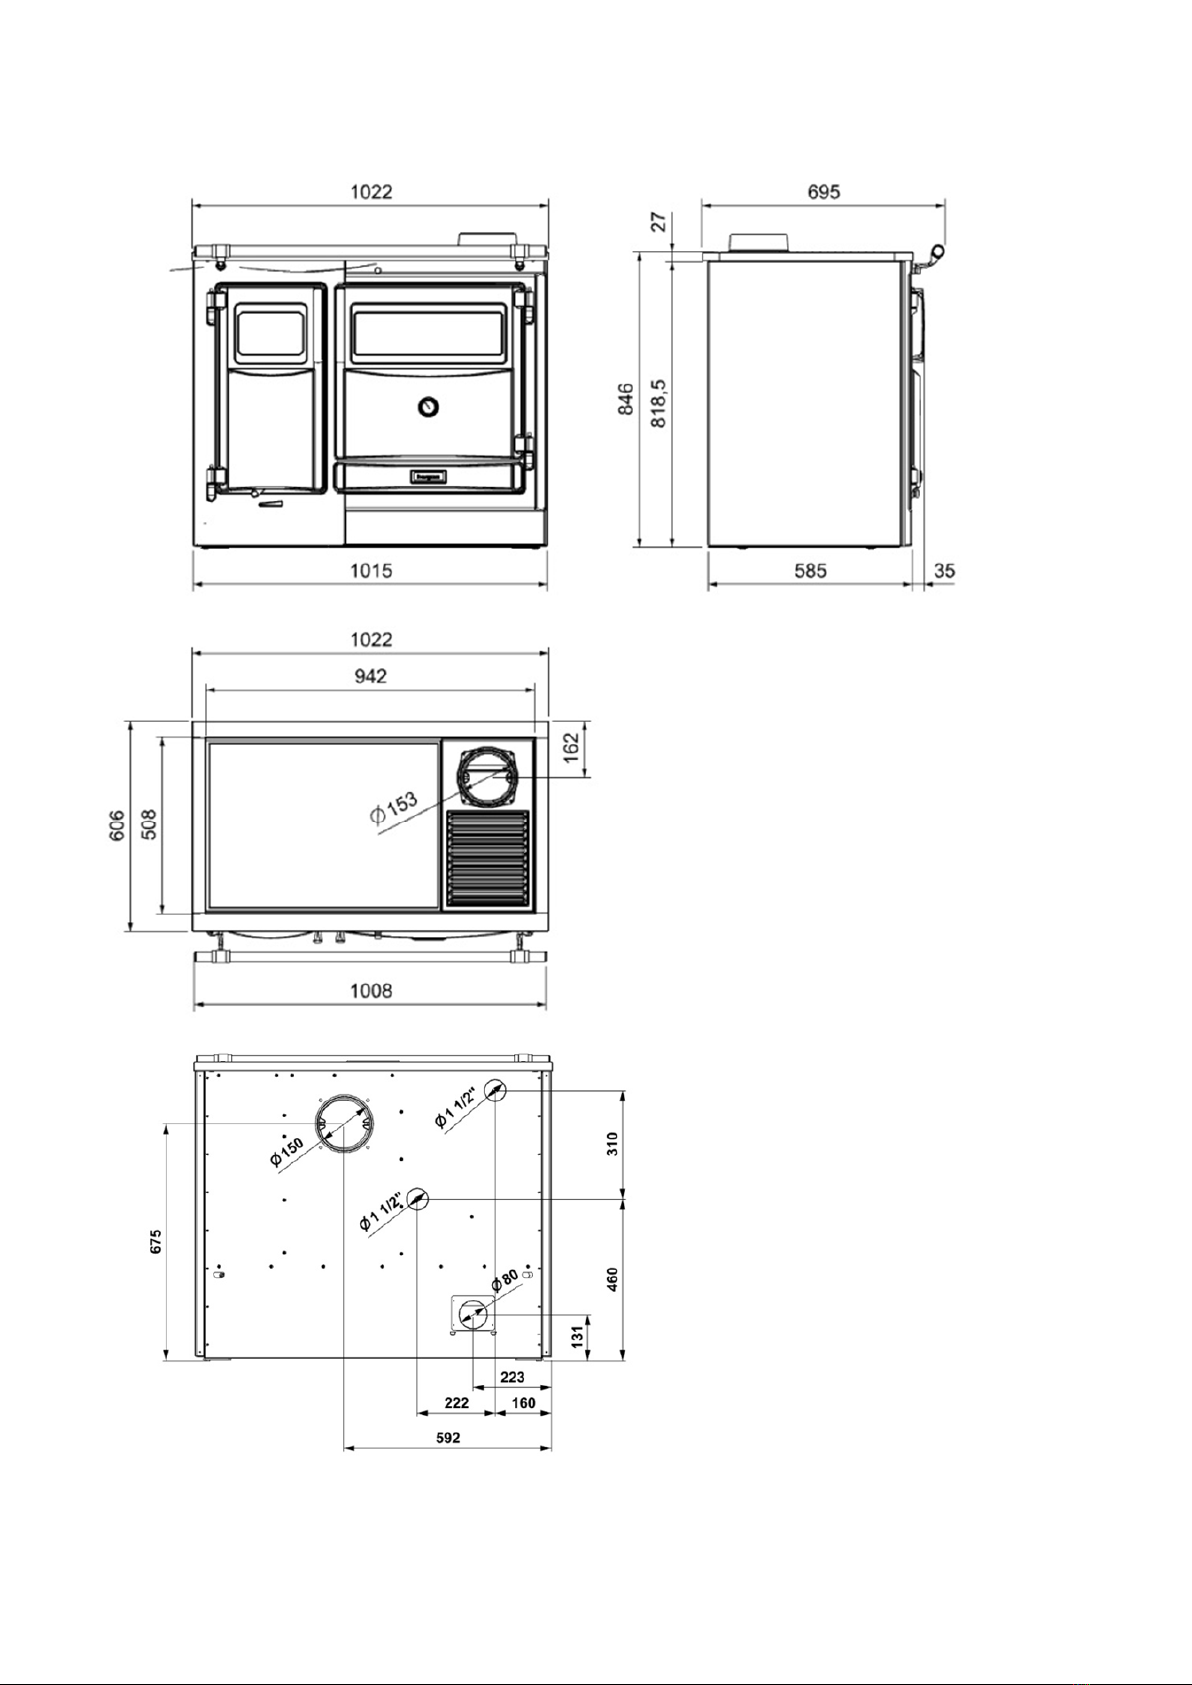
DIMENSIONS - Top Flue Exit Model; PAS II

15
EXPLODED DIAGRAM
Detail A:
Table of contents
Other hergom Cooker manuals


