Heritage Audio Super 8 User manual

2
INTRODUCTION
CONTENTS
DESCRIPTION
GETTING STARTED
APPLICATIONS!
WIRING FOR DB25 CONNECTORS
SPECIFICATIONS!
SIGNAL FLOW!
TROUBLE SHOOTING
REGISTRATION
WARRANTY STATEMENT!
RECALL SHEETS
2
2
3
4 - 5
6 - 9
10
11
12
13
14
14
15
SÚPER 8
AC POWER CORD EU & US
POWER SUPPLY HA-PSU02
TABLE OF CONTENTS
Thank you for choosing the Súper 8. Heritage Audio is dedicated to bringing you ´the sound of yesterday for tomorrow´.
We specialize in capturing that unique, enticing sound that everybody has fallen in love with. For years engineers,
producers and musicians have been yearning for that classic vibe. Usually the only option is to search for old, used
original equipment that is almost always in a questionable state of operation. This brings with it a whole lot of other
issues, making the experience less than desirable. Not to mention the very high prices asked for this equipment, which
makes them virtually unobtainable for the great majority. Now it´s possible to obtain that same sound with a brand new
piece that will give you all the problem-free, heavy-duty use you´ll need for years of music making history.
Peter Rodriguez
CEO!
Heritage Audio - Madrid, Spain
INTRODUCTION
© 2022 Heritage Audio S.L. is the sole owner of the copyright of all information and drawings contained in this manual which are not to be copied or
reproduced by any means or disclosed in part or whole to any third party without written permission.
Heritage Audio reserves the right to alter specifications without notice. The information in this manual has been carefully checked and is believed to
be accurate at the time of publication. However, no responsibility is taken by us for inaccuracies, errors or omissions nor any liability assumed for any
loss or damage resulting either directly or indirectly from use of the information contained within it.
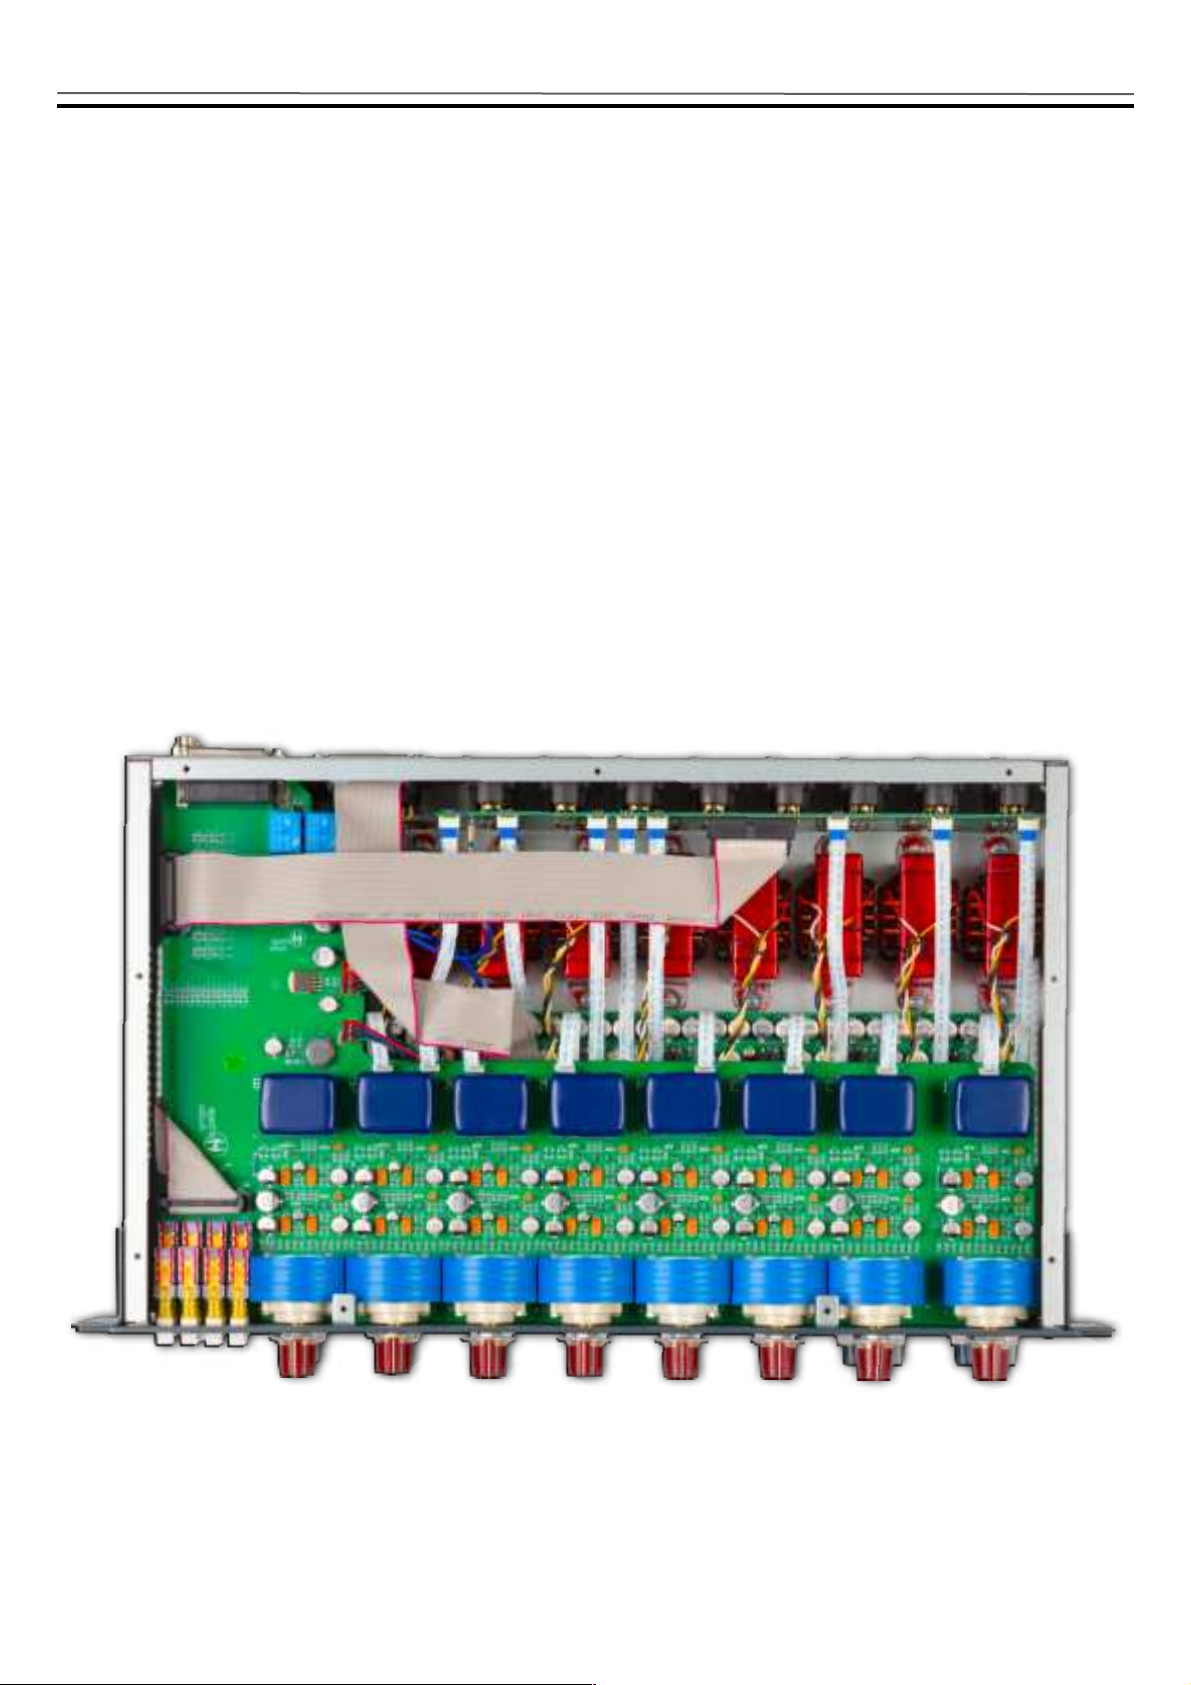
DESCRIPTION
The Súper 8 offers a fantastic, compact solution for when several high quality preamps and top class conversion is
needed.
Using our Class A 73 Preamp building experience we were able to fit 8 MIC/Line preamps into a sturdy 2 unit rack. All 8
are faithful to our 3 stage all Class A design with Carnhill transformers fitted at the input and the output. The first two
channels also include our high quality JFET DI as well as a fully sweepable Lo-cut filter. All 8 channels include switches for
48V, Line, Lo-cut(-3dB at 82Hz) and Phase.
There is built in analog to digital conversion available on 3 different digital formats: ADAT, AES/EBU and SPDIF with BNC
connectors for reliable word clock syncing.
Selectable sampling frequencies from 44.1kH to 192kH. Not only can the MIC/Line Preamp outputs be directly sent to the
DAC, but there also exists the possibility of choosing an alternative input, per channel, for the digital conversion, making
this an extremely flexible unit. This can really come in handy if you need to output the preamps to an EQ or compressor
before returning them for digital conversion.
3
GETTING STARTED
4
FRONT
6
7
8
9
10
PHASE PUSH BUTTON
Flips phase 180º
LINE PUSH BUTTON
Switches from MIC/D.I. to Line
HIGH PASS FREQUENCY
SELECTOR
Continually Adjustable CutOff
for HPF
PHANTOM POWER SWITCH
Turns Phanton Power On
D.I. INPUT
High Impedance Class A JFET
1
2
3
4
5
INPUT GAIN SWITCH
5dB Steps From 30 to 80
MIC INPUT IMPEDANCE
(Lo z)
1200ohm or 300ohm when
pressed
MIC PAD PUSH BUTTON
- 20db Pad, Ahead of the Input
Transformer
OUTPUT ATTENUATOR
Attenuates from 0 to Infinity
HIGH PASS FILTER
-3dB at 82Hz, Discrete Class A
11
12
13
14
ADC ROUTING BUTTONS
Switch Between the Preamp Or
the Returned Signal for ADC
FREQUENCY INDICATOR
Sampling Frequency of the
ADC
FREQUENCY SELECTOR
FOR ADC
To Choose the Desired
Sampling Frequency of the
ADC
POWER BUTTON ON/OFF
Turns the Unit On
5
1
4
2
3
6
7
10
8
9
13
14
11
12
D.I. Jack:
Tip: Signal!
Sleeve: Ground!
Tip=Signal
Sleeve=Ground/Shield
Tip
Sleeve

5
All XLRs are:
Pin 1: GND!
Pin 2: Hot!
Pin 3: Cold
1
2
3
3
2
1
GND!
Hot (+)!
Cold (-)
MALE XLR
FEMALE XLR
REAR
2
3
4
1
7
8
10
5
11
6
7
8
9
10
BNC IN & OUT CONNECTOR
Connect for Wordclock Syncing
AES/EBU or SPDIF PUSH
BUTTON
Alternates Between AES/EBU
and SPDIF Formats
AES/EBU & SPDIF 9-PIN
CONNECTOR
Connect Cable to Use Either
Format
ADAT - S/MUX Optical Ports
Outputs on Digital ADAT Format
EXTERNAL POWER INPUT
HA-PSU02
On Gold Plated XLR5
1
2
3
4
5
75 Ohm TERM PUSH
BUTTON
Push to Activate Termination
25 PIN D-SUB(DB25)
CONNECTOR
ADC Returns 1-8
25 PIN D-SUB(DB25)
CONNECTOR OUTPUTS
Line Outputs 1-8
25 PIN D-SUB(DB25)
CONNECTOR INPUTS
Line Inputs 1-8
INPUTS
On Gold Plated XLRs
9
6
11
OUTPUTS
On Gold Plated XLRs

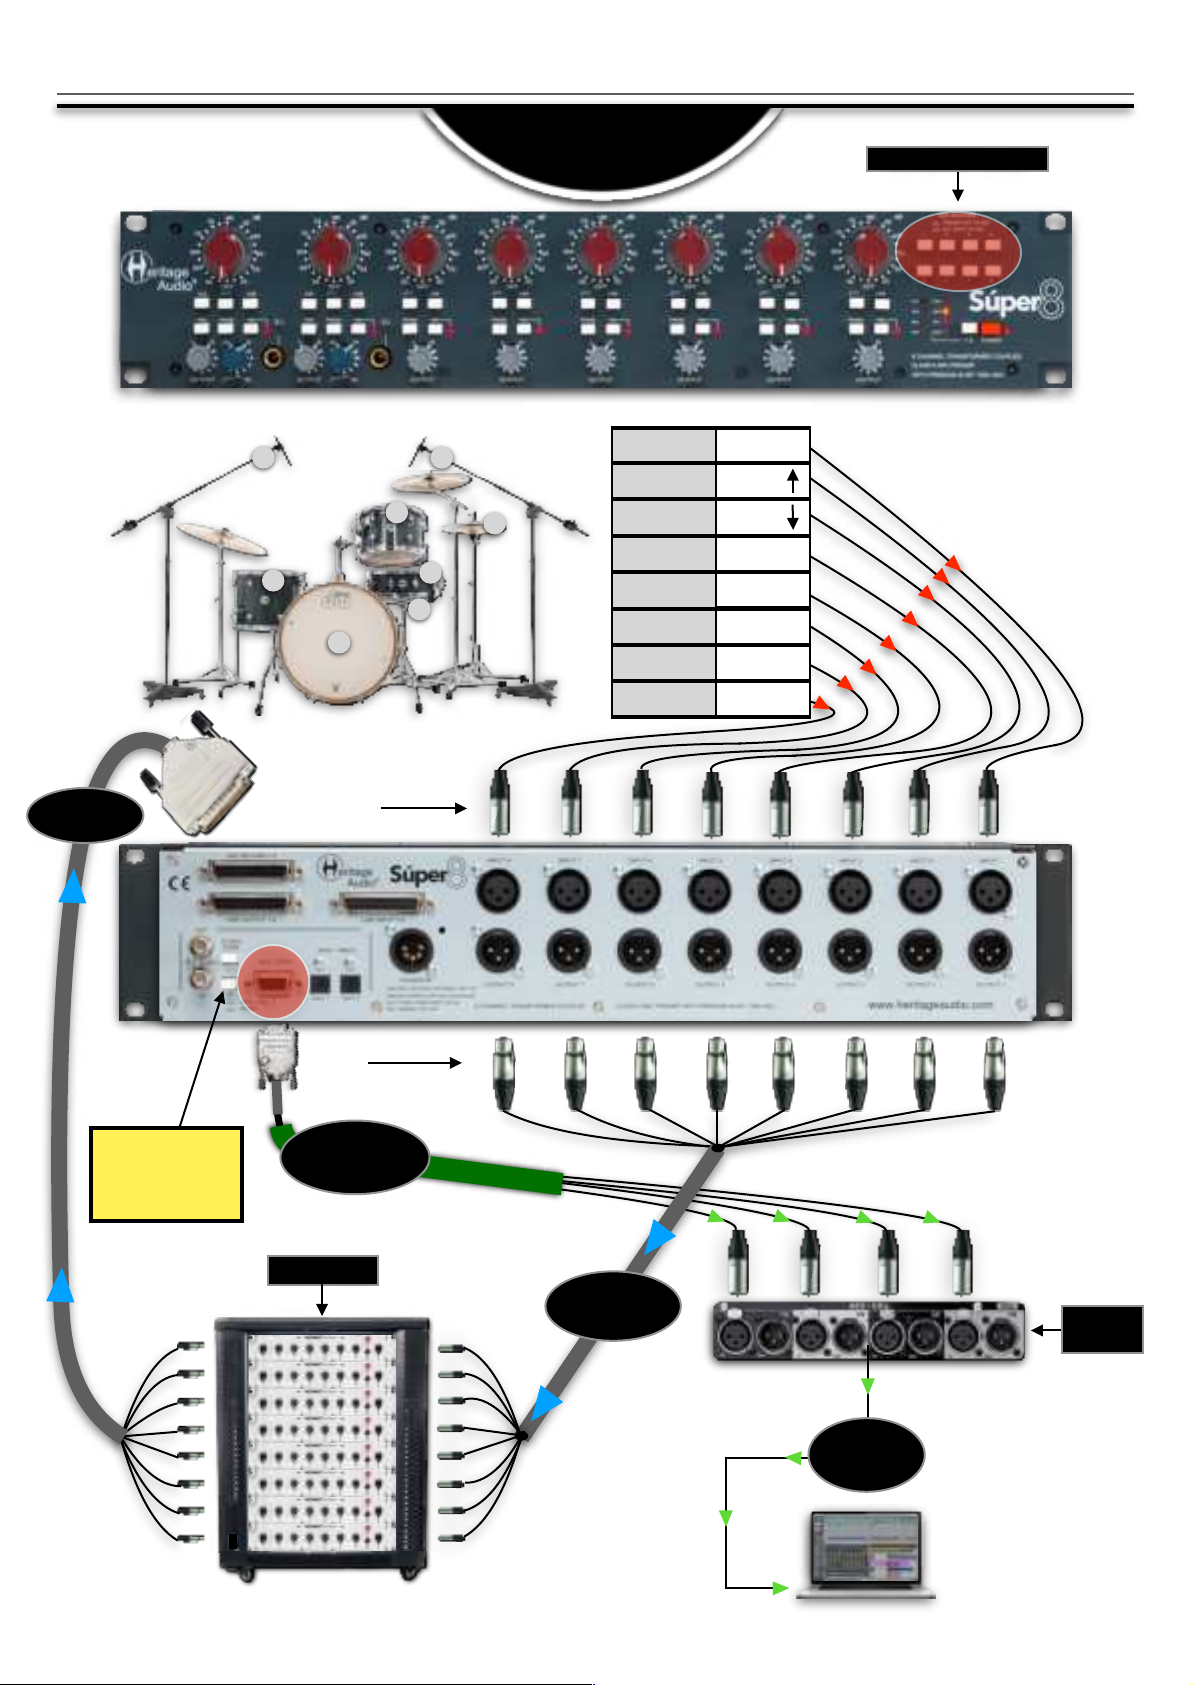
6
MIC PRE
WITHOUT CONVERSION
APPLICATIONS
KICK
SNARE
HI HAT
TOM 1
OH - L
SNARE
TOM 2
OH - R
1 - MIC INPUT
2 - MIC INPUT
3 - MIC INPUT
4 - MIC INPUT
5 - MIC INPUT
6 - MIC INPUT
7 - MIC INPUT
8 - MIC INPUT
1
2
3
5
4
8
7
MONITOR
SPEAKERS
THUNDERBOLT
COMPUTER
LINE
INPUTS
INPUTS 1-8
OUTPUTS 1-8
6
7
LINE
PROCESSING
MONITOR
SPEAKERS
THUNDERBOLT
COMPUTER
LINE
INPUTS
LINE
OUTPUTS
LINE INPUT 1-8
LINE OUTPUT 1-8

MIC PRE
ADAT CONVERSION
ADAT
IN 1
MONITOR
SPEAKERS
ADAT
IN 1
ADAT
OUT1
THUNDERBOLT
COMPUTER
KICK
SNARE
HI HAT
TOM 1
OH - L
SNARE
TOM 2
OH - R
1 - MIC INPUT
2 - MIC INPUT
3 - MIC INPUT
4 - MIC INPUT
5 - MIC INPUT
6 - MIC INPUT
7 - MIC INPUT
8 - MIC INPUT
1
2
3
5
4
8
7
6
BUTTONS MUST BE PUSHED
SET F.S.
TO
EXTERNAL
INPUTS 1-8
WORD CLOCK OUT
WORD CLOCK IN
8
EXTERNAL INPUT
TO ADC
KICK
SNARE
HI HAT
TOM 1
OH - L
SNARE
TOM 2
OH - R
1 - MIC INPUT
2 - MIC INPUT
3 - MIC INPUT
4 - MIC INPUT
5 - MIC INPUT
6 - MIC INPUT
7 - MIC INPUT
8 - MIC INPUT
1
2
3
5
4
8
7
6
AES/EBU
OUT
USB TO
COMPUTER
DB25 TO
ADC RETURNS
SÚPER 8
OUTS TO
EXTERNAL EQs
AUDIO
INTERFACE
BUTTONS NOT PUSHED
INPUTS 1-8
OUTPUTS 1-8
RACK OF 8 EQs
9
9 PIN TO AES/EBU
XLR
BREAKOUT CABLE
NOT PUSHED
FOR AES/EBU
USE

1
INPUT # 1
2
INPUT # 2
3
INPUT # 3
4
INPUT # 4
5
INPUT # 5
6
INPUT # 6
7
INPUT # 7
8
INPUT # 8
All DB25 multi pin connectors are TASCAM protocol. This same protocol is also used by AVID amongst many others,
and is a follows:
The list of the DB25 connectors used and their corresponding channels are as follows:
TASCAM DSUB
CHANNEL #
CHANNEL I/P
1-8
1
OUTPUT # 1
2
OUTPUT # 2
3
OUTPUT # 3
4
OUTPUT # 4
5
OUTPUT # 5
6
OUTPUT # 6
7
OUTPUT # 7
8
OUTPUT # 8
1
ADC RETURNS # 1
2
ADC RETURNS # 2
3
ADC RETURNS # 3
4
ADC RETURNS # 4
5
ADC RETURNS # 5
6
ADC RETURNS # 6
7
ADC RETURNS # 7
8
ADC RETURNS # 8
It is worth noting that, in order to avoid ground loops, the DB25 ground connections are lifted on the Súper 8 side,
leaving the ground paths of your DB25 snakes only acting as shields and preventing any current returns.
TASCAM DSUB
CHANNEL #
CHANNEL O/P
1-8
TASCAM DSUB
CHANNEL #
ADC RETURNS
1-8
Pin-out for TASCAM DB25 8 Channel Balanced Connector
CHANNEL INPUTS 1-8:
CHANNEL OUTPUTS 1-8:
ADC RETURNS 1-8:
H = HOT
C = COLD
G = GROUND
WIRING FOR DB25 CONNECTORS
10

SPECIFICATIONS
•Microphone input impedance only channels 1 & 2: High: 1200 Ωminimum; Low: 300 Ωminimum. Higher gain
positions gradually have greater impedances, optimum for low gain ribbon mics. Input is transformer balanced and
floating.
•Microphone input impedance only channels 3-8: High: 1200 Ωminimum.
•Line input impedance: 10 kΩbridging, transformer balanced and floating.
•Output impedance: Less than 75 Ω, transformer balanced and floating, to drive a load of 600 Ω.
•D.I. input impedance: Greater than 2 MΩ, unbalanced (Only Channels 1 & 2).
•Maximum output: Greater than +26.5 dBu into 600 Ω(internally terminated).
•THD: Less than 0.025% at 1 kHz, Less than 0.05% at 100 Hz.
•Frequency response: 20 Hz (+0.3 dB) to 20 kHz (-0.2 dB).
•Maximum Gain: Slightly greater than 80 dB.
•Equivalent Input Noise: Less than -125 dBu.
•Output stage noise: Less than -100 dBu.
11
ANALOG I/O
DIGITAL CONNECTIONS
•Dimensions (W x H x L): 280mm x 88mm x 482mm
•Weight: 9.450 Kg
S/PDIF
•Connector Type: 9 PIN Breakout Cable (RCA).
• Format: IEC 958
•Supported Sample rates (kHz): 44.1, 48, 88.2, 96, 176.4, 192.
AES/EBU
ADAT
•Connector Type: Optical TOSLINK JIS F05.
•Format: ADAT Digital Lightpipe with S/MUX.
•Supported Sample rates (kHz): 44.1, 48, 88.2, 96, 176.4, 192.
•Channel Assignments @ 44.1 kHz, 48 kHz: Port 1 = Channels 1 – 8, Port 2 = 1 – 8 (mirrored).
•Channel Assignments @ 88.2 kHz, 96 kHz: Port 1 = Channels 1 – 4, Port 2 = Channels 5 – 8.
•Channel Assignments @ 176.4 kHz, 192 kHz: Port 1 = Channels 1 – 2, Port 2 = Channels 3 – 4.
Word Clock
•Connector Type: BNC.
•Word Clock Input Termination: 75 Ohms, switchable.
•Connector Type: 9 PIN Breakout Cable (XLR).
• Format: IEC 60958
•Supported Sample rates (kHz): 44.1, 48, 88.2, 96, 176.4, 192.
Synchronization Sources
•Internal, Word Clock (EXTERNAL)
Dimensions/Weight
12
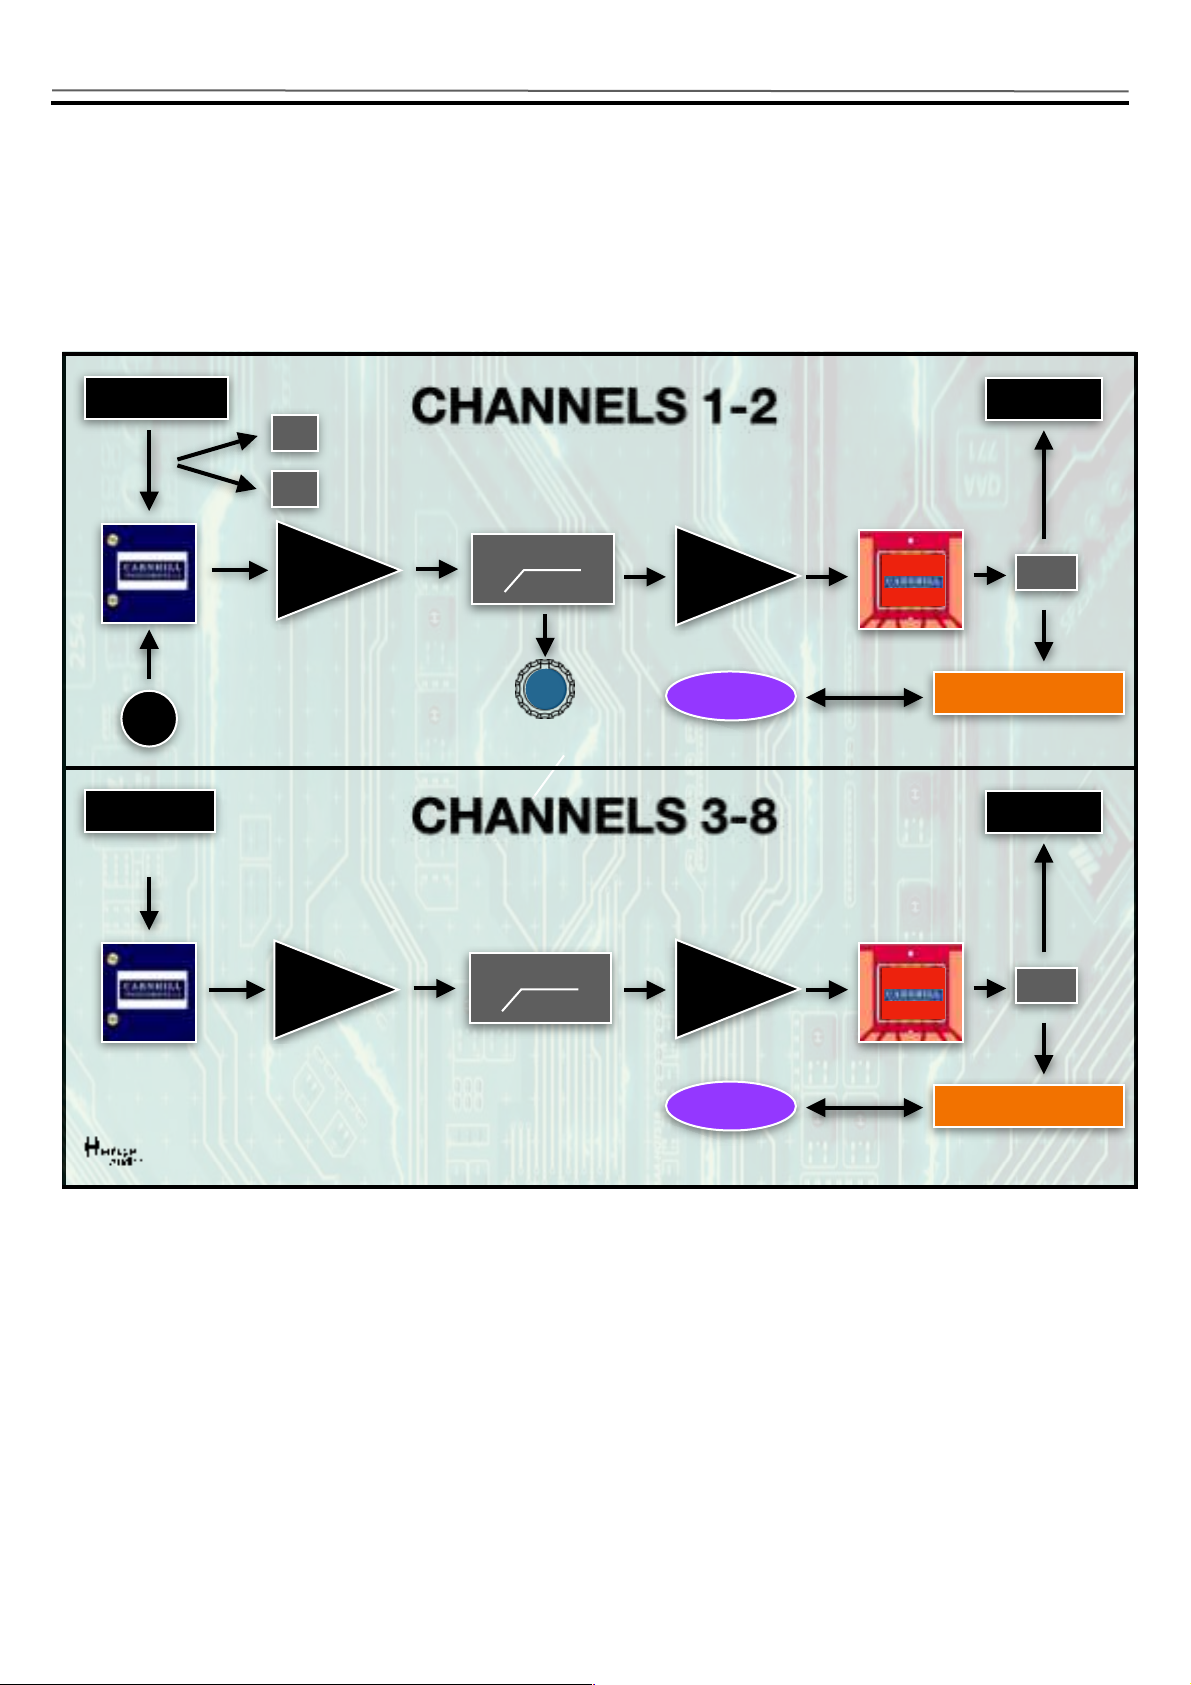
SIGNAL FLOW
MIC/LINE INPUT
LINE OUTPUT
PAD
D.I.
HIGH PASS FILTER
INPUT AMP
OUTPUT AMP
HIGH PASS FILTER
INPUT AMP
LOZ
PHASE
Analog Digital Converter
CHANNELS 1-2
D.I.
LINE OUTPUT
OUTPUT AMP
PHASE
Analog Digital Converter
WORD CLOCK
MIC/LINE INPUT
CHANNELS 3-8
WORD CLOCK
HPF FREQ SELECTOR

TROUBLE SHOOTING
PROBLEMS
SOLUTIONS
There doesn´t appear to be any signal at all arriving at the
back XLR.
Make sure the GAIN knob is not in the ´Off´ position.
There still doesn´t appear to be any signal at all arriving at
the back XLR.
Check to see if a jack cable has been left plugged into the
front panel D.I.
Even at the lowest position on the GAIN knob I still have
too much gain.
When this happens you should activate the PAD button.
This will reduce the input by 20dB ahead of the input
transformer
Condenser microphones don´t seem to work with Súper 8.
Make sure the red +48 V button is pressed in to activate
the phantom power sent to the microphone.
There doesn´t seem to be any output at all from the unit.
Check to see if the OUTPUT knob is fully turned down as
this will attenuate the signal completely.
Sending a signal to the unit from a DAW overloads it
terrible.
It is necessary to press the LINE button when sending it a
line level source.
If not, it is expecting a Microphone signal with a very
different impedance.
There is no signal arriving from the ADC.
Make sure the corresponding button in the ADC Routing is
pressed if the Preamps direct out is desired.
There is still no signal arriving from the ADC.
Double check that the appropriate connector is indeed
inserted properly.
There are clicks being generated.
Make sure you have selected the correct Sampling
Frequency.
There are clicks being generated.
Make sure you are using a BNC cable to connect the
Word Clock if being slaved.
There are unexpected noises and/or jitter being produced.
If your unit is the last in a group of digitally synced units
you should press the ´75 Ohm Term´ button.
I have everything connected correctly but I’m still not
receiving any signal in my DAW.
Make sure you have selected the correct INPUT routing in
your DAW.
I have everything connected correctly to use the SPDIF
output but there is no signal arriving at the DAW.
Make sure you have correctly selected the button that
choose either SPDIF or AES/EBU.
13

LIMITED 2 YEAR WARRANTY
Heritage Audio Súper 8 is warranted by Heritage Audio SL to be free from defects in materials and workmanship for the
period of 2 years to the original purchaser. In the event of such defects, the product will be repaired without charge or, at
our option, replaced with a new one if delivered to Heritage Audio prepaid, together with a copy of the sales slip or other
proof of purchase date. The warranty excludes problems due to normal wear, abuse, shipping damage or failure to use
the product in accordance with the specifications.
Heritage Audio shall not be liable for damages based upon inconvenience, loss of use of the product, loss of time,
interrupted operation or commercial loss or any other damages, whether incidental, consequential or otherwise.
This warranty is not transferable.
Heritage Audio and the Heritage Audio “H” logos are registered Trademarks owned and/or licensed by Heritage Audio.
REGISTRATION
14
Please visit our website:
WARRANTY STATEMENT
https://heritageaudio.net/registration/

15
RECALL SHEETS
Session / Title: Track: Connected Equipment: !
Date: Instrument: Sampling Frequency: Internal: External: !
!
Notes:
Switch ON
Switch OFF
Session / Title: Track: Connected Equipment: !
Date: Instrument: Sampling Frequency: Internal: External: !
!
Notes:
Switch ON
Switch OFF

www.heritageaudio.com
HERITAGE AUDIO. C/ Alfonso Gómez, 38, 3C. 28037 Madrid – Spain. Tel: +34 917 266 189
Table of contents


